
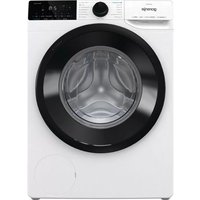
D3NEP92GN - Tumble dryer GORENJE - Free user manual and instructions
Find the device manual for free D3NEP92GN GORENJE in PDF.


| Product Type | Tumble Dryer |
| Brand | Gorenje |
| Model | D3NEP92GN |
| Installation Type | Freestanding |
| Drying Technology | Heat Pump |
| Capacity (max) | 9 kg |
| Energy Efficiency Class | A++ |
| Annual Energy Consumption | 235 kWh |
| Dimensions (H x W x D) | 85 x 60 x 60 cm |
| Weight | 50 kg |
| Power Supply | 220-240 V, 50 Hz |
| Power Consumption (max) | 2000 W |
| Drying Programs | Cotton, Synthetics, Delicates, Wool, Mix, Quick 40 min, Anti-Allergy, Sport |
| Special Features | Reverse Tumbling, Anti-Crease, Child Lock, Delay Start, Drum Light, Filter Cleaning Indicator |
| Noise Level | 65 dB |
| Condenser Unit | Self-cleaning condenser |
| Filter Type | Lint filter with fine mesh |
| Display Type | LED |
| Control Type | Electronic with rotary knob and touch |
| Accessories Included | Drain hose, owner's manual |
| Repairability Index | 8.2 / 10 (estimated) |
| Spare Parts Availability | 7 years after end of production |
| Safety Features | Overheating protection, child lock, door lock |
| Warranty | 2 years (manufacturer) |
Frequently Asked Questions - D3NEP92GN GORENJE
User questions about D3NEP92GN GORENJE
0 question about this device. Answer the ones you know or ask your own.
Ask a new question about this device
Download the instructions for your Tumble dryer in PDF format for free! Find your manual D3NEP92GN - GORENJE and take your electronic device back in hand. On this page are published all the documents necessary for the use of your device. D3NEP92GN by GORENJE.
USER MANUAL D3NEP92GN GORENJE
Life is complicated today. Let's make at least laundry care simple! Your new dryer uses innovative technology and the latest achievements in laundry care to help you simplify your daily household chores.
The technology offers the gentlest care for any garment, with minimum creasing. Moreover, your new dryer is also friendly to the environment as it uses power in the most economical way possible.
This dryer is intended solely for household use. Please do not use it to dry clothes that are not suitable for machine drying.
The following symbols are used throughout the manual and they have the following meanings:

INFORMATION!
Information, advice, tip, or recommendation

WARNING!
Warning - general danger

ELECTRIC SHOCK!
Warning - danger of electric shock

HOT SURFACE!
Warning - danger of hot surface

DANGER OF FIRE!
Warning - danger of fire

It is important that you carefully read the instructions.
Contents
SAFETY PRECAUTIONS 5
Danger of hot surface 11
Safety 12
DESCRIPTION OF THE DRYER 13
Technical data 14
Compliance information 15
Control unit 16
Selecting the room 18
Dryer placement 19
Opening the dryer door (top view) 20
Adjusting the dryer feet 21
Draining the condensate 22
Connecting to the power mains 23
Moving and transport after installation 24
DRYING PROCESS, STEP BY STEP (1–6) 28
Step 1: Heed the labels on the laundry 28
Step 3: Choosing the drying programme .... 32
Program chart 33
Remote control of your dryer using the App 35
Step 4: Selecting extra functions ...... 36
Extra function table 41
Step 5: Starting the drying programme 42
Step 6: End of the drying programme 42
Interruptions 43
Changing the program/functions 43
Adding laundry after the start of the program 43
Saving personal settings 44
Personal settings menu 44
Cleaning the door net filter in the door 46
Cleaning the heat pump filter 47
Cleaning of the heat exchanger 48
Emptying the condensate tank 49
Cleaning the dryer 50
TROUBLE-SHOOTING 51
What to do ...? 51
Troubleshooting and error table 51
Sounds 54
Service 55
56TIPSFOF Low standby mode 56 57TYPICAL LABEL 60 61PRODU DISPOSAL 63

Carefully read the instructions for use before using the dryer.
Please, do not use the dryer without reading and understanding these instructions for use first.
This appliance is not intended for use by persons (including children) with reduced physical, sensory or mental capabilities, or lack of experience and knowledge, unless they have been given supervision or instruction concerning use of the appliance by person responsible for their safety.
These instructions for use of a dryer are supplied with different types or models of dryers. Therefore, they may include descriptions of settings or equipment that are not available in your dryer.
The maximum mass of dry textile material in kilograms to be used in the appliance.
Failure to observe the instructions for use or inappropriate use of the dryer may result in damage to the laundry or the appliance, or injury to the user. Keep the instruction manual handy, near the dryer.
Instructions for use are available on our website at www.gorenje.com.
Your dryer is intended solely for household use. If the dryer is used for professional, for-profit purposes or purposes exceeding normal use in a household, or if the dryer is used by a person who is not a consumer, the warranty period shall be equal to the shortest warranty period required by relevant legislation.
Follow the instructions for correct installation of the Gorenje dryer and connection to the power mains (see chapter »INSTALLATION AND CONNECTION«).
All and any repairs or maintenance tasks on the dryer should only be done by trained experts. Unprofessional repair may result in an accident or major malfunction.
ELECTRIC SHOCK!
To avoid danger, a damaged power cord may only be replaced by the manufacturer, a service technician, or an authorized person.
After installation, the dryer should stand still for two hours before it is connected to the power mains.
WARNING!
Do not connect the dryer to power mains using an external switching device such as a programme timer, or connect it to power mains that is regularly switched on and off by the power supply provider.
The dryer shall not be connected to the power mains using an extension cord.
Do not connect the tumble dryer to an electrical outlet intended for an electric shaver or a hairdryer.
In case of a defect, only use approved spare parts by authorized manufacturers.
In case of incorrect dryer connection, incorrect use, or servicing by an unauthorized person, the user shall bear the cost of any damage as such damage shall not be covered by warranty.
Always use the hoses supplied with the dryer.
Install the dryer in a room with adequate ventilation and a temperature between 15°C and 25°C.
At least two persons are required to install the tumble dryer on top of a washing machine.
Place the dryer on a level and stable solid (concrete) base.
The appliance must not be installed behind a lockable door, a sliding door, or a door with a hinge on the opposite side to that of the tumble dryer, in such a way that a full opening of the tumble dryer door is restricted.
Never block the air exhaust (evacuation opening).
For appliances with ventilation openings in the base, a carpet must not obstruct the openings.
The air in the room where the dryer is installed may not contain industrial dust particles.
Adequate ventilation has to be provided to avoid the back flow of gases into the room from appliances burning other fuels, including open fires.
The fibre must not be allowed to accumulate around the tumble dryer.
In the appliance enclosure or in the built-in structure, keep ventilation openings clear of obstruction.
The appliance may not be in contact with a wall or adjacent furniture.
After installation, let the dryer rest still for 24 hours before using it. If the dryer has to be laid down on one of the sides during transport or servicing, place it with its left side, viewing from the appliance front, downwards.
Do not dry unwashed items in the tumble dryer.
Items that have been soiled with substances such as cooking oil, acetone, alcohol, petrol, kerosene, spot removers, turpentine, waxes and wax removers should be washed in hot water with an extra amount of detergent before being dried in the tumble dryer.
Items such as foam rubber (latex foam), shower caps, waterproof textiles, rubber backed articles and clothes or pillows fitted with foam rubber pads should not be dried in the tumble dryer.
Fabric softeners, or similar products, should be used as specified by the fabric softener instructions.

DANGER OF FIRE!
Remove all objects from pockets such as lighters and matches.
If the condensate tube is blocked or clogged, then the tumble dryer operation is stopped (see chapter »PAUSING AND CHANGING THE PROGRAMME/Full condensate tank«).
Before moving the dryer or before storing it in a non-heated room during the winter, the condensate tank has to be emptied.
The lint filter has to be cleaned frequently, if applicable. Clean the dryer filters after each drying cycle. If you have removed the filters, replace them before the next drying cycle.
Do not use any solvents or cleaning agents that could damage the dryer (please observe the recommendations and warnings provided by the manufacturers of the cleaning agents).
Never add chemicals or fragrances into the condensate tank (see chapter »DESCRIPTION OF THE DRYER and EMPTYING THE CONDENSATE TANK«).
After the drying process, unplug the dryer power cord from the power outlet.
The dryer uses a heat pump system to heat the air.
The system consists of a compressor and a heat exchanger. When the dryer is started, compressor operation (the sound of flowing liquid) or flow of refrigerant may be louder as long as the compressor operates. This is not a sign of malfunction and it will not affect useful life of the dryer. In time and with use of the dryer this noise will become quieter.
The warranty does not cover consumables, minor deviations in colour, increased noise that results from appliance age and which does not affect the functionality of the dryer, and aesthetic defects on components, which do not affect the dryer's functionality and safety.

WARNING! Child safety
Children should be supervised to ensure that they do not play with the appliance.
Children of less than 3 years should be kept away unless continuously supervised.
Prevent your children and pets from entering the dryer drum.
Before closing the dryer door and running the programme, make sure there is nothing except laundry in the drum (e.g. if a child climbed into the dryer drum and closed the door from the inside).
Activate the Childlock. See chapter »STEP 4: SETTING THE EXTRA FUNCTIONS/Childlock«.
The dryer is made in compliance with all relevant safety standards.
This appliance can be used by children aged from 8 years and above and persons with reduced physical, sensory or mental capabilities or lack of experience and knowledge if they have been given supervision or instruction concerning use of the appliance in a safe way and understand the hazards involved.
Children shall not play with the appliance.
Cleaning and user maintenance shall not be made by children without supervision.
Danger of hot surface

HOT SURFACE!
At higher drying temperatures, the door glass will heat up. Be careful to avoid burns. Make sure children do not play near the door glass.
The back of the dryer may get very hot during operation. Wait for the dryer to cool down completely before touching its backside.
If you opened dryer door during the drying process, the clothes may be very hot and there is a risk of burning.
Never stop the drying process before it is completed; if you do interrupt the cycle for any reason, be careful when removing the laundry from the drum as it is very hot. Quickly remove the laundry from the drum and spread it to allow it to cool down as quickly as possible.
Safety

DANGER OF FIRE!
Only use the dryer to dry laundry that was washed with water. Do not dry any laundry that was washed or cleaned with flammable cleaners or substances (such as gasoline, trichloroethylene, etc.) as this may result in an explosion.
The tumble dryer is not to be used if industrial chemicals have been used for cleaning.
The dryer is protected with an automatic switch-off system in case of overheating. This system will switch off the dryer if the temperature is too high.
If the net filter is clogged, the overheating automatic switch-off system may be activated. Clean the filter, wait for the dryer to cool down, and try running it again. If the dryer still fails to start, call a service technician.
Do not damage the refrigerant circuit.
The refrigerant R290 in this appliance is environmentally friendly yet combustible and may ignite if it comes into contact with open flames or ignition sources. Keep naked flames and ignition sources away from the appliance.
DESCRIPTION OF THE DRYER
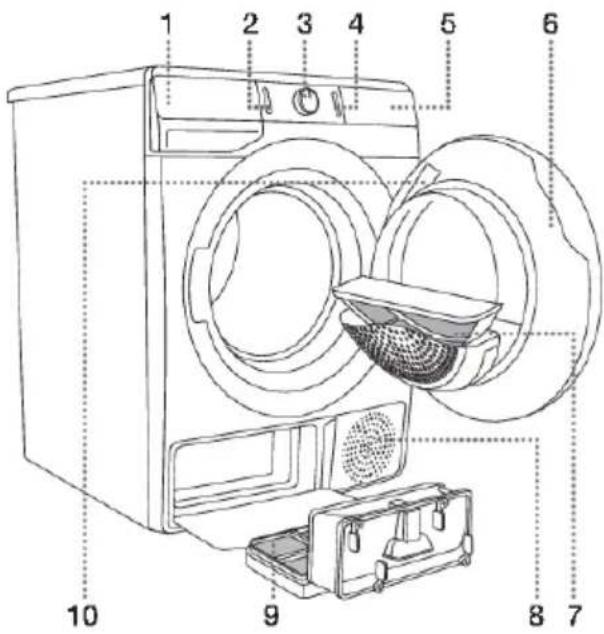
- On/off button 2. Condensate discharge hose
4. Start/pause button 5. Control unit 6. Door 7. Lint filter 8. Air vent 9. Heat pump filter 10. Rating plate

BACK FRONT
- Power cord 1. Condense water tank 3. Program selector knob Adjustable feet
Technical data
(depending on the model)
Rating plate with basic information about the dryer is located on the inner side of the dryer door (see chapter "DESCRIPTION OF THE DRYER").
| 600mmWidth | |
| 850mmHeight | |
| 625mmDryerdepth(a) | |
| 653mmDepthwithdoorclosed | |
| 1134mmDepthwithdooropen(b) | |
| XX/YYkg(dependingonthemodel)Weight | |
| SeeratingplateRatedvoltage | |
| SeeratingplateFuse | |
| SeeratingplateNominalpower | |
| SeeratingplateQuantityofrefrigerant | |
| R290Typeofrefrigerant | |
| SeeratingplateMaximumload |
Rating plate
Link to the EU EPREL database
From 1 March 2021, information on energy labelling and ecodesign requirements is available in the EU EPREL product database.
The QR code on the energy label supplied with the appliance contains a web link through which you can find your registered appliance in the EU EPREL database.
Information regarding the performance of the product can also be found in the EU EPREL database, which is accessible via the link https://eprel.ec.europa.eu, where you have to enter the model and product number; both are indicated on the rating plate on the appliance. On the website www.theenergylabel.eu you can find more detailed information about the energy label.
Keep the energy label in case it is needed in the future, together with the user manual and other documents supplied with this appliance.
Compliance information
| HL3215STGRadioequipmenttypeHLW3215-TG(dependingonthemodel)HLW3215-TG01 | |
| Wi-Fi | |
| 2.4000GHz-2.4835GHzOperatingfrequencyrange | |
| ≤10dBm/MHz(EIRP)(Antennagain<10dBi)Maximumoutputpower | |
| Gain:0dBiMaximumantennagain | |
| Bluetooth | |
| 2.400GHz-2.4835GHzOperatingfrequencyrange | |
| 6dBm(≤10dBm)Carrieroutput | |
| F1DEmissiontype | |
Declaration of conformity
The company declares that the device with the function ConnectLife complies with the essential requirements and other relevant provisions of Directive 2014/53/EU. The detailed Declaration of Conformity can be found at the web address https://auid.connectlife.io on the page of your device among the additional documents.
Control unit
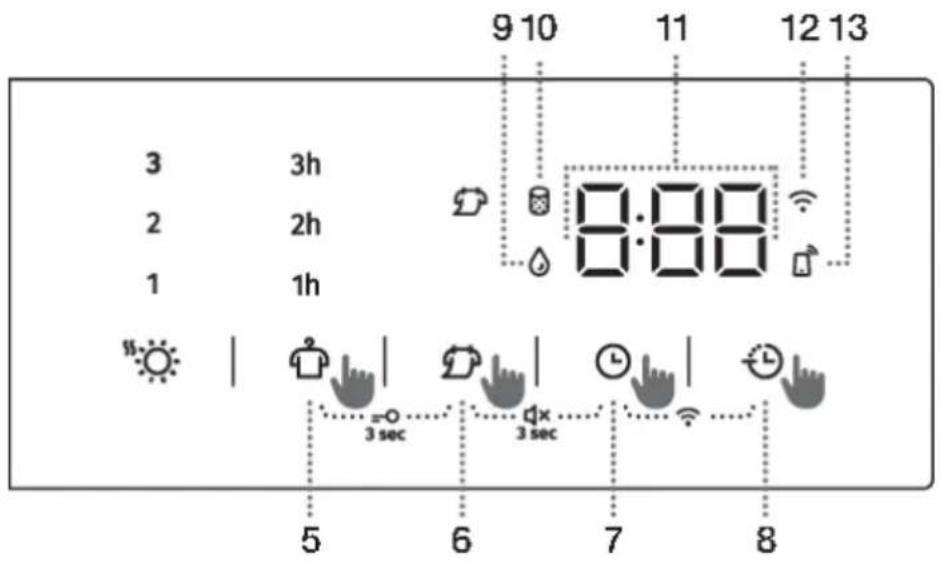
| 1 | ON/OFFBUTTONSwitchingthedryeronandoff. |
| PROGRAMMESELECTORKNOB2 | |
| 3 | START/PAUSEBUTTONUsethisbuttontostartorstoptheprogramme.Uponstart-uporduringpause,thebuttonlightwillflash;whentheprogrammeisstarted andinprogress,itwillbelitcontinuously. |
| 4 | EXTRADRY(DRYNESSLEVEL)Thesymbolislitwhenthefunctionisselected.4aAdditionalfunctions(1,2,3)allowyoutochooseahigherlevelofdrynessandextendthe dryingtime. |
| 5 | ANTICREASE(CREASEPREVENTION)5aTheselectedoperatingtimeofthefunctionwilllightup. |
| 5+6 | ChildlockON/OFPressthepositions5+6andholdthemfor3seconds. |
| 6 | NATUREDRY(LOWERTEMPERATURE)Optiontodryatalowertemperature.6aThesymbollightsupwhentheNATUREDRYfunctionisselected. |
| 6+7 | SoundON/OFPressthepositions6+7andholdthemfor3seconds. |
| 7 | TIMEDRY(TIMEDDRYING)Optiontosetthedryingtime. |
| 8 | DELAYEND(BELAYINGTHEENDOFTHEDRYINGPROGRAM)Optiontosetthetimewhenthedryingwillend. |
| 7+8 | SWITCHINGON/OFFtheWi-FiconnectionPressthepositions7+8. |
| 9 | LightingofthesymbolEMPTYTHECONDENSATETANK |
| 10 | LightingofthesymbolCLEANTHEFILTERThefollowingisdisplayedontheDISPLAYUNIT:11•Availablefunctions;•Timeremainingtoprogrammecompletion;•Informationfortheuser. |
| 12 | LightingofthesymbolCONNECT(CONNECTION) |
| 13 | LightingofthesymbolREMOTESTARTThesymbolislitatalltimeswhenREMOTESTARTisenabled,evenwhentheapplianceis notinoperationorisinstandbymode. |
INSTALLATION AND CONNECTION

INFORMATION!
Remove all packaging. When removing the packaging, make sure not to damage the dryer with a sharp object.
Selecting the room


INFORMATION!
The dryer may not be in contact with a wall or adjacent furniture. For optimum dryer operation, we recommend observing the clearance from the walls as indicated in the figure. In case of failure to heed the required minimum clearance, the dryer may overheat.

INFORMATION!
Vents on the back wall and the air exhaust opening on the front side of the dryer should never be obstructed.
The room in which you will install the dryer should be sufficiently ventilated, with a temperature between 15°C and 25°C. Dryer operation at a lower environment temperature may result in condensate accumulation in the dryer interior. Do not place the dryer into a place where there is danger of freezing. Frozen water in the condensate tank and pump may damage the dryer.
The dryer emits heat. Therefore, do not place it in a very small room, as the drying process may take longer due to limited amount of available air.
Lighting in the room should be sufficient to allow reading the information on the display unit on the control panel.
Dryer placement
If you also have a Gorenje dryer of corresponding (same) dimensions, it can be placed on top of the Gorenje washing machine; in this case, vacuum feet must be used and wall fixing bracket. Alternatively, the dryer can be placed next to the washing machine (figures 1 and 3).
If your Gorenje washing machine is smaller (minimum depth 545 mm) than your Gorenje dryer, then the dryer support has to be purchased extra (figure 2). The supplied vacuum feet must be used; they are designed to prevent the dryer from slipping.
Additional equipment: tumble dryer bracket (a), vacuum feet (b) (if not supplied) and wall fixing bracket (c), can be purchased at the service centre.
The surface on which the appliance is placed should be clean and level.
Gorenje washing machine onto which you intend to place the Gorenje dryer should hold the weight of the Gorenje dryer (see chapter »WASHING MACHINE DESCRIPTION/Technical information«).


INFORMATION!
At least two persons are required to install the tumble dryer on top of a washing machine.
Opening the dryer door (top view)

See chapter »DESCRIPTION OF THE DRYER/Technical information«. a=625 mm b=1134 mm

WARNING!
The appliance must not be installed behind a lockable door, a sliding door, or a door with a hinge on the opposite side to that of the tumble dryer, in such a way that a full opening of the tumble dryer door is restricted.

WARNING!
For appliances with ventilation openings in the base, a carpet must not obstruct the openings.


INFORMATION!
After installation, wait for 24 hours without moving the appliance before using it for the first time. If the dryer has to be laid down on one of its sides during transport or servicing, place it with its left side, viewing from the appliance front, downwards.
Adjusting the dryer feet
Level the dryer in longitudinal and transverse direction by rotating the adjustable feet which allow levelling by +/- 1 cm. Use a spirit level and spanner No. 22.
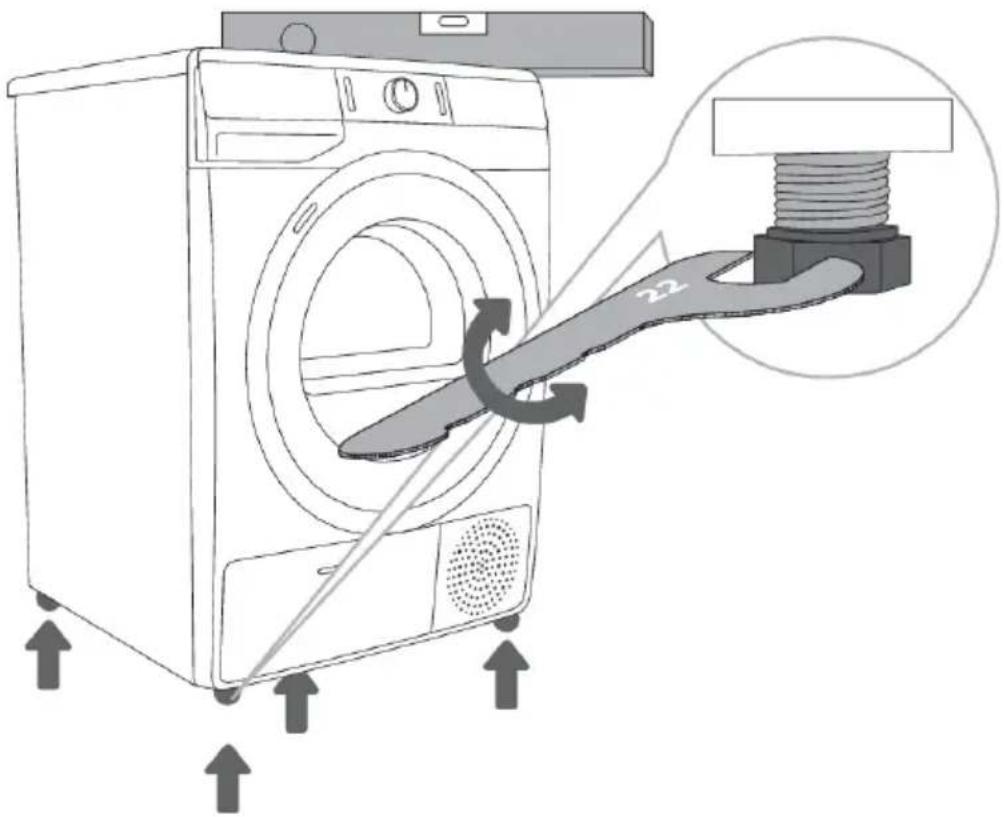

INFORMATION!
The floor on which the dryer is placed must have a concrete base. It should be clean and dry; otherwise, the dryer may slide. Also clean the adjustable feet.

INFORMATION!
The dryer must stand level and stable on a solid base.

INFORMATION!
Incorrect levelling of the dryer with the adjustable legs may cause vibration, appliance sliding across the room, and loud operation. Incorrect levelling of the dryer shall not be subject to warranty.

INFORMATION!
Sometimes, unusual or louder noises may appear during appliance operation; these are mostly the result of improper installation.
Draining the condensate
Moisture from the laundry is extracted as humid air passes through the heat exchanger and collects in the condensate container.
During the drying process, an indicator light (symbol) is lit on the display unit to warn when the condensate tank is full and needs to be emptied.
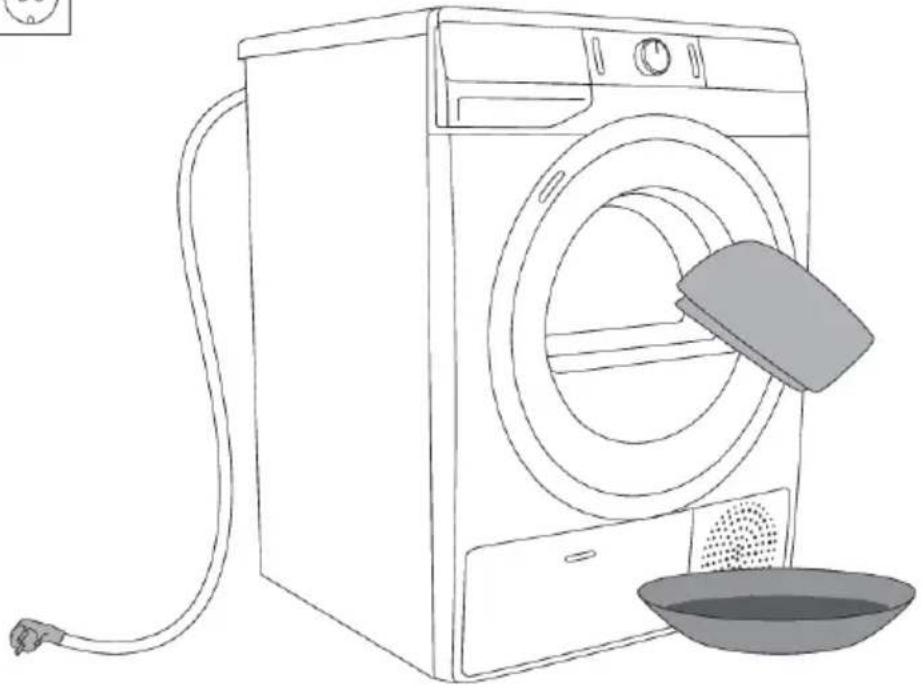
To avoid emptying the condensate tank, run the condensate discharge hose located at the back of the appliance directly into a drain.

1. Release the hose from the holder on the back wall of the dryer (left-hand side, below the top cover).
2. Run the hose into a drain at a height of no more than 80 cm from the floor.

INFORMATION!
If you decide to run the condensate drain hose into a drain, make sure the hose is securely fastened. This will prevent any water spillage which could result in unexpected damage.

WARNING!
Always use the hoses supplied with the dryer.
Connecting to the power mains
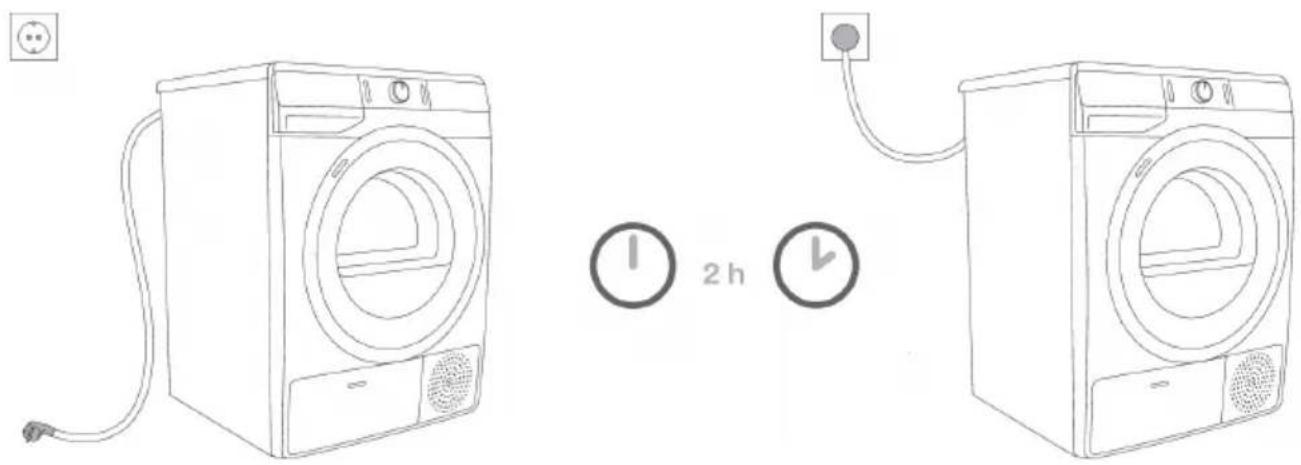

ELECTRIC SHOCK!
After installation, the dryer should stand still for two hours before it is connected to the power mains; this allows the dryer to stabilize.
Connect the dryer to a grounded power outlet. After installation, the wall outlet should be freely accessible. The outlet should be fitted with an earth contact (in compliance with the relevant regulations).
Information on your dryer is indicated on the rating plate (see chapter »DESCRIPTION OF THE DRYER/Technical information«).

ELECTRIC SHOCK!
We recommend using over-voltage protection to protect the appliance in case of a lightning strike.

WARNING!
The dryer shall not be connected to the power mains using an extension cord.

INFORMATION!
Do not connect the tumble dryer to an electrical outlet intended for an electric shaver or hair dryer.

INFORMATION!
Any repair and maintenance pertaining to safety or performance should be done by trained experts.

INFORMATION!
A damaged power cord may only be replaced by a person authorized by the manufacturer.
Moving and transport after installation
After every drying cycle, a small amount of condensed water will remain in the dryer. Switch on the dryer and choose one of the programmes, then let the appliance operate for approximately half a minute. This will pump out their remaining water and prevent damage to the dryer during transport.
If the dryer cannot be transported in the upright position, tilt it to the left side.

ELECTRIC SHOCK!
After transport, the dryers should be left to stand still for at least two hours before it is connected to the power mains. The appliances should be installed and connected by a trained technician.

INFORMATION!
If the appliance was not transported in compliance with the instructions, the dryers should be left to stand still at least 24 hours before it is reconnected to the power mains.
Failure to do so may result in a heat pump failure which shall not be covered by the warranty.
Be careful not to damage the cooling system (see chapter "INSTALLATION AND CONNECTION/Dryer placement").

ELECTRIC SHOCK!
Carefully read the instructions for use before connecting the dryer. Repair or any warranty claim resulting from incorrect connection or use of the dryer shall not be covered by the warranty.

INFORMATION!
The belt may only be replaced by a service technician authorized by the manufacturer, who can supply the original spare part with the code 907722 BELT POLY-V 7PH 1971 HUTCHINSON; 883647 BELT POLY-V 7PH E 1942 HUTCHINSON (depending on the model).
BEFORE USING THE APPLIANCE FOR THE FIRST TIME
Make sure the dryer is disconnected from the power mains; then, open the door by pulling the left side of the door towards you (figures 1 and 2).
Before using the dryer for the first time, clean the dryer drum using a soft damp cotton cloth and water (figure 3).


WARNING!
Do not use any solvents or cleaning agents that could damage the dryer (please observe the recommendations and warnings provided by the manufacturers of the cleaning agents).
Connecting the appliance to the ConnectLife application

ConnectLife is a smart home platform that connects people, devices, and services. The ConnectLife application includes advanced digital services and carefree solutions that allow users to monitor and control appliances, receive notifications from a smartphone, and update software (supported features may vary depending on your appliance and the region/country in which you are located).
To connect your smart device, you need a home Wi-Fi network (only 2.4 GHz networks are supported) and a smartphone equipped with the ConnectLife application.

To download the ConnectLife application, scan the QR code or search for ConnectLife in your favorite app store.
- Install the ConnectLife application and create an account.
- In the ConnectLife application, go to the "Add device" menu and select the appropriate type of device. Then scan the QR code (it can be found on the nameplate of the appliance; you can also enter the AUID/SN number manually).
- The application then guides you through the entire process of connecting the appliance to your smartphone.
- After a successful connection, the appliance can be operated remotely via a mobile application.
Useful tips for your smart device
Where to find the QR code for the devices required by the App during the installation process?
The QR code can be found on the warranty card or on the rating plate of the appliance.
How to enable Wi-Fi on the device?

![graph TD A["Input"] --> B{Processing} B --> C["Output"] style A fill:#f9f,stroke:#333 style B fill:#ccf,stroke:#333 style C fill:#cfc,stroke:#333](/content/2026/06/1383959/images/7bc8ca32ff72b3c81cd95e0dc6b3d8f09f7e89a694c912147c339c9171eb54df.jpg)
Check that the appliance is switched on; the programme selection button can be in any position. Then do the following:
- In the ConnectLife app, open the add device menu.
- Follow the instructions in the ConnectLife application, where you will pair your phone and appliance and add the appliance to your home Wi-Fi network. - Select the type of appliance. - Scan the QR code (it can be found on the warranty card or on the rating plate of the appliance).
- Simultaneously press and hold the positions (7+8) on the appliance until the display shows. The 5-minute countdown will begin.
In the ConnectLife app, instructions will guide you through the process of entering the appropriate data for your appliance to connect to your home network.
How to enable remote start of the appliance?
Move the programme selection button to ConnectLife/REMOTE CONTROL (remote control).
Press the (3) START/PAUSE button (the door must be closed).
How to add a user?

Check that the appliance is switched on; the programme selection button can be in any position. Then do the following:
- In the ConnectLife app, open the add device menu.
- Follow the instructions in the application ConnectLife where you will pair the phone and the appliance.
- Select the type of appliance.
- Scan the QR code (it can be found on the warranty card or on the rating plate of the appliance).
• Simultaneously press and hold the positions (7+8) on the appliance until the display shows.
The 3-minute countdown will begin.
- You can then complete and confirm the setting in the app.

How to remove the users (UnPair)?

To remove all users, do this by holding down the (7+8) keys until the display shows; confirm your selection by pressing (3) the START/PAUSE button.

INFORMATION!
This step will remove all active users of the appliance. If you want to operate the appliance
remotely again, you will need to repeat the process of adding a user.

Which Wi-Fi router can be used?
Only 2.4 GHz networks are supported. If the ConnectLife app cannot find your local network during the connection set-up process, check the following:
- your router is operating at the frequency of 2.4 GHz, • your network is hidden, and • your signal is strong enough.
Do you have more questions?
Please visit us at www.connectlife.io or contact us at hello@connectlife.io.
Remotely upgrading the software
Check the software update options in the app ConnectLife.
DRYING PROCESS, STEP BY STEP (1-6)
Step 1: Heed the labels on the laundry
| Normalwash;Sensitivelaundry | ||||||
  | Max.washingtemp.95°C |   | Max.washingtemp.40°C |  | Handwashonly | |
  | Max.washingtemp.60°C | Max.washingtemp.30°C |  | Donotwash | ||
| Bleaching | ||||||
 |  | BleachingnotallowedBleachingincoolwater | ||||
| Drycleaning | ||||||
 |  | PetroleumsolventR11,R113Drycleaningwithallage | ||||
 | Drycleaninginkerosene,purealcohol,andR113 |  | Drycleaningnotallowed | |||
| Ironing | ||||||
 |  | Hotironing,max.110°CHotironing,max.200°C | ||||
 |  | IroningnotallowedHotironing,max.150°C | ||||
| Drying | ||||||
 |  | HightemperatureDryflat(placeonaflatsurface) | ||||
 |  | LowtemperatureDripdry | ||||
 |  | TumbledryingnotallowedLinedry | ||||
Step 2: Preparing for the laundry drying process
- Sort the laundry by type and thickness of the fabric (see PROGRAMME TABLE).
- Close the buttons and zips, tie any ribbons, and turn the pockets inside out.
- Place very sensitive clothes in a special-purpose laundry bag.
(The special-purpose laundry bag is available as an optional accessory.)

Drying laundry made of particularly delicate fabrics that may be deformed is not recommended. The following types of laundry may not be dried in the dryer as this may cause your garments to deform:
• leather garments and other leather products, • garments that are waxed or treated in any other way, • garments with major wooden, plastic, or metal parts; • garments with spangles; • garments with metal parts subject to rusting.
Switching on the dryer
Connect the dryer to the power mains by plugging in the power cord.
Press the (1) ON/OFF button to switch on the dryer (figure 1).
With some models, the dryer drum is lit as well (figure 2).
(The light in the dryer drum is not suitable for any other use.)

INFORMATION!
The light in the dryer drum may only be replaced by the manufacturer, a service technician, or an authorized person.
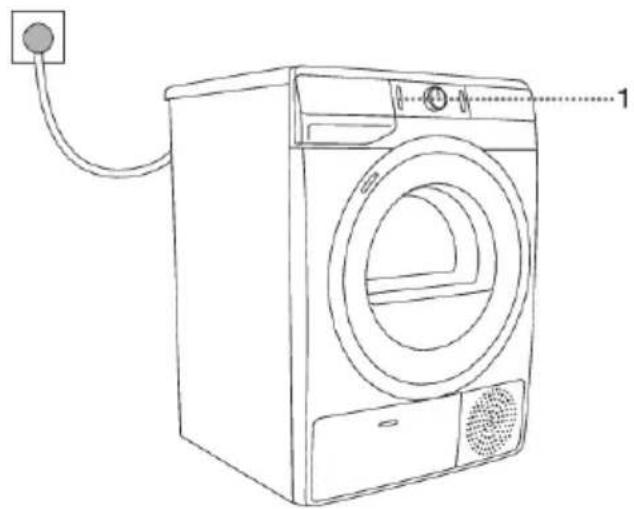
1

2
Loading the dryer
Open the dryer door by pulling the left side of the door towards you (figure 1).
Insert the laundry into the drum (after making sure the drum is empty) (figure 2).
Close the dryer door (figure 3).

1

2

3

INFORMATION!
Do not insert laundry into the dryer if it has not been wrung or spun (recommended minimum spinning cycle: 800 rpm).
Do not overload the drum! See PROGRAMME TABLE and observe your nominal load as indicated on the rating plate.
If the dryer drum is overloaded, the laundry will be more wrinkled and perhaps unevenly dried.

INFORMATION!
When drying larger items (bedding, towels, tablecloths, etc.), loosen them and then insert them into the dryer drum.
Step 3: Choosing the drying programme
Choose the programme by rotating the programme selector knob (2) to the left or to the right (depending on the type of laundry and the desired level of dryness). See PROGRAMME TABLE.


INFORMATION!
The programme selector knob (2) will not rotate automatically during operation.
| ProgramDrynesslevels | load | ProgrammedescriptionMax. | |
 | Cotton(Cotton)Storage(Cupboarddry) | 7 kg8 kg9 kg10kg | Usethisprogrammeforthickernon-sensitivecotton laundry.Afterdrying,itwillbedryandreadytobestored inthecupboard. |
 | CottonEco^* (CottonEco) | 7 kg8 kg9 kg10kg | TheEcoprogrammeissuitable drywetcotton laundry,andisthemostefficientprogrammeinterms ofenergyconsumptionfordryingwetcottonlaundry. |
 | Cotton(Cotton)Iron | 7 kg8 kg9kg(Moistforironing)10kg | Usethisprogramfornon-sensitivecottonlaundry.After drying,itwillbereadyforironing. |
 — — | (Mixedlaundry) | 3,5kgMix | Theprogramisusedfordryingcottonandsynthetic laundryatthesametime. |
 — — | (Synthetics) | 3,5kgSynthetic | Theprogramisusedfordryingsyntheticandblended textiles. |
 — — | (Wool) | 2kgWool | Thisshortprogramisintendedforsofteningorfluffing ofclothesmadeofwoolandsilk,whichhavetobedried thoroughlyaccordingtomanufacturer'sinstructions. |
 — — | (Feathers/Down) | 1,5kgPillow | Usethisprogrammetodryapparelstuffedorpadded withdown(pillows,jackets,...).Drylargeitemsseparately andusetheEXTRADRY(DRYNESSLEVEL)functionif necessary. |
| (Airing) | 2kgAirrefresh | programme,theheaterisswitchedoff.The programmeissuitableforrefreshingyourlaundry. | |
 | (Bedding) | 5kgBedding | thisprogrammeforlargeritems.Whenthe programmeiscomplete,theywillbedry.Adjusteddrum rotationpreventsthelaundryfromtangling. |
 | Sensitive(Delicate) | 1 kg | Usethisprogrammetodryhighlydelicatelaundrymade ofsyntheticfibres,whichmaybeslightlymoistafterthe dryingprocess.Werecommendusingaspecial-purpose laundrybag. 1) NATUREDRYdyingatalowertemperaturethat isfriendliertoyourlaundry. |
 | Shirts(Shirts) | 2 kg | Usethisprogramtodryshirtsandblouses.Adjusted drumrotationpreventsthelaundryfromcreasing. 1) NATUREDRYdyingatalowertemperaturethat isfriendliertoyourlaundry. |
 — — | Sports(Sportswear)(Timedprogram) | 3 kg4kgTime | Usethisprogrammeforclothingwithamembrane,for sportswearmadeofmixedmaterials,andbreathable fabrics. 1) NATUREDRYdyingatalowertemperaturethat isfriendliertoyourlaundry.Usethisprogrammefornon-sensitivelaundrythatisstillslightlymoistandhastobethoroughlydried.Inthetimeprogramme,remainingmoistureisnotdetectedautomatically.Ifthelaundryisstilldampaftertheprogrammeiscomplete,repeatheprogramme;ifitistoodryandthereforecreasedandroughtotouch,thedryingtimeyouselectedwastoolong. |
| (Fast89') | 4kgFast89 | Theprogramissuitableforsmalleramountsoflaundrythatyouwishtodryquicklyandefficiently. | |
| (Antimicrobialprogram) | 4kgExtraHygiene | Hyringprogramdurationandoverheatingofthefabricresultsinhigherdryingtemperature(above60°C),whichreducestheamountofmicrobesandallergensonthegarments.Thisdryingprogramshouldnotbeusedfordelicateitemsanditemsthatarenotsuitableformachinedrying. | |
| Remotecontrol(Remotecontrol) | UsetheRemotecontrolprogrammetoremotelycontrolyourappliance(usingyourphone).Youcanselectallprogramsavailableofyourappliance(seechapters»BEFOREFIRSTUSE/SettingupthefirstconnectionofyourappliancetotheWi-Finetwork«and»WASHINGSTEPS/1-6/Step3:Remotecontrolofyourdryerusingtheapp«). | ||
The Cotton Eco programme is used to assess compliance with EU legislation on eco-design.*
1) NATUREDRY: Drying laundry at a lower temperature than normal in order to reduce the possibility of shrinkage. During the drying process, the temperature is decreased by means of accurate control of heat pump operation and an additional temperature sensor. Therefore, shrinkage of clothes with this programme can be up to 50%* lower than with normal drying at a normal drying temperature (depending on the garments and type of fabric).
The programme is intended for garments that may be dried in a dryer.
If your laundry is not dried to the desired dryness level, use extra functions or use a more suitable programme.
Remote control of your dryer using the App

INFORMATION!
See chapter DRYING PROCESS, STEP BY STEP (1-6) and observe steps 1 and 2.

On the appliance:
- Close the dryer door.
- Rotate the programme selector knob to position ConnectLife/REMOTE CONTROL (Remote control).
- Press (3) the START/PAUSE button. The remote control symbol
REMOTE START (REMOTE START) switches on.
Remote control is available for the next 24 hours (the appliance goes into standby mode).
Opening the door will cancel REMOTE CONTROL.
Continue operating the appliance in the App, where you can choose from several options (selection, launch, and monitoring and stopping of the programme, amongst other additional settings).

INFORMATION!
The drying process can be controlled/monitored from the App.

INFORMATION!
Dryer operation can be interrupted or stopped via the application by selecting STOP/PAUSE or by opening the dryer door.

INFORMATION!
You can also control your appliance from your phone if you are not connected to the same Wi-Fi network as your appliance (the phone only needs an active internet connection). This means you can also control your appliance when you are away from home.

INFORMATION!
You can operate the appliance with multiple devices. You can control and monitor the operation of the appliance with any phone connected to the appliance, regardless of which user has initiated the drying process. The appliance can be connected to/controlled simultaneously with several ConnectLife User accounts.

INFORMATION!
After you have started the appliance from your phone, a person located next to the appliance can take over and manually turn off or control the appliance; the app will notify you in such case. In such case, controlling the appliance remotely from your phone is no longer possible. If you wish to control the appliance from your phone again, all required steps must be repeated.
Step 4: Selecting extra functions
Settings using a single button press

INFORMATION!
Activate/deactivate the functions by passing the desired function (before pressing the (3) START/PAUSE button).
Adjust the settings by using the relevant function button (before pressing the (3) START/PAUSE button).
Functions that can be changed or adjusted with the selected drying programme are partly lit (dimmed).
Certain settings cannot be selected with some programmes. Such settings will not be lit, and the button will flash when pressed (see FUNCTION TABLE).
Description of function indicators for the selected drying programme:
• Lit (basic/preset setting); - Dimmed (functions that can be adjusted) and - Unlit (functions that cannot be selected).


Pressing the (4) EXTRA DRY (DRYNESS LEVEL) position will change/increase the final dryness level and drying time. You can choose it before starting the drying process.
Three choices of higher dryness level and drying time are available. Additional functions (4a) (1, 2, 3) allow you to choose a higher level of dryness and extend the drying time. The indicator lights up next to the selected drying mode.

ANTI-CREASE (CREASE PREVENTION)
If the laundry is not removed from the dryer immediately after drying has finished, we recommend using the (5) ANTI-CREASE (CREASE PREVENTION) function, which must be selected before the start of the drying process.
By pressing the (5) ANTI-CREASE (CREASE PREVENTION) function, you can choose between 1h, 2h and 3h (5a) (the indicator light lights up next to the selected position) or turn off the function. When you open the dryer door after the completion of the drying cycle, the function is automatically deactivated.

NATURE DRY (LOWER TEMPERATURE)
By pressing the (6) NATURE DRY (LOWER TEMPERATURE) position, you can choose to dry at a lower temperature that is friendlier to your laundry. Next to the selected function, the indicator light shows (6a).
Drying laundry at a lower temperature than normal in order to reduce the possibility of shrinkage. During the drying process, the temperature is decreased by means of accurate control of heat pump operation and an additional temperature sensor. Therefore, shrinkage of clothes with this program can be up to 50% lower than with normal drying at a normal drying temperature (depending on the garments and type of fabric). The program is intended for garments that may be dried in a dryer.

The dryer starts counting down the time. When the countdown reaches the drying programme duration (e.g. 2:30), the drying programme starts automatically.
If the function is active, it can be interrupted by holding down the (8)
DELAY END (DELAYING THE END OF THE DRYING CYCLE): press the key for 3 seconds. The drying cycle starts immediately after the interruption of the function.
Example of function setting:
If you wish the drying programme to end at 6:00 in the morning and it is now 21:00, then set the DELAY END (DELAYING THE END OF THE DRYING PROGRAM) to 9 hours.
Settings using a combination of two buttons pressed simultaneously

CHILD LOCK
Turn it on or off by simultaneously pressing the positions (5) ANTI
CREASE (CREASE PREVENTION) and (6) NATURE DRY (LOWER TEMPERATURE) for at least 3 seconds. When both are pressed, the display (11) starts the animation »LocOn/LocOFF«.
If the child lock is activated, programme or additional functions cannot be changed. The child lock remains active after the dryer is switched off. Therefore, it has to be deactivated before a new programme can be selected. It can also be switched off during the drying process.

SOUND ON/OFF
To turn off the sound, simultaneously press the positions (6) NATURE
DRY (LOWER TEMPERATURE) and (7) TIMED DRY (TIMED DRYING) for at least 3 seconds. When both are pressed, the display (11) starts the animation »VolOn/VolOFF«.
To reactivate the sound, simultaneously press the positions (6) and (7) and hold them for at least 3 seconds. If you turn off the sound, then there is no audible signal at the end of a drying programme.
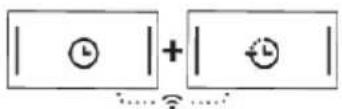
Wi-Fi MENU
The Wi-Fi menu is used for connecting the appliance and for remote control.
The programme selection button can be in any position.
Simultaneously press positions (7) TIMED DRY (TIMED DRYING) and (8) DELAY END (DELAYING THE END OF THE DRYING CYCLE) and hold them until the desired setting appears on the display.

INFORMATION!
While either the TIMED DRY or the DELAY END functions are activated, the Wi-Fi menu cannot be controlled.
Possible settings (depending on the duration for which the keys (7+8) are held):
- 0-3 seconds - turns appliance connectivity off for on.
- 3-6 seconds - Con
[on] - the appliance can be connected to a Wi-Fi network for 5 minutes.
- 6-9 seconds - PAr
PAR – the appliance can be connected to the ConnectLife app for 3 minutes. The function will only be active if you have already connected the appliance to your Wi-Fi network.
- 9-12 seconds - UnP
UnP - removes all users.
- 12 seconds or more The appliance returns to its original state.

INFORMATION!
The functions CHILD LOCK and SOUNDS OFF cannot be activated or deactivated 10 seconds after turning on.

INFORMATION!
Some functions are not available and cannot be selected with certain programmes; an acoustic signal and a flashing light will indicate such cases (see EXTRA FUNCTION TABLE).

INFORMATION!
After disconnecting the dryer from the power mains, all settings will be set to their default factory values, except for the acoustics signal loudness, anti-crease, and child lock setting.
Extra function table
| Programmes | EXTRADRY (DRYNESSLEVEL) | ANTICREASE (CREASEPREVENTION) | NATUREDRY (LOWERTEMPERATURE) | TIMEDRY (TIMEDDRYING) | DELAYEND (DELAYINGTHEENDOF THEDRYINGPROGRAM) | |
| Cotton(Cotton)Storage(Cupboarddry) | • | • | • | |||
| CottonEco (CottonEco) | • | • | • | |||
| Cotton(Cotton)Iron(Moistforironing) | • | • | • | |||
| Mix(Mixedlaundry) | • | • | • | |||
| Synthetics(Synthetics) | • | • | • | |||
| Wool(Wool) | ||||||
| Pillow(Feathers/Down) | • | • | • | |||
| Airrefresh(Airing) | ||||||
| Bedding(Bedding) | • | • | • | |||
| Sensitive (Delicate) | • | • | • | • | ||
| Shirts (Shirts) | • | • | • | • | ||
| Sports (Sportswear) | • | • | • | • | ||
| Time(Timedprogram) | • | • | ||||
| Fast89' (Fast89') | • | • | ||||
| Extrahygiene(Antimicrobialprogram) | • | • | ||||
Additional functions can be used.
Step 5: Starting the drying programme

Press the button (3) START/PAUSE.
TIME REMAINING TO PROGRAMME COMPLETION or DELAY END (DELAYING THE END OF THE DRYING PROGRAM) time (if set) will appear on the display. Symbols will be lit on the selected functions.
If the TIME REMAINING UNTIL PROGRAMME COMPLETION flashes three times on the display unit, and there is an audible signal, this means that the dryer door is open or not closed tightly. Close the dryer door and press the button (3) START/PAUSE again to resume the drying programme.
Step 6: End of the drying programme

At the end of the drying programme, "(End)" will appear on the display unit, the two red indicator lights will light up, the (3) START/PAUSE button indicator light will flash, and the light for selected time display ANTI CREASE (CREASE PREVENTION) (5a), if activated or selected, will flash.

- Open the dryer door.
- Clean the filters (see section "CLEANING"...).
- Take the laundry from the drum. 4. Close the door! 5. Switch off the dryer (press the (1) ON/OFF button).
- Empty the condensate tank.
- Unplug the power cord from the outlet.

INFORMATION!
After the end of the drying programme, immediately remove the laundry from the dryer to prevent it from creasing again.

WARNING!
The final drying cycle includes a cooling down stage without heater operation. It makes sure the laundry is of suitable temperature at the end of the programme and that it can be taken from the dryer without risk of touching hot clothes.
INTERRUPTIONS AND CHANGING THE PROGRAMME
Interruptions
Interrupting the programme process
Press the (3) START/PAUSE button to pause/resume a programme.
To stop and cancel the drying programme, press the (3) START/PAUSE button and hold it for 3 seconds. The selected programme will stop, and the dryer will start to cool down. Cooling downtime depends on the selected programme. After this process, the drying programme can be selected again.
Open door
If the dryer door is opened during the drying process, the drying cycle will be interrupted. When the door is closed and the (3) START/PAUSE button is pressed, the drying will resume from the point at which it was interrupted.

HOT SURFACE!
The dryer door will heat up during the drying process. Make sure you do not burn yourself when opening the dryer door.
Full condensate tank
When the condensate tank is full, the drying programme will pause (the sign will be lit).
Empty the condensate tank (see chapter "CLEANING AND MAINTENANCE / Emptying the condensate tank").
Press the (3) START/PAUSE button to resume the drying programme from the point at which it was interrupted.
Power supply failure
When power supply is resumed, the signal light on the (3) START/PAUSE button will flash.
To resume the drying process, press the (3) START/PAUSE button.
Changing the program/functions
Switch off the dryer by pressing the button (1) ON/OFF; then, switch it on again by pressing the button (1) ON/OFF and rotate the (2) programme selector knob to the desired programme, or choose extra functions.
Select another program/function and press the (3) START/PAUSE button again.
Adding laundry after the start of the program
Open the dryer door and press the (3) START/PAUSE button. Insert the laundry and press the button (3) START/PAUSE.
Drying time may be extended.

HOT SURFACE!
When loading the laundry, make sure you do not burn yourself when you open the dryer door.
Saving personal settings
Initial settings may be changed.
After selecting the programme and additional functions, you can save this combination by pressing the (3) START/PAUSE button for one second. Confirmation of the selection is indicated by the illuminated (3) START/PAUSE key and an acoustic signal. The display will briefly (11) show the sign "Saved".
Press the (3) START/PAUSE button to start the drying process.
The changed combination will appear every time you switch on the dryer.
Follow the same procedure to change a previously saved combination.
Personal settings menu
Switch on the dryer by pressing the (1) ON/OFF button. To enter the Personal Settings Menu, simultaneously press (4) EXTRA DRY (DRYNESS LEVEL) and (6) NATURE DRY (LOWER
TEMPERATURE) for 3 seconds. The symbols CLEAN FILTER and CONDENSATE WATER TANK light up on the display.
Number 1 will appear on the LED display, indicating the settings function. Rotate the programme selector knob (2) to the left or to the right to choose the function to change. Number 1 indicates sound settings and number 2 indicates resetting of Personal programmes setting of factory defaults. If the desired settings are not selected in 20 seconds, the programme will automatically return to main menu.
Press on the position (5) ANTI-CREASE (CREASE PREVENTION) to confirm the desired functions and their relevant settings. Press on the position (4) EXTRA DRY (DRYNESS LEVEL) to go back one step.
Acoustic signal volume can be set at four levels (0 means the sound is off; 1 means that the button sound is activated; 2 means low volume, and 3 means high volume). Choose the volume level by rotating the programme selector knob (2) to the left or to the right. The lowest setting means that the acoustic signal is switched off.
Overview of the number of drying cycles performed
The number of drying cycles performed will appear on the display for 3 seconds if you unplug the power cord, wait 10 seconds and then plug the power cord back in. After 3 seconds, the appliance enters standby mode.
CLEANING AND MAINTENANCE

ELECTRIC SHOCK!
Before cleaning, make sure to switch off the dryer and disconnect it from the power mains (unplug the power cord from the outlet).
The dryer is fitted with a filtering system consisting of several filters that prevent any impurities from entering the heat exchanger system.

1 Lint filter
2 Heat pump filter
3 Condense water tank

INFORMATION!
The dryer may never be operated without the filters in place or with damaged filters, an excessive amount of accumulated fibres from the fabric could cause malfunction or failure of the dryer.
Cleaning the door net filter in the door

INFORMATION!
Clean the lint filter after each drying cycle.

1 Open the filter housing.
2 Pull out the lint filter.
3 Gently scrape the filter to remove the lint, i.e. the lining of fibres and threads, with your hand or with a cloth.
4 If necessary, clean the filter housing and door gasket as well.
5 Insert the net filter and close the filter housing.

INFORMATION!
Make sure you do not pinch your fingers with the filter cover.
Cleaning the heat pump filter

INFORMATION!
During cleaning, some water may be spilled. It is therefore recommended to place an absorbent cloth on the floor.

1. Open the outside cover. Hold the levers on the inside cover and rotate them as indicated by the arrows.
2. Remove the inside cover along with the heat pump filter.
3. Detach the front filter part from the heat pump filter housing and open it. Push the foam part of the filter out from the housing. Use a damp cloth to clean the heat pump filter mesh.
4, 5. Pull the foam filter from the housing. Clean it with a vacuum cleaner and a soft brush attachment. Reinstall the clean foam filter into the filter housing.

INFORMATION!
Do not rinse the foam filter under water to avoid micro-plastic effluent into the groundwater!

INFORMATION!
Insert the heat pump foam filter into the housing and close the outer cover (push it upwards toward the machine until it latches into place).

INFORMATION!
The heat pump filter has to be correctly inserted into its slot. Otherwise, the heat exchanger installed inside the dryer may be clogged or damaged.

INFORMATION!
Clean the foam filter at least after every five drying cycles.
Cleaning of the heat exchanger

WARNING!
Do not touch the inner metal parts of the heat exchanger with bare hands. Danger of injury on sharp parts. Use appropriate protection gloves when cleaning the heat exchanger.

WARNING!
Incorrect cleaning of the metal fins of the heat exchanger can permanently damage the tumble dryer. Do not press on the metal fins with hard objects like for example the plastic tube of a vacuum cleaner.
The dust and dirt in the metal fins of the heat exchanger can be cleaned with a vacuum cleaner and a soft brush attachment.
Access to the heat exchanger is possible when the heat pump filter is removed as described in the chapter "Cleaning the heat pump filter".
Without pressing, gently move the brush attachment only in the direction of the metal fins from top to bottom. Too much pressure can damage or bend the metal fins of the heat exchanger.

INFORMATION!
We recommend you clean the heat exchanger at least every twelve months.

Emptying the condensate tank

INFORMATION!
Empty the condensate tank after each drying cycle.
If the condensate tank is full, the drying programme will be paused automatically.
The display shows, indicating that the condensate tank should be emptied.

1 Pull out the condensate tank from the dryer (using both hands as shown in the figure), then turn it upside down over a washbasin, sink, or any suitable vessel.
2,3 Empty the
condensate tank. Pull out the spout at the opening for easier emptying. Replace the condensate tank.

INFORMATION!
Water from the condensate tank is not drinkable. If thoroughly filtered, it can be used for ironing.

WARNING!
Never add chemicals or fragrances into the condensate tank.
It is not necessary to empty the condensate tank if the drain hose is connected directly to a drain (see chapter »INSTALLATION AND CONNECTION/Draining the condensate«).
Cleaning the dryer

ELECTRIC SHOCK!
Always disconnect the dryer from the power mains before cleaning.
Clean the dryer exterior using a soft damp cotton cloth.

WARNING!
Do not use any solvents or cleaning agents that could damage the dryer (please observe the recommendations and warnings provided by the manufacturers of the cleaning agents).
Wipe all parts of the dryer with a soft cloth until dry.

INFORMATION!
Do not clean the dryer with a jet of water!

TROUBLE-SHOOTING
What to do...?
Disturbances from the environment (e.g., the power grid) may result in various error reports (see TROUBLESHOOTING TABLE). In such a case:
- Switch off the dryer and wait at least one minute.
- Switch on the dryer and repeat the drying programme.
- Most errors during operation can be resolved by the user (see TROUBLESHOOTING TABLE).
- If the error occurs again, call an authorized service unit.
- Repairs may only be carried out by an adequately trained person.
- Repair or any warranty claim resulting from incorrect connection or use of the dryer shall not be covered by the warranty. In such cases, the cost of repair shall be charged to the user.
Troubleshooting and error table
| Whatodo?CauseProblem/Error | ||
| Themachinewill notstart. | switchedon. | •Checkwhetherthemainswitchison.Themainswitchisn |
| poweroutlet.•Checkifthepowercordplugiscorrectlyinsertedintothepoweroutlet. | •Checkthefuse.•Thereisnovoltageinthe | |
| Thereisvoltage intheoutlet,but thedrumdoes notspinandthe appliancedoes notwork. | •Checkifthedoorisclosedproperly.Opendoor. | |
| Thecondensatetankisfull. | •Emptythecondensatetank(seechapter »CLEANINGAND MAINTENANCE/Emptyingthe condensatetank«). | |
| •PerhapstheDELAYEND (DELAYINGTHEENDOF THEDRYINGPROGRAM) functionwasset.•Programwasnotstartedin accordancewiththe instructions. | •Tocancelthedelayedstartfunction, pressDELAYEND(DELAYINGTHEEND OFTHEDRYINGCYCLE)andholdfor 3seconds. Re-readtheinstructionsforuseagain. | |
| Theappliance stopsheating completely duringa programme. | •Thenetfiltermaybe clogged.Asaresult,the temperatureinthedryer rises,whichinturncauses overheating,andtherefore heatingisswitchedoff. | •Cleanthenetfilter(seechapter »CLEANINGAND MAINTENANCE/Cleaningthenetfilter inthedoor«).•Waitfortheappliancetocooldown,and tryrunningitagain.Ifthedryerstillfails tostart,callaservicetechnician. |
| Aslighthitting noiseappears. | Ifthedryerisoutofusefora longperiodoftime,the supportelementsareunder stressatthesamepoint. | •Thenoisewillsubsidewithoutany intervention. |
| Thedooropens duringdrying. | (toomuchlaundryinthe drum). | •Reducetheamountoflaundry.Excessiveload |
| Unevenlydried laundry. | Laundryofvaryingtypesand thickness,orexcessive amountoflaundry. | •Makesureyouhavesortedthelaundry bytypeandthickness,whetheryouhave addedasuitableamountoflaundryto thedrum,andwhetheryouhave selectedasuitableprogramme(see PROGRAMMETABLE). |
| Laundrynot driedordrying takestoolong | Filtersarenotclean. | •Cleanthefilters(seechapter »CLEANINGANDMAINTENANCE«). |
| •Dryerisplacedinaclosed room;roomthatistooocold; orroomthatistooosmalland theairoverheatsasaresult.•Checkifthetemperatureintheroom wherethedryerisinstalledistoohigh ortoolow. | •Makesurethereisadequatesupplyof freshairtothedryer;forexample,open thedoorand/orwindow. | |
| Laundrywasnotsufficiently wrungorspun. | •Iftheloadisstillwetaftercompleted dryingcycle,anappropriatedrying programshouldberunagain(after cleaningfilters). | |
| Amountoflaundrydriedin theapplianceistoolargeor insufficient. | •Useasuitableprogramoreextra functions. | |
| •Laundry(suchasbedding) getstangledintolargeballs. | •Closethebuttonszippersonthe laundrybeforedrying.Selectasuitable programme(e.g.theprogramBedding). •Afterthedryingprocess,loosenthe laundryandselectanadditionaldrying programme(e.g.Time(Timeddrying program)). | |
| Drumlighting error (dependingonthe model) | Thereisnolightingwhenthe dryerdoorisopened. | •Disconnectthedryerfromthepower mainsandcallanauthorizedserviceunit.Whattodo?CauseProblem/Error |
| Theappliance cannotbe controlled remotely | Applianceremotecontrolis notactivatedorenabled. | ••CheckiftheWi-Fisymbolonthe applianceislit,andsettheprogram selectorknob(1)topositionREMOTE CONTROL(ConnectLife). |
| Theappliance willnotconnect totheWi-Fi network | Theappliancecannotfind yourWi-Finetwork. | ••Checkwhether2.4GHznetworkis activatedonyourrouterandwhetherthe Wi-Fisignalattheapplianceisstrong enough. |
The following lists all the errors that the user can see on the user interface.
| Problem/Error | anddescriptionoferror | Whattodo?Indicationonthedisplayunit | |
 | Callservicecentre.Controlunitfailure | ||
 | Callservicecentre.Temperaturesensorfailure | ||
 | Callservicecentre.Communicationerror | ||
 | Callservicecentre.Pumperor | ||
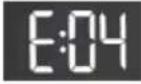 | Systemoverheating | Cleanthefilters.Seechapter»CLEANING ANDMAINTENANCE/Cleaningthenetfilter inthedoor«orcallaservicetechnician. | |
 | Controlunitfailure | Disconnectthetumbledryerfromthepower supply. Callservicecentre. | |
 | |||
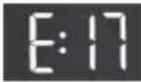 | Theappliancecannotbe connectedtotheWi-Fi network | Theerroronlyaffectstheoptiontoremotely controlyourdryingprogramme(remote control).Itdoesnotaffectthedryingprocess onotherprogrammes. Callaservicetechnician. | |
Warnings/information for the user, which can be indicated on the display unit, may include the following:
| Warning | anddescriptionofwarning | Whattodo?Indicationonthedisplayunit | |
 | Condensatetankwarning | Emptythecondensatetankbeforeresuming theprogramme(seechapter»CLEANINGAND MAINTENANCE/Emptyingthecondensate tank«). | |
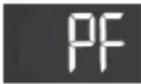 | Dryinginterruptedduetopowersupplyfailure.Pow Pressthe(3)START/PAUSEbuttontorestart orresumethedryingprogramme. | ||
 | Attheendofthedrying programme,(End)will appearonthedisplayunit.Tworedsymbolsandwill lightup.Thisisnotafault;itisjusta warningthatthefiltersneedto becleanedafterdrying. | Cleanthefiltersandemptythecondensate tank. | |
 | |||
Write down the error code (e.g., E0, E1), switch off the dryer, and call the nearest authorized service (call centre).
Sounds

INFORMATION!
In the initial drying stage during drying, the compressor and the heat pump cause noise; this, however, does not affect the tumble dryer operation.
Humming sound: compressor noise; the noise level depends on the program and the drying stage.
Buzzing sound: the compressor is occasionally ventilated.
Pumping or liquid flowing sound: the pump is pumping the condensate into the condensate tank.
Clicking sound: start of automatic cleaning of the heat exchanger (compressor).
Rumbling or rattling noise: during drying when the laundry also includes hard parts (such as buttons, zippers, etc.)
Service
Before calling a service center
When you contact a service centre, please state your dryer's type (1), code/ID (2), model number (3), and serial number (4).
Dryer type, code, model, and serial number can be found on the rating (type) plate on the inner side of the dryer door.


WARNING!
In case of a failure, only use approved spare parts from authorized manufacturers.

WARNING!
Repair or any warranty claim resulting from incorrect connection or use of the dryer shall not be covered by the warranty. In such cases, the costs of repair shall be charged to the user.

INFORMATION!
The warranty does not cover errors or failures resulting from disturbances from the environment (lightning strike, power grid failures, natural disasters, etc.).

INFORMATION!
Report any malfunction to your local call centre or web address; all information can be found in the enclosed warranty statement. Contact details of your authorised service centre are available in the warranty statement supplied with the appliance and on the website by scanning the QR code on the rating plate.

INFORMATION!
Some simple faults described in the chapter »TROUBLESHOOTING/Troubleshooting and error table« can be fixed by the user himself by taking into account the instructions without risk to their own safety and without affecting the warranty conditions.

INFORMATION!
Functional spare parts for the dryer you purchased will be available for 10 years. During this time, original spare parts will be available to ensure the correct operation of your appliance.
A list of spare parts and repair tips in accordance with the current Ecodesign Directive can be found by scanning the QR code located on the inside of the door of the dryer. Or on the following link: https://auid.connectlife.io.
TIPS FOR DRYING AND ECONOMIC USE OF YOUR DRYER

INFORMATION!
The most economical way of drying is to dry the recommended amount of laundry each batch (see PROGRAMME TABLE).
Drying laundry made of particularly delicate fabrics that may be deformed is not recommended.
Use of conditioner in the washing cycle is not necessary as the laundry is soft and smooth after drying in the dryer. Drying time will be shorter and power consumption will be lower if the garments are thoroughly wrung or spun before drying. By selecting the appropriate drying programme, you will avoid over-drying your laundry and problems with ironing or shrinkage of fabric.
Regular cleaning of the filters will lead to optimum drying time and minimum power consumption.
When drying smaller amounts of laundry or individual garments, the sensor may not perceive the actual level of moisture in the laundry. In such cases, it is recommended to dry smaller items or amounts with programmes for dryer laundry or with the timed programme.
Low standby mode
If you do not run a programme or do anything else after switching on the dryer, the dryer will switch off automatically after 5 minutes to save energy. Indicator light on the (3) START/PAUSE button will flash.
The display will be reactivated if you rotate the programme selector knob or press the (1) ON/OFF button or open the dryer door. If you do not do anything for 5 minutes after the end of the programme, the display unit will be switched off as well. Indicator light on the (3) START/PAUSE button will flash.
| <0,5Po=weightedpowerwhenoff[W] | |
| <0,5PI=weightedpowerwheninstand | |
| 5,00TI=standbytime[min] |

INFORMATION!
Low mains voltage and different drying loads may affect the drying time; the remaining time displayed is adjusted accordingly during the drying process.
TYPICAL CONSUMPTION TABLE
(depending on the model)
The table lists the values for drying time and power consumption for drying of a test batch of laundry with various spinning rpm in the washing machine.
| Explanation of symbols used below: |
| Ratedcapacity(kg) |
| Finalmoisturecontent(%) |
| Programmeduration(h:min) |
| Energyconsumption(kWhpercycle) |
| Airborneacousticnoiseemissions(dB) |
| Energyefficiencyclass:D(7kg) | |||||
| Program | |||||
| CottonEco*(CottonEco) | 7 | 0±3 | 1,462:25 | 63 | |
| 0,971:293,5 | |||||
| Storage(Cupboarddry) | 7Cotton(Cotton)-2 | 1,672:45 | |||
| 1,021:403,5 | |||||
| Iron(Moistforironing) | 7Cotton(Cotton)12±4 | 1,151:50 | |||
| 0,761:103,5 | |||||
| Sensitive(Delicate) | 0,280:3001 | ||||
| Synthetics(Synthetics) | 0,551:002±33,5 | ||||
| Mix(Mixedlaundry) | 1,021:40-23,5 | ||||
| Energyefficiencyclass:D(8kg) | |||||
| Program | |||||
| CottonEco*(CottonEco) | 8 | 0±3 | 1,782:55 | 63 | |
| 1,001:414 | |||||
| Storage(Cupboarddry) | 8Cotton(Cotton)-2 | 2,253:15 | |||
| 1,312:144 | |||||
| 1,382:20 | 12±48Cotton(Cotton) | ||||
| Iron(Moistforironing) | 0,791:194 | ||||
| Sensitive(Delicate) | 0,280:3001 | ||||
| Synthetics(Synthetics) | 0,551:002±33,5 | ||||
| Mix(Mixedlaundry) | 1,021:40-23,5 | ||||
| Energyefficiencyclass:D(9kg) | |||||
| Program | |||||
| CottonEco*(CottonEco) | 9 | 0±3 | 2,113:45 | 62 | |
| 1,021:524,5 | |||||
| Storage(Cupboarddry) | 9Cotton(Cotton)-2 | 2,534:00 | |||
| 1,472:244,5 | |||||
| Iron(Moistforironing) | 9Cotton(Cotton)12±4 | 1,482:30 | |||
| 0,791:274,5 | |||||
| Sensitive(Delicate) | 0,230:3001 | ||||
| Synthetics(Synthetics) | 0,551:002±33,5 | ||||
| Mix(Mixedlaundry) | 0,871:40-23,5 | ||||
| Energyefficiencyclass:E(10kg) | |||||
| Program | |||||
| CottonEco*(CottonEco) | 10 | 0±3 | 2,214:10 | 62 | |
| 1,342:375 | |||||
| Storage(Cupboarddry) | 10Cotton(Cotton)-2 | 2,354:40 | |||
| 1,362:515 | |||||
| Iron(Moistforironing) | 10Cotton(Cotton)12±4 | 1,553:05 | |||
| 0,711:325 | |||||
| Sensitive(Delicate) | 0,210:3001 | ||||
| Synthetics(Synthetics) | 0,521:002±33,5 | ||||
| Mix(Mixedlaundry) | 0,911:40-23,5 | ||||
*The Cotton Eco programme is suitable for drying wet cotton laundry and is used to assess compliance with EU legislation on eco-design.
The Cotton Eco programme is the most efficient programme in terms of energy consumption for drying wet cotton laundry.
All values in the table are provided per drying cycle.
The values provided for all programmes, except for the Cotton Ecoprogramme, are for information only.

INFORMATION!
You can save energy by filling up the household tumble dryer to the maximum capacity specified for each programme.

INFORMATION!
Due to deviations in terms of type and amount of laundry, power supply oscillation, and environment temperature and humidity, the values measured at the end user may differ from the ones stated in the table.
LABEL
(according to EU-Regulation No. 2023/2534)
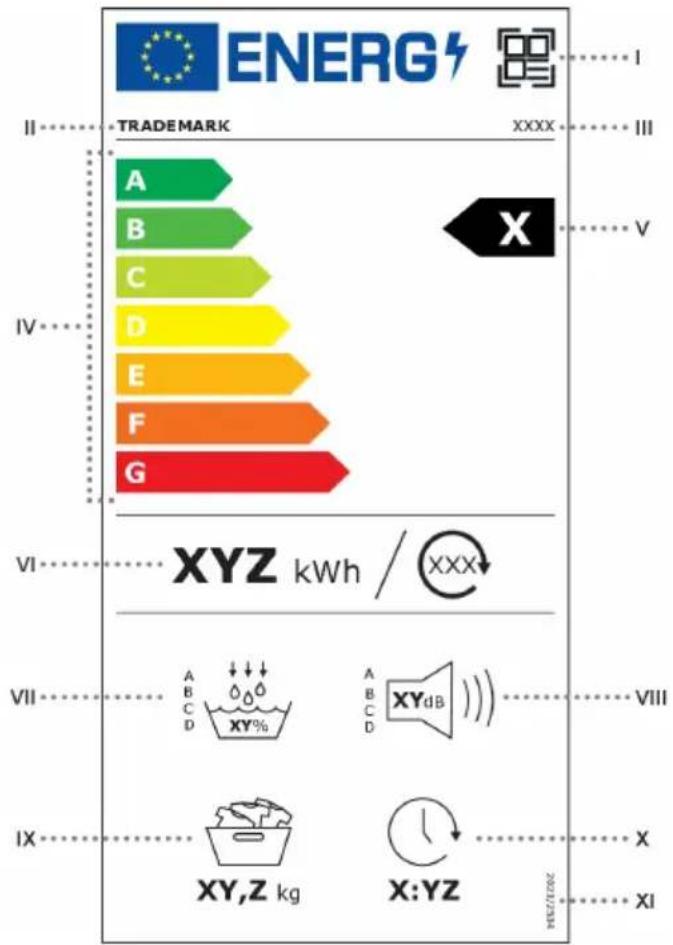
QR code; -I
trademark; –II
model identifier; -III
scale of energy efficiency classes from A to G; -IV
the energy efficiency class determined in accordance with Annex II; -V
-V weighted average energy consumption per 100 drying cycles in kWh, rounded to the nearest integer and calculated in accordance with Annex IV; in case of gas-fired tumble dryers, the weighted average energy consumption (gas and electricity) per 100 drying cycles in kWh, rounded to the nearest integer and calculated in accordance with Annex IV;
-V condensation efficiency class determined in accordance with Annex II, with relevant logo and value rounded to the nearest integer and calculated in accordance with Annex IV;
-V acoustic airborne noise emission class of the drying cycle of the eco programme, with relevant logo and value in dB(A), determined in accordance with Section 4 of Annex IV;
Rated capacity, in kg, for the eco programme at full load;
X – duration of the eco programme at full load in hours and minutes [h:min] rounded to the nearest minute;
XI - the number of this Regulation, which is '2023/2534'.
PRODUCT INFORMATION SHEET
(according to EU-Regulation No. 2023/2534)
| Supplier'snameortrademark( a),(c): | |||||
| Supplier'saddress( a),(c): | |||||
| Modelidentifier( a): | |||||
| [electricair-vented,electriccondenser,gas-fired]Technology | |||||
| Generalproductparameters: | |||||
| ValueParameterValue | |||||
| Ratedcapacity( b)(kg) | x,x | Dimensions( a), (c)incm | xHeight | ||
| xWidth | |||||
| xDepth | |||||
| EnergyEfficiencyIndex (EEI)( b) | x,x | b) | [A/B/C/D/E/F/G](d)Energyeffic | ||
| Condensationefficiency (%)(b)(ifapplicable) | xx | Condensationefficiency class(ifapplicable)( b) | [A/B/C/D](d) | ||
| Weightedenergy consumptioninkWhper dryingcycle( h).Actual energyconsumptionwill dependonhowthe applianceisused. | x,xx | ||||
| Programmeduration( b)(hours:minutes) | Rated capacity | x:xx | Type | [built-in/free standing] | |
| x:xxHalf | |||||
| Acousticairbornenoise emission(b)(dB(A)re1pW) | x | Acousticairbornenoise emissionclass( b) | [A/B/C/D](d) | ||
| Off-mode (ifapplicable)(W) | x,xx | Standbymode(if applicable)(W) | x,xx | ||
| Delaystart(W) (ifapplicable) | x,xx | Networkedstandby(W) (ifapplicable) | x,xx | ||
| Forhouseholdtumbledryersequippedwithaheatpump,thechemicalname ortheacceptedindustrydesignationoftherefrigerantgasused,without prejudicetoRegulation(EU)No517/2014onfluorinatedgreenhousegases (1) (a), (c). | |||||
| Weblinktoinformationonsparepartsavailabilityforprofessionalrepairers andendusers( a) (c) (e) | https://xxx | ||||
| Weblinktorepairinstructionsforend-users( a) (c) (f) | https://xxx | ||||
| Weblinktoindicativepre-taxprices( a) (c) (g) | https://xxx | ||||
| Minimumdurationoftheguaranteeofferedbythesupplier( 1) (g) | |||||
| Additionalinformation( 1) (c): | |||||
| Link to the supplier's website, where the information in point 6 of Annex II to Commission Regulation (EU)2023/2533( c) (2)isfound: | |||||
(1) Regulation (EU) No 517/2014 of the European Parliament and of the Council of 16 April 2014 on fluorinated greenhouse gases and repealing Regulation (EC) No 842/2006 (OJ L 150, 20.5.2014, p. 195). (2) Commission Regulation (EU) 2023/2533 implementing Directive 2009/125/EC of the European Parliament and of the Council with regard to ecodesign requirements for household tumble dryers, amending Commission Regulation (EU) 2023/826, and repealing Commission Regulation (EU) No 932/2012 (OJ L, 2023/2533, 22.11.2023, ELI: http://data.europa.eu/eli/reg/2023/2533/oj). (a) This item shall not be considered relevant for the purpose of Article 2(6) of Regulation (EU) 2017/1369. (b) For the eco programme. (c) Changes to those items shall not be considered relevant for the purpose of Article 4(4) of Regulation (EU) 2017/1369. (d) If the product database automatically generates the definitive content of that cell, the suppliers shall not enter those data. (e) The suppliers' obligation is to include the weblink to the website where the relevant information will be available. Effective access to the website is nevertheless to be granted in accordance with the timeline and provisions laid down in Annex II, point 5(1)(b) of Regulation (EU) 2023/2533. (f) The suppliers' obligation is to include the weblink to the website where the relevant information will be available. Effective access to the website is nevertheless to be granted in accordance with the timeline and provisions laid down in Annex II, point 5(1)(d) of Regulation (EU) 2023/2533. (g) The suppliers' obligation is to include the weblink to the website where the relevant information will be available. Effective access to the website is nevertheless to be granted in accordance with the timeline and provisions laid down in Annex II, point 5(1)(f) of Commission Regulation (EU) 2023/2533. (h) For gas-fired tumble dryers, calculated as the weighted average energy consumption per 100 drying cycles according to Annex IV point 1(f), divided by 100.
DISPOSAL

Packaging is made of environmentally friendly materials that can be recycled, disposed of, or destroyed without any hazard to the environment. To this end, packaging materials are labelled appropriately.
The symbol on the product or its packaging indicates that the product should not be treated as normal household waste. Take the product to an authorized collection centre for waste electric and electronic equipment processing.
When disposing of the appliance at the end of its useful life, remove all power cords, and destroy the door latch and switch to prevent the door from locking or latching (child safety).
Correct disposal of the product will help prevent any negative effects on the environment and health of people, which could occur in case of incorrect product removal. For detailed information on removal and processing of the product, please contact the relevant municipal body in charge of waste management, your waste disposal service, or the store where you bought the product.
gorenje
GORENJE gospodinjski aparati, d.o.o. Address: Partizanska 12, 3320 Velenje, Slovenia Phone: +386 (0) 3 899 1000 Fax: +386 (0) 3 899 2800 www.gorenje.com
SP22B2+HP-NDHYGA2+R290WFGOR

909587-a16
CE
- INFORMATION
- WARNING
- ELECTRIC SHOCK
- HOT SURFACE
- DANGER OF FIRE
- CONTENTS
- SAFETY PRECAUTIONS
- DESCRIPTION OF THE DRYER
- CONTROL UNIT
- DRYING PROCESS, STEP BY STEP (1–6)
- TROUBLE-SHOOTING
- CAREFULLY READ THE INSTRUCTIONS FOR USE BEFORE USING THE DRYER
- AFTER INSTALLATION, THE DRYER SHOULD STAND STILL FOR TWO HOURS BEFORE IT IS CONNECTED TO THE POWER MAINS
- THE AIR IN THE ROOM WHERE THE DRYER IS INSTALLED MAY NOT CONTAIN INDUSTRIAL DUST PARTICLES
- WARNING! CHILD SAFETY
- DANGER OF HOT SURFACE
- THE BACK OF THE DRYER MAY GET VERY HOT DURING OPERATION. WAIT FOR THE DRYER TO COOL DOWN COMPLETELY BEFORE TOUCHING ITS BACKSIDE
- SAFETY
- BACK FRONT
- TECHNICAL DATA
- LINK TO THE EU EPREL DATABASE
- DECLARATION OF CONFORMITY
- INSTALLATION AND CONNECTION
- SELECTING THE ROOM
- DRYER PLACEMENT
- OPENING THE DRYER DOOR (TOP VIEW)
- ADJUSTING THE DRYER FEET
- DRAINING THE CONDENSATE
- CONNECTING TO THE POWER MAINS
- MOVING AND TRANSPORT AFTER INSTALLATION
- BEFORE USING THE APPLIANCE FOR THE FIRST TIME
- CONNECTING THE APPLIANCE TO THE CONNECTLIFE APPLICATION
- USEFUL TIPS FOR YOUR SMART DEVICE
- WHERE TO FIND THE QR CODE FOR THE DEVICES REQUIRED BY THE APP DURING THE INSTALLATION PROCESS
- HOW TO ENABLE WI-FI ON THE DEVICE
- HOW TO ENABLE REMOTE START OF THE APPLIANCE
- HOW TO ADD A USER
- HOW TO REMOVE THE USERS (UNPAIR)
- WHICH WI-FI ROUTER CAN BE USED
- DO YOU HAVE MORE QUESTIONS
- REMOTELY UPGRADING THE SOFTWARE
- DRYING PROCESS, STEP BY STEP (1-6)
- STEP 1: HEED THE LABELS ON THE LAUNDRY
- STEP 2: PREPARING FOR THE LAUNDRY DRYING PROCESS
- SWITCHING ON THE DRYER
- LOADING THE DRYER
- STEP 3: CHOOSING THE DRYING PROGRAMME
- REMOTE CONTROL OF YOUR DRYER USING THE APP
- STEP 4: SELECTING EXTRA FUNCTIONS
- SETTINGS USING A SINGLE BUTTON PRESS
- NATURE DRY (LOWER TEMPERATURE)
- SETTINGS USING A COMBINATION OF TWO BUTTONS PRESSED SIMULTANEOUSLY
- CHILD LOCK
- SOUND ON/OFF
- WI-FI MENU
- POSSIBLE SETTINGS (DEPENDING ON THE DURATION FOR WHICH THE KEYS (7+8) ARE HELD)
- STEP 5: STARTING THE DRYING PROGRAMME
- STEP 6: END OF THE DRYING PROGRAMME
- INTERRUPTIONS AND CHANGING THE PROGRAMME
- INTERRUPTIONS
- INTERRUPTING THE PROGRAMME PROCESS
- OPEN DOOR
- FULL CONDENSATE TANK
- POWER SUPPLY FAILURE
- CHANGING THE PROGRAM/FUNCTIONS
- ADDING LAUNDRY AFTER THE START OF THE PROGRAM
- SAVING PERSONAL SETTINGS
- PERSONAL SETTINGS MENU
- OVERVIEW OF THE NUMBER OF DRYING CYCLES PERFORMED
- CLEANING AND MAINTENANCE
- CLEANING THE DOOR NET FILTER IN THE DOOR
- CLEANING THE HEAT PUMP FILTER
- CLEANING OF THE HEAT EXCHANGER
- EMPTYING THE CONDENSATE TANK
- EMPTY THE
- CLEANING THE DRYER
- WHAT TO DO
- SOUNDS
- SERVICE
- BEFORE CALLING A SERVICE CENTER
- TIPS FOR DRYING AND ECONOMIC USE OF YOUR DRYER
- LOW STANDBY MODE
- TYPICAL CONSUMPTION TABLE
- LABEL
- PRODUCT INFORMATION SHEET
- DISPOSAL
- GORENJE
Brand : GORENJE
Model : D3NEP92GN
Category : Tumble dryer