
SC-VKX65 - Hi-Fi System PANASONIC - Free user manual and instructions
Find the device manual for free SC-VKX65 PANASONIC in PDF.


| Product Type | Hi-Fi System |
| Model | SC-VKX65 |
| Brand | Panasonic |
| Dimensions (W x H x D) | Approx. 200 x 300 x 350 mm |
| Weight | Approx. 5.0 kg |
| Power Consumption | 120 W (RMS) |
| Power Supply | AC 220-240 V, 50/60 Hz |
| Disc Playback | CD, CD-R/RW, MP3 |
| Radio Tuner | FM (87.5-108 MHz) / AM (530-1710 kHz) |
| USB Playback | Yes (USB 2.0, FAT16/32, up to 64 GB) |
| Bluetooth | Version 4.2, A2DP/AVRCP, range ~10 m |
| Audio Inputs | AUX (3.5 mm), USB-A |
| Speaker Configuration | 2-way bass reflex |
| Total RMS Output Power | 120 W (60 W per channel) |
| Preset Stations | 30 (FM) / 15 (AM) |
| Clock/Timer | Yes, with sleep timer |
| Remote Control | Included (IR) |
| Display | FL (Fluorescent) display |
| Cleaning Instructions | Wipe with a soft dry cloth; avoid liquids and solvents |
| Safety Features | Automatic shutdown after 30 min idle, laser safety (Class 1) |
| Spare Parts Availability | Contact Panasonic service center; remote, fuse, speakers available |
| Repairability Index | 7.5/10 (EU standard) |
Frequently Asked Questions - SC-VKX65 PANASONIC
User questions about SC-VKX65 PANASONIC
0 question about this device. Answer the ones you know or ask your own.
Ask a new question about this device
Download the instructions for your Hi-Fi System in PDF format for free! Find your manual SC-VKX65 - PANASONIC and take your electronic device back in hand. On this page are published all the documents necessary for the use of your device. SC-VKX65 by PANASONIC.
USER MANUAL SC-VKX65 PANASONIC
Operating Instructions
DVD Stereo System
Model No. SC-VKX65


dts®
2.0+Digital Out

DOLBY.
DIGITAL
Thank you for purchasing this product.
For optimum performance and safety, please read these instructions carefully.
Please keep this manual for future reference.
Your system and the illustrations can look differently.
Region code
This system plays DVD-Video marked with labels containing the region number or "ALL":
Region Number Example
Southeast Asia 3
The Middle East and South Africa 2


| System SC-VKX65 |
| Main unit SA-VKX65 |
| Speakers SB-AKX38 |

- If you see this symbol -
Information on Disposal in other Countries outside the European Union
This symbol is only valid in the European Union.
If you wish to discard this product, please contact your local authorities or dealer and ask for the correct method of disposal.
Safety precautions
WARNING!
Unit
- To reduce the risk of fire, electric shock or product damage,
- Do not expose this unit to rain, moisture, dripping or splashing.
- Do not place objects filled with liquids, such as vases, on this unit.
- Use only the recommended accessories.
- Do not remove covers.
- Do not repair this unit by yourself. Refer servicing to qualified service personnel.
- Do not let metal objects fall inside this unit.
CAUTION!
Unit
- To reduce the risk of fire, electric shock or product damage,
- Do not install or place this unit in a bookcase, built-in cabinet or in another confined space. Ensure this unit is well ventilated.
- Do not obstruct this unit's ventilation openings with newspapers, tablecloths, curtains, and similar items.
- Do not place sources of naked flames, such as lighted candles, on this unit.
- For South Africa
This unit is intended for use in moderate climates.
For others
This unit is intended for use in tropical climates.
- This unit may receive radio interference caused by mobile telephones during use. If such interference occurs, please increase separation between this unit and the mobile telephone.
- This unit utilizes a laser. Use of controls or adjustments or performance of procedures other than those specified herein may result in hazardous radiation exposure.
- Set the unit up on an even surface away from direct sunlight, high temperatures, high humidity, and excessive vibration.
AC mains lead
- The mains plug is the disconnecting device. Install this unit so that the mains plug can be unplugged from the socket outlet immediately.
Battery
- Danger of explosion if battery is incorrectly replaced. Replace only with the type recommended by the manufacturer.
- When disposing of the batteries, please contact your local authorities or dealer and ask for the correct method of disposal.
- Do not heat or expose to flame.
- Do not leave the battery(ies) in a car exposed to direct sunlight for a long period of time with doors and windows closed.
- Do not break open or short-circuit the battery.
- Do not charge the alkaline or manganese battery.
- Do not use the battery if the cover has peeled off.
- Remove the battery if you do not use the remote control for a long period of time. Keep in a cool, dark area.
Licenses
| Manufactured under license from Dolby Laboratories.Dolby and the double-D symbol are trademarks ofDolby Laboratories. |
| For DTS patents, see http://patents.dts.com.Manufactured under license from DTS Licensing Limited.DTS, the Symbol, & DTS and the Symbol together are registered trademarks, and DTS 2.0+Digital Out is a trademark of DTS, Inc.© DTS, Inc. All Rights Reserved. |
| HDMI, the HDMI Logo, and High-Definition Multimedia Interface are trademarks or registered trademarks of HDMI Licensing LLC in the United States and other countries. |
| “DVD Logo” is a trademark of DVD Format/Logo Licensing Corporation. |
| This item incorporates copy protection technology that is protected by U.S. patents and other intellectual property rights of Rovi Corporation. Reverse engineering and disassembly are prohibited. |
| The Bluetooth® word mark and logos are registered trademarks owned by Bluetooth SIG, Inc. and any use of such marks by Panasonic Corporation is under license. Other trademarks and trade names are those of their respective owners. |
| Google Play and Android are trademarks of Google Inc. |
| MPEG Layer-3 audio coding technology licensed from Fraunhofer IIS and Thomson. |
Table of Contents
Safety precautions.... 2
Licenses 3
Note on AC mains lead 4
Maintenance....4
About Bluetooth® 4
Supplied accessories 5
Preparing the remote control 5
Placement of speakers 5
Making the connections 6
Overview of controls 8
Easy Setup 10
Preparing the media 10
Media playback 11
Using the navigation menus 13
Using on-screen menus 14
Radio 16
Recording....17
Sound and illumination effects 19
Clock and timers 20
Using microphones 21
External equipment 22
Others....22
Changing system settings 23
Playable media 25
Language code list 26
Troubleshooting....27
Specifications 30
Note on AC mains lead
(For the AC mains plug of three pins)
Before use
Remove the connector cover.
How to replace the fuse
The location of the fuse differs according to the type of AC mains plug (figures A and B). Confirm the AC mains plug fitted and follow the instructions below. Illustrations may differ from actual AC mains plug.
- Open the fuse cover with a screwdriver.

- Replace the fuse and close or attach the fuse cover.

Maintenance
To clean this system, wipe with a soft, dry cloth.
- Never use alcohol, paint thinner or benzine to clean this system.
- Before using chemically treated cloth, read the instructions that came with the cloth carefully.
About Bluetooth®
Panasonic bears no responsibility for data and/or information that can possibly be compromised during a wireless transmission.
Frequency band
- This system uses the 2.4 GHz frequency band.
Certification
- This system conforms to the frequency restrictions and has received certification based on frequency laws. Thus, a wireless permit is not necessary.
- The actions below are punishable by law:
- Taking apart or modifying the main unit.
- Removing specification indications.
Restrictions of use
- Wireless transmission and/or usage with all Bluetooth® equipped devices is not guaranteed.
- All devices must conform to standards set by Bluetooth SIG, Inc.
- Depending on the specifications and settings of a device, it can fail to connect or some operations can be different.
- This system supports Bluetooth® security features. But depending on the operating environment and/or settings, this security is possibly not sufficient. Transmit data wirelessly to this system with caution.
- This system cannot transmit data to a Bluetooth® device.
Range of use
- Use this device at a maximum range of 10 m.
- The range can decrease depending on the environment, obstacles or interference.
Interference from other devices
- This system may not function properly and troubles such as noise and sound jumps may arise due to radio wave interference if this unit is located too close to other Bluetooth® devices or the devices that use the 2.4 GHz band.
- This system may not function properly if radio waves from a nearby broadcasting station, etc. is too strong.
Intended usage
- This system is for normal, general use only.
- Do not use this system near an equipment or in an environment that is sensitive to radio frequency interference (example: airports, hospitals, laboratories, etc.).
For United Arab Emirates only
UAE-TRA
REGISTERED No:
ER34195/14
DEALER No:
DA0052708/10
Supplied accessories
Check and identify the supplied accessories.
For Southeast Asia
2 AC mains leads
For the Middle East and South Africa
2 AC mains leads
For Saudi Arabia

□ 1 AM loop antenna □ 1 FM indoor antenna

□ 1 Video cable □ 1 HDMI cable □ 1 Remote control
(N2QAYB000998)
□ 1 Remote control battery
Preparing the remote control

Use alkaline or manganese battery.
Install the battery so that the poles (+ and −) align with those in the remote control.
Placement of speakers

The left and right speakers are the same.
You cannot remove the net of the speakers.
Use only the supplied speakers.
You can cause damage to the system and decrease the sound quality if you use other speakers.
Note:
- Keep your speakers more than 10 mm from the main unit for ventilation.
- Put the speakers on a flat safe surface.
- These speakers do not have magnetic shielding. Do not put them near TVs, PCs or other equipment easily influenced by magnetism.
- When you play at high levels for a long period, it can cause damage to the speakers and decrease the life of the speakers.
- Decrease the volume in these conditions to prevent damage:
- When the sound is distorted.
- When you adjust the sound quality.
Irregular colour on your TV
The setup condition of the speakers can cause unwanted effects to the picture of the TV.
If this occurs, switch off the TV for 30 minutes.
If the demagnetising of the TV does not correct the problem, increase the distance between the speakers and the TV.
CAUTION!
- Use the speakers only with the recommended system. If not, you can cause damage to the amplifier and speakers and can cause a fire. Consult an approved service personnel if damage occurs or if there is a sudden apparent change in performance.
- Do the procedures included in these instructions when you attach the speakers.
Making the connections
Connect the AC mains lead only after all the other connections have been made.

2 Connect the FM indoor antenna.
Put the antenna where reception is best.

3 Connect the speakers.
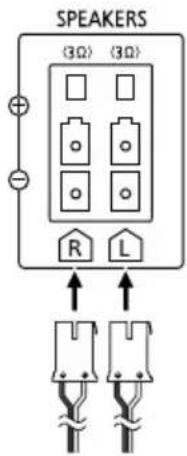
1 Connect the AM loop antenna.
Stand the antenna up on its base until it clicks.
![graph TD A["Device Insert"] --> B["Switch"] B --> C["AM ANT LOOP"] C --> D["Computer Ship"] D --> E["Computer"]](/content/2026/06/1379078/images/364b3d4bfd8a83b3282af1a46f7f19ff5b5aaf9dada85ab81a41ca4ee469bc6f.jpg)
4 Connect the TV to this system.
Connect either HDMI cable or video cable to this system.
HDMI terminal

This connection provides the best picture quality.
- Set "VIDEO PRIORITY" to "ON" (→ 24, "HDMI" menu).
- Set "VIDEO FORMAT" in Menu 4 (HDMI) (→ 16).
Note:
- Use the supplied HDMI cables.
- If you use an optional HDMI cable, use High Speed HDMI Cables. Non-HDMI compliant cables cannot be utilised.
- It is recommended that you use Panasonic HDMI cable. When outputting 1080p signal, use HDMI cables 5.0 m or less.
- For TV with more than one HDMI terminal, refer to the TV's operating instructions for the connection.
VIDEO OUT terminal

Note:
Do not make the video connections through the VCR.
The video cannot show correctly because of copy-guard protection.
Alternative connection to a TV
To listen to the TV audio on this system, connect the audio cable to this system.
AUX 1 terminal
![graph TD A["AUX IN 1"] -->|Audio cable (not supplied)| B["TV (not supplied)"] B --> C["AUDIO OUT"] C --> D["R"] C --> E["L"] A --> F["L"] A --> G["R"]](/content/2026/06/1379078/images/f3943d23a6bdbb6e13f6b716b02faa6ba18b860a65275e28194f40bbb84ae374.jpg)
5 Connect the AC mains lead.
(For the AC mains plug of three pins) READ THE "Note on AC mains lead" BEFORE CONNECTION.
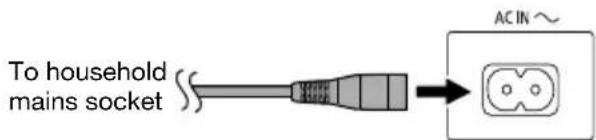
Do not use an AC mains lead from other equipment.
Conserving power
The system consumes a small amount of power even when it is in standby mode. Disconnect the power supply if you do not use the system.
Some settings will be lost after you disconnect the system. You have to set them again.
Overview of controls
Do the procedures with the remote control. You can also use the buttons on the main unit if they are the same.


①Standby/on switch [ ↓], [↓/↑] (→ 10, 30) Press to switch the unit from on to standby mode or vice versa. In standby mode, the unit is still consuming a small amount of power.
②Numeric buttons To set a 2-digit number Example: 16: [≥10] → [1] → [6]
③Cancel an item ( → 12) Delete the programmed tracks ( → 12)
④Select the source On the main unit: To start Bluetooth® pairing, press and hold [✗/USB, -PAIRING] when you are in Bluetooth® source.
⑤Basic playback control ( → 11) ⑥Select the sound effects ( → 19)
⑦Repeat playback ( → 12)
⑧Show the disc top menu ( → 13) Show the program list ( → 14)
⑨View the information shown on the display panel (→ 11) Decrease the brightness of the display panel (→ 28) Press and hold the button to use this function. To cancel, press and hold the button again. On the main unit: Press [DIMMER] to use this function.
⑩Record content to a USB device ( → 17, 18)
⑪ Set the sleep timer ( → 20) Automatically switch off the system The auto off function switches off the system if you do not use the system for approximately 20 minutes (except when you are in radio source or when a Bluetooth® device is connected). Press and hold the button to use this function. To cancel, press and hold the button again.
⑫Operate a Panasonic TV (compatible models only) Point the remote control to a Panasonic TV: [↓]: Switch on or switch off the TV [AV]: Change the video input mode of the TV [+/-, VOL]: Adjust the volume of the TV
⑬ Adjust the volume level of the system
⑭Mute the sound To cancel, press the button again. "MUTE" is also cancelled when you adjust the volume or when you switch off the system.
⑮Set the play mode item ( → 11, 12, 16, 22) ⑯Show the on-screen menu ( → 14) ⑰Show the disc menu or playlist ( → 14)
⑱Select or confirm menu items View frame-by-frame (→ 11) Browse albums on USB A-AUDIO and USB B-AUDIO source Press [▲, ▼] to browse.
⑲Go back to the previous screen ( → 12, 23)
② Change the system settings (→ 10, 23) Set the edit mode for USB B (→ 18)
②1 Set the clock and timer (→ 20)
② Remote control sensor Distance: Within approximately 7 m Angle: Approximately 20° up and down, 30° left and right
②3 Select the Karaoke mode (→ 21)
②4 Select the DJ Jukebox (→ 19)
⑲ USB A USB port () USB status indicator Play MP3 tracks, Xvid and JPEG. Record MP3 tracks to USB B.
②6 USB B USB port (●) USB status indicator Record sound or music tracks. Play MP3 tracks, Xvid and JPEG.
②7 Microphone jacks (→ 21)
⑳ Display panel
⑲ Select the Karaoke sound effect (→ 21)
③0 Select MP3 album or track Press [ALBUM/TRACK] to select album or track. Browse tracks or albums Turn [CONTROL] to browse. To start playback from the selection, press [▶/II]. Illumination Turn [ILLUMINATION] to select the setting.
③1 Open or close the disc tray (→ 10)
③2 AUX IN 2 jack (→ 22)
③3 Disc tray
③4 Adjust the volume of the microphone
Easy Setup
The EASY SETUP screen assists you in making basic settings.
Preparation
Switch on your TV and change its video input mode (example: HDMI, AV 1, etc.).
1 Press [↓] to switch on the system. If the EASY SETUP screen appears, skip steps 2 to 6. 2 Press [DVD/CD]. 3 Press [SETUP] to show the SETUP menu. 4 Press [▲, ▼] to select "OTHERS" and then press [OK].

5 Press [▲, ▼] to select "EASY SETUP" and then press [OK].
6 Press [OK] to select "SET".
7 Press [▲, ▼] to select "YES" and then press [OK].
8 Follow the messages and make the settings with [▲, ▼, ◀, ▶] and then press [OK].
Language: Select the language for the on-screen messages.
TV aspect: Select the aspect ratio that suits your TV.
9 Press [OK] to finish EASY SETUP. Press [SETUP] to close the screen.
Note:
Settings in the EASY SETUP can also be changed in the system settings (→ 23, "Changing system settings").
Preparing the media
Disc
1 Press [▲ OPEN/CLOSE] on the main unit to open the disc tray. Put in a disc with the label facing up.
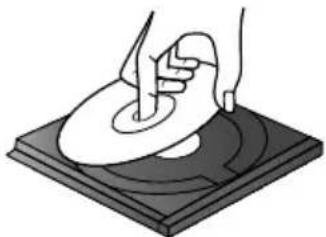
2 Press [DVD/CD].
USB
Preparation
Before you connect a USB device to the system, make sure you do a backup of the data.

1 Decrease the volume and connect the USB device to the USB port. Hold the main unit when connecting or disconnecting the USB device.
2 Press [USB] to select "USB A-AUDIO", "USB A-VIDEO", "USB B-AUDIO" or "USB B-VIDEO". USB status indicator lights up in red when selected.
Note:
- Do not use a USB extension cable. The system cannot recognise USB device connected through a cable.
- USB A-AUDIO and USB B-AUDIO source support MP3 format only.
- USB A-VIDEO and USB B-VIDEO source support JPEG and Xvid formats only.
Bluetooth®
You can connect and play an audio device wirelessly through Bluetooth®.
Preparation
- Switch on the Bluetooth® feature of the device and put the device near the system.
- Read the operating instructions of the device for details.

Pairing a device
Preparation
If this system is connected to a Bluetooth® device, disconnect it (see “Disconnecting a device” below).
1 Press [✗, USB] (main unit: [✗/USB, -PAIRING]) to select "BLUETOOTH".
If "PAIRING" is shown, continue with step 4.
2 Press [PLAY MODE] to select "PAIRING".
Or press and hold [*/USB, -PAIRING] on the main unit until "PAIRING" is shown. Continue with step 4.
3 Press [◀, ▶] to select "OK? YES" and then press [OK].
4 Select "SC-VKX65" from the Bluetooth® menu of the device.
If prompted for a passkey, input "0000".
The device connects with this system automatically after pairing is complete.
The name of the connected device is shown for a few seconds.
Note:
You can pair up to 8 devices with this system. If a 9th device is paired, the device that has not been used for the longest time will be replaced.

Connecting a device
Preparation
If this system is connected to a Bluetooth® device, disconnect it (→ below, “Disconnecting a device”).
1 Press [✗, USB] (main unit: [✗/USB, -PAIRING]) to select "BLUETOOTH".
"BLUETOOTH READY" is shown.
2 Select "SC-VKX65" from the Bluetooth ® menu of the device.
The name of the connected device is shown for a few seconds.
3 Start playback on the device.
Note:
- A device must be paired to connect.
- The system can only connect to one device at a time.
- When “BLUETOOTH” is selected as the source, this system will automatically try to connect to the last connected device. (“LINKING” is shown during this process.)
- Press [FL DISPLAY] repeatedly to view the name and profile of the connected device.

Disconnecting a device
1 Press [✗, USB] (main unit: [✗/USB, -PAIRING]) to select "BLUETOOTH". 2 Press [PLAY MODE] repeatedly to select "DISCONNECT?". 3 Press [◀, ▶] to select "OK? YES" and then press [OK].
"BLUETOOTH READY" is shown.
To cancel, select "OK? NO".
Using the main unit
Press and hold [*/USB, -PAIRING] until "PAIRING" is shown.
Note:
A device is disconnected when you:
- Select a different source.
- Move the device out of the maximum range.
- Disable the Bluetooth® transmission of the device.
- Switch off the system or the device.
Media playback
(→ 25, " playable media")
Basic playback
Preparation
To view the picture, switch on your TV and change its video input mode (e.g., HDMI, AV 1, etc.).
| Play | Press [▶/■]. |
| Stop | Press [■] during playback.The position is memorised.“RESUME STOP” shows on the screen.Press again to stop fully. |
| Pause | Press [▶/■] during playback.Press again to continue playback. |
| Skip track or content | Press [I◀◀] or [▶▶] (main unit:[I◀◀/◀◀] or [▶▶/▶▶]). |
| Search (during playback)Slow-motion (during pause) | Press [◀◀] or [▶▶].OrPress and hold [I◀◀/◀◀] or [▶▶/▶▶] on the main unit.• Up to 5 speeds.• Press [▶/■] to continue normal playback. |
| View frame-by-frame (during pause) | DVD-VPress [◀■] or [■▶] to go to the previous or next frame.DVD-VR VCDPress [■▶] to go to the next frame. |
| View information | DVD-VR DVD-V MP3 XvidJPEGPress [FL DISPLAY] to show available information on the display panel. |
Note:
- For Bluetooth®, only Play, Stop, Pause, Skip, and Search can be selected.
- Depending on the type of media, some operations are restricted.
Repeat playback
This works only when the elapsed play time can be shown. It also works with all JPEG contents.
During playback
Press [REPEAT] to select the item to play again.
Example: DVD-V

To cancel, select "COFF".
Note:
Depending on the type of media and playback mode, the display shows different items.
Link mode
(For Bluetooth® source)
You can change the link mode to suit the connection type.
Preparation
If this system is connected to a Bluetooth® device, disconnect it (→ 11, “Disconnecting a device”).
1 Press [PLAY MODE] to select "LINK MODE".
2 Press [◀, ▶] to select the setting and then press [OK].
MODE 1 Emphasis on connectivity.
MODE 2 (default) Emphasis on sound quality.
Play mode
While stopped
Press [PLAY MODE] to select the playback mode.
(For USB A-AUDIO and USB B-AUDIO source)
| 1-TRACK1-TR | Play one selected track.Press the numeric buttons to select the track. |
| 1-ALBUM1-ALB | Play one selected MP3 album.Press [▲,▼] to select the MP3 album. |
| PROGRAMPGM | Play programmed tracks.1. Press [▲,▼] to select the album.2. Press [▶▶I] and then press the numeric buttons to select the track.3. Press [OK]. |
| RANDOMRND | Play all tracks randomly. |
| 1-ALBUMRANDOM1-ALB RND | Play all tracks in one selected MP3 album randomly.Press [▲,▼] to select the MP3 album. |
(For DVD/CD, USB A-VIDEO and USB B-VIDEO source)
![graph TD A["Program"] --> B["Random"] B --> C["Close program and random screens"] C --> A](/content/2026/06/1379078/images/eaa1c37d48d8b159e912dcf75ee7c1df85f8830df501a3415ac29c7e7cd48dd0.jpg)
Note:
- During random playback, you cannot skip to tracks which have been played.
- The setting is cancelled when you open the disc tray.
(→ 24, "OTHERS" menu) to play MP3, JPEG or Xvid contents.
- If "PLAYBACK MENU" screen appears, refer to "Using playback menu" (→ 13).
- For a disc with MP3 and JPEG contents, select music or picture contents.
MP3: Select "MUSIC PROGRAM" or "MUSIC RANDOM". JPEG: Select "PICTURE PROGRAM" or "PICTURE RANDOM".
- SVDV items cannot be played even if you have programmed them.
Program playback (maximum 30 items)
1 Press [▲, ▼] to select an item and then press [OK].
Example: DVD-V

- Do this step again to program other items.
- To go back to the previous menu, press [→, RETURN].
2 Press [▶/Ⅲ] to start playback.
To select all the items
Press [▲, ▼] to select "ALL" and then press [OK].
To clear the selected program
- Press [▶] and then press [▲, ▼] to select the program.
- Press [CANCEL DEL].
To clear the whole program
Press [▶] to select "CLEAR ALL" and then press [OK].
Note:
The whole program is also cleared when you:
- Open the disc tray.
- Switch off the system.
- Select another source.

Random playback
1 Press [▲, ▼] to select a group or title. 2 Press [OK] to put “*” on your selection.
Example: DVD-V
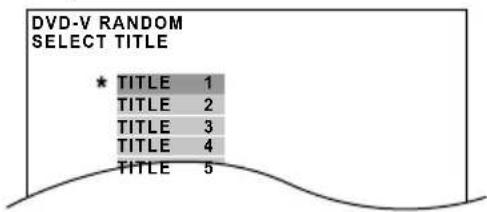
To cancel a selection, press [OK] again.
3 Press [▶/II] to start playback.
Using the navigation menus
Using playback menu

Playing data discs
MP3 JPEG Xvid
DVD-VR Select "DATA" in "DVD-VR/DATA"
(→ 24, "OTHERS" menu) to play MP3, JPEG or Xvid contents.
"PLAYBACK MENU" shows when the disc contains video (Xvid) and other formats (MP3/JPEG).
1 Press [▲, ▼] to select "AUDIO/PICTURE" or "VIDEO" and then press [OK].

2 Press [▶/Ⅲ] to start playback.

Playing USB
JPEG Xvid
"PLAYBACK MENU" shows when you select "USB A-VIDEO" or "USB B-VIDEO".
1 Press [▲, ▼] to select "PICTURE" or "VIDEO" and then press [OK].

2 Press [▶/II] to start playback.
Playing from the selected item
While the "DATA-DISC" screen is shown
Group/Album (Folder)

Content/Track (File)


1 Press [▲, ▼] to select an item. Press [◀, ▶] to skip page by page.
2 Press [OK] to start playback. Playback starts from the item you select to the last item in the group or album.
To close the screen, press [MENU].
JPEG
Selecting picture in thumbnail menu
While the display shows a picture
1 Press [TOP MENU].
2 Press [▲, ▼, ◀, ▶] to select a picture and then press [OK]. Press [▶▶] or [◀◀] to skip page by page.
To select a picture in other groups
- Press [▲] to select the group name.
- Press [◀, ▶] to select the group and then press [OK].
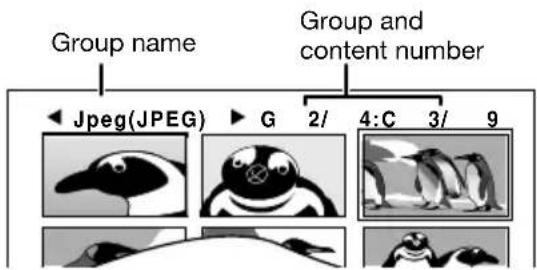
To close the screen, press [MENU].
Playing DVD-R/-RW (DVD-VR) discs
DVD-VR
- Display shows the title only if a title is given during recording.
- You cannot edit programs, playlists and disc titles.
Playing the programs
While stopped
1 Press [DIRECT NAVIGATOR]. 2 Press [▲, ▼] to select the program and then press [OK]. Press [◀, ▶] to skip page by page.

To close the screen, press [DIRECT NAVIGATOR].
Playing the playlist
This works only when the disc contains a playlist.
While stopped
1 Press [PLAYLIST]. 2 Press [▲, ▼] to select the playlist and then press [OK]. Press [◀, ▶] to skip page by page.

To close the screen, press [PLAYLIST].
Using on-screen menus
1 Press [FUNCTIONS] to show the on-screen menu.
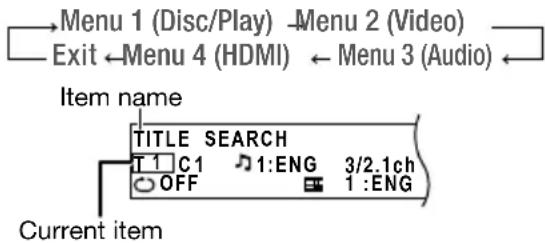
2 Press [▲, ▼, ◀, ▶] to select an item and then press [OK].
Example: Menu 1 (Disc/Play) DVD-V

3 Press [▲, ▼] to make the settings and then press [OK]. To close the screen, press [▶RETURN].
The type of disc and the disc format can cause some items to not show or work.
Menu 1 (Disc/Play)
TRACK SEARCH, TITLE SEARCH, CONTENT SEARCH, CHAPTER SEARCH, PG SEARCH (program search), PL SEARCH (playlist search)
Start playback from a specified item
VCD This function does not work when you play a disc with the playback control (PBC) function.
Example: DVD-V : T2 C5
To select numbers for data disc
Example: 12: [≥10] → [1] → [2] → [OK]

DVD-V Xvid
(with multiple soundtrack)
Select audio soundtrack
DVD-V
Change the audio mode (when using Karaoke formatted source)
Solo disc
OFF: Vocals off
ON: Vocals on
Duet disc
OFF: Vocals off
V1+V2: Vocal 1 and 2
V1: Vocal 1
V2: Vocal 2
DVD-VR VCD
Select "L", "R", "L+R" or "L R"
Signal type/data
LPCM/PPCM/□□D/DTS/MP3/MPEG:
Signal type kHz (sampling frequency)/bit/ch (number of channels)
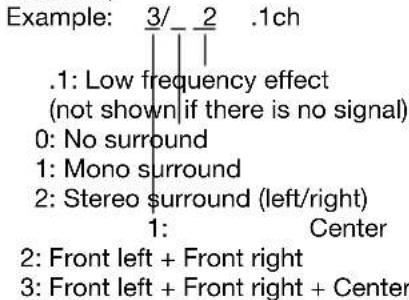
Xvid It can be a while before playback starts if you change the audio of a Xvid disc.

PLAY SPEED
DVD-VR DVD-V
Change play speed
- from "x0.6" to "x1.4" (in 0.1-unit step)
- Press [▶/III] two times to continue normal playback. • After you change the speed:
- Audio output will switch to 2-channel stereo.
- Sampling frequency of 96 kHz is converted to 48 kHz.

REPEAT MODE
(→ 12, "Repeat playback")
A-B Repeat: Repeat a specified section
Except JPEG X(sill picturepart) (SVCD only)
VCD
Press [OK] at the start and end points.
- To cancel, select "OFF".

SUBTITLE
DVD-V (with multiple subtitles) VSDCD only)
Select subtitle language
- For +R/+RW disc, a number display will replace the subtitles that cannot be shown.
DVD-VR (with subtitle on or off information)
ON ↔ OFF

ANGLE
DVD-V (with multiple angles) Select a video angle

DATE DISPLAY
JPEG
Show the date of a picture ON <> OFF

ROTATION
JPEG
Rotate a picture (during pause)
0 ↔ 90 ↔ 180 ↔ 270

Men(Video)

PICTURE MODE
NORMAL: Normal images.
CINEMA1: Mellows images and enhances details in dark scenes.
CINEMA2: Sharpens images and enhances details in dark scenes.
DYNAMIC: Enhances the contrast for powerful images.
ANIMATION: Suitable for animation.

ZOOM
Select zoom sizes
NORMAL, AUTO (DVD-VR DVD-V VCB2 Xvid x4
JPEG (during pause)

TRANSFER MODE
Select the method of conversion for video output accordingly
When playing PAL discs
AUTO: Converts the film and video automatically.
VIDEO: Select when the content is distorted in the "AUTO" mode.
FILM: Select when the edges of the film content are jagged or rough in the "AUTO" mode.
But, if the video content is distorted (as illustrated on the right), then select "AUTO".

When playing NTSC discs
AUTO1: Converts the film and video automatically.
AUTO2: Select to automatically sense the differences in the frame rates of the film content and converts it accordingly.
VIDEO: Select when the video content is distorted in the "AUTO1" or "AUTO2" mode.

SOURCE SELECT
Xvid
AUTO: Converts the Xvid content automatically.
INTERLACE: Select if the Xvid content was encoded in interlace format.
PROGRESSIVE: Select if the Xvid content was encoded in progressive format.

Menu 3 (Audio)

DIALOGUE ENHANCER
Make the dialogue in films easier to hear
DVD-V (Dolby Digital, DTS, 3-channel or higher, with the dialogue recorded in the center channel)
Xvid (Dolby Digital, 3-channel or higher, with the dialogue recorded in the center channel)
ON <> OFF

Menu 4 (HDMI)
HDMI HDMI STATUS
To show HDMI information
Example:

① Connection status
② Shows the output signal type.
(When "OFF" is selected in "AUDIO OUT"
(→ 24, "HDMI" menu), "---" will be shown.)
③ Shows the number of audio channels.
④ (→ below, "VIDEO FORMAT")
⑤ (→ below, "COLOUR SPACE")

HD ENHANCER
This works when the HDMI connection is being used with “VIDEO PRIORITY” (→ 24, “HDMI” menu) set to “ON”.
To sharpen the "720p", "1080i" and "1080p" picture quality
OFF, 1 (weakest) to 3 (strongest)

VIDEO FORMAT
This works when the HDMI connection is being used with "VIDEO PRIORITY" (→ 24, "HDMI" menu) set to "ON".
To select suitable picture quality with your TV (Video recordings will be converted to, and output as, high-definition video.)
* 480p/576p/720p/1080p (progressive)
* 480i/576i/1080i* (interlaced)
* The numbers shown depend on the disc being played. One of the above numbers is shown.
- If the picture is distorted, press [CANCEL DEL] until the picture is shown correctly. (The output will return to "480p"/"576p".)

COLOUR SPACE
This works when the HDMI connection is being used with "VIDEO PRIORITY" (→ 24, "HDMI" menu) set to "ON".
To select suitable picture colour with your TV
YCbCr 4:2:2
YCbCr 4:4:4
RGB
- An "*" mark will appear if compatible with your TV.
- If the picture colour is distorted, press [CANCEL DEL] until the picture colour is shown correctly.
Radio
Preparation
Press [RADIO/AUX] to select "FM" or "AM".
Manual tuning
Press [◀◀] or [▶▶] to tune in to the station.
To tune automatically, press and hold the button until the frequency starts changing quickly.
"ST" is shown when a stereo broadcast is being received.
Using the main unit
1 Press [TUNE MODE] to select "MANUAL".
2 Press [|◀◀/◀◀] or [▶▶/▶▶] to tune in to the station.
Improving the sound quality
When "FM" is selected
1 Press [PLAY MODE] to select "FM MODE". 2 Press [◀, ▶] to select "MONO" and then press [OK].
To cancel, select "STEREO".
"MONO" is also cancelled when you change the frequency.
Memory presetting
You can preset up to 30 FM and 15 AM stations.

Automatic presetting
1 Press [PLAY MODE] repeatedly to select "A.PRESET". 2 Press [◀, ▶] to select "LOWEST" or "CURRENT".
LOWEST: Tuning begins from the lowest frequency.
CURRENT: Tuning begins from the current frequency.
3 Press [OK] to start presetting.
The tuner presets all the stations it can receive into the channels in ascending order.
To cancel, press [■].
Manual presetting
1 Press [◀◀] or [▶▶] (main unit: [▶▶/▶▶▶] or [▶◀◀/◀◀]) to tune in to the station and then press [OK]. "PGM" is shown.
2 Press the numeric buttons to select a preset number.
The new station replaces any station that occupies the same preset number.
Do steps 1 and 2 again to preset more stations.
Selecting a preset station
Press the numeric buttons, [◀◀] or [▶▶] to select the preset station.
Using the main unit
1 Press [TUNE MODE] to select "PRESET".
2 Press [◀◀/◀◀] or [▶▶/▶▶] to select the preset station.
AM allocation setting
By main unit only
This system can also receive AM broadcasts allocated in 10 kHz steps.
1 Press [RADIO/AUX] to select "FM" or "AM".
2 Press and hold [RADIO/AUX].
After a few seconds, the display panel shows the current minimum radio frequency. Release the button when the minimum frequency changes.
- To go back to the initial setting, do the above steps again.
- After you change the setting, preset frequencies are erased.
Recording
This system can record up to the followings depending on the available storage capacity of the USB device in USB B and the mode selected:
- MP3 disc and CD-DA to USB B - 255 folders or a total of 4000 tracks.
- USB A-AUDIO and others to USB B - 800 folders (maximum 999 tracks in an album) or a total of 8000 tracks.
To check storage space
In the stop mode (except for DVD/CD, USB A-VIDEO and USB B-VIDEO), press [FL DISPLAY].
- "UPDATE" is shown when the system is reading the device.
- "NODEVICE" is shown if there is no USB device connected to USB B.
Panasonic cannot be held responsible for the action of the consumer to record copyrighted contents which can cause copyright infringement.
Note:
- All recordings are in ".mp3" format.
- You cannot do recording when you are using random playback mode.
- You cannot do recording when DJ jukebox is switched on.
- Repeat playback mode is off during recording.
- A new album is added each time you do a recording.
- The sequence of albums may change after the recording.
- The recordings are kept in a folder named "REC_DATA" in the USB device.
- USB status indicator blinks in red during USB recording.
Basic recording
1 Select the source you want to record. CD-DA
Prepare the disc playback mode (→ 12, “Play mode”)
Make sure the disc is stopped.
Radio
Tune in to the radio station.
External equipment
Connect and play the equipment
(→ 22, "External equipment").
2 Press [USB REC ●/II] to start recording.
The name of the folder that keeps the recording is shown.
| Stop recording | Press [■]. “WRITING” is shown. |
| Pause recording | Press [USB REC ●/■] during recording. Press again to continue recording.Note:You can pause during recording from radio, AUX 1 or AUX 2 (except in SYNCHRO mode). A track mark is added every time you pause (→ 18, “Adding track marks”). |
Note:
- Wait for a few seconds for the system to prepare the USB device before recording starts.
- When the next track of the CD-DA disc is being recorded, it will be shown on the display.
Recording MP3 tracks
Recording from MP3 disc
1 Put in the disc. 2 Press [▲, ▼] to select the album and then press [OK]. 3 Press [USB REC ●/II] to start recording. Example: Recording an album from MP3 disc.
Recording progress in percentage of all contents in the group


Recording from USB A-AUDIO
1 Prepare the source you want to record. You can also use playmode function to record specified files (→ 12, "Play mode"). 2 Press [USB REC ●/II] to start recording. Example: Recording an album from the USB device.

| Stop recording | Press [■]. Recording stops at the last fully recorded track in the album. For example, if you stop recording during the fourth track, only the first three tracks are recorded.“NO FILE RECORDED” is shown if no track is recorded. |
Note:
- Some tracks can use a longer time to record.
- Some tracks cannot be recorded because of the condition of the source.
- When recording from MP3 disc, the recorded file name will be different from the original file.
- When recording from USB A-AUDIO, the recorded file name will be the same as the original file (maximum 32 characters).
Adding track marks
When recording from radio or external equipment, you can divide tracks using various modes.
Before recording
Press [EDIT MODE] to select the setting.
| MANUAL Add a track mark manually. Press [OK] during recording to add a track mark. | |
| SYNCHRO(For AUX 1 or AUX 2 source) | Recording starts automatically when the other equipment starts to play. Recording pauses when it detects silence for 3 seconds. |
| TIME MARK A track is automatically divided at 5-minute intervals. | |
Note:
- During recording, if you press [OK] or pause recording while using "TIME MARK" mode, the 5-minute counter is reset.
- You cannot add track marks manually in "SYNCHRO" mode.
Deleting recorded tracks
1 Press [✗, USB] (main unit: [✗/USB, -PAIRING]) to select "USB B-AUDIO". 2 Press [▲, ▼] to select album. 3 Press [|◀◀] or [▶▶|] to select the track. 4 Press [EDIT MODE] to select the mode.
TRK DEL Delete a single track.
ALB DEL Delete one album (maximum 999 tracks).
FORMAT Format the USB device.
5 Press [OK].
The selected item to be deleted is shown.
6 Press [OK].
"SURE? NO" is shown.
7 Press [◀, ▶] to select "YES" and then press [OK]. "WRITING" is shown.
To cancel, select "NO".
Sound and illumination effects
Sound effects
1 Press [SOUND] to select the sound effect. 2 Press [◀, ▶] to select the setting and then press [OK].
| PRESET EQ Select the desired preset EQ setting.Using the main unitPress [LOCAL PRESET EQ]. | |
| BASS -4 to +4 | |
| MID | Using the main unit1. Press [MANUAL EQ] to select “BASS”, “MID” or “TREBLE”.2. Press [I◄◄/◄◄] or [►►/►►] to adjust the level. |
| TREBLE | |
| SURROUND “ON SURROUND” or “OFF SURROUND” (default) | |
| INPUT LEVEL(For AUX 2 source) | “NORMAL” (default) or “HIGH”Note:Select “NORMAL” if the sound is distorted during “HIGH” input level. |
| D.BASS | “D.BASS ON” (default) or “D.BASS OFF”Using the main unitPress [D.BASS]. |
Illumination effects
By main unit only
You can change the illumination colour on this system.
Turn [ILLUMINATION].
To cancel, select "OFF".
DJ jukebox
(For USB A-AUDIO and USB B-AUDIO source)
You can use DJ jukebox to add cross-fading effect between songs. You can also use additional features with the “Panasonic MAX Juke” app ( → below).
By main unit only
1 Press [DJ JUKEBOX] to select the setting.
OFF CROSSFADE Cancel cross-fading.
ON CROSSFADE Add cross-fading.
OFF Switch off DJ jukebox.
2 During stop mode, turn [CONTROL] to select the repeat setting.
RANDOM REPEAT: Play all tracks randomly and repeat all tracks.
ALL TITLE REPEAT: Repeat all tracks.
Note:
The DJ jukebox effect is canceled when you switch off the system or change to another source.
Using the "Panasonic MAX Juke" app
You can download and install the free Android™ app "Panasonic MAX Juke" from Google Play™ for additional features, such as requesting song playback from multiple devices simultaneously.
Clock and timers
Setting the clock
This is a 24-hour clock.
1. Press [CLOCK/TIMER] to select "CLOCK".
2. Press [▲, ▼] to set the time, then press [OK].
To check the time, press [CLOCK/TIMER].
Note: Reset the clock regularly to maintain accuracy.
Sleep timer
The sleep timer switches off the system after the set time.
Press [SLEEP] to select the setting (in minutes). To cancel, select "OFF".
![graph LR A["SLEEP 30"] --> B["SLEEP 60"] B --> C["SLEEP 90"] C --> D["SLEEP120"] D --> E["OFF"]](/content/2026/06/1379078/images/d42925470784e540ca521e29fbc83cc76cb9044e3c5a1b97f2ede8675049c840.jpg)
To check the remaining time, press [SLEEP].
Note:
- The play timer and sleep timer, or the record timer and sleep timer, can be used together.
- The sleep timer always comes first. Be sure not to set an overlap of timers.
Play and record timer
(Except for Bluetooth® source)
You can set the timer to come on at a certain time to:
- Wake you up (play timer).
- Record from the radio or external equipment (record timer).
Play timer and record timer cannot be used together.
Preparation
Set the clock.
1 Press [CLOCK/TIMER] to select "⊕PLAY" or "⊕REC". 2 Press [▲, ▼] to set the start time. 3 Press [OK]. 4 Do steps 2 and 3 again to set the end time. 5 Press [▲, ▼] to select the source you want to play or record, and then press [OK].
To start the timer
1 Prepare the audio source.
| Play timer Prepare the music source you want to listen to (disc, USB, radio or external equipment) and set the volume. |
| Record timer Connect the USB device toUSB Band tune to the radio station or select the external equipment. |
2 Press and hold [⊕, -PLAY/REC] and then press the button again to select the setting.
TIMER OFF Cancel the setting.
☑PLAY ON Start the play timer. “☑PLAY” is shown.
④REC ON Start the record timer. “④REC” is shown.
The system must be switched off for the timer to operate.
To check the settings
Press [CLOCK/TIMER] to select “∅PLAY” or “∅REC”. In standby mode, press [CLOCK/TIMER] two times.
Note:
- The play timer starts at a low volume and increases gradually to the preset level.
- The record timer starts 30 seconds before the set time with the volume muted.
- The timer comes on at the set time every day if the timer is on.
- If you switch off the system and switch on again while a timer is in operation, the timer will not stop at the end time.
Using microphones
Preparation
Decrease the volume of the system to its minimum before you connect or disconnect a microphone.
1 Connect a microphone (not supplied) to the microphone jack.
Plug type: ∅ 6.3 mm monaural
2 Turn [MIC VOL 1, MIN/MAX] or [MIC VOL 2, MIN/MAX] on the main unit to adjust the volume of the microphone.
If you want to use the microphone with background music.
3 Play the music source and adjust the volume of the system.
Note:
- If a strange noise (howling) is emitted, move the microphone away from the speakers, or decrease the volume of the microphone.
- When you do not use the microphone, disconnect it from the microphone jack, and decrease the volume of the microphone level to "MIN".
Enjoying Karaoke (by main unit only)
1 Select the music source. "DVD/CD" or "USB".
2 Press [KARAOKE] to select "ON KARAOKE". To cancel, select "OFF KARAOKE".
Note:
Karaoke mode switches off when you switch off this system.
KEY CONTROL
Press [KEY-CON] repeatedly to make the setting. Alternatively, press [KEY-CON] and then turn [CONTROL] to make the setting.
Change the key of a song from -6 (lowest) to +6 (highest). 0: Normal
Note:
The key control automatically resets to "0" when you change to another source.
VOCAL CANCEL
Press [VOCAL CANCEL] repeatedly to make the setting. Alternatively, press [VOCAL CANCEL] and then turn [CONTROL] to make the setting.
Reduce the vocal level (when using a stereo source not formatted for Karaoke).
VOCAL CANCEL: Reduces vocal level OFF VOCAL CANCEL: Cancel
Change the audio mode (when using a Karaoke formatted source).
L: Only left channel sound (accompaniment only).
R: Only right channel sound (vocals only).
L+R: Left and right channel sounds are mixed and heard from both speakers.
Note:
- "L" and "R" are reversed on some discs.
- This function can fail to work depending on the type of song.
DVD-V VCD
- To make the setting, refer to "AUDIO" in Menu 1 (→ 14).
ECHO EFFECT
Press [ECHO] repeatedly to select the level. Alternatively, press [ECHO] and then turn [CONTROL] to select the level.
ECHO1 → ECHO2 -ECHO3; uparrow ECHO OFF
Note:
You can adjust echo effect, key control and vocal cancel only when Karaoke mode is set to "ON".
External equipment
Preparation
- Disconnect the AC mains lead.
- Switch off all equipment and read the appropriate operating instructions.
Using the auxiliary input
You can connect the TV and listen to the audio through this system.
1 Connect the TV to this system. (→ 7, "Alternative connection to a TV")
2 Press [RADIO/AUX] to select "AUX 1".
Note:
- You can also connect other equipment (such as a Blu-ray Disc player, DVD recorder, VCR, etc.) to the AUX 1 terminal of this system.
- Sound distortion can occur when you use an adaptor.
Connect to a portable audio equipment
You can play music from a portable audio equipment.
Preparation
- Switch off the equaliser (if any) of the portable audio equipment to prevent sound distortion.
- Decrease the volume of the system and the portable audio equipment before you connect or disconnect the portable audio equipment.
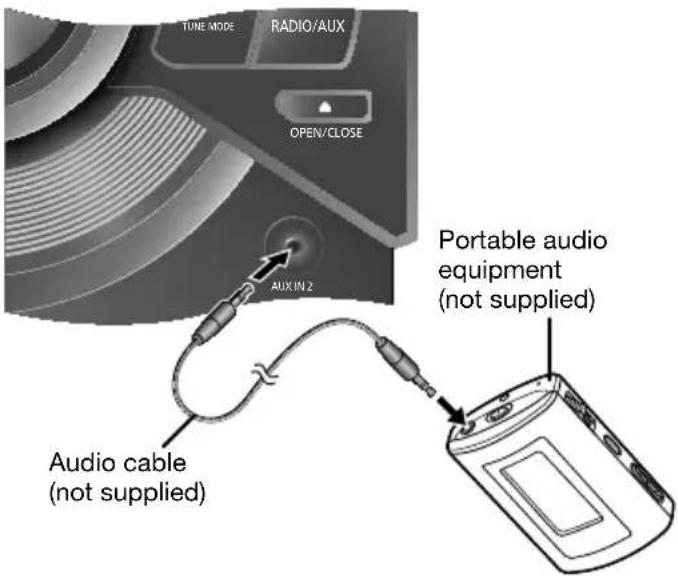
1 Connect the portable audio equipment. Plug type: ∅ 3.5 mm stereo
2 Press [RADIO/AUX] to select "AUX 2".
3 Play the portable audio equipment.
Others
Bluetooth® standby
This function automatically switches on the system when you establish a Bluetooth® connection from a paired device.
1 Press [✗, USB] (main unit: [✗/USB, -PAIRING]) to select "BLUETOOTH". 2 Press [PLAY MODE] to select "STANDBY MODE". 3 Press [◀, ▶] to select "ON STANDBY MODE" and then press [OK]. To cancel, select "OFF STANDBY MODE".
Changing system settings
1 Press [DVD/CD].
2 Press [SETUP] to show the SETUP menu.
3 Press [▲, ▼] to select the menu and then press [OK].
To go back to the previous menu, press [→, RETURN].
4 Press [▲, ▼] to select an item and then press [OK].
5 Press [▲, ▼] to make the setting and then press [OK].
6 Press [SETUP] to close the screen.
- The settings stay intact even if you put the system on standby mode.
- Underlined items are the factory settings in the menu.
EASY SETUP allows successive settings of the items in the shaded area.
"DISC" menu
| AUDIOChange the audio language. | |||
| ENGLISH | FRENCH | SPANISH | |
| RUSSIAN | ORIGINAL*1 | OTHER *2 | ---- |
| SUBTITLEChange the subtitle language. | |||
| AUTO*3 | ENGLISH | FRENCH | |
| SPANISH | RUSSIAN | OTHER *2 | |
| MENUSChange the language for disc menus. | |||
| ENGLISH | FRENCH | SPANISH | |
| RUSSIAN | OTHER *2 | ---- | |
RATINGS
Set a ratings level to limit DVD-Video playback.
Setting ratings
0 LOCK ALL: To prevent playback of discs without ratings levels.
1 to 7: To prevent playback of DVD-Video with the same ratings recorded on them.
8 NO LIMIT
When you set the ratings level, a password screen is shown.
Follow the on-screen instructions.
Do not forget your password.
A message screen is shown if a DVD-Video with higher ratings level is played.
Follow the on-screen instructions.
PASSWORD
Change the password for "RATINGS" ( → left).
- Select "CHANGE" and then press [OK].
- Input the current password with the numeric buttons and then press [OK].
- Input the new password with the numeric buttons and then press [OK].
If "VERIFY" is shown, make sure that the new password is correct and input it again.
The original language designated on the disc is selected.
Input the applicable code from the "Language code list" (see page 26).
If the language selection for "AUDIO" is not available for the disc played, the subtitles in that language will be shown (if available on the disc).
"VIDEO" menu
TV ASPECT
Change the setting to suit your TV and preference. 16:9: Widescreen TV (16:9)
4:3 PAN & SCAN: Regular aspect TV (4:3). The sides of the widescreen picture are cut off so it fills the screen (unless prohibited by the disc).
4:3 LETTERBOX: Regular aspect TV (4:3). Widescreen picture is shown in the letterbox style.

TIME DELAY
When connected with an AV amplifier and Plasma TV, adjust if the audio is out of sync with the video.
0 ms 20 ms 40 ms
60 ms 80 ms 100 ms
NTSC DISC OUT
Change PAL 60 or NTSC output when you play NTSC discs.
NTSC: Output signals from NTSC discs remain as NTSC.
PAL60: NTSC discs can be viewed on PAL TV.
For the Middle East and South Africa
"PAL60" is the factory preset.
STILL MODE
Specify the type of picture shown when in pause mode.
AUTO
FIELD: The picture is not blurred, but the picture quality is lowered.
FRAME: Overall quality is high, but the picture is blurred.
"AUDIO" menu
DOLBY DIGITAL*
BITSTREAM
PCM
DTS*
BITSTREAM
PCM
For the Middle East and South Africa
MPEG*
BITSTREAM
PCM
* Select “BITSTREAM” when the equipment can decode the bitstream (digital form of multi-channel data). If not, select “PCM”. (If the bitstream output to the equipment without a decoder, there can be high levels of noise output that can do damage to your speakers and hearing.)
DYNAMIC RANGE
ON: Adjust for clarity even when the volume is low. The range between the lowest and the highest sound levels is compressed. Convenient for late night viewing. (Only works with Dolby Digital.)
OFF
"DISPLAY" menu
LANGUAGE
Select the language for the on-screen messages.
ENGLISH
FRANÇAIS
SPANISH
RUSSIAN
"HDMI" menu
VIDEO PRIORITY
ON: When using the HDMI AV OUT terminal for video output. The resolution of the video output from the HDMI AV OUT terminal is optimised according to the capability of the connected equipment (e.g. TV).
OFF: When not using the HDMI AV OUT terminal for video output.
AUDIO OUT
ON: When audio output is from the HDMI AV OUT terminal. (Depending on the capabilities of the connected equipment, audio output may differ from the audio settings of this system.)
OFF: When audio output is not from the HDMI AV OUT terminal. (The audio is output using the settings of this system.)
RGB RANGE
STANDARD
ENHANCED: When the black and white images are not distinct.
"OTHERS" menu
JPEG
SLIDE SHOW TIME
To change the slideshow time.
1 SEC to 15 SEC (in 1-unit)
15 SEC to 60 SEC (in 5-unit)
60 SEC to 180 SEC (in 30-unit)
"3 SEC" is the factory preset.
EASY SETUP
SET: Shows the EASY SETUP settings.
DVD-VR/DATA
Select to play only DVD-VR or DATA format.
DVD-VR: To play video on DVD-R/RW.
DATA: To play data files on DVD-R/RW.
SCREEN DIMMER
This is to prevent burnt mark on the TV screen.
OFF
WAIT 5 MIN: If there is no operation for 5 minutes, the picture becomes grey. The TV screen will go back to the normal position when you do some operations. (This does not apply during video playback.)
DEFAULTS
This returns all values in the SETUP menus to the default settings.
RESET
The password screen is shown if "RATINGS"
(→ 23, "RATINGS") is set. Input the same password and then press [OK], then switch off the system and switch on again.
playable media
Commercial discs
| Type Icon Details | ||
| DVD-Video • High quality video | and audio discs | |
 | ||
 | ||
 | ||
| Video CD | VCD | • Video discs• Including SVCD(conforms to IEC62107) |
 | ||
| DIGITAL VIDEO | ||
 | ||
| CD | CD | • Audio discs |
 | ||
| DIGITAL AUDIO | ||
Recorded discs and USB devices
| Type Icon Details | ||
DVD-R/RW RR4.7 RR4.7 RW RW | DVD-VDVD-VRMP3JPEGXvid | • DVD-Video format• Version 1.1 of the DVD Video Recording format• MP3 format• JPEG format• Xvid format |
DVD-R DL RRDL RRDL | DVD-VDVD-VRXvid | • DVD-Video format• Version 1.2 of the DVD Video Recording format• Xvid format |
| +R/+RW/+R DL | DVD-V | • +VR (+R/+RW Video Recording) format |
| CD-R/RW | MP3JPEGXvid | • MP3 format• JPEG format• Xvid format |
| USB A-AUDIO/USB B-AUDIO | MP3 | • MP3 format |
| USB A-VIDEO/USB B-VIDEO | JPEGXvid | • JPEG format• Xvid format |
- Before playback, finalise the disc on the device it was recorded on.
- It is not possible to play all the above-mentioned media in some conditions because of:
- The type of media.
- The condition of the recording.
- The recording procedure.
- How the files were made (see below, "About MP3/JPEG/Xvid files").
Note on using a DualDisc
A DualDisc may not play if the side containing digital audio content does not meet the technical specifications of the Compact Disc Digital Audio (CD-DA) format.
Discs that cannot be played
Blu-ray, HD DVD, AVCHD discs, DVD-RW version 1.0, DVD-Audio, DVD-ROM, CD-ROM, CDV, CD-G, SACD, Photo CD, DVD-RAM, and "Chaoji VCD" (including CVD, DVCD, and SVCD) that do not conform to IEC62107.
Video systems
- This system can play discs with PAL and NTSC, but your TV must be compatible with the system used on the disc.
- Videos from PAL discs cannot be correctly shown on an NTSC TV.
- This system can convert NTSC signals to PAL 60 to show video on a PAL TV (see 23, "NTSC DISC OUT" in the "VIDEO" menu).
About MP3/JPEG/Xvid files
• This system can access up to:
– Data disc: 255 folders (excluding root folder) and 4000 tracks. - USB A-AUDIO/USB B-AUDIO: 800 albums (including root folder) and 8000 tracks. - USB A-VIDEO/USB B-VIDEO: 4000 picture and video contents and 255 groups (excluding root folder).
MP3 (Extension: ".MP3", ".mp3")
- This system supports ID3 tags (USB A-AUDIO and USB B-AUDIO only).
- Sampling frequency and compression rate:
- DVD-R/RW: 11.02, 12, 22.05, 24 kHz (8 to 160 kbps), 44.1 and 48 kHz (32 to 320 kbps)
- CD-R/RW: 8, 11.02, 12, 16, 22.05, 24 kHz (8 to 160 kbps), 32, 44.1 and 48 kHz (32 to 320 kbps)
- MP3 disc must conform to ISO9660 level 1 or 2 (except for extended formats).
JPEG (Extension: ".JPG", ".jpg", ".JPEG", ".jpeg")
- JPEG files taken on a digital camera that conforms to DCF Standard (Design rule for Camera File system) Version 1.0 are shown.
- Files that have been changed, edited or saved with a computer picture editing software are possibly not shown.
- This system cannot show moving pictures, MOTION JPEG and other such formats, still pictures other than JPEG (example: TIFF), or play pictures with attached audio.
Xvid (Extension: ".XVID", ".xvid", ".AVI", ".avi")
- Xvid files that are more than 2 GB or have no index can fail to play correctly on this system.
- This system supports all resolutions until a maximum of 720 x 480 (NTSC)/720 x 576 (PAL).
- There can be differences in the display sequence on the menu screen and computer screen.
- This system cannot play files recorded using packet write.
DVD-R/RW
• Discs must conform to UDF bridge (UDF 1.02/ISO9660). - This system does not support multi-session. Only the default session is played.
CD-R/RW
- Discs must conform to ISO9660 level 1 or 2 (except for extended formats).
- This system supports multi-session but if there are many sessions, it uses more time for playback to start. Keep the number of sessions to a minimum to prevent this.
USB device
- This system does not guarantee connection with all USB devices.
- This system does not support USB device charging.
- This system can support USB devices of up to 32 GB.
- Only FAT 12/16/32 file system is supported.
- This system supports USB 2.0 full speed.
Note:
The above media may not be played in some cases due to the type of media, the condition of the recording, the recording method, and how the files were created.
Language code list
Abkhazian: 6566 Malayalam: 7776 Afar: 6565 Maltese: 7784 Afrikaans: 6570 Māori: 7773 Albanian: 8381 Marathi: 7782 Amharic: 6577 Moldavian: 7779 Arabic: 6582 Mongolian: 7778 Armenian: 7289 Nauru: 7865 Assamese: 6583 Nepali: 7869 Aymara: 6589 Norwegian: 7879 Azerbaijani: 6590 Oriya: 7982 Bashkir: 6665 Pashto, Pushto: 8083 Basque: 6985 Persian: 7065 Bengali, Bangla: 6678 Polish: 8076 Bhutani: 6890 Portuguese: 8084 Bihari: 6672 Punjabi: 8065 Breton: 6682 Quechua: 8185 Bulgarian: 6671 Rhaeto-Romance: 8277 Burmese: 7789 Romanian: 8279 Byelorussian: 6669 Russian: 8285 Cambodian: 7577 Samoan: 8377 Catalan: 6765 Sanskrit: 8365 Chinese: 9072 Scots Gaelic: 7168 Corsican: 6779 Serbian: 8382 Croatian: 7282 Serbo-Croatian: 8372 Czech: 6783 Shona: 8378 Danish: 6865 Sindhi: 8368 Dutch: 7876 Singhalese: 8373 English: 6978 Slovak: 8375 Esperanto: 6979 Slovenian: 8376 Estonian: 6984 Somali: 8379 Faroese: 7079 Spanish: 6983 Fiji: 7074 Sundanese: 8385 Finnish: 7073 Swahili: 8387 French: 7082 Swedish: 8386 Frisian: 7089 Tagalog: 8476 Galician: 7176 Tajik: 8471 Georgian: 7565 Tamil: 8465 German: 6869 Tatar: 8484 Greek: 6976 Telugu: 8469 Greenlandic: 7576 Thai: 8472 Guaraní: 7178 Tibetan: 6679 Gujarati: 7185 Tigrinya: 8473 Hausa: 7265 Tonga: 8479 Hebrew: 7387 Turkish: 8482 Hindi: 7273 Turkmen: 8475 Hungarian: 7285 Twi: 8487 Icelandic: 7383 Ukrainian: 8575 Indonesian: 7378 Urdu: 8582 Interlingua: 7365 Uzbek: 8590 Irish: 7165 Vietnamese: 8673 Italian: 7384 Volapük: 8679 Japanese: 7465 Welsh: 6789 Javanese: 7487 Wolof: 8779 Kannada: 7578 Xhosa: 8872 Kashmiri: 7583 Yiddish: 7473 Kazakh: 7575 Yoruba: 8979 Kirghiz: 7589 Zulu: 9085
Korean: 7579
Kurdish: 7585
Laotian: 7679
Latin: 7665
Latvian, Lettish: 7686
Lingala: 7678
Lithuanian: 7684
Macedonian: 7775
Malagasy: 7771
Malay: 7783
Troubleshooting
Before requesting service, make the following checks. If you are in doubt about some of the check points, or if the solutions indicated do not solve the problem, consult your dealer for instructions.

Common problems
The unit does not work.
- The safety device has been activated. Do the following:
- Press [∅/l] on the main unit to switch the unit to standby mode. If the unit does not switch to standby mode,
- Press and hold the button for a minimum of 10 seconds. Or,
- Disconnect the AC mains lead and connect it again.
- Press [☐/I] again to switch on the unit. If the problem persists, consult your dealer.
The display panel lights up and changes continuously in standby mode.
- Press and hold [■] on the main unit to select “DEMO OFF”.
No operations can be done with the remote control.
- Examine that the battery is installed correctly. (→ 5)
Sound is distorted or no sound.
- Adjust the volume of the system. (→ 9)
- Switch off the system, determine and correct the cause, then switch on again. It can be caused by straining of the speakers through excessive volume or power, and when using the system in a hot environment.
- Xvid Audio is possibly not output because of how the contents are made.
A humming sound can be heard during playback.
- An AC mains lead or fluorescent light is near the cables. Keep other appliances and cords away from the cables of this system.
The sound level reduces.
- The protection circuit has been activated due to the continuous use at high volume output. This is to protect the system and maintain the sound quality.
No sound from the TV.
- Confirm the audio connection. (→ 7)
- When using the HDMI connection, ensure that "AUDIO OUT" in the HDMI menu is set to "ON". (→ 24)
You have forgotten your ratings password.
- Reset all the settings to factory preset.
- Press [DVD/CD] and then press [■].
- Press [■] on the main unit and [≥10] on the remote control at the same time. “INIT” is shown.
Other equipment operates with the supplied remote control.
- Change the remote control mode. (→ 30)

Disc
Display not shown correctly.
Playback does not start.
- You have not put in the disc correctly. Put it in correctly. (→ 10) • Disc is dirty. Clean the disc.
- Replace the disc if it is scratched, warped, or non-standard.
- There is condensation. Let the system dry for 1 to 2 hours.
- If a disc contains CD-DA and other formats, correct playback is not possible.
The total number of tracks shown is incorrect.
The disc cannot be read.
Distorted sound is heard.
- You put in a disc that the system cannot play. Change to a playable disc. (→ 25)
- You put in a disc that has not been finalised.
Playback starts slowly.
- Playback starts slowly when an MP3 content has still picture data. Even after the content starts, the correct play time will not be shown.
• Xvid This is usual on Xvid video.
Groups deeper than the eighth layer on a data disc are not shown correctly.
MP3 Xvid JPEG
- Groups deeper than the eighth layer are shown as the eighth layer.
A menu screen shows during skip or search.
• This is usual for Video CDs.
Playback control menu does not show.
VCD with playback control (PBC).
- Press [■] two times and then press [▶/III].
The program and random playback functions do not work.
- DVD-V These functions do not work with some DVD-Videos.
Programmed items are not played.
- DVD-V Some items cannot be played even if you have programmed them.
No subtitles.
- Show the subtitles ("SUBTITLE" in Menu 1 (→ 15)).
- It is possible that the subtitles are not shown because of the disc.
Cannot select alternative languages.
- Select from the menu of the disc if one is available.
Point B is automatically set.
- The end of an item becomes point B when it is at the end. (→ 15)
The SETUP menu cannot be accessed.
- Select "DVD/CD" as the source. (→ 10)
- Cancel the program and random playback. (→ 12, 13)

USB
The USB device or the contents in it cannot be read.
- The format of the USB device or the contents in it are not compatible with the system.
- USB devices with storage capacity of more than 32 GB cannot work in some conditions.
- Make sure you have selected the correct USB source and format type. (→ 10, 25)
Slow operation of the USB device.
- Large content size or large memory USB device takes longer time to read.

Bluetooth®
Pairing cannot be done.
- Check the Bluetooth® device condition.
- The device is out of the 10 m communication range. Move the device nearer to the system.
The device cannot be connected.
- The pairing of the device was unsuccessful. Do pairing again. (→ 11)
- The pairing of the device has been replaced. Do pairing again. (→ 11)
- This system might be connected to a different device. Disconnect the other device and try pairing the device again. (→ 11)
- The system may have a problem. Switch off the system and then switch on again.
The device is connected but audio cannot be heard through the system.
- For some built-in Bluetooth ® devices, you have to set the audio output to “SC-VKX65” manually. Read the operating instructions of the device for details.
Sound from the device is interrupted.
- The device is out of the 10 m communication range. Move the device nearer to the system.
- Remove any obstacle between the system and the device.
- Other devices that use the 2.4 GHz frequency band (wireless router, microwaves, cordless phones, etc.) are interfering. Move the device nearer to the system and distance it from the other devices.
- Select "MODE 1" for stable communication. (→ 12)
Playback image and sound are not synchronised.
- Restart the playback app of the device.
- Connect the device to the system with an audio cable (not supplied). (→ 22)

Radio
Sound is distorted.
"ST" flickers or does not show. - Use an optional FM outdoor antenna. The antenna should be installed by a competent technician. - Press [PLAY MODE] to select "MONO". (→ 16)
A beat sound is heard.
- Switch off the TV or move it away from the system.
- Move mobile telephones away from the system if the interference is apparent.
A low hum is heard during AM broadcasts.
- Move the antenna away from other cables and cords.

Main unit displays
The display panel is dark.
- Press and hold [-DIMMER] on the remote control or press [DIMMER] on the main unit to increase the brightness of the display panel. (→ 9)
"A NO DEV"
"B NO DEV"
- The USB device is not connected. Examine the connection.
"ADJUST CLOCK"
- The clock is not set. Adjust the clock. (→ 20)
"ADJUST TIMER"
- The play and/or record timer is not set. Adjust the play and/or record timer. (→ 20)
"AUTO OFF"
- The system has not been used for 20 minutes and will switch off within a minute. To cancel, press any button. (→ 9)
"CAN'T REC"
"DEVICE FULL"
- You cannot do recording because the remaining recording time of the USB device is less than the total time of the music source. Change to a USB device which has enough recording time and do the recording again. (→ 17)
"DVD H □ □"
"DVD F □ □"
□ is a number.
- Disconnect the AC mains lead, and then connect it again. If the service numbers fail to clear, note the service number and contact a qualified service person.
"DVD U11"
• Disc is dirty. Clean the disc.
"ERROR"
- An incorrect operation was done. Read the instructions and try again.
"ERROR" (during recording)
- You cannot select another playback source (e.g., radio, USB, etc.) or press [I◄◄] or [►►I] during recording. Stop the recording function.
- You cannot open the disc tray when recording from an AM source.
"F61"
- Examine and correct the speaker cord connections. (→ 6)
- Disconnect the USB device. Switch off the system and then switch on again.
"F70"
- Examine the Bluetooth® connection. (→ 11)
- Disconnect the Bluetooth® device. Switch off the system and then switch on again. (→ 11)
"F76"
- There is a problem with the power supply.
- Disconnect the AC mains lead and consult your dealer.
"F77"
- Disconnect the AC mains lead and consult your dealer.
"TR FULL"
- The number of files has exceeded the supported limit.
"ALB FULL"
- The number of groups or albums has exceeded the supported limit.
"NODEVICE"
"NO DEVICE"
- You cannot do recording or check available storage space because there is no USB device connected to USB B.
"NO DISC"
- You have not put in a disc.
- You have not put in the disc correctly. Put it in correctly. (→ 10)
"NO MP3"
- Select an MP3 content before recording can start.
"NO PLAY"
"UNSUPPORT"
- Examine the content. You can only play supported formats. (→ 25)
- The files in the USB device can be corrupted. Format the USB device and try again.
- The system may have a problem. Switch off the system and then switch on again.
- You put in a disc that the system cannot play. Change to a playable disc. (→ 25)
- You put in a blank disc.
- You put in a disc that has not been finalised.
"NO TRACK"
- There is no MP3 file in the USB device.
"PLAYEROR"
- You played an unsupported MP3 file. The system will skip that track and play the next one.
"REC ERROR"
- You disconnected the USB device while recording. Connect the USB device and do recording again. (→ 10, 17)
- Error occurred during USB recording. Disconnect the USB device and then connect again. (→ 10, 17)
"REMOTE 1"
"REMOTE 2"
- The remote control and the main unit are using different codes. Change the code of the remote control. (→ 30) - When “REMOTE 1” is shown, press and hold [OK] and [1] for a minimum of 4 seconds. - When “REMOTE 2” is shown, press and hold [OK] and [2] for a minimum of 4 seconds.
"TEMP NG"
- The temperature protection circuit has been activated, and the system will switch off. Let the unit cool down before switching it on again.
- Check that the ventilation opening of the unit is not obstructed.
- Ensure this unit is well ventilated.
“U70 □”
□ is a number.
(The actual number following "U70" will depend on the state of this unit.)
• HDMI connection acts unusually.
- The connected equipment is not HDMI-compatible.
– Use HDMI cables that have the HDMI logo.
- The HDMI cable is too long.
– The HDMI cable is damaged.
"USB OVER CURRENT ERROR"
- The USB device is using too much power. Disconnect the USB device, switch off the system and then switch on again.
"VBR"
- The system cannot show the remaining play time for variable bit rate (VBR) tracks.

TV displays
"THIS DISC CANNOT BE PLAYED IN YOUR REGION."
- You can only play DVD-Video if the region code is compatible with this system. You can check the compatible region code at the rear of the main unit. (→ Cover page)
"∅"
- The operation is prevented by the system or disc.
"THIS TYPE OF DEVICE CANNOT BE PLAYED. PLEASE INSERT A DIFFERENT DEVICE."
- Make sure there is video or picture content in the USB device.

Picture
Picture is distorted.
- It is common to experience some distortion during "SEARCH".
- Make sure that the system is connected directly to the TV, and is not connected through a VCR. (→ 7)
- Change the "SOURCE SELECT" in Menu 2. (→ 15)
- When using the HDMI AV OUT terminal, ensure that an incompatible video output with the connected TV is not selected. Press [CANCEL DEL] until the picture is shown correctly. The output will return to "480p" or "576p".
- Video images converted to 1920x1080 resolution may look different from the true native 1080p full-HD sources. This is not a malfunction of this unit.
No picture.
- Examine the connection. (→ 7)
- Make sure that the video input mode of the TV is correct. (→ 7)
A defective TV display or faded colours.
- The system and TV are using different video systems.
For Southeast Asia
- Use the multi-system or NTSC TV.
For the Middle East and South Africa
- Use the multi-system or PAL TV.
- The system used on the disc does not complement your TV. – Videos on PAL discs cannot be correctly shown on an NTSC TV.
- This system can convert NTSC signals to PAL 60 to be shown on a PAL TV ("NTSC DISC OUT" in "VIDEO" menu). (→ 23)
Picture stops.
- Xvid Picture can stop if the Xvid contents are more than 2 GB.
Menus not shown correctly.
- Change the zoom ratio to "NORMAL" in "ZOOM" in Menu 2. (→ 15)
- Change the "TV ASPECT" in "VIDEO" menu. (→ 23)
Auto zoom function does not operate correctly.
- Switch off the zoom function of the TV.
- Use the other preset aspect ratios or manual adjustment. (→ 23)
- Zoom function does not work well especially in dark scenes or does not work at all due to the type of disc.
When playing PAL disc, picture is distorted.
- Set "TRANSFER MODE" in Menu 2 to "AUTO". (→ 15)

HDMI progressive video
There is a ghosting effect when the HDMI progressive output is on.
- This problem is caused by the editing method or material used on DVD-Video, but should be corrected if you use interlaced output. When using the HDMI AV OUT terminal, set "VIDEO FORMAT" in Menu 4 to "480i" or "576i". Or, disable the HDMI AV OUT connection and use the other video connection. (→ 7, 16)
Remote control code
When other Panasonic equipment responds to the remote control of this system, change the remote control code for this system.
Preparation
Press [RADIO/AUX] to select "AUX 1" or "AUX 2".

To set the code to "REMOTE 2"
1 Press and hold [RADIO/AUX] on the main unit and [2] on the remote control until "REMOTE 2" is shown. 2 Press and hold [OK] and [2] for a minimum of 4 seconds.

To set the code to "REMOTE 1"
1 Press and hold [RADIO/AUX] on the main unit and [1] on the remote control until "REMOTE 1" is shown. 2 Press and hold [OK] and [1] for a minimum of 4 seconds.
Note:
After you set the code, you can continue to use the TV operation buttons on the remote control to operate a Panasonic TV (→ 9).
System memory reset
Reset the memory when the following situations occur:
- There is no response when buttons are pressed.
- You want to clear and reset the memory contents.
1 Disconnect the AC mains lead.
2 While you press and hold [⏻/ɪ] on the main unit, connect the AC mains lead again. Continue to press and hold the button until "----" is shown.
3 Release [↓/↓]. All the settings are set back to the factory preset. It is necessary to set the memory items again.
Specifications

Amplifier section
RMS output power stereo mode
Front Ch 275 W per channel (3 Ω), 1 kHz
Total RMS stereo mode power 550 W (30% THD)
PMPO output power 6000 W

Tuner, terminals section
Preset station FM 30 stations AM 15 stations
Frequency modulation (FM)
Frequency range 87.50 MHz to 108.00 MHz (50 kHz step)
Antenna terminals 75 Ω (unbalanced)
Amplitude modulation (AM)
Frequency range 522 kHz to 1629 kHz (9 kHz step) 520 kHz to 1630 kHz (10 kHz step)
Mic jack
Terminal Mono, 6.3 mm jack (2 system) Sensitivity 0.7 mV, 1.2 k Ω
AUX 1
Audio input Pin jack (1 system)
AUX 2
Sensitivity 100 mV, 4.7 kΩ

USB section
USB port
USB standard: USB 2.0 full speed
Media file format support
USB AUDIO: MP3 (*.mp3) USB VIDEO: JPEG (*.jpg, *.jpeg), Xvid (*.xvid, *.avi)
USB device file system: FAT12, FAT16, FAT32
USB port power: 500 mA (max) Bit rate: Up to 4 Mbps (Xvid)
USB recording
Bit rate: 128 kbps USB recording speed: 1x Recording file format: MP3 (*.mp3)

Bluetooth
| Version | Bluetooth Ver. 2.1 + EDR |
| Class | Class 2 |
| Supported profiles | A2DP, AVRCP, SPP |
| Operating frequency | 2.4 GHz band, FH-SS |
| Operation distance | 10 m line of sight |

Video section
Video system: PAL, NTSC
Composite video output
Output level 1 Vp-p (75 Terminal Pin jack (1 system)
HDMI AV output
Terminal 19-pin type A connector

Disc section
Disc played (8 cm or 12 cm) (1) DVD (DVD-Video, Xvid 4,5 ) (2) DVD-R (DVD-Video, DVD-VR, JPEG 3,5 , MP3 2,5 , Xvid 4,5 ) (3) DVD-R DL (DVD-Video, DVD-VR, Xvid 4,5 ) (4) DVD-RW (DVD-Video, DVD-VR, JPEG 3,5 , MP3 2,5 , Xvid 4,5 ) (5) +R/+RW (Video) (6) +R DL (Video) (7) CD, CD-R/RW (CD-DA, Video CD, SVCD 1 , MP3 2,5 , JPEG 3,5 , Xvid 4,5 ) *1 Conforming to IEC62107 MPEG-1 Layer 3, MPEG-2 Layer 3 3 Exif Ver 2.1 JPEG Baseline files Picture resolution: between 160 x 120 and 6144 x 4096 pixels (Sub sampling is 4:0:0, 4:2:0, 4:2:2 or 4:4:4). Extremely long and narrow pictures may not be displayed. *4 Plays Xvid video. 5 The total combined maximum number of recognisable audio, picture and video contents and groups: 4000 audio, picture and video contents and 255 groups (Excluding Root folder).
Pick up
Wavelength
CD 790 nm
DVD 655 nm

Speaker section
Speaker unit(s)
Woofer 20 cm cone type
Tweeter 6 cm cone type
Impedance 3Ω
Dimensions (W x H x D) 250 mm x 429 mm x 226 mm
Mass 4.0 kg

General
Power supply AC 220 V to 240 V, 50/60 Hz
Power consumption 81 W
Dimensions (W x H x D) 230 mm x 335 mm x 249 mm
Mass 3.1 kg
Operating temperature range 0°C to +40°C
Operating humidity range
35% to 80% RH (no condensation)
Power consumption in standby mode
0.5 W (approximate)
Power consumption in standby mode
(With Bluetooth® "STANDBY MODE" set to
"ON STANDBY MODE")
0.6 W (approximate)
Note:
- Specifications are subject to change without notice. Mass and dimensions are approximate.
- Total harmonic distortion is measured by the digital spectrum analyser.
- DVD STEREO SYSTEM
- SAFETY PRECAUTIONS
- WARNING
- UNIT
- CAUTION
- FOR SOUTH AFRICA
- FOR OTHERS
- AC MAINS LEAD
- BATTERY
- LICENSES
- TABLE OF CONTENTS
- NOTE ON AC MAINS LEAD
- BEFORE USE
- HOW TO REPLACE THE FUSE
- MAINTENANCE
- ABOUT BLUETOOTH®
- FREQUENCY BAND
- CERTIFICATION
- RESTRICTIONS OF USE
- RANGE OF USE
- INTERFERENCE FROM OTHER DEVICES
- INTENDED USAGE
- SUPPLIED ACCESSORIES
- FOR SOUTHEAST ASIA
- FOR THE MIDDLE EAST AND SOUTH AFRICA
- FOR SAUDI ARABIA
- PREPARING THE REMOTE CONTROL
- PLACEMENT OF SPEAKERS
- USE ONLY THE SUPPLIED SPEAKERS
- NOTE
- IRREGULAR COLOUR ON YOUR TV
- MAKING THE CONNECTIONS
- CONNECT THE TV TO THIS SYSTEM
- HDMI TERMINAL
- VIDEO OUT TERMINAL
- ALTERNATIVE CONNECTION TO A TV
- AUX 1 TERMINAL
- CONNECT THE AC MAINS LEAD
- CONSERVING POWER
- OVERVIEW OF CONTROLS
- EASY SETUP
- PREPARATION
- PREPARING THE MEDIA
- DISC
- USB
- BLUETOOTH®
- PAIRING A DEVICE
- CONNECTING A DEVICE
- DISCONNECTING A DEVICE
- USING THE MAIN UNIT
- MEDIA PLAYBACK
- BASIC PLAYBACK
- REPEAT PLAYBACK
- DURING PLAYBACK
- LINK MODE
- PLAY MODE
- WHILE STOPPED
- PROGRAM PLAYBACK (MAXIMUM 30 ITEMS)
- TO SELECT ALL THE ITEMS
- TO CLEAR THE SELECTED PROGRAM
- TO CLEAR THE WHOLE PROGRAM
- RANDOM PLAYBACK
- USING THE NAVIGATION MENUS
- USING PLAYBACK MENU
- PLAYING DATA DISCS
- PLAYING USB
- PLAYING FROM THE SELECTED ITEM
- PLAYING DVD-R/-RW (DVD-VR) DISCS
- DVD-VR
- PLAYING THE PROGRAMS
- PLAYING THE PLAYLIST
- USING ON-SCREEN MENUS
- MENU 1 (DISC/PLAY)
- SIGNAL TYPE/DATA
- PLAY SPEED
- DVD-VR DVD-V
- CHANGE PLAY SPEED
- REPEAT MODE
- (→ 12, "REPEAT PLAYBACK")
- SUBTITLE
- ANGLE
- DATE DISPLAY
- JPEG
- ROTATION
- MEN(VIDEO)
- PICTURE MODE
- ZOOM
- TRANSFER MODE
- SOURCE SELECT
- XVID
- MENU 3 (AUDIO)
- DIALOGUE ENHANCER
- MENU 4 (HDMI)
- HD ENHANCER
- VIDEO FORMAT
- COLOUR SPACE
- RADIO
- MANUAL TUNING
- IMPROVING THE SOUND QUALITY
- MEMORY PRESETTING
- AUTOMATIC PRESETTING
- MANUAL PRESETTING
- SELECTING A PRESET STATION
- AM ALLOCATION SETTING
- RECORDING
- BASIC RECORDING
- RECORDING MP3 TRACKS
- ADDING TRACK MARKS
- BEFORE RECORDING
- DELETING RECORDED TRACKS
- SOUND AND ILLUMINATION EFFECTS
- SOUND EFFECTS
- ILLUMINATION EFFECTS
- BY MAIN UNIT ONLY
- DJ JUKEBOX
- CLOCK AND TIMERS
- SETTING THE CLOCK
- SLEEP TIMER
- PLAY AND RECORD TIMER
- TO START THE TIMER
- TO CHECK THE SETTINGS
- USING MICROPHONES
- ENJOYING KARAOKE (BY MAIN UNIT ONLY)
- KEY CONTROL
- VOCAL CANCEL
- DVD-V VCD
- ECHO EFFECT
- EXTERNAL EQUIPMENT
- USING THE AUXILIARY INPUT
- CONNECT TO A PORTABLE AUDIO EQUIPMENT
- OTHERS
- BLUETOOTH® STANDBY
- CHANGING SYSTEM SETTINGS
- RATINGS
- PASSWORD
- VIDEO" MENU
- TV ASPECT
- TIME DELAY
- NTSC DISC OUT
- STILL MODE
- AUDIO" MENU
- DOLBY DIGITAL
- BITSTREAM
- DTS
- MPEG
- DYNAMIC RANGE
- DISPLAY" MENU
- LANGUAGE
- HDMI" MENU
- VIDEO PRIORITY
- AUDIO OUT
- RGB RANGE
- STANDARD
- OTHERS" MENU
- SLIDE SHOW TIME
- DVD-VR/DATA
- SCREEN DIMMER
- DEFAULTS
- PLAYABLE MEDIA
- NOTE ON USING A DUALDISC
- DISCS THAT CANNOT BE PLAYED
- VIDEO SYSTEMS
- ABOUT MP3/JPEG/XVID FILES
- MP3 (EXTENSION: ".MP3", ".MP3")
- JPEG (EXTENSION: ".JPG", ".JPG", ".JPEG", ".JPEG")
- XVID (EXTENSION: ".XVID", ".XVID", ".AVI", ".AVI")
- DVD-R/RW
- CD-R/RW
- USB DEVICE
- LANGUAGE CODE LIST
- TROUBLESHOOTING
- COMMON PROBLEMS
- THE UNIT DOES NOT WORK
- MAIN UNIT DISPLAYS
- NODEVICE
- NO DEVICE
- NO DISC
- NO MP
- NO PLAY
- UNSUPPORT
- NO TRACK
- PLAYEROR
- REC ERROR
- REMOTE
- TEMP NG
- U
- IS A NUMBER
- USB OVER CURRENT ERROR
- VBR
- TV DISPLAYS
- THIS DISC CANNOT BE PLAYED IN YOUR REGION
- ∅
- THIS TYPE OF DEVICE CANNOT BE PLAYED. PLEASE INSERT A DIFFERENT DEVICE
- PICTURE
- PICTURE IS DISTORTED
- NO PICTURE
- A DEFECTIVE TV DISPLAY OR FADED COLOURS
- PICTURE STOPS
- MENUS NOT SHOWN CORRECTLY
- AUTO ZOOM FUNCTION DOES NOT OPERATE CORRECTLY
- WHEN PLAYING PAL DISC, PICTURE IS DISTORTED
- HDMI PROGRESSIVE VIDEO
- REMOTE CONTROL CODE
- TO SET THE CODE TO "REMOTE
- SYSTEM MEMORY RESET
- SPECIFICATIONS
- AMPLIFIER SECTION
- TUNER, TERMINALS SECTION
- USB SECTION
- BLUETOOTH
- VIDEO SECTION
- DISC SECTION
- SPEAKER SECTION
- GENERAL
Brand : PANASONIC
Model : SC-VKX65
Category : Hi-Fi System