USER MANUAL BOS6747A01BG GORENJE
We thank you for your trust and the purchase of our appliance.
This detailed instruction manual is supplied to make the use of this product easier. The instruction should allow you to learn about your new appliance as quickly as possible.
Make sure you have received an undamaged appliance. If you do find transport damage, please contact the seller from which you purchased the appliance, or the regional warehouse from which it was supplied. The telephone number can be found on the invoice or on the delivery note.
Instructions for installation and connection are supplied on a separate sheet.
Instructions for use, installation and connection are also available at our website:
http://www.gorenje.com
The following symbols are used throughout the manual and they have the following meanings:

Information, advice, tip, or recommendation

WARNING!
Warning - general danger

It is important that you carefully read the instructions.
Contents
Safety precautions 4
Other important safety warnings 5
Appliance description 7
Rating plate – product information 7
Control unit 8
Appliance equipment 9
Control lights 9
Guides 9
Oven door switch 10
Cooling fan 10
Oven equipment and accessories 10
Before first use 12
Switching on for the first time 12
Choosing the settings 13
PROFESSIONAL MODE (pro bake) 13
AUTOMATIC MODE (auto bake) 18
Child lock 21
Starting the cooking process 23
End of cooking 23
Choosing the general settings 25
General tips and advice for baking 27
Cooking table 28
Cooking with a temperature probe 32
Recommendations 34
Cleaning and maintenance 35
Using the... 36
Removing... 37
Removing... 38
Replacing the bulb 39
Troubleshooting table 40
Special warnings and fault reporting 40
Disposal 41
Safety precautions

Carefully read the instructions and save them for future reference.
The appliance must be connected to fixed wiring which has incorporated means of disconnection. Fixed wiring must be made in accordance with the wiring rules.
Means for disconnection must be incorporated in the fixed wiring in accordance with the wiring rules.
The appliance must not be installed behind a decorative door in order to avoid overheating.
If the supply cord is damaged, it must be replaced by the manufacturer, its service agent or similarly qualified persons in order to avoid a hazard (only for appliance supplied with connection cord).
During use the appliance becomes hot. Care should be taken to avoid touching the heating elements inside the oven.
This appliance can be used by children aged 8 years and above, and by persons with reduced physical, sensory or mental capabilities or lack of experience and knowledge, if they have been given supervision or instruction concerning the use of the appliance in a safe way, and if they understand the hazards involved. Children shall not play with the appliance. Cleaning and user maintenance shall not be done by children without supervision.
WARNING: Accessible parts may be hot during use. Young children should be kept away.
WARNING: The appliance and some of its accessible parts may become very hot during use. Care should be taken to avoid touching heating elements. Children less than 8 years of age shall be kept away unless continuously supervised.
The appliance is not intended to be controlled by external timers or separate remote control system.
Only use the temperature probe recommended for use in this oven.
Do not use harsh abrasive cleaners or sharp metal scrapers to clean the oven door glass / the glass of hinged lids of the hob (as appropriate), since they can scratch the surface, which may result in shattering of the glass.
Do not use steam cleaners or high-pressure cleaners to clean the appliance as this may result in an electric shock.
WARNING: Before replacing the light bulb, make sure the appliance has been disconnected from the mains power, in order to prevent the hazard of an electric shock.
Never pour water directly on the bottom of the oven cavity. Temperature differences could result in damage to the enamel coating.
Other important safety warnings
The appliance is intended for household use. Do not use it for any other purpose, such as room heating, drying of pets or other animals, paper, fabrics, herbs, etc. As this may lead to injury or fire hazard.
Appliance must be connected to fixed wiring which has incorporated means of disconnection. Fixed wiring must be made in accordance with the wiring rules.
Do not lift the appliance by holding it by the door handle.
Oven door hinges may be damaged when under excessive load. Do not stand or sit on the open oven door, and do not lean against it. Also, do not place any heavy objects onto the oven door.
If the power cords of other appliances placed near this appliance get entangled in the oven door, they can be damaged, which in turn can result in a short circuit. Therefore, make sure the power cords of other appliances are always at a safe distance.
Oven door becomes very hot during operation. A third glass is installed for extra protection, reducing the temperature of the outside surface (only with some models).
Make sure the vents are never covered or obstructed in any other way.
Do not line the oven cavity with aluminium foil, and do not place any baking trays or other cookware on the oven bottom. This would obstruct and reduce air circulation in the oven, slow down the baking process, and destroy the enamel coating.
We recommend you avoid opening the oven door during baking, as this increases power consumption and increases condensate accumulation.
At the end of the baking process, and during baking, be careful when opening the oven door, as there is danger of scalding.
To prevent limescale accumulation, leave the oven door open after baking or using the oven, to allow the oven cavity to cool down to room temperature.
Clean the oven when it has completely cooled down.
Eventual mismatches in colour shades between different appliances or components within a single design line may occur due to various factors, such as different angles under which the appliances are observed, different coloured backgrounds, materials, and room illumination.
Never pour water onto the oven cavity bottom. Temperature differences could result in damage to the enamel coating.

WARNING!
Carefully read the instructions for use before connecting the appliance. Repair or any warranty claim resulting from incorrect connection or use of the appliance shall not be covered by the warranty.
Appliance description

INFORMATION!
Appliance functions and equipment depend on the model.
Basic equipment of your appliance includes wire guides, shallow baking tray, and a wire rack.

5 Guides - cooking levels 1 Control unit
6 Rating plate 2 Door switch
7 Oven door 3 Lighting
8 Door handle 4 Temperature probe socket
A rating plate with basic information about the appliance is attached to the edge of the oven. Precise information on appliance type and model can also be found on the warranty sheet.

5 Model 1 Serial number
6 Technical information 2 Code/ID
7 Compliance indications/symbols 3 Type
4 Brand
Control unit
(depending on the model)

1. On/off key 2. (Pro bake) professional mode key 3. (Auto bake) automatic mode key 4. Settings selection and confirmation knob
- Rotate the knob to choose a setting
- Press the knob to confirm the setting
5. (Extra bake) key for extra functions and general appliance settings 6. (Light) key for switching the oven lighting on and off 7. Start/stop key for starting or pausing, and confirming settings 8. Display unit:
A. Baking systems, step mode (STEP), connectivity (WIFI, REMOTE) B. Special baking systems, automatic programs, gratins C. Clock, timer functions, temperature probe, baking time D. Special programs, preheating E. Temperature, weight

For better key response, touch the keys with a large area of your fingertip. Each time you press a key, this will be acknowledged by a short acoustic signal (if the function is available).
Appliance equipment
Control lights
Oven light: oven light is switched on when you open or close the oven door, when you switch on the oven, at the end of the baking process, and when you touch the oven light key on the control unit.
Guides
The guides allow cooking or baking on 5 rack levels. The height levels of guides into which the racks can be inserted shall be counted from bottom up. Guide levels 4 and 5 are intended for grilling/broiling. When inserting equipment, it should be correctly rotated. Always push the equipment all the way into the appliance.
Wire guides
In case of wire guides, always insert the wire rack and the baking tray into the slot between the upper and lower part of each guide level.
Fixed pull-out guides (depending on the model)
Pull-out guides may be fitted for the 2nd and 4th level.
In case of fixed pull-out guides, place the rack or baking tray onto the guide. You can place the wire rack directly onto a baking tray (shallow or deep all-purpose baking tray) and place both onto the same guide; in this case, the baking tray acts as a drip tray.
Click-on pull-out guides
(depending on the model)
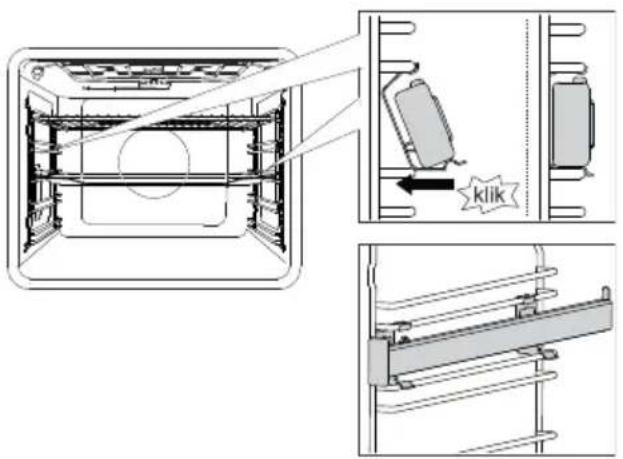
The click-on pull-out guide can be inserted into any space between two wire guides.
Place the guide symmetrically onto the wire guides on the left and the right side of the oven cavity. First, hook the upper clip of the guide under the wire of the wire guide. Then, press the lower clip into the right position until you hear a CLICK.
NOTE: The guides can be attached to any height between two levels of wire guides.

The click-on pull-out guides cannot be mounted onto guides with fixed double-level partial extension. They can, however, be mounted onto single-level partially extendible guides, to levels 3–4 and 4–5.
Make sure the pull-out guide is correctly rotated and that it extends outwards, i.e. out from the oven.
Oven door switch
(depending on the model)
If the oven door is opened during oven operation, the switch turns off the heater and fan in the oven cavity. When the door is closed, the switch turns the appliance operation back on.

WARNING!
Using the oven with the door open and the door switch engaged (closed) is not allowed. The oven will signal an error, and it will have to be reset.
Cooling fan
The appliance is fitted with a cooling fan that cools the housing, the door, and the appliance control unit. After the oven is switched off, the cooling fan continues to operate for a short while in order to cool down the oven.
Oven equipment and accessories
(depending on the model)

The WIRE RACK is used for grilling/broiling or as support for a pan, baking tray, or baking dish with the food you are baking.


There is a safety latch on the wire rack. Therefore, the wire rack has to be lifted slightly at the front when pulling it out from the oven.
SHALLOW BAKING TRAY is used for flat and small pastry. It can also be used as a drip tray.

WARNING!
The shallow baking tray may deform as it heats up in the oven. Once it cools down, it returns to the initial shape. Such deformation does not affect its function.

The all-around deep baking tray is used for roasting vegetables and baking moist pastry. It can also be used as a drip tray.

Never insert the all-purpose (or universal) deep baking tray into the first guide during baking.

Temperature probe (bake sensor).

WARNING!
The appliance and some of the accessible parts tend to heat up during cooking.
Before first use
- Remove oven accessories and any packaging (cardboard, polystyrene foam) from the oven.
- Wipe the oven accessories and interior with a damp cloth. Do not use abrasive or aggressive cloths or cleaners.
- Heat an empty oven for approximately one hour with the top and bottom heater system at a temperature of 250°C. The characteristic "new oven scent" will be released; therefore, ventilate the room thoroughly during this process.
Switching on for the first time
After connecting your appliance or after an extended power outage, 12:00 will flash on the display.
First, choose and confirm the following basic settings.

Change them by rotating the KNOB. To confirm the desired setting, press the KNOB or touch the start|stop key.

1. CLOCK SETTING
Set the clock/time of day. First, set and confirm the minutes; then set and confirm the hours.

To set or adjust the clock later on, see chapter Extra functions.
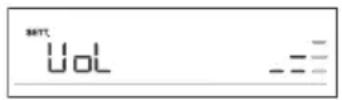
3. ACOUSTIC SIGNAL VOLUME
Medium volume is the default setting. The sign 'Vol' and the currently set value for the acoustic signal volume will appear on the display unit. Rotate the KNOB to increase or decrease the key volume.

2. DISPLAY DIMMER
Medium light intensity is the default setting. The sign 'brht' and the currently set value for the display light intensity will appear on the display unit. Rotate the KNOB to increase or decrease lighting intensity.
After you confirm the selected settings, the clock will appear on the display unit. The appliance is in standby mode.
Choosing the settings
The interface allows choosing several operating modes:
• Professional mode (probake) • Automatic mode (autobake) • Extra functions (extrabake) - Step program (STEP) in the professional mode (probake) • Automatic programs in automatic mode (autobake)

- Rotate the KNOB to scroll through the settings.
- First, confirm these selected settings by passing the KNOB; then, change the setting.
- Confirm each setting by passing the KNOB.
- A line and an arrow indicate the location of the parameter that you are looking to set.
- Touch the start/stop key to start the program.

PRO BAKE PROFESSIONAL MODE (PROBAKE)
This function allows setting the baking parameters – baking system, temperature, fast preheating, and baking time – freely, at the user's discretion.
Touch the PROBAKE key and set the following:

A baking system
C program duration
D preheating
E temperature
Additionally, the following can be set:
- timer functions (see chapter Timer functions) - step baking mode (STEP) (see chapter Step program) - gratin (GRATIN) (see chapter Starting the cooking process)
Fast preheat
Use the fast preheating function if you wish to heat the oven to the desired temperature as quickly as possible.
To activate fast preheating, rotate the KNOB to the setting (see image, label D). Confirm the selection. Rotate the KNOB to select the fully lit sign and confirm it. The function is now activated. When the selected temperature is reached, the preheating process stops and an acoustic signal is emitted. The door will appear on the display unit. Open the door and insert the food. The program will automatically continue baking with selected settings.

When the fast preheat function is activated, the delayed start function cannot be used.
Appliance functions and equipment depend on the model.
| UseSymbol |
 ∅ STEAM + ∅ STEAM + | HOTAIRHotairallowsbetterflowofhotairaroundthefood.Thisway,itdriesoutthesurface andcreatesathickercrust.Usethissystemtocookmeat,pastryandvegetables,andtodryfoodonasinglerackormultiplerackssimultaneously.Steaminjectionresultsinbetterbrowningandmorecrunchinessofthesurface. |
 | PIZZASYSTEMThissystemisoptimalforbakinghomemadepizzaandpastrywithhigherwater content.Useittobakeonasinglerack,whenyouwantthefoodtobedonefaster andtobecrunchy. |
| [S8YK]∅ STEAM + | AIRFRY1)Thiscookingmethodresultsinacrunchycrustwithoutaddedfat.Thisisahealthy versionoffast-foodfrying,withfewercaloriesinthecookedfood.Suitablefor smallercutsofmeat,fish,vegetables,andfrozenproductsreadyforfrying(French fries,chickennuggets).Steaminjectionresultsinbetterbrowningandacrunchiercrust. |
| [SZ5X] | GRILLWITHHOTAIRHotairallowsbetterflowofhotairaroundthefood.Thiswilldryoutthesurface.Incombinationwiththegrillheater/broiler,thiswillalsoresultinamoreintensive colour.Forfasterbakingofmeatandvegetables. |
 | TURBOBAKEFordisheswhereevencrispinessfromallsidesidesirable.Thesystemisalso suitableasthefirststepinthestepbakingmode,asitallowsquickbrowningof thesurfaceinthefirststageandslowbakinginthesecondstage.Themeatwillbe juicywithanicelybrownedcrust. |
| LARGEGRILLUsethissystemtogrillargeamountsofflat-shapedfoodliketoast,open sandwiches,grillsausages,steaks,fish,skewersetc.,aswellasforcookingau gratinandforbrowningthecrust.Theheatersmountedonthetopoftheovencavity evenlyheattheentiresurface.Maximumallowedtemperature:240°C |
 ∅ STEAM + ∅ STEAM + | TOPANDBOTTOMHEATER1)Usethissystemforconventionalbakingonasinglerack,makingsoufflés,and bakingatlowtemperatures(slowcooking).Steaminjectionresultsinbetterbrowningandacrunchiercrust. |
 | GENTLEBAKINGForgentleandcontrolledslowcookingofdelicatefood(softcutsofmeat)and bakingpastrywithacrunchybottom. |
 | TOPANDBOTTOMHEATERWITHFANForevenbakingoffoodonasinglerack,andformakingsoufflés. |
 | LARGEGRILLWITHFANForroastingpoultryandlargercutsofmeatunderabroiler. |
Table continued from last page
| UseSymbol |
| [HSXZ] | LARGEGRILLANDBOTTOMHEATERForfasterbakingonasinglerackandforcrisplybrowningthetopofyourpastry. |
 | GRILLWITHBOTTOMHEATERANDFANForoptimumbakingofyeast-leaveneddough,alltypesofbread,andforpreservation. |
1) The systems also allow steam injection during baking (see chapter Starting the cooking process).

In these systems, it is possible to use the gratin function (see chapter Starting the cooking process).
Touch the start | stop key to start the cooking process. Selected settings will appear on the display unit.
TIMER FUNCTIONS
Rotate the KNOB to select the timer functions.


Timed cooking
In this mode, you can specify the duration of oven operation (cooking time).
The cooking duration symbol will appear on the display unit. Rotate the KNOB to set the desired cooking time. Confirm these settings by pressing on the KNOB.
Touch the start | stop key to start baking.

Setting the delayed start

Delayed start is not possible when the preheating function is activated.
Use this function when you wish to start cooking the food in the oven after a certain period of time. Place the food into the oven, then set the system and temperature. Then, set the program duration and the time when you wish your food done.
Example:
Current time: 12:00 (noon)
Cooking time: 2 hours
End of cooking: at 18:00 (6 p.m.)
The cooking duration symbol will appear on the display unit. Choose the setting and confirm it by pressing the KNOB (in our case, 2:00). Press the KNOB again and rotate it to select the symbol. Confirm and set the time when you wish your food to be done (in our case, this is 18:00, or 6 p.m.). Desired cooking and time will appear on the display unit (18:00). Confirm these settings by pressing on the KNOB.
Touch the start/stop key to start baking.
While waiting to be activated, the oven switches to a partial stand-by (the display unit goes dark). The oven will switch on with the selected settings automatically (in our case at 16:00, or 4 p.m.). The oven will switch off at the set time (in our case, this is 18:00, or 6 p.m.).

Cooking end time and the clock will alternate on the display unit.
After the set time expires, the oven will automatically stop operating. Sign End and 00.00 will alternate on the display unit. An acoustic signal will be emitted, which can be turned off by touching any key. After one minute, the acoustic signal will be switched off automatically.

WARNING!
This function is not suitable for food requiring fast preheating.
Perishable food should not be kept in the oven for a long time. Before using this mode, check whether the clock on the appliance is accurately set.

Minute minder setting
The minute minder can be used independently of oven operation. The longest possible setting is 24 hours. During the last minute, the minute minder is displayed in seconds.
Rotate the KNOB to select the symbol and confirm your setting.
Rotate the KNOB and set the minute minder duration. Confirm the setting by pressing on the KNOB.

The select timer function can be reset to 00:00 by long-pressing the KNOB.

The most recently used timer function values can be stored and offered as preset values the next time you use the timer. As a factory setting, this function is off, but it can be activated (see chapter Selecting extra functions, Adaptive function).
STEP PROGRAM
This function allows baking in two steps or stages (two consecutive baking steps are combined in a single cooking process).

A1 first cooking step STEP1, (STEP2)
C program duration/end of program (see chapter Timer Functions)
E temperature
Step: STEP1
In the pro bake mode, set the baking system and temperature. You can also choose the fast preheating function. Then, set the baking duration for STEP1 (see chapter Timer Functions). Confirm these settings by pressing on the KNOB.

In STEP 1, you can set the delayed start; however, if you do so, you cannot activate fast preheating.
Step: STEP 2
Press and hold the pro bake key. STEP 2 (second cooking step) will appear on the display unit (the first one has already been set). Set the baking system, temperature, and duration. Confirm the setting by pressing on the KNOB.
If you wish, you can also modify STEP 1 or STEP 2 before starting them.
Touch the pro bake key and select STEP 1. Now you can change the settings. Then, do the same for STEP 2.
To delete the step mode, press and hold the pro bake key.
Touch the start | stop key to start baking. The oven first starts to operate with the settings selected for STEP 1. When STEP 1 is done, STEP 2 is activated.
AUTOMATIC MODE (auto bake)
In this mode, you may choose between special baking systems or automatic programs (preset programs for particular types of food).
Special baking systems
Touch the auto bake key and set the following:
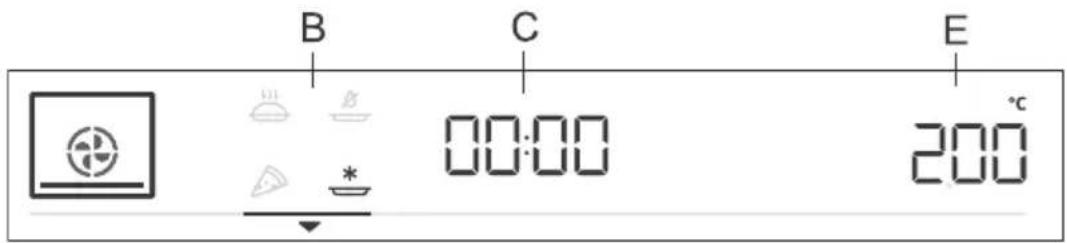
B: special baking systems
C: program duration (see chapter Timer functions)
E: temperature
Rotate the KNOB and choose your settings. Preset values will be displayed: You can change the temperature and program duration.
| UseSymbol |
 | BAKINGFROZENFOOD1)Thismethodallowsbakingfrozenfoodinashorterperiodoftimewithout pre-heating.Optimumforpre-bakedfrozenproducts(bakeryproducts,croissants, lasagne,Frenchfries,chickennuggets),meatandvegetables. |
 | PIZZASYSTEM1)Thissystemisoptimalforbakinghomemadepizzaandpastrywithhigherwater content.Useittobakeonasinglerack,whenyouwantthefoodtobedonefaster andtobecrunchy. |
 | SLOWBAKING2)Forgentle,slowandevencookingofmeat,fishandpastryonasinglerack.This cookingmethodwillleavethemeatwithahigherwatercontent,makingitjuicier andmoretender,whilepastrywillbeevenlybrowned/baked.Thissystemisused inthetemperaturerangebetween 140° Cand 220° C. |
 | AIRFRY1)Thiscookingmethodresultsinacrunchycrustwithoutaddedfat.Thisisahealthy versionoffast-foodfrying,withfewercaloriesinthecookedfood.Suitablefor smallercutsofmeat,fish,vegetables,andfrozenproductsreadyforfrying(French fries,chickennuggets). |
1) In these systems, it is possible to use the gratin function (see chapter Starting the cooking process). 2) This function is used for determining the energy efficiency class pursuant to the EN60350-1 standard.
Fast preheat
Cooking procedures for some dishes in the auto bake mode also include the fast preheating function. The sign will be fully lit. When the selected temperature is reached, the preheating process stops and an acoustic signal is emitted. The door will appear on the display unit. Open the door and insert the food. The program will automatically continue baking with selected settings.
Automatic programs
In the automatic mode (auto bake), you may choose between numerous automatic programs (the appliance will recommend the optimum cooking method, temperature, and cooking duration depending on the type of food specified).
Press and hold the (auto bake) key to display the automatic programs on the display unit (see table). Suggested baking system, temperature and duration can also be changed by your discretion. Where possible, you can also set the weight of the food.
Confirm your setting by pressing the KNOB. Touch the start | stop key to start baking. Preset values will appear on the display unit.

A baking system
C automatic program indication/program duration
D fast preheating
E selected amount
| | | | | TurningPreheatingl |
| | | | | noyes3shallowbal |
| | | | | noyes3shallowbal |
| spongecakePr03 | wirerack | | | noyes2bakingpan |
| Pr04 | smallpastry | | | | noyes2shallowbal |
| | | | | noyes2shallowbal |
| Pr06 | applepie | wirerack | 2bakingpan/dishon | no |
| Pr07 | apple strudel | shallow baking tray | 2 | no | no |
| Pr08 | chocolatesoufflé | wirerack | | | noyes3bakingpan |
| Pr09 | rising and proofing | shallow baking tray | 2 | no | no |
| | | | | noyes2shallowbal |
| Pr11 | porkroast | wirerack | 2smallbakingdishon | no |
| Pr12 | roastedbeef | wirerack | 2smallbakingdishon | no |
| Pr13 | poultry-whole | tray | 2wirerackwithadrip | after2/3of cooking time |
Table continued from last page
| | | | | TurningPreheatingl |
| Pr14 | poultry-smaller pieces | tray | | no3wirerafterwith/adfip cooking time | kickingpan/ |
| meatloafPr15 | wirerack | | | nono2bakingpan/ |
| Pr16 | oven-bakedbeef steak | tray | | no4wirerafterwith/adfip cooking time | smallbakin |
| Pr17 | meat-slow cooking | wirerack | | | noyes2s |
| baked/grilledfishPr18 | tray | | no4wirerafterwith/adfip cooking time | - purpose |
| Pr19 | bakedpotatoes-wedges | bakingtray | | | nono3all |
| VegetablesouffléPr20 | wirerack | | | nono2bakingpan/ |
| lasagnePr21 | wirerack | | | nono2bakingpan/ |
| | | | | noyes1shallowbal |

Gratin function can be used with some automatic programs (see chapter Starting the cooking process).
Touch the extra bake key to display extra functions with their respective preset values on the display unit.

Cooking duration
Program
Preset temperature
Rotate the knob and select the program. Preset values will be displayed: Some programs allow setting the temperature and cooking time.

Rotate the knob to scroll through the programs. Confirm each setting by pressing the knob.

Aquaclean
This program allows easy removal of stains from the oven (see chapter Cleaning and Maintenance).

Defrosting
Use this function to slowly defrost frozen food (cakes, pastry, bread, rolls, and deep-frozen fruit). Preset program values may be changed (temperature, cooking duration).
Halfway through the defrost time, the pieces should be turned over, stirred, and separated if they were frozen together.

Reheating
This is used to keep warm the food that has already been cooked. You may set the temperature and reheating start and end time.

Plate warming
Use this function to restore your dinnerware (plates, cups) before serving food in it to keep the food warm longer. You may set the temperature and reheating start and end time.
Child lock
To activate the child lock, press and hold (for 5 seconds) the light key 🔊. Loc will appear on the display unit. When you long-press the light key again, the child lock is deactivated.
- If the child lock is activated with no timer function engaged (only clock is displayed), then the oven will not operate.
- If the child lock is activated after a timer function has been set, then the oven will operate normally; however, it will not be possible to change the settings.
- When the child lock is activated, cooking or baking systems (modes) or additional functions cannot be changed. The cooking/baking/roasting process can only be stopped or switched off.
- Child lock will remain active after the oven is switched off. To select a new system, the child lock must first be deactivated.
Starting the cooking process


start | stop
Start the cooking process by pressing the start|stop key.
Until the set temperature is reached for the first time, the current and the temperature will alternate on the display unit. The temperature symbol flashes at first. When the desired temperature is reached, it goes off.

If no timer function is selected, cooking time will appear on the display unit. A short acoustic signal is emitted when the oven reaches the selected temperature.
*** GRATIN ***
You may only activate this function 10 minutes after the start of the cooking process (the symbol will appear on the display unit). Rotate the KNOB to setting and confirm by pressing on the KNOB. Cooking time of 10 minutes (10:00) will appear on the display unit. Rotate the KNOB to set the gratin time. The function is used in the last stage of baking after you have added sauce (wet rub) or dry rub onto the food, or when you wish to additionally brown the surface or crust. A golden-brown crust will form on the dish during the gratin process, which protects the food from drying out, while also imparting a more pleasant appearance and better flavour.

The function can also be switched off while it is in progress. Rotate the KNOB to setting. Choose the immediate sign and confirm by pressing on the KNOB.

Baking with addition of steam

In systems with addition of steam, insert the shallow baking tray in the first-level guide, while the oven is still cool. Pour a maximum of 2 dl of water onto the baking sheet. Place the food to be cooked on the second level and start the system.

If you are using a deep baking tray, insert it one level higher than specified in the recommended setting table. For optimum operation of the function, do not open the oven door and do not add water during the cooking process.
End of cooking and switching off the oven
Touch the start | stop key to stop the operation. End appears on display unit and an acoustic signal is emitted. After three minutes, the clock will appear on the display unit.

After the operation is completed, all timer settings are also stopped and deleted, except for the minute minder. Time of day (clock) will be displayed. The cooling fan will continue to operate for a while.
After the use of the oven, some water may be left in the condensate channel (underneath the door). Wipe the channel with a sponge or a cloth.
Choosing the general settings
Press and hold the extra bake key. SEtt will appear on the display unit for a few seconds. Then, the general settings menu will appear.

Rotate the KNOB to scroll through the settings. Confirm each setting by pressing the KNOB or the start/stop key.

Clock display
Rotate the KNOB to set the clock. CLoc will appear on the display unit. After confirming, you can choose between the 12h and 24h clock display. Confirm, then set the clock/time of day. First, set the minutes. Confirm, and then set the hours and confirm again.

Acoustic signal volume
Choose between three acoustic signal volume levels. Rotate the KNOB to choose the VoL setting. Confirm the setting and set the volume. There are four available volume levels (zero bars - OFF, one, two or three bars).

Display illumination
Choose between three levels of display light intensity. Rotate the KNOB to select the brht setting. Confirm your selection and choose lower or higher intensity. There are three available illumination levels (one, two or three bars).

Display unit - night mode
This function will automatically dim the display (switch from high to low display illumination level) during nighttime (8:00 p.m. to 6:00 a.m.). Choose the nGht setting. Rotate the KNOB to switch On or OFF.

Standby
This function switches the clock display on or off. Select the hidE setting. Rotate the KNOB to switch On or OFF.

Adaptive function
The function allows adjusting the set cooking temperature and the cooking time. As a factory default, this function is deactivated, but you can activate it.
When the function is activated, the most recent cooking time is displayed. Settings for the most recent cooking session lasting at least 1 minute are taken into account.
AdPt will appear on the display unit. To deactivate the function, rotate the KNOB to position OFF. Follow the same procedure to activate the function. Select "On" on the display unit.

Automatic fast preheating
This function allows automatic addition of fast preheating to the baking systems that allow it.
Rotate the KNOB to select the Auto setting. Choose On or OFF.

Sabbath
The Sabbath function allows keeping the food warm in the oven without having to switch the oven on or off.
Rotate the KNOB to select SAbb. Choose On or OFF.
Set the duration (between 24 and 72 hours) and temperature. Confirm each setting by pressing the KNOB.
If you wish the oven light to be on all the time, switch it on by touching the symbol.
Touch the start|stop key to start the countdown. SAbb will appear on the display unit.
All sounds and operation will be deactivated, except for the on|off key.

In case of a power outage, the Sabbath mode will be deactivated and the oven will return to the initial state.

Factory settings
This function allows resetting the appliance to factory settings. FAct will appear on the display unit. Rotate the KNOB to select rES. Hold the start|stop until the end of animation to confirm.

WARNING!
After a power outage or after the appliance is switched off, additional function settings will remain stored for no more than a few minutes. Then, all settings, except for the acoustic signal volume and display dimmer, will be reset to factory defaults.
General tips and advice for baking
- Remove all unnecessary equipment from the oven during baking.
- Use equipment made of heat-resistant, non-reflective materials (supplied baking trays and dishes, enamel-coated cookware, tempered glass cookware). Bright-colored materials (stainless steel or aluminum) reflect heat. As a result, thermal processing of food in them is less effective.
- Always insert the baking sheets and trays to the end of the guides. When baking on the wire rack, place the baking dishes or trays in the middle of the rack.
- For optimum food preparation, we recommend observing the guidelines specified in the cooking table. Choose the lower specified temperature and the shortest specified cooking time. When this time expires, check the results and then adjust the settings as necessary.
- Unless it is absolutely necessary, do not open the oven door during baking.
- Do not place the baking trays directly onto the oven cavity bottom.
- Do not use the all-purpose deep baking tray on the 1st guide level while the appliance is operating.
- Do not cover the oven cavity bottom or the wire rack with aluminum foil.
- With longer cooking programs, you can switch off the oven approximately 10 minutes before the end of cooking time to make use of the accumulated heat.
- Always place the baking dishes onto the wire rack.
- When baking on several levels at the same time, insert the all-purpose deep baking tray into the lower level.
- When cooking according to recipes from older cookbooks, use the bottom and top heaters system (as in conventional ovens) and set the temperature 10°C lower than specified in the recipe.
- If you are using parchment paper, make sure it is resistant to high temperatures. Always trim it accordingly. Parchment paper prevents the food from sticking to the baking tray and makes it easier to remove the food from the baking tray.
- When cooking larger cuts of meat or pastry with higher water content, a lot of steam will be generated inside the oven, which in turn may condense on the oven door. This is a normal phenomenon that will not affect the operation of the appliance. After the cooking process, wipe the door and the door glass dry.
- When baking directly on the wire rack, insert the all-purpose deep tray one level lower to serve as a drip tray.
Fast preheating of the oven: Only preheat the oven if required by the recipe or in the tables in these instructions for use. If you are using the fast preheating function, do not insert the food into the oven until the oven is fully heated. Temperature has a substantial effect on the final result. Fast preheating is recommended for delicate cuts of meat (sirloin), and for yeast-leavened and sponge dough that require a shorter baking time. Heating an empty oven consumes a lot of energy. Therefore, if possible, we recommend cooking several dishes in succession, or making several dishes simultaneously.
GentleBake: Allows slow and controlled cooking at a low temperature. The meat juices are distributed evenly, and the meat remains juicy and tender. The Gentle Bake slow cooking method is suitable for delicate boneless meat cuts. Before slow cooking, sear the meat thoroughly from all sides in a frying pan.
Cooking table
NOTE: Dishes requiring a fully pre-heated oven are indicated with a single asterisk * in the table. Dishes for which a 5-minute pre-heating cycle suffices are indicated with two asterisks **. In this case, do not use the rapid preheat mode.
| Dish | | | | |
| PASTRYANDBAKERYPRODUCTS |
| pastry/cakesinmoulds |
| spongecake | | | | 30-401603 |
| piewithfilling | | | | 60-701802 |
| marblecake | | | | 50-60170-1802 |
| Gugelhupf(Bundtcake,pound cake) | | | | 45-55170-1802cake |
| openpie,tart | | | | 35-45170-1803 |
| brownies | | | | 30-35170-1802 |
| pastryonbakingtraysanddishes |
| | | | 60-70180-1902struc |
| | | | 34-45200-2102struc |
| 3spongerollbakingtray withwater | | | 13-18170-180* |
| | | | 30-40180-1902buch |
| biscuits,cookies |
| | | | 25-35160*3cupcake |
| | | | 30-40155-165*2,4cu |
| | | | 17-22180*2yeast-lea |
| yeast-leavenedsmallpastry,2 levels | | | | 18-25160*2,4 |
| | | | 15-20200*2puffpast |
| | | | 25-30170*2,4puffpa |
| cookies/biscuits |
| | | | 30-40150*3pipedco |
| | | | 30-40150*2,4pipedc |
| | | | 40-50145*1,3,5 |
| | | | 15-20160-170* |
Table continued from last page
| Dish | [HZZ6] | [HZSW] |  |  |
| | [3TBK] | | 20-25150-160*2,4bi |
| |  | | 120-15080-100*3mei |
| |  | | 120-15080-100*2,4m |
| | [TBC5] | | 15-20130-140*3ma |
| |  | | 15-20130-140*2,4m |
| bread |
| |  | | 30-4540-452risingal |
| 2breadonabekingatru. |  | | 40-55190-200 |
 withwater withwater |
| |  | | 40-55190-200*2,4bi |
| |  | | 30-45190-2001brea |
| |  | | 30-45200-2102,4bre |
| |  | | 15-252702flatbread |
| freshbreadrolls(Semmel/morning rolls) | 3 |  +bal +bal  with with  | | 10-15200-210 |
| freshbreadrolls(Semmel/morning rolls),2levels | |  | | 15-20200-210*2,4 |
| |  | 2405toastedbre | 6 |
| | [KAHT] | 2405opensandwishes |
| pizzaandotherdishes |
| 1homemadepiz. |  | 300* | 4-7 |
| |  | | 25-30210-220*2,4hc |
| |  | | 10-20200-2202froze |
| |  | | 10-20200-2202,4fro |
| | [38X2] | | 50-60190-2002savc |
| |  | | 40-50180-1902bure |
| MEAT | [SWSZ] |
| beefandveal |
| |  | 160-1702beefroed | 13st(l60,rump),1.5kg |
| |  | 200-2102boiled | 86e1205kg |
Table continued from last page
| Dish | | | | |
| | | | 40-60170-190*2sirlc |
| | | | 250-300120-140*2be |
| beefsteaks,welldone,thickness 4 cm | | | | 25-30220-2304 |
| | | | 25-35220-2304burg |
| | | | 120-150160-1702vea |
| pork |
| | | | 100-130170-1803por |
| | | | 90-120180-1903porl |
| | | | 80-10080-100*2pork |
| | | | 200-230100-120*2pc |
| | | | 210-240120-140*2pc |
| | | | 20-25220-2304pork |
| poultry |
| | | | 60-80200-2202poul |
| | | | 70-90170-1802poul |
| | | | 45-60170-1802poul |
| | | | 25-40210-2203chicl |
| | | | 20-35210-2204chicl |
| | | | 60-90100-120*3pou |
| meatdishes |
| | | | 60-70170-1802mea |
| | | | 8-15230**4grillsaus |
| FISHANDSEAFOOD |
| | | | 12-20230-2404who |
| | | | 8-12220-2304fishfil |
| | | | 10-15220-2304fishs |
| | | | 5-10230*4scallops |
| | | | 3-10230*4shrimps |
| VEGETABLES |
| | | | 30-40210-220*3bak |
Table continued from last page
| Dish |  |  |  |  |
| | [HT40]Bakingwaywithwater | | 40-50200-210* |
| | [BHAT] | | 30-40190-2003stuff |
| |  | | 20-30210-220*4Frei |
| |  Bakingwaywithwater Bakingwaywithwater | | 30-40190-200 |
| |  | | 30-40190-2003stuff |
| CONVENTIONALPRODUCTS-FROZEN |
| |  | | 20-25210-2203Fren |
| |  | | 30-40190-2102,4fre |
| |  | | 12-17210-220*4chic |
| |  | | 15-20210-2202fishfi |
| |  | | 30-40200-2102lasag |
| |  | | 20-30190-2002dice |
| | [DS74] | | 18-23170-1803crois |
| BAKEDPUDDINGS,SOUFFLÉSANDDISHESAUGRATIN |
| | [WAS3] | | 35-45180-1902pota |
| |  | | 35-45180-1902lasag |
| |  | | 40-60160-1802swe |
| |  | | 35-45160-180*2swe |
| |  | | 30-45170-1903dish |
| |  | | 20-35180-2002stuff |
| |  | | 6-9240**4grillingch |
| OTHER |
| |  | | 301802preservatic |
| |  | | 301253sterilization |
| cookinginabain-marie(doubleboiler) | |  | | /150-170*2 |
| |  | | /60-953reheating |
| | [CSYZ] | | 15752platewarmir |
Cooking with a temperature probe (BAKESENSOR)
(depending on the model)
The temperature probe allows for accurate monitoring of the core temperature of the food during cooking.

WARNING!
The temperature probe should not be in direct vicinity of the heating elements.
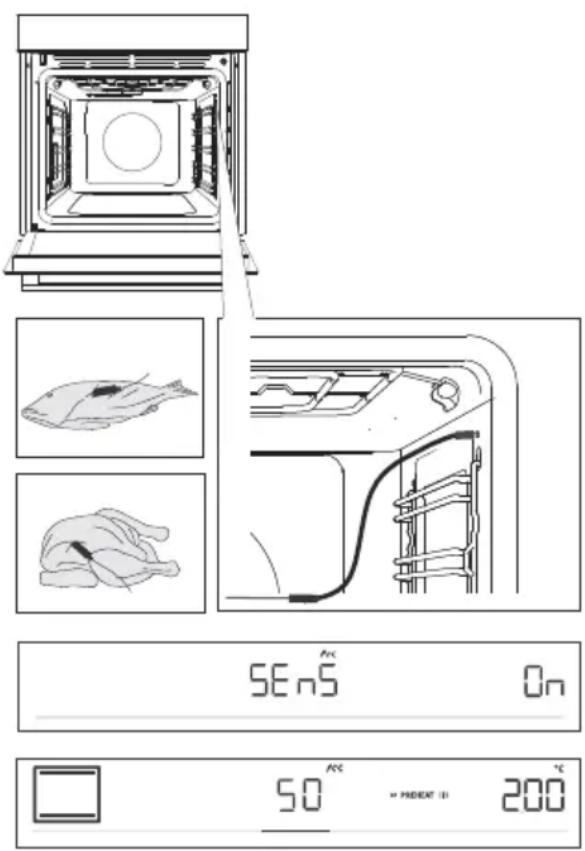
1. Stick the metal end of the probe into the thickest part of the food.
2 Plug the probe plug into the socket located in the upper-right corner at the front of the oven cavity (see figure). SEnS will appear on the display unit. To activate the function, rotate the KNOB to position On. Follow the same procedure to deactivate the function. Select OFF on the display unit.
NOTE: To enter the SEnS menu, stop the current cooking process and connect the probe to the socket. When you insert the probe into the socket, the previously selected or preset functions on the oven are deleted.
3 Choose the desired system and cooking temperature (in the temperature range of up to 230°C). Probe operation symbol and the preset temperature will appear on the display unit. To change the temperature, rotate the KNOB. Select the desired final core temperature of the food (in the temperature range between 30 and 99°C).
NOTE: When using the probe, setting the cooking time is not possible.
4 Confirm the setting by touching the start | stop key.
5 When the set core temperature is reached, the oven will stop operating. End will appear on the display unit. An acoustic signal will be heard which you may turn off by touching any key. After one minute, the acoustic signal will be switched off automatically.

During the cooking process, set and current food core temperature alternate on the display unit. You may change the cooking temperature or the target food core temperature during the cooking process.
Correct use of the probe, by type of food:
- poultry: stick the probe in the thickest part of the breast;
- red meat: stick the probe into a lean part that is not marbled with fat;
- smaller chunks with bone: stick them into an area along the bone;
- fish: stick the probe behind the head, towards the spine.

WARNING!
After use, carefully remove the probe from the food, unplug from the socket in the oven cavity, and clean it.
If "SEn" appears on the display unit when the temperature probe is not connected, clean the socket. Try connecting and disconnecting the temperature probe several times in a row.

If you do not use the probe, remove it from the oven.
Recommended doneness levels for different types of meat
| Typeoffood | blue (raw) | medium rare | medium | medium well | welldone |
| BEEF |
| | | | | 68-7359-6553-584 |
| | | | | 63-6658-6254-574 |
| | | | | 63-6658-6254-574 |
| | | | | 71-7466-6860-635 |
| VEAL |
| | | | | 63-6658-6254-574 |
| | | | | 63-6658-6254-574 |
| PORK |
| | | | | 75-8565-70///roast |
| | | | | /60-69///pork,loi |
| | | | | 80-85///meatloaf |
| LAMB |
| | | | | 77-8072-7666-716 |
| MUTTON |
| | | | | 77-8072-7666-716 |
| GOATMEAT |
| | | | | 77-8072-7666-716 |
| POULTRY |
| | | | | 82-90///poultry,wl |
| | | | | 62-65///poultry,br |
| FISHANDSEAFOOD |
| | | | | /62-65///trout |
| | | | | /55-60///tuna |
| | | | | /52-55///salmon |
Cleaning and maintenance

WARNING!
Before cleaning, unplug the appliance from the power mains and wait for the appliance to cool down.
Children should not clean the appliance or perform maintenance tasks without proper supervision.
For easier cleaning, the oven cavity and baking tray are coated with special enamel for a smooth and resistant surface.
Regularly clean the appliance and use warm water and hand dishwashing liquid to remove larger impurities and limescale. Use a clean soft cloth or sponge cloth.
Appliance exterior: use hot soapsuds and a soft cloth to remove impurities, then wipe the surfaces dry.
Appliance interior: for stubborn dirt and grime, use conventional oven cleaners. When using such cleaners, thoroughly wipe the appliance with a wet cloth to remove all cleaner residue.
Accessories and guides: clean with hot soapsuds and a damp cloth. For stubborn dirt and grime, we recommend prior soaking and use of a brush.
If the cleaning results are not satisfactory, repeat the cleaning process.

Never use aggressive or abrasive cleaners and accessories (abrasive sponges and detergents, stain and rust removers, scrapers for glass ceramic plates).
Oven equipment is dishwasher-safe.
Food residue (fat, sugar, protein) can ignite during the use of the appliance. Therefore, remove larger chunks of dirt from the oven interior and accessories before each use.
Using the AquaClean program to clean the oven
This program makes it easier to remove any stains from inside the oven.
The function is the most effective if used regularly, after each use.
Before running the cleaning program, remove all large visible chunks of dirt and food residues from the oven cavity.

1. Insert the shallow baking tray into the first guide level and pour 0.4 litres of hot water into it.
2. Touch the extra bake key to display extra functions on the display unit. Rotate the KNOB to the symbol. Preset values will appear on the display unit.
3. The program will operate for 30 minutes. When the program is complete, "End" will appear on the display unit.
4. When the program is completed, carefully remove the baking tray, using oven mitts (there can still be some water on the baking tray). Wipe down the stains with a damp cloth and soapsuds. Thoroughly wipe the appliance with a wet cloth to remove all cleaner residue.

If the cleaning process is not successful (in case of particularly stubborn dirt), repeat it.

WARNING!
Use the AquaClean system when the oven has fully cooled down.
Removing wire and fixed pull-out (extendible) guides

A Hold the guides by the bottom side and pull them towards the center of the oven cavity.
B Remove them from the openings at the top.
When removing the guides, take care not to damage the enamel coating.
Removing and replacing the oven door and glass panes

1 First, fully open the door (as far as it will go).
2 The oven door is attached to the hinges with special supports that also include safety levers. Rotate the safety levers towards the door by 90°. Slowly close the door to a 45° angle (relative to the position of the fully closed door); then, lift the door and pull it out.
The oven door glass pane can be cleaned from the inside, but it has to be removed from the appliance door first. First, proceed as described under item 2, but do not remove it.
3 Remove the air guide. Hold it on the left- and right-hand side of the door with your hands. Remove it by slightly pulling it towards you.
4 Hold the door glass at the upper edge and remove it. Do the same for the second and third glass pane (depending on the model).
5 To replace the glass panes, observe the reverse order.

To replace the door, follow the reverse order. If the door does not open or close properly, make sure the notches on the hinges are aligned with the hinge beds.

WARNING!
The oven door hinge can close with considerable force. Therefore, always rotate both safety levers to the support when fitting or removing the appliance door.
Soft door closing and opening
(depending on the model)
The oven door is fitted with a system that dampens the door closing force, starting at a 75° angle. It allows simple, quiet, and gentle opening and closing of the door. A gentle push (to a 15° angle relative to the closed door position) is enough for the door to close automatically and softly.

WARNING!
If the force applied to close the door is too strong, the effect of the system is reduced or the system will be bypassed for safety.
Replacing the bulb
The bulb is a consumable and therefore not covered by warranty. Before replacing the bulb, remove all accessories from the oven.
Halogen lamp: G9, 230V, 25W
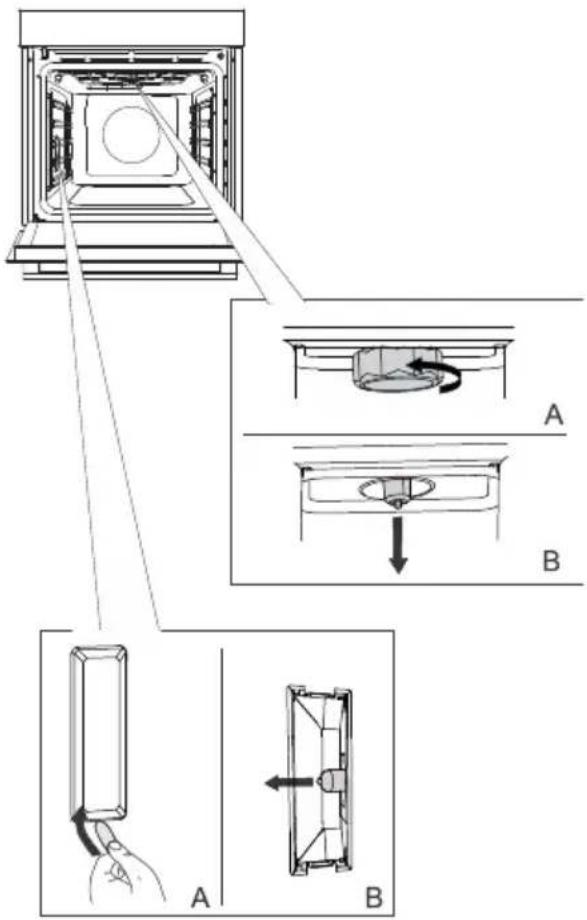
1. Unscrew and remove the cover (in anti-clockwise direction). Remove the halogen bulb.
2. Use a flat plastic tool to remove the cover. Remove the halogen bulb.
Take care not to damage the enamel coating.
Use protection to avoid burning yourself.

WARNING!
Only replace the light bulb when the appliance is disconnected from power supply.
Troubleshooting table
Special warnings and fault reporting
During the warranty period, only a service center authorized by the manufacturer may carry out any repairs.
Before making any repairs, make sure the appliance is disconnected from the power mains either by removing the fuse or by disconnecting the power plug from the wall outlet.
Any unauthorized repairs of the appliance may result in electric shock and short circuit hazard; therefore, do not perform them. Leave such work to an expert or a service technician.
In case of minor problems with appliance operation, check this manual to see if you can fix the problem yourself.
If the appliance is not operating properly or at all due to inappropriate operation or handling, a visit from a service technician shall not be free of charge, even during the warranty period.
Save the instructions for future reference and pass them on to any subsequent owners or users of the appliance.
Following is some advice on rectifying some common problems.
| CauseProblem/error |
| Callaservicetechnician.Themainfuseinyourhometripsoften. |
| Theovenlightingdoesnotwork. | Theprocessofchangingthelightbulbintheovenis describedinthechapterReplacingthebulb. |
| Controlunitisnotresponding,the screenisfrozen. | Disconnectttheappliancefromthepowermainsforafew minutes(undothefuseorswitchoffthemainswitch); then,reconnecttheapplianceandswitchiton. |
| ErrorCodeErrXisdisplayed.Incaseofadouble-digiterrorcode, ErXXwillbedisplayed. | Thereisanerrorintheelectronicmoduleoperation.Disconnectttheappliancefromthepowermainsforafew minutes.Iftheerrorisstillindicated,callaservicetechnician. |
If the problem persists despite observing the above advice, call an authorized service technician. Repair or any warranty claim resulting from incorrect connection or use of the appliance shall not be covered by the warranty. In this case, the user will cover the cost of repair.
Disposal
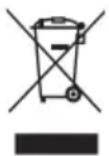
Our product packaging is made of environmentally friendly materials that can be recycled, disposed of, or destroyed without any hazard to the environment. To this end, packaging materials are labelled appropriately.
The symbol on the product or its packaging indicates that the product should not be treated as normal household waste. Take the product to an authorized collection centre for waste electric and electronic equipment processing.
Correct disposal of the product will help prevent any negative effects on the environment and health of people, which could occur in case of incorrect product removal. For detailed information on removal and processing of the product, please contact the relevant municipal body in charge of waste management, your waste disposal service, or the store where you bought the product.
We reserve the right to any changes and errors in the instructions for use.


Made in Slovenia
BOS6747A01X
gorenje

843525-a8
CE