
MBB1755SEM - Microwave AEG - Free user manual and instructions
Find the device manual for free MBB1755SEM AEG in PDF.


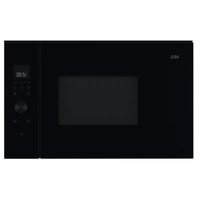
| Product Type | Microwave Oven |
| Brand | AEG |
| Model | MBB1755SEM |
| Capacity | 25 Liters |
| Dimensions (W x H x D) | 455 x 290 x 385 mm |
| Weight | 12 kg |
| Power Supply | 220-240 V, 50 Hz |
| Microwave Power | 800 W |
| Control Type | Touch Control |
| Display | LED Digital |
| Auto Cook Programs | Yes |
| Defrost Function | By Weight or Time |
| Child Lock | Yes |
| Timer | Up to 99 minutes |
| Clock | 24-hour display |
| Interior Light | Yes |
| Cavity Material | Stainless Steel |
| Installation Type | Built-in or Countertop |
| Certifications | CE, UKCA |
| Manual Available | Yes (152 pages) |
| Reparability Index | 3/10 (Typical for microwaves) |
Frequently Asked Questions - MBB1755SEM AEG
User questions about MBB1755SEM AEG
0 question about this device. Answer the ones you know or ask your own.
Ask a new question about this device
Download the instructions for your Microwave in PDF format for free! Find your manual MBB1755SEM - AEG and take your electronic device back in hand. On this page are published all the documents necessary for the use of your device. MBB1755SEM by AEG.
USER MANUAL MBB1755SEM AEG
TABLE OF CONTENTS
- IMPORTANT SAFETY INSTRUCTIONS....3
- INSTALLATION....7
- APPLIANCE OVERVIEW 11
- BEFORE FIRST USE....12
- OPERATION 13
- COOKING CHARTS 16
- TIPS AND ADVICE....22
- WHAT TO DO IF 24
- SPECIFICATIONS......25
- ENVIRONMENTAL INFORMATION 25
WE THINK OF YOU


Display segments

Weight
80W 240W 400W Power levels
2 function buttons
3 favorite buttons
4 automatic defrost button
5 more button
8. WHAT TO DO IF


WE'RE THINKING OF YOU
Thank you for choosing this AEG product. We have created it to give you impeccable performance for many years, with innovative technologies that help make life simpler – features you might not find on ordinary appliances. Please spend a few minutes reading to get the very best from it.
Visit our website for:

Get usage advice, brochures, trouble shooter, service information: www.aeg.com

Register your product for better service: www.registeraeg.com

Buy Accessories, Consumables and Original spare parts for your appliance: www.aeg.com/shop
CUSTOMER CARE AND SERVICE
We recommend the use of original spare parts.
When contacting Service, ensure that you have the following data available.
The information can be found on the rating plate. Model, PNC, Serial Number.

Warning/Caution - Safety information

General information and tips

Environmental information
Subject to change without notice.
1. ⚠️ SAFETY INFORMATION
This appliance can be used by children aged from 8 years and above and persons with reduced physical, sensory or mental capabilities or lack of experience and knowledge if they have been given supervision or instruction concerning use of the appliance in a safe way and understand the hazards involved. Children should be supervised to ensure that they do not play with the appliance. Cleaning and user maintenance shall not be made by children unless they are aged from 8 years and above and supervised.
This appliance is not intended for use at altitudes above 2000m.

IMPORTANT! IMPORTANT SAFETY
INSTRUCTIONS: READ CAREFULLY AND KEEP FOR FUTURE REFERENCE.

WARNING!
Do not use the appliance without the turntable and turntable support. Do not use the appliance when empty.

WARNING!
If the door or door seals are damaged, the oven must not be operated until it has been repaired by a competent person.

WARNING!
It is hazardous for anyone other than a competent person to carry out any service or repair operation that involves the removal of a cover which gives protection against exposure to microwave energy.

WARNING!
Liquids and other foods must not be heated in sealed containers since they are liable to explode.
This appliance is intended to be used in household and similar applications such as: staff kitchen areas in shops, offices and other working environments; farm houses; by clients in hotels, motels and other residential environments; bed and breakfast type environments.
Only use microwave-safe containers and utensils.
Metallic containers for food and beverages are not allowed during microwave cooking.
Do not leave the oven unattended when using disposable plastic, paper or other combustible food containers.
The microwave oven is intended for heating food and beverages. Drying of food or clothing and heating of warming pads, slippers, sponges, damp cloth and similar may lead to risk of injury, ignition or fire.
If food being heated begins to smoke, DO NOT OPEN THE DOOR. Turn off and unplug the oven and wait until the food has stopped smoking. Opening the door while food is smoking may cause a fire.
Microwave heating of beverages can result in delayed eruptive boiling, therefore care has to be taken when handling the container.
The contents of feeding bottles and baby food jars shall be stirred or shaken and the temperature checked before consumption, in order to avoid burns.
Do not cook eggs in their shells and whole hard boiled eggs should not be heated in microwave ovens since they may explode even after microwave cooking has ended.
1.1 Care and cleaning
Door:
To remove all trace of dirt, regularly clean both sides of the door, the door seals and sealing surfaces with a soft, damp cloth. Do not use harsh abrasive cleaners or sharp metal scrapers to clean the oven door glass since they can scratch the surface, which may result in shattering of the glass.
Oven interior:
For cleaning, wipe any splatters or spills with a soft damp cloth or sponge after each use while the oven is still warm. For heavier spills, use a mild soap and wipe several times with a damp cloth until all residues are removed. Do not remove the waveguide cover. Make sure that mild soap or water does not penetrate the small vents in the walls which may cause damage to the oven. Do not use spray type cleaners on the oven interior.
Clean the waveguide cover, the oven cavity, the turntable and turntable support after use. These must be dry and free from grease. Built-up grease may overheat and begin to smoke or catch fire.
Oven exterior:
The outside of your oven can be cleaned easily with mild soap and water. Make sure the soap is wiped off with a moist cloth, and dry the exterior with a soft towel.
Control panel:
Open the door before cleaning to de-activate the control panel. Care should be taken when cleaning the control panel. Using a cloth dampened with water only, gently wipe the panel until it becomes clean. Avoid using excessive amounts of water. Do not use any sort of chemical or abrasive cleaner.
Turntable and turntable support:
Remove the turntable and turntable support from the oven. Wash the turntable and turntable support in mild soapy water. Dry with a soft cloth. Both the turntable and the turntable support are dishwasher safe.

IMPORTANT!
Clean the oven at regular intervals and remove any food deposits. Failure to maintain the oven in a clean condition could lead to a deterioration of the surface that could adversely affect the life of the appliance and possibly result in a hazardous situation.
Care should be taken not to displace the turntable when removing containers from the appliance.

IMPORTANT!
A steam cleaner should not be used.
The microwave oven is intended to be used built-in.
The appliance and its accessible parts become hot during use.

WARNING!
Keep children away from the door to prevent them burning themselves.

IMPORTANT!
Do not use commercial oven cleaners, steam cleaners, abrasive, harsh cleaners, any that contain sodium hydroxide or scouring pads on any part of your microwave oven.
2. INSTALLATION

The microwave can be fitted in position A, B, C or D:

| Position | Niche size | ||
| W | D | H | |
| A 562 x 550 x 360 | |||
| B+C 462 x 300 x 350 | |||
| 462 x 300 x 360 | |||
| 562 x 300 x 350 | |||
| 562 x 300 x 360 | |||
| D 462 x 500 x 350 | |||
| 462 x 500 x 360 | |||
| 562 x 500 x 350 | |||
| 562 x 500 x 360 | |||
Measurements in (mm)
2.1 Safe use of the appliance
If fitting the microwave in position B or C:
- The cupboard must be a minimum of 500 mm (E) above the worktop and must not be installed directly above a hob.
- This appliance has been tested and approved for use near domestic gas, electric and induction hobs only.
- Sufficient space between hob and microwave should be allowed to prevent overheating of microwave oven, surrounding cupboard and accessories.
- Do not operate the hob without pans when the microwave oven is operating.
- Care should be taken when attending to the microwave oven while the hob is on.
2.2 Installing the appliance


- Remove all packaging and check carefully for any signs of damage.
- This oven is designed to fit into a 350 mm high cupboard as standard. When fitting into a 360 mm high cupboard: Unscrew and remove the 4 feet from the bottom of the oven. Rotate the feet 90 degrees and refit with the long side to the front of the oven.
- Fit the fixing hook to the right hand side of the kitchen cupboard using the instruction sheet supplied.
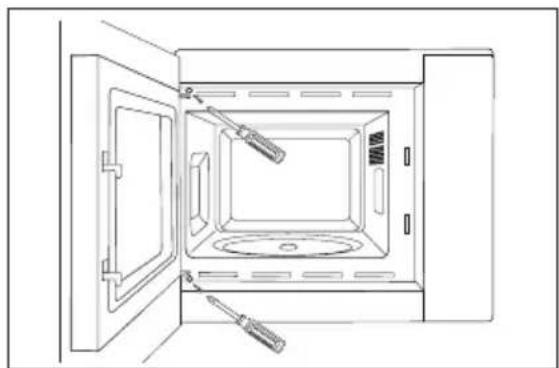
- Fit the appliance into the kitchen cupboard slowly, and without force. The appliance should be lifted onto the fixing hook and then lowered into place. Fix the oven on the left hand side using the two screws provided.
- Ensure the appliance is stable and not leaning. Ensure that a 2.5 mm gap is kept between the cupboard door above and the top of the frame (see diagram).
2.3 Connecting the appliance to the power supply

- The electrical outlet should be readily accessible so that the unit can be unplugged easily in an emergency. Or it should be possible to isolate the oven from the supply by incorporating a switch in the fixed wiring in accordance with the wiring rules.
- The power supply cord may only be replaced by an electrician.
- If the supply cord is damaged it must be replaced by the manufacturer, its service agent or similarly qualified persons in order to avoid a hazard.
- The socket should not be positioned behind the cupboard.
- The best position is above the cupboard, see (A).
- Connect the appliance to a single phase 220-240 V/50 Hz alternating current via a correctly installed earth socket. The socket must be fused with a 10 A fuse.
- Before installing, tie a piece of string to the power supply cord to facilitate connection to point (A) when the appliance is being installed.
- When inserting the appliance into the high-sided cupboard, DO NOT crush the power supply cord.
- Do not immerse the power supply cord or plug in water or any other liquid.
- Do not allow the power supply cord to run over any hot or sharp surfaces, such as the hot air vent area at the top rear of the oven.
2.4 Additional advice
Do not use the microwave oven to heat oil for deep frying. The temperature cannot be controlled and the oil may catch fire. To make popcorn, only use special microwave popcorn makers.
Individuals with PACEMAKERS should check with their doctor or the manufacturer of the pacemaker for precautions regarding microwave ovens.
Never spill or insert any objects into the door lock openings or ventilation openings. In the event of a spill, turn off and unplug the oven immediately and call an authorised ELECTROLUX service agent.
Never modify the oven in any way.
Only use the turntable and the turntable support designed for this oven. Do not operate the oven without the turntable.
To prevent the turntable from breaking:
- Before cleaning the turntable with water, leave the turntable to cool.
- Do not put hot foods or hot utensils on a cold turntable.
- Do not put cold foods or cold utensils on a hot turntable.
Neither the manufacturer nor the dealer can accept any liability for damage to the oven or personal injury resulting from failure to observe the correct electrical connection procedure. Water vapour or drops may occasionally form on the oven walls or around the door seals and sealing surfaces. This is a normal occurrence and is not an indication of microwave leakage or a malfunction.
Concerning the lamp(s) inside this product and spare part lamps sold separately: These lamps are intended to withstand extreme physical conditions in household appliances, such as temperature, vibration, humidity, or are intended to signal information about the operational status of the appliance. They are not intended to be used in other applications and are not suitable for household room illumination.
3. PRODUCT DESCRIPTION
3.1 Microwave oven
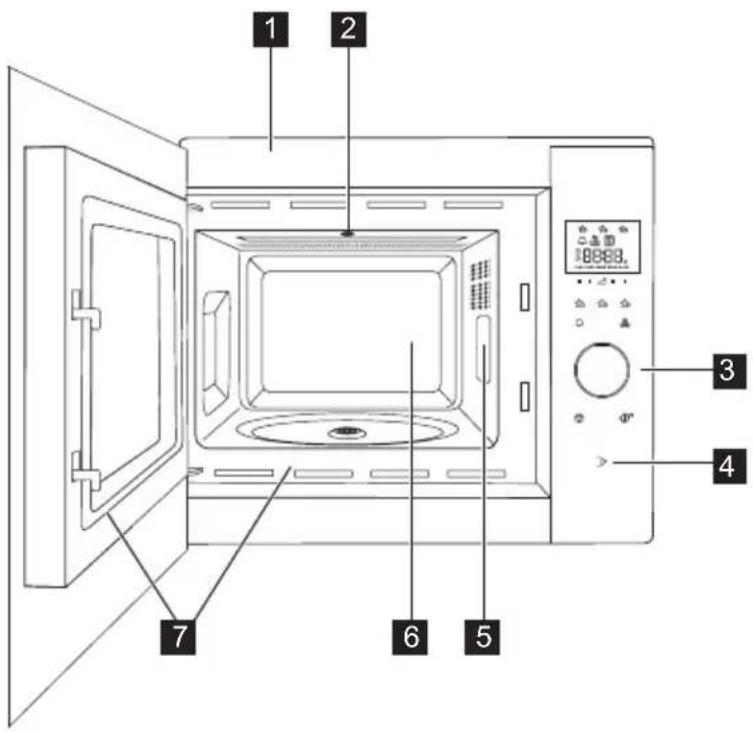
1 Front trim 2 Oven light 3 Control panel 4 Door open key 5 Waveguide cover (do not remove) 6 Oven cavity 7 Door seals and sealing surfaces
3.2 Accessories
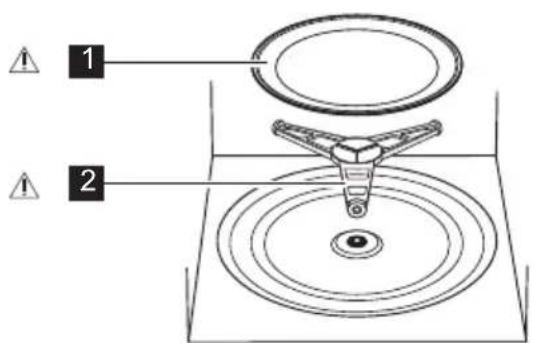
Check to make sure the following accessories are provided:
1 Turntable 2 Turntable support
- Place the turntable support in the hole on the floor of the cavity.
- Then place the turntable on the turntable support. • To avoid turntable damage, ensure dishes or containers are lifted clear of the turntable rim when removing them from the oven.

When you order accessories, please mention two items: part name and model name to your dealer or an authorised ELECTROLUX service agent.

WARNING!
Do not operate the microwave oven without these parts fitted.
3.3 Control panel


4. BEFORE FIRST USE
4.1 Plug in
When the oven is plugged in for the first time you have the option of setting the clock. The oven has a 24hr clock.
- The oven will beep and all of the display icons will be switched on for half a second.
Use the knob to select clock 'on' or clock 'oFF'.
2a. To turn the clock off, turn the knob until the display shows 'oFF', then press the START key. The oven is ready to use.
If you have turned the clock off and want to turn it back on, press the KITCHEN TIMER key twice and follow 2b.
2b. To turn the clock on, turn the knob until the display shows 'on', then press the START key.
Example: To set the clock to 18:45.
- Rotate the knob to adjust the hour.
- Press the START key to confirm.
- Rotate the knob to adjust the minutes.
- Press the START key to confirm.
When the clock is set, the time of day will be shown in the display.
4.2 Standby (Economy mode)
The oven will automatically enter standby mode if it is not used within a 5-minute period.
Example: If the clock has not been set:
The display will switch off.
To exit standby mode open the door, press any key or rotate the knob.
Example: If the clock has been set:
After the 5 minute period, the time will be displayed.
4.3 Adjusting the clock when set
You can adjust the clock after the time has been set.
Example: To change from 18.45 to 19.50.
- Press the KITCHEN TIMER key twice.
- Press the START key.
- Rotate the knob till '19' is displayed.
- Press the START key.
- Rotate the knob till '50' is displayed.
- Press the START key.
4.4 To cancel the clock and set standby (Economy mode)
- Press the KITCHEN TIMER key twice.
- Rotate the knob until 'oFF' is displayed.
- Press the START key to confirm.
4.5 Child safety lock
The oven has a safety feature which prevents the accidental running of the oven by a child. When the lock has been set, no part of the microwave will operate until the lock feature has been turned off.
Switching the lock on or off is only possible when the oven is not running.
Example: To switch the lock on.
Press and hold the STOP key until the 'child lock' symbol switches on.
Example: To switch the lock off.
Press and hold the STOP key until the 'child lock' symbol switches off.
When child lock is switched on, all keys are disabled except the STOP key.
5. OPERATION
5.1 Microwave cooking
Example: To heat soup for 2 minutes and 30 seconds on 560 W microwave power.
- Press the POWER LEVEL key to the right of the triangle until '560 W' is displayed.
- Rotate the knob to enter the time.
- Press the START key.
In microwave cooking mode, you can adjust the power level of the oven by pressing the key directly below the required setting.
You can change the power level when the oven is running by pressing and holding the required
POWER LEVEL key until the new power setting is highlighted on the display. Power levels that are too high or cooking times that are too long may overheat foods resulting in a fire.
If 800 W is selected then the maximum microwave time that can be input is 15 minutes.
If the oven runs in any mode for 3 minutes or longer, the fan will stay on for 2 minutes after the cooking ends. Open the door and it will stop, close the door it will start again until 2 minutes is finished (including door open time). If the oven runs for less than 3 minutes the fan will not come on.
After cooking the turntable will continue to rotate until the cooking vessel returns to its initial start position. The cavity light will remain on until completion of the rotation, or for 5 seconds (whichever is greater). The oven will beep when complete. If the door is opened during this process, the rotation will stop.
5.2 Power levels
| Power setting | Suggested use |
| 800 W/HIGH Used for fast cooking or reheating (e.g. soup, casseroles, canned food, hot beverages, vegetables, fish). | |
| 560 W Used for longer cooking of dense foods such as roast joints, meat loaf and plated meals, also for sensitive dishes such as cheese sauce and sponge cakes. At this reduced setting, the sauce will not boil over and food will cook evenly without over cooking at the sides. | |
| 400 W For dense foods which require a long cooking time when cooked conventionally (e.g. beef dishes) it is advisable to use this power setting to ensure the meat will be tender. | |
| 240 W/DEFROST | To defrost, select this power setting, to ensure that the dish defrosts evenly.This setting is also ideal for simmering rice, pasta, dumplings and cooking egg custard. |
| 80 W For gentle defrosting (e.g. cream gateaux or pastry). | |
| 0 W For standing/kitchen timer. | |
W = WATT
5.3 Reduced power level
| Cooking mode Standard time Reduced power level |
| Microwave 800 W 15 minutes Microwave 560 W |
5.4 Adjusting the cooking time during cooking
You can adjust the cooking time during cooking.
Example: To add 2 minutes (120 seconds) using the START key.
- Press the START key four times.
The cooking time will increase by 120 seconds.
5.5 Using the stop key
Press the STOP key once to enter Pause mode.
Press the STOP key again to cancel the cooking time.
5.6 Kitchen timer
To set the kitchen timer.
- Press the KITCHEN TIMER key.
- Rotate the knob to enter the time.
- Press the START key. The timer will automatically start.
The time can be extended when the timer is running by rotating the knob or pressing the START key.
The timer function can only be used when the oven is not running.
5.7 Quick start
You can directly start cooking on 800 W/HIGH for 30 seconds by pressing the START key.
To add more time press the START key.
5.8 Mute
To turn the sound off.
- Press the KITCHEN TIMER key 3 times until 'Soun' is displayed.
- Rotate the knob until 'oFF' is displayed.
- Press the START key.
To turn the sound on.
- Press the KITCHEN TIMER key 3 times until 'Soun' is displayed.
- Rotate the knob until 'on' is displayed.
- Press the START key.
5.9 Pause
To pause whilst the microwave is running. 1. Press the STOP key or open the door. 2. The oven will pause for up to 5 minutes. 3. Press START to continue cooking.
5.10 Favourites
The oven has 3 Favourite recipes.

Example: To soften butter.
- Press the FAVOURITE 1 key once.
- Rotate the knob to enter the weight.
- Press the START key.
If display segments exhibit a rotating pattern this indicates that the food needs to be stirred or turned over. To continue cooking, press the START key. At the end of the auto defrost time, the programme will automatically stop. The power levels for the pre-set Favourite recipes cannot be adjusted. 1-4 Mug cakes can be cooked.

WARNING! Chocolate may become very hot! If the chocolate needs longer cooking time then add
10 seconds. Take care with chocolate as it may overheat and burn.
To overwrite Favourites for your own recipes.
- Press the POWER level key to select the power.
- Rotate knob to enter the required cooking time.
- Press and hold the FAVOURITE key you want to set until you hear a single beep and the favourite star is visible.
To re-set Favourites to the factory settings.
- Press the STOP key.
- Press and hold POWER LEVEL 400 W for 3 seconds. The oven will reset Favourites to the factory settings.
5.11 Auto defrost
Auto defrost automatically works out the correct cooking mode and cooking time based on the weight of the food.
You can choose from 2 auto defrost menus.
- Auto Defrost: Meat/Fish/Poultry
- Auto Defrost: Bread
Example: To defrost 0.2 kg steak.
- Select the auto defrost menu by pressing the AUTO DEFROST key once.
- Rotate the knob to select the weight.
- Press the START key.
If display segments exhibit a rotating pattern this indicates that the food needs to be stirred or turned over. To continue cooking, press the START key. At the end of the auto defrost time, the programme will automatically stop.
Time/Power adjustment is not available in auto defrost.
6. COOKING CHARTS
6.1 Favourites
| Favourites Weight Key Procedure | |
Soften Butter 0.05-0.25 kg • Place the butter in the pyrex dish. Stir well after cooking. Stir well after cooking. | |
Melt Chocolate 0.1-0.2 kg • Break up the chocolate into small pieces. Place the chocolate into a pyrex dish. Stir when audible bell sounds. Stir well after cooking. pieces. Place the chocolate into a pyrex dish. Stir when audible bell sounds. Stir well after cooking. WARNING: Chocolate may become very hot! If the chocolate needs longer then add 10 seconds cooking time. Take care with chocolate as it may overheat and burn. WARNING: Chocolate may become very hot! If the chocolate needs longer then add 10 seconds cooking time. Take care with chocolate as it may overheat and burn. | |
| Mug Cake 1-4 mugs • Make the cake as the recipe. Place themug towards the edge of the turntable.Stand for 30 seconds after cooking. |
6.2 Mug cake recipes
| Rich Chocolate Mug Cake | |
| Ingredients for 1 Mug: | |
| 2 1/2 tbsp (25 g) Plain Flour | |
| 2 tbsp (12 g) Cocoa Powder | |
| 2 1/2 tbsp (30 g) Castor Sugar | |
| 1/4 tsp | Baking Powder |
| 1 1/2 tbsp (15 g) Vegetable Oil | |
| 1/4 tsp | Vanilla Extract |
| 1 | Medium Egg |
| Raspberry Ripple Mug Cake | |
| Ingredients for 1 Mug: | |
| 2 1/2 tbsp (25 g) Plain Flour | |
| 2 1/2 tbsp (30 g) Castor Sugar | |
| 1/4 tsp Baking Powder | |
| 1 1/2 tbsp (15 g) Vegetable Oil | |
| 1/2 tsp Vanilla Extract | |
| 1 Medium Egg | |
| 1 1/2 tbsp Seedless Raspberry Jam |
Method:
- Put all of the dry ingredients into a mug, mix well with a fork.
- Add the vegetable oil, vanilla extract and egg, mix well.
- Place the mug off centre on the turntable.
- Cook using ☆ 3. The cake will rise out of the mug during cooking. After cooking, stand for 30 seconds.
Decorate with a swirl of chocolate buttercream.
Tip: To make Chocolate Orange Mug Cake replace the vanilla extract with 1/2 tsp orange extract.
Method:
- Put all of the dry ingredients into a mug, mix well with a fork.
- Add the vegetable oil, vanilla extract and egg, mix well.
- Fold in the jam using a spoon so that it streaks the mixture.
- Place the mug off centre on the turntable.
- Cook using ☆ 3. The cake will rise out of the mug during cooking. After cooking, stand for 30 seconds.
Decorate with a swirl of vanilla buttercream.
| Apple Crumble Mug Cake |
| Ingredients for 1 Mug: |
| 2 1/2 tbsp (25 g) Plain Flour |
| 2 tbsp (30 g) Soft Brown Sugar |
| 1/4 tsp Baking Powder |
| 1/4 tsp Ground Cinnamon |
| 1 1/2 tbsp (15 g) Vegetable Oil |
| 1 Medium Egg |
| 1 1/2 tbsp (30 g) Apple Sauce |
| half (7 g) Digestive Biscuit, crushed |
Method:
- Put all of the dry ingredients (except for the biscuit) into a mug, mix well with a fork.
- Add the vegetable oil and egg, mix well.
- Gently fold in the apple sauce using a spoon so that it streaks the mixture.
- Top with the crushed digestive biscuit.
- Place the mug off centre on the turntable.
- Cook using ☆ 3 . The cake will rise out of the mug during cooking. After cooking, stand for 30 seconds.
Top with a scoop of vanilla ice cream.

WARNING! The apple sauce will be hot.
| Peanut Butter Mug Cake |
| Ingredients for 1 Mug: |
| 2 1/2 tbsp (25 g) Plain Flour |
| 2 tbsp (30 g) Soft Brown Sugar |
| 1/4 tsp Baking Powder |
| 1 1/2 tbsp (15 g) Vegetable Oil |
| 1/4 tsp Vanilla Extract |
| 2 tbsp (30 g) Smooth Peanut Butter |
| 1 Medium Egg |
Method:
- Put all of the dry ingredients into a mug, mix well with a fork.
- Add the vegetable oil, vanilla extract, peanut butter, and egg mix well.
- Place the mug off centre on the turntable.
- Cook using ☆ 3 . The cake will rise out of the mug during cooking. After cooking, stand for 30 seconds.
Top with chocolate spread.
Tip: Use crunchy peanut butter if you prefer.
| Lemon Drizzle Mug Cake |
| Ingredients for 1 Mug: |
| 2 1/2 tbsp (25 g) Plain Flour |
| 2 1/2 tbsp (30 g) Castor Sugar |
| 1/4 tsp Baking Powder |
| 1 1/2 tbsp (15 g) Vegetable Oil |
| 1 tsp Lemon Zest |
| 1 Medium Egg |
| Topping: 1 tbsp Lemon Juice mixed with 2 tbsp Castor Sugar |
Method:
- Put all of the dry ingredients into a mug, mix well with a fork.
- Add the vegetable oil, lemon zest and egg, mix well.
- Place the mug off centre on the turntable.
- Cook using ☆ 3 . The cake will rise out of the mug during cooking.
- Make the drizzle topping by mixing the lemon juice with the castor sugar.
- After cooking, loosen the cake, pierce the top all over with a skewer, then drizzle the topping over the cake, stand for 30 seconds.
| Carrot Mug Cake |
| Ingredients for 1 Mug: |
| 2 tbsp (20 g) Plain Flour |
| 2 1/2 tbsp (30 g) Light Brown Sugar |
| 1/4 tsp Baking Powder |
| 1/4 tsp Ground Cinnamon |
| 1/4 tsp Ground Nutmeg |
| 1 tbsp Ground Almonds |
| 1 1/2 tbsp (15 g) Sunflower Oil |
| zest from 1/2 Orange |
| 30 g Grated Carrot |
| 1 Medium Egg |
| Cream Topping: 15 g Butter, Softened40 g Icing Sugar40 g Full-fat Cream Cheese 1/2 tsp Orange Juice |
Method:
- Put all of the dry ingredients into a mug, mix well with a fork.
- Add the sunflower oil, orange zest, grated carrot and egg, mix well.
- Place the mug off centre on the turntable.
- Cook using ☆ 3 . The cake will rise out of the mug during cooking.
- Make the topping by mixing the butter, icing sugar, cream cheese and orange juice together. After cooking, stand for 30 seconds.
Allow the cake to cool, then add the topping.
6.3 Auto defrost
| Auto defrost Weight Key Procedure | |
| Meat/fish/poultry | 0.2-0.8 kg • Place the food in a flan dish in the centre of the turntable.When the audible bell sounds, turn the food over, rearrange and separate.Shield thin parts and warm spots with aluminium foil.After defrosting, wrap in aluminium foil for 15-45 min, until thoroughly defrosted.Minced meat: When the audible bell sounds, turn the food over. Remove the defrosted parts if possible. Not suitable for whole poultry. |
| (Whole fish, fish steaks, fish fillets, chicken legs, chicken breast, minced meat, steak, chops, burgers, sausages) | |
| Bread 0.1-1.0 kg • Distribute in a flan dish in the centre of the turntable. For 1.0 kg, distribute directly on the turntable.When the audible bell sounds, turn over, rearrange and remove defrosted slices.After defrosting cover in aluminium foil and stand for 5-15 min until thoroughly defrosted. | |

Enter the weight of the food only. Do not include the weight of the container.
For food weighing more or less than weights/quantities given in the chart, use manual operation.
The final temperature will vary according to the initial temperature.
Steaks and chops should be frozen in one layer.
Minced meat should be frozen in a thin shape.
6.4 Heating food and drink
| Food/drink | Quantity -g/ml- | Power Level | Time -Min- | Method |
| Milk, 1 cup 150 800 W 1 do not cover | ||||
| Water, 1 cup | 150 | 800 W | 1-2 | do not cover |
| 6 cups | 900 | 800 W | 10-12 | do not cover |
| 1 bowl | 1000 | 800 W | 11-13 | do not cover |
| One plate meal | 400 | 800 W | 3-6 | cover, stir halfway through cooking |
| Soup/stew 200 800 W 1-2 cover, stir after heating | ||||
| Vegetables 500 800 W 4-5 cover, stir halfway through cooking | ||||
| Meat, 1 slice1) | 200 800 W 3-4 thinly spread sauce over the top, cover | |||
| Fish fillet1) | 200 800 W 2-3 cover | |||
| Cake, 1 slice | 150 | 400 W | 1/2 | place in a flan dish |
| Baby food, 1 jar | 190 | 400 W | 1 | transfer into a suitable microwaveable container, after heating stir well and test the temperature |
| Melting margarine or butter1) | 50 800 W 1/2 cover | |||
| Melting chocolate | 100 | 400 W | 2-3 | stir occasionally |
1) from chilled
6.5 Defrosting
| Food | Quantity -g- | Power Level | Time -Min- | Method | Standing time -Min- |
| Goulash | 500 | 240 W | 8-12 | stir halfway through defrosting | 10-30 |
| Cake, 1 slice | 150 | 80 W | 2-5 | place in a flan dish | 5 |
| Fruit | 250 | 240 W | 4-5 | spread out evenly, turn over halfway through defrosting | 5 |
6.6 Cooking from frozen
| Food | Quantity -g- | Power Level | Time -Min- | Method | Standing time -Min- |
| Fish fillet 300 800 W 10-12 cover 2 | |||||
| One plate meal 400 800 W 9-11 cover, stir after 6 minutes 2 | |||||
6.7 Cooking
| Food | Quantity -g- | Power Level | Time -Min- | Method | Standing time -Min- |
| Broccoli/ Peas | 500 | 800 W | 9-11 | add 4-5 tbsps water, cover, stir halfway through cooking | - |
| Carrots | 500 | 800 W | 10-12 | cut into rings, add 4-5 tbsps water, cover, stir halfway through cooking | - |
| Roasts | 1000 | 800 W | 19-21 | season to taste, place in a shallow flan dish, turn over halfway through cooking | 10 |
| Fish fillet | 200 | 800 W | 3-4 | season to taste, place in a flan dish, cover | 2 |

If the oven runs in any mode for 3 minutes or longer, the fan will stay on for 2 minutes after the cooking ends. Open the door and it will stop, close the door it will start again until 2 minutes is finished (including door open time). If the oven runs for less than 3 minutes the fan will not come on.
7. HINTS AND TIPS
7.1 Microwave safe cookware
| Cookware | Microwave safe | Comments |
| Aluminium foil/containers | √ / ✘ | Small pieces of aluminium foil can be used to shield food from overheating. Keep foil at least 2 cm from the oven walls, as arcing may occur. Foil containers are not recommended unless specified by the manufacturer.Follow instructions carefully. |
| China and ceramics | √ / ✘ | Porcelain, pottery, glazed earthenware and bone china are usually suitable, except for those with metallic decoration. |
| Glasswaree.g. Pyrex ® | √ | Care should be taken if using fine glassware as it can break or crack if heated suddenly. |
| Metal | ✕ | It is not recommended to use metal cookware when using microwave power as it will arc, which can lead to fire. |
| Plastic/polystyrenee.g. fast food containers | √ | Care must be taken as some containers warp, melt or discolour at high temperatures. |
| Freezer/roasting bags | √ | Must be pierced to let steam escape. Ensure bags are suitable for microwave use. Do not use plastic or metal ties, as they may melt or catch fire due to the metal arcing. |
| Paper-plates, cups and kitchen paper | √ | Only use for warming or to absorb moisture. Care must be taken as overheating may cause fire. |
| Straw and wooden containers | √ | Always attend the oven when using these materials as overheating may cause fire. |
| Recycled paper and newspaper | ✕ | May contain extracts of metal which will cause arcing and may lead to fire. |
7.2 Microwave cooking advice
| Microwave cooking advice | |
| Composition Foods high in fat or sugar (e.g. Christmas pudding, mince pies) require less heating time. Care should be taken as overheating can lead to fire. | |
| Size For even cooking make all the pieces the same size. | |
| Temperature of food | The initial temperature of food affects the amount of cooking time needed.Cut into foods with fillings (e.g. jam doughnuts) to release heat or steam. |
| Arrange Place the thickest parts of food towards the outside of the dish (e.g. chicken drumsticks). | |
| Cover Use vented microwave cling film or a suitable lid. | |
Pierce Foods with a shell, skin or membrane must be pierced in several places before cooking or reheating as steam will build up and may cause food to explode (e.g. potatoes, fish, chicken, sausages). | IMPORTANT! Eggs should not be heated using microwave power as they may explode, even after cooking has ended (e.g. poached, hard boiled). |
| Stir, turn and rearrange | For even cooking it is essential to stir, turn and rearrange food during cooking.Always stir and rearrange from the outside towards the centre. |
| Stand Standing time is necessary after cooking to enable the heat to disperse equally throughout the food. | |
| Shield Warm areas can be shielded with small pieces of foil, which reflect microwaves (e.g. legs and wings on a chicken). | |

Use pot holders or oven gloves when removing food from the oven to prevent burns. Always open containers, popcorn makers, oven cooking bags, etc., away from the face and hands to avoid steam burns.
Always stand back from the oven door when opening to avoid burns from escaping steam and heat. Slice stuffed baked foods after heating to release steam and avoid burns.
8. TROUBLESHOOTING
| Problem Check if . . . | |
| The microwave appliance is not working properly? | · The fuses in the fuse box are working.· There has not been a power outage.· If the fuses continue to blow, please contact a qualified electrician. |
| The microwave mode is not working? | · The door is properly closed.· The door seals and their surfaces are clean.· The START key has been pressed. |
| The turntable is not turning? | · The turntable support is correctly connected to the drive.· The ovenware does not extend beyond the turntable.· Food does not extend beyond the edge of the turntable preventing it from rotating.· There is nothing in the well beneath the turntable. |
| The microwave will not switch off? | · Isolate the appliance from the fuse box.· Call an authorised ELECTROLUX service agent. |
| The interior light is not working? | · Call your authorised ELECTROLUX service agent. The interior light can be exchanged only by a trained authorised ELECTROLUX service agent. |
| The food is taking longer to heat through and cook than before? | · Set a longer cooking time (double quantity = nearly double time) or· If the food is colder than usual, rotate or turn from time to time or· Set a higher power setting. |
| The door will not open due to power cut? | · Open the door carefully by pulling outward at the bottom right hand corner of the door glass. |
9. TECHNICAL INFORMATION
| AC Line Voltage 220-240 V, 50 Hz, single phase | |
| Distribution line fuse/circuit breaker Minimum 10 A | |
| AC Power required: Microwave 1.25 kW | |
| Output power: Microwave 800 W (IEC 60705) | |
| Microwave Frequency 2450 MHz | 1) (Group 2/Class B) |
| Outside Dimensions: MBB1755SE | 495 mm (W) x 371 mm (H) x 312 mm (D) |
| MBB1756SE | 595 mm (W) x 371 mm (H) x 312 mm (D) |
| Cavity Dimensions 285 mm (W) x 202 mm (H) x 298 mm (D) | 2) |
| Oven Capacity 17 litres | 2) |
| Turntable ø 272 mm, glass | |
| Weight approx. 16 kg | |
1) This product fulfills the requirements of the European standard EN55011.
In conformity with this standard, this product is classified as group 2 class B equipment.
Group 2 means that the equipment intentionally generates radio-frequency energy in the form of electromagnetic radiation for the heat treatment of food.
Class B equipment means that the equipment is suitable to be used in domestic establishments.
2) Internal capacity is calculated by measuring maximum width, depth and height.
Actual capacity for holding food is less.
10. ENVIRONMENT CONCERNS
This product contains a light source of energy efficiency class E.
Recycle materials with the symbol ⚙. Put the packaging in applicable containers to recycle it.
Help protect the environment and human health and recycle waste electrical and electronic appliances.
Do not dispose of appliances marked with the symbol 📄 with household waste. Return the product to your local recycling facility or contact your municipal office.
- PRODUCT DESCRIPTION 86
- BEFORE USE....87
- OPERATION......88
- COOKING TABLES 91
- TIPS....97
- TROUBLESHOOTING....99
- TECHNICAL DATA....100
- ENVIRONMENTAL INFORMATION 100


6. COOKING TABLES
6.1 Favorites


- TABLE OF CONTENTS
- WE THINK OF YOU
- WHAT TO DO IF
- WE'RE THINKING OF YOU
- VISIT OUR WEBSITE FOR
- CUSTOMER CARE AND SERVICE
- ⚠️ SAFETY INFORMATION
- IMPORTANT! IMPORTANT SAFETY
- WARNING
- CARE AND CLEANING
- DOOR
- OVEN INTERIOR
- OVEN EXTERIOR
- CONTROL PANEL
- IMPORTANT
- INSTALLATION
- SAFE USE OF THE APPLIANCE
- INSTALLING THE APPLIANCE
- CONNECTING THE APPLIANCE TO THE POWER SUPPLY
- ADDITIONAL ADVICE
- PRODUCT DESCRIPTION
- MICROWAVE OVEN
- ACCESSORIES
- BEFORE FIRST USE
- PLUG IN
- STANDBY (ECONOMY MODE)
- ADJUSTING THE CLOCK WHEN SET
- TO CANCEL THE CLOCK AND SET STANDBY (ECONOMY MODE)
- CHILD SAFETY LOCK
- OPERATION
- MICROWAVE COOKING
- POWER LEVELS
- REDUCED POWER LEVEL
- ADJUSTING THE COOKING TIME DURING COOKING
- USING THE STOP KEY
- KITCHEN TIMER
- QUICK START
- MUTE
- PAUSE
- FAVOURITES
- AUTO DEFROST
- COOKING CHARTS
- MUG CAKE RECIPES
- METHOD
- COOKING FROM FROZEN
- COOKING
- HINTS AND TIPS
- MICROWAVE SAFE COOKWARE
- MICROWAVE COOKING ADVICE
- TROUBLESHOOTING
- TECHNICAL INFORMATION
- ENVIRONMENT CONCERNS
- COOKING TABLES
- FAVORITES
Brand : AEG
Model : MBB1755SEM
Category : Microwave