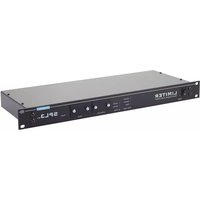
SPL-3 - Effect machine Dateq - Free user manual and instructions
Find the device manual for free SPL-3 Dateq in PDF.


| Product Type | Effect Machine |
| Brand | Dateq |
| Model | SPL-3 |
| Dimensions (W x H x D) | 19 x 1.75 x 6 inches (rackmount 1U) |
| Weight | 2.5 lbs (1.1 kg) |
| Power Supply | 9V DC, 500 mA (center negative) |
| Audio Inputs | 1/4" TS (mono) or balanced TRS |
| Audio Outputs | 1/4" TS (mono) or balanced TRS |
| Effect Types | Delay, Reverb, Chorus, Flanger, Phaser, Distortion, Compression, EQ, Pitch Shift, Wah |
| Number of Presets | 99 user + 99 factory |
| Control Interface | Rotary knobs, footswitch jacks, LED display |
| MIDI I/O | 5-pin DIN In/Out/Thru |
| USB Port | USB-B for firmware updates and preset editing |
| Sample Rate | 44.1 kHz or 48 kHz |
| Bit Depth | 24-bit |
| Frequency Response | 20 Hz - 20 kHz |
| Signal-to-Noise Ratio | >100 dB |
| Power Consumption | 5W max |
| Operating Temperature | 32°F to 104°F (0°C to 40°C) |
| Cleaning Instructions | Wipe with a soft, dry cloth. Do not use solvents. |
| Safety Warnings | Do not expose to moisture or heat. Use only with specified power adapter. |
| Spare Parts / Repairability | Contact authorized service center. No user-serviceable parts. |
| Included Accessories | Power adapter, user manual, warranty card |
| Certifications | CE, FCC, RoHS |
Frequently Asked Questions - SPL-3 Dateq
User questions about SPL-3 Dateq
0 question about this device. Answer the ones you know or ask your own.
Ask a new question about this device
Download the instructions for your Effect machine in PDF format for free! Find your manual SPL-3 - Dateq and take your electronic device back in hand. On this page are published all the documents necessary for the use of your device. SPL-3 by Dateq.
USER MANUAL SPL-3 Dateq
SPL 2 SPL 2 TS SPL 3 SPL 3 TS
GEBRUIKSAANWIJZING USER MANUAL GEBRAUCHSANWEISUNG
| S SPL 3 SPL 3 TS | ||||
| meetmicrofoon | ● ● | |||
| timer | ● | ● | ||
| SERIAL INTERFACE | ||
| 1 Ext Attenuation In | 9 *Mic In + | 21 *Mic In - |
| 2 Reduction | 10 Left In + | 22 Left In - |
| 3 Overload | 11 Right In + | 23 Right In - |
| 4 *Warning | 12 Left Out + | 24 Left Out - |
| 5 *Live Mode OK | 13 Right Out+ | 25 Right Out - |
| 18 I/O TXD | ||
| 19 I/O RXD | ||
| 6-8 Ground | 14-17, 20 Ground | *SPL3(TS) only |
DATEQ
LIMITER
Stereo Program Audio Limiter
SERIAL NUMBER
CAUTION
RISK OF ELECTRIC SHOCK. DISCONNECT POWER CABLE BEFORE OPENING.
MADE IN THE NETHERLANDS
SPL3(T8) only L
RL - R
2、本次股东大会的召集人和召集人
SERIAL INTERFACE
RoHS
CE
NPUT 2011
100-240VAC
POWER

Mic Input (gebruik alleen originele DATEQ microfoon) (XLR 3-pins female)
Balanced Stereo Left / Right Inputs (XLR 3-pins female)
Balanced Stereo Left / Right Outputs (XLR 3-pins male)
Signalling Connector (25-SUBD female)
EXTERNAL ATTENUATION INPUT
Front 483 x 45 mm (B x H) = 19", 1HE
Kastdiepte.... 175 mm
Gewicht (netto) 3.2 kg (SPL2 / SPL3), 3.5 kg (SPL2TS / SPL3TS)
1 All safety instructions, warnings and operating instructions must be read first.
2 All warnings on the equipment must be heeded.
3 The operating instructions must be followed.
4 Keep the operating instructions for future reference.
5 The equipment may never be used in the immediate vicinity of water; make sure that water and damp cannot get into the equipment.
6 The equipment may only be installed or fitted in accordance with the manufacturer's recommendations.
7 The equipment must be installed or fitted such that good ventilation is not obstructed in any way.
8 The equipment may never be installed in the immediate vicinity of sources of heat, such as parts of heating units, boilers, and other equipment which generates heat (including amplifiers).
9 Connect the equipment to a power supply of the correct voltage, using only the cables recommended by the manufacturer, as specified in the operating instructions and/or shown on the connection side of the equipment.
10 The equipment may only be connected to a legally approved earthed mains power supply.
11 The power cable or power cord must be positioned such that it cannot be walked on in normal use, and objects which might damage the cable or cord cannot be placed on it or against it. Special attention must be paid to the point at which the cable is attached to the equipment and where the cable is connected to the power supply.
12 Ensure that foreign objects and liquids cannot get into the equipment.
13 The equipment must be cleaned using the method recommended by the manufacturer.
14 If the equipment is not being used for a prolonged period, the power cable or power cord should be disconnected from the power supply.
15 In all cases where there is a risk, following an incident that the equipment could be unsafe, such as:
- if the power cable or power cord has been damaged
- if foreign objects or liquids (including water) have entered the equipment
- if the equipment has suffered a fall or the casing has been damaged
- if a change in the performance of the equipment is noticed it must be checked by appropriately qualified technical staff.
16 The user may not carry out any work on the equipment other than that specified in the operating instructions.
Introduction

The SPL2, SPL2TS, SPL3 and SPL3TS are sound pressure limiters (SPL), especially designed for use in public houses, discotheques, etc. The SPL-limiters are no peak-limiters, they only limit the average sound pressure. Trimmers for on-site calibration are positioned behind removable cover (plates) which can be put under seal.
The four different Dateq SPL-limiters form one family. The SPL2 and SPL27S function without a microphone, the SPL3 and SPL37S use a special measuring microphone. The SPL27S and SPL37S are supplied with a timer, able of setting the maximum sound level for certain periods of the day (see table 1). Basically, all four types are identical. This manual covers all different types. Directions for one specific type are indicated with a logo in the left margin.
| 3 SPL 3 TS | ||||
| measuring microphone | ● ● | |||
| timer | ● | ● |
Table 1: individual functions limiter types
Measuring microphone (advantages and disadvantages)
3 3TS
In some cases, authorities dictate the use of a measuring microphone. Also when using the limiter with live-music, a measuring microphone will be essential. Using a measuring microphone can have advantages and disadvantages.
- Calibrating the limiter usually takes place during the day, in an empty room. When this room fills with a crowd during the night, acoustical damping will occur, so the maximum sound level will be lower than the level set earlier. When making use of a microphone, the limiter will compensate for this difference.
- Using a measuring microphone can be a disadvantage in smaller rooms, with relatively low maximum sound levels (less than 100 dBA). In these situations, the crowd can easily drown the music, when singing along. This will be detected by the microphone, and the limiter can only react
in one way: by reducing the music level. Especially at these moments, this is a totally unwanted effect.
The measuring microphone of the SPL3 and SPL3TS can be bypassed, by means of the bypass-switch behind the left cover, so experimenting with or without a microphone is possible. However in bypass-mode, the SPL3 and SPL3TS cannot handle live-music.
Timer
A built-in timer can be very useful when the maximum allowed sound level varies per day or time-of-day. For example during the earlier hours of the evening, a higher level can be allowed than later in the evening or at night. The timer will switch automatically to the preset maximum level. The SPL2TS and SPL3T clock automatically switches between normal time and daylight savings time. The timer divides each day in 3 Timeslots. The beginning and ending as well as the maximum sound level of each timeslot can be set by software.

Using the SPL limiter
The limiting-algorithm is designed in such a way that the presence of the limiter action is difficult to notice. Of course it is not recommended to cross the limiter threshold too often. As soon as the threshold has been crossed more than 14 dB the OVERLOAD-LED will start to blink. If normally operated, this situation will never occur.
Music-mode / Live mode
The SPL3/3TS-limiters can be operated in two modes: a music-mode, during which the limiter will be a part of the audio-chain, and a live-mode especially for use with live-music, when musicians use their own amplifiers, percussion, etc.
- When signal is applied to the audio-input, the limiter will switch over into music-mode. The DETECT-, REDUCTION- and OVERLOAD-LED's indicate the status of the limiter. When the maximum level is exceeded, the audio-output will be reduced.
- In case no signal is applied to the audio-input, and the measuring microphone measures a sound level above the maximum allowed level, the limiter will switch over to live-mode. The WARNING-and SANCTION-LED's indicate the status of the limiter. In live-mode, the SPL3/3TS becomes a real "guard": because the limiter is not able to reduce the sound level in an active way, guarding the sound level will be done with the aid of two logical outputs. The first output (WARNING) can drive a LED or a lamp (via a solid-state-relay) to warn the musicians that the maximum level is exceeded. The second output is meant for switching the mains supply of the amplifiers of the live-band (via a solid-state-relay). If the WARNING-lamp will be ignored, the SPL3/3TS will sanction by switching off the mains supply of the bands' amplifiers.
Tip
Never try to use the SPL3/3TS in music-mode and live-mode at the same time, for example by feeding some of the bands' instruments through the limiter, while other instruments remain uncontrolled (percussion!). The limiter will unjustly try to reduce the level of only the instruments it is able to reduce, so the whole balance of the mix will be disturbed. Another problem of using both modes at the same time is that the WARNING-output will be disabled when signal is applied to the limiter. This is done because otherwise the WARNING-lamp will blink continuously in music-mode, since the limiter will always try to reach maximum sound pressure level when the input-threshold has been reached.
Connectors
To prevent modification of the connections after calibration and sealing, the connectors of the limiter are inaccessible after sealing of the cover plates at the front. To access the connector board, remove the right cover plate at the front panel.

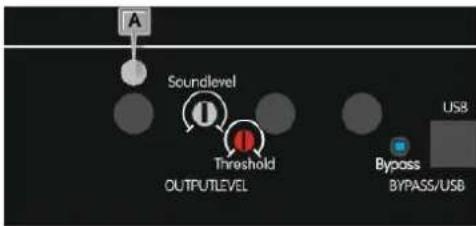
Unfasten screw (A) with a torx-screwdriver (see illustration). Now remove the 4 torx-screws (B) from the top lid. The top cover can be removed now. Gently lift the front side a little, and slowly shift the lop lid to the rear. The connector board will become visible.


AUDIO XLR
| 1 Ground |
| 2 Audio + |
| 3 Audio - |
| SERIAL INTERFACE | ||
| 1 Ext Attenuation In | 9 *Mic In + | 21 *Mic In - |
| 2 Reduction | 10 Left In + | 22 Left In - |
| 3 Overload | 11 Right In + | 23 Right In - |
| 4 *Warning | 12 Left Out + | 24 Left Out - |
| 5 *Live Mode OK | 13 Right Out+ | 25 Right Out - |
| 18 I/O TXD | ||
| 19 I/O RXD | ||
| 5-8 Ground | 14-17, 20 Ground | *SPL3(TS) only |
CHECK US E R MANUAL OR WWW.DATEQ.NL FOR O P E RATION AND MAINTENANCE DETAILS
DATEQ
LIMITER
Stereo Program Audio Limiter
SERIAL NUMBER
CAUTION
| RISK OF ELECTRIC SHOCK. |
| DISCONNECT POWER CABLEBEFORE OPENING. |
MADE IN THE NETHERLANDS
BPLS(T8) only L - R L - R
SERIAL INTERFACEAUDIO OUT PUTSAUDIO INPUT SMIC INPUT 2011
100-240VAC POWER

Mike Input (only use the original DATEQ-microphone) (XLR 3-pins female)
| Pin | Function | Type |
| 1 | Ground | A-GND |
| 2 | Audio + | In |
| 3 | Audio - | In |
Audio in Left / Right (balanced XLR 3-pins female)
| Pin | Function | Type |
| 1 | Ground | A-GND |
| 2 | Audio + | In |
| 3 | Audio - | In |
Audio out Left / Right (balanced XLR 3-pins male)
| Pin | Function | Type |
| 1 | Ground | A-GND |
| 2 | Audio + | Out |
| 3 | Audio - | Out |
Signalling Connector (25-SUBD female)
| Pin Function Type | ||
| 1 | external attenuation input (variable resistor 10 kΩ linear) | In |
| 2 reduction Out | ||
| 3 overload Out | ||
| 4 warning (SPL3 and SPL3TS only) Out | ||
| 5 live mode OK (SPL3 and SPL3TS only) Out | ||
| 6 Sanction active In | ||
| 9 mike in + (SPL3 and SPL3TS only) In | ||
| 21 mike in - (SPL3 and SPL3TS only) In | ||
| 10 audio in left + In | ||
| 22 audio in left - In | ||
| 11 audio in right + In | ||
| 23 audio in right - | In | |
| 12 audio out left + | Out | |
| 24 audio out left - | Out | |
| 13 audio out right + | Out | |
| 25 audio out right - | Out | |
| 18 TXD | ||
| 19 RXD | ||
| 6-8 | gnd | |
| 14-17, 20 | gnd | |
Connectors

MIC IN
Jack connector for the measuring microphone, supplied with the SPL3 and SPL37S. The limiter does not function without a connected microphone, except when the microphone is bypassed. The microphone cable can be extended, maximum is 100 meters (300 feet), but be aware of the polarity of the symmetrical cable. Mount the microphone to the wall or ceiling. Try to choose the position of the microphone in such a way, that the microphone picks up a good quality audio-signal. Try to prevent resonance for certain frequencies, or feeding the microphone with a filtered sound. Experience learns that it is advisable to try to position the microphone not too close to the crowd, so the balance between "human noise" and "electronic noise" tends to tip the scale in favour of "electronic noise". Sometimes authorities dictate the location where the measuring microphone should be mounted.
AUDIO IN L/R
Balanced audio inputs left and right.
AUDIO OUT L/R
Balanced audio outputs left and right.
EXTERNAL ATTENUATION INPUT
External volume control is possible by connecting a 10kΩ variable resistor. This way it is possible to control the volume from another place than where a the equipment is situated, for instance behind the bar.

REDUCTION
Connection for LED's or solid-state-relays, for external signalling of the REDUCTION situation (20 V DC / 10 mA).
OVERLOAD
Connection for LED's or solid-state-relays, for external signalling of the OVERLOAD situation (20 V / 10 mA).

WARNING
Connection for LED's or solid-state-relays, for external signalling of the WARNING situation (20 V / 10 mA).

LIVE MODE OK
Output for driving the switched power for the "live"-amplifiers (normally this output is "on" (+20 V / 10 mA DC), in the case of sanction, current is switched off.
SANCTION ACTIVE
In SPL2 mode it is possible to apply an additional sanction when the threshold is exceeded by more than 14dB. If this function is required pins 6 and 7 must be shorted.
MAINS Mains connection cable. The SPL limiters operate at 220 .. 240 V AC. The limiter has a built-in self recovering fuse which does not need to be replaced.
Operation
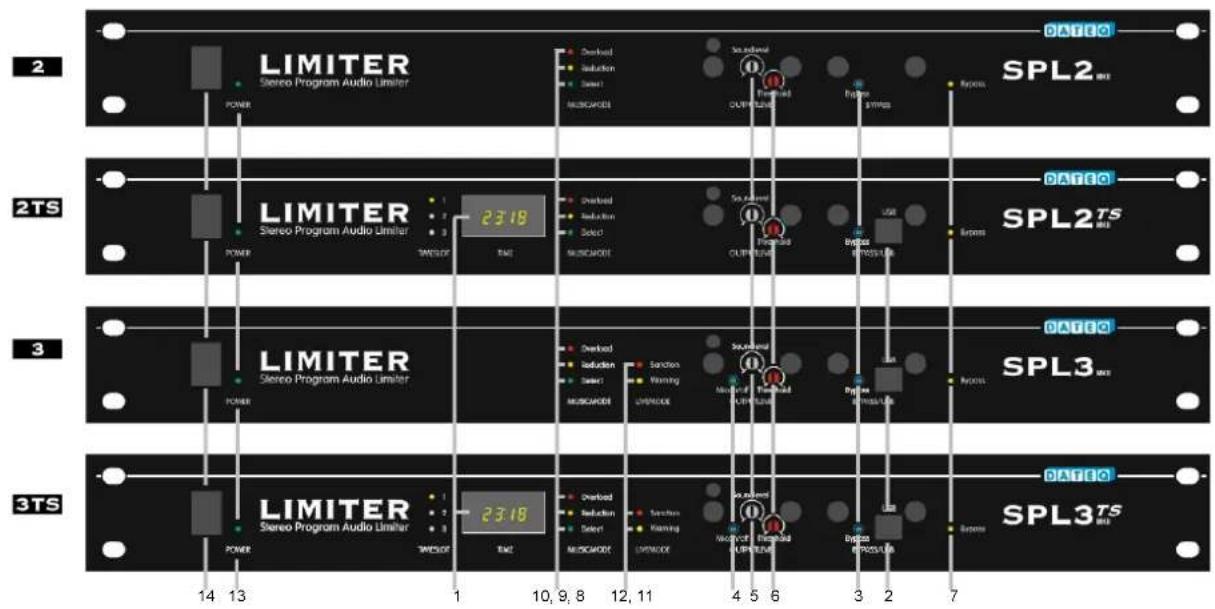
① TIME display. In normal mode the LED-display shows the time-of-day, in military format
2TS (24h-format). When switching on the limiter, the date and time will scroll through the

display. This is the easiest way to check if the time and date are set correctly. The 3 LED's on the left side of the display indicate which TimeSlot is active. Be sure the installation engineer or authority who programs the limiter leaves a programmed settings list, so the settings can always be checked afterwards. Other messages than time-of-day can appear on the display:
23:18
This is the normal mode of the display. The display indicates the time-of-day.
b P:2
The timer switched the limiter in bypass-mode. The number indicates the active bypass-period: in this case bypass-period 2. This message alternates with the time.
Err.3
The timeslot-data in the memory of the timer is corrupted. The limiter has to be programmed again to solve the problem. As long as the problem persists, the limiter will remain in error-mode: the maximum output of the limiter will be reduced considerable.
Err.4
Something went wrong when programming the timer. The timer needs to be reprogrammed, otherwise the limiter will remain in error-mode.
Err.5
The internal check of the limiter failed. Have the limiter repaired by authorised service personnel.
2TS 3TS
② USB-connector. The installation engineer or authority that calibrates the limiter is able to program the limiter, with the aid of a special computer program. Each day of the week is divided into 3 TimeSlots. The attenuation of each timeslot and the timeslot boundaries can be programmed with this program. Also special bypass-periods can be set: periods during which the limiter-functions are not active, for example during special events. 20 Different bypass periods can be programmed. The computer program is able to make a hardcopy of the data programmed in your limiter. It is useful to keep a hardcopy with the limiter, so the programmed data can always be checked. If your installation engineer or the calibrating authority doesn't have this program at his disposal, please contact your DATEQ-representative. With some restrictions, software is available freely.
In the carton you will find a USB stick with the new interface software. Connect the limiter to the computer, start the software and the following screen will be loaded.

Click on "connect"
The clock in the timer can be synchronized with the clock of your computer. If a DSR (license file) is present on your system you can make adjustments to the time slots of your limiter.


The next screen allows the programming of "bypass periods"

③ Bypass-switch. The mentioned bypass periods can also be set manually with the aid of the bypass switch behind the left cover. Leave the right cover under seal when setting the limiter in bypass-mode. This way the limiter doesn't have to be recalibrated after each special event.

4 Mic-switch. Mic-switch pressed: limiter with the aid of the measuring microphone. Mic-switch released: the measuring microphone is unused. This means that the live-mode can not be used. N.B.: after switching mode, the limiter needs to be recalibrated!

⑤ Output Level adjustment. With this trimmer the maximum allowed sound pressure level can be set. Apply signal to the input of the limiter (preferably white noise), so that the threshold will be crossed (DETECT and REDUCTION-LED are on). Adjust the OUTPUT LEVEL so that sound level will be the maximum allowed level. Note that the threshold should be set prior to the output level.
6 Threshold adjustment. The threshold-level is factory-set to 0dBm. As soon as the audio input level exceeds 0dBm, the limiter will reduce output level. In the case a mixing console is connected to the limiter, it is desired that the level meters on the console will indicate "0 dB" at the point the threshold is crossed. If the output level of the mixing console is different from 0dBm (775mV), the threshold level can be re-adjusted. Adjust the threshold to the level that the detect LED is blinking on the beat of the sound.

5 Sound Level adjustment. With this trimmer the maximum allowed sound pressure level for the SPL3 and SPL3TS can be set. Apply signal to the input (preferably white noise), so that the threshold will be crossed (DETECT and REDUCTION-LED are on). Adjust the SOUND LEVEL so that sound level will be the maximum allowed level. The adjusted sound level is automatically also the valid maximum sound level in live-mode. This means that the limiter can also be adjusted in another way: apply signal (preferably white noise) to the microphone by means of an external audio amplifier and speakers. Be sure that the maximum sound level is reached. Now adjust the SOUND LEVEL trimmer so that the LIVE-WARNING-LED just starts blinking. Decreasing the noise level only 1 dB should quiet the blinking LIVE-WARNING-LED eventually.
⑥ Threshold adjustment. The threshold-level is factory-set to 0dBm. As soon as the audio input level exceeds 0dBm, the limiter will reduce output level. In the case a mixing console is connected to the limiter, it is desired that the level meters on the console will indicate "0 dB" at the point the threshold is crossed. If the output level of the mixing console is different from 0dBm (775mV), the threshold level can be re-adjusted.
It takes some time before the limiter settles itself after adjusting the SOUND-LEVEL or the THRESHOLD-trimmer. Take this into account, when calibrating the limiter.
⑦ Bypass indication. This LED blinks if the limiter is switched in bypass-mode. This can be the result of a pre-programmed bypass period in the SPL2TS/3TS, or a pressed bypass-switch (behind the left front cover) in all limiters.
⑧ Detect indication. As soon as the input level exceeds the threshold level, the DETECT-LED lights up.
⑨ Reduction indication. When the limiter needs to reduce its output level, the REDUCTION-LED lights up.
10 Overload indication. As soon as the threshold is crossed more than 14dB, the SPL-limiter can not guarantee the audio quality of its output. If the threshold is crossed more than 14dB, the OVERLOAD-LED starts blinking.

11 WARNING-indication. In music mode, the DETECT/REDUCTION/OVERLOAD-LED's are active, while in live mode, the WARNING/SANCTION-LED's are active. When the measuring microphone detects a sound pressure level higher than the allowed maximum, the WARNING-LED will blink. If this situation persists, the blinking will become more intense (increasing duty-cycle). See figure below. An external lamp can be connected with the same indication (via a solid-state-relay).

⑫ SANCTION-indication (live-mode). If the sound level remains exceeded, the blinking WARNING-LED will light continuously. A few seconds after this, the SANCTION-LED will light, and the current of the "Live mode OK"-pin will be switched off. This should be used to switch of the mains from the live-bands amplifiers. After 30 seconds the limiter will reset, and power will be reapplied.

WARNING- and LIVE MODE OK- outputs
13 POWER ON-indication. This LED is on when the limiter is switched on.
14 POWER-switch. This is the mains switch of the limiter. When switched off, no audio will be fed through the limiter, and all outputs will be shut off. When switched on, the limiter needs some settling-time (blinking DETECT-LED (8)). After this, the limiter is ready for use.
Error messages
There are a few error situations in which the limiter will switch off its output, while one of the LED's at the front will blink to indicate that there is something wrong.

DETECT-LED (8) blinking: limiter is initialising after switching the power on. This situation will not last longer than a 2 seconds.


DETECT- & WARNING-LED (8) (11) blinking: limiter is initialising after switching the power on. In this case, the measuring microphone is switched on.


WARNING- & SANCTION-LED (11)(12) blinking: the supplied microphone is not connected correctly. Check the connection.

BYPASS-LED (7) blinking: the limiter is in BYPASS-mode, and will simply pass all audio on the input directly to the output.
Frequently asked questions
When installing a limiter based on a measuring microphone, a few problems can rise, which not everyone will realise in advance. To give a better insight in the operation of the limiter, the most frequently asked questions and their answers are mentioned below:
If the crowd makes too much noise (singing along with the music), the SPL3/3TS reduces the output level. How do I prevent this problem?
Especially in relatively small rooms, where the maximum allowed sound level is relatively low, the crowd is often capable of drowning the music. Of course this will be detected by the measuring microphone, and the limiter can only do one thing: reducing the music level, which is totally comprehensible, but rather undesired. This problem can be prevented by mounting the microphone at a location where the balance between crowd and music tends to tip the scale in favour of music (closer to the speakers). Another possibility is not using the measuring microphone. Realise that after relocating or switching off the measuring microphone, the limiter needs to be recalibrated.
I only use the SPL3/3TS for live music. What to do with the threshold trimmer?
The threshold trimmer has no function in live-mode. The setting of the threshold is only important in the case the microphone is not used. In that case the limiter is monitoring the input signal in order to calculate the nessecary attenuation. When using the microphone, only the measured microphone-sound-level is important.
Even with the SOUND LEVEL trimmer turned fully clockwise, the maximum sound level is too low. What to do now?
It is likely that the maximum sound level is far higher than what will be allowed by the authorities. The SPL3/3TS is designed to handle sound levels from as low as 80 dBA to nearly 120 dBA. If for one reason or another, more sound level is desired, increase the distance between microphone and speakers. This way the limiter will detect a lower sound level, so the limiter will apply less reduction.
With a live band, some instruments and the vocals are going via the main PA-system, through the SPL3/3TS. The other instruments are protected with the switched sanction output of the limiter. When the maximum level is exceeded, all sources via the main PA-system will be attenuated, while all "self support" instruments remain at the original level, so the whole balance of the mix is gone.
This is right. The SPL3 and SPL3TS are not suitable to be used in music mode and live mode at the same time. When the maximum level is exceeded, there is only one sensible thing to do for the limiter: reducing the output level, which will disturb the balance of the mix if some instruments are not controlled by the VCA's of the limiter. Use the limiter only in live mode in such cases.
Technical specifications
INPUTS
3 MIC (measuring microphone).... XLR-3 female, electronically balanced, use only the supplied microphone
LINE (left & right) ...... XLR-3 female, electronically balanced
Signal level -14 .. +6 dBu
Input impedance 10 kOhm
OUTPUTS
LINE (left & right) ...... XLR-3 male, electronically balanced
Output impedance 600 Ohm
GENERAL
AUDIO
Frequency response 20 Hz .. 20 kHz
Signal/noise ratio > 80 dB
THD+N < 0.05 % (CCIR-RMS)
LIMITING
Limiter threshold (adjustable)....-14 .. +6 dBu (without measuring microphone)
Limiter threshold (adjustable).... 80 .. 120 dBA (with measuring microphone)
Output reduction (adjustable).... 0 .. -40 dB (without measuring microphone)
EXTERNAL SIGNALLING
External attenuation.... 0 .. -20 dB (10 kOhm variable resistor)
Signalling- and switch outputs.... 20 V / 10 mA DC
POWER SUPPLY
Supply voltage 220...240 VAC / 50 Hz
Power consumption 10 W (SPL2 / SPL3), 20 W (SPL2TS / SPL3TS)
SIZE AND WEIGHT
Front 483 x 45 mm (B x H) = 19", 1HE
Depth 175 mm
Weight (net.) 3.2 kg (SPL2 / SPL3), 3.5 kg (SPL2TS / SPL3TS)
Product support
For questions about the SPL limiter series, accessories and other products, please contact:
Dateq Audio Technologies B.V.
De Paal 37
1351 JG ALMERE
The Netherlands
Telephone: +31 36 54 72 222
Fax: +31 36 53 17 776
E-mail: info@dateq.nl
Internet: www.dateq.nl
CHECK US ER MANUAL OR WWW.DATEQ.NL FOR OPERATION AND MAINTENANCE DETAILS

LIMITER
Stereo Program Audio Limiter
SERIAL NUMBER

CAUTION

MADE IN THE NETHERLANDS
SPL3(T5) only L - R L - R
SERIAL INTERFACEAUDIO OUTPUTSAUDIO INPUTSMIC INPUT 2011
100-24HVAC
POWER
Mic Input (nur das originale DATEQ-Mikrophon benutzen) (XLR 3-pins female)
Audio In Left / Right (XLR 3-pins female)
Audio Out Left / Right (XLR 3-pins male)
Signal Stecker (25-SUB D female)
EXTERNAL ATTENUATION INPUT
acc.to art.10.1 EMC directive 89/336/EEC
Wij, DATEQ Audio Technologies b.v.
de Paal 37,
1351 JG ALMERE,
Nederland
We, DATEQ Audio Technologies B.V.
de Paal 37
1351 JG ALMERE
THE NETHERLANDS
hereby declare, exclusively to our responsibility, that this product
Type: SPL 2 MkII Serialnrs.: 18-XXXX
to which this declaration applies, is in accordance with the following harmonized European norms
EN 50081-1 and EN 50082-1
According to the regulations of the EMC-directive 89/336/EEG, amended by directive 91/263/EEG, 92/31/EEG and 93/68/EEG.
EN 60065
According to the regulations of IEC 65: 1985 + A1: 1987 + A2: 1989 + A3: 1992, mod. Ratification: 1993-07-06
Almere, February 12th 2013 J.H. Kloppenburg, managing director
stamp: signature:

De Paal 37
1351 JG Almere
tel. 036-5472222, fax 036-5317776

Wij, DATEQ Audio Technologies b.v.
de Paal 37,
1351 JG ALMERE,
Nederland
We, DATEQ Audio Technologies B.V.
de Paal 37
1351 JG ALMERE
THE NETHERLANDS
hereby declare, exclusively to our responsibility, that this product
Type: SPL 3 MkII Serialnrs.: 23-XXXX
to which this declaration applies, is in accordance with the following harmonized European norms
EN 50081-1 and EN 50082-1
According to the regulations of the EMC-directive 89/336/EEG, amended by directive 91/263/EEG, 92/31/EEG and 93/68/EEG.
EN 60065
According to the regulations of IEC 65: 1985 + A1: 1987 + A2: 1989 + A3: 1992, mod. Ratification: 1993-07-06
Almere, February 12th 2013 J.H. Kloppenburg, managing director
stamp: signature:

audio technologies
De Paal 37
1351 JG Almere
tel. 036-5472222, fax 036-5317776

Wij, DATEQ Audio Technologies b.v.
de Paal 37,
1351 JG ALMERE,
Nederland
We, DATEQ Audio Technologies B.V.
de Paal 37
1351 JG ALMERE
THE NETHERLANDS
hereby declare, exclusively to our responsibility, that this product
Type: SPL 2 TS MkII Serialnrs.: 19-XXXX
to which this declaration applies, is in accordance with the following harmonized European norms
EN 50081-1 and EN 50082-1
According to the regulations of the EMC-directive 89/336/EEG, amended by directive 91/263/EEG, 92/31/EEG and 93/68/EEG.
EN 60065
According to the regulations of IEC 65: 1985 + A1: 1987 + A2: 1989 + A3: 1992, mod. Ratification: 1993-07-06
Almere, February 12th 2013 J.H. Kloppenburg, managing director
stamp: signature:

De Paal 37
1351 JG Almere
tel. 036-5472222, fax 036-5317776

VERKLARING VAN OVEREENSTEMMING
acc.to art.10.1 EMC directive 89/336/EEC
Wij, DATEQ Audio Technologies b.v.
de Paal 37,
1351 JG ALMERE,
Nederland
We, DATEQ Audio Technologies B.V.
de Paal 37
1351 JG ALMERE
THE NETHERLANDS
hereby declare, exclusively to our responsibility, that this product
Type: SPL 3 TS MkII Serialnrs.: 24-XXXX
to which this declaration applies, is in accordance with the following harmonized European norms
EN 50081-1 and EN 50082-1
According to the regulations of the EMC-directive 89/336/EEG, amended by directive 91/263/EEG, 92/31/EEG and 93/68/EEG.
EN 60065
According to the regulations of IEC 65: 1985 + A1: 1987 + A2: 1989 + A3: 1992, mod. Ratification: 1993-07-06
Almere, February 12th 2013 J.H. Kloppenburg, managing director
stamp: signature:

audio technologies
De Paal 37
1351 JG Almere
tel. 036-5472222, fax 036-5317776




- SPL 2 SPL 2 TS SPL 3 SPL 3 TS
- GEBRUIKSAANWIJZING USER MANUAL GEBRAUCHSANWEISUNG
- DATEQ
- LIMITER
- SERIAL NUMBER
- CAUTION
- EXTERNAL ATTENUATION INPUT
- INTRODUCTION
- MEASURING MICROPHONE (ADVANTAGES AND DISADVANTAGES)
- 3 3TS
- TIMER
- USING THE SPL LIMITER
- MUSIC-MODE / LIVE MODE
- TIP
- CONNECTORS
- MIC IN
- AUDIO IN L/R
- AUDIO OUT L/R
- REDUCTION
- OVERLOAD
- WARNING
- LIVE MODE OK
- SANCTION ACTIVE
- OPERATION
- 2TS 3TS
- ERROR MESSAGES
- FREQUENTLY ASKED QUESTIONS
- TECHNICAL SPECIFICATIONS
- INPUTS
- OUTPUTS
- GENERAL
- PRODUCT SUPPORT
- DATEQ AUDIO TECHNOLOGIES B.V
- TYPE: SPL 2 MKII SERIALNRS.: 18-XXXX
- TYPE: SPL 2 TS MKII SERIALNRS.: 19-XXXX
- VERKLARING VAN OVEREENSTEMMING
- TYPE: SPL 3 TS MKII SERIALNRS.: 24-XXXX
Brand : Dateq
Model : SPL-3
Category : Effect machine