
Deluxe Memory Boy - Guitar effect pedal Electro Harmonix - Free user manual and instructions
Find the device manual for free Deluxe Memory Boy Electro Harmonix in PDF.


| Product Type | Analog Delay & Modulation Effect Pedal |
| Brand | Electro Harmonix |
| Model | Deluxe Memory Boy |
| Power Supply | 9V DC (center negative), 200mA recommended, optional 9V battery |
| Dimensions | 2.75 in x 4.5 in x 1.5 in (70 mm x 114 mm x 38 mm) |
| Weight | 0.5 lb (227 g) |
| Input Impedance | 1 MΩ |
| Output Impedance | 100 Ω |
| Delay Time Range | Up to 600 ms |
| Modulation | Built-in LFO with Depth and Rate controls |
| Controls | Blend, Delay Time, Feedback, Modulation Depth, Modulation Rate, Tap Tempo switch |
| Additional Features | Expression pedal input (control delay time or modulation), True bypass switching |
| LED Indicators | Red status LED, Modulation LED |
| Connectors | 1/4 in Input, Output, Expression Pedal, 9V DC power jack |
| Construction | Sturdy metal chassis with durable paint finish |
| Cleaning Instructions | Wipe with dry cloth; do not use solvents or abrasives |
| Storage | Store in a cool, dry place away from direct sunlight |
| Safety Warnings | Use only specified power supply; avoid exposure to moisture or extreme temperatures |
| Repairability | No user-serviceable parts inside; refer to qualified technician for service |
| Warranty | 1 year limited warranty (check seller for details) |
| Included Accessories | User manual, 9V battery (may not be included) |
Frequently Asked Questions - Deluxe Memory Boy Electro Harmonix
User questions about Deluxe Memory Boy Electro Harmonix
0 question about this device. Answer the ones you know or ask your own.
Ask a new question about this device
Download the instructions for your Guitar effect pedal in PDF format for free! Find your manual Deluxe Memory Boy - Electro Harmonix and take your electronic device back in hand. On this page are published all the documents necessary for the use of your device. Deluxe Memory Boy by Electro Harmonix.
USER MANUAL Deluxe Memory Boy Electro Harmonix
Congratulations on your purchase of the Electro-Harmonix Deluxe Memory Boy, a true analog delay with the ability to tap in the delay time. The Deluxe Memory Boy (DXMB) also includes two types of delay time modulation, an effects loop in the feedback path of the delay block, an input gain control, tap tempo divide and optional expression pedal control over four parameters: Delay Time, Feedback, Modulation Depth and Modulation Rate. The DXMB is true bypass.
-CONTROLS and INDICATORS -
WARNING: Your Deluxe Memory Boy comes equipped with an Electro-Harmonix 9.6DC-200BI power supply (same as used by Boss™ & Ibanez™: 9.6 Volts DC 200mA). The Deluxe Memory Boy requires 100mA at 9VDC with a plug that is center negative. The DXMB does not take batteries. Using the wrong adapter may damage your unit and void the warranty.
KNOBS
DELAY Knob – Sets the delay time from 34 mS to 700 mS. As you turn the DELAY knob clockwise, the delay time will increase. If you tap in the delay time, using the TAP Footswitch, the DELAY knob's setting will be ignored until you move it again. If you turn the DELAY knob after tapping in a delay time, the DELAY knob's setting will supersede the last tap tempo that was entered. Turning the DELAY knob, while listening to your echoes, will bend the pitch of your notes. The DELAY knob can also be used to set the maximum delay time for expression pedal control. N.B.: the TAP DIVIDE button functions have no effect on the DELAY knob; pressing this button while the DELAY knob controls the delay time will not change the delay time.
FEEDBACK Knob – Controls the amount of signal that is circulated from the output of the delay block to its input. Turning the FEEDBACK knob clockwise increases the number of echoes. Setting the FEEDBACK control to its maximum
clockwise position will cause the DXMB to run-away, or self-oscillate. If instead you only want to hear one echo for each of your notes, turn the FEEDBACK knob down to its full counter-clockwise position. The FEEDBACK knob is also used to set the maximum amount of feedback for expression pedal control.
DEPTH Knob – Sets the amount of triangle or square wave modulation that is applied to the delay time. The DEPTH knob has a center detent which signifies the off position for no modulation. Triangle wave modulation occupies the counter-clockwise half of the DEPTH knob, square wave modulation the clockwise half of the DEPTH knob. As you turn DEPTH counter-clockwise from the center-detent's off position, the amount of TRIANGLE wave modulation increases, to its maximum setting at full counter-clockwise on the DEPTH knob. As you turn the DEPTH knob clockwise from the center-detent position, the amount of square wave modulation applied to the delay time increases, to its maximum setting at full clockwise on the DEPTH knob. The DEPTH knob is also used to set the maximum amount of modulation for expression pedal control.
RATE Knob – The RATE knob's main function is to set the rate or speed of modulation. As you turn the RATE knob clockwise the modulation rate will increase. The DEPTH knob must be set to somewhere other than the off position to hear the RATE knob change modulation speed. Additionally the RATE knob sets the maximum rate of modulation for expression pedal control.
The DXMB has a low cut tone control feature which the RATE knob adjusts. Enter low cut mode by pressing and holding down the EXP. MODE button for 2 seconds. After two seconds, all of the EXP. MODE LEDs will light solid and you can release the button. At this point, the RATE knob no longer adjusts the rate of modulation but instead sets the frequency for the DXMB's low cut filter. As you turn RATE clockwise, less bass will be present in the delayed signal. To completely bypass the low cut filter so that the full bass response comes through, turn the RATE knob down to the full counter-clockwise position. To exit low cut mode, press and release the EXP. MODE button. The DXMB will save the low cut setting, even after power cycling, and it will remain at that setting until adjusted again. The default setting from the factory is for the low cut filter to be bypassed.
GAIN Knob – Sets the input gain for the DXMB. As you turn the GAIN knob clockwise, the input gain will increase. The total gain range is -6 dB to +20 dB. The gain block is the first stage that the input signal goes through in the circuit. Both the dry and wet signals mixed by the BLEND knob go through the gain block.
BLEND Knob – The BLEND knob is a wet/dry control allowing you to vary the mix between direct and delayed signals at the OUTPUT jack of the DXMB. Set the BLEND knob to the full clockwise position for an output that is 100% wet. Set the Blend knob to full counter-clockwise for an output that is 100% dry. Setting BLEND anywhere in between will mix the wet and dry signals together.
SWITCHES & LEDs
BYPASS Footswitch and STATUS LED – The BYPASS FSW is used to toggle the DXMB between effect mode and true bypass mode. The red STATUS LED will light up when in effect mode and turn off in bypass.
TAP Footswitch – The TAP FSW is used to tap in the delay time. Stomp on the TAP FSW two times and the delay time will jump to the time between taps (if all the TAP DIVIDE LEDs are off). If you tap more than twice, it will average the tap tempo for all taps. The DXMB will always take into account the TAP DIVIDE setting when determining the delay time from the tap tempo. For example, if your tap time is 1 second and the TAP DIVIDE setting is eighth notes, the actual delay time is changed to 0.5 seconds. The maximum delay time, when tapped in, is 1.5 seconds; though at this delay time the effect will sound quite lo-fi. The DXMB will save and recall the tap tempo when power cycling.
N.B.: The delay time for the DXMB is always set by the last method used. If you tap in a delay time, the DELAY knob's setting is ignored. After tapping in a delay time, if you turn the delay knob, the tap time will be forgotten and replaced by the current position of the DELAY knob.
BEAT LED – The green BEAT LED always blinks at a rate that reflects the current delay time, whether you used the TAP FSW or the DELAY knob to set the delay time. The BEAT LED will also reflect the actual delay time rather than your tap time. For example, if your tap time is 900 mS but have the TAPE DIVIDE setting at eighth note triplet, the actual delay time is 300 mS so the BEAT LED will blink every 300 mS. If you are modulating the delay time, the change in delay time due to modulation will also be reflected in the BEAT LED.
TAP DIVIDE Button and LEDs – This button cycles through the six possible settings for TAP DIVIDE. Each setting, except when all LEDs are off, will divide the tap tempo to create shorter delay times in sync with your original tempo. It works like so: The DXMB always assumes that the musician taps in a quarter note. That quarter note can then be divided down to five other types of notes: dotted eighth note, quarter note triplet, eighth note, eighth note triplet and sixteenth note. The sixth mode is quarter note or OFF, where the tap tempo is not divided down and the delay time is set to your actual tap time. No LEDs are lit when Tap Divide is set to quarter note/OFF. Below is a chart displaying the six available modes and how they divide down the tap tempo to produce the actual delay time plus an example delay time setting:
| TAP DIVIDE MODE | SYMBOL | DIVIDE RATIO | DELAY TIME (for a 600 mS TAP) |
| Quarter Note / OFF | 1 / 1 | 600 mS | |
| Dotted 8th Note | 3 / 4 | 450 mS | |
| Quarter Note Triplet | [ABVT] | 2 / 3 | 400 mS |
| 8th Note | [Y500] | 1 / 2 | 300 mS |
| 8th Note Triplet |  | 1 / 3 | 200 mS |
| 16th Note |  | 1 / 4 | 150 mS |
N.B. The TAP DIVIDE button has no effect on the delay time when the delay is set by the DELAY knob. Cycling through the different TAP DIVIDE modes, when the delay time was last set by the DELAY knob, will not change the delay time in any way.
The TAP DIVIDE button setting is saved and recalled when power cycling.
TAP DIVIDE SEQUENCE MODE – The DXMB contains a little easter egg called Tap Divide Sequence mode. In this mode, the DXMB will automatically cycle through the six tap divide modes at a rate set by the RATE knob. To use this mode, do the following:
- Tap in a delay time. Tap Divide Sequence mode will not work if the delay time is set by the DELAY knob.
- Press and hold the TAP DIVIDE button for 2 seconds. After 2 seconds, all of the TAP DIVIDE LEDs will light up briefly, now you are in sequencer mode. You can release the button.
- Turn the RATE knob to change the speed of the sequence. You should see the tap divide LEDs light up in a sequential fashion.
- You can tap in new delay times to change the delay time range.
- To exit Tap Divide Sequence mode: hold down the TAP DIVIDE button for another 2 seconds. All 5 LEDs will light briefly to indicate you have exited sequence mode. You could also simply turn the DELAY knob.
EXP. MODE Button and LEDs – The EXP. Mode button cycles through the five available expression modes: RATE, DEPTH, FEEDBACK, DELAY and OFF. An expression pedal must be plugged into the EXP. PEDAL jack to make use of these modes. When one of the LEDs of any of the four modes is lit, the expression pedal will control that parameter. For example, if the RATE LED is lit, the expression pedal controls the modulation rate, from slowest (expression pedal = toe up), to the RATE knob's current setting (expression pedal = toe down). The OFF setting allows you to disable the expression pedal while it remains plugged into the DXMB. The setting for the EXP. MODE is saved and recalled when power cycling.
LOW CUT MODE – The EXP. MODE button is also used to enter and exit low cut mode. Low cut mode places a high pass filter after the bucket brigades in the delay section to remove bass or low frequencies from the delayed signal. To enter low cut mode, press and hold the EXP. MODE button for 2 seconds. All four Exp. Mode LEDs will light up indicating that you are in low cut mode. Now you can release the button. Use the RATE knob to adjust the amount of bass roll-off
in the wet signal; as you turn RATE clockwise you will hear less bass. Turning the RATE knob to full counter-clockwise completely bypasses low cut mode. The factory default setting bypasses low cut mode. To exit low cut mode, press and release the EXP. MODE button, it will return you to the previous expression mode setting while saving the new low cut setting. The low cut mode setting is also saved and recalled when power cycling the DXMB.
LOW CUT MODE BYPASS – There are two ways to bypass low cut mode: 1) Enter low cut mode by holding down the EXP. MODE button, then turn the RATE knob down to the full counter-clockwise position. 2) While powering up the DXMB, hold down the EXP. MODE button. It will immediately set the DXMB to bypass the low cut filter and also save the new setting. To bypass low cut mode, you must press and hold the EXP. MODE button before applying power to the DXMB.
I/O & POWER JACKS
EXPRESSION PEDAL CONTROL – The Deluxe Memory Boy allows external control over four of its parameters: modulation RATE, modulation DEPTH, FEEDBACK and DELAY time. Please see the EXP. PEDAL Jack section on the following page for suggestions on the type of expression pedals to use. The pedal will need to have a TRS plug. You may also use a control voltage between 0 V and 5 V.
Use the EXP. MODE button to choose the knob you want to control with an expression pedal; repeatedly press and release the EXP. MODE button until the proper LED lights up. After selecting a parameter, its associated knob will now set the maximum sweep range, which is the toe down position for the expression pedal. For example, if you want to sweep the full range of the FEEDBACK knob, you will need to set the FEEDBACK knob to its full clockwise position. The expression pedal will then sweep from 0% feedback (toe up position) to 100% feedback (toe down position).
Some expression pedals allow you to dial in the toe up position using an extra knob on the pedal itself. When using this type of pedal you can set the range for both toe up (using the knob on the pedal) and toe down (using the selected knob on the DXMB). If you use an expression pedal that does not allow you to dial in the toe up position, then toe up will always be that particular knob's minimum setting.
The minimum setting for the RATE, FEEDBACK and DELAY knobs is the full counter clockwise position. The minimum setting for the DEPTH knob is the center detent position at 12 o'clock. In the case of the DEPTH knob, the expression pedal will always sweep from the 12 o'clock position (toe up = depth off) to wherever the knob is set (toe down = maximum depth). So the expression pedal will not sweep through both the Triangle and Square waves, but sweeps through whichever side you have the DEPTH knob pointed to. For
example, set the DEPTH knob to 3 o'clock, approximately 50% square wave depth, and the expression pedal will sweep from no depth (toe up) to 50% square wave depth (toe down).
EFFECTS LOOP – The Deluxe Memory Boy has an effects loop feature which allows other effects to be inserted into the feedback loop of the delay block, before the bucket brigade chips. This means that you can put additional effects on your wet signal without changing your dry signal and each time your notes go around the feedback loop, they will also go through the effects loop.
For example, if you connect a Micro POG in the DXMB's effects loop, setting the Micro POG to output only the upper octave, the delayed note will be one octave above the dry note that you played. Additionally, with a fair amount of feedback on the DXMB, each time the note circles around the delay loop, the signal will go up another octave. So if you play a C2 on the guitar, the first echo will be a C3, the second C4, the third C5 and so on.
Another example would be to plug a volume pedal into the DXMB's effects loop. The volume pedal will act as a FEEDBACK control. With the addition of an expression pedal, you could have two pedals controlling parameters on the DXMB.
To properly use the DXMB's effects loop, connect the SEND jack to the input of your effects loop and the RETURN jack to the output of your effects loop.
N.B. If you do not wish to use the effects loop, please leave the RETURN jack disconnected.
INPUT Jack – Connect the output of your instrument or other effects pedal to the 14 " INPUT jack. The impedance presented at the INPUT jack is 1 MΩ.
OUTPUT Jack – Connect the output of the DXMB to the input of an amplifier or another effects pedal.
SEND Jack – Connect this jack to the input of another effects pedal or chain of effects pedals.
RETURN Jack – Connect this jack to the output of another effects pedal or chain of effects pedals. The input impedance presented at the RETURN jack is 2 MΩ.
EXP. PEDAL Jack – Allows the musician to control any of the four available expression modes with an optional expression pedal or control voltage. The expression pedal should have a Tip-Ring-Sleeve plug attached to it. It is important that the expression pedal have the correct polarity. The tip of the plug must be connected to the wiper of the potentiometer inside the expression pedal. If you are not sure what type of expression pedal to use, try to purchase one with a polarity switch so that it will work with many different types of instruments. Some suggested Expression Pedals: M-Audio EX-P, Moog EP-2,
Roland EV-5 or Boss FV-500L. You may also connect a control voltage to this jack. The Control Voltage range must be 0 V to 5 V.
9V PWR JACK – Connect the output plug of the supplied AC Adaptor into the 9V power jack at the top of the DXMB. The DXMB's current requirement is 100mA at 9VDC. The polarity of the power jack is center negative. The maximum allowable power supply voltage is 12 VDC.
- WARRANTY INFORMATION -
Please register online at http://www.ehx.com/product-registration or complete and return the enclosed warranty card within 10 days of purchase. Electro-Harmonix will repair or replace, at its discretion, a product that fails to operate due to defects in materials or workmanship for a period of one year from date of purchase. This applies only to original purchasers who have bought their product from an authorized Electro-Harmonix retailer. Repaired or replaced units will then be warranted for the unexpired portion of the original warranty term.
If you should need to return your unit for service within the warranty period, please contact the appropriate office listed below. Customers outside the regions listed below, please contact EHX Customer Service for information on warranty repairs at info@ehx.com or +1-718-937-8300. USA and Canadian customers: please obtain a Return Authorization Number (RA#) from EHX Customer Service before returning your product. Include with your returned unit: a written description of the problem as well as your name, address, telephone number, e-mail address, and RA#; and a copy of your receipt clearly showing the purchase date.
United States & Canada
EHX CUSTOMER SERVICE
ELECTRO-HARMONIX
c/o NEW SENSOR CORP.
47-50 33 ^RD STREET
LONG ISLAND CITY, NY 11101
Tel: 718-937-8300
Email: info@ehx.com
Europe
JOHN WILLIAMS
ELECTRO-HARMONIX UK
13 CWMDONKIN TERRACE
SWANSEA SA2 0RQ
UNITED KINGDOM
Tel: +44 179 247 3258
Email: electroharmonixuk@virginmedia.com
This warranty gives a purchaser specific legal rights. A purchaser may have even greater rights depending upon the laws of the jurisdiction within which the product was purchased.
To hear demos on all EHX pedals visit us on the web at www.ehx.com Email us at info@ehx.com
FCC COMPLIANCE
Note: This equipment has been tested and found to comply with the limits for a Class B digital device, pursuant to part 15 of the FCC Rules. These limits are designed to provide reasonable protection against harmful interference in a residential installation. This equipment generates, uses and can radiate radio frequency energy and, if not installed and used in accordance with the instructions, may cause harmful interference to radio communications. However, there is no guarantee that interference will not occur in a particular installation. If this equipment does cause harmful interference to radio or television reception, which can be determined by turning the equipment off and on, the user is encouraged to try to correct the interference by one or more of the following measures:
• Reorient or relocate the receiving antenna.
- Increase the separation between the equipment and receiver.
- Connect the equipment into an outlet on a circuit different from that to which the receiver is connected.
- Consult the dealer or an experienced radio/TV technician for help.
Modifications not expressly approved by the manufacturer could void the user's authority to operate the equipment under FCC rules.


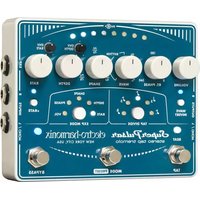
Brand : Electro Harmonix
Model : Deluxe Memory Boy
Category : Guitar effect pedal