
KSE 61 X, KSET61 - Home Appliances SMEG - Free user manual and instructions
Find the device manual for free KSE 61 X, KSET61 SMEG in PDF.


| Product type | Range hood |
| Brand | SMEG |
| Compatible models | KSE 61 X, KSET61 |
| Width | 600 mm |
| Depth | 280 mm |
| Height | 181 mm |
| Number of motor speeds | 2 speeds |
| Lighting | 2 lamps, max 40 W each |
| Filter type | Removable, washable metal filters |
| Activated carbon filter | Optional, lifespan 3 to 6 months |
| Installation mode | Under-cabinet mounting |
| Minimum distance (electric stove) | 60 cm |
| Minimum distance (gas stove) | 65 cm |
| Max length of exhaust duct | 4 meters |
| Max number of bends | 2 |
| Filter maintenance | Monthly dishwasher or hot water wash |
| Body cleaning | Soapy water at 40 °C, soft cloth |
| Lamp replacement | Disconnect power, max 40 W |
| Repairability | Authorized technical service recommended |
| Recycling | Compliant with WEEE (Directive 2002/96/EC) |
Frequently Asked Questions - KSE 61 X, KSET61 SMEG
User questions about KSE 61 X, KSET61 SMEG
0 question about this device. Answer the ones you know or ask your own.
Ask a new question about this device
Download the instructions for your Home Appliances in PDF format for free! Find your manual KSE 61 X, KSET61 - SMEG and take your electronic device back in hand. On this page are published all the documents necessary for the use of your device. KSE 61 X, KSET61 by SMEG.
USER MANUAL KSE 61 X, KSET61 SMEG
We congratulate you on your choice. We are sure that this modern, functional and practical article, constructed from highest quality materials, will fully meet your requirements.
Please read all the sections of this INSTRUCTION MANUAL before using the extractor for the first time to be able to obtain its full performance and to avoid any breakdowns that could arise from its misuse, also allowing small problems to be overcome.
Keep and store this manual. It will always provide useful information on the extractor and will help other people to use it.
Safety Instructions
Before using the extractor for the first time, you must read the following safety instructions.
-
Never pull the cable to unplug the extractor.
-
Do not switch on the extractor if the electricity cable is worn out or has cuts or if there are signs of deterioration around the control panel.
-
If the extractor stops working or functions abnormally, unplug it from the mains and advise the technical service.
-
Do not leave gas burning without a pan above it under the hood.
-
Do not allow grease to accumulate in any part of the extractor, especially in the filter as this COULD PRODUCE A FIRE RISK
-
Do not flambe food under the hood.
-
Before installing the extractor consult local rules and regulations in force with respect to current standards on air and fumes.
-
Before connecting the extractor to the mains, check that both the voltage and the frequency conform to what shown on the characteristics label of the extractor located inside it.
-
The cooker hoods provided with plug must preserve it accessible. In the opposite way, it is necessary to install an omnipolar switch with at least a distance of 3 mm. between Line (L) and Neutral (N).
-
The room must be provided with appropriate ventilation if the extractor is going to be used at the same time as other food processing equipment not using electrical power.
-
We recommend the use of gloves and caution when cleaning the inside of the extractor.
-
Your extractor is designed for domestic use and only for expelling and purifying gases arising from food preparation. Its use for any other purpose must be at your own responsibility and may be dangerous.
-
You should contact the nearest Qualified Technical Assistance Service for any repairs always using original spare parts. Repairs and modifications carried out by others could damage the apparatus or cause it to malfunction, and risking your safety. The manufacturer cannot be held liable for inappropriate use of the apparatus.
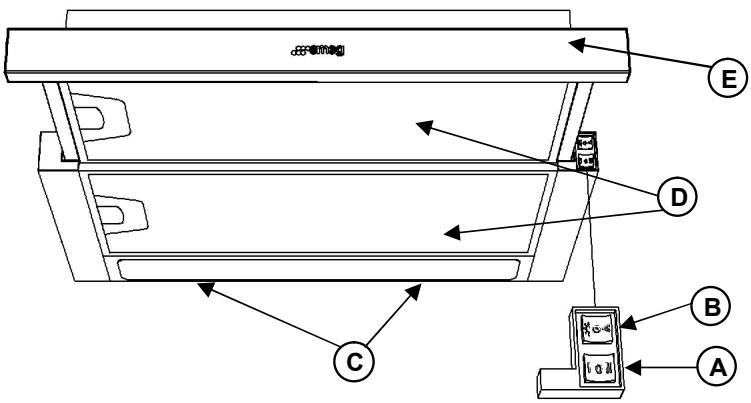
Description of the appliance (Fig.1)
A Motor controls, two speeds.
B Light switch independent from motor commands.
C Two lamps for hood lighting.
D Filters located over cooking area, easily removable for cleaning
E Extractable group that allows a greater gas capture area.
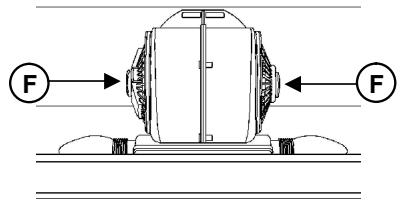
F Possibility of incorporating active charcoal filters (Fig. 2).
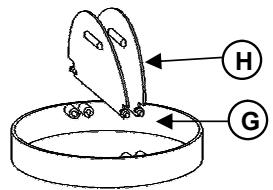
G-H Anti return tabs to be located in the outlet mouth, locating their ends in the holes provided (Fig. 2).
4
5
2
| Speed | Vitesse | Velocidad | Velocità | Snelheid | Absaugleistung | Скорочь | Velocidade | Hastigvet | |
| I | Low | Moyenne | Baja | Bassa | Laag | Leistungsstufe | Нizзая | Baixa | Låg |
| II | High | Maximum | Alta | Alta | Hoog | Intensivstufe | Бысокая | Alta | Hög |
| Light | Lumière | Luz | Luce | Licht | Beleuchtung | С Bret | Luz | Lampa | |
| 火 | On | Allumé | Encendido | Accesa | Aan | Ein | Вкlioчин | Acesa | Pà |
| 0 | Off | Eteint | Apagado | Spenta | Uit | Aus | Быкlioчин | Desligada | Av |
| A | Automatic | Automatice | Automatico | Automatica | Automaticsch | Automaticsch | Атоматчески | Automatico | Automaticisk |
3
Instructions for use
By pushing buttons shown in the figure 1, you will be able to control the functions of the extractor
Two achieve better extraction, we recommend switching on the extractor a few minutes before starting to cook (3 - 5 minutes) so that the air flow is continuous and stable when extracting the fumes.
Likewise, keep the extractor switched on for a few minutes when cooking is complete to allow all fumes and odours to be expelled.
Cleaning and maintenance
Before carrying out any cleaning or maintenance activities, ensure that the extractor is disconnected from the mains.
To carry out cleaning and maintenance, follow the Safety Instructions.
Filter cleaning
To remove the filters from their locations release the anchoring points. Clean the filter, either by putting it in the dishwasher (see notes) or leaving it standing in hot water to simplify the removal of grease or, if wished, by means of special sprays (protecting the non metallic parts). Once clean, leave it to dry.
Notes: cleaning in the dishwasher with aggressive detergents may darken the surface of metallic parts, without this affecting its gas retaining properties.
N.B. The filter must be cleaned at least once a month depending on how often the extractor is used. It must be remembered that grease accumulates in the extractor when cooking, whether it is switched on or not.
Cleaning of the extractor body
The use of warm (40^ approx.) soapy water is recommended. A cloth moistened in this water is used for cleaning the extractor, paying special attention to the grids. Afterwards, dry it using a lint-free cloth.
Note:
- Never use metallic scouring pads or abrasive products that could damage the surface.
- Do not use scrapers with metallic surfaces such as knives, scissors etc.
Active charcoal filter
- To install the charcoal filter, the motor anchorage is made to coincide with the anchor points of the activated charcoal filter and turn it clockwise.
- The carbon filter lasts from three to six months depending on the particular conditions of use.
- The activated carbon filter can neither be washed nor regenerated. Once it is exhausted, it must be changed.
- To replace exhausted filters with new ones, withdraw the old one in the reverse order to that of installation.
Changing Bulbs
- It is important that the mains are disconnected, and ensure the bulbs that are to be replaced are not hot.
- Remove the light lens to expose the extractable lamps.
- The maximum bulbs power is 40W.
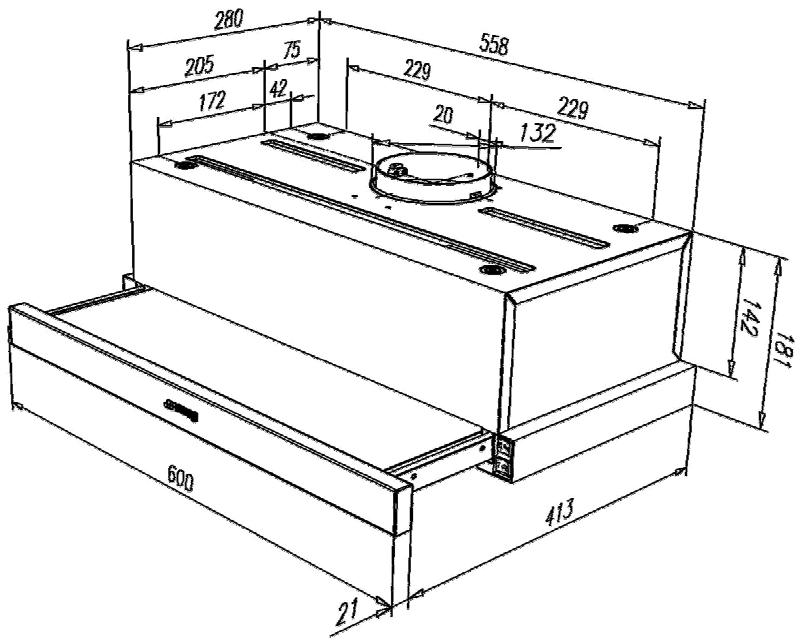
Technical Information (Fig.3)
Dimensions: Width = 600 mm
Depth = 280 mm
Height = 181 mm
Electrical characteristics:
REFER TO RATING PLATE
| MOD.XXXXXXXX Made in European Union - C.I.F.: A-39004932 | |
| TYP. Z-000000 | N' de fabric. Fabrik-Nr. Serial N, |
| CCD. CB-X-00000-Z | |
| POTENCA NOM. LAMPARAS NENNLEISTUNG Q.U.H.LAMPEN LAMPS RATE PUSSANCE LAMPS 2x40 W | ELECT. XXXV~X XX Hz. XXXW |
| POTENCA LAMPADA | |
English
Installation
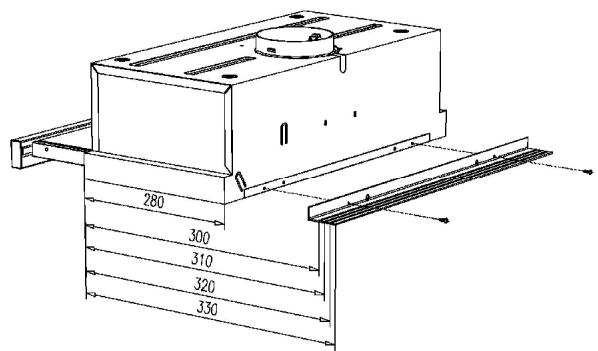
To fix the extractor to the kitchen use measures shown on fig. 4.
The lower part of the extractor must be located at a minimum height of 60~cm above the hob for electric cookers and 65 cm for gas cookers. If the instructions of a gas cooker indicate a greater distance these must be observed.
When the extractor is working at the same time as other non-electrical cooking equipment, the outlet air pressure must not exceed 4Pa (4× 10^-5bar)
To achieve optimum performance the length of the outlet hose should not exceed 4 meters, or include more than two 90^ angles (elbows)
Although venting to the outside is recommended, activated carbon filters may be used, which allow the gas to be returned to the kitchen through the outlet pipe.
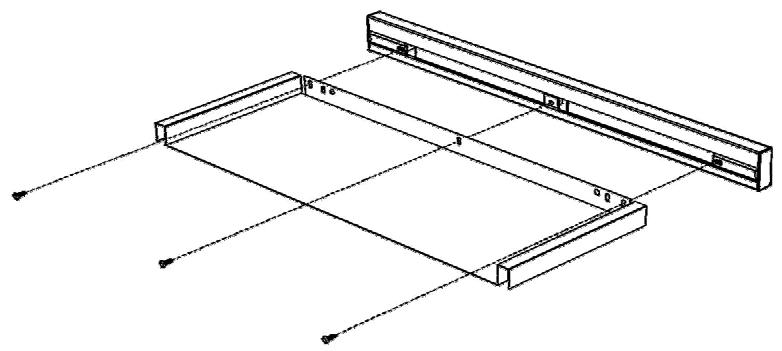
If you wish to exchange the front for one matching the kitchen units, follow the following instructions (Fig. 5):
-
Withdraw the movable group.
-
Remove the screws (T) that support the front
-
Install the new front fixing it with the same screws that held the old one.
If something does not work
Before seeking technical assistance carry out the following checks first:
| Defect | Possible cause | Solution |
| The extractor does not work | The cable is not connected | Connect the mains cable |
| No current is reaching the plug | Revise/repair the electricity circuit | |
| The extractor does not blow enough or vibrates | Filter saturated with grease | Clean or substitute filter |
| Outlet obstructed | Eliminate obstructions | |
| Inadequate air conduit | Contact the installer and follow instructions of this manual | |
| The lamps do not light | Lamp broken | Exchange the bulb |
| Lamp loose | Tighten bulb |
Special U.K. Requirements
Height above gas hob: 75 mm minimum
NEVER PLACE THE COOKER H OVER AN EYE-LEVEL GRILL.
This appliance must be connected by a competent person, using fixed wiring via a DOUBLE POLE SWITCHED FUSED SPUR OUTLET.
Electrical connection
We recommend that the appliance is connected by a qualified electrician, who is a member of the N.I.C.E.I.C. and who will comply with the I.E.E. and local regulations. Should the colour of the wires in the mains lead for the appliance not correspond with the coloured markings identifying the terminal in your spur box proceed as follow:
- The wire which is coloured blur must be connected to the marked N (Neutral) or coloured Black.
- The wire which is coloured brown must be connected to the marked L (Live) or couloured Red
- Where avialable (see installation), the wire which is coloured yellow/green must be connected to the market or coloured Yellow/Green.
If the cooker hood is installed for use above a gas appliance then the provision of ventilation must be in accordance with the Gas Safety (Installation & Use) Regulations 1984 and the relevant Building Regulations. Detailed recommendations are contained in the following British Standard Codes of Practice BS6172, BS5440 and BS6891 Current Edition.
This apparatus has the marked CEE in conformity with Standard 2002/92/EC of the European Parliament and the Council about remainers of electrical en electronic apparatuses. The correct elimination of this product avoids negative consequences for the market and the health.
Symbol (In the product or in the documents that are included with it), indicates that it's not possible to be treated like domestic remainder. It's necessary to give it in a collection point to recycle electrical and electronic apparatuses. Get rid of it in accordance with the environmental norms for remainders elimination.
In order to obtain detailed information about the treatment, recovery or recycling of this product, put yourself in contact with the city council, with the elimination service of urban remainder or with the store where you acquired the product.
François
Cher Client,
HCTpykuzno npnpMeHeHHIO
YnpabJIbTb BbITaKKOIMoKHO C NOMOJIbHO KHONOK, NOKa3aHHbIX Ha pnc.1.
Дя HanboJee 3ФФeKTHBHorO OTbOda napOBиDbIa peKOMeHdyETc BkHIOuHTb BbITXKky 3a HECKOJIbKO MNHYTdo npriTOBJIeHnI pIiN (OT 3 Do 5 MNHyT), YTO obecneuyNT NOCTOHHBI NOTOK BO3dYxa BO BpEMy OTBODa DblMa.
Tako CLeNyET OCTaBHTb BbITJkKByKIOUeHHo HECKOJIbKO MmHyT NOCIeIPIrTOBJIeHn IINu INIg NOJHOYdaJIeHn DbIMa N3aNAxOB.
UncTkau yxOa
Ipeed IIO6oIonepaunie no YnCTke N yXOdy UDOCTOBepebTecb, YTO np16op OTKJIOUeH OT CETN.
PnpnpoeHn pa6oT no uicTe n yxoNyte npabuam texhkn be30naochtn.
UncTkaФиЛьТра
YTObI CHaTb FnJIbTp, HaxMNTe Ha 3aUeJIky FnJIbTpA.ДЯ MbyTbЯ FnJIbTpA NOMecTe erO B NOcyDOMOeHyU MaUNHy (CM. npIMeuaHn) INN 3aMOHTe B rOpayB OBe
Ha Bpem, Heo6xOdImoe DnI ydaJIeHnJ Knpa. TaKke MOXHO NcNoIb30BaTb CneuNaIbHbIe a3P030NI (pn 3tOM cIeDyET IpeOxpaHrTb HEmTaIIInueckne qactN fNbTp). Pocne 3tOro BbICyUInTe fNbTp.
PnmuemueHn:MbIbE 2B NOCydomOeHOMaUNHe C arpeCnBHbIMMOUUMCpeCTBaMm MOKET Bb3BaTbNOTEmHHe MeTAJIuYeCKoN IOBePxHOCTNu,HTO HIKAK He CKa3bIBaEcTcH JaHKnPOrNOIooAIOxKaueCTBax OJbTpA.
BHHMaHHe: YnCTKa QnIbTPOB DOJXHa npOn3BOIDNTBCr He pexe OndHO rpa3a B MeCraB 3aBNCIMOCTN OT NOpJb3OBaHNB BbITAKKo. CJeNyET NMeTb B BVdy, UTO npn PnIroTOBJIeHNn PIIuN Ha NOBepXHOCTn DaJke Hepa6OtaHOSeBbITAKKN Ha QnJIbTpe HAKaPnBaIOCTKINpbl.
UcTka Kopnyca BbITJxKn
PekomeHnyetc NcNoIb3ObaTb paCTBop MOUoJero cpeIcTBa TEMnepaTypor OKOIO 40^ . PpOTpIte np6Op canFetKo, CMOueHHo B pACTBOpe MOUoJero cpeIcTBa, OC6eHHo TuaTeIbHO OuNCTHTe na3bl I UeIN. Pocne 3tORo BbICyUHTE np6Op TKaHbHO.
BHMaHne:
- He nCNoJIb3yIte MeTaNJIuYeCKne MoaJIKN i a6pa3nBhIe CpeDCTBa, KOTOpIe MOrYT NOBpeDITb NOBepxHOCtB BbITJkKN.
- He ckoJInte BbITaKky C NOMOuIbTO TBepdbIX NpeDMETOB KaK, HApPIMep, HOXN, HOXHNUcbl T.D.
- Safety Instructions
- Description of the appliance (Fig.1)
- 2
- 3
- Instructions for use
- Cleaning and maintenance
- Filter cleaning
- Cleaning of the extractor body
- Note:
- Active charcoal filter
- Changing Bulbs
- Technical Information (Fig.3)
- English
- Installation
- If something does not work
- Special U.K. Requirements
- Electrical connection
- François
- HCTpykuzno npnpMeHeHHIO
- UncTkau yxOa
- UncTkaФиЛьТра
- UcTka Kopnyca BbITJxKn
- BHMaHne:
Brand : SMEG
Model : KSE 61 X, KSET61
Category : Home Appliances