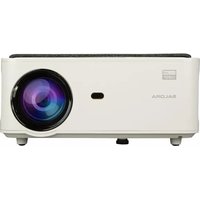
51BFM3850 - Projector SALORA - Free user manual and instructions
Find the device manual for free 51BFM3850 SALORA in PDF.


| Product Type | Home Theater Projector |
| Model | 51BFM3850 |
| Brand | Salora |
| Display Technology | LCD |
| Resolution | 1920 x 1080 (Full HD) |
| Brightness | 3200 ANSI Lumens |
| Contrast Ratio | 20000:1 |
| Lamp Life | Up to 20,000 hours (Eco mode) |
| Lamp Type | LED |
| Keystone Correction | ±15° Vertical / ±15° Horizontal (Auto) |
| Projection Size | 50 - 200 inches |
| Aspect Ratio | 16:9 / 4:3 |
| Throw Ratio | 1.2:1 |
| Connectivity | HDMI x2, USB x2, VGA, AV, Audio Out, Wi-Fi (built-in), Bluetooth |
| Built-in Speaker | 2 x 10W Stereo |
| Dimensions (W x D x H) | 310 x 250 x 110 mm |
| Weight | 3.2 kg |
| Power Consumption | 150W (max) |
| Power Supply | AC 100-240V, 50/60Hz |
| Noise Level | < 30 dB (Eco mode) |
| Maintenance | Clean air filter every 500 hours; replace lamp per manual |
| Safety Features | Overheat protection, auto power off, child lock |
| Spare Parts Available | Lamp, remote control, power cord, filter |
| Repairability Index | 7.5 / 10 (user-replaceable lamp and filter) |
| General Information | Supports 1080p input, 4K compatible via HDMI, HDR10, included carry bag |
Frequently Asked Questions - 51BFM3850 SALORA
User questions about 51BFM3850 SALORA
0 question about this device. Answer the ones you know or ask your own.
Ask a new question about this device
Download the instructions for your Projector in PDF format for free! Find your manual 51BFM3850 - SALORA and take your electronic device back in hand. On this page are published all the documents necessary for the use of your device. 51BFM3850 by SALORA.
USER MANUAL 51BFM3850 SALORA
natural_image
Line drawing of a projector with ventilation grille and control panel (no text or symbols)INSTRUCTION MANUAL
Contents
Important Safeguards....1
Projector Knowledge.... 2
Remote Control.... 4
Projector Installation.... 5
Standard Setting.... 5
Installation Method.... 6
Turn the Projector Operation On/Off....7
Focus Adjustment....7
Interface Operation Instructions.... 8
How to Select the Source.... 8
How to Connect to WiFi.... 8
How to Use Projection Settings.... 10
How to Use iOS Cast.... 11
How to Use Miracast.... 12
How to Play Files in USB Disk.... 13
Multimedia Format Supported.... 13
Troubleshooting....14
Specifications.... 15
Important Safeguards
Installation
- To get a better watching, please use this projector while drawing the curtain or in a dark room.
- Please use the projector carefully, dropping or crashing may damage parts or result in blurred images and abnormal displaying.
Power
- Be careful while using the power cord, avoid excessive bending; the damage of power cable may cause electric shock and fire.
- It is better to unplug the power cord after power off.
Cleaning
- Unplug the power cable firstly.
- Clean the shell regularly with a damp cloth, neutral detergent can be used.
- Please use a glasses cloth or lens paper, not to scratch the lens.
- Please clean projector's vents and speakers regularly by banister brush, or the ventilation will be blocked.
High Temperature Attention
- While projection or just finishing, the exhaust port nearby will be very hot, if touch it, would get scald.
- While projection, please do not look the lens directly, or may hurt eyes.
\*Warm Tips
- Do not disassemble the projector, if not, there will be a risk of electric shock, and the disassembling affect the normal warranty.
- Please do not put any liquid or heavy stuff on the projector.
- To ensure the stability of heat dissipation, please open the height bracket in the bottom of the projector before starting.
Projector Knowledge
Projector can input high-definition video signal and composite video signal, and support stereo audio signal input and output. Please refer to the following figure to connect the projector and other audio equipment according to your own needs.

- Level-Stand Adjustment
- IR receiver
- Focus Lens
- Power Switch
- IR for remote control
- 3.5mm port for audio output
-
HDMI 1 port
-
USB port
- AV port
- HDMI2 port
- Speaker
- Cooling window
- Focus
- Switch of removable dust cover
- Removable dust cover
Projector Knowledge


- Keystrokes (picture 1)
- Rating label
- Projector mount holes
- Level-stand adjustment
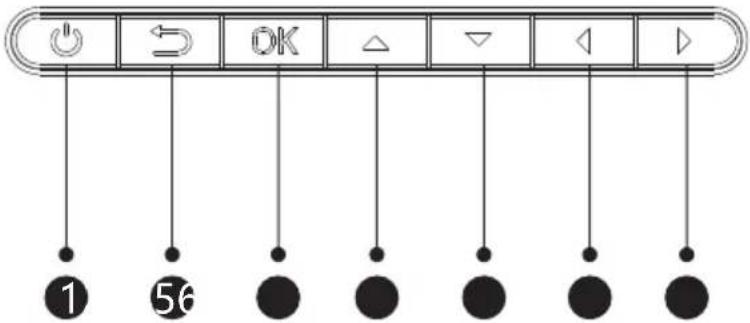
(picture 1)
- Power Key
- Exit
- OK Key
- Up Key
- Down Key
- Left Key
- Right Key
Remote Control
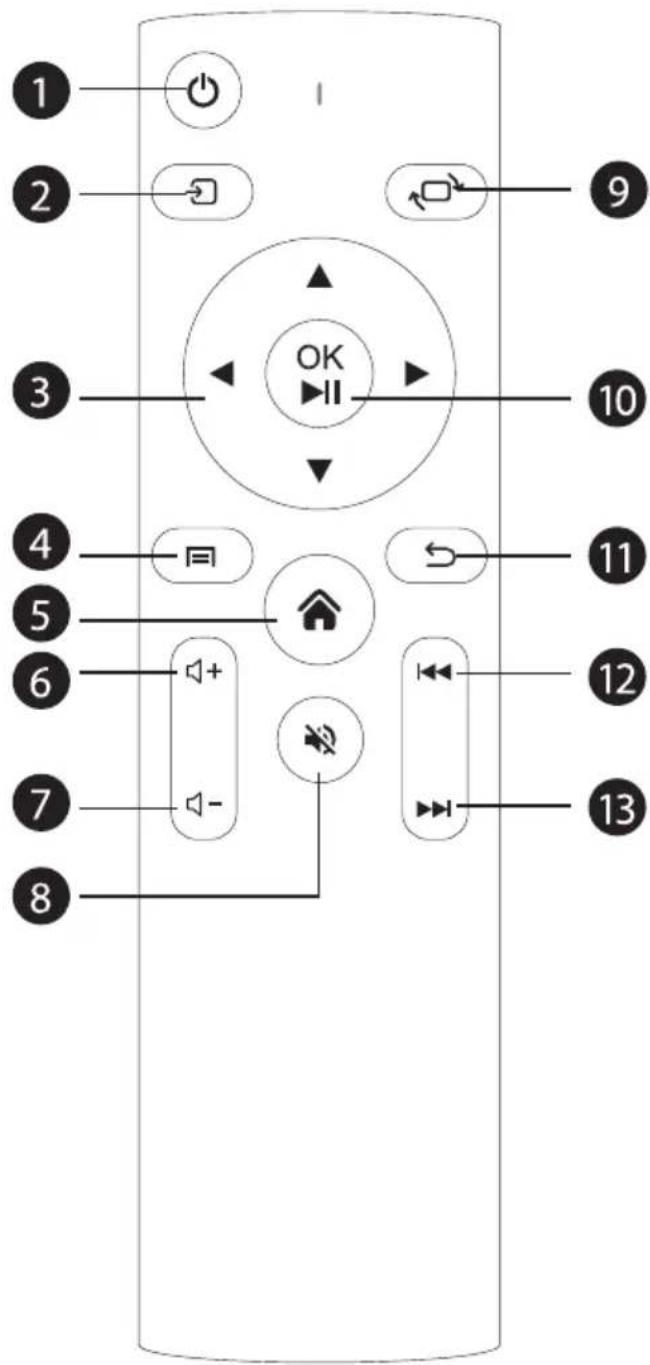
- Power
- Source
- Arrow keys
- Menu
- Homepape
- Volume +
- Volume -
- Mute
- Picture flip
- Confirmation key (Play and Pause)
- Return
- Previous
- Next
Projector Installation
Standard Setting
Please refer to the following table to adjust your picture size and distance. (from the lens to the screen).
| Aspect ratio 16:9 | |
| Picture size (inch) | Projection distance (m) |
| 50 | 1.70 |
| 70 | 2.38 |
| 100 | 3.30 |
| 120 | 3.97 |
Please allow ± 3% to the image sizes in the table above. If the distance is less than min data and more than max data, the image could be blurry.
Warning:
Please check the diagram below for the trapezoid adjustment.

Projector Installation
Installation Method
Contact a professional installer to mount this projector to a ceiling.
Follow the instructions below for the correct projector positions.
 1 Front projection ceiling mount 1 Front projection ceiling mount |  3 Rear projection ceiling mount 3 Rear projection ceiling mount |
 2 Front projection table mount Rear projection table mount 2 Front projection table mount Rear projection table mount |  |
Warning:
- The projector may be damaged beyond repair if it is incorrectly mounted on a ceiling or on a surface.
- The projector should only be used in an environment where the temperature does not exceed the range of 5^ C - 35^ C. Projector malfunction may occur if this is not adhered to.
- Malfunction may occur if the projector is subjected to dusty, wet, moist or smoky conditions.
- Poor ventilation could cause overheating which could lead to damage to the projector as well as a life threatening situation.
Turn the Projector Operation On/Off
When the projector is connected to a power source, the projector enters standby and thecover signal indicator is red.
Operation on: Press the power key on the body or the power key on the remote control, the indicator will turn blue and enter the working state.
Operation off: In the working state, press the power key of the body or the power key on the remote control, the indicator changes from blue to red, and the projector is turned on.
Focus Adjustment
Focus Adjustment
Turn the trackwheel clockwise to bring the trackwheel to the end, then slowly rotate the trackwheel counterclockwise. At the same time, carefully observe the pixels on the screen. When the image particles are the clearest (Subjed to the middle of the image), the pixels on the screen are the best focus of the lens.

Interface Operation Instructions
How to Select the Source
Select the source channel you want to enter in the list on the left side of the main interface, such as HDMI 1 / HDMI 2 / AV, then press the "OK" key on the remote control to enter the corresponding source interface.

How to Connect to WiFi
Select the settings icon in the upper right corner of the main interface, press the "OK" key on the remote control to enter the settings interface, and select "WiFi Setting".
After entering the interface, select the WiFi you want to connect to in the list below, then enter the password and complete the connection. Connected will be displayed behind the successfully connected WiFi.
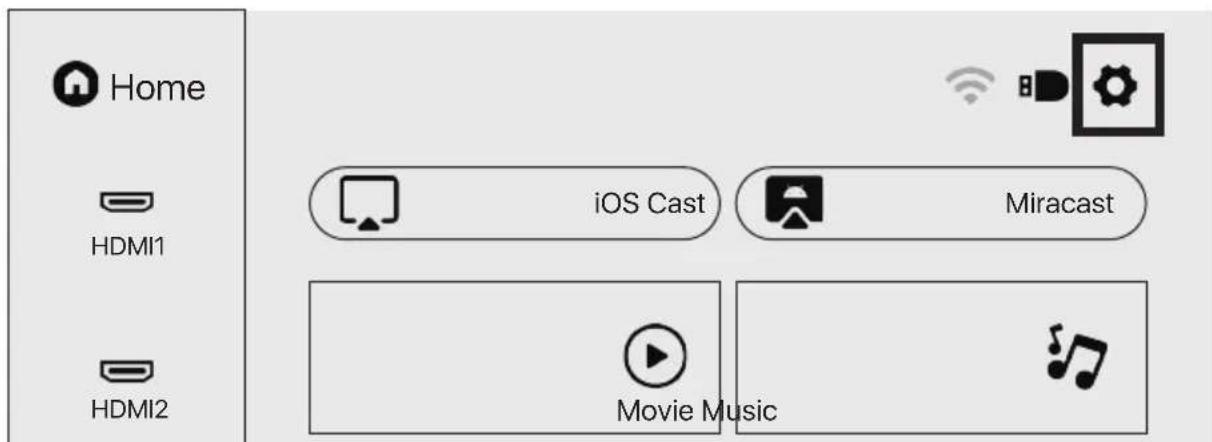
Interface Operation Instructions


WiFi Setting
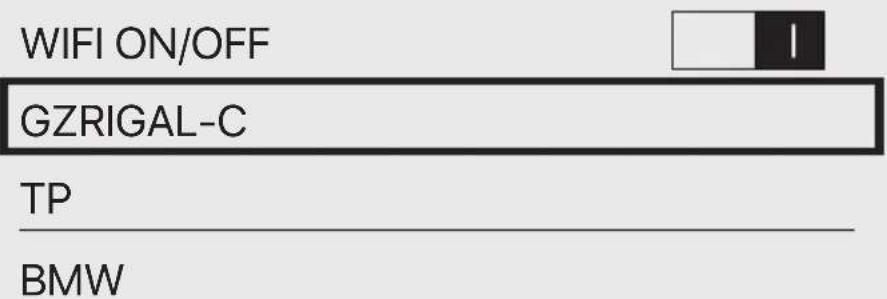
Interface Operation Instructions
How to Use Projection Settings
Select the settings icon in the upper right corner of the main interface, and then press the "OK" key on the remote control to enter the settings interface and select "Projection Image Setting".
After entering the interface, select the mode you want in the projection settings.
Manual Keystone: 4-point Keystone
Projection mode: Front-Desktop / Rear-Desktop / Front-Ceiling / Rear-Ceiling
Digital Zoom: 50%-100%

← Projecton
4-point Keystone
Projection Mode Front-Desktop
Digital Zoom
Interface Operation Instructions
How to Use iOS Cast
In the main interface, select "iOS Cast", press the "OK" key on the remote control to enter the interface, and and then set up in the order in the interface.
Note: The projector needs to be connected to the Internet for using the iOS Cast or upgrading the projector for the first time
- The iOS device and the projector are connected to the same network
- Open the control center of the iOS device and select Screen mirroring
- Choose the corresponding projector device name.

Make sure that your iOS device is connected to the same network as your Projector
| Screen Mirroring | Screen Mirroring | |
| Looking for Apple TV... | ||
| 1.On your iOS device, open Control Center and tap Screen Mirroring. | 2.Looking for devices that can be mirrored on. | 3. Select BridCast-496d from the list |
Interface Operation Instructions
How to Use Miracast
Select "Miracast" in the main interface and press the "OK" key on the remote control to enter the interface, and then set up in the order in the interface.
- Turn on the WIFI of the Android device. (It is recommended that the projector is connected to the same router or the WIFI of the Android device is not connected to any router).
- Turn on the "Wireless Display" of the Android device.
- Select the corresponding projector device name.
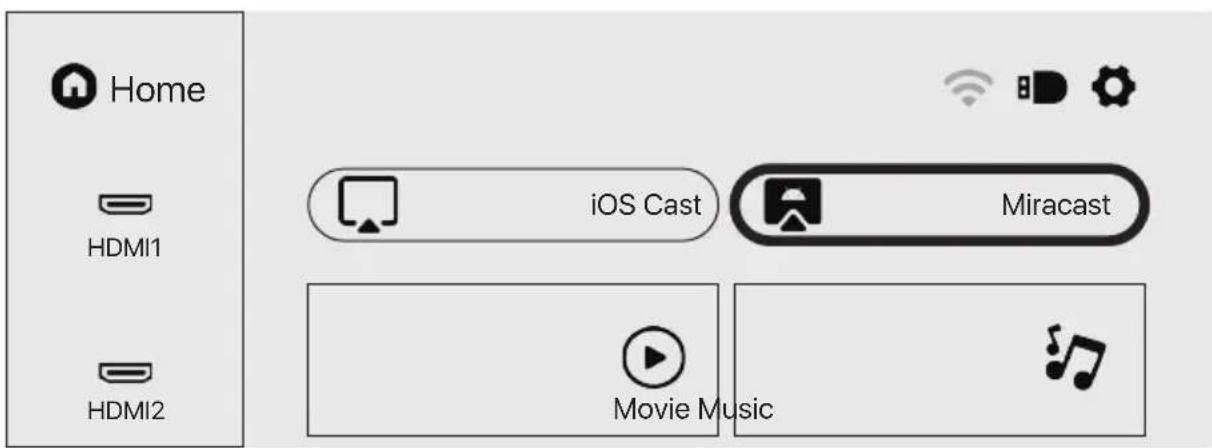
Miracast
To connect Android Mobile/Pad Device with Projetor Based on WiFi-Display Technology

Projector


Pad

Mobile
- On your Android Mobile/Pad, open the settings menu.
- Access your display settings or screen-mirroring.
- Select your Miracast receiver: NEWLINK-8a41
Interface Operation Instructions
How to Play Files in USB Disk
Select the required category "movie", "music", "photo" or "Office Suite" in the main interface, and press the "OK" key on the remote control to enter the corresponding category.
Then find the file you want to play in that category, start playing by pressing "OK" key. (You cannot enter the required category without connecting a USB disk.)

Multimedia Format Supported
Video Format: 3GP/AVI/FLV/MP4/MPG/VOB/TS/M2TS/DAT/MKV
Audio Format: MP3/APE/AAC/FLAC/OGG/WAV/WMA/MID/DTS/M4A
Image Format: BMP/JPG/PNG/JPEG

This model does not support any Dolby audio decoding due to the copyright of Dolby patent.
Troubleshooting
| Problem | Possible Causes |
| 1. The indicator light does not work when the power switch is turned on. | ◎ Prower cable is not connected properly. |
| ◎ The power switch is faulty. | |
| 2. The projector does not work on when using the remote control. | ◎ The power switch is turned off. |
| ◎ The remote control has no batteries or the batteries are low. | |
| ◎ The remote control is not being aimed at the IR receiver. | |
| ◎ The IR receiver is under strong lights. | |
| 3. No image. | ◎ The input source may not be correct. |
| ◎ No input signal. | |
| ◎ The input cable is not connected. | |
| ◎ If under PC mode, the PC output frequency is not 50-60Hz. Make sure that the PC output is connected with the projector | |
| ◎ If use laptop, check the output signal is HDMI1 or HDMI2 | |
| 4. Auto-off. | ◎ The projector ventilation is blocked. |
| ◎ The voltage is not stable. | |
| ◎ The projector has overheated- check that the fan is not broken. |
Specifications
| Projection Technology: 5” LCD TFT display |
| Native Resolution: 1920x1080 |
| Image Flip: 360° |
| Projection mode: Front-Desktop / Rear-Desktop /Front-Ceiling / Rear-Ceiling |
| Lens: 5 pieces of glasses lens |
| Aspect Ratio: 16:9 & 4:3 |
| Lamp Type: LED lamp, 50,000 hours life |
| Image Size: 40-150 inch |
| Digital Zoom: 50%-100% |
| Working Voltage: AC100-240V/50-60Hz |
| Projector Size: 260×230×110mm |
| Net Weight: 2.2kg |
SALORA
BEAMER 51BFM3850

natural_image
Line drawing of a projector with ventilation grille and control panel (no text or symbols)GEBRUIKERSHANDLEIDING
WiFi verbinding maken....8
Specifications....15
BELANGRIJKE VEILIGHEIDSVOORSCHRIFTEN
Installatie
natural_image
Line drawing of a projector with ventilation grille and control panel (no text or symbols)GUIDE D'UTILISATION
natural_image
Technical line drawing of a rectangular device with internal ventilation grilles and a directional arrow (no text or symbols)INSTRUCTIONS D'UTILISATION DE L'INTERFA
natural_image
Line drawing of a projector with ventilation grille and control panel (no text or symbols)BENUTZERHANDBUCH
Installationsmethode....6
(Foto 1)
INSTALLATIONSMETHODE
Installation Methode
natural_image
Technical line drawing of a rectangular device with internal ventilation grilles and a vent, no text or symbols present
- INSTRUCTION MANUAL
- Contents
- Important Safeguards
- Installation
- Power
- Cleaning
- High Temperature Attention
- \*Warm Tips
- Projector Knowledge
- Remote Control
- Projector Installation
- Standard Setting
- Warning:
- Installation Method
- Turn the Projector Operation On/Off
- Focus Adjustment
- Interface Operation Instructions
- How to Select the Source
- How to Connect to WiFi
- WiFi Setting
- How to Use Projection Settings
- ← Projecton
- How to Use iOS Cast
- How to Use Miracast
- Miracast
- How to Play Files in USB Disk
- Multimedia Format Supported
- Troubleshooting
- Specifications
- SALORA
- BEAMER 51BFM3850
- GEBRUIKERSHANDLEIDING
- BELANGRIJKE VEILIGHEIDSVOORSCHRIFTEN
- Installatie
- GUIDE D'UTILISATION
- INSTRUCTIONS D'UTILISATION DE L'INTERFA
- BENUTZERHANDBUCH
- INSTALLATIONSMETHODE
- Installation Methode
Brand : SALORA
Model : 51BFM3850
Category : Projector