NV-MPS4-E - Hi-Fi System NUVO - Free user manual and instructions
Find the device manual for free NV-MPS4-E NUVO in PDF.


| Product Type | Hi-Fi System |
| Brand | NUVO |
| Model | NV-MPS4-E |
| Dimensions (W x H x D) | 430 x 140 x 300 mm |
| Weight | 5.5 kg |
| Power Supply | AC 110-240 V, 50/60 Hz |
| Power Consumption | 50 W (standby <1 W) |
| Audio Output Power | 2 x 20 W RMS |
| Frequency Response | 20 Hz - 20 kHz |
| Supported Media | CD, CD-R/RW, MP3 via USB |
| Radio Tuner | FM/AM with RDS |
| Bluetooth | Yes, Version 4.0 |
| USB Port | 1 x USB 2.0 (front) |
| Auxiliary Input | 1 x 3.5 mm stereo (front) |
| Headphone Jack | 1 x 3.5 mm (front) |
| Remote Control | Included (IR) |
| Speaker System | 2.0 channel (passive speakers included) |
| Display | LCD with white backlight |
| Maintenance & Cleaning | Wipe with soft dry cloth. Do not use liquids or solvents. |
| Safety Precautions | Do not expose to rain or moisture. Use only specified power adapter. |
| Spare Parts & Repairability | Contact NUVO service center for spare parts. Do not attempt self-repair. |
| General Information | Designed for home audio enjoyment. User manual available for download. |
Frequently Asked Questions - NV-MPS4-E NUVO
User questions about NV-MPS4-E NUVO
0 question about this device. Answer the ones you know or ask your own.
Ask a new question about this device
Download the instructions for your Hi-Fi System in PDF format for free! Find your manual NV-MPS4-E - NUVO and take your electronic device back in hand. On this page are published all the documents necessary for the use of your device. NV-MPS4-E by NUVO.
USER MANUAL NV-MPS4-E NUVO
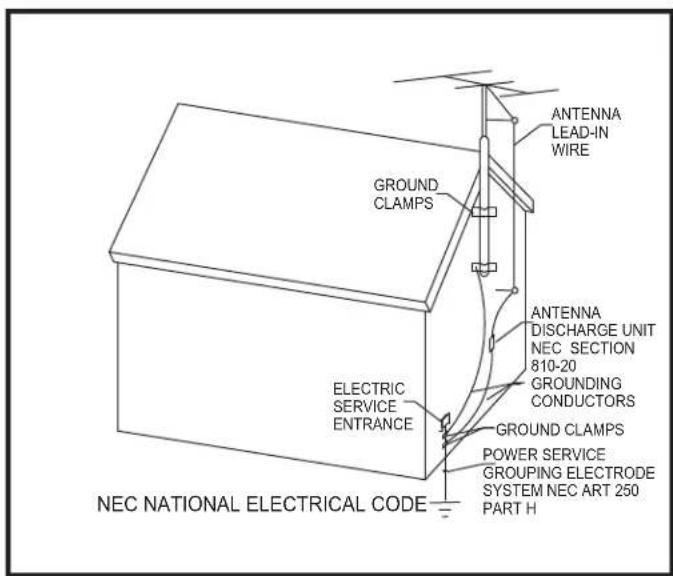
Note to CATV system installer:
This reminder is provided to call the CATV system installer's attention to Section 820-40 of the NEC, which provides guidelines for proper grounding and, in particular, specifies that the cable ground shall be connected to the grounding systems of the building, as close to the point of cable entry as practical.
FCC Information for the User
Caution:
Changes or modifications by the user that are not expressly approved by the party responsible for compliance could void the user's authority to operate the equipment.
NOTE:
This equipment has been tested and found to comply with the limits for a class B digital device, pursuant to part 15 of the FCC rules. These Limits are designed to provide reasonable protection against harmful interference in a residential installation. This equipment generates, uses and can radiate radio frequency energy and, if not installed and used in accordance with the instructions, may cause harmful interference to radio communications. However, there is no guarantee that interference will occur in a particular Installation. If this equipment does cause harmful interference to radio or television reception, which can be determined by turning the equipment off and on, the user is encouraged to try to correct the interference by one or more of the following measures:
1) Reorient or relocate the receiving antenna.
2) Increase the separation between the equipment and the receiver.
3) Connect the equipment into an outlet on a circuit different from that to which the receiver is connected.
4) Consult the dealer or an experienced radio/TV technician for help.
FC CE
SAFETY NOTE:
Where the MAINS plug or appliance coupler is used as the disconnect device, the disconnect device shall remain readily operable
ENGLISH
Danger
Exposure to extremely high noise levels may cause a permanent hearing loss. Individuals vary considerably to noise induced hearing loss but nearly everyone will lose some hearing if exposed to sufficiently intense noise for a sufficient time. The U.S. Government's Occupational Safety and Health Administration (OSHA) has specified the following permissible noise level exposures:
DURATION PER DAY (HOURS) 8 6 4 3 2 1
SOUND LEVEL (dB) 90 93 95 97 100 103
According to OSHA, any exposure in the above permissible limits could result in some hearing loss. Ear plugs or protectors in the ear canal or over the ears must be worn when operating this amplification system in order to prevent a permanent hearing loss. If exposure in excess of the limits as put forth above, to insure against potentially harmful exposure to high sound pressure levels, it is recommended that all persons exposed to equipment capable of inducing high sound pressure levels, such as this amplification system, be protected by hearing protectors while this unit is in operation.
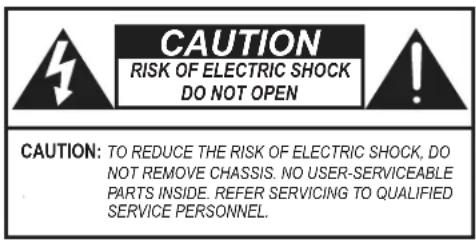
AVIS: RISQUE DE CHOC ELECTRIQUE-NE PAS OUVRIR.

THIS SYMBOL IS INTENDED TO ALERT THE USER TO THE PRESENCE OF NON-INSULATED "DANGEROUS VOLTAGE" WITHIN THE PRODUCT'S ENCLOSURE THAT MAY BE OF SUFFICIENT MAGNITUDE TO CONSTITUTE A RISK OF ELECTRIC SHOCK TO PERSONS.

THIS SYMBOL IS INTENDED TO ALERT THE USER TO THE PRESENCE OF IMPORTANT OPERATINGAND MAINTENANCE (SERVICING) INSTRUCTIONS IN THE LITERATURE ACCOMPANYING THE UNIT.

APPARATUS SHALL NOT BE EXPOSED TO DRIPPING OR SPLASHING AND THAT NO OBJECTS FILLED WITH LIQUIDS, SUCH AS VASES, SHALL BE PLACED ON THE APPARATUS.
IMPORTANT SAFETY INSTRUCTIONS
- Read all safety and operating instructions before using this product.
- All safety and operating instructions should be kept for future reference.
- Read and understand all warnings listed on the operating instructions.
- Follow all operating instructions to operate this product.
- This product should not be used near water, i.e. bathtub, sink, swimming pool, wet basement, etc.
- Only use dry cloth to clean this product.
- Do not block any ventilation openings, It should not be placed flat against a wall or placed in a built-in enclosure that will impede the flow of cooling air.
- Do not install this product near any heat sources; such as, radiators, heat registers, stove or other apparatus (including heat producing amplifiers) that produce heat.
- Do not defeat the safety purpose of the polarized or grounding-type plug. A polarized plug has two blades with one wider than the other. A grounding-type plug has two blades and a third grounding prong. The wide blade or the third prong are provided for your safety. If the provided plug does not fit into your outlet, consult an electrician for replacement of the obsolete outlet.
- Protect the power cord being walked on or pinched, particularly at plugs, convenience receptacles and the point where they exit from the apparatus. Do not break the ground pin of the power supply cord.
- Only use attachments specified by the manufacturer.
- Use only with the cart, stand, tripod, bracket, or table specified by the manufacturer or sold with the apparatus. When a cart is used, use caution when moving cart/apparatus combination to avoid
injury from tip-over. - Unplug this apparatus during lightning storms or when unused for long periods of time.
- Care should be taken so that objects do not fall and liquids are not spilled into the unit through the ventilation ports or any other openings.
- Refer all servicing to qualified service personnel. Servicing is required when the apparatus has been damaged in any way; such as, power-supply cord or plug is damaged, liquid has been spilled or objects have fallen into the apparatus, the apparatus has been exposed to rain or moisture, does not operate normally or has been dropped.
- WARNING: To reduce the risk of fire or electric shock, do not expose this apparatus to rain or moisture.

FRENCH
Danger
Music Port MPS4 and MPS4-E Front Panel Features Page 4
Music Port MPS4 and MPS4-E Back Panel Features Page 5
I. Installing the NV-MPS4 and MPS4-E as part of a NuVo Distributed Audio System
Audio Outputs Page 6
NuVoNet Connection Page 6
RS232 Connection Page 7
II. Accessing the Remote Configuration Tool
Making a Network Connection ....Page 7
Understanding the LAN Error LED Page 8
Music Port Elite VGA and DVI-D Outputs Page 8
Accessing the Remote Configuration Tool from the Local Area Network Page 8
Finding the IP Address for the NV-MPS4 and MPS4-E Page 9
III. Setting Up the NV-MPS4 and MPS4-E through the Remote Config Tool
Machine Settings Page 11
Display (MPS4-E) Page 12
Source Settings (MPS4) Page 13
Source Settings (MPS4-E) Page 14
Content Page 14
Scheduling (MPS4-E) Page 16
Firmware Page 17
IV. Loading and Using the Music Port Sync Tool
Loading the Music Port Sync Tool Page 18
Status Page 20
Music Page 20
Advanced Page 21
Mac Sync Page 21
NV-MPS4 and MPS4-E Specifications Page 22
NV-MPS4 and MPS4-E Package Contents
• NV-MPS4 Music Port
1 pr. NV-REM1U single rack space Rack Ear Mounts
4 NV-RCA1 Stereo RCA audio cables
1 pr. NV-REM Rack Ear Mounts
1 NV-RS232 6 ft. 9 pin serial cable
1 NV-NC1 10 ft. black network cable
1 NV-NC10W 10 ft. white network cable
1 NV-PC2-NA Power Cable, 2 wire, North America
Introduction
The Music Port or Music Port Elite are designed to fully communicate with the NuVo Essentia, Grand Concerto and Renovia Distributed Audio Systems through its NuVoNet communication protocol. Properly installing the Music Port as a source component will provide full browsing to all of your personal music (both through iTunes and Media Player) as well as online Internet radio.
Whether across the Web or from its internal hard drive, the Music Port gives you full metadata feedback from any of the NuVo Control Pads, and when it is controlled through the new NV-CTP36 Touch Pad controller and the iPad/iPhone app control, you will even enjoy full color album art.
Third party IP control, cloud synchronization with all of your music content, music event scheduling and other additional features are available through the new Music Port Elite.
Through the Music Port, a world of music is at your fingertips.
NV-MPS4 Music Port Wiring Diagram


NV-MPS4 and MPS4-E Music Port Front Panel Features
- Power: This button supplies power to the Music Port when the unit is plugged into an AC power source and the button is pushed. The associated blue LED will light.
- USB Port: This USB port is for use by NuVoTechnical Support.
- NuVoNet Error LED: The Music Port is designed to communicate via a CAT5 cable to the NuVo Essentia, Grand Concerto, and Renovia Distributed Audio Systems. This red LED is designed to light indicating a lack of communication. With normal communication, it will remain unlit.
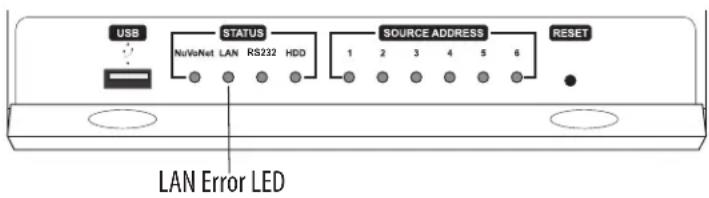
- LAN Error LED: This red LED will light when there is no Local Area Network signal present at the RJ45 Ethremethe Music Port back panel, or when there is an interruption in the LAN signal. See page 8, Understanding the LAN Error LED, for a detailed description of the different error states. In normal operation it will remain unlit.
- RS232 Error LED: This red LED will light when the Music Port does not detect a serial connection at its DB9 output on the back panel. When a serial connection is present and active, the LED will remain unlit.
- HDD Status LED: This green LED will light when the Music Port's hard drive is active.
- Source Address LED's: These green LED's 1 - 6 will light indicating the assigned source inputs on the associated NuVo Distributed Audio System.
- Reset Button: This recessed button will reset the Music Port's operating system when it is pushed.
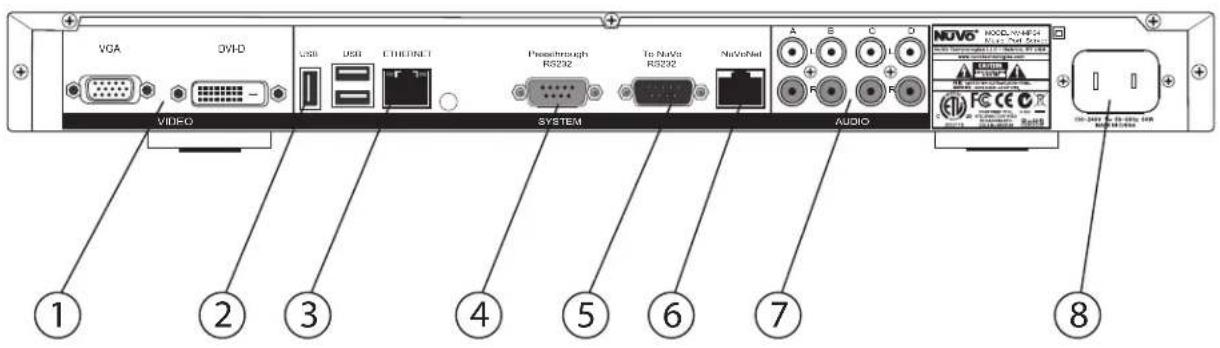
NV-MPS4 and MPS4-E Music Port Back Panel Features
-
Video Outputs: (Elite only) A VGA or DVI output is available for providing a selected picture slide show or onscreen "now playing" information for the selected source output.
-
USB Ports: The USB ports are only for use by NuVoTechnical Support.
-
Ethernet: This RJ45 port allows the Music Port to connect to the home's network. This enables the music files on the home's network to be shared on the Music Port's hard drive and the streaming of online Internet radio stations.
-
Passthrough RS232: The NuVo distributed audio systems are capable of being controlled serially by a third party home automation system. This DB9 input is designed to pass incoming serial commands through to the adjacent RS232 output. This allows both Client interface control from network computers of the attached NuVo audio system, and third party serial control of the same NuVo system.
-
NuVo RS232: This DB9 port connects to the attached NuVo distributed audio system. This allows any computer on the home's network to operate the Client interface for control of audio zones, source selection, and access to the music library. It also works with the adjacent Passthrough RS232 port to send control commands from a third party home automation system to the attached NuVo audio system.
-
NuVoNet: This RJ45 port connects to the attached NuVo distributed audio system and allows full source metadata display and control from the NuVo system Control Pads.
-
Audio Outputs: The Music Port has four independent stereo RCA audio outputs that allow its audio streaming content and stored music file audio signal to be sent to any audio distribution system or amplifier.
-
AC Power: A standard detachable IEC power cord supplies power to the NV-MPS4. A switching power supply allows the Music Port to operate world wide at any voltage.
I. Installing the NV-MPS4 and MPS4-E as Part of a NuVo Distributed Audio System
The NV-MPS4 will fully communicate as a NuVoNet audio component with a few simple connections. Locate the NV-MPS4 component with the main component of the NuVo Distributed Audio System. Make all the connections first and plug it into an AC power source and press the Power button on the front panel. The NV-MPS4 operating system will automatically boot up. You will see considerable activity on the "HDD" hard drive status LED on the front panel during this process. This will take approximately 60 seconds.
Audio Outputs
There are four independent audio outputs available to the NuVo System. These will be addressed through the Remote Configuration tool, see II. Setting Up the NV-MPS4 Through the Remote Configuration Tool, page11.
Connect the audio outputs from the NV-MPS4 to the desired audio inputs on the Essentia, Grand Concerto or Renovia System using standard stereo RCA cables (four are supplied with the NV-MPS4 package) or if you are connecting to the Renovia System, use stereo RCA to stereo mini 3.5 mm cables, Fig. 1.
Fig. 1

flowchart
graph TD
    A["NV-MPS4 Audio Outputs"] --> B["AVIO"]
    C["Essentia or Grand Concerto Audio Inputs"] --> D["ZO™1 2345 12346"]
    C --> E["ZO™2 2346 12346"]
    C --> F["Source INPUTS"]
    G["Renovia Audio Inputs"] --> H["AUX OUT 1-4"]
    G --> I["AUX OUT 4-4"]
    G --> J["ANTenna SOURCE INPUT"]
NuVoNet Connection
Full communication with the NuVo Distributed Audio Systems is provided through a single CAT5 connection. This requires a standard network CAT5 cable (one is provided in the NV-MPS4 package).
To make this connection to the Essentia or Grand Concerto Systems, plug the CAT5 into the "NuVoNet" RJ45 output on the NV-MPS4 back panel and into one of the "Device" inputs on the Essentia Allport or the Grand Concerto EZ Port. Connect another CAT5 from the Allport or EZ Port "NuVoNet" output to the input on the NuVo Distributed Audio System, Fig. 2.
Fig. 2

If you are installing the Music Port with a Renovia System, plug the CAT5 directly into one of the three "NuVoNet" inputs on the back panel of the Renovia Source Hub, Fig. 3.
Fig. 3


RS232 Connection
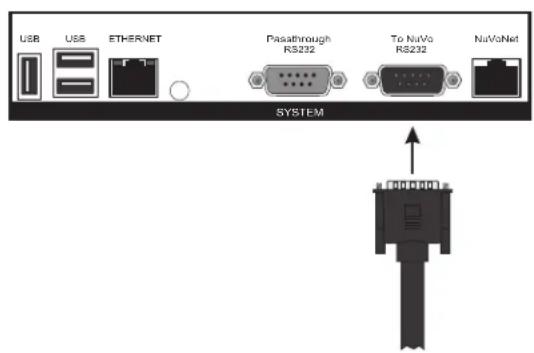
A DB9 cable connection is needed between the Music Port and the attached NuVo System to enable full integration of the Music Port. Most often, this control is the iPhone/iPad app or the network computer Client interface, but it is also important if you are controlling through one of the home automation control modules. These are currently available for AMX, Crestron and URC from the NuVo Website Dealer Resource Center, Fig. 4. A passthrough port is available to allow serial control to pass to the common RS232 port on the NuVo System.
Fig. 4

II. Accessing the Remote Configuration Tool
The Remote Configuration Tool is a quick, easy setup for the operation of the Music Port. Once configured, it will be fully operational with any of the NuVoNet Audio Distribution Systems.
Making a Network Connection
Make sure the NV-MPS4 is plugged in, powered on, and connected to the home's router through its "Ethernet" port. A live Internet connection will cause the port LED's to light green, Fig. 5. It is suggested that you use the white CAT5 cable for this purpose to avoid confusing it with the NuVoNet cables.
Fig. 5

A: A green LED indicates that a LAN link has been established. A blinking green LED indicates LAN activity.
B: This LED indicates connection speed. Not lit means 10 Mb/s data rate, solid green is 100 Mb/s data rate and Yellow is 1000 Mb/s data rate.
Understanding the LAN Error LED
The front panel of the NV-MPS4 has a red LED designed to alert you to communication issues across its network, Fig. 6. The state of the LED indicates the nature of the problem.
LED not lit: This indicates good communication. No problem is found.
LED solid red: A cable connection at the "Ethernet" port on the back panel is not detected.
LED blinking twice: There is no WAN, Wide Area Network detected or no Internet connectivity.
LED blinking three times: No DHCP server has been found on the local area network.
Fig. 6
Music Port Elite VGA and DVI-D Outputs
The Music Port Elite model has a VGA and DVI-D video output. Either of these can be connected to a local video monitor to display local photos as a slide show, or display the current "now playing" information for that local zone. The outputs are not simultaneously active, and can only be attached to a single NuVo zone. The display tab in the Remote Config Tool discussed in section III. Setting Up the Music Port Through the Remote
Config Tool, pg. 11 allows the appropriate zone output and content folder selection from the network
Accessing the Remote Configuration Tool from the Local Area Network
Go to your computer and make sure it is connected to the same network as the NV-MPS4 (this is usually a wireless connection). Open an Internet browser window and type the default name, in the address bar, Fig. 7.music-port/config
Fig. 7

This should open the Remote Configuration Tool, Fig. 8.
Fig. 8

Finding the IP Address for the NV-MPS4 and MPS4-E
If the "music-port" name does not connect, you can look up the IP address assigned to the Music Port and type that into the browser address bar, i.e.. 9.192.168.0.124/config;
Fig. 9

To find the address, go to the Menu of a Control Pad in the System. Choose one of the Music Port outputs from a Control Pad. In the Menu, go to "Source Options" and then select "Source Info". You will then see the selection "IP Address". Highlight and press the "OK" button. This will display the IP address that has been assigned to the Music Port, Fig. 10.
Fig. 10

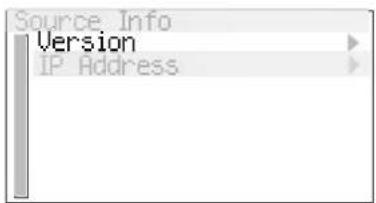
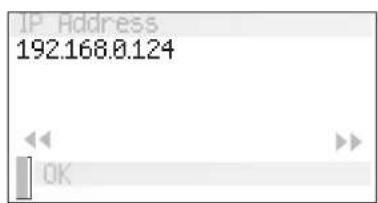
Another alternative is to open the Music Port Sync Tool to discover the NV-MPS4. The IP address will appear in the "Advanced"Tab (note that the SyncTool must be loaded on your computer), Fig. 11, see section Page loading and hosting the Music Port Sync Tool, . startup screen of the iPhone or iPad app, Fig. 12. This screen first appears when the app is opened on an Apple device.
Fig. 11

Fig. 12

III. Setting Up the MPS4 and MPS4-E through the Remote Configuration Tool
Once you have opened the Remote Configuration Tool, setup of the Music Port is easy.
Machine Settings
The first tab of the setup utility is Machine Settings. The choices to note here are the Name Identification, time zone settings, for monitoring the correct time from the web, and a choice of automatically configuring the NV-MPS4 on the home's network or assigning a static IP address.
Machine Identification: This is an option of renaming the Music Port from its default, "music-port", .This12 is the name that will be used to access the server on the network, with the Music Port Client and Music Port SyncTool, see section JV. Loading and Using the Music Port Sync Tool, page 13
Fig. 13

Date and Time: This section allows you to specify a time zone and online server for monitoring the current time from the Web. If you check the box, "Syncronize NuVo amplifier's clock" it will automatically update the time on the attached NuVo Distributed Audio System, Fig. 14.
Fig. 14
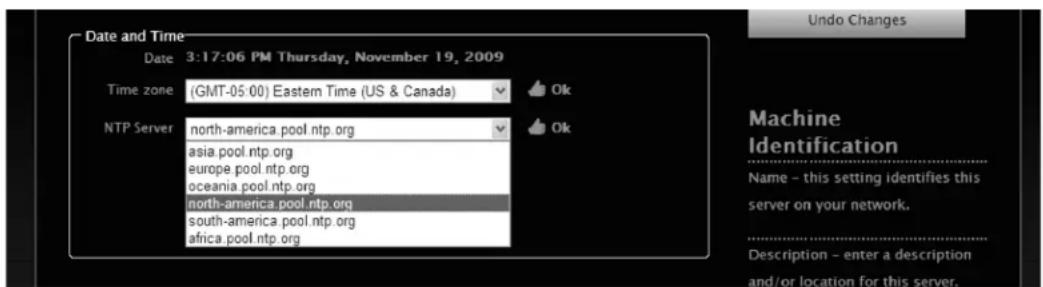
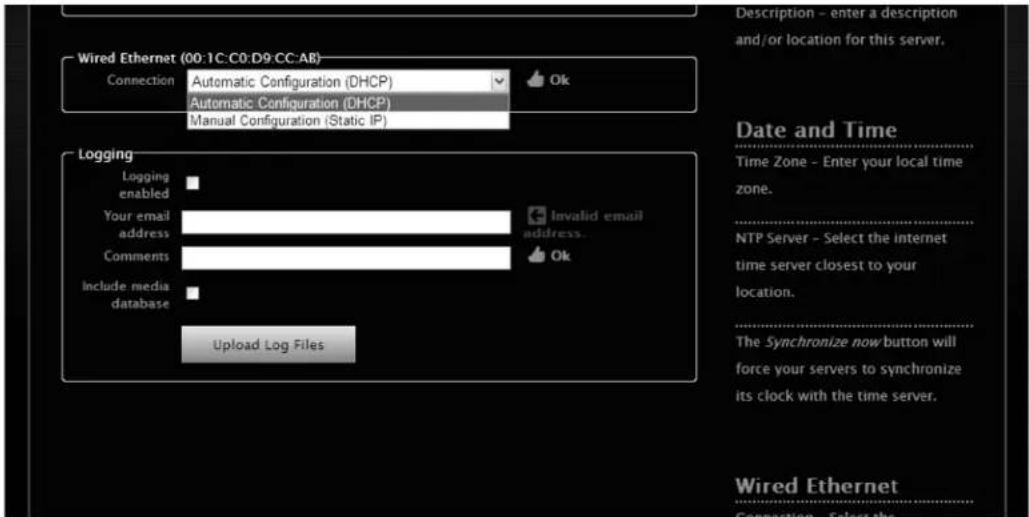
Wired Ethernet: The default is to let the network automatically supply an address to the Music Port when is connected through the "Ethernet" port. If you choose, you can assign a static address using this drop-down menu, Fig. 15.
Logging: This section is for technical support. If instructed to do so by a technical support person, you can upload log files to NuVo Technical support for troubleshooting purposes. When the "Machine Settings" choices are made, click "Save Changes".
Fig. 15
Display (MPS4-E): The Elite model features a VGA and DVI outputs to provide an onscreen "now playing" display and photo slide show. This tab is to allow selection of the photo content to be displayed and the zone of the attached display, Fig. 16.
Fig. 16

Photo (MMSus)c Shared Folder (MPS4 and MPS4-E)
When the Music Port and the Music Port Elite are connected to a network, it creates a network shared folder for music. In addition, the Music Port Elite creates a picture folder. Any photos intended for the onscreen display must first be copied to the picture folder. This is accessed by placing a \ and the MPS4-E or MPS4 IP address in the "Search" field under the "Start" menu, ie., \192.168.1.100. This will make both the music and picture folders (MPS4-E) available, Fig. 17. Any music or picture content to be shared with the associated Music Port can be directly copied to these folders.
Fig. 17

Source Settings (MPS4): This tab simply sets a source address for the way in which you choose to connect the NV-MPS4 to the NuVo System, Fig. 18. When these choices are made, click "Save Changes". Make sure to select the appropriate number of outputs you intend to use in the "Active Outputs" drop-down menu.
Fig. 18

Source Settings (MPS4-E): The Source Settings tab for the Elite model is slightly different. It has an "Audio System" drop-down menu that sets the intended control for the Music Port Elite. Part of the Elite's capability is third party IP based control. There are three potential control choices.
None: This choice is intended for a strictly "stand-alone" installation which will not use a NuVo Distributed Audio System and NuVo Control Pads. This control relies on the Apple iPhone, iTouch and iPad devices, or the Client control for network computers or portable flash enabled Wi Fi devices. This choice does not allow zone selection and control beyond the four audio outputs and music content available through the Music Port Elite.
NuVo: This choice sets the MPS4-E for control from any of the NuVo Control Pads and also opens up additional control from third party IP control. This selection requires a serial cable connection between the MPS4-E and the NuVo System.
AMX/Crestron/other: This selection is important as full third party IP control is developed for the Music Port Elite. This should be used in an installation where the MPS4-E is connected to a NuVo System, but zone and source control is strictly done through a third party automation system. With this choice, it is necessary to associate the MPS4-E with an established IP address for the controlling automation system, Fig. 19.
Fig. 19

Content: Here is where you set the streaming capabilities of the Music Port. Supply the user account information in each of the provider sections that apply to the intended use of the Music Port. Once this information is entered, click "Save Changes".
MP3tunes (Elite only): An important feature of the Music Port Elite is the ability to synchronize content with a cloud locker. Any computer or wi fi device can automatically upload content to a "cloud" account. There are two choices for MP3tunes content, Fig. 20.
Access content from my cloud account: This choice will allow the MPS4-E to access content that has been added to the MP3tunes online locker account. The MPS4-E will copy the content to its internal hard drive.
Add content from this server: This choice will force the MPS4-E to add all of the music from its internal hard drive to the MP3 tunes online locker.
Fig. 20

Streaming Internet Radio: As streaming internet services are licensed through the Music Port and Music Port Elite, the prompt for log in information will be available in the "Content tab". Some services are free to the user and others require a paid subscription depending on the provider. Individual accounts must be established through the providers website, Fig 21.
Fig. 21

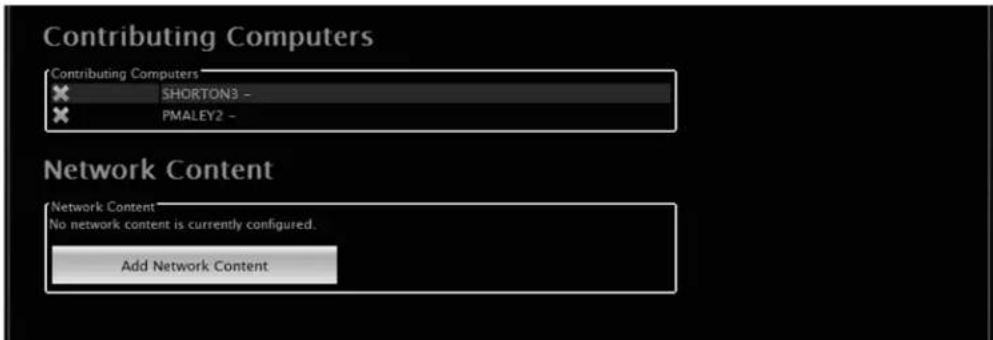
Contributing Computers: Listed here are all computers synced to the Music Port. To remove a contributing computer click the 'X' listed to the left of the computer name. This will remove all content contributed by this computer.
Network Content (Elite only): The Music Port Elite can stream content from Network Attached Storage (NAS) drives. This is very useful for users that have a large library of uncompressed music already located on a separate drive on the network. The "Add Network Content" button allows you to select the desired content location, Fig. 22.
Fig. 22
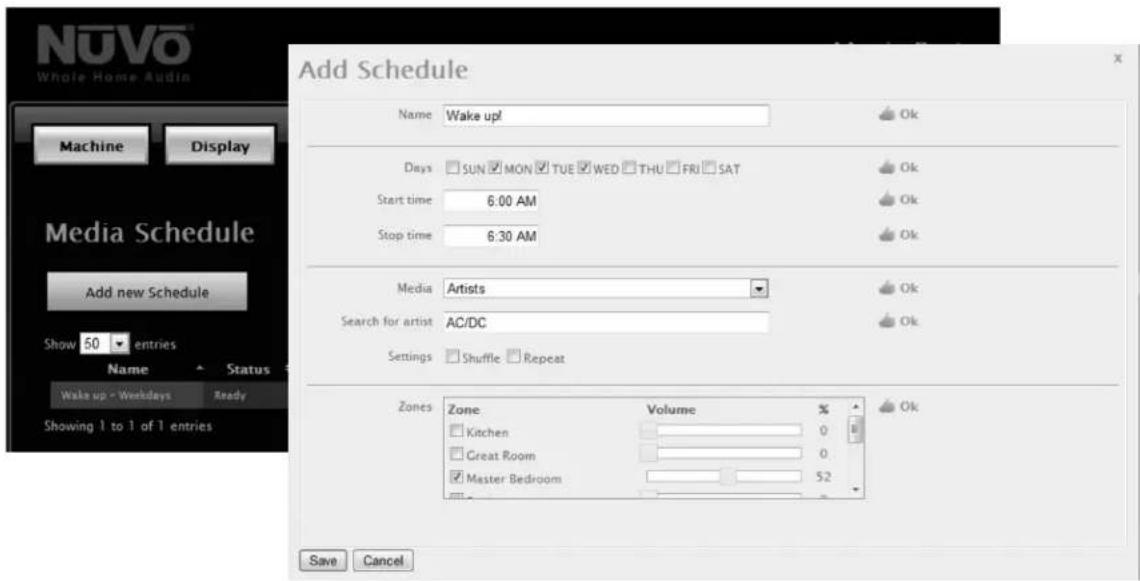
Scheduling (MPS4-E): This is a utility for creating time, zone, and music selection specific events. The "Add New Schedule" will open a second window for setting the specific parameters of the event, Fig. 23. Any number of scheduled events can be created. Once they are set, they become a default recurring function. There is also an option for cancelling scheduled events. Note that this tab is the only place a scheduled event can be created or deleted.
Fig. 23
Firmware: This tab allows you to update the firmware, load the computer based Music Port Client control, and setup music sharing with the Music Port, Fig. 24.
Fig. 24

Firmware Update: This download utility will prompt you when a new version is available. When you click on the supplied link, the newest version will automatically update the NV-MPS4. If "No firmware update is currently available" appears, no further action is necessary. It is important to note that the NV-MPS4 is not updated over NuVoNet.
Other Software: There are two links here under the title "Music Port Client", and a third application called the Music Port Sync Tool are contained in this section.
Music Port Client: The Client is a network computer application that provides full control of the content both personal and online streaming from any computer on the same LAN. When the RS232 serial connection is made to the NuVo Distributed Audio System, the Client will also allow access to all of the System zones, and sources with basic source and zone control, see section1. Installing the NV-MPS4 as Part of a NuVo Distributed Audio System, page 6.
Start Music Port Client in this browser window: This link will open the Music Port Client interface in an internet browser window. When the Client is open, it is easily saved as a "favorite" for future access. This application is recommended for Mac users.
Install the Music Port Client stand alone application: This link opens an install wizard that installs the Client as a standalone program on the PC. Once loaded the Client interface is easily accessed from a desktop icon. It is important to load the Client on any user PC's as part of the installation process of the Music Port. For a detailed description of the Client interface see the Music Port User Guide.
Install the Music Port Sync application for Windows: This link will open an install wizard that loads the Music Port Sync Tool on any networked PC. This is the application that allows content from your computer to be shared with the Music Port and the associated NuVo Distributed Audio System. This tool will be covered in the next section, Page loading and Using the Music Port Sync Tool, .
Install the Music Port Sync application for Mac: The same sync application is available specifically for Mac users. This will also be covered in more detail in section, Mac loading and Using the Music Port Sync Tool,
Support: The Remote Support section allows NuVo Technical Support to provide a security code to enable external access to the Remote Configuration Tool. This is only used for troubleshooting purposes.
IV. Loading and Using the Music Port Sync Tool
The Music Port Sync Tool is a powerful application that allows any user network PC to contribute music to the Music Port hard drive.
Loading the Music Port Sync Tool: You will find a link to the Music Port Sync Tool executable file in the Firmware tab of the Remote Configuration Tool. Click on the link and open the file, Fig. 25. You will be prompted to save the .exe file to a folder or run it from its current location.
Fig. 25

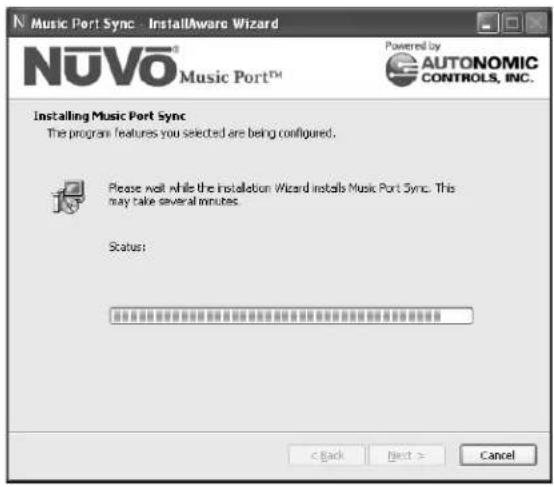
The executable will launch an installer program that loads the application on the user's computer hard drive, Fig. 26.
Fig. 26
The Mac Sync Tool can be found in the "System Preferences", Fig. 27.
Fig. 27

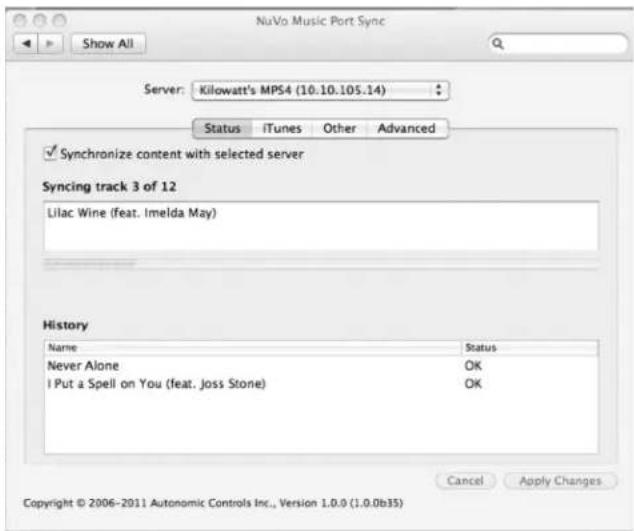
Status: This tab shows current activity for music syncing. You will see the running progress for any content that is being synced. When no new content is found, the tool sits in a "monitoring" mode. An "On/Off" switch allows the tool to automatically monitor the selected libraries and or network directories, or when it is in the "Off" position, to only monitor and sync content when is it is manually turned on. When the tool is in the "Off" position, it provides a quick link for removing that computer's content from the Music Port's hard drive, Fig. 28.
Fig. 28

Music: This tab provides a utility for any computer to add iTunes and Media Player content to the Music Port and Music Port Elite's hard drive. Each computer contributing library content must have the Sync Tool installed.
A second option is to select a specific folder, or folders located on the network. Multiple folders can be selected and synced from a single computer. Once the selection is made, the Music Port will automatically sync any relevant files it sees. When this is complete, it will continue to monitor for any changes, Fig. 29. Acceptable file formats are ACC,WMA, MP3, WAV and FLAC.The Music Port will not play M4P protected content purchased and downloaded from iTunes. As of April of 2009 all content from iTunes is unprotected and compatible with the NV-MPS4 and NV-MPS4-E.
Fig. 29

Advanced: This tab provides a summary of the current firmware and software versions and IP address assigned to the Music Port or Music Port Elite, Fig. 30. Its purpose is simply reference.
Fig. 30

Mac Sync Tool: Once the Mac Sync Tool is loaded, its operation mirrors that of the PC version with the exception of the Media Player Sync utility, Fig. 31.
Important Note: To properly run the Sync Tool, the Mac computer must be on version 10.5/10.6 or greater and needs to have an Intel processor.
Fig. 31
NV-MPS4 and NV-MPS4-E Specifications
Analog Audio Outputs 4
| Support Audio Formats | |
| Hard Drive Content | MP3 |
| WMA | |
| M4A | |
| WAV | |
| FLAC | |
| Internet Radio | Pandora |
| Sirius | |
| RadioTime | |
IP Control
| Music Port | Windows PC & Mac |
| Adobe Flash-Enabled Mobile Devices and Computers | |
| Apple iPhone, iPod touch | |
Music Port Elite
AMX
Crestron
URC MX6000
Windows PC & Mac
| Adobe Flash-Enabled Mobile Devices and ComputersApple iPhone, iPod touch |
Support Video Formats
| Music Port | N/A |
| Music Port Elite | DVI |
| VGA |
Power Requirements
| Power Supply | 85-265VAC 50/60Hz |
| Power Consumption | 16W |
System Information
| Hard Drive Capacity, Music Port | 320GB |
| Hard Drive Capacity, Music Port Elite | 640GB |
| Network Connection | 10/100/1000 Mbits/sec |
| NuVoNet Connection (RJ45) | 1 |
Physical Specifications
| Unit Size Millimeters | 44 H x 420 W x 250 D |
| Unit Size Inches | 1 3/4 H x 17 W x 9 7/8 D |
| Shipping Size Millimeter | 205 H x 515 W x 343 D |
| Shipping Size Inches | 8 H x 20 1/4 W x 13 1/2 D |
| Unit Weight Kilograms | 2.6 |
| Unit Weight Pounds | 5.75 |
| Shipping Weight Kilograms | 5.44 |
| Shipping Weight Pounds | 12.00 |
| Compatibility Grand Concerto, Essentia (E6G), Renovia | |
USB Connections
| Front Panel | 1 |
| Rear Panel | 3 |
RS-232 Serial Connection
| NuVo System | RS-232Male DB-957,600 Baud8 Data BitsNo parity1 Stop Bit |
| Serial Pass Through | RS-232 |
*NuVo reserves the right to change specifications without notice
NuVo Technologies LLC, Hebron, Kentucky USA
www.nuvotechnologies.com

NV-MPS4 1124
- FCC Information for the User
- NOTE:
- FC CE
- SAFETY NOTE:
- ENGLISH
- Danger
- IMPORTANT SAFETY INSTRUCTIONS
- FRENCH
- Installing the NV-MPS4 and MPS4-E as part of a NuVo Distributed Audio System
- Accessing the Remote Configuration Tool
- Setting Up the NV-MPS4 and MPS4-E through the Remote Config Tool
- Loading and Using the Music Port Sync Tool
- NV-MPS4 and MPS4-E Package Contents
- Introduction
- NV-MPS4 and MPS4-E Music Port Front Panel Features
- NV-MPS4 and MPS4-E Music Port Back Panel Features
- Audio Outputs
- NuVoNet Connection
- RS232 Connection
- Making a Network Connection
- Understanding the LAN Error LED
- Music Port Elite VGA and DVI-D Outputs
- Accessing the Remote Configuration Tool from the Local Area Network
- Finding the IP Address for the NV-MPS4 and MPS4-E
- Setting Up the MPS4 and MPS4-E through the Remote Configuration Tool
- Machine Settings
- Photo (MMSus)c Shared Folder (MPS4 and MPS4-E)
- NV-MPS4 and NV-MPS4-E Specifications
Brand : NUVO
Model : NV-MPS4-E
Category : Hi-Fi System