NV-P100-NA - Hi-Fi System NUVO - Free user manual and instructions
Find the device manual for free NV-P100-NA NUVO in PDF.


| Product Type | Hi-Fi System |
| Brand | NUVO |
| Model | NV-P100-NA |
| Dimensions (W x H x D) | 420 x 100 x 300 mm (main unit) |
| Weight | 4.5 kg (main unit) |
| Power Supply | AC 120V / 60Hz (North America) |
| Power Consumption | 60 W (max) |
| Power Output | 2 x 25 W RMS (stereo) |
| Frequency Range | FM: 87.5 – 108 MHz; AM: 530 – 1710 kHz |
| Supported Media | CD, CD-R/RW, MP3 CD, USB flash drive |
| Inputs | USB 2.0 (type A), AUX (3.5 mm stereo), FM/AM antenna |
| Outputs | Headphone (3.5 mm stereo), Speaker terminals (spring clip) |
| Bluetooth | Yes, version 4.2, A2DP profile |
| Preset Stations | 30 (FM) / 15 (AM) |
| Clock/Timer | Yes, with sleep timer and alarm |
| Display | LCD with white backlight |
| Remote Control | Included (CR2025 battery) |
| Maintenance | Clean with soft dry cloth; avoid solvents and moisture. |
| Safety | Do not block ventilation; keep away from heat sources and liquids. |
| Spare Parts & Repairability | Contact NUVO or authorized service centers; spare parts available for 5 years after production. |
| Warranty | 1 year limited parts and labor (check local regulations) |
| Country of Origin | China |
Frequently Asked Questions - NV-P100-NA NUVO
User questions about NV-P100-NA NUVO
0 question about this device. Answer the ones you know or ask your own.
Ask a new question about this device
Download the instructions for your Hi-Fi System in PDF format for free! Find your manual NV-P100-NA - NUVO and take your electronic device back in hand. On this page are published all the documents necessary for the use of your device. NV-P100-NA by NUVO.
USER MANUAL NV-P100-NA NUVO
Wireless Audio System


Rhapsody PANDORA
tunein (Siriusxm) INTERNET RADIO
AUDYSSEY DYNAMIC VOLUME
Bluetooth
TEXAS INSTRUMENTS
Product Manual
Table of Contents
Introduction Page 3
P100 Zone Player Back Panel Features Page 4
P200 Zone Player Back Panel Features Page 4
P3100 Back Panel Features Page 5
1. Setup/Installation
1.1 Network Requirements Page 5
1.2 Connecting the Gateway to the Network Page 5
1.3 Hardwiring the Players Directly to the Network Page 6
1.4 Installing the P3100 Zone Player Page 7
1.5 Connecting the Speakers to the P100 and P200 Zone Players Page 8
1.6 Connecting the Speakers to the P3100 Zone Player.... Page 8
2. Setting Up a System from the iOS or Android App
2.1 New Wireless System Setup Page 9
2.2 Adding Zones to an Existing System Page 12
2.3 Adding Additional Gateways to an Existing System Page 13
3. Using the iOS and Android Control App
3.1 The Dashboard Page 14
3.2 Music Selection Page 14
3.3 Bluetooth® Playback Page 15
3.4 Line In Page 15
4. The Settings Menu
4.1 Zones Page 16
4.2 Gateways Page 18
4.3 Controller Page 19
4.4 Add a NuVo Component......Page 19
4.5 Music Library Page 19
4.6 Music Services Page 20
4.7 System Page 21
4.8 International Page 22
4.9 Help Page 22
- The Music Share Software Page 23
6. Troubleshooting
6.1 Front Panel LEDs Page 25
6.2 Not Connected Page 25
6.3 Restoring Defaults Page 26
6.4 System Diagnostics....Page 27
6.5 Advanced Network Management Page 28
- Specifications Page 26
The NuVo Wireless Audio System Product Manual
Introduction
Welcome to the exciting world of the NuVo Wireless Audio System. Now your favorite music, in any room you want it, anytime you want it, is as close as the touch of a button on any of your Apple or Android Wi-Fi enabled portable devices. True high fidelity music, from your own personal library or streaming from the Internet, is more affordable and accessible than you ever imagined.
This is your guide to quickly and easily filling a home with music.
The NuVo Wireless Audio System

flowchart
graph TD
    A["Add speakers to each player for high-fidelity audio in any room of your home."] --> B["P200 Player"]
    C["Add up to 16 independent players to the system."] --> D["P100 Player"]
    B --> E["GW100 Gateway"]
    D --> E
    E --> F["Simply connect the wireless Gateway to your home's router."]
    G["Enjoy music streaming from the Internet."] --> E
    H["Share music from any hard drive or computer on your network with the NuVo Wireless Audio System."] --> I["P200 Player"]
    I --> J["Wirelessly control the system with an Android or iOS Wi-Fi device."]
P100 Zone Player Back Panel Features

- Ethernet: This RJ45 port allows for a wired connection directly to the GW100 Gateway or directly to the network router.
- USB: Any USB compatible hard drive can share music content with the NuVo Wireless Audio System through this port.
- Audio In: This 3.5mm stereo input will accept any analog line level audio signal. The local audio source is amplified by the local player, as well as providing it as an additional source selection in any other associated audio zones within the NuVo Wireless Audio System.
- Audio Out: This 3.5mm stereo output provides the local line level audio signal to an additional amplifier, powered subwoofer, or headphones.
- Left and Right Speaker Outputs: These binding posts provide an amplified audio signal to any connected speakers. The maximum output of the P100 is 40 watts stereo.
- AC: The switchable universal power supply will accept any incoming AC voltage worldwide.
P200 Zone Player Back Panel Features
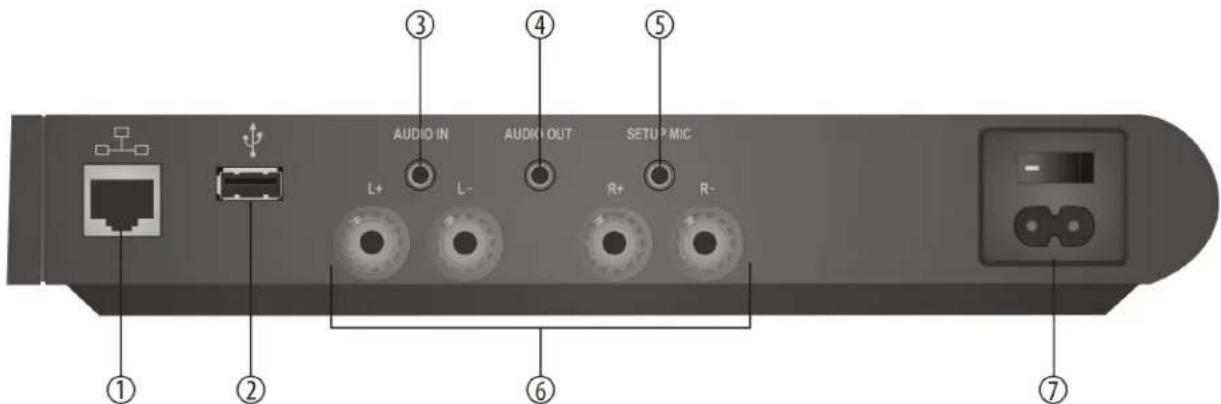
- Ethernet: This RJ45 port allows for a wired connection directly to the GW100 Gateway or directly to the network router.
- USB: Any USB compatible hard drive can share music content with the NuVo Wireless Audio System through this port.
- Audio In: This 3.5mm stereo input will accept any analog line level audio signal. The local audio source is amplified by the local Player, as well as providing it as an additional source selection in any other associated audio zones within the NuVo Wireless Audio System.
- Audio Out: This 3.5mm stereo output provides the local line level audio signal to an additional amplifier, powered subwoofer, or headphones.
- Setup Mic: This 3.5mm input is for future use with future software upgrades.
- Left and Right Speaker Outputs: These binding posts provide an amplified local audio signal to any connected speakers. The maximum output of the P200 is 120 watts stereo.
- AC: The switchable universal power supply will accept any incoming AC voltage worldwide.
P3100 Zone Player Back Panel Features

- Ethernet: The P3100 is designed to connect directly to the network LAN. The second port enables multiple P3100s to share the same network connection within one system.
- Speaker: This modular connection provides a maximum 40 watt stereo amplified signal to the connected speakers. Each zone represents an independent output.
- Line In: This 3.5mm stereo input will accept any analog line level audio signal. The local audio source is amplified by the local Player, as well as providing it as an additional source selection in any other associated audio zones within the NuVo Wireless Audio System. Each zone represents an independent input.
- Trigger In: This optional input is a 3-12 volt trigger. This will be enabled in a future firmware release.
- Line Out: This 3.5mm stereo output provides the local line level audio signal to an additional amplifier, powered subwoofer, or headphones. Each zone represents an independent output.
- Line Out Trigger: This 3.5mm output acts as a voltage (5V, 20mA) trigger for external equipment. This will be enabled in a future firmware release.
- USB: Any USB enabled hard drive can share music content with the NuVo Wireless Audio System through this port. Each zone represents an independent input.
- Setup: This button is used for each of the zone sections in the setup process to associate the zone control with the network.
- AC: The switchable universal power supply will accept any incoming AC voltage worldwide.
1. Setup/Installation
1.1 Network Requirements
A live Internet connection is necessary for complete setup, operation, and music enjoyment of your NuVo Wireless Audio System. Once the system is set up and running, Internet is not necessary for listening to music streaming from a network source. A minimum 100mb wired network is necessary for proper communication. This should not be a problem. Today's network routers are designed to operate in the Gigabyte range. If this is not the case, you should update the installation's network equipment before you proceed with the setup. The NuVo Wireless Audio System uses the most advanced dual band 802.11N wireless communication available for the most robust operation. To insure that all components are compatible and communicating correctly, it is strongly suggested network routers using the older 802.11G protocol are upgraded.
1.2 Connecting the Gateway to the Network
The GW100 Gateway is the wireless communication point for the NuVo Wireless Audio System's players. It requires a standard Ethernet CAT5 or 6 (four twisted pair) wire connection to the home's network. It should be a standard EIA/TIA 568A or 568B network termination if you choose to terminate the cable to a specific length, as shown in fig. 1, or simply use a pre-terminated "network" cable (a cable is included in the package for this purpose), as shown in fig. 2. Note this is a straight-through connection. You should never connect the Gateway using a "crossover" style cable.
Fig. 1 Fig. 2
Top view of RJ45 connector with tab down.

Fig. 1: EIA 568A and 568B wiring scheme for CAT5 Cable
Pin # 568A
1. Green Stripe
2. Green
3. Orange Stripe
4. Blue
5. Blue Stripe
6. Orange
7. Brown Stripe
8. Brown
Pin # 568B
1. Orange Stripe
2. Orange
3. Green Stripe
4. Blue
5. Blue Stripe
6. Green
7. Brown Stripe
8. Brown
Note: Colors listed as "stripe" are a white wire with a colored stripe.

natural_image
Illustration of a USB cable with two connectors (no text or symbols)Make sure that the installation's router is connected to the network modem (this is generally supplied by the Internet Service Provider, ISP) with a single CAT5 network cable. The Gateway has five Ethernet ports and acts as a standard Ethernet switch. Simply connect the included cable, or any Ethernet cable with a standard RJ45 modular plug, into one of the five ports on the back of the Gateway and connect the other end into an available port on the back of the installation's router, as shown in fig. 3.
Fig. 3

A network switch can also be used for the connection to the Gateway, provided the switch is connected to the Internet through the network's router. Once you have made the necessary connections, you are ready to continue with each audio zone setup.
1.3 Hardwiring the Players Directly to the Network
In lieu of running the players wirelessly, each P100 and P200 zone player has an individual Ethernet port. This port allows a standard four twisted pair wire, either CAT5 or CAT6, terminated with a modular RJ45 plug to "hardwire" the player directly to the system's Gateway or network router, as shown in fig 4. Once the player is connected to the network via the Gateway or directly to the home's router, the actual network connection will be completed from the control app on the desired control device, see 2.2 Advanced Setup.
Fig. 4

natural_image
Three images showing network devices: a two-port router connected via USB cable, a wireless router with two antennas, and an open QDAN router with ports and cables (no visible text or symbols)1.4 Installing the P3100 Zone Player
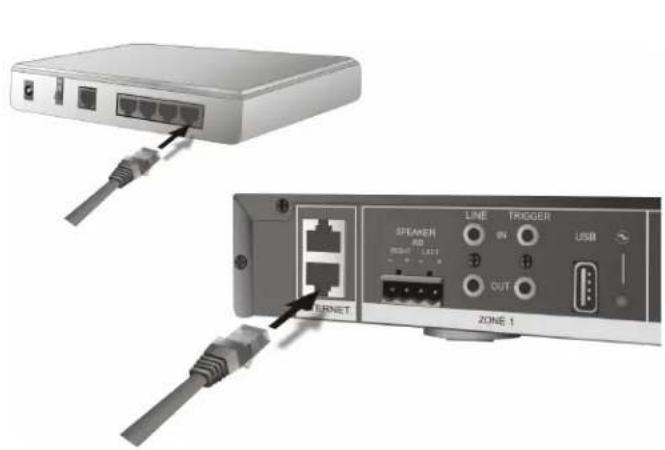
If you are installing the P3100 rack mount component, the network connection is completed by connecting one of the P3100's two Ethernet ports directly to the home's network using a standard Ethernet cable. Either of the two Ethernet ports will communicate when connected, as shown in fig. 5. The second port is used for daisy chaining multiple P3100 units for more audio zones, as shown in fig. 6. Note that the P3100 is not a wireless device and does not use the Gateway for communication.

1.5 Connecting Speakers to the P100 and P200 Zone Players
The P100 and P200 zone players are equipped with "5-way" binding posts for connecting the amplified audio signal to speakers. These can be bookshelf, floor standing, or installed in the wall or ceiling. 16 gauge speaker wire is recommended for this purpose. The binding posts provide two different methods for terminating the wire. The post can be unscrewed to expose a hole for the speaker wire. Strip about 1/4 inch of insulation from the inner conductor wire and insert it into the hole. Screw the post back in until it firmly secures the wire, as shown in fig 7. The alternative method is to terminate the speaker wire into "banana" plugs and insert that into the end of the binding posts, as shown in fig. 8. Be careful to keep the positive and negative speaker connections consistent at both ends. Crossing the left and right terminations will inhibit the audio quality from the amplifier.
Fig. 7 Fig. 8

natural_image
3D rendered illustration of a robotic hand gripping a small mechanical component (no text or symbols visible)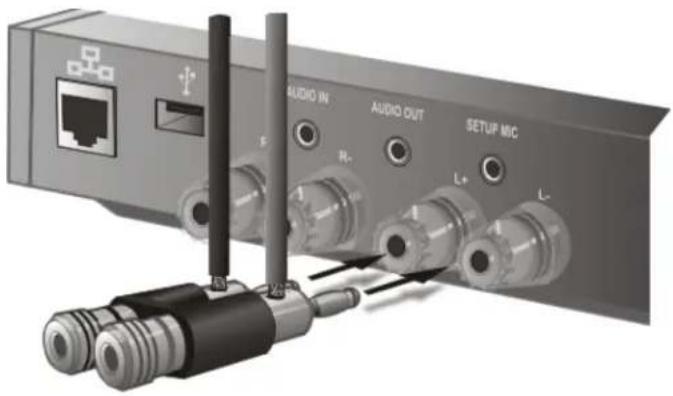
1.6 Connecting Speakers to the P3100 Zone Player
The P3100 zone player has three separate zone "euro" style speaker connectors. The speaker wire is terminated into this modular plug and then inserted into the appropriate zone output on the back panel of the P3100, as shown in fig. 9. It is only necessary to strip about 1/8 inch of the insulation from the inner conductor for these plugs. Be careful not to let the exposed speaker wires touch. This will short the connection and could damage the amplifier.
Fig. 9

2. Setting Up a System from the iOS or Android App
Once you have connected the system to the local network you are ready to begin adding zone players in their desired locations, naming those locations for local control and creating your multi-zone music system. The process is easily done from any iPod Touch, iPhone, iPad, or Android device using the NuVo Wireless Audio System app.
2.1 New Wireless System Setup
Download the app to your device from the iTunes App Store or the Google Play Marketplace. Make sure your device is connected to the same network as the NuVo Wireless Audio System. Open the app and select "Setup a new system" from the initial screen, as shown in fig. 10. "Join my existing system" is used to connect a new iOS or Android device to an existing system. Note that the iOS app will not run on older iOS devices that cannot support iOS5 or later versions.
Fig. 10

You should already have connected your Gateway to the home's network. If not, make sure that connection is made, see section 1.2, Connecting the Gateway to the Network. When the Gateway and home router connection is made, simply touch "Next", as shown in fig. 11.

Fig. 12

The app will indicate that the Gateway is connected to the network. Touch "Next" to proceed to the individual zone player setup, as shown in fig. 12.
The next step is to place your first zone player in its desired location. When it is plugged in and powered on, the front LED light will flash white while the player is booting up. When it is ready the front panel LED will be solid green. Touch the "Next" button to proceed to the next step, as shown in fig. 13.
Fig. 13

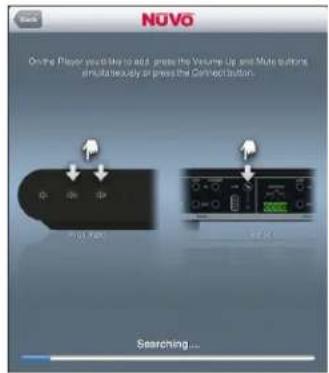
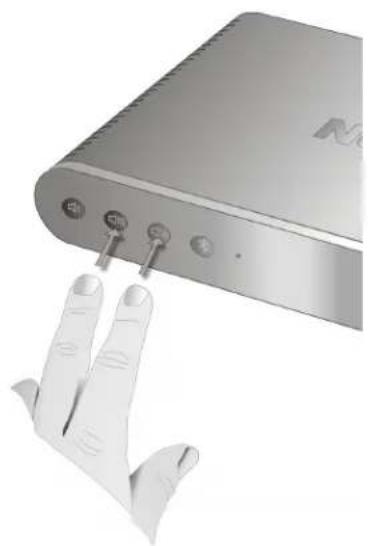
Each player is assigned a network ID as well as a NuVo System ID. This process is completed by pressing the Volume UP and Mute buttons on the front panel of the P100 and P200 players simultaneously, or press the Zone Setup button located on the back panel of the P3100 player, as shown in fig. 14. Note that the P3100 represents three individual zones in the system. Each zone output section has its own setup button, requiring the process to be repeated on each
Fig. 14
natural_image
Close-up of a hand interacting with a silver wireless device (no visible text or symbols)
Fig. 15
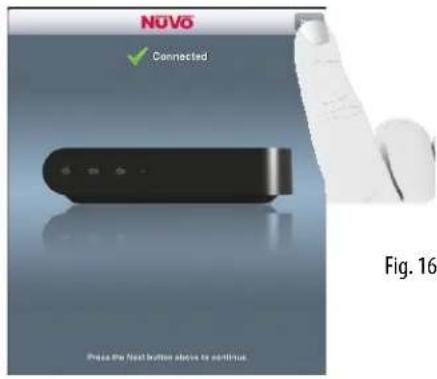
While the connection is being made, the front panel LED will flash. The app will indicate when the connection is complete and the LED will be solid white. Touch "Next" to proceed, as shown in fig. 15.
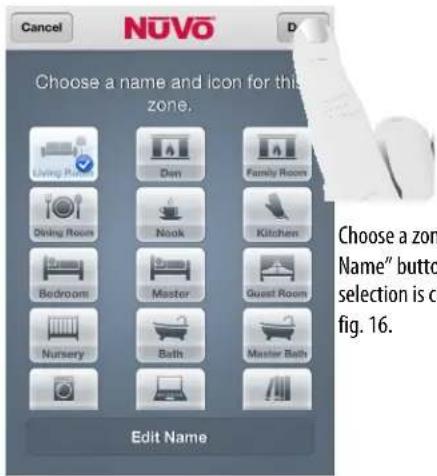
Choose a zone icon for the player. Then you use the "Edit Name" button to give the zone a customized name. When the selection is complete, touch the "Done" button, as shown in fig. 16.
Fig. 17

The "Add" button will repeat the setup process for the next zone. If you have completed the setup on all of the desired zones, touch the "Done" button. The app will go to the home screen, referred to as the Dashboard view, as shown in fig. 17. From there any zone can be selected for music playback, and you are ready to enjoy music anywhere in the home, as shown in fig. 18.

Fig. 18

2.2 Adding Zones to an Existing System
Once a system is set up, adding additional P100, P200, or P3100 zone players is easily done.
Fig. 19

To do this, go to the "Settings" button at the bottom of the Dashboard, which is the section of the app defined by the zone icons, as shown in fig. 19.
Fig. 20

Touch the "Add a NuVo Component" button as shown in fig. 20. This will take you to the zone setup procedure described in section 2.1 New Wireless System Setup.
From this point the setup is identical to the process covered in section 2.1, New System Setup.

2.3 Adding Additional Gateways to an Existing System
Up to two additional Gateways can be added to a system when additional Wi-Fi range is needed. Additional Gateways must be hardwired to the network along with the original Gateway. This can be done by plugging the new Gateway(s) into the first Gateway, into the installation's router, or a switch from the router. When a new Gateway is added to the system, go to the Settings menu and select "Add a NuVo Component", as shown in fig. 21. The control app will recognize that a new Gateway has been added and the next step is to touch "Add Gateway(s)", as shown in fig. 22.
Fig. 21
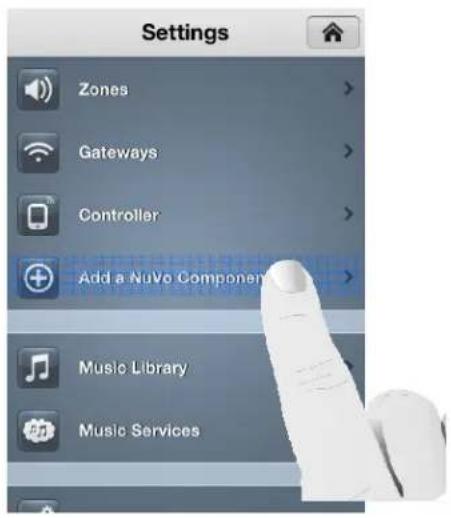
Fig. 22

The next step will join the new Gateway to the system, as shown in fig. 23. When the process is complete, the app will indicate that the Gateway has been successfully added, as shown in fig. 24.
Fig. 23 Fig. 24


The zones in the system will connect to the best Gateway signal at startup, depending on their location.
3. Using the iOS and Android Control App
The iOS and Android apps offer complete system control wirelessly from any Wi-Fi enabled phone or tablet. The iOS version is available for free download from the iTunes App Store and the Android version is available from Google Play. Both versions offer the same look and control options. The iPad version is nicely optimized for a view of the complete system operation on one screen.
3.1 The Dashboard
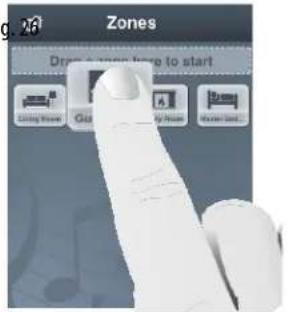
System control begins with the Dashboard. All of the available zones are represented by an icon. Your initial selection is done by dragging and dropping a zone into a new zone group, as shown in fig. 25. This can also be done by simply tapping an inactive zone. Once a music selection is made, the related album art and now playing information will appear in the zone group. Zones can play music individually or you can share music by dragging and dropping multiple zones into a single group, as shown in fig. 26.
Fig. 25 Fig

To deactivate a zone and stop the music playback on that zone, simply drag the icon back into the open dashboard area below the zone groups.
3.2 Music Selection
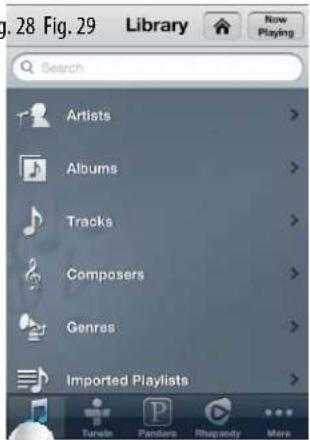
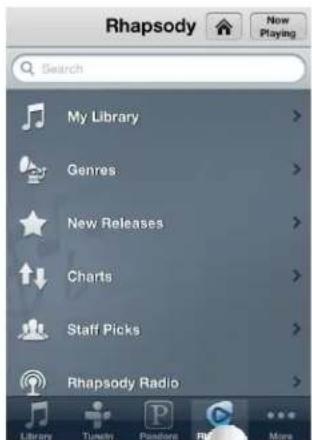
When a zone group is activated by moving a zone icon into the zone group field (see fig. 25), the app will go to the music navigation pane. From there, any streaming service, personal music libraries, Bluetooth, or local line in sources can be selected for playback. The available music choices are visible in a music selection ribbon. As you scroll across the selections with your finger, the active choice will be highlighted and the display will change accordingly, as shown in figs. 27, 28, and 29.
Fig. 27 Fig

3.3 Bluetooth® Playback
An important feature of the P200 zone player is the ability to stream music content from any Bluetooth enabled device.
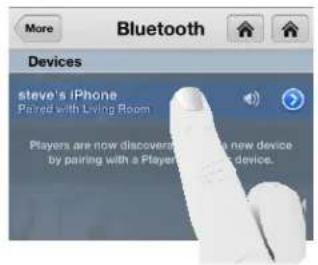
To take advantage of Bluetooth streaming, make sure that your device's Bluetooth is turned on. This is done within the device's settings. When in range of a P200, that zone will appear in the device's Bluetooth menu. Choose the zone to "pair" your device, as shown in fig 30.
Fig. 30

A paired device will remain paired and available when it is within range of the paired zone. To connect a device and initiate playback, select Bluetooth as an audio source, as shown in fig. 31. Then select the desired device, as shown in fig. 32. The app will show the selected device as "Connected", as shown in fig. 33, and the zone player will switch to the Bluetooth stream. Music content control is made from the connected device.


3.4 Line In
Each player has a 3.5 inch stereo audio line in on its back panel. This input allows any local zone analog music source to be plugged in and added to the system as an additional source input. This is done by connecting a 3.5 mm stereo audio cable from the audio output on the playback device and into the input on the zone player, as shown in fig. 34.

natural_image
Illustration of a vintage iPod device with a pencil inserted, showing its screen and disc (no text or symbols on the device itself)
natural_image
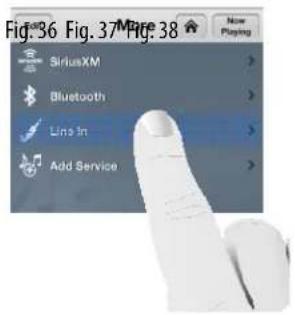
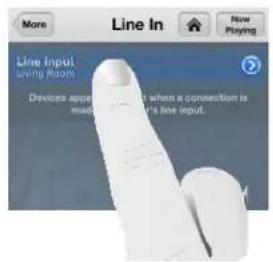
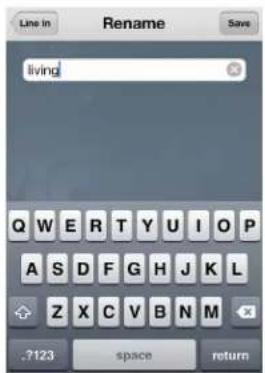
Exterior view of a network switch device with ports and connectors (no visible text or symbols)When a line in device is connected to a zone, select "Line In" from the app, as shown in fig. 35. The device will appear in the "Line In" menu and be available for selection from all the zones, as shown in fig. 36. A "Rename" utility is available by touching the arrow button next to "Line Input", this allows a specific name to be given to it in the app, as shown in figs. 37 and 38.
Fig. 35

4. The Settings Menu
The Settings menu has several selections important to the system's control and operation. Access to Settings is made through the "Settings" button located at the bottom of the Dashboard. On the smaller format devices such as the iPhone, iPod Touch, or Android phones, if you are on the "Now Playing" screen or browsing musical selections, the "Home" button at the top of the screen will always return the app to the Dashboard, as shown in fig. 39. From there, touch the "Settings" button, as shown in fig. 40 to access the Settings menu, as shown in fig. 41.
Fig. 39 Fig. 40


4.1 Zones
Selecting "Zones" in the Settings menu provides several controls for audio playback and functionality, as shown in fig. 42. When the "Zones" button is touched, the app will display the choice of zones within the system, as shown in fig. 43. When one of the zones is selected, its individual settings and controls will be available, as shown in fig. 44.
Fig. 42

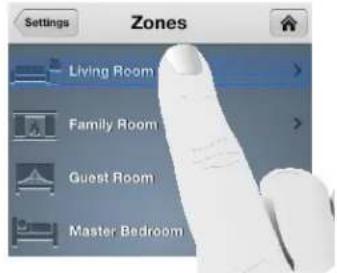

The Zone Settings menu has several zone playback choices that are simple slider adjustments or on/off choices.
Bass, Treble, and Balance: These three sliders allow individual settings for each zone.
Loudness: This on/off button allows for bass boost designed for low volume listening.
Fixed Volume Line-Out: Each of the zone players have an individual audio line out. This allows the audio output of the zone to be supplied to an additional amplifier, subwoofer, or even headphones. By default, the volume level of this output will adjust with the volume setting made on the app. In some uses, such as a separate amplifier being used in a sub-zone, a fixed volume level that requires a separate volume control is preferred. For those instances, turn this feature on.
Mono: When this feature is turned on, it sums the individual left and right stereo outputs into a single identical audio output for each of the speaker terminals. This is a very useful feature in allowing a single mono speaker to provide all the stereo audio content to a zone, or you may have a large aria in which the speakers would be too far apart to be in ear-shot of a single listener.
Audyssey Dynamic Volume: This is designed to level relative volume between audio selections. This feature is useful where the music is meant to be at a lower background level. It is not recommended for critical listening scenarios.
If you touch the zone icon and name at the top of the "Zones Settings" screen, the zone icon page will appear, as shown in fig. 45. From there you can change a zone's icon and name, as shown in fig. 46.


The "Advanced" section has a single selection, as shown in fig. 47. It allows the P100s and P200s wireless communication to be set at the default 2.4 GHz band or the higher 5 GHz, shown in fig. 48. In most settings 2.4 is preferred. The exception is a scenario in which there are many wireless networks operating in close proximity. Since most network traffic is in the 2.4 GHz band, audio streaming could be a challenge. In these instances, the zone can be changed to 5 GHz where there is more streaming bandwidth and the traffic is much lower. Note that the 5 GHz wireless range is lower than 2.4. Multiple Gateways can be installed to increase the wireless range when needed, see section 2.3 Adding Additional Gateways to an Existing System.


When this setting is changed, the P100 or P200 will go offline momentarily causing the front panel LED to flash red. When the LED returns to solid white, the zone is back on the network and ready to resume normal operation. This wireless band selection only applies to the P100 and P200 wireless players. This feature will not be active if you are using the P3100.
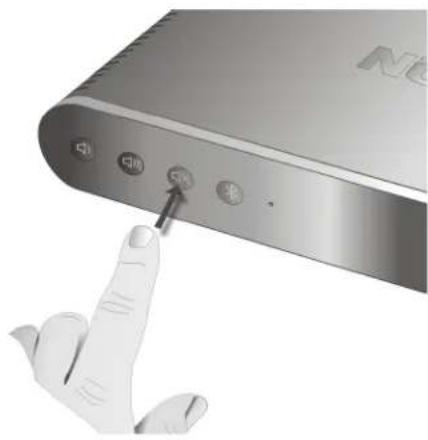
The P100 and P200 have a "quick change" function for toggling between 2.4 and 5 GHz communication. Simply press and hold the front panel mute button for about six seconds until you see the LED flash, as shown in fig. 49. Let go of the button. The LED will flash red momentarily as the zone is reconnecting at the new frequency. When the process is complete, the LED will return a solid white state. At that point the zone will be fully operational.
Fig. 49
natural_image
Close-up of a device's front panel with a finger pointing to the button (no visible text or symbols)4.2 Gateways
The Gateway selection allows you to view and change important settings to the Gateway(s) operation. When "Gateways" is selected, as shown in fig. 50, the app will show the Gateways present in the system, as shown in fig. 51. The Gateway page will show "Name", "Serial Number", and "Wireless", as shown in fig. 52.
![Gateways Gateway Name Gateway > Serial Number [00:25 ED,9A,01 BA] Wireless >](/content/2026/06/1354918/images/ae664306f0ee4d8c5098f7b5b9e6182f119f295ce2a0f4a091dc4fde5936dbb6.jpg)
When "Name" is selected, a screen with a keyboard will allow the name of the chosen Gateway to be edited, as shown in fig. 53. This is useful if you are using more than one Gateway in a system. "Wireless" shows the current channel selection for 2.4 and 5 GHz broadcast, as shown in fig. 54. The default is "Autoselect" but when that feature is turned off and "Channel" is selected, a manual channel select choice will appear, as shown in fig. 55.


4.3 Controller
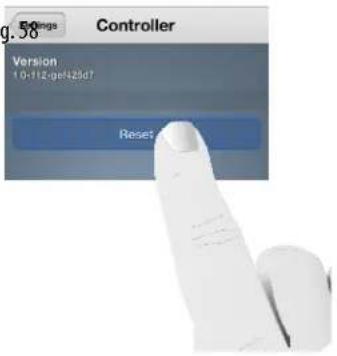
When "Controller" is selected, as shown in fig. 56, a page will appear with the current software version number, as shown in fig. 57. It also has a "Reset" button which will disassociate the app from the system. The screen will display its original preconfigured state, as shown in fig. 58.
Fig. 56

Fig. 57 Fig

4.4 Add a NuVo Component
See section 2.2, Adding Zones to an Existing System.
4.5 Music Library
Existing personal music is easily shared with the entire system by plugging a USB hard drive into the USB port on the back panel of any of the zone players, as shown in fig. 59. The player will automatically scan the drives content and add it with its associated album art to the system's music library.
Fig. 59

natural_image
Illustration of a computer interface with connected ports and cables (no text or symbols visible)Another way to add music is to use the Music Share software, see section 5, The Music Share Software. Once music is added and you select "Music Library", as shown in fig. 60, the Music Library screen will display the number of songs and file size of the accumulated library, as shown in fig. 61. It will also show the individual sources for music content. An additional selection "Add Share" will allow you to type in the network path to a directory or shared drive with music content, as shown in fig. 62. When a new library is added, it may take time for the content to be refreshed. The length of time depends on the amount of content.
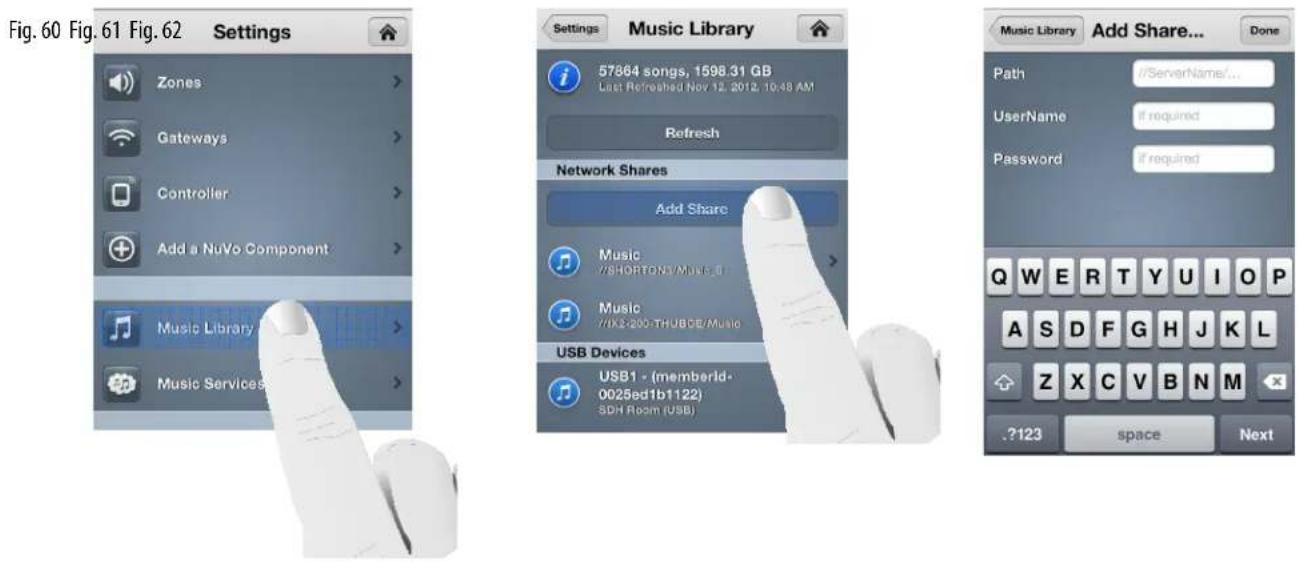
New music shares will appear in the music library as "Refreshing" while the files of the library are scanned. Once the refresh is completed, the content will be available for browsing and playback.
4.6 Music Services
When "Music Services" is selected, as shown in fig. 63, the active streaming music services on the system will be displayed, as shown in fig. 64. It also provides a button for adding new services. Most services require an online subscription account. The associated user name and password for the account must be added in this selection for the service to be active on the system.

Note that music service availability is based on your region. The cost, functionality, and terms of subscription vary by service and are a function of the service provider.
4.7 System
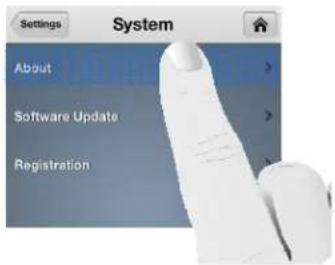
When "System" is selected, as shown in fig. 65, the menu will display three important choices for information about the components of the system, as shown in fig. 66. The first choice, "About", gives specific component information for each zone, as shown in fig. 67.


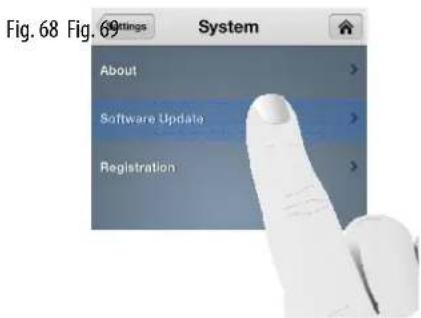
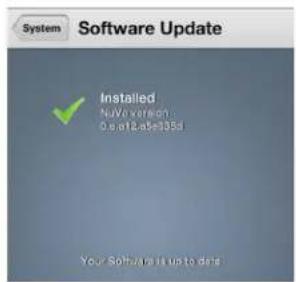
"Software Update" will show any software updates that may be available, and allow for easy updates, as shown in figs. 68 and 69. Typically any updates will pop up on the app. An important advantage for the user is that the update is already downloaded in the background and once "install" is selected all the zones in the system will automatically be updated.
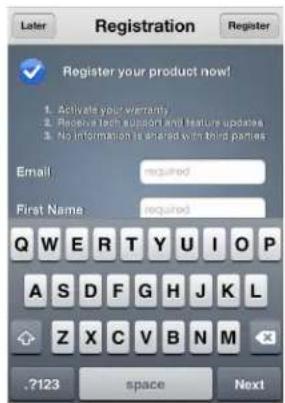
"Registration" will open the product warranty registration page, as shown in figs. 70 and 71. The opportunity to register the product is offered at the initial setup of the system. If the registration is completed at that time, this System selection is not necessary.

4.8 International
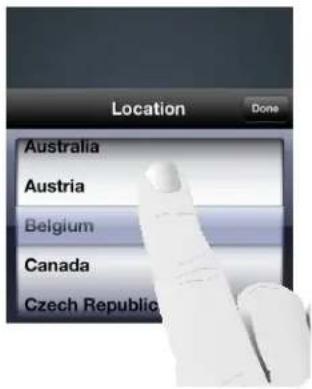
The "International" selection, as shown in fig. 72, provides a "Location" setting, as shown in fig. 73. When a country location is set, as shown in fig. 74, the legal 5 GHz wireless broadcast channel is set for the selected region. This is an important selection if you are using the 5 GHz wireless band for communication, see section 4.1 Zones "Advanced".
Fig. 72

Fig. 73 Fig

4.10 Help
The "Help" button, as shown in fig. 75, has links to contact NuVo directly or reference information on the system's components, as shown in fig. 76.
Fig. 75 Fig. 76


5. The Music Share Software
The Music Share Software allows music content from either shared network locations or libraries contained on personal computers to be streamed from any zone in the system.
- From your computer, go to www.nuvotechnologies.com/musicshare to download the software from the NuVo website.
- Follow the prompts for installing the software.
- When the software is opened, it will connect to the network and display a blank music share page, as shown in fig. 77.
Fig. 77

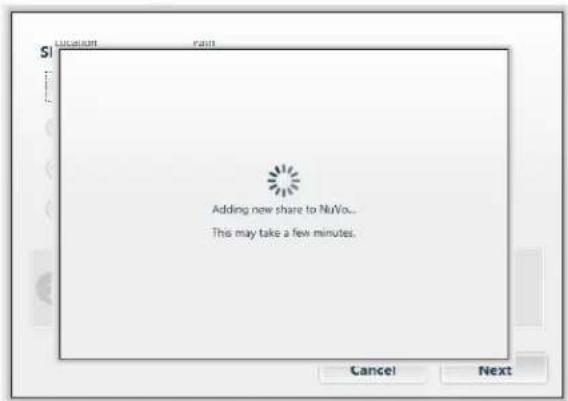
- Click on the "Add new" button at the top of the window. The music share choices will open in the next window, as shown in fig. 78. "My Music" folder is the default location for Windows Media Player libraries. If your music is stored on a Mac computer, or your preferred music library software is in iTunes, then select "iTunes media folder". When a selection is made, you will see a progress window, as shown in fig. 79.
Fig. 78 Fig. 79

- You can also choose to share a specific folder or drive on the network. The "A specific folder..." choice will open Windows Explorer, as shown in fig. 80. From there you can choose a shared folder with music content or drive that is shared with the network.
Fig. 80

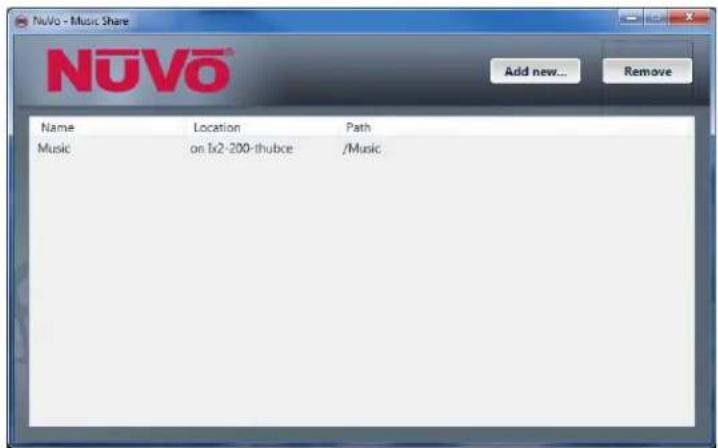
- All shared folders and drives will be displayed in the software, as shown in fig. 81. The software can be opened at any time and content can be added or removed. Note that if you are sharing a personal library located on a personal computer hard drive, the software must actually be downloaded to that computer before the share is created. Once the share directory is created for the zone's of the system, it is not necessary to keep the Music Share software open, although the computer hosting the music content must be active on the same network as the system for that content to be available for music playback.
Fig. 81
6. Troubleshooting
6.1 Front Panel LEDs
An important indicator of each zone's operation is the LED light on the front panel of the zone players. The color and either solid or flashing state of the LED provides a visual reference for the player's state of operation. Refer to the chart for an explanation of the functions and LED status.
| LED Color | State of Zone Player | Explanation |
| Not Lit | Zone player is not powered on. | |
| Solid White | Zone player is connected to the network and in normal operation. | |
| Flashing White | Zone player processor is busy; it should return to solid white. | |
| Solid Red | Hard failure. There is no network communication. Reboot by turning the power off and back on. | |
| Flashing Red | If the LED is flashing Red, its state indicates that the zone player is no longer seeing the network. | |
| Solid Green | Uninitialized state. It will become solid white when the zone player is added to a system and acquires a network address. | |
| Flashing Green | Busy uninitialized state. This is normal during the zone setup process. The LED will turn white at the completion of the zone setup. It also means that the zone is updating to a new version. Do not unplug during this process. At the completion of the update it will return to solid white. | |
| Solid Cyan | Zone is muted. When it is taken out of mute, it will return to solid white. | |
| Flashing Blue | This indicates that the P200 is in Bluetooth discovery mode. |
6.2 Not Connected
A common indicator for lack of communication with the system is the app's "Not Connected" screen, as shown in fig. 82. This screen appears when the controller is unable to see the zones in the system. There are several potential causes and remedies for this state that are important for troubleshooting.
Fig. 82

- Look in the network settings of your control device and verify that it is connected to the same network as the Gateway and zone players.
- This may sound relatively simple, but check the power status of the zone players. They should have a solid white or cyan LED light on the front panel.
- Make sure that one or more of the players are not offline. This state would be indicated by a flashing red LED on the front panel. This can occur as a momentary state, in which case the LED will return to a solid white when the network connection is restored. This is often corrected by simply turning off and restoring power to the player. Once it is rebooted it should have a solid white LED on the front panel. If that does not restore a connection, reset the player defaults by turning the power off and back on. When the front panel LED lights up, follow the steps outlined in section 6.3 Restoring Defaults. When that process is complete the player will have a solid green LED. Repeat the zone player setup procedure from the control app, see section 2.2 Adding Zones to an Existing System. When the zone is reconnected the front panel LED should once again be solid white.
- If you are using a Gateway, check its connection to the network's router. Reboot if necessary by unplugging the power cable and plugging it back in. This resets the Gateway and puts it back into channel auto select. If there is conflicting traffic on a given Wi-Fi channel, this will often correct the situation.
- Occasionally home routers go offline. This is typically corrected by rebooting the router.
6.3 Restoring Defaults
An important troubleshooting step is to restore defaults on a zone player. If a hard failure occurs, which results in a solid red LED, or the boot up process does not complete correctly, which will result in a flashing white LED, you should follow these steps to return the player to its original factory state.
Once a zone is reset, repeat the setup procedure from the control app.
Process for the P100 and P200 wireless players:
- Turn off the power using the power switch on the back panel above the AC plug.
- Turn the power back on and look for a white LED to light up.
- As soon as you see a white LED, touch the Volume UP and Volume down buttons simultaneously, as shown in fig. 83.
- When the LED appears green, release the buttons.
- The LED will flash green, then white.
- When the LED becomes solid green, the process is complete and the defaults have been restored.
Process for the P3100 players (these steps must be performed on each zone output independently):
- Turn off the power using the power switch on the back panel above the AC plug.
- Turn the power back on and look for a white LED to light up.
- As soon as you see a white LED, touch the zone setup button, as shown in fig. 84.
- When the LED appears green, release the button.
- The LED will flash green, then white.
- When the LED becomes solid green, the process is complete and the defaults have been restored.
Process for the GW100 Gateway
- Press and hold the "Connect" button for until the LED begins a rapid flash, as shown in fig. 85.
- Wait for the flashing LED to return to a solid state.
- Once the LED is solid green the reset is complete.
If you have reset defaults on all of the zones of the system, it is a good idea to also reset the Gateway as well before reinitiating the system setup.

natural_image
Close-up of a finger pressing a button on a device (no visible text or symbols)Fig. 84

Fig. 85

natural_image
Close-up of a white USB device with a probe inserted, showing ports and wiring (no visible text or symbols)6.4 System Diagnostics
A valuable tool for diagnosing system performance is the built-in system diagnostic utility. This can be accessed across the network from any computer or Wi-Fi enabled device through a web browser. To access the diagnostics page, enter a zone's IP address into the browser address window followed by a forward slash (/) and the text, "diagnostics.fcgi", as shown in fig. 86. This will open the diagnostics window as shown in fig. 87.
Fig. 86

Fig. 87

The advantage of the diagnostics utility is that is provides a view of all of the zones on the network from that particular zone's view. At the bottom of the window are a series of buttons, two of which can be advantageous for the installer. On is the Site Survey button (labeled impriv ra0 get_site_survey). This opens a new window that shows all of the neighboring networks in view of the zone and the channel those networks are operating on depending on whether the zone is set at 2.4 GHz or 5 GHz, as shown in fig. 88. If there is significant traffic at the displayed frequency across the available channels, it is a good idea to change frequency. Overloading of channel traffic generally is associated with 2.4 GHz. This issue rarely occurs at 5 GHz.
Fig. 88
| Networked Audio SDK | ||||||||
| ra0 get_site_survey: | ||||||||
| Ch | SSID | BSSID | Security | Siganl(%)W-Mode | ExtCH | NT WPS | DPID | |
| 36 | NuVoHomeAudio9A009A | 00:25:ed:9a:00:9b | WPA2PSK/AES | 57 | 11a/n | NONE | In | NO |
| 36 | NuVoHomeAudio9A01AA | 00:25:ed:9a:01:ab | WPA2PSK/AES | 78 | 11a/n | NONE | In | NO |
| 36 | belkin.076.5GHz | ec:1a:59:14:20:78 | WPA2PSK/AES | 31 | 11a/n | NONE | In | YES |
| 40 | NuVoHomeAudio9A00B4 | 00:25:ed:9a:00:d3 | WPA2PSK/AES | 73 | 11a/n | NONE | In | NO |
| 40 | NuVoHomeAudio9A00E4 | 00:25:ed:9a:00:e5 | WPA2PSK/AES | 63 | 11a/n | NONE | In | NO |
| 40 | dlink_media | 00:18:e7:e1:7a:19 | WPA1PSKWPA2PSK/TKIPAES | 52 | 11a/n | NONE | In | YES |
| 44 | NuVoHomeAudio9A0086 | 00:25:ed:9a:00:87 | WPA2PSK/AES | 83 | 11a/n | NONE | In | NO |
| 44 | MikeKlein | 58:6d:8f:c2:48:76 | WPA1PSKWPA2PSK/TKIPAES | 68 | 11a/n | ABOVE | In | YES |
| 48 | NuVoHomeAudio9A0068 | 00:25:ed:9a:00:69 | WPA2PSK/AES | 83 | 11a/n | NONE | In | NO |
| 149 | BrianGW_2_4 | 00:25:ed:9a:00:e1 | WPA2PSK/AES | 57 | 11a/n | NONE | In | NO |
| 149 | NuVo Wireless | 34:bdi:c8:86:69:50 | WPA2PSK/AES | 26 | 11a/n | NONE | In | NO |
| 149 | NuVoHomeAudio9A00A8 | 00:25:ed:9a:00:a9 | WPA2PSK/AES | 63 | 11a/n | NONE | In | NO |
| 153 | NETGEAR-5G | 74:44:01:48:60:b0 | NONE | 26 | 11a/n | BELOW | In | YES |
| 153 | NuVo Wireless | 00:26:cb:13:ee:b0 | WPA2PSK/AES | 100 | 11a | NONE | In | NO |
| 153 | PeteCisco_5 | 58:6d:8f:c2:46:55 | NONE | 47 | 11a/n | BELOW | In | YES |
| 157 | NuVoHomeAudio9A00CE | 00:25:ed:9a:00:cf | WPA2PSK/AES | 63 | 11a/n | NONE | In | NO |
| 157 | Pete_5 | 28:cf:da:b1:b4:44 | WPA2PSK/AES | 73 | 11a/n | ABOVE | In | NO |
| 161 | BachroomNuVo | 98:fcc:ll:7d:66:8a | WPAPSK/TKIP | 100 | 11a/ n/a | |||
Another useful tool is the button labeled "iPerf". This is a built-in throughput test for all of the zones in the system. When iPerf is selected, the system will run a test across all zones that measures the available throughput to each of the zones, as shown in fig. 89. The results appear as green, meaning good throughput, yellow, meaning marginal but still acceptable, and red, meaning not good enough to support necessary audio streaming. The result to be concerned about is red. If a zone result is red, the solutions are to move the zone to a better location, wire it directly to the network, try 5 GHz communication as opposed to 2.4, see section 4.1 zones page 17, or add an additional Gateway for additional Wi-Fi coverage.
Fig. 89
| Zones/Gateways | Gateway 2 | |
| Tx | Rx | |
| Nook | 43.7 Mbits/sec0.270 ms [5G]22205/41395 (54%) | 63.5 Mbits/sec4.463 ms [5G]721/28092 (2.6%) |
| Living Room | 42.0 Mbits/sec0.165 ms [5G]23874/42108 (57%) | 75.6 Mbits/sec0.202 ms [5G]830/33026 (2.5%) |
| Pool | (testing) | (testing) |
| Garage | ||
| Game Room | 39.0 Mbits/sec0.336 ms [5G]23857/40804 (58%) | 71.1 Mbits/sec0.543 ms [5G]683/30984 (2.2%) |
| Bedroom | ||
6.5 Advanced Network Management
A popular practice is to prioritize home network traffic by creating VLANs (Virtual Local Area Networks) to provide better performance for streaming audio and video. This work should only be done by a network administrator. The practice uses configurable network switches that allow specific ports to be grouped for their specific VLAN communication. Each of the VLANs are considered broadcast domains. The concept of broadcast domains is very important to proper communication among the components of the NuVo Wireless Audio System. For all zones to communicate properly they must be on the same broadcast domain. Make sure that the switch ports being used for the NuVo Wireless Audio System are operating on the same VLAN.
Another potential issue with zone communication can be the way in which port security has been configured. Since the components of the system are continually sending packets of information back and forth, it is important that the switch ports being used are open to all network traffic. If they are not, this will impede the necessary communication across the entire system.
On any managed switch, speed and duplex must be set on the ports being used by the NuVo Wireless Audio System to auto negotiate. This is the way in which the zones communicate. The common mistake would be to set the ports to gigabit communication which will cause a communication mismatch with the zones.
For more advanced troubleshooting, please visit www.nuvotechnologies.com/troubleshooting/player.
7. Specifications
GW100 Gateway
System Information
LAN Connection 5 LAN - RJ45 - 10/100/1000 Mbps
Wireless Connection 2 TX x 2 RX MIMO, IEEE 802.11a/b/g/n
Dual Band – Concurrent
Wireless Data Rate Up to 300 Mbps
Power Requirements
Power Supply 12V DC, 1.0A
Input Voltage 100 - 240VAC, 50/60 Hz
Rated Power 12W
Regulatory Approvals
Controller
EMC FCC, IC, CE-EMC, C-Tick
Power Supply
Safety cULus, GS Mark, CE-LVD
EMC FCC, IC, CE-EMC, C-Tick
Environmental Compliance Europe RoHS
Operating Temperature
0°C to 40°C
Physical Specifications
Unit Size (mm) 32.8 H x 176.5 W x 133 D (including antennas)
Unit Size (inch) 1.29 H x 6.95 W x 5.24 D (including antennas)
Unit Weight (kg) 0.55
Unit Weight (pounds) 1.21
Shipping Specifications
Unit Size (mm) 240 D x 230 W x 65.5 H
Unit Size (inch) 9.45 D x 9.06 W x 2.58 H
Unit Weight (kg) 0.90
Unit Weight (pounds) 1.98
NuVo reserves the right to change specifications without notice.
P100 Wireless Player
Input/Output Connectors
| Line Input | 1 - TRS 3.5 mm stereo jack |
| Line Output | 1 - TRS 3.5 mm stereo jack |
| Speaker Output | 4 - Gold 5-way binding post |
| USB 2.0 Connection (Type A) | 1 |
| Local Area Network (LAN) | 1 - RJ45 |
Supported Audio Formats
| Music File (USB or over network) | MP3 |
| WMA | |
| AAC | |
| Ogg Vorbis | |
| FLAC | |
| WAV |
| Internet Radio | PandoraSirius/XMRhapsodyTuneln |
IP Control
| Apple iTouch® |
| Apple iPhone® |
| Apple iPad® |
| Android Mobile |
Android Tablet
Network Connectivity
| LAN (Wired Connection) | 10/100base-t Ethernet |
| Wireless Connection | MIMO, 2 TX + 2 RX Channels |
| IEEE 802.11a/b/g/n |
Amplifier Output
| Rated Output Power (8 ohm) | 40W (20W x 2) |
| Two channels driven 20 Hz – 20 KHz @ 0.5% distortion | |
| Rated Distortion (1/2 Power) | 0.20% |
| Speaker Impedance | 6 – 8 ohms |
| Frequency Response (20 - 20kHz) | +/-0.5 dB |
| Damping Factor | 50+ |
| Signal-to-Noise Ratio, rated output: | 94 dB A – weighted |
Line Output
| Output Level | 0-1000 mV RMS |
| Output Impedance | 5 Ohms |
| Signal-to-Noise Ratio, rated output | 88 dB A – weighted |
Line Input
| Input Impedance | 10 KOhms |
| Input Overload | 2.3 V RMS |
Audio Processing
| Audyssey Dynamic VolumeTM | |
| Bass Equalization | +/-12 dB range |
| Treble Equalization | +/-12 dB range |
| Balance | |
Regulatory Approvals
| Safety: | cTUVus, CE-LVD |
| EMC: | FCC, IC, CE-EMC, C-Tick |
| Environmental Compliance Europe RoHS | |
Power Requirements
| Input Voltage: | 100 – 240VAC, 50/60 Hz |
| Power Consumption (max): | 70 W |
| Power Consumption (typical – 1/8 audio power): | 13 W |
Operating Temperature
0°C to 40°C
Physical Specifications
| Unit Size (mm) | 42 H x 187 W x 115 D |
| Unit Size (inch) | 1.65 H x 7.36 W x 4.53 D |
| Unit Weight (kg) | 0.613 |
| Unit Weight (pounds) | 1.35 |
Shipping Specifications
| Unit Size (mm) | 240 D x 230 W x 65.5 H |
| Unit Size (inch) | 9.45 D x 9.06 W x 2.58 H |
| Unit Weight (kg) | 1.30 |
| Unit Weight (pounds) | 2.87 |
NuVo reserves the right to change specifications without notice.
P200 Wireless Player
Input/Output Connectors
Line Input 1 - TRS 3.5 mm stereo jack
Line Output 1 - TRS 3.5 mm stereo jack
Setup Mic: (Audyssey) 1 - TS 3.5 mm stereo jack
Speaker Output 4 - Gold 5-way binding post
USB 2.0 Connection (Type A) 1
Local Area Network (LAN) 1 - RJ45
Supported Audio Formats
Music File (via USB or network) MP3
WMA
AAC
Ogg Vorbis
FLAC
WAV
Internet Radio: Pandora
Sirius/XM
Rhapsody
Tuneln
IP Control
Apple iTouch*
Apple iPhone®
Apple iPad®
Android Mobile
Android Tablet
Network Connectivity
LAN (Wired Connection)
Wireless Connection
10/100base-t Ethernet
MIMO, 2 TX + 2 RX Channels
IEEE 802.11a/b/g/n
Amplifier Output
Rated Output Power (8 ohm)
Two channels driven
Rated Output Power (4 ohm)
Two channels driven
Rated Distortion (1/2 Power)
Speaker Impedance
Frequency Response (20 - 20kHz)
Damping Factor
Signal-to-Noise Ratio at rated output
120W (60W x 2)
20 Hz - 20 KHz @ 0.5% distortion
120W (60W x 2)
20 Hz - 20 KHz @ 0.5% distortion
0.20%
4-8 ohms
+/-0.5 dB
65+
92 dB A - weighted
Line Output:
Output Level
0-1000 mV RMS
Output Impedance
5 Ohms
Signal-to-Noise Ratio at rated output
88 dB A - weighted
Line Input:
Input Impedance
10 KOhms
Input Overload
2.3 VRMS
Audio Processing
Audyssey Dynamic Volume™
Bass Equalization
+/-12 dB range
Treble Equalization
+/-12 dB range
Balance
Regulatory Approvals
Safety
cTUVus, CE-LVD
EMC
FCC, IC, CE-EMC, C-Tick
Environmental Compliance
RoHS
Power Requirements
Input Voltage 100 - 240VAC, 50/60 Hz
Power Consumption (max)
150 W
Power Consumption (typical - 1/8 audio power)
31 W
Operating Temperature
0^ C to 40^ C
Physical Specifications
Unit Size (mm)
42 H x 229 W x 127 D
Unit Size (inch) 1.65 H x 9.02 W x 5.0 D
Unit Weight (kg)
1.11
Unit Weight (pounds)
2.45
Shipping Specifications
Unit Size (mm)
260 D x 240 W x 65.5 H
Unit Size (inch)
10.24 D x 9.45 W x 2.58 H
Unit Weight (kg)
2.0
Unit Weight (pounds)
4.41
NuVo reserves the right to change specifications without notice.
P3100 Player
Input/Output Connectors
Line Input 3 - TRS 3.5 mm stereo jack
Line Output 3 - TRS 3.5 mm stereo jack
Trigger Input 3-TS 3.5 mm stereo jack
Trigger Output 3-TS 3.5 mm stereo jack
Speaker Output 3 - (4 contact) Pluggable
USB 2.0 Connection (Type A) 3
Local Area Network (LAN) 1 - Dual RJ45
Supported Audio Formats
Music File (USB or over network) MP3
WMA
AAC
Ogg Vorbis
FLAC
WAV
Internet Radio Pandora
Sirius/XM
Rhapsody
Tuneln
IP Control
Apple iTouch*
Apple iPhone®
Apple iPad®
Android Mobile
Android Tablet
Network Connectivity
10/100base-t Ethernet
Internal Ethernet switch to 3 independent zone nodes
Amplifier Output (typical of 3 zones)
| Rated Output Power (8 ohm) | 40W (20W x 2) |
| Two channels driven | 20 Hz – 20 KHz @ 0.5% distortion |
| Rated Distortion (1/2 Power) | 0.20% |
| Speaker Impedance | 6 – 8 ohms |
| Frequency Response (20 - 20kHz) | +/-0.5 dB |
| Damping Factor | 50+ |
| Signal-to-Noise Ratio, rated output | 92 dB A – weighted |
Line Output:
0-1000 mV RMS
Output Impedance 5 Ohms
Signal-to-Noise Ratio, rated output 91 dB A – weighted
Line Input:
| Input Impedance | 10 KOhms | |
| Input Overload | 2.3 V RMS |
Audio Processing
| Audyssey Dynamic VolumeTM | |
| Bass Equalization | +/-12 dB range |
| Treble Equalization +/- 12 dB range | |
| Balance | |
Regulatory Approvals
| Safety | cTUVus, CE-LVD |
| EMC | FCC, IC, CE-EMC, C-Tick |
| Environmental Europe | RoHS |
Power Requirements
| Input Voltage 100 – 240VAC, 50/60 Hz | |
| Power Consumption (max) | 200 W |
| (typical – 3 zones, 1/8 audio power) | 42 W |
Operating Temperature
0°C to 40°C
Physical Specifications
| Unit Size (mm) | 44 H x 430 W x 250 D |
| Unit Size (inch) | 1.73 H x 16.93 W x 9.84 D |
| Unit Weight (kg) | 2.81 |
| Unit Weight (pounds) | 6.20 |
Shipping Specifications
| Unit Size (mm) | 565 D x 328 W x 130 H |
| Unit Size (inch) | 22.24 D x 12.91 W x 5.12 H |
| Unit Weight (kg) | 3.50 |
| Unit Weight (pounds) | 7.72 |
NuVo reserves the right to change specifications without notice.

Whole Home Audio
NuVo Technologies, LLC, 3015 Kustom Dr., Hebron, KY 41048
www.nuvotechnologies.com
(866) 796-4904


NWAS 1310
- Wireless Audio System
- Table of Contents
- Setup/Installation
- Setting Up a System from the iOS or Android App
- Using the iOS and Android Control App
- The Settings Menu
- Troubleshooting
- The NuVo Wireless Audio System Product Manual
- Introduction
- P3100 Zone Player Back Panel Features
- Network Requirements
- Connecting the Gateway to the Network
- Hardwiring the Players Directly to the Network
- Installing the P3100 Zone Player
- Connecting Speakers to the P100 and P200 Zone Players
- Connecting Speakers to the P3100 Zone Player
- New Wireless System Setup
- Adding Zones to an Existing System
- Adding Additional Gateways to an Existing System
- The Dashboard
- Music Selection
- Bluetooth® Playback
- Line In
- Zones
- Gateways
- Controller
- Add a NuVo Component
- Music Library
- Music Services
- System
- International
- Help
- The Music Share Software
- Front Panel LEDs
- Not Connected
- Restoring Defaults
- System Diagnostics
- Advanced Network Management
- Specifications
- GW100 Gateway
- System Information
- Power Requirements
- Regulatory Approvals
- Operating Temperature
- Physical Specifications
- Shipping Specifications
- P100 Wireless Player
- P200 Wireless Player
- Input/Output Connectors
- Supported Audio Formats
- Network Connectivity
- Amplifier Output
- Line Output:
- Line Input:
- Audio Processing
- P3100 Player
Brand : NUVO
Model : NV-P100-NA
Category : Hi-Fi System