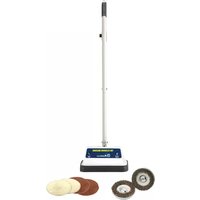
The Cleaning Machine P-620 - Vacuum Cleaner Koblenz - Free user manual and instructions
Find the device manual for free The Cleaning Machine P-620 Koblenz in PDF.


| Product Type | Canister Vacuum Cleaner |
| Model | P-620 |
| Brand | Koblenz |
| Power | 1200W |
| Voltage | 120V / 60Hz |
| Dust Capacity | 3.5 Liters |
| Filtration System | HEPA filter |
| Suction Power | High performance cyclonic |
| Cord Length | 20 feet (6 meters) |
| Cleaning Path Width | 12 inches (30 cm) |
| Weight | 12 lbs (5.4 kg) |
| Dimensions (L x W x H) | 18 x 12 x 10 inches |
| Included Accessories | Crevice tool, upholstery brush, dusting brush |
| Bagless | Yes, easy-empty dust canister |
| Noise Level | 75 dB |
| Maintenance | Regular filter cleaning/washing |
| Safety Features | Overheat protection, automatic cord rewind |
| Repairability | Replaceable parts available |
Frequently Asked Questions - The Cleaning Machine P-620 Koblenz
User questions about The Cleaning Machine P-620 Koblenz
0 question about this device. Answer the ones you know or ask your own.
Ask a new question about this device
Download the instructions for your Vacuum Cleaner in PDF format for free! Find your manual The Cleaning Machine P-620 - Koblenz and take your electronic device back in hand. On this page are published all the documents necessary for the use of your device. The Cleaning Machine P-620 by Koblenz.
USER MANUAL The Cleaning Machine P-620 Koblenz
THE CLEANING MACHINE®
PROFESSIONAL CARPET SHAMPOOER/HARDFLOOR CLEANER/ BUFFER
LAVALFOMBRAS/PULIDORA PROFESSIONAL
OWNER'S MANUAL AND OPERATING INSTRUCTIONS
MANUAL DE OPERACIÓN
MODEL MODELO
| LM-1400 | P-830 | P-1800 |
| P-600 | P-840 | P-2000 |
| P-620 | 680.84973 | P-2500 |
| P-650 | P-850 | P-2600 |
| P-700 | P-860 | P-4000 |
| P-780 | P-870 | P-4200 |
| P-800 | P-900 | P-5800 |
| P-810 | P-1500 | P-84973 |
| P-820 | P-1700 |
YOU HAVE PURCHASED A KOBLENZ / SHAMPOOER / HARDFLOOR CLEANER/BUFFER TO CLEAN AND MAINTAIN VIRTUALLY EVERY TYPE OF FLOOR, INCLUDING WOOD, PLEASE READ THIS MANUAL CAREFULLY BEFORE OPERATING YOUR NEW FLOOR POLISHER.
KEEP THIS MANUAL FOR FUTURE REFERENCE.
¡Felicidades!
ACABA DE ADQUIRIR UNA LAVALFOMBRAS/PULIDORA KOBLENZ DISEÑADA PARA EL CUIDADO DE SUS PISOS, INCLUSIVE PISOS DE MADERA. ANTES DE UTILIZAR SU NUEVA PULIDORA, FAVOR DE LEER ESTE MANUAL CUIDADOSAMENTE.
IMPORTANT SAFETY INSTRUCTIONS
This Carpet Shampooer/ Hardfloor Cleaner/Polisher is for household use only.
When using an electrical Carpet Shampooer/ Hardfloor cleaner/Polisher, basic precautions should be followed.
READ ALL INSTRUCTIONS BEFORE USING THIS APPLIANCE.
WARNING
To reduce risk of fire, electric shock or injury:
- DO NOT USE WITH FLAMMABLE OR COMBUSTIBLE LIQUIDS, SUCH AS GASOLINE, OR USE IN AREAS WHERE THEY MAY BE PRESENT.
- Do not leave this appliance when it is plugged in. To reduce the risk of electric shock-Use indoors only.
- This appliance is double insulated. Use only identical replacement parts. See instructions for servicing a double-insulated appliance.
- Do not immerse. To reduce the risk of electric shock use only on carpets moistened by cleaning process.
- To reduce the risk of fire, use only commercially available floor cleaners and waxes intended for machine application.
- Unplug from the outlet when not in use and before servicing.
- Do not allow to be used as a toy. Close attention is necessary when used by or near children.
- Use only as described in this manual. Use manufacturer's recommended attachments.
-
Do not use with damaged cord or plug. If this appliance is not working as it should, has been dropped, damaged, left outdoors or dropped into water, return it to a service center before using.
-
Do not pull or carry buy the cord, use cord as a handle or close a door on the cord. Do not pull the cord around sharp edges or corners. Do not run appliance over cord, keep cord away from heated surfaces.
- Do not unplug by pulling on cord. To unplug, grasp the
- plug, not the cord.
Do not handle the plug with wet hands.
Do not put any objects into openings. Do not use with
- blocked openings. Keep free of dust, lint, hair and anything that may reduce air flow.
- Keep hair, loose clothing, fingers and parts of body away from openings and moving partes.
- Do not attach or remove brushes with electric cord
- plugged in.
- Turn off before unplugging.
- Use extra care when cleaning stairs.
Never fill dispenser without removing it from the appliance.
- Never turn the appliance on with the handle in the upright
- position. Make sure the handle is in operating position.
- Disassembly of this unit can be hazardous.
- Do not leave the appliance turned on when it is not in use.
- Seek professional servicing.
SAVE THESE INSTRUCTIONS
SERVICING OF DOUBLE-INSULATED APPLIANCES.
A double-insulated appliance is marked with one or more of following: The words “DOUBLE INSULATION” or “DOUBLE INSULATED” or the double insulation symbol (square within a square).

In a double-insulated appliance, two system of insulation are provided instead of grounding.
No grounding means is provided on a double-insulate appliance, nor should a means for grounding be added to
the appliance. Service of a double-insulated appliance requires extreme care and knowledge of the system, and should be done only by a qualified service personnel. Replacement parts of a double-insulated appliance must be identical to the parts they replace.
Polarization Instructions
To reduce the risk of electric shock, this appliance has a polarized plug (one blade is wider than the other). This plug will fit in a polarized outlet only one way. If the plug does not fit fully in the outlet, reverse the plug. If still does not fit, contact a qualified electrician to install the proper outlet. Do not change the plug in any way.
Warning: The power cord on this product contains lead, a chemical known to the state of California to cause birth defects or other reproductive harm. Wash hands after handling.
DIAGRAM / DIAGRAMA GENERAL


natural_image
Diagram of a laboratory setup with a clamp, test tube, and glassware (no text or labels)
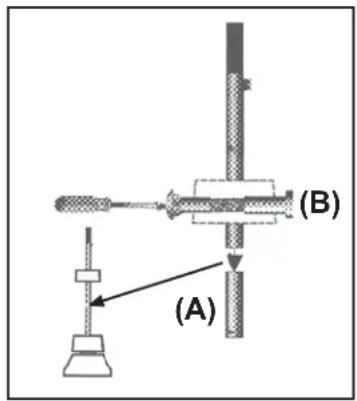
1.- Place the lower tube into socket above motor cover. Fasten using a bolt and internally threaded nut (larger screws provided). Make sure that screws are aligned with the tube openings.
2.- a) Place the upper handle tube in the lower tube. b) Secure with screws.
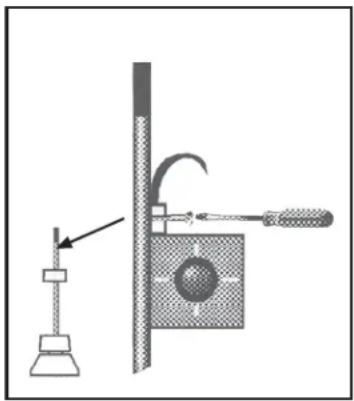
3.- Snap the switch box into a rectangular hole in the upper handle tube. Secure with a small screw provided with the owner's manual.
4.- Snap in tank as shown, make sure that the metal dispensing button at the top of the tank fits into the metal dispensing mechanism.
5.- Connect the small dispensing hose into the hole provided at the rear of the motor cover.
ACCESSORIES
NOT ALL MODELS CONTAIN ALL ACCESSORIES
BRUSHES PADS

▶ SHAMPOO BRUSHES
(White polyethylene)
Cleans carpets with shampoo foam without soaking. Use only on carpets.

▶ SCRUBBING BRUSHES
(Dark brown)
Removes imbedded dirt and grime on all hard floors, except wood. DO NOT USE ON CARPETS. THIS BRUSHES ALSO WORKS AS A BASE FOR PADS.

POLISHING BRUSHES
(Light brown)
Ideal for polishing hardwood floors or irregular surfaces. Improves the luster of most waxes by making a smoother, more durable coat. CAN ALSO BE USED AS A BASE FOR PADS.
PLEASE SEE INVENTORY ON THE OUTSIDE OF BOX

▶ SCRUBBING PADS
(Green fiber)
For use on ceramic tile floors, vinyl or linoleum.
Removes embedded dirt and grime. Good for very heavy duty cleaning. Ideal for smooth surfaces.
MOUNT DIRECTLY ON SCRUBBING BRUSHES OR POLISHING BRUSHES USING SNAPS.
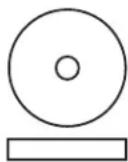
▶ CLEANING AND POLISHING PADS (Tan fiber)
Removes and redistributes wax layers. Improves the luster to create a more durable coat. Removes scuff marks. MOUNT DIRECTLY ON SCRUBBING BRUSHES OR POLISHING BRUSHES.
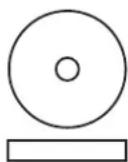
▶ BUFFING PADS (Grey felt)
Brings out the shine on any waxed or unwaxed surfaces. Quickly removes brush swirls caused by polishing. MOUNT DIRECTLY ON SCRUBBING BRUSHES OR POLISHING BRUSHES.
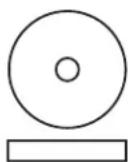
▶ LAMBSWOOL PADS (White)
Improves luster on wood and other hard floor surfaces. MOUNT DIRECTLY ON SCRUBBING BRUSHES OR POLISHING BRUSHES.
For more information on the use of accessories see
The Floor Care Accessory Guide on the last page.
AVAILABLE
| Dry Foam Rug Shampoo | Cleans and brightens carpeting bringing back the original color.Dry foam deep cleans without soaking. |
| Carpet Spotter | Pretreats tough stains on carpeting before shampooing. |
| Deodorizer | Shampoo additive which eliminates pet odors and strong smells.Clean fresh scent. |
| All Purpose Neutral Cleaner | Ph-balanced formula safely cleans delicate surfaces.Use with The Cleaning Machine to deep clean wood, marble, terrazzo and linoleum floors. |
| Heavy Duty Cleaner | Excellente for deep cleaning kitchen and bathroom floors.Removes grease and deep embedded dirt. |
| High Gloss Protective Floor Finish | Seals and protects floor finish leaving a smooth shiny surface. |
| Wax Stripper | When used with the cleaning machine removes old wax films from floor surfaces. |
NOT ALL CLEANING SOLUTIONS ARE INCLUDED WITH ALL MODELS.
For prices see enclose product "Customer Order Form"
HOW TO INSTALL BRUSHES AND PADS
- Unplug your unit, and remove tank.
- Turn motor cover up by placing polisher in front of you, incline the machine toward you pressing the motor cover down.
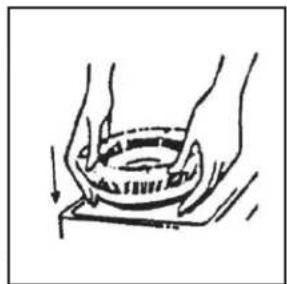
- Place the brush on spindle and press down until it locks into position (Fig. C)
- Pads should be placed on top of scrubbing or polishing brushes only. Place pad retainer in hole on pad and press down to snap into position (Fig. D)
- To remove pads, pull the pad retainers firmly out of place.
- To remove brushes, pull them out firmly.
CAUTION: PLACE PADS ON SCRUBBING BRUSHES OR POLISHING BRUSHES ONLY, NEVER ON CARPET BRUSHES.
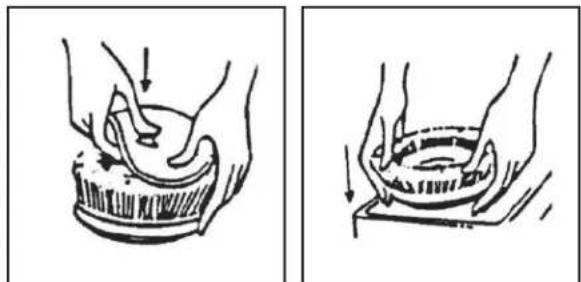
FIG. C FIG. D
HOW TO START YOUR RUG SHAMPOOER / FLOOR POLISHER
-
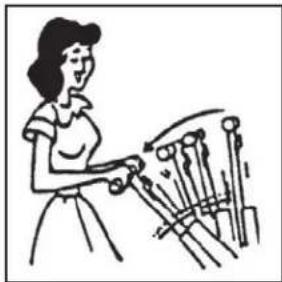
Pull the handle toward you (Fig. E) to the operating position.
-
Using switch box turn on the Shampooer/Polisher, see chart bellow.
SPEED:
LOW/MEDIUM: To scrub floors, shampoo carpets
HIGH: To polish to a high gloss.
NOT ALL MODELS ARE THREE (3) SPEEDS.
natural_image
Illustration of a woman using a computer with multiple keyboard-like components (no text or symbols)FIG. E FIG. F

natural_image
Simple line drawing of a mechanical device with a lever and rotating arrow (no text or symbols)HOW TO CLEAN TANK AND ACCESSORIES
STORAGE: ALL ACCESSORIES AND TANK SHOULD BE COMPLETELY DRY BEFORE STORING THEM. REMOVE BRUSHES AND PADS FROM MACHINE FOR STORAGE.
Cord Storage: After use, unplug and coil the power cord around the cord wrap placed on the back of the machine.
BRUSHES
▶ After each use, wash with lukewarm soapy water.
NEVER USE HOT WATER. Shake out excess water. Stand bristles on paper towel to dry.
DO NOT FORCE DRY BY USING OVEN OR RADIATOR HEAT.
▶ PADS
Pads should be washed with warm soapy water. Rinse throughly in cold water. Stretch out to shape and allow to dry on a flat surface.
▶ TANK
Rinse thoroughly with warm water and allow to dry. (Fig. G) NEVER STORE LIQUID IN TANK
Flush dispensing system by partially filling tank with warm water and mounting it and dispensing the water into a receptacle placed under the unit.

natural_image
Three technical line drawings showing mechanical assembly, a container with internal components, and a hand holding a spray bottle (no text or symbols)FIG. G
CARPET CARE
- Vacuum carpet to remove any loose dirt.
- Test color fastness of your carpet by cleaning a small area with your shampooer / polisher following steps 5,6 and 7. While damp, brush carpet in one direction and let dry. If your color holds, you can proceed to shampoo the rest of your carpet
- Pretreat spots and stains with a carpet spotter.
- Remove all furniture from room, or protect as shown in figure (A).
- Attach the SHAMPOO BRUSHES.

natural_image
Simple line drawing of two hanging bags with ropes, no text or symbols presentFIG. A
-
Fill tank with water then add the desired cleaning solution. It is recommended to put the water first, to avoid foaming. Place tank on shampooer. DO NOT USE SOAP OR DETERGENT ON CARPET.
-
Lower handle to the operating position, and turn the unit on. When brushes start rotating, press the dispenser trigger to release shampoo solution. DO NOT SOAK TO AVOID MILDEWING AND DISCOLORATION.
-
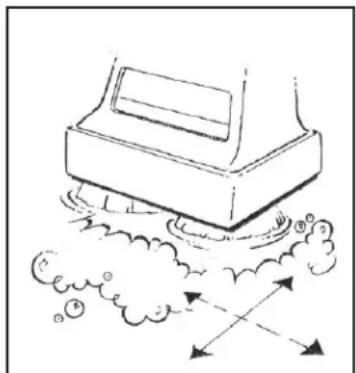
Clean small areas of 3 x 3 feet at a time using slow forward, sideways and backwards strokes until a small uniform film of foam disappears. (Fig. B)
-
Proceed to another area in the same manner. Make sure that the last movement in one area is in the same direction as the last area.
-
Allow carpeting to dry completely, preferably overnight. Ventilating the room or using a fan may reduce drying time. If your need to walk over a wet carpet, protect it with a white cloth or towel.
-
Once dry, vacuum the carpet to remove all crystallized debris.

natural_image
Simple line drawing of a roof drain with cloud and directional arrows indicating airflow or water flow (no text or symbols)FIG. B
HARDWOOD FLOOR CARE
| ■ KEEP FLOORS CLEAN | Vacuum Hardwood floors daily. |
| ■ BUFFING | Buff once or twice a week to remove scuff marks and improve the shine of the hardwood floor. Make sure that the floor is dry. Attach the lambswool or felt pads over the polishing or scrubbing brushes. Secure with the pad retainers. To remove stubborn scuff marks use the tan cleaning pads. Turn the unit on and glide the machine over the surface with forward and backward strokes, following the direction of the grain until the desired finish is achieved. |
| ■ CLEANING | Hardwood floors may be damp mopped with a ph balanced neutral cleaner if they have been previously sealed with a polyurethane finish. Always avoid excess water on wood floors. |
| ■ POLISHING | To polish using paste wax, apply the wax by hand and let dry. Use the machine with polishing brushes or dry tan pads placed over the polishing brushes. Turn the unit on. Glide the machine over the floor with forward and backward strokes following the direction of the grain. If you apply two or more layers of wax, polish the first layer before applying the second layer. Never pour liquid wax into the tank. If a liquid wax finish is applied to the wood floor by hand, let it dry, they buff with the lambswool pads if desired. |
| ■ DEEP CLEANING | A sealed hardwood floor may be deep cleaned if excessively soiled. Dilute a neutral cleaner in the tank following the instructions on the product. Use the machine with the tan pads placed over the polishing or scrubbing brushes. Pull the trigger to dispense the cleaning solution of the floor. Do not place too much water on the floor and dry immediately after cleaning. |
IF YOU HAVE A PROBLEM
| PROBLEM POSSIBLE CAUSE SOLUTION | ||
| Shampooer does not turn on | Bad connection | Connect plug firmly. |
| Does not clean properly | Wrong brushes or pads | Check if brushes or pads are the correct ones. |
| Does not dispense shampoo | Tank cloggedTank looseTank valve not opening | Remove tank and clean.Check that tank is installed correctly.Make sure tank is inserted correctly with valve stem above valve hook.(see how to assemble the tank) |
| Shampoo leaks | Hose looseBroken tankBroken hose | Place hose into position.Replace tank with original replacements.Replace hose. |
| Brushes fall off | Not attached correctlySpring not functioning | Push brushes completely down into spindle.If this does not work, check the little spring loaded ball or nib.Replace nib. See spindle cap insulator. |
| Pads fall off | Worn or DamagedPads retainers not placed correctlyPad retainers broken | Kit part number 46-1610Place pad retainers correctly.Replace with genuine parts. |
natural_image
Diagram of a laboratory setup with a clamp, test tube, and glassware (no text or labels)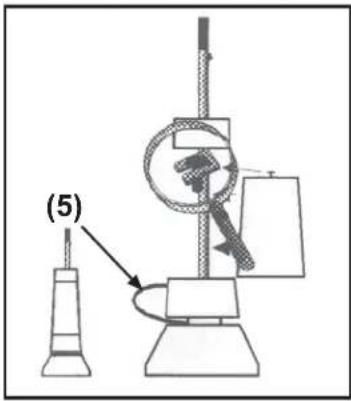
natural_image
Illustration of hands cleaning a circular object with a downward arrow (no text or symbols)FIG. C
natural_image
Illustration of hands holding a circular object on a flat surface, with an arrow indicating direction (no text or symbols)FIG. D
COMO ENCENDER SU LAVAPISOS/ PULIDORA
natural_image
Illustration of a woman using a computer with a keyboard (no text or symbols visible)FIG. E FIG. F

natural_image
Simple line drawing of a mechanical device with a handle and rotating arrow (no text or symbols)natural_image
Three technical line drawings showing mechanical assembly, a close-up of a component, and a hand holding a container (no text or symbols)FIG. G
COMO CUIDAR SU ALFOMBRA
natural_image
Simple line drawing of two hanging bags with ropes, no text or symbols presentFIG. A
natural_image
Simple line drawing of a boat spraying water with cloud and directional arrows (no text or symbols)FIG. B
COMO CUIDAR SUS PISOS DE MADERA
| TILL ENGLISH EASY STEPS TO TOTAL FLOOR CARE The Cleaning Machine | ||||
| Type of Floor Step 1 CLEAN Step 2 PROTECT Step 3 BUFF Step 4 TOUCH-UPS | ||||
| WOODCERA & VINYL MARBLE, TERRAZO & LINOLEUM | All Purpose Neutral Cleaner·Damp mop floors using ph. balanced neutral cleaner with your mop.For Deep Cleaning:·Dilute Neutral Cleaner in tank as indicated on bottle.·Use Cleaning Machine with Tan polishing pads.·Mop and dry (continue with step 2) | Polishing pads·Use Cleaning Machine with dry tan polishing pads over dry polishing or scrubbing brushes to the renew luster.·If you apply a paste wax let dry then use the machine with dry polishing brushes or tan pads. | Buff·Use The Cleaning Machine with Lambswool or felt pads to obtain high gloss on floor finish. | Touch-ups·To remove scuff marks on floor finish use The Cleaning Machine with dry lambswool or felt pads.For stubborn scuff marks use with tan cleaning pads. |
| Heavy Duty Cleaner·Dilute in tank as indicated on bottle.·Use Cleaning Machine with Green or Tan Pads or Scrubbing Brushes.·Mop and dry.·Continue with step 2.Note: Scrubbing Brushes are recommended for textured surfaces and Green scrubbing Pads for smooth surfaces. | Tan Polishing pads·Use Cleaning Machine with dry tan polishing over dry scrub brushes to renew luster | Buff·Use The Cleaning Machine with Felt pads to obtain high gloss on floor finish. | Touch-ups·To remove superficial dirt on floor finish mop using Neutral Cleaner.·Polish with The Cleaning Machine using dry Tan Polishing Pads to remove scuff marks. | |
| All Purpose Neutral Cleaner·Dilute the Neutral Cleaner in tank as indicated on bottle.·Use Cleaning Machine with tan cleaning Pads.·Mop and dry.·Continue with step 2. | Buff·Use The Cleaning Machine with Felt pads to obtain high gloss on floor finish. | Touch-ups·To remove superficial dirt on floor finish mop using Neutral Cleaner.To remove scuff marks on floor finish use The Cleaning Machine with Tan Polishing Pads and Buff with Felt Pads once a week. | ||
| RUGS & CARPETS | Dry Foam Rug Shampoo·Dilute Koblenz Dry Foam Shampoo in tank as indicated on the bottle.·Snap on white bristle shampoo brushes.·Guide The Cleaning Machine with movements from side to side.Use dispensing trigger on machine to release the correct amount of shampoo.Do not soak.·Pretreat tough stains on carpets with Koblenz Carpet Spotter. After carpet is dry vacuum to pick up crystallized dirt debris. | Touch-ups·The shampoo may be used for quick touch-ups on carpets or upholstery. | ||
This warranty gives you specific legal rights, and you may also have other rights which vary from state to state.
This product is warranted against malfunctions and defects in material and workmanship for period of one year for domestic use and ninety days for commercial use.
THIS WARRANTY SHALL NOT APPLY to any products or parts there of which have been damaged by tampering,
misuse or abuse or which have been altered or repaired by an unauthorized person on service center.
THIS WARRANTY SHALL NOT APPLY to brushes, since the length of their life depends upon the amount of use.
FOR REPAIR, the inoperative machine must be delivered with shipping and delivery charges prepaid, together with satisfactory evidence of the purchase date to the dealer from whom it was purchased. Koblenz will either repair or replace, at its selection, all detective machines during the warranty period.
THE FOREGOING OBLIGATIONS ARE LIEU OF ALL OTHER OBLIGATIONS AND LIABILITIES INCLUDING NEGLIGENCE AND STATE KOBLENZ'S ENTIRE AND EXCLUSIVE LIABILITY AND PURCHASER'S EXCLUSIVE REMEDY. KOBLENZ WILL IN NO EVENT BE LIABLE FOR ANY DIRECT, INDIRECT, SPECIAL, INCIDENTAL, OR CONSEQUENTIAL DAMAGES OR LOSSES WHATSOEVER, AND KOBLENZ LIABILITY UNDER NO CIRCUMSTANCES WILL EXCEED THE CONTRACT PRICE FOR GOODS OR PARTS FOR WHICH LIABILITY IS CLAIMED.
Some states do not allow the exclusion or limitation of incidental o consequential damages, so the above limitation or exclusion may not apply to you.
THORNE ELECTRIC, CO.
P.O. BOX 18363
SAN ANTONIO, TX. 78218-0363
U.S.A.
TEL: (210) 590 1226
FAX: (210) 590 1258
SERVICE CENTER AND
PARTS INFORMATION
CALL TOLL FREE:
TEL: 1 (888) 647 1433
CANADIAN CALL
COLLECT:
TEL: (210) 590 1226
Made in Mexico
GARANTÍA
- THE CLEANING MACHINE®
- OWNER'S MANUAL AND OPERATING INSTRUCTIONS
- ¡Felicidades!
- IMPORTANT SAFETY INSTRUCTIONS
- WARNING
- SAVE THESE INSTRUCTIONS
- SERVICING OF DOUBLE-INSULATED APPLIANCES.
- Polarization Instructions
- ACCESSORIES
- NOT ALL MODELS CONTAIN ALL ACCESSORIES
- BRUSHES PADS
- ▶ SHAMPOO BRUSHES
- ▶ SCRUBBING BRUSHES
- POLISHING BRUSHES
- PLEASE SEE INVENTORY ON THE OUTSIDE OF BOX
- ▶ SCRUBBING PADS
- ▶ CLEANING AND POLISHING PADS (Tan fiber)
- ▶ BUFFING PADS (Grey felt)
- ▶ LAMBSWOOL PADS (White)
- NOT ALL CLEANING SOLUTIONS ARE INCLUDED WITH ALL MODELS.
- HOW TO INSTALL BRUSHES AND PADS
- HOW TO START YOUR RUG SHAMPOOER / FLOOR POLISHER
- SPEED:
- HOW TO CLEAN TANK AND ACCESSORIES
- BRUSHES
- ▶ PADS
- ▶ TANK
- CARPET CARE
- COMO ENCENDER SU LAVAPISOS/ PULIDORA
- COMO CUIDAR SU ALFOMBRA
- COMO CUIDAR SUS PISOS DE MADERA
- GARANTÍA
Brand : Koblenz
Model : The Cleaning Machine P-620
Category : Vacuum Cleaner