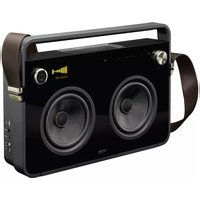
TP6802BLK - Loudspeaker TDK - Free user manual and instructions
Find the device manual for free TP6802BLK TDK in PDF.


| Product Type | Portable Bluetooth Speaker |
| Brand | TDK |
| Model | TP6802BLK |
| Dimensions (W x H x D) | Approx. 200 x 100 x 100 mm |
| Weight | Approx. 800 g |
| Power Supply | Built-in rechargeable lithium-ion battery, 5V/1A USB charging |
| Battery Capacity | 2000 mAh (typical) |
| Charging Time | Approx. 3 hours |
| Playback Time | Up to 10 hours (at moderate volume) |
| Bluetooth Version | 5.0 |
| Bluetooth Range | Up to 10 meters (33 ft) |
| Frequency Response | 80 Hz – 20 kHz |
| Output Power (RMS) | 10 W (1 x 10W driver) |
| Waterproof Rating | IPX5 (splash-proof) |
| Microphone | Built-in with echo cancellation for hands-free calling |
| Additional Features | AUX input (3.5mm), TWS pairing, TF card slot |
| Controls | Power, Volume +/-, Play/Pause, Mode (Bluetooth/AUX/TF), Answer/End call |
| LED Indicator | Blue (Bluetooth pairing), Red (charging), Green (full charge) |
| Materials | Plastic enclosure with mesh grille |
| Cleaning Instructions | Use a soft, dry cloth. Do not use water or cleaning solvents. |
| Safety Warnings | Do not disassemble, expose to extreme heat, or submerge in water. Keep away from children. |
| Spare Parts Availability | Not offered as standard; battery replacement service available through authorized centers. |
| Repair Information | Contact TDK support for service. Do not attempt self-repair. |
| General Notes | For optimal performance, keep firmware updated and avoid obstructing the speaker grille. |
Frequently Asked Questions - TP6802BLK TDK
User questions about TP6802BLK TDK
0 question about this device. Answer the ones you know or ask your own.
Ask a new question about this device
Download the instructions for your Loudspeaker in PDF format for free! Find your manual TP6802BLK - TDK and take your electronic device back in hand. On this page are published all the documents necessary for the use of your device. TP6802BLK by TDK.
USER MANUAL TP6802BLK TDK
IMPORTANT SAFETY INSTRUCTIONS
CAUTION
RISK OF ELECTRIC SHOCK DO NOT OPEN

CAUTION: TO REDUCE THE RISK OF ELECTRIC SHOCK, DO NOT REMOVE COVER (OR BACK). NO USER-SERVICEABLE PARTS INSIDE. REFER SERVICING TO QUALIFIED SERVICE PERSONNEL.
DANGEROUS VOLTAGE:
The lightning flash with arrowhead symbol within an equilateral triangle is intended to alert the user to the presence of uninsulated dangerous voltage within the product's enclosure that may be of sufficient magnitude to constitute a risk of electric shock to persons.

ATTENTION:
The exclamation point within an equilateral triangle is intended to alert the user to the presence of important operating and maintenance (servicing) instructions in the literature accompanying the appliance.
FCC WARNING:
This equipment may generate or use radio frequency energy. Changes or modifications to this equipment may cause harmful interference unless the modifications are expressly approved in the instruction manual. The user could lose the authority to operate this equipment if an unauthorized change or modification is made.
ATTENTION:
POUR ÉVITER LES CHOC ÉLECTRIQUES, INTRODUIRE LA LAME LA PLUS LARGE DE LA FICHE DANS LA BORNE CORRESPONDANTE DE LA PRISES ET POUSSER JUSQU'AU FOND.
iPod is a trademark of Apple Computer, Inc., registered in the U.S. and other countries.
The TDK Life on Record logo is a trademark of TDK Corporation used under license.
WARNING: TO PREVENT FIRE OR SHOCK HAZARD, DO NOT EXPOSE THIS UNIT TO RAIN OR MOISTURE.
IMPORTANT SAFETY INSTRUCTIONS
WARNING:
TO REDUCE THE RISK OF FIRE OR ELECTRIC SHOCK, AND ANNOYING INTERFERENCE, USE THE RECOMMENDED ACCESSORIES ONLY.
SURGE PROTECTORS:
It is recommended to use a surge protector for AC connection. Lightning and power surges ARE NOT covered under warranty for this product.
INFORMATION:
This equipment complies with Class B digital device regulations. This equipment generates, uses and can radiate radio frequency energy and, if not installed and used in accordance with the instructions, may cause harmful interference to radio communications. However, there is no guarantee that interference will not occur in a particular installation. If this equipment does cause harmful interference to radio or television reception, which can be determined by turning the equipment off and on, the user is encouraged to try to correct the interference by one or more of the following measures:
- Reorient or relocate the receiving antenna.
- Increase the separation between the equipment and receiver.
- Connect the equipment into an outlet on a circuit different from that to which the receiver is connected.
- Consult the dealer or an experienced radio/TV technician for help.
- The rating and caution information is located at the rear of the apparatus.
This Class B digital apparatus complies with Canadian ICES-003.
Only use attachments/accessories specified by the manufacturer.
To be completely disconnected from the power input, the main plug of the AC/DC adapter shall be disconnected from the electrical outlet. The main plug of the AC/DC adapter should not be obstructed OR should be easily accessed during intended use.
Do not expose the product to dripping or splashing. Do not place liquid objects such as vases on the product.
IMPORTANT SAFETY INSTRUCTIONS
- Read these Instructions.
- Keep these Instructions.
- Heed all Warnings.
- Follow all instructions.
- Do not use this apparatus near water.
- Clean only with a dry cloth.
- Do not block any of the ventilation openings. Install in accordance with the Manufacturer's instructions.
- Do not install near any heat sources such as radiators, heat registers, stoves, or other apparatus (including amplifiers) that produce heat.
- Do not defeat the safety purpose of the polarized or grounding - type plug. A polarized plug has two blades with one wider than the other. A grounding type plug has two blades and a third grounding prong. The wide blade or the third prong are provided for your safety. When the provided plug does not fit into your outlet, consult an electrician for replacement of the obsolete outlet.
- Protect the power cord from being walked on or pinched particularly at plugs, convenience receptacles, and the point where they exit from the apparatus.
- Only use attachments/accessories specified by the manufacturer.
- Use only with a cart, stand, tripod, bracket, or table specified by the manufacturer, or sold with the apparatus. When a cart is used, use caution when moving the cart/apparatus combination to avoid injury from tip-over.
- Unplug this apparatus during lightning storms or when unused for long periods of time.
- Refer all servicing to qualified service personnel. Servicing is required when the apparatus has been damaged in any way, such as power-supply cord or plug is damaged, liquid has been spilled or objects have fallen into the apparatus, the apparatus has been exposed to rain or moisture, does not operate normally, or has been dropped.
- WARNING: To reduce the risk of fire or electric shock, do not expose this apparatus to rain or moisture. Do not place objects filled with water, such as a vase, on the apparatus.
- The AC mains plug is used as the power disconnect device and it should remain readily accessible and operable during intended use. In order to completely disconnect the apparatus from power, the mains plug should be completely removed from the AC outlet socket.
- CAUTION: To reduce the risk of fire or explosion, do not expose batteries to excessive heat such as sunshine, fire or other heat sources.
PORTABLE CART WARNING (symbol provided by RETAC)

natural_image
Symbolic illustration of a person climbing a ladder inside a circle with no text or symbolsLOCATION OF CONTROLS
FRONT
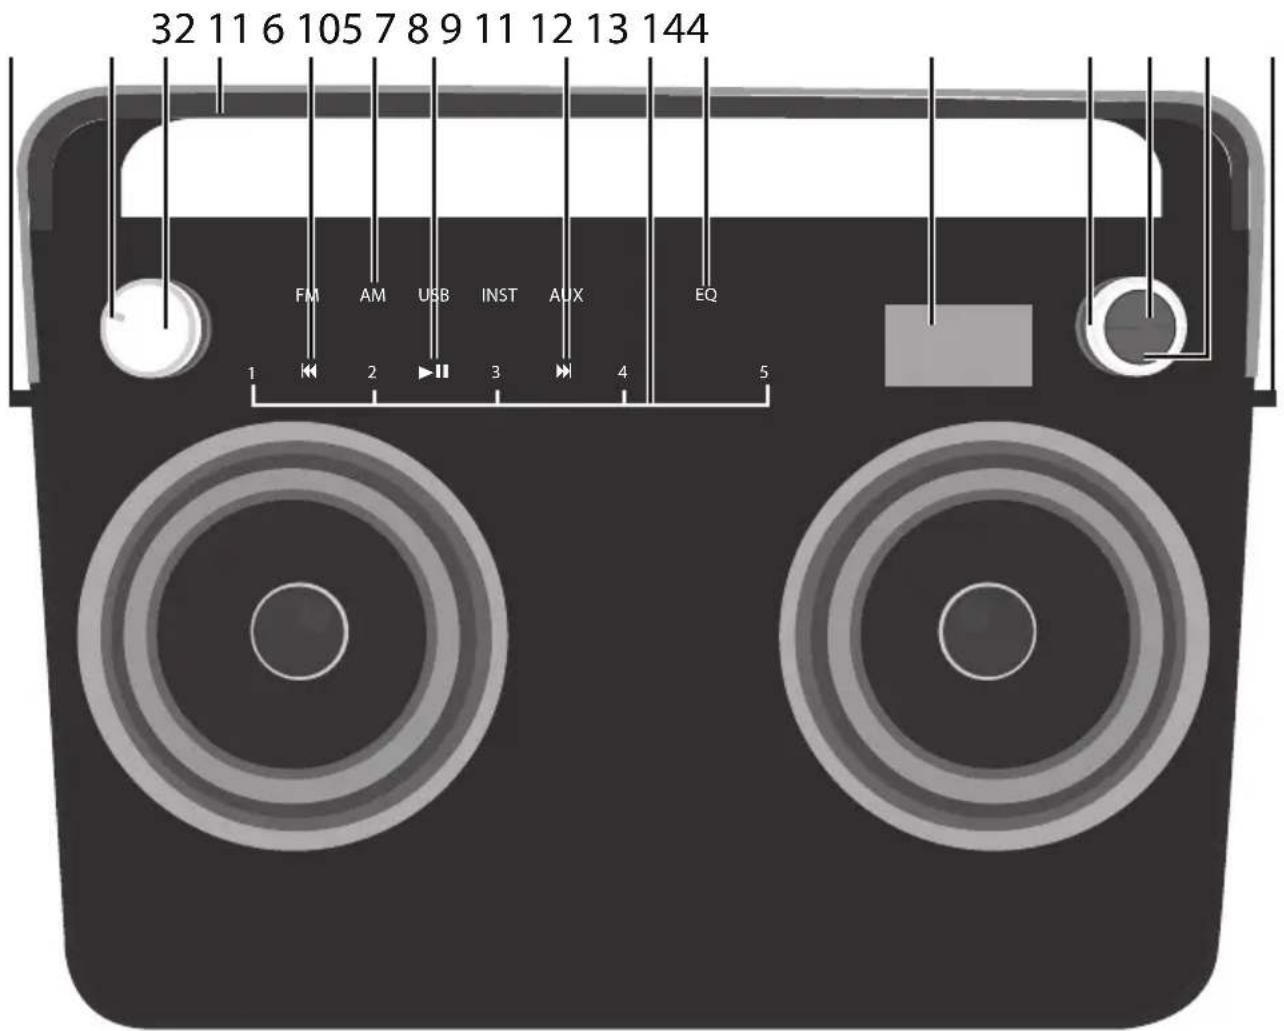
- Strap Holders (STRAP PART NO. 398-ABS-05565-0BAE*)
- Power Indicator
- Volume/Power Control
- Carrying Handle
- Skip ◀ Button/Indicator
6 Function Buttons/Indicators - Play/Pause ▶■ Button/Indicator
-
Skip ▶ Button/Indicator
-
Preset Buttons/Indicators
- EQ Button/Indicator
- Display
- Select Control
- OK Button
- BACK Button
*Consumer Replaceable Part (See page 19 to order.)
RIGHT SIDE/REAR
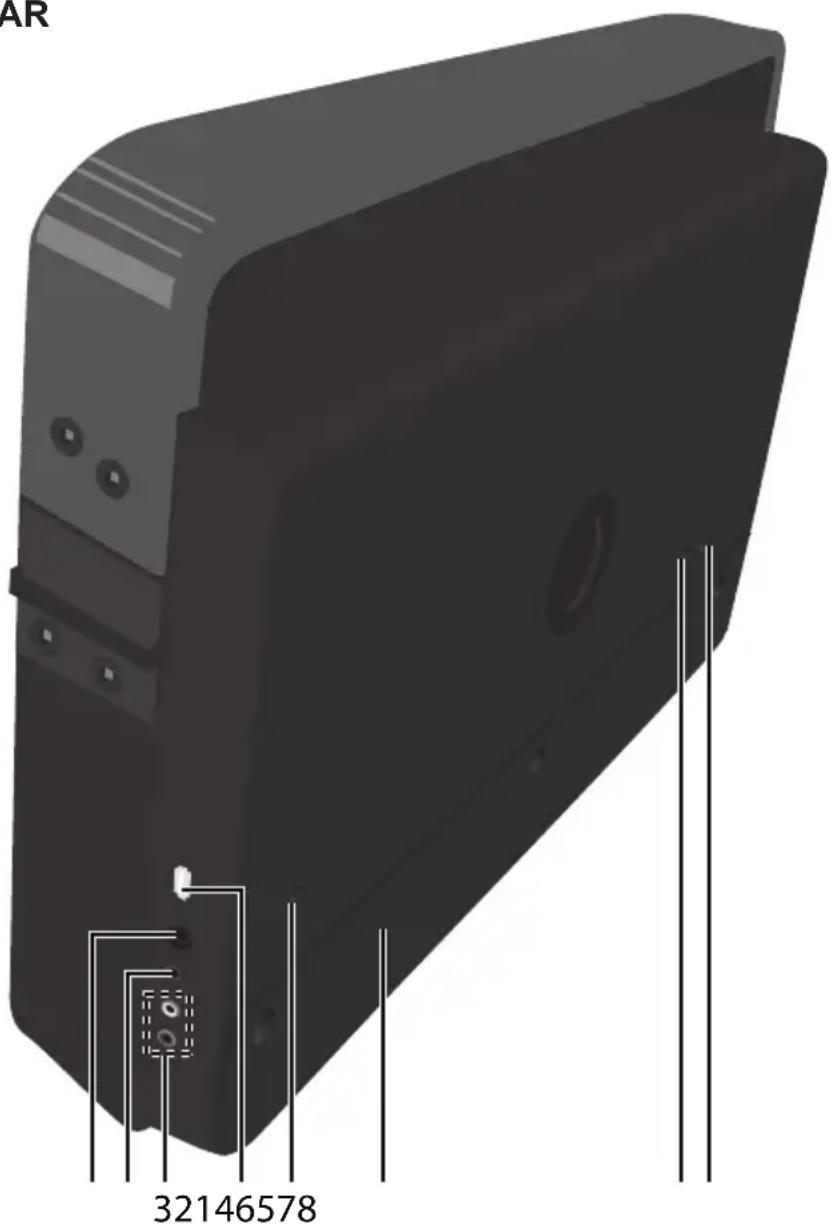
- INST (Instrument) Jack
- LINE IN Jack
- RCA IN Jacks
- USB Jack
(USB CABLE PART NO. 174-9USBBGBW-E*)
- DC IN Jack 18V
(AC ADAPTER PART NO. 151-UGPE30201-E*)
- Battery Compartment
(BATTERY COVER PART NO. 309-ABS-05139-0BAE* BATTERY SCREW PART NO. 353-0607176-E*)
- FM Antenna Jack
(FM ANTENNA WIRE PART NO. 162-1150001-E*)
- AM Antenna Jack
(AM ANTENNA WIRE PART NO. 188-T09WHFT002-E*)
*Consumer Replaceable Part (See page 19 to order.)
INSTALLATION
AC CONNECTION
Insert the small end of the AC adapter into the jack on the rear of the unit. Insert the other end (with the 2 blades) into a conveniently located AC outlet having 120V AC, 60Hz.
AC ADAPTER SPECIFICATIONS: DC 18V ☑☐☐
NOTES:
- To disconnect the AC adapter, remove it from the DC IN jack on the side of the unit as well as from the AC outlet.
- Use the enclosed AC adapter for this product only.

INSERTING BATTERIES
To use this unit with battery power, remove the Battery Compartment cover on the rear of the unit by removing the three screws with a flathead screwdriver, and then lifting the cover off. Insert ten (10) "D" cell batteries (not included), observing the battery polarity

natural_image
Diagram of a battery pack with multiple cells and polarity indicators (no text or symbols)indicated inside the compartment. Replace the Battery Compartment cover and screws.
NOTE: The AC adapter must be disconnected from the jack on the rear of the unit in order for the unit to operate on battery power. We recommend Alkaline or rechargeable types for maximum cycle time and ecological efficiency.
BATTERY PRECAUTIONS
Follow these precautions when using batteries in this device:
- Caution – Danger of explosion if battery is incorrectly replaced. Replace only with the same or equivalent type.
- Use only the size and type of batteries specified.
- Be sure to follow the correct polarity when installing the batteries as indicated in the Battery Compartment. A reversed battery may cause damage to the device.
- Do not mix different types of batteries together (e.g. Alkaline, Rechargeable and Carbon-zinc) or old batteries with fresh ones.
- If the device is not to be used for a long period of time, remove the batteries to prevent damage or injury from possible battery leakage.
- Do not try to recharge a battery not intended to be recharged; it can overheat and rupture. (Follow battery manufacturer's directions.)
- Remove batteries promptly if consumed.
- Clean the battery contacts and also those of the device prior to battery installation.
STRAP
For ease of carrying, simply slide each strap end into the strap holder on each side of this unit until it clicks in place, as shown. Then, press the male buckle to release the strap.
PRESS THIS BUTTON

natural_image
3D mechanical component diagram showing a piston and housing assembly with directional arrows (no text or symbols)OPERATION
The following controls operate most or all of the functions.
TURNING THE UNIT ON/OFF AND ADJUSTING THE VOLUME

Rotate the Volume/Power control until a click is heard and the Power indicator lights to turn the unit on.
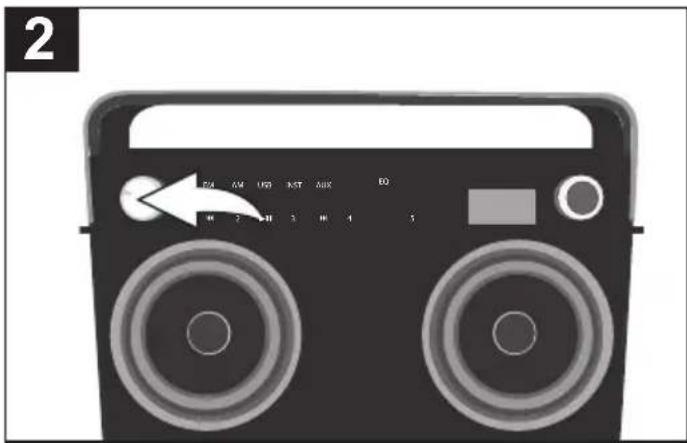
Rotate the Volume/Power control clockwise to increase or counterclockwise to decrease the volume. Rotate the Volume/Power control counter-clockwise until a click is heard and the Power indicator light goes off to turn the unit off.
EQ

During any mode, press the EQ button/indicator ①; Basswill appear in the display. Adjust the Bass as desired using the Select control ②.
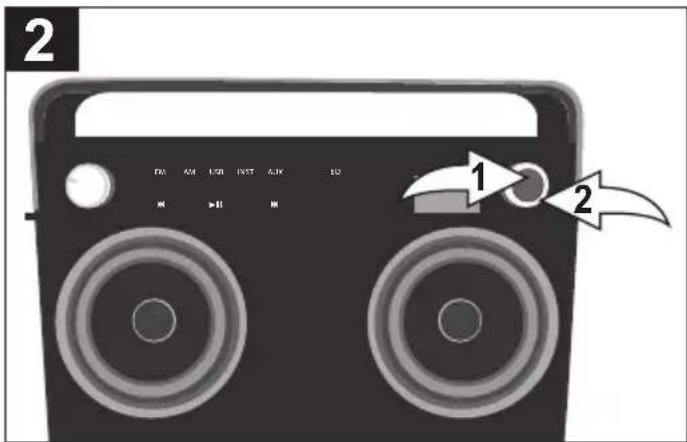
Press the OK button ① and Treblewill appear in the display. Adjust the Treble as desired using the Select control ②. Press the OK button ① to confirm the setting or wait a few seconds to go back to the previous menu.
USING THE AM OR FM RADIO
1 2
Turn this unit on by rotating the Volume/Power control until a click is heard and the Power indicator lights to turn the unit on.
Press the FM button/indicator ① to select FM or the AM button/indicator ② to select AM.
Seek Tune

While the frequency appears in the display, press the OK button ①; Manual Tune/Seek Tune will appear in the display. Using the Select control ②, select Manual Tune to adjust the frequency one step at a time, or Seek Tune to have the unit automatically go to the next strong station; then press the OK button ①. Press the BACK button ③ or wait a few seconds to return to the station view.
Select a station using the Select control. Stronger stations will have a larger line (see above).
Adjust the Volume and EQ as described on the previous page.
Antennas:
FM: For best FM reception, plug the included FM Antenna Wire into the FM Antenna jack on the rear of the unit. Unravel and extend for best reception.
AM: For best AM reception, plug the included AM Antenna Wire into the AM Antenna jack on the rear of the unit. Unravel and extend for best reception. Move the AM Loop Antenna away from the system, AC adapter and other equipment.
SETTING THE AM/FM PRESETS (FIVE PRESETS FOR EACH BAND)
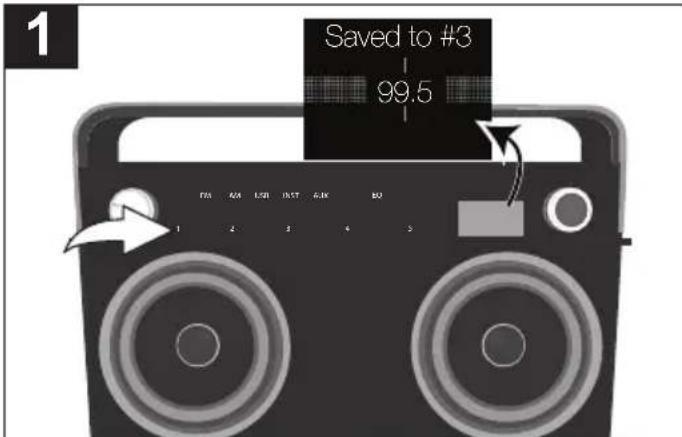
Follow Steps 1-4 on the previous page to tune a station. Press and hold one of the five Preset buttons/indicators.
Saved to #X (e.g. Saved to #3) will appear briefly in the display and the preset will be set.
RETRIEVING THE AM/FM PRESETS

natural_image
Black-and-white illustration of a portable radio with two speakers and a control panel (no text or symbols)Follow Steps 1-2 on the previous page to turn the unit on and enter the FM/AM mode. Press one of the five Preset buttons/indicators and the station will automatically tune in.
OPERATION (CONTINUED)
USING AN iPod

Turn this unit on by rotating the Volume/Power control until a click is heard and the Power indicator lights to turn the unit on.

natural_image
Close-up of a black electronic device with a USB cable inserted, showing a small component and a pointer (no text or symbols visible)Insert the iPod cable to the iPod and the other end with the USB plug into the USB jack on the side of this unit.

Press the USB button/indicator to select USB (iPod).
In order to play or navigate for music, operate the iPod using its own controls, as per its owner's manual.
iPod PLAYBACK NOTES:
- Refer to the owner's manual of the iPod for detailed connection instructions.
- The controls on your iPod will determine music playback. Volume is controlled on the boombox.
CONTINUED ON THE NEXT PAGE
OPERATION (CONTINUED)
USING A USB DEVICE (i.e. USB DRIVE)

Turn this unit on by rotating the Volume/Power control until a click is heard and the Power indicator lights to turn the unit on.
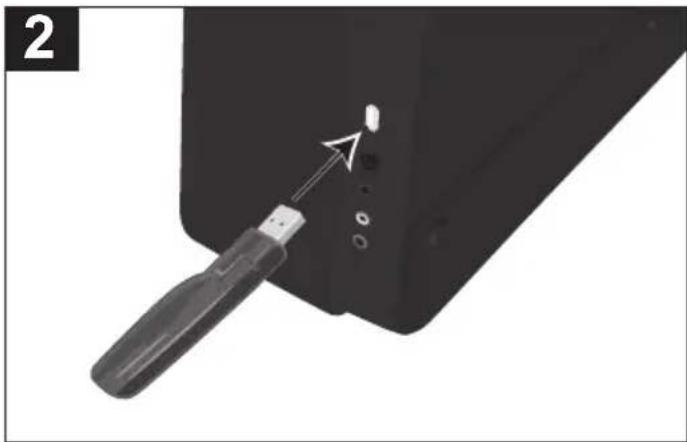
natural_image
Close-up of a black electronic device with a USB flash and a pointing button (no text or symbols visible)Insert a USB drive (support up to 32GB) into the USB jack. This unit supports MP3/WMA with a Bit Rate up to 320kbps.

Press the USB button/indicator to select USB; the list of folders/files will appear in the display.

If there are folders, select a folder using the Select control ①, and then press the OK button ② to enter the folder.
CONTINUED ON THE NEXT PAGE
OPERATION (CONTINUED)

Repeat step 4 until you are in the desired folder. Select a song/file using the Select control ① and then press the OK button ②; the selected song will then start playing and the song name (if tagged) will appear in the display.

Press the Play/Pause ▶■ button/indicator to pause playback; ■ will appear in the display. Press the Play/Pause ▶■ button/indicator again to continue playback.
The unit will then play the song and continue with the next song in the folder. When all songs have played, the unit will stop, depending on the Repeat function (see page 14). Adjust the Volume and EQ as described on page 7.

To skip forward or backward: Press the Skip ◀◀ ① or ▶▶ ② button/indicator to skip to the beginning of the current file/previous or next file.
To search forward or backward: Press and hold the Skip ◀◀ ① or ▶▶ ② button/indicator to search within the currently-playing file.
PLAYBACK NOTES:
- Refer to the owner's manual of the USB device for detailed connection instructions.
- When going through the menu items, press the BACK button to return to the previous menu.
- For the titles, albums, etc. to appear correctly, they must have been tagged properly when recorded to MP3.
OPERATION (CONTINUED)
SHUFFLE PLAYBACK
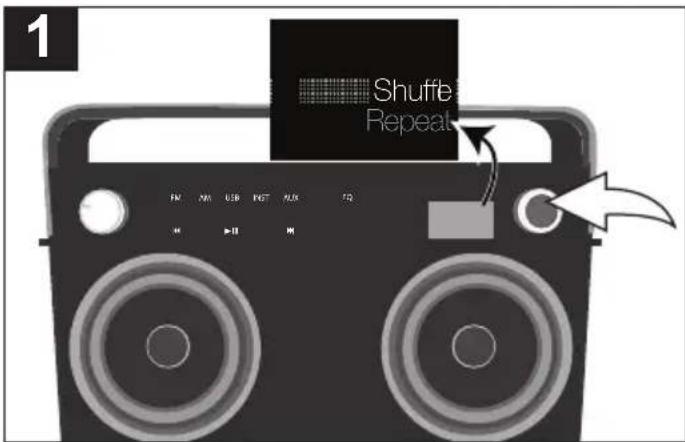
While in the Play or Paused USB mode and with a USB device inserted, press the OK button; Shuffleand Repeatwill appear in the display.

Select Shuffle using the Select control.
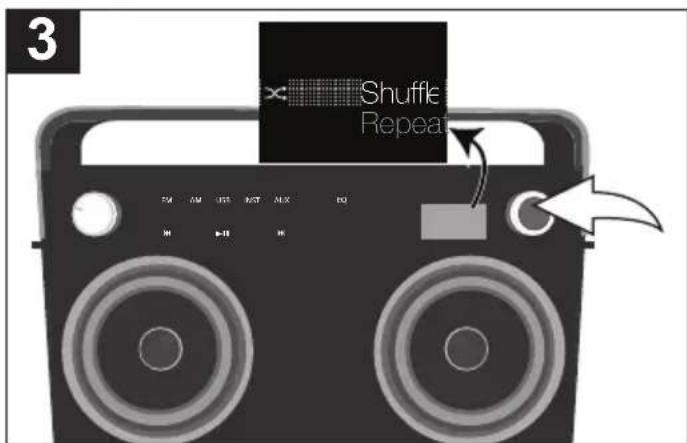
Press the OK button once; the Shuffle indicator will light and appear on the display. All songs in the selected folder will randomly play and then stop.
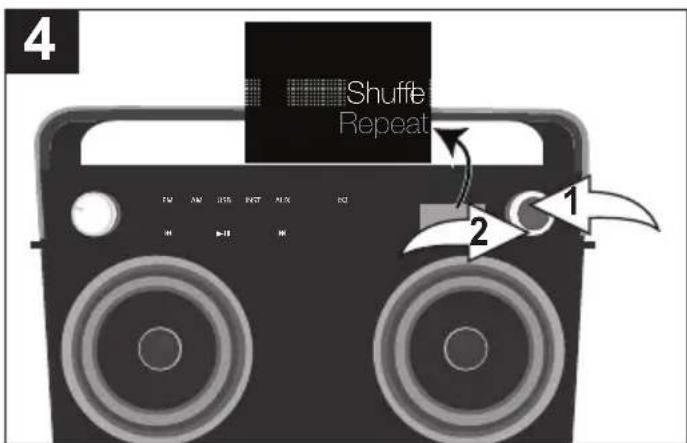
To cancel Random playback, press the OK button ① to bring up the Shuffle/Repeat menu. Select Shuffle using the Select control ②, and then press the OK button ① again; will disappear. Press the OK button ① to confirm the setting or wait a few seconds to go back to the previous menu.
OPERATION (CONTINUED)
REPEAT PLAYBACK

While in the Play or Pause USB mode and with a USB device inserted, press the OK button; Shuffleand Repeatwill appear in the display.

Select Repeat using the Select control.
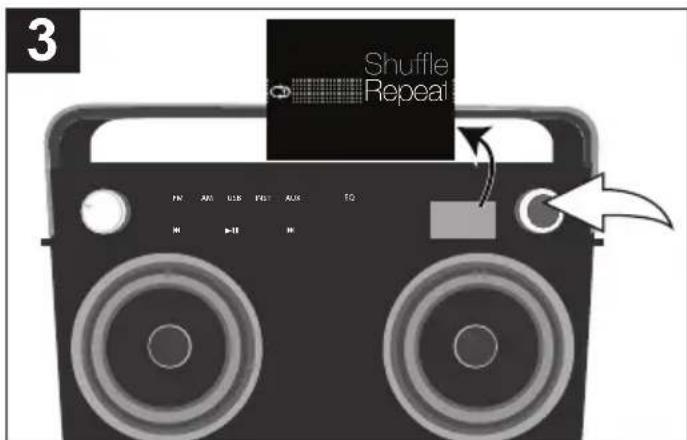
Press the OK button once; the Repeat 1 indicator will light and the selected song will play repeatedly.

Press the OK button once more; the Repeat All indicator will light and all songs in the selected folder will repeat continuously. Press the OK button to confirm the setting or wait a few seconds to go back to the previous menu.

To cancel Repeat playback, press the OK button ① to bring up the Shuffle/Repeat menu. Select Repeat using the Select control ②, and then press the OK button ① repeatedly until the Repeat indicators disappear.
NOTE: You can perform Random All and Repeat playback at the same time to repeatedly playback all the songs randomly. Press the OK button ① to confirm the setting or wait a few seconds to go back to the previous menu.
OPERATION (CONTINUED)
USING AN EXTERNAL UNIT CONNECTED TO THE LINE IN OR RCA JACKS

Turn this unit on by rotating the Volume/Power control until a click is heard and the Power indicator lights to turn the unit on.

natural_image
Close-up of a black electronic device with a small circular mark and arrow pointing to its side (no text or symbols visible)To use the LINE IN Jack: Insert one end of an audio cable into the AUX/LINE OUT jack on your external audio unit and the other end into the LINE IN jack on the side of this unit.

natural_image
Close-up of a black electronic component with a white arrow pointing to a small circular feature (no text or symbols visible)To use the RCA IN Jacks: Connect a left and right audio cable from the Left/Right jacks of your external unit to the RCA IN Left/Right jacks on the side of this unit.

natural_image
Black-and-white illustration of a portable electronic device with two large speakers and a control panel (no text or symbols visible)Press the AUX button/indicator once to select the AUX1 mode (LINE IN jack) or twice to select the AUX2 mode (RCA IN jack) and start playback of the external device.
Adjust the Volume and EQ as described on page 7.
NOTE:
Refer to the owner's manual of the external unit for detailed connection instructions.
OPERATION (CONTINUED)
USING THE INSTRUMENT FUNCTION

Turn this unit on by rotating the Volume/Power control until a click is heard and the Power indicator lights to turn the unit on.

natural_image
Close-up of a black electronic device with a small hole and mounting holes, no visible text or symbolsInsert one end of an instrument cable into the OUTPUT jack on your instrument and the other end into the INST (Instrument) jack on the side of this unit.

Select a source to play along with (USB or AUX) by pressing the respective function button/indicator.
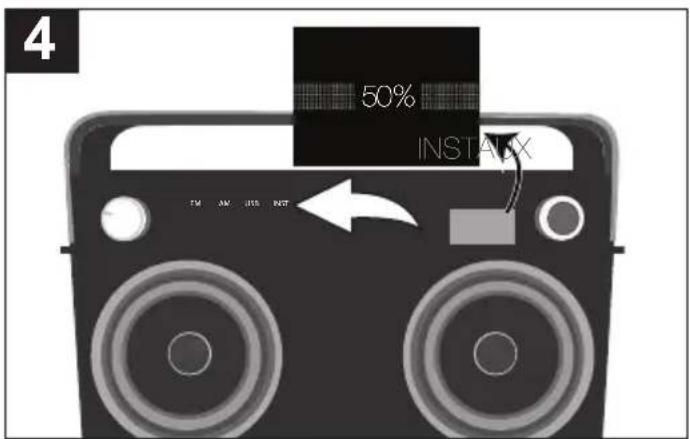
Press the INST (Instrument) button/indicator to select Instrument; the MIX menu will appear in the display.
NOTE:
Refer to the owner's manual of the instrument for detailed connection instructions.
CONTINUED ON THE NEXT PAGE
OPERATION (CONTINUED)

If the MIX menu has disappeared from the display, press the OK button ① or BACK button ② to bring it back.

Select the desired ratio using the Select control. For example, to make the instrument more dominant, rotate the Select control clockwise to increase the instrument ratio.

Press the OK button ①; Mix and Solo will appear in the display.
To mix the sound of the instrument with the selected source, select MIX using the Select control ② and then press the OK button ①. Mix will appear in the display.
NOTE: While USB is selected in MIX mode, it can select the normal playback function.
To play solo, select SOLO using the Select control ② and then press the OK button ①. Solo will appear in the display. Adjust the Volume and EQ as described on page 7.
TROUBLESHOOTING GUIDE
No Sound – General
• Volume is set to minimum; raise volume.
- Power is not on; turn power on.
- Correct function button/indicator was not pressed; press the correct function button/indicator.
Radio, no sound
- FM or AM button/indicator was not pressed; press the FM or AM button/indicator.
Radio, poor sound
- Station is not tuned properly; retune station.
- AM or FM Antenna is not adjusted or connected properly (see page 8).
iPod, no sound
- iPod is not plugged into the USB jack; plug in securely.
- USB button/indicator was not pressed; press the USB button/indicator.
iPod, poor sound
- Close other applications on the iPod/iPhone or restart the iPod/iPhone.
- Consider using the headphone audio out for music playback.
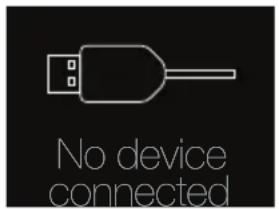
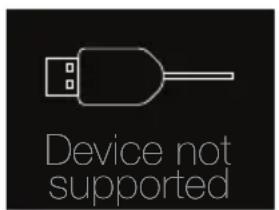
The following screen appears:
- There is no USB device connected; connect to the USB jack.
- If USB device is connected, keep boombox powered on, remove the USB plug from the boombox and then reconnect.
- The file is corrupted, or not in a format this unit will play.
- The connected USB device is not supported by the product. - The device can still be used for playback by connecting the headphone output to the AUX by 1/8" stereo cable.

SPECIFICATIONS
GENERAL:
Power Source (AC) ......DC 18V Adapter (Center Positive)
Power Source (DC)....10 "D" size 1.5V Batteries
Speakers. 2 x 6 ohms
Output Power 10W x 2
Weight....15 lbs
Dimensions....20 (L) x 4 (W) x 13.3 (H) inches
USB Version....2.0 A type (support USB flash drive up to 32GB)
Audio Format.....MP3, WMA (with a Bit Rate up to 320kbps)
RADIO SECTION:
Frequency Range (FM)....87.5-108MHz
Frequency Range (AM)....530-1710KHz
Specifications are subject to change without notice.
FOR ADDITIONAL SET-UP OR OPERATING ASSISTANCE, PLEASE VISIT OUR WEBSITE AT:
TDKPERFORMANCE.COM
FOR CONSUMER REPLACEABLE PART(S), CONTACT OUR PARTS AND ACCESSORIES FULFILLMENT CENTER AT: 1-800-379-8439.
Imation Enterprises Corp.
1 Imation Way, Oakdale, MN 55128-3414 USA
The TDK Life on Record logo is a trademark of TDK Corporation used under license.
Imation Enterprises Corp.
1 Imation Way, Oakdale, MN 55128-3414 USA
The TDK Life on Record logo is a trademark
of TDK Corporation used under license.


- IMPORTANT SAFETY INSTRUCTIONS
- CAUTION
- RISK OF ELECTRIC SHOCK DO NOT OPEN
- DANGEROUS VOLTAGE:
- ATTENTION:
- FCC WARNING:
- WARNING:
- SURGE PROTECTORS:
- INFORMATION:
- LOCATION OF CONTROLS
- FRONT
- INSTALLATION
- AC CONNECTION
- NOTES:
- INSERTING BATTERIES
- BATTERY PRECAUTIONS
- STRAP
- OPERATION
- TURNING THE UNIT ON/OFF AND ADJUSTING THE VOLUME
- EQ
- USING THE AM OR FM RADIO
- 2
- Antennas:
- SETTING THE AM/FM PRESETS (FIVE PRESETS FOR EACH BAND)
- RETRIEVING THE AM/FM PRESETS
- OPERATION (CONTINUED)
- USING AN iPod
- iPod PLAYBACK NOTES:
- CONTINUED ON THE NEXT PAGE
- USING A USB DEVICE (i.e. USB DRIVE)
- PLAYBACK NOTES:
- SHUFFLE PLAYBACK
- REPEAT PLAYBACK
- USING AN EXTERNAL UNIT CONNECTED TO THE LINE IN OR RCA JACKS
- NOTE:
- USING THE INSTRUMENT FUNCTION
- TROUBLESHOOTING GUIDE
- No Sound – General
- Radio, no sound
- Radio, poor sound
- iPod, no sound
- iPod, poor sound
- The following screen appears:
- SPECIFICATIONS
- GENERAL:
- RADIO SECTION:
Brand : TDK
Model : TP6802BLK
Category : Loudspeaker