
3IF-355BS - Cooker FAGOR - Free user manual and instructions
Find the device manual for free 3IF-355BS FAGOR in PDF.


| Product Type | Freestanding Cooker |
| Brand | Fagor |
| Model | 3IF-355BS |
| Energy Source | Electric / Gas (Dual Fuel) |
| Hob Burners | 3 Gas Burners |
| Oven Type | Electric Fan Oven |
| Oven Capacity | 65 Liters |
| Grill | Integrated Grill |
| Energy Class | A |
| Width | 60 cm |
| Depth | 60 cm |
| Height | 85 cm |
| Weight | 50 kg |
| Power Supply | 220-240 V / 50-60 Hz |
| Safety Features | Flame Failure Safety Device, Child Lock |
| Cleaning | Catalytic Self-Cleaning Oven Liners |
| Control Type | Knobs |
| Temperature Control | Thermostat-controlled Oven |
| Number of Functions | 8 Oven Functions |
| Viewing Window | Double-Glazed Oven Door |
| Interior Light | Oven Light |
Frequently Asked Questions - 3IF-355BS FAGOR
User questions about 3IF-355BS FAGOR
0 question about this device. Answer the ones you know or ask your own.
Ask a new question about this device
Download the instructions for your Cooker in PDF format for free! Find your manual 3IF-355BS - FAGOR and take your electronic device back in hand. On this page are published all the documents necessary for the use of your device. 3IF-355BS by FAGOR.
USER MANUAL 3IF-355BS FAGOR
EN - Table of contents
SAFETY INSTRUCTIONS 47
UNPACKING 49
DISPOSAL 49
HOW TO SAVE ELECTRICITY 50
INSTALLATION INSTRUCTIONS 51
MAKE THE WORKTOP RECESS 51
INSTALL THE HOB IN THE OPENING 53
TIPS FOR THE INSTALLER 53
WIRING DIAGRAM 54
BASIC INFORMATION ABOUT YOUR APPLIANCE 55
INDUCTION HOB OPERATION PRINCIPLE 55
COOKWARE CHARACTERISTICS 55
RESIDUAL HEAT INDICATOR "H" 57
BEFORE USING THE APPLIANCE FOR THE FIRST TIME 57
IF THE APPLIANCE DOES NOT DETECT THE COOKWARE ON THE OPERATING COOKING ZONE 57
COOKWARE SIZE 57
OPERATION 58
FEATURES AND COMPONENTS 58
CONTROL PANEL 58
CONNECT THE POWER SUPPLY 58
USE A COOKING ZONE 58
BOOSTER FUNCTION 59
ADJUST THE HEAT SETTING 59
TURN OFF A COOKING ZONE 59
CHILD LOCK 59
COOKING ZONE AUTO OFF 59
MINUTE MINDER 60
SET COOKING ZONE TIMER 60
TROUBLESHOOTING 61
ERROR CODES 62
CLEANING AND MAINTENANCE 63
CLEANING AFTER EACH USE 63
REMOVING STAINS 63
PERIODIC INSPECTIONS 64
WARRANTY AND AFTER SALES SERVICE 65
WARRANTY 65
Dear Customer


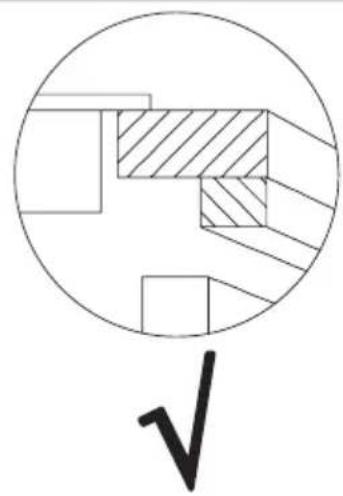
From now on, your daily housework will be easier than ever before. Your appliance is exceptionally easy to use and extremely efficient. After reading these Operating Instructions, operating the appliance will be easy.
Before being packaged and leaving the manufacturer, the appliance was thoroughly checked with regard to safety and functionality.
Before using the appliance, please carefully read these Operating Instructions. By following these instructions carefully you will be able to avoid any problems in using the appliance. It is important to keep these Operating Instructions and store them in a safe place so that they can be consulted at any time.
Follow these instructions carefully in order to avoid possible accidents.
Sincerely,
FAGOR
ELECTRODOMÉSTICO

SAFETY INSTRUCTIONS
Warning: The appliance and its accessible parts become hot during use. Care should be taken to avoid touching heating elements. Children less than 8 years of age shall be kept away unless continuously supervised.
This appliance can be used by children aged from 8 years and above and persons with reduced physical, sensory or mental capabilities or lack of experience and knowledge if they have been given supervision or instruction concerning use of the appliance in a safe way and understand the hazards involved. Children shall not play with the appliance. Cleaning and user maintenance shall not be made by children without supervision.
Warning: Unattended cooking on a hob with fat or oil can be dangerous and may result in fire.
NEVER try to extinguish a fire with water, but switch off the appliance and then cover flame e.g. with a lid or a fire blanket.
Warning: Danger of fire: do not store items on the cooking surfaces.
Warning: If the surface is cracked, switch off the appliance to avoid the possibility of electric shock.
Metallic objects, such as knives, forks, spoons and lids should not be placed on the hob surface since they can get hot.
After use, switch off the hob element by its control and do not rely on the pan detector.
The appliance is not intended to be operated by means of an external timer or separate remote-control system.
You should not use steam cleaning devices to clean the appliance.
Before using the induction hob for the first time, carefully read its user manual. This will ensure user safety and prevent damage to the appliance.
If the induction hob is operated in immediate vicinity to the radio, television set or other radio-frequency-emitting device, make sure that the hob's touch sensor controls operate correctly.
- The hob must be connected by a qualified installer.
- Do not install the appliance near a refrigerator.
- Furniture where the hob is installed must be resistant to temperatures up to 100°C. This applies to veneers, edges, surfaces made of plastics, adhesives, and paints.
- The appliance may only be used once fitted in kitchen furniture. This will protect the user against accidental contact with live parts.
- Repairs to electrical appliances may only be conducted by specialists. Improper repairs can be dangerous to the user.
- The appliance is not connected to the mains when it is unplugged or when the main circuit breaker is switched off.
- The plug of the power cord should be accessible after the appliance has been installed.
- Ensure that children do not play with the appliance.
- This appliance is not intended for use by persons (including children) with physical, mental, or sensory handicaps, or by those who are inexperienced or unfamiliar with the appliance, unless under supervision or in accordance with the instructions communicated to them by persons responsible for their safety.
- Persons with implanted devices that support vital functions (e.g., pacemaker, insulin pump, or hearing aids) must ensure that these devices are not affected by the induction hob (the frequency of the induction hob is 20-50 kHz).
- Once power is disconnected, all settings and indications are erased. When electric power is restored, caution is advisable. If the cooking zones are hot, the "H" residual heat indicator will be displayed. Also, the child lock key will be displayed, as when the appliance is connected for the first time.
- The built-in residual heat indicator can be used to determine if the appliance is on and if it is still hot.
- If the mains socket is near the cooking zone, make sure the cord does not touch any hot areas.
- When cooking with oil and fat, do not leave the appliance unattended, as there is a fire hazard.
- Do not use plastic containers and aluminum foil. They melt at high temperatures and may damage the cooking surface.
- Solid or liquid sugar, citric acid, salt, or plastic must not be allowed to spill on the hot cooking zone.
- If sugar or plastic accidentally falls on the hot cooking zone, do not turn off the hob and scrape the sugar or plastic off with a sharp scraper. Protect hands from burns and injuries.
- When cooking on induction hob only use pots and pans with a flat base having no sharp edges or burrs as these can permanently scratch the cooking surface.
- Induction hob cooking surface is resistant to thermal shock. It is not sensitive to cold nor hot.
- Avoid dropping objects on the cooking surface. In some circumstances, point impacts such as dropping a bottle of spices, may lead to cracks and chipping of the cooking surface.
- If any damage occurs, seething food can get into the live parts of the induction hob through damaged areas.
- If the cooking surface is cracked, switch off power to avoid the risk of electric shock.
- Do not use the cooking surface as a cutting board or work table.
- Do not place metal objects such as knives, forks, spoons, lids and aluminium foil on the cooking surface as they could become hot.
- Do not install the hob over a heater without a fan, over a dishwasher, refrigerator, freezer or washing machine.
- If the hob has been built in the kitchen worktop, metal objects located in a cabinet below can be heated to high temperatures through the air flowing from the hob ventilation system. As a result it is recommended to use a partition (see Figure 2).
- Please follow the instructions for care and cleaning of induction hob. In the event of misuse or mishandling warranty may be void.
- If the supply cord is damaged, it must be replaced by the manufacturer or service agent or a similarly qualified person in order to avoid a hazard.
- CAUTION: The cooking process has to be supervised. A short term cooking process has to be supervised continuously.
- The appliance incorporates an earth connection for functional purposes only
UNPACKING

The appliance was protected from damage at the time of transport. After unpacking, please dispose of all elements of packaging in a way that will not cause damage to the environment. All materials used for packaging the appliance are environmentally friendly; they are 100% recyclable and are marked with the appropriate symbol.
Important! Keep the packaging material (bags, Styrofoam pieces, etc.) out of reach of children during unpacking.
DISPOSAL

In accordance with European Directive 2002/96/EC and Polish legislation regarding used electrical and electronic goods, this appliance is marked with the symbol of the crossed-out waste container. This marking means that the appliance must not be disposed of together with other household waste after it has been used. The user is obliged to hand it over to a waste collection centre collecting used electrical and electronic goods. The collectors, including local collection points, shops and local authority departments, provide recycling schemes. Proper handling of used electrical and electronic
goods helps avoid environmental and health hazards resulting from the presence of dangerous components and the inappropriate storage and processing of such goods.
HOW TO SAVE ELECTRICITY

Using electricity in a responsible manner not only saves money, but also helps protect the environment. So let's save electricity! This is how it's done:
- Use the correct cookware.
- Cookware with a flat and thick base can save up to 1/3 of electricity. Please remember to cover cookware with the lid, otherwise electricity consumption increases four times!
- Always keep the cooking zones and cookware bases clean.
- Dirt prevents proper heat transfer. Often burnt stains can be removed only with agents harmful to the environment.
- Avoid lifting the lid unnecessarily to peek into the pot.
- Do not install the hob in the immediate vicinity of a refrigerator/freezer.
- The electricity consumption is then unnecessarily increased.
INSTALLATION INSTRUCTIONS
Make the worktop recess
The worktop must be flat and level. The edge of the worktop near the wall must be sealed to prevent ingress of water or other liquids.
The worktop must be made of materials, including veneer and adhesives, resistant to a temperature of 100°C. Otherwise, the veneer could come off or the surface of the worktop become deformed.
The edge of the opening should be sealed with suitable materials to prevent ingress of water.
Ensure sufficient clearance below the hob to allow proper air circulation and prevent overheating. Please read on for more information on correct clearance.
The worktop opening must be cut to the dimensions shown in the figure below (measurement unit: mm):


Built-in hob above the oven
Built-in hob above kitchen cabinets

Do not install the hob above the oven without ventilation
Install the hob in the opening
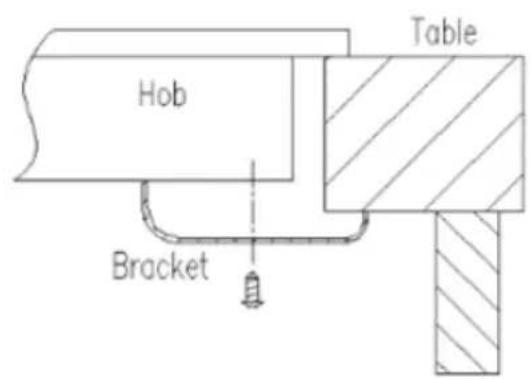
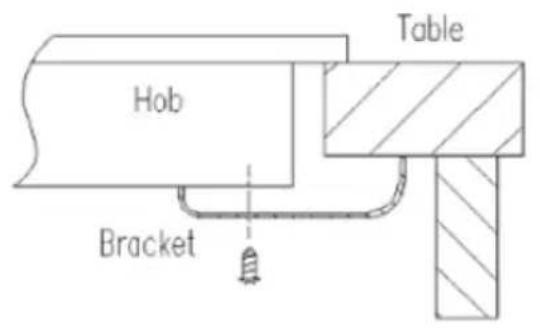
Using an electrical cord, connect the hob according to the electrical diagram provided. Remove dust from the worktop, insert the hob into the opening, and press it in firmly.

Tips for the installer
The hob is equipped with a terminal block allowing different connections appropriate for a specific type of power supply.
The terminal block allows the following connections:
• Single-phase AC220-240V / 50/60Hz
The hob can be adapted to a specific type of power supply by bridging the appropriate terminals according to the wiring diagram. The wiring diagram is placed on the hob's underside. The terminal block can be accessed by removing the lid on the hob's underside. Remember to match the power cord to the type of connection and the hob's power rating.
Note: Remember to connect the protective conductor to the correctly marked terminal block clamp. The electrical system supplying the hob must be protected by a properly selected tripping device or a circuit breaker allowing to disconnect the power supply in an emergency.
Before connecting the appliance to power, please carefully read the information provided on the rating plate and wiring diagram. Connecting the hob other than shown on the wiring diagram may damage the hob.
Note: Electrical connection must be made by a properly certified qualified installer. Do not make any alterations in the appliance electrical system.
Note: The installer is obliged to provide the user with the “appliance electrical connection certificate” (enclosed with the warranty card). After installation, the installer should also provide information on the connection made:
- Single-phase, two-phase or three-phase, • Conductor cross-section, • Electrical protection (fuse type).
Wiring diagram
3IF-355BS
| Note: For each connection the protective conductor must be connected to the terminal marked | Type / Conductor cross section | Fuse protection | ||
| For a 220-240V network, single phase connection with a neutral lead, L1 and L2 terminals bridged, neutral lead is connected to N terminal, and the protective conductor to | 1N~ |  | HO5VV-FG 3x4 mm2 | min. 30A |
3IF-305BC
| Note: For each connection the protective conductor must be connected to the terminal marked | Type / Conductor cross section | Fuse protection | ||
| For a 220-240V network, single phase connection with a neutral lead, L1 and L2 terminals bridged, neutral lead is connected to N terminal, and the protective conductor to | 1N~ | 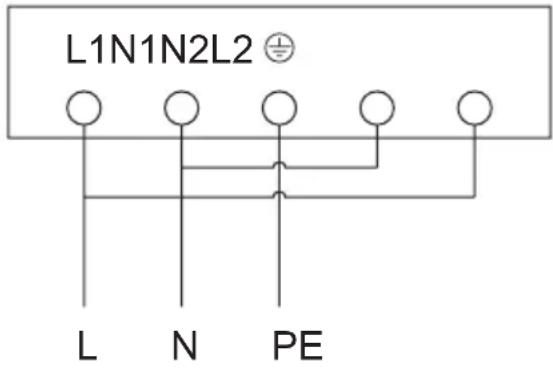 | HO5VV-FG 3x4 mm2 | min. 30A |
BASIC INFORMATION ABOUT YOUR APPLIANCE
Induction hob operation principle
Under the surface glass, there are induction coils that produce a pulsing magnetic field. This magnetic field penetrates a pot placed on the hob surface causing the pot to heat up. It is important to use pots with a suitable base.
The cooking zone is powered intermittently, which is normal. The intermittent power depends on the heat setting.

Depending on the pots used and heat setting during cooking, the appliance produces a distinctive whiz. This is normal and does not constitute grounds for a complaint.
Cookware characteristics
- To check that the pot is suitable for your induction hob, make sure that a magnet strongly attracts its base. The greater the attraction force, the better the pot.
- Always use high-quality cookware with a perfectly flat base. The use of this kind of cookware prevents hot spots that may result in food sticking to the pot. Pots and pans with thick steel walls provide superior heat distribution. The concave base or deep embossed logo of the manufacturer interfere with the temperature induction control module and can cause overheating of the pot or pan.
- Do not use damaged cookware such as cookware with deformed base due to excessive heat.

- When you use large ferromagnetic base cookware, whose diameter is less than the total diameter of the cookware, only the ferromagnetic base heats up. This results in a situation where it is not possible to uniformly distribute the heat in the cookware. If the ferromagnetic area is reduced due to inclusion of aluminium parts then the effective heated area can be reduced. Problems with the detection of the cookware could arise or cookware may not be detected at all. To achieve optimum cooking results, the diameter of the ferromagnetic base should match that of the cooking zone. If cookware is not detected in a given cooking zone, it is advisable to try it in a smaller cooking zone.

The high-quality cookware is essential for efficient induction cooking.

It is not recommended to use external induction adapters.
- For induction cooking use only ferromagnetic base materials such as:
- Enamelled steel
- Cast iron
- Special stainless steel cookware designed for induction cooking.
- Lid prevents heat from escaping and thus reduces heating time and lowers energy consumption.
- Make sure that cookware base is dry. When filling a pot or when using a pot taken out of the refrigerator make sure its base is completely dry before placing it on the cooking zone. This is to avoid soiling the surface of the hob.

Kitchen cookware marking
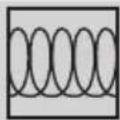
Check for marking indicating that the cookware is suitable for induction cooking.
Stainless Steel
Cookware is not detected
With the exception of the ferromagnetic steel cookware
Aluminium Cookware is not detected
Cast iron
High efficiency
Note: cookware can scratch the hob surface
Enamelled steel
High efficiency
Cookware with a flat, thick and smooth base is recommended
Glass Cookware is not detected
Porcelain Cookware is not detected
Cookware with copper base Cookware is not detected
Residual heat indicator "H"
When you have finished cooking, the induction hob glass within the cooking zone is still hot, this is called residual heat.
If the glass surface is hot, the "H" is shown on the cooking zone display.


When residual heat indicator is on, do not touch the cooking zone as there is a risk of burns and do not place on it any items sensitive to heat!

The "H" residual heat indicator is not displayed during a power outage. However, cooking zones may still be hot!
Before using the appliance for the first time
- Thoroughly clean the induction hob. The hob has a glass surface, therefore handle it with care.
- Odours may be released when you first start your appliance. If this happens, turn on exhaust hood or open the window in the room. Emission of odour is temporary.
If the appliance does not detect the cookware on the operating cooking zone
If there is no cookware on the active cooking zone or the cookware is unsuitable, the symbol indicated on the side will be shown on the display. If you do not place a suitable cookware on the cooking zone, it will turn off after 1 minute. If no other cooking zones are used, your induction hob will be in standby mode for another minute, and then turn off completely.

Cookware size
In order to achieve best cooking results, use cookware with bottoms (ferromagnetic part) of the size corresponding to the size of the cooking zone.
Using cookware with the bottom diameter smaller than the cooking zone size will reduce the effectiveness of the cooking zone and increase cooking time.
Cookware detection sensitivity of a cooking zone is affected by the diameter of ferromagnetic component embedded in the cookware base and its material.
Cooking zone diameter Cookware diameter [mm]
| 160 120 |
| 180 140 |
| 280 180 |
| 320 180 |
OPERATION
Features and components
- Control Panel
- Booster induction cooking zone
Control Panel![graph TD A["88"] --> B["7"] B --> C["3"] C --> D["8"] D --> E["1"] E --> F["4"] F --> G["5"] G --> H["6"] H --> I["7"] I --> J["3"] J --> K["5"] K --> L["6"] L --> M["7"] M --> N["8"] N --> O["1"] O --> P["4"] P --> Q["5"] Q --> R["6"] R --> S["7"] S --> T["8"] T --> U["1"]](/content/2026/06/1363083/images/e84fa54e37b92f462d1fa9f01e38097306d4cc779ea86c68902940a0af7669ba.jpg)
- Cooking zone selection sensor
- Child Lock
- Slider
- Minute Minder
- Booster sensor field
- On / off
- Timer display
Note! You will hear a beep each time you touch a sensor. It is not possible to turn off the acoustic beeps.
Connect the power supply
When you connect the power supply, all displays will light up for about 1 second and you will hear a beep. The appliance is on.
Use a cooking zone
Place the cookware on the cooking zone, for example on the front cooking zone. Touch the sensor and will be shown on all cooking zone displays. Touch to select the desired cooking zone and then use the Slider to set the heat setting. Touch the sensor again to confirm the heat setting or simply wait a
few seconds until it is confirmed automatically. If there is no cookware on the selected cooking zone, the symbol will be displayed and the cooking will only start when you place the cookware on the cooking zone.
Note!
You can place the cookware on the cooking zone at any time, also before selecting a heat setting for the cooking zone.
If you do not select a heat setting within 1 minute, the appliance will turn off automatically.
When you select a cooking zone, a default heat setting of 5 will be displayed, and it is not possible to have a different default setting.
Booster function
When active, this function temporarily boosts the power output of a specific cooking zone.
To activate the Booster function, touch Ⓧ to select the cooking zone and then touch Ⓞ, and the display will show P.
Note! The Booster function can only operate for a maximum of 5 minutes, and then the heat setting is automatically reduced to level 9.
To deactivate the Booster function, touch Ⓧ to select the cooking zone and then touch Ⓞ again, or simply use the power slider to reduce the heat setting.
You can activate the Booster function for all cooking zones at the same time.
Adjust the heat setting
Touch to select the cooking zone with the pot, and then use the Slider to adjust the heat setting from 1 to 9. Touch to confirm the new heat setting.
Turn off a cooking zone
To turn off a cooking zone, touch to select the desired cooking zone, then use the Slider to reduce the heat setting to 0 and touch, or simply wait a few seconds to confirm.
To turn off all the cooking zones at once, touch ①, and the appliance will turn off completely.
Child Lock
The Child Lock function disables all touch controls except, and the symbol is shown on the display.
In order to activate Child Lock, touch and hold for 3 seconds, and it will be displayed. To deactivate Child Lock, touch and hold for 3 seconds, and it will disappear.
You can enable Child Lock when the appliance and the sensor are active. In the event of an emergency, touch the sensor to turn off the appliance without having to unlock it first. To turn on the appliance again, you need to deactivate the Child Lock first.
Cooking zone auto off
The cooking zone will turn off automatically after a specified time has elapsed, which depends on its heat setting. This is a safety feature that cannot be disabled.
Heat setting Auto off time
| 1 | 8h |
| 2 | 8h |
| 3 | 8h |
| 4 | 4h |
| 5 | 4h |
| 6 | 4h |
| 7 | 2h |
| 8 | 2h |
| 9 | 2h |
Minute Minder
In order to set the Minute Minder for 25 minutes, first touch the power button to turn on the appliance, and the power indicator will be shown on cooking zone displays. Now touch the power button, and the right digit on the display will flash. Use the Slider to select the value of 5, then touch the power button once again, and the left digit on the display will flash. Use the Slider to select the value of 2. Touch the power button to confirm and start the countdown. The Minute Minder has been set to 25 minutes, and after this time elapses you will hear beeping for about 30 seconds. Touch any sensor to mute the beeping. You can also use the Minute Minder during cooking on any of the cooking zones.
Set cooking zone Timer
You can set the cooking zone to turn off after a specific time. To do this, select the desired cooking zone and set its heat setting. Touch the timer button while the heat setting is flashing on the display. Proceed to set the Timer in the same way as the Minute Minder. Touch the timer button to confirm the Timer setting and start the countdown. A dot will flash on the cooking zone display for which a Timer countdown is running. When the set time has elapsed, the cooking zone will turn off automatically. You can set the Timer independently for each cooking zone.
Note! For both the Timer and Minute Minder functions:
- You can set the time from 1 to 99 minutes.
- Countdown starts when you touch to confirm.
- You can adjust the set time. To cancel the running Timer, adjust the set time down to 00.
- Touch to cancel the running timers and to turn off the appliance completely.
TROUBLESHOOTING
In the event of any fault:
- Turn off the appliance
- Disconnect the power supply
- Have the appliance repaired
- Based on the instructions given in the table below, some minor issues can be corrected by the user. Please check the consecutive points in the table before you refer the repair to customer service.
| PROBLEM POSSIBLE CAUSE REMEDY | ||
| 1. The appliance does not work | - No power -Check the fuse, replace if blown | |
| 2. Sensor fields do not respond when touched | - Appliance is not turned on - Turn on | the appliance |
| - Sensor field touched too briefly (less than one second) | - Touch the sensor field longer | |
| - Multiple sensors touched at the same time | - Always touch only one sensor field (except when a cooking zone is switched off) | |
| 3. The appliance does not respond and emits and extended beep | - Improper use (wrong sensor fields touched or sensors touched too briefly) | - Reconnect the hob |
| - Sensor fields covered or dirty - Uncover or clean the sensor fields | ||
| 4. The appliance switches itself off | - No sensor field is touched for 10 seconds of activating the appliance | - Switch on the appliance and set heat setting without delay |
| - Sensor fields covered or dirty - Uncover or clean the sensor fields | ||
| 5. A single cooking zone switches off and residual heat indicator „H” is shown. | - Limited cook time - Switch on the cooking zone again | |
| - Sensor fields covered or dirty | - Uncover or clean the sensor fields | |
| - Electronic components overheated | ||
| 6. Residual heat indicator extinguished even though the cooking zones are hot | - A power outage or the appliance has been disconnected | - Residual heat indicator will be shown again the next time the appliance is turned on and off again |
| 7. Hob cooking surface is cracked. |  Danger! Immediately unplug the appliance or switch off the main circuit breaker. Refer the repair to the nearest service centre. Danger! Immediately unplug the appliance or switch off the main circuit breaker. Refer the repair to the nearest service centre. | |
| 8. When the problem is still not remedied. | Immediately unplug the appliance or switch off the main circuit breaker (fuse). Refer the repair to the nearest service centre.Important!You are responsible for operating the appliance correctly and maintaining its good condition. If you call service as a result of operating the appliance incorrectly you will be responsible for the costs incurred even under warranty.The manufacturer shall not be held liable for damage caused by failure to follow this manual. | |
| 9. Induction hob makes buzzing sound. | This is normal. Cooling fan is operating to cool down internal electronics. | |
| 10. Induction hob makes hissing and whistling sounds. | This is normal. When using several cooking zones at full power, the hob makes hissing and whistling sounds due to the frequencies used to power the coils. | |
| 11. The hob does not work. The cooking zones will not operate. | - Faulty electronics | - Reset the appliance, unplug it for a few minutes (disconnect the fuse). |
ERROR CODES
During appliance operation, an error code may appear on the display. For details, please refer to the table below:
| PROBLEM POSSIBLE CAUSE REMEDY | ||
| E4/E5 Temperature sensor damaged Contact the Service | Centre | |
| E7/E8 IGBT temperature sensor damaged Contact the Service Centre | ||
| E2/E3 Incorrect supply voltage: Make sure the supply voltage is correct. | ||
| E6/E9 Hob overheated | Allow the hob to cool down before using it again. | |
CLEANING AND MAINTENANCE
Proper routine maintenance and cleaning of the appliance can significantly extend its trouble-free operation.

When cleaning induction hobs, the same principles apply as for glass surfaces. Do not use under any circumstances any abrasive or caustic cleaners or scouring powders or pads! Do not use steam or pressure cleaners.
Cleaning after each use
Wipe light stains with a damp cloth without detergent. The use of dishwashing liquid may cause a bluish surface discolouration. These persistent stains cannot always be removed right away, even using a special cleaner.

Firmly adhering dirt can be carefully removed with a scraper. Then wipe the cooking surface with a damp cloth.
Removing stains
Bright stains of pearl colour (residual aluminium) can be removed from the cool hob using a special cleaning agent. Limestone residue (eg. after evaporated water) can be removed by vinegar or a special cleaning agent.
Do not turn off the cooking zone when removing sugar, food containing sugar, plastic and aluminium foil. Immediately and thoroughly scrape the leftovers off the hot cooking zone using a sharp scraper. Once the bulk of the stain is removed the hob can be turned off and clean the cooled off cooking zone with a special cleaning agent.
Special cleaners are available in supermarkets, electrical and home appliance shops, drug stores, as well as retail food shops and kitchen showrooms. Scrapers can be purchased in DIY and construction equipment stores, as well as in shops carrying painting accessories.
Never apply a detergent on the hot cooking zone. It is best to let the cleaner dry and then wipe it wet. Any traces of the detergent should be wiped off clean with a damp cloth before re-heating. Otherwise, it can be corrosive.
Warranty will be void if you do not follow the above guidelines!
Periodic inspections
In addition to normal cleaning and maintenance:
- Carry out periodic checks of touch controls and other elements. After the warranty expires, have authorised service inspect the appliance every two years,
• Repair and identified problems,
- Carry out periodic maintenance of the hob.
Important!
If the hob's controls do not respond for whatever reason, then turn off the main circuit breaker or remove the fuse and contact customer service.
Important!
In the event of breakage or chipping of the hob cooking surface, turn off and unplug the appliance. To do this, disconnect the fuse or unplug the appliance. Then refer the repair to professional service.
Important!
All repairs and adjustments must be performed by a competent technician or by an authorised installer.
WARRANTY AND AFTER SALES SERVICE
Warranty
Warranty service as stated on the warranty card. The manufacturer shall not be held liable for any damage caused by improper use of the product.
Service
- The manufacturer recommends that all repairs and adjustments be carried out by the Factory Service Technician or the Manufacturer's Authorized Service Point. For safety reasons, repairs should be referred to professionals.
- Repairs carried out by unqualified persons may seriously endanger the appliance user.
- The minimum warranty period for the appliance offered by the manufacturer, importer or authorized representative is given in the warranty card.
- The warranty shall be void if you make any independent adaptations or alterations, tamper with seals or other appliance safety devices or its parts or interfere with the appliance contrary to operating instructions.
In the event of appliance malfunction, request assistance or repair.
If your appliance needs repair, please contact the service centre. Please see warranty card for address and contact details of our service centre. Before contacting us, please have ready the appliance serial number, which can be found on the identification sticker: For your convenience, please write it down below:
Manufacturer's Declaration
The manufacturer hereby declares that this product meets the requirements of the following European directives:
• Low Voltage Directive 2014/35/EC • Electromagnetic Compatibility (EMC) Directive 2014/30/EC • ErP Directive 2009/125/EC • Directive RoHS 2011/65/EC
and has thus been marked with the symbol and been issued with a declaration of compliance made available to market regulators.
FAGOR
ELECTRODOMÉSTICO

www.fagorelectrodomestico.com
- EN - TABLE OF CONTENTS
- SAFETY INSTRUCTIONS
- HOW TO SAVE ELECTRICITY
- INSTALLATION INSTRUCTIONS
- BASIC INFORMATION ABOUT YOUR APPLIANCE
- OPERATION
- TROUBLESHOOTING
- ERROR CODES
- CLEANING AND MAINTENANCE
- WARRANTY AND AFTER SALES SERVICE
- DEAR CUSTOMER
- UNPACKING
- DISPOSAL
- MAKE THE WORKTOP RECESS
- INSTALL THE HOB IN THE OPENING
- TIPS FOR THE INSTALLER
- WIRING DIAGRAM
- INDUCTION HOB OPERATION PRINCIPLE
- COOKWARE CHARACTERISTICS
- RESIDUAL HEAT INDICATOR "H
- BEFORE USING THE APPLIANCE FOR THE FIRST TIME
- IF THE APPLIANCE DOES NOT DETECT THE COOKWARE ON THE OPERATING COOKING ZONE
- COOKWARE SIZE
- CONNECT THE POWER SUPPLY
- USE A COOKING ZONE
- NOTE
- BOOSTER FUNCTION
- ADJUST THE HEAT SETTING
- TURN OFF A COOKING ZONE
- CHILD LOCK
- COOKING ZONE AUTO OFF
- MINUTE MINDER
- SET COOKING ZONE TIMER
- CLEANING AFTER EACH USE
- REMOVING STAINS
- PERIODIC INSPECTIONS
- IMPORTANT
- WARRANTY
- SERVICE
- MANUFACTURER'S DECLARATION
- FAGOR
Brand : FAGOR
Model : 3IF-355BS
Category : Cooker