
AR6430PR - Oven ARDES - Free user manual and instructions
Find the device manual for free AR6430PR ARDES in PDF.
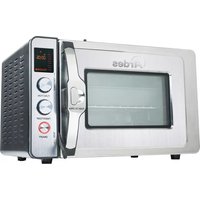


| Product Type | Freestanding Electric Oven |
| Brand | Ardes |
| Model | AR6430PR |
| Energy Source | Electricity |
| Capacity | 65 Liters |
| Dimensions (WxHxD) | 595 x 595 x 550 mm |
| Weight | 35 kg |
| Power Consumption | 2500 W |
| Functions | Convection, Grill, Bake, Defrost, Fan-assisted |
| Temperature Range | 50 - 250 °C |
| Timer | Up to 120 minutes with automatic shut-off |
| Interior Light | Yes |
| Cooling System | Cool-touch door and handles |
| Cleaning | Enamel interior, removable door glass for easy cleaning |
| Safety Features | Child lock, overheating protection, automatic shut-off |
| Spare Parts & Repairability | Replacement heating elements, door gaskets, and thermostats available |
| Warranty | 2 years |
| Included Accessories | 1 wire shelf, 1 baking tray |
Frequently Asked Questions - AR6430PR ARDES
User questions about AR6430PR ARDES
0 question about this device. Answer the ones you know or ask your own.
Ask a new question about this device
Download the instructions for your Oven in PDF format for free! Find your manual AR6430PR - ARDES and take your electronic device back in hand. On this page are published all the documents necessary for the use of your device. AR6430PR by ARDES.
USER MANUAL AR6430PR ARDES
WARNINGS

9
11


13

16
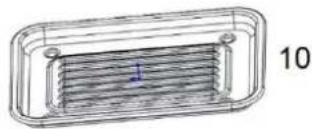
- Drip tray (10)
Attention: read this booklet carefully. It contains important instructions for a safe installation, use and maintenance.
Important instructions to be kept for future reference.
This appliance can be used by children aged from 8 years and above and persons with reduced physical, sensory or mental capabilities or lack of experience and knowledge if they have been given supervision or instruction concerning use of the appliance in a safe way and understand the hazards involved.
Children shall not play with the appliance.
Cleaning and user maintenance shall not be made by children unless they are older than 8 and supervised.
Keep the equipment and its cable out of reach of children younger than 8 years of age.
The surfaces are subject to heating up during use. Place the unit with its back against a wall.
The appliance must never be operated by means of an external timer or with a separate remote control system.
If the power cable is damaged, it must only be replaced at service centres authorised by the manufacturer in order to prevent any risks.
Before opening the door, turn the Vent Release Valve to “VENT” and wait for the pressure to dissipate, then raise the Sealing Lever to the standard position.

WARNING: HOT STEAM
To avoid burns or damage, do not expose parts of the body or objects to
the steam.
Before using the appliance for the first time, wash the parts that come into contact with food as specified in the MAINTENANCE section.
Always inspect the Vent Release Valve and make sure it is clean of any food particles or other obstructions.
The appliance has been designed and manufactured to operate in a household environment as a KITCHEN OVEN. Any other use is considered inappropriate and therefore dangerous.
After removing the packaging, check the appliance for any signs of damage. If there is visible damage, do not use it and contact a qualified technician.
Do not leave parts of the packaging within the reach of children.
This appliance is not a children's toy: it is an electrical device and must be treated with the necessary caution.
Before connecting the appliance, make sure that the power supply voltage matches the indication on the data plate.
The electrical safety of this appliance is assured only if it has been connected to an effective earthing system.
If the plug and socket are not compatible, the socket must be replaced with a suitable type by skilled persons. Do not use adapters or extension cables that do not meet current safety standards or that exceed the current carrying capacity limits.
Unplug the appliance from the mains when not in use.
Do not tug on the power cable or on the appliance itself to remove the plug from the socket.
The use of any electrical appliance requires that a number of basic rules are observed, namely:
- Never touch the appliance with wet or humid hands.
- Children must be supervised to make sure that they do not play with the appliance.
- Do not use the appliance when barefoot.
- Do not leave the appliance exposed to weathering (rain, sunlight).
- Do not subject it to rough handling.
In case of a breakdown or malfunctioning of the appliance, disconnect it at once. Do not attempt to repair it, but take it to a service centre approved by the manufacturer.
If you decide you do not want to use this appliance any longer, disable it by cutting the power cable; of course, after disconnecting it from the socket.
The appliance has been designed and manufactured to operate as an electric cooker in the home. Any other use is considered inappropriate and dangerous.
Do not use the appliance out of doors.
For safety reasons, the appliance should never be opened.
During use, rest the appliance on a flat and stable surface.
To prevent children from accidentally touching hot components, use the appliance on surfaces that are at least 85 cm high.
Attention: the surfaces temperature could be elevated when the appliance is on.
Do not place the cord near sources of heat.
Do not place the appliance above or below other ovens, microwave ovens, or close to gas stoves.
Leave at least 12 cm of free space around the oven to allow for appropriate ventilation and cooling.
Do not store or place any other item on top of the oven.
Do not move the appliance when it is on, when it is hot, or when it contains food or liquids.
Be very careful when using containers made of materials other than metal or glass (for example, ceramic).
Do not cover the crumb tray or any part of the oven with metal foil; this will cause overheating.
Do not use containers made of plastic, paper, or similar materials.
Do not let any object into the ventilation inlets.
Use of gloves or other protective devices is recommended when handling hot food to be put into or taken out of the oven.
Appliance surfaces are hot during and after use! Do not touch hot surfaces.
Use handles or knobs.
This appliance has a tempered, safety glass door. This glass is stronger than ordinary glass and more resistant to breakage. However, tempered glass could break. If the door has a scratch or nick, contact us or our customer service.
Do not place eyes or face in close proximity with the tempered safety glass door, in the event that the safety glass breaks.
Oversize foods or metal utensils must not be inserted in an oven as they may create a fire or risk of electric shock.
The use of attachments which are not recommended or sold by the appliance manufacturer may cause a risk of injury to persons.
INTRODUCTION
Congratulations on your purchase of the pressure oven, a breakthrough technology in the world of cooking.
Low pressure and even heat distribution in a sealed oven chamber allow for faster cooking and improved flavor, without sacrificing moisture. Imagine roasting a 6 kg turkey in under an hour (over 4 hours in a traditional oven). Imagine getting the fullness of baked goods without the need for convection fans or rotating pans.
The brushed stainless steel exterior, easy-to-read controls, and superior performance are a welcome addition to any kitchen countertop.
Please be sure to read all important safeguards in this manual, as well as the helpful hints section, to ensure you get the best this innovative oven has to offer.
KNOW YOUR PRESSURE OVEN
| 1. Vent Release Valve2. Door Handle3. Door Release Button4. LED display5. FUNCTION Knob6. TIMER/TEMP Knob7. ON/OFF Button8. Sealing Lever | 9. Roasting Pan (*)10. Drip Pan11. Chicken Rotating stick (*)12. Broil Rack Insert (*)13. Crumb Tray14. Baking Rack (*)15. Rotisserie Removal Tool16. Rack Removal Tool |
(*) Intended to come in contact with food
DISPLAY
PROGRAMS TABLE
| Progr. | Description | Default time (hh:mm) | Adjustable min - max (hh:mm) | Default temperature (°C) | Adjustable min-max (°C) | Tray position (indicative)  |
| Toast - | 00:06 | 00:02 – 00:11 | - | - 2 | ||
| Bagel - | 00:20 | 00:01 – 02:00 | 200 | 65 - 230 1-2 | ||
| Pizza - | 00:16 | 00:01 – 02:00 | 200 | 65 – 230 1-2 | ||
| Cake - | 00:30 | 00:01 – 02:00 | 160 | 65 – 230 1 | ||
| Roast - | 00:40 | 00:01 – 02:00 | 200 | 65 – 230 1 | ||
| Broil - | 01:00 | 00:01 – 02:00 | 200 | 65 – 230 1-2 | ||
| Cookies - | 00:15 | 00:01 – 02:00 | 175 | 65 – 230 1-2 | ||
| Defrost - | 00:15 | 00:01 – 12:00 | 70 | 35 – 85 2 | ||
| Warm - | 00:15 | 00:01 – 12:00 | 80 | 45 – 80 1-2 | ||
 | Above cooking | 00:30 | 00:01 – 02:00 | 180 | 65 - 230 2-3 | |
 | Below cooking | 00:30 | 00:01 – 02:00 | 175 | 65 – 230 1 | |
 | Above+below cooking | 00:16 | 00:01 – 02:00 | 200 | 65 – 230 1-2 | |
 | Above cooking + rotisserie | 00:30 | 00:01 – 02:00 | 180 | 65 – 230 | |
 | Above+below +rotisserie cooking | 00:30 | 00:01 – 02:00 | 200 | 65 – 230 |
Note (indicative):

Suitable for grilled fish, steaks, chicken, pork chops, etc.

Suitable for desserts, cakes, and cookies.

Suitable for bread, focaccia, and pizza.
- Vent Release Valve (1)
Used to maintain low pressure (about 10 kPa) in the oven during the cooking process.
VENT RELEASE VALVE has two settings:
- SEAL to maintain the pressure;
- VENT to release pressure at the end of cooking process or to cook in standard mode (STATIC).
| SEAL VENT | |||
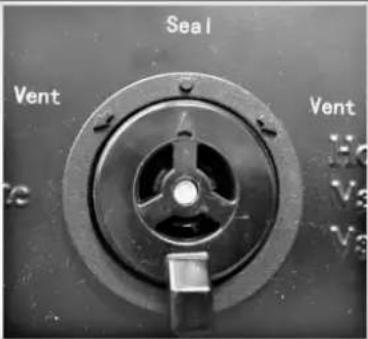 |  |
Note: By design the VENT RELEASE VALVE rests loosely on top of the vent valve. This allows the VENT RELEASE VALVE to rise up and down during the cooking process to maintain the proper pressure.
- Door Release Button (3)
Press the DOOR RELEASE BUTTON to open the oven door. Do not attempt to pull the door open without using the DOOR RELEASE BUTTON.
- Display (4)
During setting and working, the display will show the setting information (program, function, time, temperature, etc.).
When the appliance is in off mode, the display will show "-- --".
When cooking time is completed, the oven will "beep" and the display will show "End".
- FUNCTION knob (5)
By rotating this knob, you can set one of the 9 cooking programs or set directly the cooking FUNCTIONS (see DISPLAY and PROGRAMS TABLE).
- TIMER/TEMP knob (6)
TIMER/TEMP functions are in the same knob.
By pushing this knob, you can switch from time setting to temperature setting (and the opposite).
When you turn the knob, the Timer or Temp will change as you desired.
Temperature can be adjusted even during cooking.
Note: timer and temp values might not increase or decrease if the knob is rotated too fast.
- ON/OFF button (7)
Press this button to start or stop cooking.
The ON/OFF button has a signal lamp that shows the oven state:
◦ LIGHTED OFF: oven is off. - BLINKING: while program setting. - LIGHTED ON: cooking or end of cooking.
- Sealing Lever (8)
Your oven has the ability to cook in STANDARD oven mode (STATIC) or in PRESSURE mode. Both functions require lowering the SEALING LEVER (8) to the SEAL position.
- Roasting pan (9)
When used, the roasting pan has to be placed on the Baking rack (14).

- Drip Pan (10)
When used, the Drip pan (10) has to be placed on the Baking rack (14). Note: the Drip pan (10) is not intended to come in contact with food to eat; it can be used to collect cooking liquids during cooking with broil rack insert (12) or rotating stick (11).

- Chicken rotating stick (11)
Put the stick through the food in a way that the food remains in the middle. Use the forks to lock the food and then place the stick in the holders placed in the middle of the cavity.
- Broil Rack Insert (12)
When used, it has to be placed on the roasting pan (9) or on the Drip/Baking pan (10).
- Crumb tray (13)
To access the CRUMB TRAY, open the door and slide it out from underneath the bottom heating elements. Always have the CRUMB TRAY in place underneath the heating elements when using your oven.
Note: The Crumb tray (13) is not intended to come into contact with food for consumption.
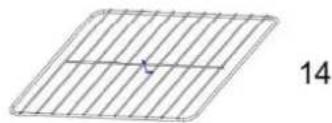
- Baking rack (14)
The baking rack has to be placed in the holders located on the cavity walls.
- Rotisserie Removal Tool (15)
Use this tool to insert or remove the Chicken rotating stick (11).
- Rack Removal Tool (16)
This tool is suitable for removing the baking rack (14) or the Drip/Baking Pan (10).
It is not recommended to be used when lifting heavy casserole dishes.
- Cavity lamp
The appliance has an inner lamp to light the cavity.
The lamp will light on at the beginning of the cooking and then it will light off after 1 minute.
The lamp can be lighted on again by rotating the FUNCTION knob (5) or by pressing the TIMER/TEMP knob (6): it will remain lighted on for one minute.
When the inner light is on, the corresponding symbol on the display will light up.
Before using this oven, please ensure that you have read the instruction manual fully and have become familiar with important safeguards.
Warning: the oven exterior and door are hot during and after use. To prevent a burn injury, we recommend always using protective hot pads or oven mitts when adding or removing items from the oven or when using the Vent Release Valve (1).
First use
It is necessary to do a trial run of your oven to eliminate any protective substance on the heating elements.
Conduct the trial run in a well-ventilated area as a small amount of smoke and odor may be detected. This is normal and should be expected. Follow the procedure below for the trial run.
- Remove all accessories from the oven and close the door.
- Ensure the VENT RELEASE VALVE (1) is in the VENT position and the SEALING LEVER (8) is in the STANDARD position.
- Plug the oven into a standard 220-240V grounded outlet.
- Set the FUNCTION knob (5) to BAKE, then by TEMP/TIMER knob (6) set the oven to 250°C and 30 minutes.
- Start the program by pushing ON/OFF button (7).
- At the end of the 30 minutes, switch off the oven and let it cool down.
WARNING:
Before using the appliance for the first time, clean it and wash the accessories (9-16) as specified in section MAINTENANCE.
Pre-heating (if expected by the recipe)
- Close the oven door and lower the SEALING LEVER (8) to the SEAL position.
- Turn the VENT RELEASE VALVE (1) to the VENT position.
- Set the FUNCTION knob (5) to the desired program or function.
- Set the TIME to 5-10 minutes by rotating the TIMER/TEMP knob (6).
- Push the TIMER/TEMP knob (6) and set the temperature.
- Push the ON/OFF button (7) and start the pre-heating.
- When pre-heating is completed, raise the SEALING LEVER (8) to the STANDARD position and press the DOOR RELEASE BUTTON (3) to open the door.
PRESSURE COOKING
- Insert the accessory with the food in the oven.
- Close the oven door and lower the SEALING LEVER (8) to the SEAL position.
- Turn the VENT RELEASE VALVE (1) to the SEAL position.
- Set the FUNCTION knob (5) to the desired program or function.
- Set the TIME by rotating the TIMER/TEMP knob (6).
- Push the TIMER/TEMP knob (6) and set the temperature.
- Push the ON/OFF button (7) to start cooking.
When cooking is complete:
- Push the ON/OFF button (7) to switch off the oven (unless already off).
- Turn the VENT RELEASE VALVE (1) to the VENT position.

WARNING: HOT STEAM
In order to avoid burns or damages, do not expose parts of the body or objects to the steam.
- Raise the SEALING LEVER (8) to the STANDARD position.
- Press the DOOR RELEASE BUTTON (3) to open the door.
WARNING! Never attempt to raise the SEALING LEVER (8) or open the door until all steam has been vented from the VENT RELEASE VALVE (1). Failure to do so could result in a scalding injury.
STANDARD COOKING (STATIC)
Note: When cooking in STANDARD mode (without pressure), turn the VENT RELEASE VALVE (1) to VENT before cooking.
- Insert the accessory with the food in the oven.
- Close the oven door and lower the SEALING LEVER (8) to the SEAL position.
- Turn the VENT RELEASE VALVE (1) to the VENT position.
- Set the FUNCTION knob (5) to the desired program or function.
- Set the TIME by rotating the TIMER/TEMP knob (6).
- Push the TIMER/TEMP knob (6) and set the temperature.
- Push the ON/OFF button (7) to start cooking.
When cooking is complete:
- Push the ON/OFF button (7) to switch off the oven (unless already off).
- Raise the SEALING LEVER (8) to the STANDARD position.
- Press the DOOR RELEASE BUTTON (3) to open the door.
MAINTENANCE
Disconnect the plug from the socket and let the appliance cool down well before cleaning it.
In order to clean the appliance, use a soft or slightly damp cloth.
Never use abrasives or chemical solvents.
Do not use very wet substances, liquids or cloths to prevent water from entering into the appliance and irreparably damaging it. Never use abrasive sponges to clean the oven and the accessories.
Clean the accessories provided (9-16) with common washing up detergents.
Clean the inner walls of the oven after each use, when the appliance has cooled down, with a soft damp cloth or sponge.
NEVER IMMERSE THE APPLIANCE INTO THE WATER.
Inner light
The inner lamp must be only be replaced at service centres authorised by the manufacturer.
DISPOSAL
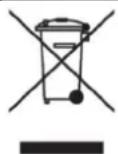
USER INFORMATION
“Implementation of Directive 2012/19/EU on Waste Electrical and Electronic Equipment (WEEE)”, pertaining to reduced use of hazardous substances in electrical and electronic equipment, as well as to waste disposal”.
The symbol of the crossed-out wheelie bin on the equipment or on its packaging indicates that the product must be disposed of separately from other waste at the end of its service life.
The user must therefore take the dismissed equipment to suitable separate collection centres for electrical and electronic waste.
For more details, please contact the appropriate local authority. Suitable segregated collection of the equipment for subsequent recycling, treatment or environmentally-friendly disposal helps prevent damage to the environment and to human health, and encourages the re-use and/or recycling of the materials that make up the equipment.
Abusive disposal of the product by the user shall result in the application of administrative fines in accordance with the laws in force.
GUARANTEE
Terms and Conditions
The guarantee is valid for 24 months.
This guarantee applies only if it has been duly filled in and is submitted with the receipt showing the date of purchase.
The guarantee covers the replacement or repair of parts making up the appliance which were faulty at source due to manufacturing faults.
After the guarantee has expired, the appliance will be repaired against payment.
The manufacturer declines any responsibility for damage to persons, animals or property due to misuse of the appliance and failure to observe the directions contained in the instructions.
Limits
All rights under this guarantee and any responsibility on our part will be voided if the appliance has been:
- mishandled by unauthorized persons
- improperly used, stored or transported.
The guarantee does not cover damage to the outward appearance or any other that does not prevent regular operation.
If any faults should be found despite the care taken in selecting the materials and in creating the product, or if any information or advice are required, please contact your local dealer.

Poly Pool S.p.A. Via Sottocorna, 21/B
24020 Parre (Bergamo) - Italy
Tel. +39 035 4104000 r.a. - Fax +39 035 702716
http://www.ardes.it - e-mail:polypool@polypool.it
MADE IN CHINA
- WARNINGS
- DRIP TRAY (10)
- USE OF GLOVES OR OTHER PROTECTIVE DEVICES IS RECOMMENDED WHEN HANDLING HOT FOOD TO BE PUT INTO OR TAKEN OUT OF THE OVEN
- INTRODUCTION
- VENT RELEASE VALVE (1)
- DOOR RELEASE BUTTON (3)
- DISPLAY (4)
- FUNCTION KNOB (5)
- TIMER/TEMP KNOB (6)
- ON/OFF BUTTON (7)
- SEALING LEVER (8)
- ROASTING PAN (9)
- DRIP PAN (10)
- CHICKEN ROTATING STICK (11)
- BROIL RACK INSERT (12)
- CRUMB TRAY (13)
- BAKING RACK (14)
- ROTISSERIE REMOVAL TOOL (15)
- RACK REMOVAL TOOL (16)
- CAVITY LAMP
- FIRST USE
- WARNING
- PRE-HEATING (IF EXPECTED BY THE RECIPE)
- PRESSURE COOKING
- STANDARD COOKING (STATIC)
- MAINTENANCE
- DISCONNECT THE PLUG FROM THE SOCKET AND LET THE APPLIANCE COOL DOWN WELL BEFORE CLEANING IT
- INNER LIGHT
- DISPOSAL
- USER INFORMATION
- GUARANTEE
- TERMS AND CONDITIONS
- THE GUARANTEE IS VALID FOR 24 MONTHS
- LIMITS
Brand : ARDES
Model : AR6430PR
Category : Oven