
BBSE17300B - Built-in oven BEKO - Free user manual and instructions
Find the device manual for free BBSE17300B BEKO in PDF.


| Product type | Freestanding fridge freezer |
| Energy class | A+ |
| Annual energy consumption | 280 kWh |
| Total net capacity | 300 L |
| Fridge net capacity | 200 L |
| Freezer net capacity | 100 L |
| Freezing capacity | 10 kg/24h |
| Climate class | SN-T |
| Noise level | 42 dB(A) |
| Dimensions (H x W x D) | 1700 x 600 x 660 mm |
| Weight | 65 kg |
| Power supply | 220-240 V, 50 Hz |
| Current | 1.2 A |
| Defrost type | Frost free (No Frost) |
| Door hinge | Right, reversible |
| Shelves material | Tempered glass |
| Interior light | LED |
| Door alarm | Yes |
| Temperature control | Electronic |
| Cleaning | Wipe with damp cloth; avoid abrasive cleaners |
| Safety | Child lock (optional), anti-fingerprint coating |
| Spare parts availability | Yes, via Beko service centers |
| Repair index | 8.0/10 |
Frequently Asked Questions - BBSE17300B BEKO
User questions about BBSE17300B BEKO
0 question about this device. Answer the ones you know or ask your own.
Ask a new question about this device
Download the instructions for your Built-in oven in PDF format for free! Find your manual BBSE17300B - BEKO and take your electronic device back in hand. On this page are published all the documents necessary for the use of your device. BBSE17300B by BEKO.
USER MANUAL BBSE17300B BEKO
385442782_1/ EN/ PL/ RO/ R.AB/ 24/11/23 09:45
7768287870
Welcome!
Dear Customer,
Thank you for choosing the Beko product. We want your product, manufactured with high quality and technology, to offer you the best efficiency. Therefore, carefully read this manual and any other documentation provided before using the product.
Keep in mind all the information and warnings stated in the user's manual. This way, you will protect yourself and your product against the dangers that may occur.
Keep the user's manual. If you give the product to someone else, give the manual with it. The warranty conditions, usage and troubleshooting methods for your product are provided in this manual.
The symbols and their descriptions in the user's manual:

Hazard that may result in death or injury.

Important information or useful usage tips.

Read the user's manual.
Hot surface warning.
NOTICE Hazard that may result in material damage to the product or its environment.
Arçelik A.Ş.
Karaağaç Caddesi No:2-6 34445 Sütlüce/Istanbul/TURKEY
Made in TURKEY
Table of Contents
1 Safety Instructions...... 4
1.1 Intended Use.... 4 1.2 Child, Vulnerable Person and Pet Safety 4 1.3 Electrical Safety.... 5 1.4 Transportation Safety 7 1.5 Installation Safety...... 7 1.6 Safety of Use 8 1.7 Temperature Warnings 8 1.8 Accessory Use.... 9 1.9 Cooking Safety 9 1.10 Maintenance and Cleaning Safety 10
2 Environmental Instructions...... 11
2.1 Waste Directive.... 11 2.1.1 Compliance with the WEEE Directive and Disposing of the Waste Product .... 11 2.2 Package Information...... 11 2.3 Recommendations for Energy Saving.... 11
3 Your product 12
3.1 Product Introduction 12 3.2 Product Control Panel Introduction and Usage.... 12 3.2.1 Control Panel.... 13 3.2.2 Introduction of the oven control panel .... 13 3.3 Oven operating functions...... 13 3.4 Product Accessories.... 14 3.5 Use of Product Accessories ..... 15 3.6 Technical Specifications...... 17
4 First Use.... 18
4.1 First Timer Setting.... 18 4.2 Initial Cleaning.... 18
5 Using the Oven.... 19
5.1 General Information on Using the Oven .... 19 5.2 Operation of the Oven Control Unit .... 19 5.3 Settings 21
6 General Information About Baking.... 23
6.1 General Warnings About Baking in the Oven .... 23
6.1.1 Pastries and oven food.... 23 6.1.2 Meat, Fish and Poultry 25 6.1.3 Grill 26 6.1.4 Test foods.... 27
7 Maintenance and Cleaning...... 28
7.1 General Cleaning Information..... 28 7.2 Cleaning Accessories.... 29 7.3 Cleaning the Control Panel...... 29 7.4 Cleaning the inside of the oven (cooking area).... 29 7.5 Easy Steam Cleaning.... 30 7.6 Cleaning the Oven Door...... 31 7.7 Removing the Inner Glass of The Oven Door.... 31 7.8 Cleaning the Oven Lamp 32
8 Troubleshooting 33

1 Safety Instructions
EN
• This section includes the safety instructions necessary to prevent the risk of personal injury or material damage. - If the product is handed over to someone else for personal use or second-hand use purposes, the user's manual, product labels and other relevant documents and parts should also be given. - Our company shall not be held responsible for damages that may occur if these instructions are not observed. - Failure to follow these instructions shall void any warranty. • Always have the installation and repair works made by the manufacturer, the authorised service or a person that the importer company shall designate. - Use original spare parts and accessories only. - Do not repair or replace any component of the product unless it is clearly specified in the user's manual. - Do not make technical modifications on the product.

1.1 Intended Use
• This product is designed to be used at home. It is not suitable for commercial use. - Do not use the product in gardens, balconies or other outdoors. This product is intended to be used in households and in the staff kitchens of shops, offices and other working environments. - CAUTION: This product should be used for cooking purposes only. It should not be used for different purposes, such as heating the room. • The oven can be used to defrost, bake, fry and grill food. • This product should not be used for plate heating, drying by hanging towels or clothes on the handle.

1.2 Child, Vulnerable Person and Pet Safety
- This product can be used by children 8 years of age and older, and people who are underdeveloped in physical, sensory or mental skills, or who have lack of experience and knowledge, as long as they are supervised or trained about the safe use and hazards of the product.
• Children should not play with the product. Cleaning and user maintenance should not be performed by children unless supervised. - This product should not be used by people with limited physical, sensory, or mental capacity (including children), unless they are supervised or receive the necessary instructions. • Children should be supervised to ensure that they do not play with the product. - Electrical products are dangerous for children and pets. Children and pets must not play with, climb on, or enter the product. - Do not place objects that children may reach on the product. - CAUTION: During use, the accessible surfaces of the product are hot. Keep children away from the product. - Keep the packaging materials out of the reach of children. There is a hazard of injury and suffocation. - When the door is open, do not put any heavy objects on it or allow children to sit on it. You may cause the oven to tip over or damage the door hinges.
- Before discarding worn out and useless products:
- Unplug the power plug and remove it from the socket.
- Cut off the power cable and disconnect it with the plug from the product.
- Take precautions to prevent children from entering the product.
- Do not allow children to play with the product when it is in idle mode.
1.3 Electrical Safety
- Plug the product into a grounded outlet protected by a fuse that matches the current ratings indicated on the type label. Have the grounding installation made by a qualified electrician. Do not use the product without grounding in accordance with local/national regulations.
- The plug or the electrical connection of the appliance shall be in an easily accessible place. If this is not possible, there should be a mechanism (fuse, switch, key switch, etc.) on the electrical installation to which the product is connected, in compliance with the electrical regulations and separating all poles from the network.
- Unplug the product or switch off the fuse before repair, maintenance, and cleaning.
- Plug the product into an outlet that meets the voltage and frequency values specified on the type label.
- (If your product does not have a mains cable) only use the connecting cable described in the "Technical specifications" section.
- Do not jam the power cable under and behind the product. Do not put a heavy object on the power cable. The power cable should not be bent, crushed, and come into contact with any heat source.
- Make sure that the power cable is not jammed while putting the product to its place after assembly or cleaning.
- The rear surface of the oven gets hot when it is in use. The power cables must not touch the rear surface of the product. Otherwise it might get damaged.
- Do not jam the electric cables into the oven door and do not pass them over hot surfaces. Otherwise, cable insulation may melt and cause fire as a result of short circuit.
- Use original cable only. Do not use cut or damaged cables.
- Do not use an extension cord or multi-plug to operate your product.
- Contact the authorized service centre or importer to use the approved adapter in cases where the use of a converter adapter (for plug type) is necessary.
- Contact the importer or the authorized service centre if the length of the power line is inadequate.
- Portable power sources or multiple plugs may overheat and catch fire. Keep multiple plugs and portable power sources away from the product.
- If the power cable is damaged, it must be replaced by the manufacturer, an authorized service or a person to be specified by the importer company in order to prevent possible dangers.
- CAUTION: Before replacing the oven lamp, be sure to disconnect the product from the mains supply to avoid the risk of electric shock. Unplug the product or turn off the fuse from the fuse box.
If your product has a power cable and plug:
- Never insert the product plug into a broken, loose, or damaged socket. Make sure the plug is fully inserted into the socket. Otherwise, the connections may overheat and cause a fire.
- Avoid inserting the device into plugs that are greasy, unclean, or potentially exposed to water (such as those near a worktop where water may escape). Otherwise, there is a risk of short circuit and electrocution.
- Never touch the plug with wet hands!
- Pull the plug out of the socket using the plug's body rather than the cord itself.

1.4 Transportation Safety
- Disconnect the product from the mains before transporting the product.
- The product is heavy; carry the product with at least two people.
- Do not use the door and/or handle to transport or move the product.
- Do not place items on the appliance. Carry the appliance vertically.
- When you need to transport the product, wrap it with bubble wrap packaging material
or thick cardboard and tape it tightly. Secure the moving parts of the product firmly to prevent damage.
Before the product is installed, check the product for any damage after transport. Contact the importer or the authorized service center if damaged.

1.5 Installation Safety
- Before beginning the installation, de-energize the power line to which the product will be connected by turning off the fuse. Always wear protective gloves during transport and installation. Otherwise, there is a risk of injury from sharp edges!
- Before the product is installed, check the product for any damage. Do not have it installed if the product is damaged.
- Avoid using any heat-insulating materials to cover the interior of the furniture that will be installed.
- Direct sunlight and heat sources, such as electric or gas heaters, must not be present in the area where the product is installed.
- Keep the surroundings of all ventilation ducts of the product open.
- To avoid overheating, product installation should not be carried out behind decorative covers.
- In cases where a gas hose/pipe or plastic water pipe is situated behind the designated installation area for the product, it is imperative to guarantee that there is no contact between the product and these utility lines. Otherwise the hose/pipe may be crushed.
- If there is a socket behind the place where the product will be installed, it must be ensured that the product does not come into contact with the socket nor with the plug plugged into the socket.

1.6 Safety of Use
- Ensure that the appliance is switched off after every use.
- If you will not use the product for a long time, unplug it or turn off the power from the fuse box.
- Don't use the product if it breaks down or gets damaged while being used. Disconnect the product from the electricity. Contact the importer or the authorized service centre.
- Do not use the product if the front door glass is removed or cracked. Otherwise there is a risk of injury and environmental damage.
- Do not step on the appliance for any reason.
- Never use the product when your judgement or coordination is impaired by the use of alcohol and/or drugs.
- Flammable objects must not be kept in or around the cooking area. Otherwise, they may cause a fire.
- The oven handle is not a towel dryer. When using the product, do not hang towels, gloves, or similar textiles on the handle.
- The hinges of the product door move when opening and closing the door and might jam. When opening or closing the door, do not hold the part with the hinges.

1.7 Temperature Warnings
- CAUTION: When the product is in use, the product and its accessible parts will be hot. Care should be taken to avoid touching the product and heating elements. Children under 8 years of age should be kept away from the product unless constantly supervised.
- Do not place flammable or explosive materials near the product, as the surfaces will be hot while it is operating.
- Keep your distance when opening the oven door during or at the end of cooking. The steam may burn your hand, face, and/or eyes.
- During operation, the product is hot. Care should be taken to avoid touching hot parts, the inside of the oven, and heating elements. Always wear heat-resistant oven gloves when handling the product.

1.8 Accessory Use
- It is important that the wire grill and tray are placed properly on the wire shelves. For detailed information, refer to the section "Usage of accessories".
- Close the oven door after pushing the accessories completely into the cooking space; otherwise, they may hit the door glass and damage it.

1.9 Cooking Safety
- Be careful when using alcoholic drinks in your dishes. Alcohol evaporates at high temperatures and may cause fire
since it can ignite when it comes into contact with hot surfaces.
- Food residues in the cooking area, such as oil, can ignite. Clean these residues before cooking.
- Food Poisoning Hazard: Do not let food sit in the oven for more than 1 hour before or after cooking. Otherwise, it may cause food poisoning or diseases.
- Do not heat closed tins and glass jars in the oven. The pressure that would build up in the tin/jar may cause it to burst.
- Do not place baking trays, dishes, or aluminum foil directly onto the bottom of the oven. The accumulated heat might damage the bottom of the oven.
Be mindful of the following precautions when using greasy parchment paper or similar materials:
- Place the greaseproof paper in a cookware or on the oven accessory (tray, wire grill, etc.) with food and place it in the preheated oven. To prevent the risk of touching the oven heating elements and obstructing the flow of hot air, remove any excess parts of
greaseproof paper that hang from accessories or containers. Do not use greaseproof paper at oven temperatures higher than the maximum usage temperature specified by the manufacturer. Never place greaseproof paper on the oven base.
- Do not place it on top of accessories during preheating. Always press down with a plate or similar object to prevent the material from flying around due to the air circulation inside the oven.
- Only cover the necessary surface inside the tray. After each use, the tray should be cleaned, and any greaseproof paper or similar materials used in the tray should be replaced. Otherwise, liquids dripping onto the tray can cause smoking or even ignite flames.
- An air flow is generated when the product lid is opened. Greaseproof paper can come into contact with heating elements and ignite.
- When using a grilling rack for frying, a tray should be placed on the lower rack. Otherwise,
the food oil and other components that drip onto the oven bottom can create heavy smoke and lead to flames.
- Close the oven door during grilling. Hot surfaces may cause burns!
- Food not suitable for grilling carries a fire hazard. Grill only food that is suitable for heavy grill fire. Do not place the food too far in the back of the grill. This is the hottest area and fatty foods may catch fire.

1.10 Maintenance and Cleaning Safety
- Wait for the product to cool before cleaning the product. Hot surfaces may cause burns!
- Never wash the product by spraying or pouring water on it! There is the risk of electric shock!
- Do not use steam cleaners to clean the product as this may cause an electric shock.
- Do not use harsh abrasive cleaners, metal scrapers, wire wool, or bleach materials to clean the oven front door glass. These materials can cause glass surfaces to be scratched and broken.
2.1 Waste Directive
2.1.1 Compliance with the WEEE Directive and Disposing of the Waste Product
This product complies with EU WEEE Directive (2012/19/EU). This product bears a classification symbol for waste electrical and electronic equipment (WEEE).
This product has been manufactured with high quality parts and materials which can be reused and are suitable for recycling. Therefore, do not dispose of the waste product with normal domestic and other wastes at the end of its service life. Take it to a collection point for the recycling of electrical and electronic equipment. You can ask your local administration about these collection points. Disposing of the appliance properly helps prevent negative consequences for the environment and human health.
Compliance with RoHS Directive:
The product you have purchased complies with EU RoHS Directive (2011/65/EU). It does not contain harmful and prohibited materials specified in the Directive.
2.2 Package Information
Packaging materials of the product are manufactured from recyclable materials in accordance with our National Environment Regulations. Do not dispose of the packaging waste with the household or other wastes, take it to the packaging material collection points designated by the local authorities.
2.3 Recommendations for Energy Saving
According to EU 66/2014, information on energy efficiency can be found on the product receipt supplied with the product. The following suggestions will help you use your product in an ecological and energy-efficient way:
- Defrost frozen food before baking.
- In the oven, use dark or enamelled containers that transmit heat better.
- If specified in the recipe or user's manual, always preheat. Do not open the oven door frequently during baking.
- Turn off the product 5 to 10 minutes before the end time of baking in prolonged bakings. You can save up to 20% electricity by using residual heat.
- Try to cook more than one dish at a time in the oven. You may cook at the same time by placing two cookers on the wire rack. In addition, if you cook your meals one after the other, it will save energy because the oven will not lose its heat.
3.1 Product Introduction
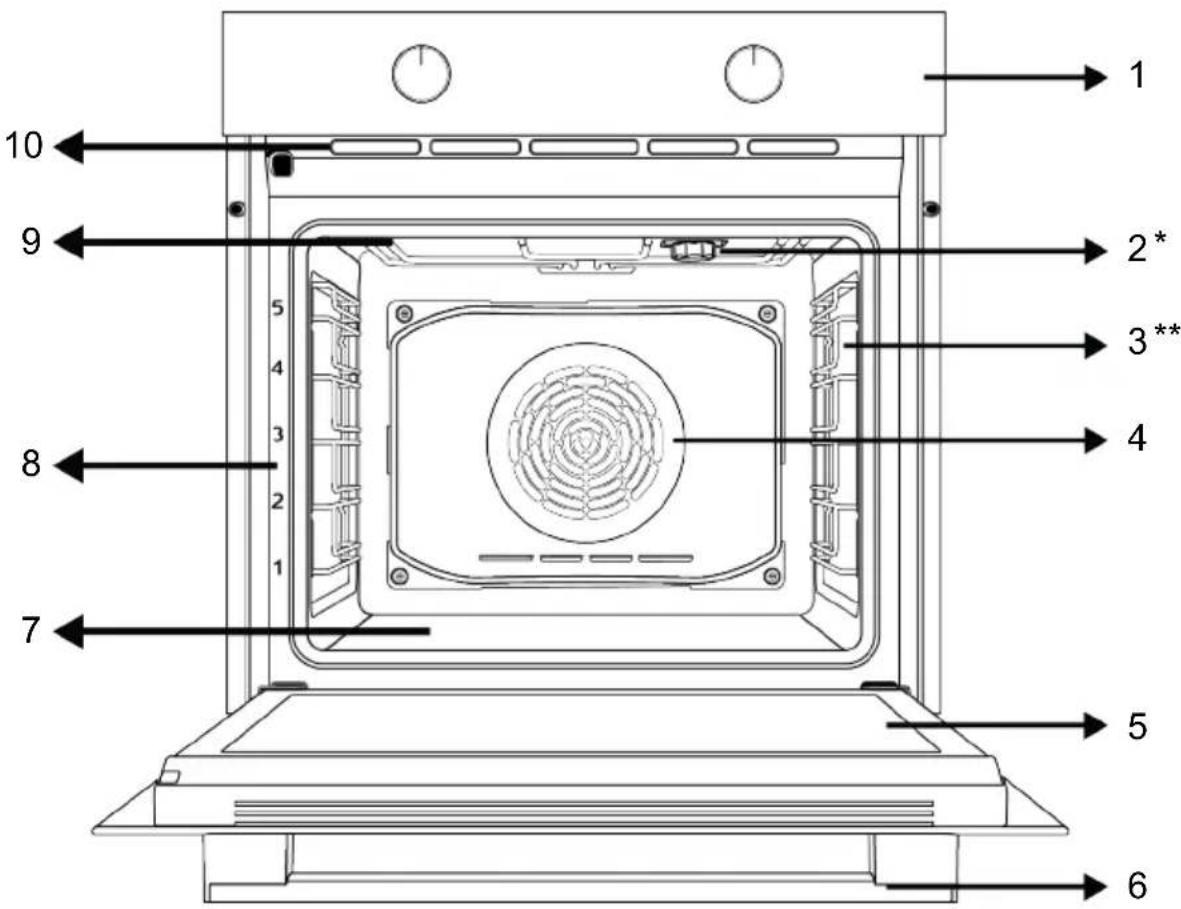
1 Control panel 2 Lamp 3 Wire shelves 4 Fan motor (behind the steel plate) 5 Door 6 Handle 7 Lower heater (under the steel plate) 8 Shelf positions 9 Upper heater 10 Ventilation holes
* Varies depending on the model. Your product may not be equipped with a lamp, or the type and location of the lamp may differ from the illustration.
** Varies depending on the model. Your product may not be equipped with a wire rack. In the image, a product with wire rack is shown as an example.
3.2 Product Control Panel Introduction and Usage
In this section, you can find the overview and basic uses of the product's control panel. There may be differences in images and some features depending on the type of product.
3.2.1 Control Panel
EN
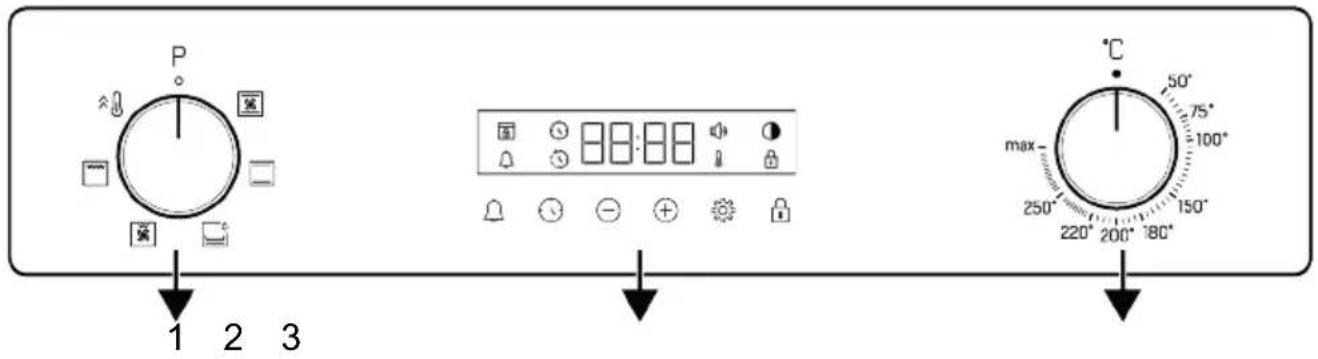
1 Function selection knob 2 Timer 3 Temperature knob
If there are knob(s) controlling your product, in some models this/these knob(s) may be so that they come out when pushed (buried knobs). For settings to be made with these knobs, first push the relevant knob in and pull out the knob. After making your adjustment, push it in again and replace the knob.
3.2.2 Introduction of the oven control panel
Function selection knob
You can select the oven operating functions with the function selection knob. Turn left or right from the closed (top) position to select.
Temperature knob
You can select the temperature you want to cook with the temperature knob. Turn clockwise from the closed (top) position to select.
Oven inner temperature indicator
You can understand the oven interior temperature from the temperature symbol on the timer display. The temperature symbol appears on the display when the cooking starts, and the temperature symbol disappears when the appliance reaches the set temperature. When the temperature inside the oven drops below the set temperature, the temperature symbol reappears.
Timer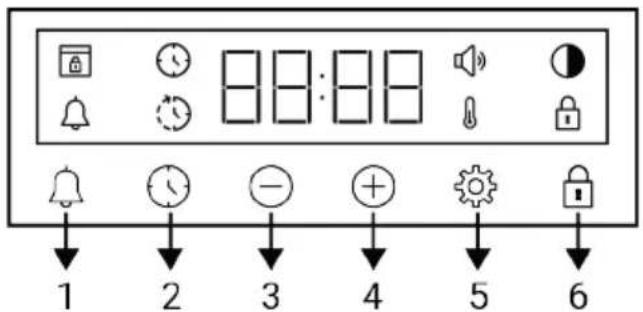
1 Alarm key 2 Time setting key 3 Decrease key 4 Increase key 5 Settings key 6 Key lock key
Display symbols
: Baking time symbol : Baking end time symbol *
: Alarm symbol
① : Brightness symbol
: Key lock symbol
: Temperature symbol
: Volume level symbol
: Door lock symbol *
*It varies depending on the product model. It may not be available on your product.
3.3 Oven operating functions
On the function table, the operating functions you can use in your oven and the highest and lowest temperatures that can be set for these functions are shown. The
order of the operating modes shown here may differ from the arrangement on your product.
| Function symbol | Function description | Temperature range (°C) | Description and use |
 | Top and bottom heating | * | Food is heated from above and below at the same time. Suitable for cakes, pastries or cakes and stews in baking moulds. Cooking is done with a single tray. |
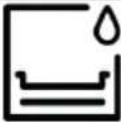 | Bottom heating * | Only lower heating is on. It is suitable for foods that need browning on the bottom. This function should also be used for easy steam cleaning. | |
— | |||
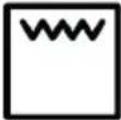
 | Fan assisted bottom/top heating | * | The hot air heated by the upper and lower heaters is distributed equally and rapidly throughout the oven with the fan. Cooking is done with a single tray. |
 | Full grill * | The large grill on the oven ceiling works. It is suitable for grilling in large amounts. | |
 | Fan assisted low grill * | The hot air heated by the small grill is quickly distributed into the oven with the fan. It is suitable for grilling smaller amounts. | |
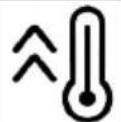 | Booster - | All the heaters of the oven work. This operating function is used to quickly bring the oven to the desired temperature (pre-heating). Do not use it for cooking food. |
* Your product operates in the temperature range specified on the temperature knob.
3.4 Product Accessories
There are various accessories in your product. In this section, the description of the accessories and the descriptions of the correct usage are available. Depending on the product model, the supplied accessory varies. All accessories described in the user's manual may not be available in your product.
The trays inside your appliance may be deformed with the effect of the heat. This has no effect on the functionality. Deformation disappears when the tray is cooled.
Standard tray
It is used for pastries, frozen foods and frying large pieces.

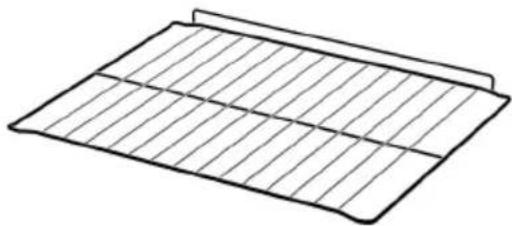
Wire grill
It is used for frying or placing the food to be baked, fried and stewed on the desired shelf.
On models with wire shelves :

On models without wire shelves :
3.5 Use of Product Accessories
Cooking shelves
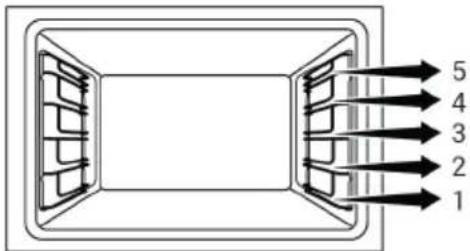
There are 5 levels of shelf position in the cooking area. You can also see the order of the shelves in the numbers on the front frame of the oven.
On models with wire shelves:
On models without wire shelves:

Placing the wire grill on the cooking shelves
On models with wire shelves:
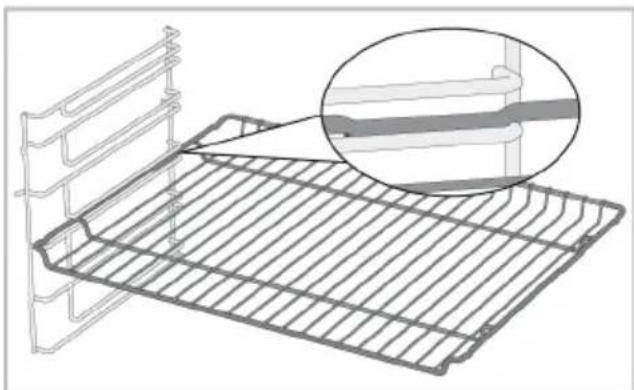
It is crucial to place the wire grill on the wire side shelves properly. While placing the wire grill on the desired shelf, the open section must be on the front. For better cooking, the wire grill must be secured on the wire shelf's stopping point. It must not pass over the stopping point to contact with the rear wall of the oven.
On models without wire shelves:
It is crucial to place the wire grill on the side shelves properly. The wire grill has one direction when placing it on the shelf. While placing the wire grill on the desired shelf, the open section must be on the front.

Placing the tray on the cooking shelves
On models with wire shelves:
It is also crucial to place the trays on the wire side shelves properly. While placing the tray on the desired shelf, its side designed for holding must be on the front. For better cooking, the tray must be secured on the stopping socket on the wire shelf. It must not pass over the stopping socket to contact with the rear wall of the oven.
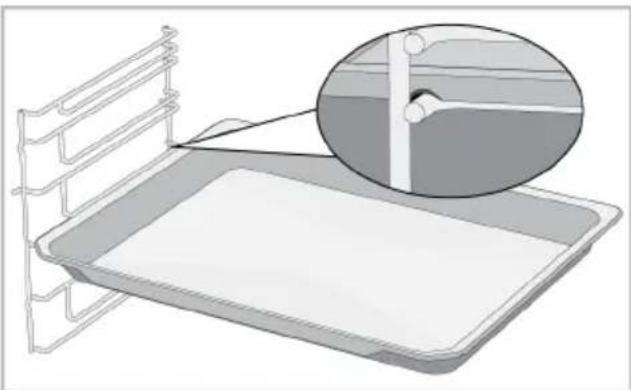
On models without wire shelves:
It is also crucial to place the trays on the side shelves properly. The tray has one direction when placing it on the shelf. While placing the tray on the desired shelf, its side designed for holding must be on the front.

Stopping function of the wire grill
There is a stopping function to prevent the wire grill from tipping out of the wire shelf. With this function, you can easily and safely take out your food. While removing the wire grill, you can pull it forward until it reaches the stopping point. You must pass over this point to remove it completely.
On models with wire shelves:
On models without wire shelves:
Tray stopping function - On models with wire shelves
There is also a stopping function to prevent the tray from tipping out of the wire shelf. While removing the tray, release it from the rear stopping socket and pull it towards yourself until it reaches the front side. You must pass over this stopping socket to remove it completely.
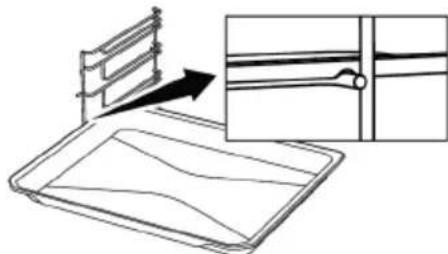
Proper placement of the wire grill and tray on the telescopic rails - On models with wire shelves and telescopic models
Thanks to telescopic rails, trays or the wire grill can be easily installed and removed. When using trays and wire grills with the telescopic rail, care should be taken that the pins on the front and back of the telescopic rails rest against the edges of the grill and the tray (shown in the figure).

3.6 Technical Specifications
EN
| General specifications | |
| Product external dimensions (height/width/depth) (mm) | 595 /594 /567 |
| Oven installation dimensions (height / width / depth) (mm) | 590 - 600 /560 /min. 550 |
| Voltage/Frequency 220-240 V ~; 50 Hz | |
| Cable type and section used/suitable for use in the product | min. H05VV-FG 3 x 1,5 mm2 |
| Total power consumption (kW) 2,4 | |
| Oven type Fan assisted oven | |
Basics: Information on the energy label of home type electrical ovens is given in accordance with the EN 60350-1 / IEC 60350-1 standard. The values are determined in Top and bottom heating or (if present) Fan assisted bottom/top heating functions with the standard load.
Energy efficiency class is determined in accordance with the following prioritization depending on whether the relevant functions exist on the product or not. 1-Eco fan heating, 2-Fan Heating, 3-Fan assisted low grill, 4-Top and bottom heating.
Technical specifications may be changed without prior notice to improve the quality of the product.

Figures in this manual are schematic and may not exactly match your product.

Values stated on the product labels or in the documentation accompanying it are obtained in laboratory conditions in accordance with relevant standards. Depending on operational and environmental conditions of the product, these values may vary.
4 First Use
Before you start using your product, it is recommended to do the following, as stated in the respective sections below.
4.1 First Time Setting
Always set the time of day before using your oven. If you do not set it, you cannot cook in some oven models.
- When the oven is first started, "12:00" and the symbol will flash on the display.
- Set the time of day by touching the Ⓕ keys.
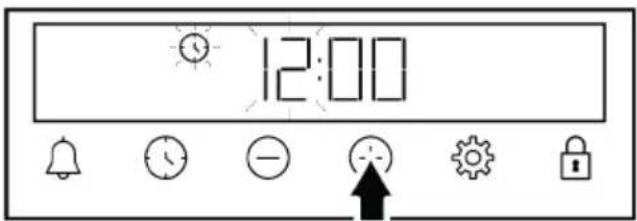
- Touch the or key to activate the minutes field.
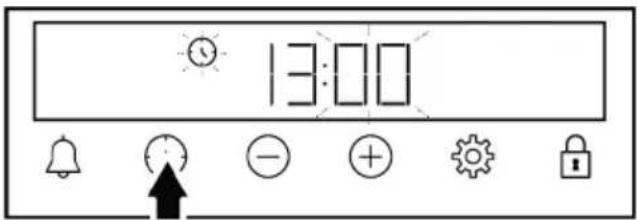
- Touch the + keys to set the minute.
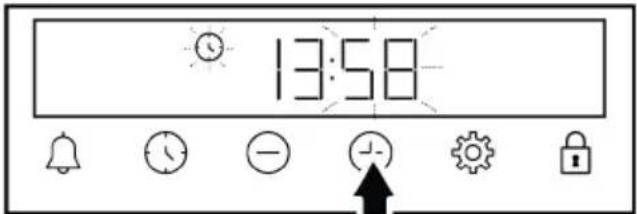
- Confirm by touching the or key.
⇒ The time of day is set and the symbol disappears from the display.
If the first time is not set, "12:00" and the ⓣ symbol will continue to flash and your oven will not start. For your oven to function, you must confirm the time of day by setting it or by touching the ⏻ key when it is at "12:00". You can change the time of day setting later as described in the "Settings" section.

In the event of a power outage, the time of day settings are cancelled. They should be set again.
4.2 Initial Cleaning
- Remove all packaging materials.
- Remove all accessories from the oven provided with the product.
- Operate the product for 30 minutes and then turn it off. This way, residues and layers that may have remained in the oven during production are burned and cleaned.
- When operating the product, select the highest temperature and the operating function that all the heaters in your product operate. See "Oven operating functions [▶ 13]". You can learn how to operate the oven in the following section.
- Wait for the oven to cool.
- Wipe the surfaces of the product with a wet cloth or sponge and dry with a cloth.
Before using the accessories:
Clean the accessories you remove from the oven with detergent water and a soft cleaning sponge.
NOTICE: Some detergents or cleaning agents may cause damage to the surface. Do not use abrasive detergents, cleaning powders, cleaning creams or sharp objects during cleaning.
NOTICE: During the first use, smoke and odour may come up for several hours. This is normal and you just need good ventilation to remove it. Avoid directly inhaling the smoke and odours that form.
5 Using the Oven
5.1 General Information on Using the Oven
Cooling fan ( It varies depending on the product model. It may not be available on your product.)
Your product has a cooling fan. The cooling fan is activated automatically when necessary and cools both the front of the product and the furniture. It is automatically deactivated when the cooling process is finished. Hot air comes out over the oven door. Do not cover these ventilation openings with anything. Otherwise, the oven may overheat. The cooling fan continues to operate during oven operation or after the oven is turned off (approximately 20-30 minutes). If you cook by programming the oven timer, at the end of the baking time, the cooling fan turns off with all functions. The cooling fan running time cannot be determined by the user. It turns on and off automatically. This is not an error.
Oven lighting
The oven lighting is turned on when the oven starts baking. In some models, the lighting is on during baking, while in some models it turns off after a certain time.
5.2 Operation of the Oven Control Unit
General warnings for the oven control unit
- The maximum time that can be set for the baking process is 5 hours 59 minutes. In case of a power failure, the program is canceled. You will need to re-program.
- While making any adjustments, the relevant symbols flash on the display. A short time should be waited for the settings to be saved.
- If any cooking setting has been made, the time of day cannot be adjusted.
- If cooking time is set when cooking starts, the remaining time is displayed on the display.
- In cases where cooking time or cooking end time is set; you can cancel automatically by touching the ⓚkey for a long time.
Timer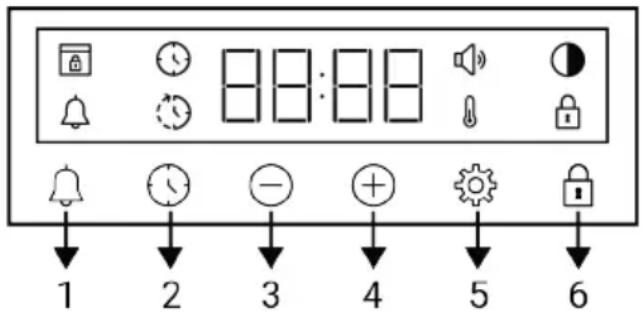
1 Alarm key 2 Time setting key 3 Decrease key 4 Increase key 5 Settings key 6 Key lock key
Display symbols
: Baking time symbol : Baking end time symbol * : Alarm symbol
① : Brightness symbol
: Key lock symbol
: Temperature symbol
: Volume level symbol
: Door lock symbol *
*It varies depending on the product model. It may not be available on your product.
Turning on the oven
When you select an operating function you want to cook with the function selection knob and set a certain temperature with the temperature knob, the oven starts operating.
Turning off the oven
You can turn the oven off by turning the function selection knob and temperature knob to the off (up) position.
Manual cooking to select temperature and oven operating function
You can cook by making a manual control (at your own control) without setting the cooking time by selecting the temperature and operating function specific to your food.
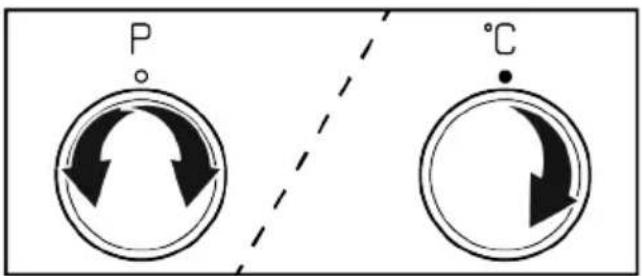
- Select the operating function you want to cook with the function selection knob.
- Set the temperature you want to cook with the temperature knob.
Your oven will start operating immediately at the selected function and temperature, and the symbol will appear on the display. When the temperature inside the oven reaches the set temperature, the symbol disappears. The oven does not switch off automatically since manual cooking is done without setting the cooking time. You have to control cooking and turn it off yourself. When your cooking is completed, turn off the oven by turning the function selection knob and the temperature knob to the off (up) position.
Cooking by setting the cooking time:
You can have the oven turn off automatically at the end of the time by selecting the temperature and operating function specific to your food and setting the cooking time on the timer.
- Select the operating function for cooking.
- Touch the key until the symbol appears on the display for the cooking time.
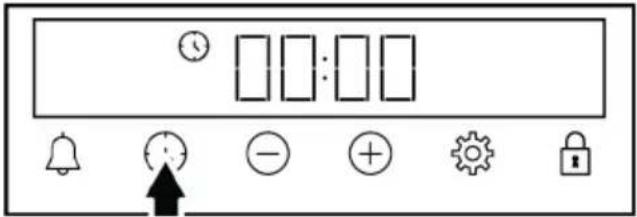

After setting the operation function and temperature, you can set the cooking time for 30 minutes by touching the + key directly for quick setting of the cooking time and change the time with the ⨁ - keys.
- Set the cooking time with the ⊕ keys.
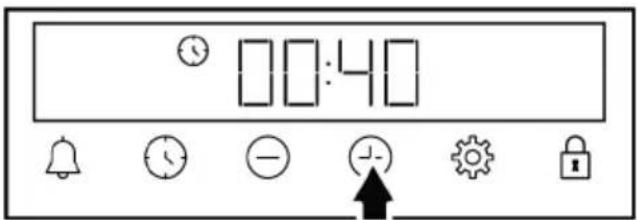
The cooking time increases by 1 minute in the first 15 minutes, after 15 minutes it increases by 5 minutes.
- Put your food in the oven and set the temperature with the temperature knob.
Your oven will start operating immediately at the selected function and temperature. The set cooking time starts to count down and the symbol appears on the display. When the temperature inside the oven reaches the set temperature, the symbol disappears.
- After the set cooking time is completed, on the display, "End" appears, the ⏻ symbol flashes and the timer beeps.
- The warning sounds for two minutes. Press any key to stop the warning. The warning stops and the time of day appears on the display.

If any key is pushed at the end of the audible warning, the oven will start operating again. To prevent the oven from operating again at the end of the warning, turn off the oven by turning the temperature knob and function knob to the "0" (off) position.
5.3 Settings
Activating the key lock
By using the key lock feature, you can safeguard the timer from interference.
- Touch the key until the symbol appears on the display.

The symbol is shown on the display and the 3-2-1 countdown starts. The key lock activates when the countdown ends. When any key is touched after the key lock is set, the timer sounds an audible signal and the symbol flashes.

If you release the key before the end of the countdown, the key lock does not activate.
Timer keys cannot be used when the key lock is on. The key lock will not be cancelled in case of power failure.
Deactivating the key lock
- Touch the key until the symbol disappears from the display.
The symbol disappears from the display and the key lock is disabled.
Setting the alarm
You can also use the timer of the product for any warning or reminder other than baking. The alarm clock has no effect on the oven operating functions. It is used for warning purposes. For example, you can use the alarm clock when you want to turn the food in the oven at a certain time. As soon as the time you set has expired, the timer gives you an audible warning.

The maximum alarm time may be 23 hours 59 minutes.
- Touch the key until the symbol appears on the display.
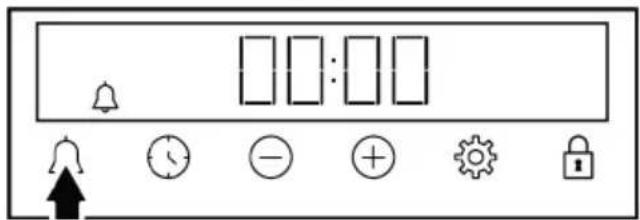
- Set the alarm time with the /+ keys.
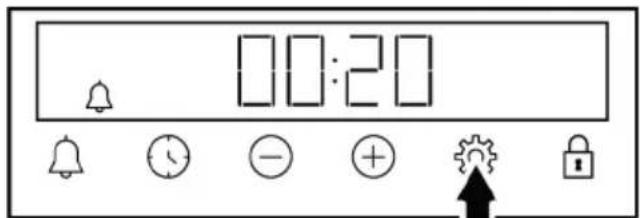
After setting the alarm time, the symbol remains lit and the alarm time starts to countdown on the display. If the alarm time and baking time are set at the same time, the shorter time is shown on the display.
- After the alarm time is completed, the symbol starts flashing and gives you an audible warning.
Turning off the alarm
- At the end of the alarm period, the warning sounds for two minutes. Touch any key to stop the audible warning.
⇒ The warning stops and the time of day appears on the display.
If you want to cancel the alarm:
- Touch the key until the symbol appears on the display to reset the alarm time. Touch the key until the "00:00" symbol appears on the display.
- You can also cancel the alarm by touching the 🔊 key for a long time.
Adjusting the volume
- Touch key until the symbol appears on the display.

- Set the desired level with the keys. (b-01-b-02-b-03)
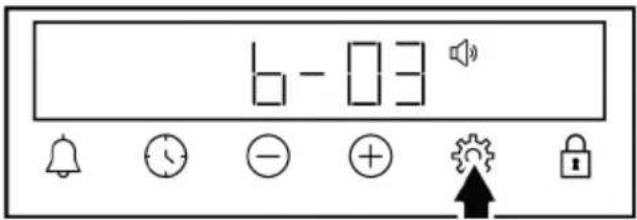
- Touch the key for confirmation or wait without touching any key. The volume set becomes active after a while.
Setting the display brightness
- Touch key until the symbol appears on the display.
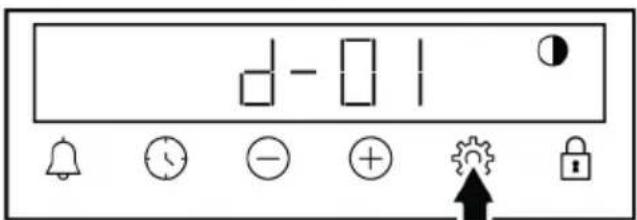
- Set the desired brightness with the ④ keys. (d-01-d-02-d-03)
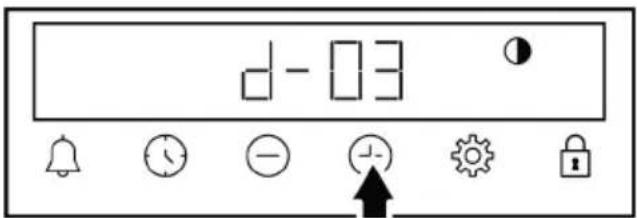
- Touch the key for confirmation or wait without touching any key. The brightness set becomes active after a while.
Changing the time of day
On your oven to change the time of day that you have previously set:
- Touch the key until the symbol appears on the display.
- Set the time of day by touching the Ⓗ keys.
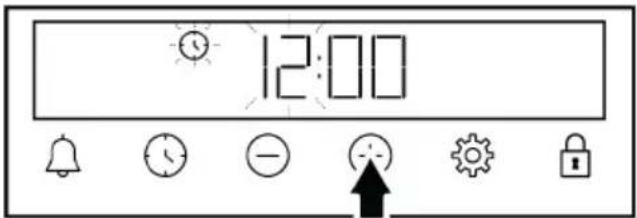
- Touch the key to activate the minutes field.
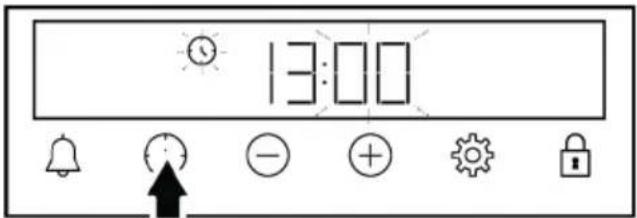
- Touch the + keys to set the minute.
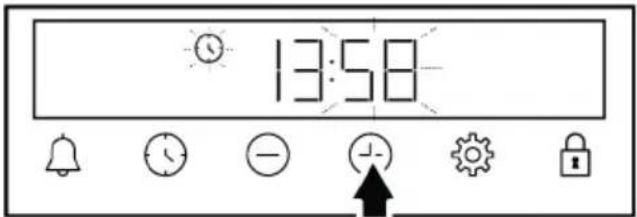
- Confirm by touching the key.
⇒ The time of day is set and the symbol disappears on the display.
6 General Information About Baking
You can find tips on preparing and cooking your food in this section.
Plus, this section describes some of the foods tested as producers and the most appropriate settings for these foods. Appropriate oven settings and accessories for these foods are also indicated.
6.1 General Warnings About Baking in the Oven
- While opening the oven door during or after baking, hot-burning steam may emerge. The steam may burn your hand, face and/or eyes. When opening the oven door, stay away.
- Intense steam generated during baking may form condensed water drops on the interior and exterior of the oven and on the upper parts of the furniture due to the temperature difference. This is a normal and physical occurrence.
- The cooking temperature and time values given for foods may vary depending on the recipe and amount. For this reason, these values are given as ranges. • Always remove unused accessories from the oven before you start cooking. Accessories that will remain in the oven may prevent your food from being cooked at the correct values.
- For foods that you will cook according to your own recipe, you can reference similar foods given in the cooking tables.
- Using the supplied accessories ensures you get the best cooking performance. Always observe the warnings and information provided by the manufacturer for the external cookware you will use.
- Cut the greaseproof paper you will use in your cooking to suitable sizes for the container you will cook in. Greaseproof papers that overflow from the container can create a risk of burns and affect the quality of your baking. Use the greaseproof paper within the specified temperature range.
- For good baking performance, place your food on the recommended correct shelf. Do not change the shelf position during baking.
6.1.1 Pastries and oven food
General Information
- We recommend using the accessories of the product for good cooking performance. If you will use external cookware, prefer dark, non-sticking, and heat-resistant ware.
- If preheating is recommended in the cooking table, be sure to put your food in the oven after preheating.
- If you will cook using cookware on the wire grill, place it in the middle of the wire grill, not near the back wall.
- All materials used in making pastry should be fresh and at room temperature.
- The cooking status of the foods may vary depending on the amount of food and the size of the cookware.
- Metal, ceramic, and glass moulds extend the cooking time and the bottom surfaces of pastry foods do not brown evenly.
- If you are using baking paper, a small browning can be observed on the bottom surface of the food. In this situation, you may have to extend your cooking period by approximately 10 minutes.
- The values specified in the cooking tables are determined as a result of the tests carried out in our laboratories. Values suitable for you may differ from these values.
- Place your food on the appropriate shelf recommended in the cooking table. Refer to the bottom shelf of the oven as shelf 1.
- Cook the recommended dishes in the cooking table with a single tray.
Tips for baking cakes
- If the cake is too dry, increase the temperature by 10°C and shorten the baking time.
- If the cake is moist, use a small amount of liquid or reduce the temperature by 10°C.
- If the top of the cake is burnt, put it on the lower shelf, lower the temperature and increase the baking time.
- If the inside of the cake is cooked well, but outside is sticky, use less liquid, decrease the temperature and increase the cooking time.
Hints for pastry
- If the pastry is too dry, increase the temperature by 10°C and shorten the cooking time. Wet the dough sheets with a sauce consisting of milk, oil, egg and yoghurt mixture.
- If the pastry is getting cooked slowly, make sure that the thickness of the pastry you have prepared does not overflow the tray.
- If the pastry is browned on the surface but the bottom is not cooked, make sure that the amount of sauce you will use for the pastry is not too much at the bottom of the pastry. For an even browning, try to spread the sauce evenly between the dough sheets and the pastry.
- Bake your pastry in the position and temperature appropriate to the cooking table. If the bottom is still not browned enough, place it on a bottom shelf for the next cooking.
Cooking table for pastries and oven foods
| Food Accessory to be used | Operating function | Shelf position Temperature (°C) Baking time (min) (approx.) |
| Cake on the tray Standard tray * | Top and bottom heating | 3 180 30 ... 40 |
| Cake in the mould Cake mould on wire grill** ** | Top and bottom heating | 2 180 30 ... 40 |
| Small cakes Standard tray * | Top and bottom heating | 3 160 25 ... 35 |
| Small cakes Standard tray * | Fan assisted bottom/top heating | 3 150 20 ... 30 |
| Sponge cake Round springform pan, 26 cm in diameter on wire grill ** | Top and bottom heating | 2 160 30 ... 40 |
| Sponge cake Round springform pan, 26 cm in diameter on wire grill ** | Fan assisted bottom/top heating | 2 160 20 ... 30 |
| Cookie Pastry tray * | Top and bottom heating | 3 170 25 ... 35 |
| Pastry Standard tray * | Fan assisted bottom/top heating | 2 200 35 ... 45 |
| Bun Standard tray * | Top and bottom heating | 2 200 20 ... 30 |
| Whole bread Standard tray * | Top and bottom heating | 3 200 30 ... 40 |
| Lasagne | Glass / metal rectangular container on wire grill ** | Top and bottom heating2 or 3 200 30 ... 40 |
| Apple pie | Round black metal mould, 20 cm in diameter on wire grill ** | Top and bottom heating2 180 50 ... 70 |
| Pizza Standard tray * | Top and bottom heating | 2 200 ... 220 10 ... 20 |
Preheating is recommended for all food.
*These accessories may not be included with your product.
**These accessories are not included with your product. They are commercially available accessories.
6.1.2 Meat, Fish and Poultry
The key points on grilling
- Seasoning it with lemon juice and pepper before cooking whole chicken, turkey and large pieces of meat will increase cooking performance.
- It takes 15 to 30 minutes more to cook boned meat than fillet by frying.
- You should calculate about 4 to 5 minutes of cooking time per centimetre of the meat thickness.
• After the cooking time is expired, keep the meat in the oven for approximately 10 minutes. The juice of the meat is better distributed to the fried meat and does not come out when the meat is cut. - Fish should be placed on the medium or low level shelf in a heat resistant plate. - Cook the recommended dishes in the cooking table with a single tray.
Cooking table for meat, fish and poultry
| Food Accessory to be used | Operating function | Shelf position Temperature (°C) Baking time (min) (approx.) | |||
| Steak (whole) / Roast (1 kg) | Standard tray * | Fan assisted bottom/top heating | 3 | 15 mins. 250/ max, after 180 ... 190 | 60 ... 80 |
| Lamb's shank (1,5-2 kg) | Standard tray * | Fan assisted bottom/top heating | 3 | 15 mins. 250/ max, after 170 | 110 ... 120 |
| Fried chicken (1,8-2 kg) | Wire grill *Place one tray on a lower shelf | Fan assisted bottom/top heating | 2 | 15 mins. 250/ max, after 190 | 60 ... 80 |
| Turkey (5.5 kg) Standard tray * | Standard tray * | Fan assisted bottom/top heating | 1 | 25 mins. 250/ max, after 180 ... 190 | 150 ... 210 |
| Fish | Wire grill *Place one tray on a lower shelf | Fan assisted bottom/top heating | 3 200 20 ... 30 | ||
Preheating is recommended for all food.
*These accessories may not be included with your product.
**These accessories are not included with your product. They are commercially available accessories.
6.1.3 Grill
Red meat, fish and poultry meat quickly turns brown when grilled, holds a beautiful crust and does not dry out. Fillet meats, skewer meats, sausages as well as juicy vegetables (tomatoes, onions, etc.) are particularly suitable for grilling.
General warnings
- Food not suitable for grilling carries a fire hazard. Grill only food that is suitable for heavy grill fire. Also, do not place the food too far in the back of the grill. This is the hottest area and fatty foods may catch fire.
- When the preheating time is 5 minutes in the grill mode, skip the preheating, do not wait for the entire preheating time to pass.
- Close the oven door during grilling. Never grill with the oven door open. Hot surfaces may cause burns!
The key points of the grill
• Prepare foods of similar thickness and weight as much as possible for the grill. - Place the pieces to be grilled on the wire grill or wire grill tray by distributing them without exceeding the dimensions of the heater. - Depending on the thickness of the pieces to be grilled, the cooking times given in the table may vary. - Slide the wire grill or the wire grill tray to the desired level in the oven. If you are cooking on the wire grill, slide the oven tray to the lower shelf to collect the oils. The oven tray you will slide should be sized to cover the entire grill area. This tray may not be supplied with the product. Put some water into the oven tray for easy cleaning.
EN
Grill table
| Food Accessory to be used | Shelf position Temperature (°C) Baking time (min)(approx.) | ||
| Fish Wire grill 4 - 5 250 | 20 ... 25 | ||
| Chicken pieces Wire grill 4 - 5 250 25 ... 35 | |||
| Meatball (veal) - 12 amount | Wire grill 4 250 20 ... 30 | ||
| Lamb chop Wire grill 4 - 5 250 20 ... 25 | |||
| Steak - (meat cubes) Wire grill 4 - 5 250 25 ... 30 | |||
| Veal chop Wire grill 4 - 5 250 25 ... 30 | |||
| Vegetable gratin Wire grill 4 - 5 220 20 ... 30 | |||
| Toast bread Wire grill 4 250 1 ... 4 | |||
| It is recommended to preheat for 5 minutes for all grilled food.Turn pieces of food after 1/2 of the total grilling time. | |||
Fan assisted low grill EN
| Food Accessory to be used | Operating function | Shelf position Temperature (°C) Baking time (min) (approx.) | ||
| Fish Wire grill | Fan assisted low grill | 4 200 30 ... 35 | ||
| Chicken pieces Wire grill | Fan assisted low grill | 4 250 25 ... 35 | ||
| Meatball (veal) - 12 amount | Wire grill | Fan assisted low grill | 4 250 30 ... 40 | |
| Steak (whole) / Roast (1 kg ) | Wire grill - Place one tray on a lower shelf | Fan assisted low grill | 3 | 15 mins. 250, after 180 ... 190 |
| Do not preheat the dishes recommended in this grill chart. | ||||
6.1.4 Test foods
- Foods in this cooking table are prepared according to the EN 60350-1 standard to facilitate testing of the product for control institutes.
- Cook the recommended dishes in the cooking table with a single tray.
Cooking table for test meals
| Food Accessory to be used | Operating function | Shelf position Temperature (°C) Baking time (min) (approx.) |
| Shortbread (sweet cookie) | Standard tray *Top and bottom heating | 3 140 20 ... 30 |
| Small cakes Standard tray * | Top and bottom heating | 3 160 25 ... 35 |
| Small cakes Standard tray * | Fan assisted bottom/top heating | 3 150 20 ... 30 |
| Sponge cake | Round springform pan, 26 cm in diameter on wire grill **Top and bottom heating | 2 160 30 ... 40 |
| Sponge cake | Round springform pan, 26 cm in diameter on wire grill **Fan assisted bottom/top heating | 2 160 20 ... 30 |
| Apple pie | Round black metal mould, 20 cm in diameter on wire grill **Top and bottom heating | 2 180 50 ... 70 |
Preheating is recommended for all food.
*These accessories may not be included with your product. **These accessories are not included with your product. They are commercially available accessories.
| Food Accessory to be used | Shelf position Temperature (°C) Baking time (min)(approx.) | ||
| Meatball (veal) - 12 amount | Wire grill 4 250 20 ... 30 | ||
| Toast bread Wire grill 4 | 250 1 ... 4 | ||
| It is recommended to preheat for 5 minutes for all grilled food.Turn pieces of food after 1/2 of the total grilling time. | |||
7 Maintenance and Cleaning
7.1 General Cleaning Information
General warnings
- Wait for the product to cool before cleaning the product. Hot surfaces may cause burns!
- Do not apply the detergents directly on the hot surfaces. This may cause permanent stains.
- The product should be thoroughly cleaned and dried after each operation. Thus, food residues shall be easily cleaned and these residues shall be prevented from burning when the product is used again later. Thus, the service life of the appliance extends and frequently faced problems are decreased.
- Do not use steam cleaning products for cleaning.
- Some detergents or cleaning agents cause damage to the surface. Unsuitable cleaning agents are: bleach, cleaning products containing ammonia, acid or chloride, steam cleaning products, de-scaling agents, stain and rust removers, abrasive cleaning products (cream cleaners, scouring powder, scouring cream, abrasive and scratching scrubber, wire, sponges, cleaning cloths containing dirt and detergent residues).
- No special cleaning material is needed in the cleaning made after each use. Clean the appliance using dishwashing detergent, warm water and a soft cloth or sponge and dry it with a dry cloth.
- Be sure to completely wipe off any remaining liquid after cleaning and immediately clean any food splashing around during cooking.
- Do not wash any component of your appliance in a dishwasher unless otherwise stated in the user's manual.
Inox - stainless surfaces
- Do not use acid or chlorine-containing cleaning agents to clean stainless-inox surfaces and handles.
- Stainless-inox surface may change colour in time. This is normal. After each operation, clean with a detergent suitable for the stainless or inox surface.
- Clean with a soft soapy cloth and liquid (non-scratching) detergent suitable for inox surfaces, taking care to wipe in one direction.
- Remove lime, oil, starch, milk and protein stains on the glass and inox surfaces immediately without waiting. Stains may rust under long periods of time.
- Cleaners sprayed/applied to the surface should be cleaned immediately. Abrasive cleaners left on the surface cause the surface to turn white.
Enamelled surfaces
• After each use, clean the enamel surfaces using dishwashing detergent, warm water and a soft cloth or sponge and dry them with a dry cloth. - If your product has an easy steam cleaning function, you can make easy steam cleaning for light non-permanent dirt. (See "Easy Steam Cleaning [▶ 30]".) - For difficult stains, an oven and grill cleaner recommended on the website of your product brand and a non-scratching scouring pad can be used. Do not use an external oven cleaner.
- The oven must cool down before cleaning the cooking area. Cleaning on hot surfaces shall create both fire hazard and damage the enamel surface.
Catalytic surfaces
- The side walls in the cooking area can only be covered with enamel or catalytic walls. It varies by model.
- The catalytic walls have a light matte and porous surface. The catalytic walls of the oven should not be cleaned.
- Catalytic surfaces absorb oil thanks to their porous structure and start to shine when the surface is saturated with oil. In this case, it is recommended to replace the parts.
Glass surfaces
- When cleaning glass surfaces, do not use hard metal scrapers or abrasive cleaning materials. They can damage the glass surface.
- Clean the appliance using dishwashing detergent, warm water, and a microfiber cloth specific for glass surfaces, and dry it with a dry microfiber cloth.
- If there is residual detergent after cleaning, wipe it with cold water and dry with a clean and dry microfiber cloth. Residual detergent may damage the glass surface next time.
- Under no circumstances should the dried-up residue on the glass surface be cleaned off with serrated knives, wire wool, or similar scratching tools.
- You can remove the calcium stains (yellow stains) on the glass surface with a commercially available descaling agent, such as vinegar or lemon juice.
- If the surface is heavily soiled, apply the cleaning agent on the stain with a sponge and wait a long time for it to work properly. Then clean the glass surface with a wet cloth. Discolorations and stains on the glass surface are normal and not defects.
Plastic parts and painted surfaces
- Clean plastic parts and painted surfaces using dishwashing detergent, warm water, and a soft cloth or sponge, and dry them with a dry cloth.
- Do not use hard metal scrapers or abrasive cleaners. They may damage the surfaces.
- Ensure that the joints of the components of the product are not left damp or with detergent. Otherwise, corrosion may occur on these joints.
7.2 Cleaning Accessories
Do not put the product accessories in a dishwasher unless otherwise stated in the user's manual.
7.3 Cleaning the Control Panel
- When cleaning the panels with knob-control, wipe the panel and knobs with a damp soft cloth and dry with a dry cloth. Do not remove the knobs and gaskets underneath to clean the panel. The control panel and knobs may be damaged.
- While cleaning the inox panels with knob control, do not use inox cleaning agents around the knob. The indicators around the knob can be erased.
- Clean the touch control panels with a damp soft cloth and dry with a dry cloth. If your product has a key lock feature, set the key lock before performing control panel cleaning. Otherwise, incorrect detection may occur on the keys.
7.4 Cleaning the inside of the oven (cooking area)
Follow the cleaning steps described in the "General Cleaning Information" section according to the surface types in your oven.
Cleaning the side walls of the oven
The side walls in the cooking area can only be covered with enamel or catalytic walls. It varies by model. If there is a catalytic wall, refer to the “Catalytic surfaces” section for information.
If your product is a wire shelf model, remove the wire shelves before cleaning the side walls. Then complete the cleaning as described in the "General Cleaning Information" section according to the side wall surface type.
To remove the side wire shelves:
- Remove the front of the wire shelf by pulling it on the side wall in the opposite direction.
- Pull the wire shelf towards you to remove it completely.
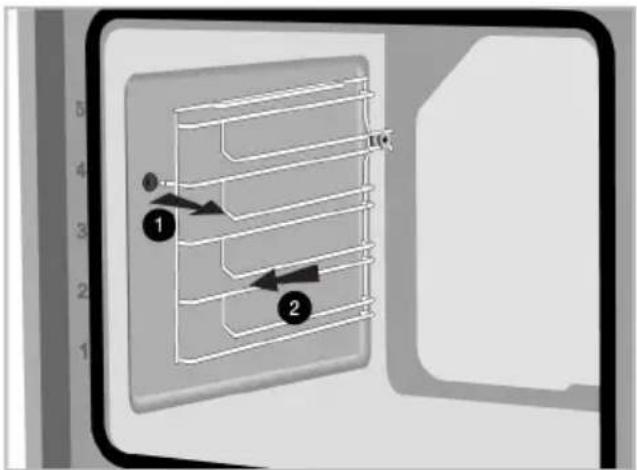
- To reattach the shelves, the procedures applied when removing them must be repeated from the end to the beginning, respectively.
7.5 Easy Steam Cleaning
This allows easy cleaning of dirt (that has not been present for a long time) that is softened by the steam inside the oven and by water droplets condensing on the internal surfaces of the oven.
- Remove all accessories from inside the oven.
- Add 500 ml of water to the tray and place it on the second shelf of the oven.
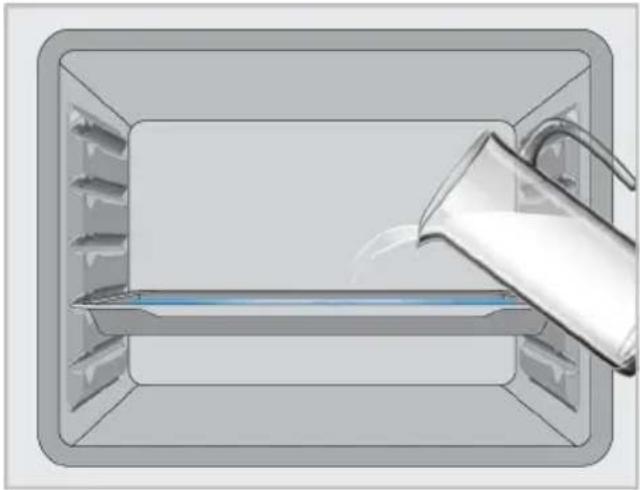
- Set the oven to the easy steam cleaning mode and operate it at 100°C for 15 minutes.
Immediately open the door and wipe the oven interior with a wet sponge or cloth. Steam will be released when opening the door. This may pose a risk of burns. Be careful when opening the door.
For stubborn dirt, clean the product using dishwashing detergent, warm water, and a soft cloth or sponge, then dry it with a dry cloth.
In the easy steam cleaning function, the added water is expected to evaporate and condense on the inside of the oven and the oven door to soften light dirt. Condensation formed on the oven door may drip when the door is opened. As soon as you open the oven door, wipe off the condensation.
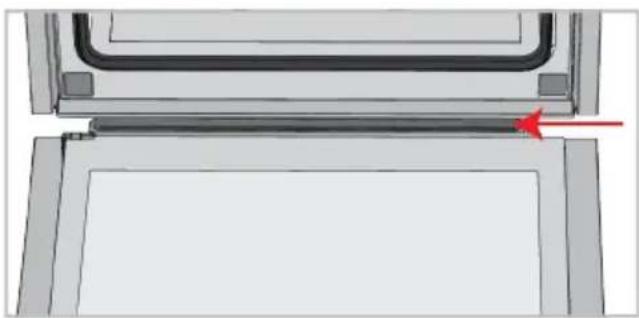
(This varies depending on the product model; it may not be available on your product.) After condensation inside the oven, puddles or moisture may occur in the pool channel under the oven. Wipe this pool channel with a damp cloth after use and dry it.
7.6 Cleaning the Oven Door
You can remove the oven door and door glasses for cleaning. How to remove the doors and windows is explained in the sections "Removing the oven door" and "Removing the inner glasses of the door".
After removing the door inner glasses, clean them using dishwashing detergent, warm water, and a soft cloth or sponge, then dry them with a dry cloth. For lime residue that may form on the oven glass, wipe the glass with vinegar and rinse.
Do not use harsh abrasive cleaners, metal scrapers, wire wool, or bleach materials to clean the oven door and glass.
Removing the oven door
- Open the oven door.
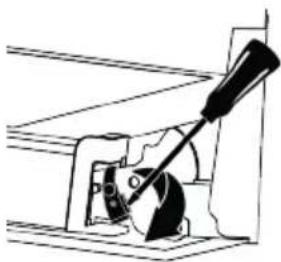
- Open the clips in the front door hinge socket on the right and left by pushing them downwards as shown in the figure.
- Hinge types vary as (A), (B), (C) types according to the product model. The following figures show how to open each type of hinge.
- (A) type hinge is available in normal door types.

- (B) type hinge is available in soft closing door types.
B

- (C) type hinge is available in soft opening/closing door types.
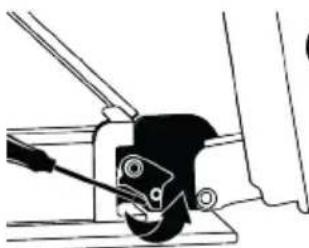
C
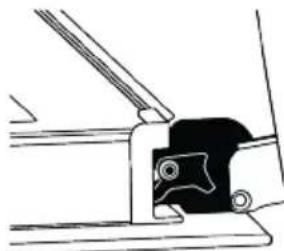
- Get the oven door to a half-open position.
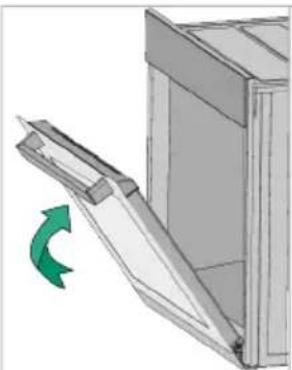
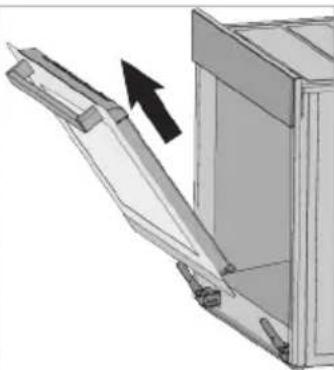
- Pull the removed door upwards to release it from the right and left hinges and remove it.
To reattach the door, the procedures applied when removing it must be repeated from the end to the beginning, respectively. When installing the door, be sure to close the clips on the hinge socket.
7.7 Removing the Inner Glass of The Oven Door
Inner glass of the product's front door may be removed for cleaning.
- Open the oven door.
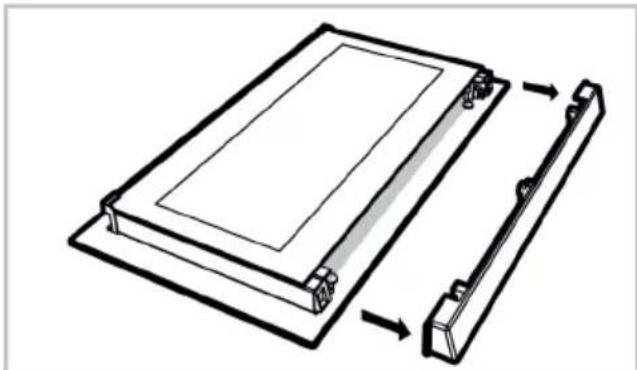
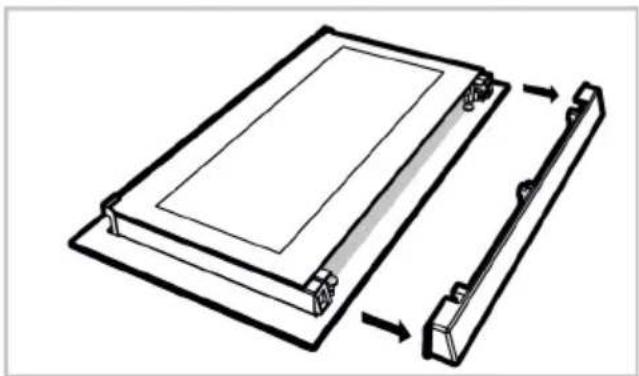
- Pull the plastic component, attached on the upper section of the front door, towards yourself by simultaneously pushing on the pressure points on both sides of the component and remove it.


- As shown in the figure, gently lift the innermost glass (1) towards "A" and then, remove it by pulling towards "B".

1 Innermost glass 2* Inner glass (it may not be available for your product)
- If your product has an inner glass (2), repeat the same process to detach it (2).
- The first step of regrouping the door is to reassemble the inner glass (2). Place the bevelled edge of the glass to meet the bevelled edge of the plastic slot. (If your product has an inner glass). Inner glass (2) must be attached to the plastic slot closest to the innermost glass (1).
- While reassembling the innermost glass (1), pay attention to place the printed side of the glass on the inner glass. It is
crucial to place the lower corners of the innermost glass (1) to meet the lower plastic slots.

- Push the plastic component towards the frame until a "click" sound is heard.
7.8 Cleaning the Oven Lamp
In the event that the glass door of the oven lamp in the cooking area becomes dirty; clean using dishwashing detergent, warm water and a soft cloth or sponge and dry with a dry cloth. In case of oven lamp failure, you can replace the oven lamp by following the sections that follow.
Replacing the oven lamp
General Warnings
• To avoid the risk of electric shock before replacing the oven lamp, disconnect the product and wait for the oven to cool. Hot surfaces may cause burns!
- This oven is powered by an incandescent lamp with less than 40 W, less than 60 mm in height, less than 30 mm in diameter, or a halogen lamp with G9 sockets with less than 60 W power. Lamps are suitable for operation at temperatures above 300 °C. Oven lamps are available from Authorised Services or licensed technicians. This product contains a G energy class lamp.
- The position of the lamp may differ from that shown in the figure.
- The lamp used in this product is not suitable for use in lighting home rooms. The purpose of this lamp is to help the user see food products.
- The lamps used in this product must withstand extreme physical conditions such as temperatures above 50 °C.
If your oven has a round lamp,
- Disconnect the product from the electricity.
- Remove the glass cover by turning it counterclockwise.

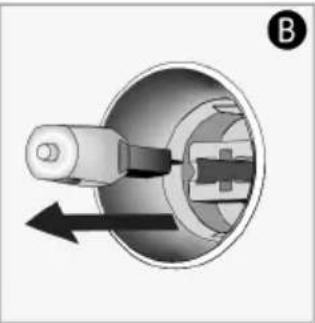
- If your oven lamp is type (A) shown in the figure below, rotate the oven lamp as shown in the figure and replace it with a new one. If it is type (B) model, pull it out as shown in the figure and replace it with a new one.

- Refit the glass cover.
If your oven has a square lamp,
- Disconnect the product from the electricity.
- Remove the wire shelves according to the description.
8 Troubleshooting
If the problem persists after following the instructions in this section, contact your vendor or an Authorized Service. Never try to repair your product yourself.
Steam is emitted while the oven is in operation.
- It is normal to see vapor during operation. >>> This is not an error.
Water droplets appear during cooking.
- The steam generated during cooking condenses when it comes into contact with cold surfaces outside the product and may form water droplets. >>> This is not an error.

- Lift the lamp's protective glass cover with a screwdriver. Remove the screw first, if there is a screw on the square lamp in your product.
- If your oven lamp is type (A) shown in the figure below, rotate the oven lamp as shown in the figure and replace it with a new one. If it is type (B) model, pull it out as shown in the figure and replace it with a new one.
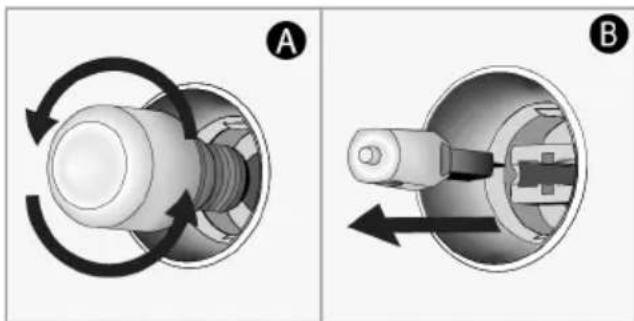
- Refit the glass cover and wire shelves.
Metal sounds are heard while the product is warming up and cooling down.
- Metal parts may expand and make sounds when heated. >>> This is not an error.
The product does not work.
- The fuse may be faulty or blown. >>> Check the fuses in the fuse box. Replace them if necessary or reactivate them.
- The appliance may not be plugged into the (grounded) outlet. >>> Check if the appliance is plugged into the outlet.
- (If there is a timer on your appliance) Keys on the control panel do not work. >>> If your product has a key lock, the key lock may be enabled; disable the key lock.
The oven light is not on.
- The oven lamp may be faulty. >>> Replace the oven's lamp.
- No electricity. >>> Ensure the mains is operational and check the fuses in the fuse box. Change the fuses if necessary or reactivate them.
Oven is not heating.
- The oven may not be set to a specific cooking function and/or temperature. >>> Set the oven to a specific cooking function and/or temperature.
- For the models with timer, the time is not set. >>> Set the time.
- No electricity. >>> Ensure the mains is operational and check the fuses in the fuse box. Change the fuses if necessary or reactivate them.
(For models with timer) The timer display flashes or the timer symbol is left open.
- There has been a power outage before. >>> Set the time / Turn off the product function knobs and again switch it to the desired position.
Welcome!
Dear customer,
: Temperature symbol
Grill rack
: Temperature symbol

RoHS Directive Compliance:
Wire grill
RO


Built-in Hob / User Manual
BBSE17300B
185929974_1/EN/PL/RO/R.AB/24/11/23 10:52
7768287870
Welcome!
Dear Customer,
Thank you for choosing the Beko product. We want your product, manufactured with high quality and technology, to offer you the best efficiency. Therefore, carefully read this manual and any other documentation provided before using the product.
Keep in mind all the information and warnings stated in the user's manual. This way, you will protect yourself and your product against the dangers that may occur.
Keep the user's manual. If you give the product to someone else, give the manual with it. The warranty conditions, usage and troubleshooting methods for your product are provided in this manual.
The symbols and their descriptions in the user's manual:

Hazard that may result in death or injury.

Important information or useful usage tips.

Read the user's manual.
Hot surface warning.
NOTICE Hazard that may result in material damage to the product or its environment.
Arçelik A.Ş.
Karaağaç caddesi No:2-6 34445 Sütlüce/Istanbul/TURKEY
Made in TURKEY
Table of Contents
1 Safety Instructions...... 4
1.1 Intended Use.... 4 1.2 Child, Vulnerable Person and Pet Safety 4 1.3 Electrical Safety...... 5 1.4 Transportation Safety 6 1.5 Installation Safety...... 7 1.6 Safety of Use 7 1.7 Temperature Warnings 8 1.8 Cooking Safety 8 1.9 Induction 9 1.10 Maintenance and Cleaning Safety 9
2 Environmental Instructions...... 9
2.1 Waste Directive....9 2.1.1 Compliance with the WEEE Directive and Disposing of the Waste Product ...... 9 2.2 Package Information...... 10 2.3 Recommendations for Energy Saving.... 10
3 Your product 10
3.1 Product introduction 10 3.2 Technical Specifications...... 11
4 First Use.... 12
4.1 Initial Cleaning.... 12
5 How to use the hob 12
5.1 General information on hob usage.... 12 5.2 Hob control unit.... 14
6 General Information About Baking.... 19
6.1 General warnings about cooking 19 with hob ....
7 Maintenance and Cleaning ...... 20
7.1 General Cleaning Information..... 20 7.2 Cleaning the hob.... 22 7.3 Cleaning the Control Panel ...... 22
8 Troubleshooting.... 22

1 Safety Instructions
- This section includes the safety instructions necessary to prevent the risk of personal injury or material damage.
- If the product is handed over to someone else for personal use or second-hand use purposes, the user's manual, product labels and other relevant documents and parts should also be given.
- Our company shall not be held responsible for damages that may occur if these instructions are not observed.
- Failure to follow these instructions shall void any warranty. • Always have the installation and repair works made by the manufacturer, the authorised service or a person that the importer company shall designate.
- Use original spare parts and accessories only.
- Do not repair or replace any component of the product unless it is clearly specified in the user's manual.
- Do not make technical modifications on the product.

1.1 Intended Use
- This product is designed to be used at home. It is not suitable for commercial use.
- Do not use the product in gardens, balconies or other outdoors. This product is intended to be used in households and in the staff kitchens of shops, offices and other working environments.
- CAUTION: This product should be used for cooking purposes only. It should not be used for different purposes, such as heating the room.

1.2 Child, Vulnerable Person and Pet Safety
- This product can be used by children 8 years of age and older, and people who are underdeveloped in physical, sensory or mental skills, or who have lack of experience and knowledge, as long as they are supervised or trained about the safe use and hazards of the product.
- Children should not play with the product. Cleaning and user maintenance should not be performed by children unless there is someone overseeing them.
- This product should not be used by people with limited physical, sensory or mental capacity (including children), unless they are kept under supervision or receive the necessary instructions.
• Children should be supervised to ensure that they do not play with the product.
- Electrical products are dangerous for children and pets. Children and pets must not play with, climb on, or enter the product.
- Do not put objects that children may reach on the product.
- Turn the handle of the pots and pans to the side of the counter so that children cannot grab and burn.
- CAUTION: During use, the accessible surfaces of the product are hot. Keep children away from the product.
- Keep the packaging materials out of the reach of children. There is a hazard of injury and suffocation.
- Before discarding worn out and useless products:
- Unplug the power plug and remove it from the socket.
- Cut off the power cable and disconnect it with the plug from the product.
- Take precautions to prevent children from entering the product.
- Do not allow children to play with the product when it is in idle mode.
1.3 Electrical Safety
- Plug the product into a grounded outlet protected by a fuse that matches the current ratings indicated on the type label. Have the grounding installation made by a qualified electrician. Do not use the product without grounding in accordance with local / national regulations.
- The plug or the electrical connection of the appliance shall be in an easily accessible place. If this is not possible, there should be a mechanism (fuse, switch, key switch, etc.) on the electrical installation to which the product is connected, in compliance with the electrical regulations and separating all poles from the network.
- Unplug the product or switch off the fuse before repair, maintenance and cleaning.
- Plug the product into an outlet that meets the voltage and frequency values specified on the type label.
- (If your product does not have a mains cable) only use the connecting cable described in the "Technical specifications" section.
- Do not jam the power cable under and behind the product. Do not put a heavy object on the power cable. The power cable should not be bent, crushed, and come into contact with any heat source.
- Make sure that the power cable is not jammed while putting the product to its place after assembly or cleaning.
- Use original cable only. Do not use cut or damaged cables.
- Do not use an extension cord or multi-plug to operate your product.
- Contact the authorized service centre or importer to use the approved adapter in cases where the use of a converter adapter (for plug type) is necessary.
- Contact the importer or the authorized service centre if the length of the power line is inadequate.
- Portable power sources or multiple plugs may overheat and catch fire. Keep multiple plugs and portable power sources away from the product.
If the power cable is damaged, it must be replaced by the manufacturer, an authorized service or a person to be specified by the importer company in order to prevent possible dangers.
If your product has a power cable and plug:
- Never put the product plug into a broken, loose, or out-of-socket plug. Make sure the plug is fully inserted into the socket. Otherwise the connections may overheat and cause a fire.
- Avoid inserting the device into plugs that are greasy, unclean, or potentially exposed to water (such as those near a worktop where water may escape). Otherwise there is a risk of short circuit and electrocution.
- Never touch the plug with wet hands!
- Pull the plug out of the socket using the plug's body rather than the cord itself.

1.4 Transportation Safety
- Disconnect the product from the mains before transporting the product.
- When you need to transport the product, wrap it with bubble wrap packaging material or thick cardboard and tape it tightly. Secure the moving parts of the product firmly to prevent damage.
ial or thick cardboard and tape it tightly. Secure the moving parts of the product firmly to prevent damage.
- Before the product is installed, check the product for any damage after transport. Contact the importer or the authorized service centre if damaged.

1.5 Installation Safety
- Before beginning the installation, de-energize the power line to which the product will be connected by turning off the fuse. Always wear protective gloves during transport and installation. Otherwise there is a risk of injury from sharp edges!
- Before the product is installed, check the product for any damage. Do not have it installed if the product is damaged.
- Avoid using any heat-insulating materials to cover the interior of the furniture that will be installed.
- Direct sunlight and heat sources, such as electric or gas heaters, must not be present in the area where the product is installed.
- Keep the surroundings of all ventilation ducts of the product open.
- Do not install the product near a window. There is a risk that the hob flame will ignite curtains and flammable materials around the hob. When you open the window, hot cookware may tip over.
- Do not install the product near a window. When you open the window, hot cookware may tip over.
- If there is a socket behind the place where the product will be installed, it must be ensured that the product does not come into contact with the socket nor with the plug plugged into the socket.
- There should be no gas hose, plastic water pipe and socket on the back or side wall of the place where the product will be installed. Otherwise, they may be deformed by the heat effect when the hob is operated and may create a safety risk.

1.6 Safety of Use
- Ensure that the appliance is switched off after every use.
- If you will not use the product for a long time, unplug it or turn off the power from the fuse box.
- Don't use the product if it breaks down or gets damaged while being used. Disconnect
the product from the electricity. Contact the importer or the authorized service centre.
- CAUTION: If the hob surface is cracked, disconnect the product from the mains to avoid the risk of electric shock.
- CAUTION: If the hob glass surface is broken:
Switch off all gas and (if applicable) electric hotplates. Disconnect the product from the electricity.
- Do not touch the appliance surface.
- Do not use the appliance.
- Do not step on the appliance for any reason.
- Never use the product when your judgement or coordination is impaired by the use of alcohol and/or drugs.
- Flammable objects must not be kept in and around the cooking area. Otherwise, these may lead to fire.
- This product is not suitable for use with a remote control or an external clock.

1.7 Temperature Warnings
- CAUTION: When the product is in use, the product and its accessible parts will be hot. Care should be taken to avoid touching the product and heat-
ing elements. Children under 8 years of age should be kept away from the product unless constantly supervised.
- Do not place flammable / explosive materials near the product, as the surfaces will be hot while it is operating.
- CAUTION: Danger of fire: Do not store items on the cooking surfaces.

1.8 Cooking Safety
- CAUTION: The cooking process must be observed. Short-term cooking processes must be constantly observed.
- CAUTION: In solid or liquid oil cooking, it is dangerous to leave the hob unattended, which may cause a fire. NEVER try to extinguish the fire with water; disconnect the product from the mains, and then cover the flames with a cover or fire cloth (etc.).
- Be careful when using alcoholic drinks in your dishes. Alcohol evaporates at high temperatures and may cause fire since it can ignite when it comes into contact with hot surfaces.

1.9 Induction
- The electrically operated zones of your hob are equipped with advanced "Induction" technology. On the induction hob zones, which save time and energy, cookware suitable for induction cooking must be used; otherwise the hob zone will not work. For detailed information, see the section "Pot selection".
- Since the induction hob creates a magnetic field, it can have harmful effects for people who use devices such as pacemakers or insulin pumps.
- Close the zone from its control panel after use, do not rely on the pot sensor.
- Metal objects such as knives, forks, spoons and lids should not be placed on the hob surface as they will get hot.
2 Environmental Instructions
2.1 Waste Directive
2.1.1 Compliance with the WEEE Directive and Disposing of the Waste Product
This product complies with EU WEEE Directive (2012/19/EU). This product bears a classification symbol for waste electrical and electronic equipment (WEEE).
- Do not store metal objects in drawers under the hob. During long and intensive use, the materials here may overheat. - Do not place electronic products such as mobile phones, tablets, computers on the induction hob. Your appliance may be damaged.

1.10 Maintenance and Cleaning Safety
- Wait for the product to cool before cleaning it. Hot surfaces may cause burns!
- Never wash the product by spraying or pouring water on it! There is a risk of electric shock!
- Do not use steam cleaners to clean the product as this may cause an electric shock.

This product has been manufactured with high quality parts and materials which can be reused and are suitable for recycling. Therefore, do not dispose of the waste product with normal domestic and other wastes at the end of its service life. Take it to a collection point for the recycling of electrical and electronic equipment. You can ask your local administration about these collection points. Disposing of the appliance properly helps prevent negative consequences for the environment and human health.
Compliance with RoHS Directive:
The product you have purchased complies with EU RoHS Directive (2011/65/EU). It does not contain harmful and prohibited materials specified in the Directive.
2.2 Package Information
Packaging materials of the product are manufactured from recyclable materials in accordance with our National Environment Regulations. Do not dispose of the packaging waste with the household or other wastes, take it to the packaging material collection points designated by the local authorities.
2.3 Recommendations for Energy Saving
According to EU 66/2014, information on energy efficiency can be found on the product receipt supplied with the product. The following suggestions will help you use your product in an ecological and energy-efficient way:
- Defrost frozen food before baking.
- Use pots / pans with a size and lid suitable for the hob zone. Always choose the right size pot for your meals. More than necessary energy is needed for containers of the wrong size.
- Keep hob baking areas and pot bases clean. Dirt reduces the heat transfer between the baking area and the pot base.
3 Your product
3.1 Product introduction
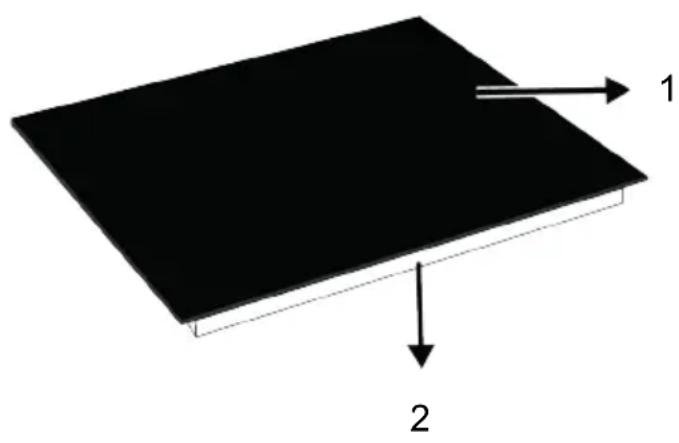
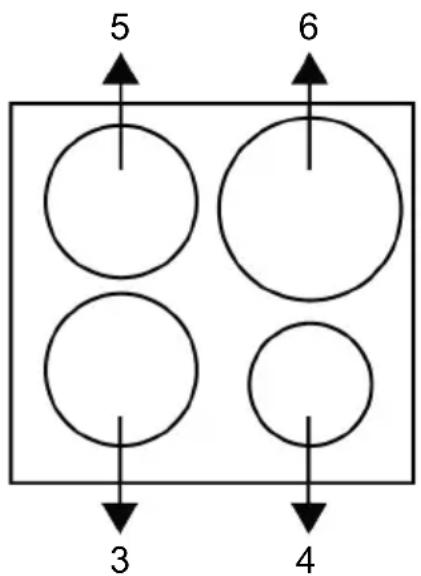
1 Glass cooking surface 2 Lower housing 3 Induction cooking zone 4 Induction cooking zone 5 Induction cooking zone 6 Induction cooking zone
3.2 Technical Specifications
EN
| Hob General Specifications | |
| Product external dimensions (height/width/depth) (mm) 5 | 2 /590 /520 * |
| Hob installation dimensions (width / depth) (mm) 560 (+2) | /490 (+2) |
| Voltage/Frequency 1N~220-240 V /2N~380-415 V; 50 Hz | |
| Cable type and section used/suitable for use in the product | min. H05V2V2-F 5 x 2,5 mm2 |
| Total power consumption (kW) max. 7,2 kW | |
Cooking zones
| Front left Induction cooking zone | |
| Dimension 180 mm | |
| Power 2000 W / Booster 2300 W |
| Front right Induction cooking zone | |
| Dimension 145 mm | |
| Power 1600 W / Booster 1800 W |
| Rear left Induction cooking zone | |
| Dimension 180 mm | |
| Power 2000 W / Booster 2300 W |
| Rear right Induction cooking zone | |
| Dimension 210 mm | |
| Power 2000 W / Booster 2300 W |
* The height of the hob specified in the technical table is the base cover height of the product.

Technical specifications may be changed without prior notice to improve the quality of the product.
Figures in this manual are schematic and may not exactly match your product.
Values stated on the product labels or in the documentation accompanying it are obtained in laboratory conditions in accordance with relevant standards. Depending on operational and environmental conditions of the product, these values may vary.
4 First Use
Before you start using your product, it is recommended to do the following stated in the following sections respectively.
4.1 Initial Cleaning
- Remove all packaging materials.
- Wipe the surfaces of the product with a wet cloth or sponge and dry with a cloth.
5 How to use the hob
5.1 General information on hob usage
General warnings
- Do not let any objects fall on the hob. Even small objects such as saltshakers may damage the hob. Do not use cracked hobs. Water may seep through these cracks and cause a short circuit. If the surface is damaged in any way (e.g. visible cracks), turn off the fuse first, then call the authorized service to unplug the product to reduce the risk of electric shock.
- Do not use unbalanced and easily tilting pots/pans on the hob.
- Do not heat the pots/pans and pots empty. The pots and the appliance may be damaged.
- Always turn off the hob's burners after each use.
- You shall damage the appliance if you operate the hobs without any pot or pots/pans. Always turn off the hobs after each operation. • After each use the cooking surface will be hot, so do not put the plastic pots/pans on the cooking surface. Clean such material on the surface immediately.
- Sudden temperature changes on the glass cooking surface may cause damage, be careful not to spill cold liquids during cooking.
- Put a sufficient amount of food in pots and pans. Thus, you can prevent food from pouring forth out of the pots/pans and will not need to clean unnecessarily.
NOTICE: Some detergents or cleaning agents may cause damage to the surface. Do not use abrasive detergents, cleaning powders, cleaning creams or sharp objects during cleaning.
NOTICE: During the first use, smoke and odour may come up for several hours. This is normal and you just need good ventilation to remove it. Avoid directly inhaling the smoke and odours that form.
- Do not place the covers of pots and pans on burners/zones.
- Place the pots by centering them on the burners/zones. If you wish to place a pot on a different burner/zone, do not slide it towards the desired burner; rather, lift it first and then put it on the other burner.
Operating principle of the induction hob An induction hob is like an open circuit. The circuit completes when cooking pots or pans suitable for induction cooking are placed on it, and an electronic system below the glass surface generates a magnetic field. The metal base of the pots or pans is heated by taking energy from this magnetic field. Thus, the heat is not generated on the surface of the hob, but directly on the pots or pans above it. The glass surface is heated by the heat of the cooking pots or pans.
Advantages of cooking with induction
Induction hobs offer some advantages as the heat is transferred directly to the cooking pots or pans.
- Foods that overflow during cooking do not burn rapidly as the glass cooking surface is not heated directly. It is cleaned more easily.
- Cooking shall be faster as the heat is generated directly on the cooking pots or pans. Thus, it saves time and energy with respect to other hob types.
- As the heat is given directly to the cooking pots or pans, there is no heat loss, and it provides a more efficient cooking.
- The fact that the heat transfer stops and the cooking surface is not heated directly when the cooking pots or pans are removed from the cooking surface provides a safer use against possible accidents while cooking.
For a safe operation:
- Do not select high heating levels when using non-sticking cooking pots or pans coated with little amount of oil or used without oil (teflon type).
- Do not use the glass cooking surface as a surface where you can place something on it or as a cutting surface.
- Do not place metal objects such as cutlery or pot lids on your hob as they may get hot.
- Never use aluminium foil for cooking. Never place food wrapped in aluminium foil on the induction zone.
- Keep magnetic objects such as credit cards or tapes away from the hob while it is operating.
- If there is an oven under your hob and it is being operated, the sensors on the hob may reduce the cooking level or turn off the hob.
- Your hob has an automatic shut-off system. Detailed information about this system is provided in the following sections. However, if you use thin based pots for your cooking, these pots shall heat up very quickly and the bottom of the pan may melt and damage the cooking surface and the appliance before the automatic shut-off system is activated.
Cooking pots/pans
You shall use ferromagnetic, quality cooking pots/pans which bear a label or warning that it is compatible for induction cooking only with your induction hob. Generally, the higher the iron content, the better the cooking pots/pans shall perform. The base diameter of the cooking pots/pans shall match the induction zone. Suggested dimensions are listed below.
Suitable pots/pans:
- Cast iron pots/pans
- Enamelled steel pots/pans
- Steel and stainless steel pots/pans (with label or warning indicating that it is induction compatible)
Unsuitable pots/pans:
- Aluminium pots/pans
- Copper pots/pans
- Brass pots/pans
- Glass pots/pans
- Pottery • Ceramic and porcelain
Recommendations:
- Use flat bottomed cooking pots/pans only. Do not use pots/pans with convex or concave bases.
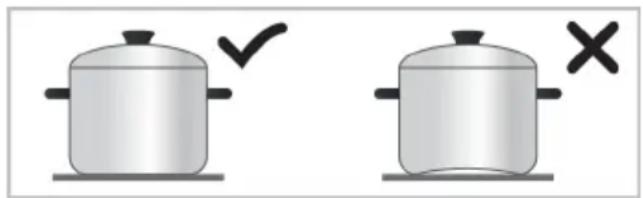
- Use cooking pots/pans with thick, processed bases only. If you use thin based pots, these pots shall heat up very quickly and the bottom of the pan may melt and damage the cooking surface and the appliance before the automatic shut-off system is activated. Sharp edges may cause scratches on the surface.
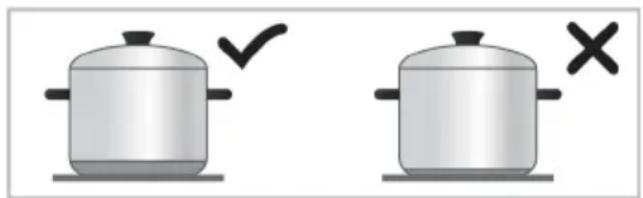
- The bases of some cooking pots/pans have a smaller ferromagnetic field than its true diameter. Only this area is heated by the hob. Therefore, the heat is not evenly distributed and the cooking performance is decreased. Moreover, such cooking pots/pans may not be detected by large induction hobs. Thus, the cooking hob shall be selected according to the size of the ferromagnetic field.

- Some cooking pots/pans have a base that contains non-ferromagnetic materials such as aluminium. These types of cooking pots/pans may not heat adequately or may not be detected by the induction hob at all. In some cases, a bad pots/pans warning may appear.
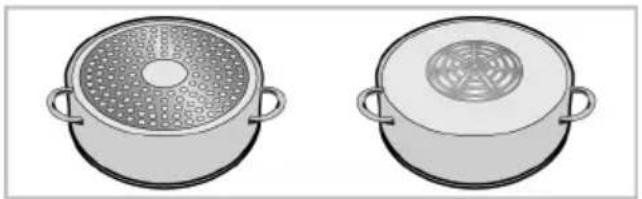
Equal distribution of the cookware on the right and left and center hobs for the selection of hobs affects the cooking performance positively while cooking multiple meals on the induction hobs.
Cooking pots/pans test
Test whether your pot is compatible with cooking with an induction hob using the methods below.
- It is compatible if the base of your pot holds a magnet.
- It is compatible if I does not flash when you place your pot on the induction hob and turn on the hob.
Recommended cooking pots/pans sizes
| Cooking zone diameter - mm Pot diameter - mm | |
| 145 min. 100 - max. 145 | |
| 180 min. 100 - max. 180 | |
| 210 min. 140 - max. 210 | |
| 240 min. 140 - max. 240 | |
| 280 min. 125 - max. 280 | |
| 320 min. 125 - max. 320 | |
| Cooking zone with wide (flexi) surface width 230 - length 390 | |
The detection of cooking pots/pans by the induction hobs depend on the diameter and material of the ferromagnetic in the base of the pots/pans. To ensure detection of the cooking pots/pans and achieve an efficient cooking, the cooking pots/pans shall be selected as per the size of your hob. The cooking pots/pans sizes recommended for hob sizes are given above.
5.2 Hob control unit
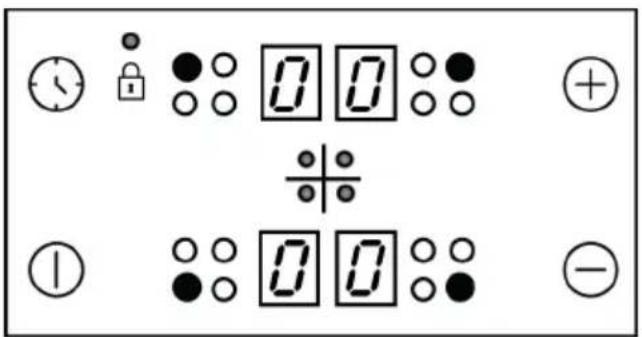
Keys :
On/Off key
Boiling behavior may vary depending on the pot types, size of the pot and size of the cooking zone. For a more homogenous boiling behavior, a one step larger cooking zone might be used. To use a larger cooking zone does not cause wasting of energy at induction hobs, because the heat is only created in the relevant pot area.
Timer key ⊕ Increase key - Decrease key
Symbols :

Key lock symbol
Cooking zone selection keys:
●○ ○○ Rear left cooking zone selection key, Front left cooking zone selection key
Front right cooking zone selection key, Rear right cooking zone selection key
General warnings for the control panel
- Graphics and figures are for informational purposes only. Actual displays and functions may vary according to the model of your hob.
- This product is controlled with a touch control panel. Each operation you make on your touch control panel will be confirmed by an audible signal. • Always keep the control panel clean and dry. Having a damp and soiled surface may cause problems in the functions.
Turning on the hob
- Touch the key on the control panel.
→ “0” icon appears on all cooking zone displays.
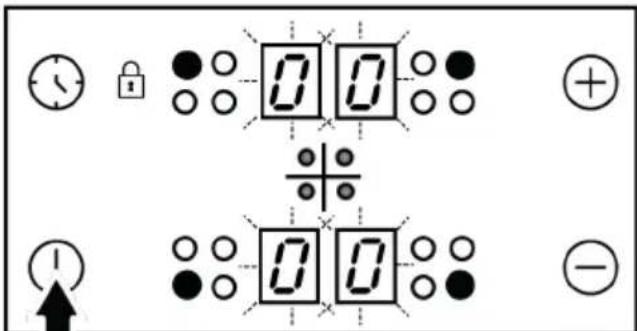

If no operation is performed within 20 seconds, the hob will automatically return to Standby mode.
Turning off the hob
- Touch the key on the control panel.
⇒ The hob will turn off and return to Standby mode.
“H” or “h” symbol that appears on the cooking zone display indicates that the cooking zone is still hot. Do not touch cooking zones.
Residual heat indicator
The “H” symbol that appears on the cooking zone display indicates that the hob is still hot and may be used to keep a small amount of food warm. This symbol will soon turn to the “h” symbol, meaning less hot.
When power is cut off, the residual heat indicator will not light up and does not warn the user against hot cooking zones.
Turning on the cooking zones
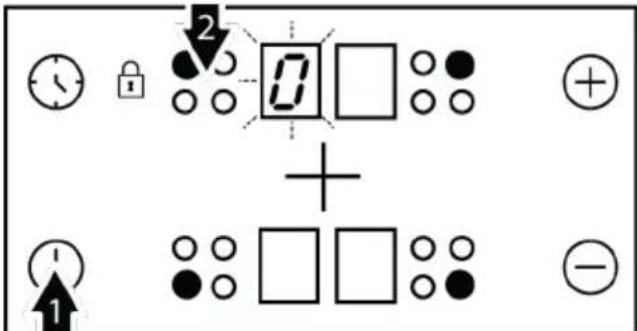
- Touch the ⓚ key to turn on the hob.
- Touch the selection key of the cooking zone you want to turn on.
The “0” symbol appears on the cooking zone display and the related display illuminates more brightly.
If no operation is performed within 20 seconds, the hob will automatically return to Standby mode.
Setting the temperature level
Touch the keys to set the temperature level between "1" and "9" or "9" and "1".
The product might start-stop when it is operating on levels from 1 to 7, especially with cookware with a small diameter and when water-oil is little. This is not a fault.
The outer section of the 280 mm induction hob cooking zone (if your product is equipped with a 280 mm induction hob cooking zone) is activated only when a saucepan large enough to cover the cooking zone is placed on the cooking zone and the temperature is set to a level higher than 8.
Turning off the cooking zones:
A cooking zone can be turned off in 3 different ways:
- By dropping the temperature level to "0": You can turn the cooking zone off by dropping the temperature adjustment to "0" level.
- By touching the relevant cooking zone symbol for a certain time: Turn on the cooking zone by pressing relevant symbol for a certain time to drop temperature value to "0".
- By using the turn-off on the timer option for the desired cooking zone: When the time is over, the timer will turn off the cooking zone assigned to it. "0" or "00" will appear on related display. When the time is over, an audible alarm will sound. Touch any key on the control panel to silence the audible alarm.
High Power (Booster) It varies depending on the product model. It may not be available on your product.
For rapid heating, you can use booster function "P". However, this function is not recommended for cooking a long time. Booster function may not be available in all cooking zones.
Turning on High Power (Booster):
- Touch key to turn on the hob.
- Select the desired cooking zone by touching the cooking zone selection keys.
- Touch dr key firstly to reach the level "9".
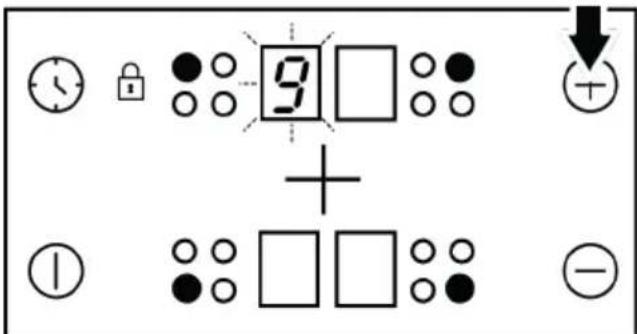
- When the cooking zone is at level "9", touch ⏻key once to set cooking zone temperature to "P".
Turning off High Power (Booster):
- To disable the Booster function, touch and set the temperature to level "9". Cooking zone goes out of booster and continues to operate at level "9".
- You can decrease the temperature level by touching ☐ or you can switch off the cooking zone completely by decreasing the temperature level to "0".
Keylock
You can activate the keylock to avoid changing the functions by mistake when the hob is operating.
Activating the keylock
- Touch ① key to turn on the hob.
- Touch and keys simultaneously to activate the keylock.
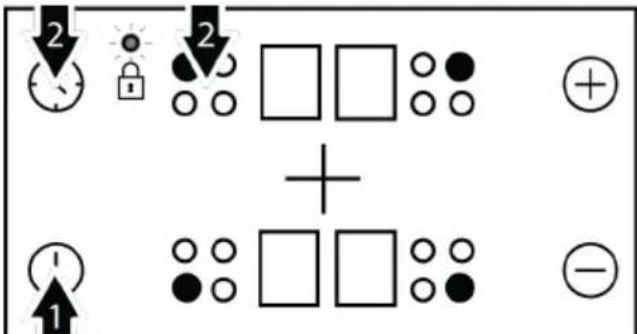
Keylock will be activated and the dot on the symbol will light up.

If you turn the hob off when the keys are locked, the keylock will be activated next time you turn the hob on again. Key lock must be deactivated in order to be able to operate the hob.
Deactivating the keylock
- When the keylock is active, touch and keys simultaneously.
Keylock will be deactivated and the dot on the symbol will disappear.
Childlock It varies depending on the product model. It may not be available on your product.
You can protect the hob against being operated unintentionally in order to prevent children from turning on the cooking zone. Child Lock can only be activated and deactivated in Standby mode.
Child lock will be cancelled in case of power failure.
Activating the childlock
- Touch key to turn on the hob.
- Touch and keys simultaneously After "beep" signal touch to activate the childlock.
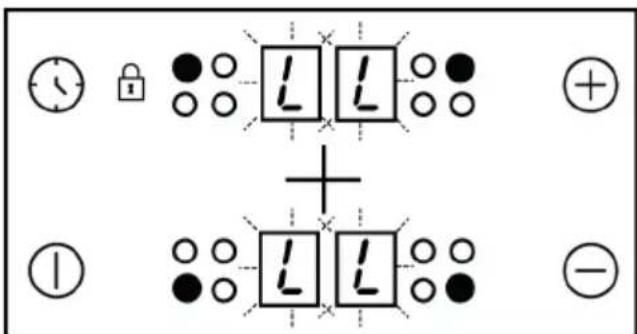
→ Childlock will be activated and "L" symbol appears on all cooking zone displays.
Deactivating the childlock
- When the keylock is active, touch key to turn on the hob.
- Touch and keys simultaneously. After "beep" signal, touch to deactivate the childlock. → Childlock will be deactivated and "L" symbol disappears on all cooking zone displays.
Timer function
This function facilitates cooking for you. It will not be necessary to attend the oven for the whole cooking period. Cooking zone will be turned off automatically at the end of the time you have selected.
Activating the timer
- Touch key to turn on the hob.
- Select the desired cooking zone by touching the cooking zone selection keys.

- Touch or keys to set the desired temperature level.
- Touch key to turn the timer on.
→ “00” symbol will illuminate on timer display and decimal point will appear on the selected cooking zone display.
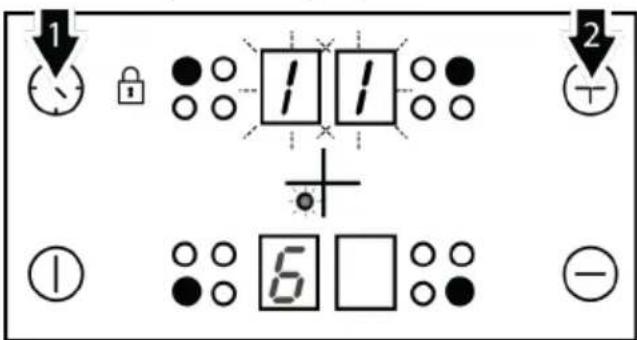
Right rear and left rear cooking zone displays serve as timer display when the timer is active.
- Touch or keys to set the desired time.
The timer can only be set for the cooking zones already in use.
Repeat the above procedures for the other cooking zones for which you wish to set the timer.
Timer cannot be adjusted unless the cooking zone and the temperature value for the cooking zone are selected.
When the cooking zone for which a timer was set is selected, you can see the remaining time by touching the ⓚ key again.
Deactivating the timer
Once the set time is over, the hob will automatically turn off and give an audible warning. Press any key to silence the audio warning.
Turning off the timers earlier
If you turn off the timer earlier, the hob will carry on operating at the set temperature until it is turned off.
- Select the cooking zone you want to turn off.
- Touch key to turn the timer on.
- Until "00" appears on the timer screen, touch ⓣ to set the value to "00". → Dot shaped light on the relevant cooking zone display itself turns off completely after having flashed for a certain period of time and the timer is cancelled.
Using induction cooking zones safely and efficiently
Operating principles: Induction hob heats directly the cooking vessel as a feature of its operating principles. Therefore, it has various advantages when compared to other hob types. It operates more efficiently and the hob surface does not heat up. Induction hob is equipped with superior safety systems that will provide you maximum usage safety.

Your hob can be equipped with induction cooking zones with a diameter of 145, 180, 210-280 mm depending on the model. With induction feature, each cooking zone detects each vessel placed on them. Energy builds up only where the vessel contacts with the cooking zone and thus, minimum energy consumption is achieved.
Automatic turning off system
The hob control has an automatic turn off system. If one or more hob zone(s) are left on, the hob zone turns off automatically after a while (See Table-1). In case of a timer assigned to the hob, the timer screen is turned off then, too. The time limit for automatic turn off depends on the selected temperature level. Maximum operating period is applied for this temperature level. The hob zone may be operated by the user again after it is turned off automatically as described above.
| Temperature level Automatic turning off periods - hours | |
| 0 | 0 |
| 1 | 6 |
| 2 | 6 |
| 3 | 5 |
| 4 | 5 |
| 5 | 4 |
| 6 1,5 | |
| 7 1,5 | |
| 8 1,5 | |
| 9 20-30 minute | |
| P (Booster) 5-10 minute* | |
| (*) The hob will drop to level 9 after 5 minutes | |
Table 1: Automatic turning off periods
Overheating protection
Your hob is equipped with some sensors ensuring protection against overheating. The following may be observed in case of overheating:
• Active cooking zone may be turned off. - Selected level may drop. However, this condition cannot be seen on the indicator.
Overflow safety system
Your hob is equipped with an overflow safety system. If any overflow spills onto the control panel, the system will immediately cut the power connection and turn off your hob. An "F" warning appears on the display during this period.
Precise power setting
As a feature of its operating principles, the induction hob reacts to commands immediately. It changes power settings very fast. Thus, you can prevent a cooking pot (containing water, milk, etc.) from overflowing even if it was just about to overflow.
If the surface of the touch control panel is exposed to intense vapor, the entire control system may become deactivated and give an error signal.
Keep the surface of the touch control panel clean. Erroneous operation may be observed.
6 General Information About Cooking
In this section, you can find tips on preparing and cooking your food.
6.1 General warnings about cooking with the hob
General warnings about cooking with the hob
- Never fill the pan with oil more than one third full. Do not leave the hob unattended when heating oil. Overheated oils bring risk of fire. Never attempt to extinguish a possible fire with water! When oil catches fire, cover it with a fire blanket or damp cloth. Turn off the hob if it is safe to do so and call the fire department.
- Before frying foods, always remove their excess water and put them inside the heated oil slowly. Make sure that frozen foods are defrosted before frying.
- When heating oil, make sure that the pot you use is dry and keep its lid open.
- For recommendations on cooking with power saving, refer to the "Environmental Instructions" section.
- The cooking temperature and time values given for foods may vary depending on the recipe and amount. For this reason, these values are given as ranges.
Cooking table
| Food Temperature level Baking time (min) (approx.) | |||
| Melting | |||
| Chocolate melting (e.g..Dr.Oetker brand, bitter chocolate 55-60% cocoa,150 g) | 1 20 ... 30 | ||
| Butter (200 g) 6 5 ... 6 | |||
| Boiling, Heating, Keeping Warm | |||
| Water 1 L (Boiling) P 3 ... 5 | |||
| Water 3 L (Boiling) P 8 ... 10 | |||
| Milk 1 L (Boiling) 6 4 ... 6 | |||
| Milk 1 L (Keeping warm) 1-2 18 ... 22 | |||
| Vegetable oil (Heating) (Sunflower seed oil 0,5 L) 8 | 3 ... 5 | ||
| Boiling | |||
| Unshelled potato coarsely minced (2 Piece big size) | 9 12 ... 14 | ||
| Salmon fillet 8 10 ... 15 | |||
| Sausage 9 2 .. 4 | |||
| Pasta (150 g) 8 8 ... 12 | |||
| Cooking, Sauteing | |||
| Rice dish (200 g rice) 6 8 ... 14 | |||
| Paella * 9 15 ... 20 | |||
| Noah's pudding ** | |||
| Bean-Chickpea boiling Boiling - for noah's pudding | 9 5 ... 6 | ||
| Bean-Chickpea boiling cooking - for noah's pudding | 3 10 ... 30 | ||
| Wheat Boiling - for noah's pudding 9 2 ... 5 | |||
| Wheat cooking - for noah's pudding 3 10 ... 30 | |||
| Noah's pudding -All ingredients 8 20 ... 25 | |||
| Shanks with vegetable ** | |||
| Vegetable sauteing 9 3 ... 8 | |||
| Baking 4-5 120 ... 150 | |||
| Soups (E.g. Lentil soup) | 6-7 17 ... 20 | ||
| Shallow fry | |||
| Sea bass fillet | 8 3 ... 7 | ||
| Sirloin Steak ** (3-5 cm) | 8 5 ... 9 | ||
| Sausage 8 2 ... 5 | |||
| Fried egg | 7 4 ... 8 | ||
| French fry | |||
| Boortsog | 8 13 ... 16 | ||
| Schnitzel | 8 5 ... 7 | ||
| Nugget | 8 4 ... 6 | ||
| * Wok pan is recommended. ** Cast pan/pot is recommended. | |||
7 Maintenance and Cleaning
7.1 General Cleaning Information
General warnings
- Wait for the product to cool before cleaning the product. Hot surfaces may cause burns!
- Do not apply the detergents directly on the hot surfaces. This may cause permanent stains.
- The product should be thoroughly cleaned and dried after each operation. Thus, food residues shall be easily cleaned and these residues shall be prevented from burning when the product is used again later. Thus, the service life of the appliance extends and frequently faced problems are decreased.
- Do not use steam cleaning products for cleaning.
- Some detergents or cleaning agents cause damage to the surface. Unsuitable cleaning agents are: bleach, cleaning products containing ammonia, acid or chloride, steam cleaning products, de-scaling agents, stain and rust removers, abrasive cleaning products (cream cleaners, scouring powder, scouring cream, abrasive and scratching scrubber, wire, sponges, cleaning cloths containing dirt and detergent residues).
- No special cleaning material is needed in the cleaning made after each use. Clean the appliance using dishwashing detergent, warm water and a soft cloth or sponge and dry it with a dry cloth.
- Be sure to completely wipe off any remaining liquid after cleaning and immediately clean any food splashing around during cooking.
- Do not wash any component of your appliance in a dishwasher unless otherwise stated in the user's manual.
For the hobs:
- Acidic dirt such as milk, tomato paste and oil may cause permanent stains on the hobs and components of the hob zones. Clean any overflown fluids immediately after cooling down the hob by turning it off.
Inox - stainless surfaces
- Do not use acid or chlorine-containing cleaning agents to clean stainless-inox surfaces and handles.
- Stainless-inox surface may change colour in time. This is normal. After each operation, clean with a detergent suitable for the stainless or inox surface.
- Clean with a soft soapy cloth and liquid (non-scratching) detergent suitable for inox surfaces, taking care to wipe in one direction.
- Remove lime, oil, starch, milk and protein stains on the glass and inox surfaces immediately without waiting. Stains may rust under long periods of time.
- Cleaners sprayed/applied to the surface should be cleaned immediately. Abrasive cleaners left on the surface cause the surface to turn white.
Glass surfaces
- When cleaning glass surfaces, do not use hard metal scrapers and abrasive cleaning materials. They can damage the glass surface.
- Clean the appliance using dishwashing detergent, warm water and a microfiber cloth specific for glass surfaces and dry it with a dry microfiber cloth.
- If there is residual detergent after cleaning, wipe it with cold water and dry with a clean and dry microfiber cloth. Residual detergent may damage the glass surface next time.
- Under no circumstances should the dried-up residue on the glass surface be cleaned off with serrated knives, wire wool or similar scratching tools.
- You can remove the calcium stains (yellow stains) on the glass surface with the commercially available descaling agent, with a descaling agent such as vinegar or lemon juice.
- If the surface is heavily soiled, apply the cleaning agent on the stain with a sponge and wait a long time for it to work properly. Then clean the glass surface with a wet cloth.
• Discolorations and stains on the glass surface are normal and not defects.
Plastic parts and painted surfaces
- Clean plastic parts and painted surfaces using dishwashing detergent, warm water and a soft cloth or sponge and dry them with a dry cloth.
- Do not use hard metal scrapers and abrasive cleaners. They may damage the surfaces.
- Ensure that the joints of the components of the product are not left damp and with detergent. Otherwise, corrosion may occur on these joints.
7.2 Cleaning the hob
Glass cooking surface
Follow the cleaning steps described for the glass surfaces in the “General cleaning information” section for the cleaning of glass cooking surface. You may complete your cleaning as per the information below for special cases.
- Sugar-based foods such as dark cream, starch and syrup should be cleaned immediately, without waiting for the surface to cool. Otherwise, the glass cooking surface may be permanently damaged.
- Do not use cleaning agents for cleaning operations you perform while the hob is hot, otherwise permanent stains may occur.
8 Troubleshooting
If the problem persists after following the instructions in this section, contact your vendor or an Authorized Service. Never try to repair your product yourself.
The product does not work.
- Fuse may be faulty or blown. >>> Check the fuses in the fuse box. Change them if necessary or reactivate them.
- The appliance may not be plugged into the (grounded) outlet. >>> Check if the appliance is plugged into the outlet.
- (If there is a timer on your appliance) Keys on the control panel do not work. >>> If your product has a key lock, the key lock may be enabled. Disable the key lock.
- If the hob does not turn on when the on/off key is pushed >>> Unplug it and wait at least 20 seconds before plugging it in.
- It has overheat protection. >>> Wait for your hob to cool down.
- Appropriate pots may not be used. >>> Check your pots.
L icon is always lit on the hob zone display.
- Pots may not be placed on the operating hob. >>> Check if there is a pot on the hob zone.
7.3 Cleaning the Control Panel
- When cleaning the panels with knob-control, wipe the panel and knobs with a damp soft cloth and dry with a dry cloth. Do not remove the knobs and gaskets underneath to clean the panel. The control panel and knobs may be damaged.
- While cleaning the inox panels with knob control, do not use inox cleaning agents around the knob. The indicators around the knob can be erased.
- Clean the touch control panels with a damp soft cloth and dry with a dry cloth. If your product has a key lock feature, set the key lock before performing control panel cleaning. Otherwise, incorrect detection may occur on the keys.
- Your pot may not be induction suitable. >>> Check if your cooker is suitable for the induction hob.
- The pot may not be centred correctly on the hob zone or the bottom surface of the pan may not be wide enough for the selected hob zone. >>> Center the hob zone by choosing a pot that is wide enough for the hob zone.
- The pot or hob zone may be too hot. >>> Wait for them to cool down.
The selected hob zone suddenly turns off while it is operating.
- The cooking time of the selected compartment may have expired. >>> You can set a new cooking time or finish cooking.
- It has overheat protection. >>> Wait for your hob to cool down.
- An object may have covered the touch control panel. >>> Remove the object on the panel.
Although the hob zone is turned on, the pot does not heat up.
- The pot may not be suitable with the Induction hob. >>> Check if your cooker is suitable for the induction hob.
- The pot may not be centred correctly on the hob zone or the bottom surface of the pan may not be wide enough for the
selected hob zone. >>> Center the hob zone by choosing a pot that is wide enough for the hob zone.
The cooling fan continues to run even though the hob is turned off.
- This is not an error. The cooling fan continues to operate until the electronic equipment in the hob falls to the appropriate temperature.
Noise from the hob during cooking
- Some sounds may be heard from the hob while cooking. These sounds are due to the composition of the cooking vessel. These sounds are normal, they are not a malfunction and they are a part of induction technology.
Possible noises and reasons
- Fan noise: The cooker is equipped with a fan that activates automatically according to the temperature of the appliance.
The fan has various operating levels and operates at different levels as per the temperature.
- Lower buzz like the operating noise of a transformer: This is due to the nature of the induction technology. As the heat is transmitted directly to the base of the cooking vessel, such buzz sounds may be heard as per the material of the cooking vessel. Thus, different noises may be heard with different cookware.
- Cracking noise: The reason of this is the structure and material of the base of the cooking vessel. A cracking sound may be heard if the cooking vessel is made of various layers with different materials.
- Whining noise: A whining sound may be heard when two cooking zones on the same side of the cooker are used to cook with different cooking levels.
Error codes/reasons and possible solutions
| Error codes Error reasons Possible solutions | ||
| E 2 | Communication error between Display and Knob Interface board | Turn the induction hob off and operate again after 30 seconds. Contact the authorized dealership if the issue is resumed |
| E 22E 26 | Induction hob is overheated. | Turn the induction cooker off and wait until it is cooled down. The error shall be resolved when temperature of the hob comes down below the limits. |
| E 46 | One or more keys are kept pressed for more than 10 seconds.An object is left on the control panel or the control is exposed to vapour. | The problem shall be resolved when you remove your hand from the hob.The problem shall be resolved when the control panel is cleaned. |
| E 47 | A pot suitable for induction heating is not used. | The error shall be resolved when a pot suitable for induction heating is used. |
| E 1 - E 15 | Communication error on induction hob. | Turn the induction hob off and operate again after 30 seconds. Contact the authorized dealership if the issue is resumed. |
| E 16 - E 21 | Temperature sensor error on induction hob. | Turn the induction hob off and operate again after 30 seconds. Contact the authorized dealership if the issue is resumed. |
| E 23E 24 | Software error on induction hob. | Turn the induction hob off and operate again after 30 seconds. Contact the authorized dealership if the issue is resumed. |
| Error codes Error reasons Possible solutions | ||
| E 25 Fan operation error on induction hob. | Turn the induction hob off and operate again after 30 seconds. Contact the authorized dealership if the issue is resumed. | |
| E 31 – E 45 | Electronic board hardware error on induction hob. | Turn the induction hob off and operate again after 30 seconds. Contact the authorized dealership if the issue is resumed. |
| E 48E 49E 51 | Sensor error on induction hob. | Sensor equipment shall be rendered compatible for the operating conditions. Contact the authorized dealership if the issue is resumed. |
| E 52 – E 57 | High temperature error on induction hob. | Turn the induction hob off and wait until it is cooled down. The error shall be resolved when temperature of the sensor comes down below the limits. Contact the authorized dealership if the issue is resumed. |
Welcome!
Dear customer,
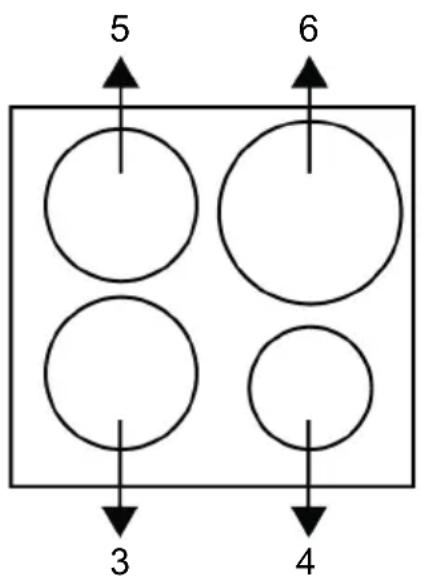
Buttons:
Compliance with the RoHS Directive:
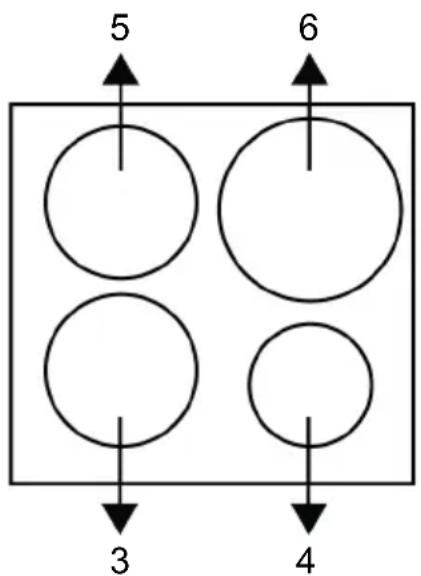
Keys:
① On/Off key (ON/OFF)
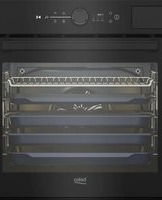
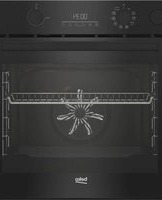
- WELCOME
- THE SYMBOLS AND THEIR DESCRIPTIONS IN THE USER'S MANUAL
- TABLE OF CONTENTS
- SAFETY INSTRUCTIONS
- ENVIRONMENTAL INSTRUCTIONS
- YOUR PRODUCT
- FIRST USE
- USING THE OVEN
- GENERAL INFORMATION ABOUT BAKING
- MAINTENANCE AND CLEANING
- TROUBLESHOOTING
- INTENDED USE
- CHILD, VULNERABLE PERSON AND PET SAFETY
- ELECTRICAL SAFETY
- TRANSPORTATION SAFETY
- INSTALLATION SAFETY
- SAFETY OF USE
- TEMPERATURE WARNINGS
- ACCESSORY USE
- COOKING SAFETY
- MAINTENANCE AND CLEANING SAFETY
- WASTE DIRECTIVE
- COMPLIANCE WITH THE WEEE DIRECTIVE AND DISPOSING OF THE WASTE PRODUCT
- COMPLIANCE WITH ROHS DIRECTIVE
- PACKAGE INFORMATION
- RECOMMENDATIONS FOR ENERGY SAVING
- PRODUCT INTRODUCTION
- PRODUCT CONTROL PANEL INTRODUCTION AND USAGE
- CONTROL PANEL
- INTRODUCTION OF THE OVEN CONTROL PANEL
- FUNCTION SELECTION KNOB
- TEMPERATURE KNOB
- OVEN INNER TEMPERATURE INDICATOR
- DISPLAY SYMBOLS
- OVEN OPERATING FUNCTIONS
- PRODUCT ACCESSORIES
- STANDARD TRAY
- WIRE GRILL
- USE OF PRODUCT ACCESSORIES
- COOKING SHELVES
- PLACING THE WIRE GRILL ON THE COOKING SHELVES
- ON MODELS WITH WIRE SHELVES
- ON MODELS WITHOUT WIRE SHELVES
- PLACING THE TRAY ON THE COOKING SHELVES
- STOPPING FUNCTION OF THE WIRE GRILL
- TRAY STOPPING FUNCTION - ON MODELS WITH WIRE SHELVES
- PROPER PLACEMENT OF THE WIRE GRILL AND TRAY ON THE TELESCOPIC RAILS - ON MODELS WITH WIRE SHELVES AND TELESCOPIC MODELS
- TECHNICAL SPECIFICATIONS
- FIRST TIME SETTING
- INITIAL CLEANING
- BEFORE USING THE ACCESSORIES
- GENERAL INFORMATION ON USING THE OVEN
- COOLING FAN ( IT VARIES DEPENDING ON THE PRODUCT MODEL. IT MAY NOT BE AVAILABLE ON YOUR PRODUCT.)
- OVEN LIGHTING
- OPERATION OF THE OVEN CONTROL UNIT
- GENERAL WARNINGS FOR THE OVEN CONTROL UNIT
- TURNING ON THE OVEN
- TURNING OFF THE OVEN
- MANUAL COOKING TO SELECT TEMPERATURE AND OVEN OPERATING FUNCTION
- COOKING BY SETTING THE COOKING TIME
- SETTINGS
- ACTIVATING THE KEY LOCK
- DEACTIVATING THE KEY LOCK
- SETTING THE ALARM
- TURNING OFF THE ALARM
- IF YOU WANT TO CANCEL THE ALARM
- ADJUSTING THE VOLUME
- SETTING THE DISPLAY BRIGHTNESS
- CHANGING THE TIME OF DAY
- GENERAL WARNINGS ABOUT BAKING IN THE OVEN
- PASTRIES AND OVEN FOOD
- GENERAL INFORMATION
- TIPS FOR BAKING CAKES
- HINTS FOR PASTRY
- MEAT, FISH AND POULTRY
- THE KEY POINTS ON GRILLING
- GRILL
- GENERAL WARNINGS
- THE KEY POINTS OF THE GRILL
- TEST FOODS
- GENERAL CLEANING INFORMATION
- INOX - STAINLESS SURFACES
- ENAMELLED SURFACES
- CATALYTIC SURFACES
- GLASS SURFACES
- PLASTIC PARTS AND PAINTED SURFACES
- CLEANING ACCESSORIES
- CLEANING THE CONTROL PANEL
- CLEANING THE INSIDE OF THE OVEN (COOKING AREA)
- CLEANING THE SIDE WALLS OF THE OVEN
- TO REMOVE THE SIDE WIRE SHELVES
- EASY STEAM CLEANING
- CLEANING THE OVEN DOOR
- REMOVING THE OVEN DOOR
- REMOVING THE INNER GLASS OF THE OVEN DOOR
- CLEANING THE OVEN LAMP
- REPLACING THE OVEN LAMP
- IF YOUR OVEN HAS A ROUND LAMP
- IF YOUR OVEN HAS A SQUARE LAMP
- STEAM IS EMITTED WHILE THE OVEN IS IN OPERATION
- WATER DROPLETS APPEAR DURING COOKING
- METAL SOUNDS ARE HEARD WHILE THE PRODUCT IS WARMING UP AND COOLING DOWN
- THE PRODUCT DOES NOT WORK
- THE OVEN LIGHT IS NOT ON
- OVEN IS NOT HEATING
- (FOR MODELS WITH TIMER) THE TIMER DISPLAY FLASHES OR THE TIMER SYMBOL IS LEFT OPEN
- GRILL RACK
- ROHS DIRECTIVE COMPLIANCE
- BUILT-IN HOB / USER MANUAL
- HOW TO USE THE HOB
- INDUCTION
- GENERAL INFORMATION ON HOB USAGE
- ADVANTAGES OF COOKING WITH INDUCTION
- FOR A SAFE OPERATION
- COOKING POTS/PANS
- SUITABLE POTS/PANS
- UNSUITABLE POTS/PANS
- RECOMMENDATIONS
- COOKING POTS/PANS TEST
- HOB CONTROL UNIT
- SYMBOLS
- COOKING ZONE SELECTION KEYS
- GENERAL WARNINGS FOR THE CONTROL PANEL
- TURNING ON THE HOB
- TURNING OFF THE HOB
- RESIDUAL HEAT INDICATOR
- TURNING ON THE COOKING ZONES
- SETTING THE TEMPERATURE LEVEL
- TURNING OFF THE COOKING ZONES
- HIGH POWER (BOOSTER) IT VARIES DEPENDING ON THE PRODUCT MODEL. IT MAY NOT BE AVAILABLE ON YOUR PRODUCT
- TURNING ON HIGH POWER (BOOSTER)
- TURNING OFF HIGH POWER (BOOSTER)
- KEYLOCK
- ACTIVATING THE KEYLOCK
- DEACTIVATING THE KEYLOCK
- CHILDLOCK IT VARIES DEPENDING ON THE PRODUCT MODEL. IT MAY NOT BE AVAILABLE ON YOUR PRODUCT
- ACTIVATING THE CHILDLOCK
- DEACTIVATING THE CHILDLOCK
- TIMER FUNCTION
- ACTIVATING THE TIMER
- DEACTIVATING THE TIMER
- TURNING OFF THE TIMERS EARLIER
- USING INDUCTION COOKING ZONES SAFELY AND EFFICIENTLY
- AUTOMATIC TURNING OFF SYSTEM
- TABLE 1: AUTOMATIC TURNING OFF PERIODS
- OVERHEATING PROTECTION
- OVERFLOW SAFETY SYSTEM
- PRECISE POWER SETTING
- GENERAL INFORMATION ABOUT COOKING
- GENERAL WARNINGS ABOUT COOKING WITH THE HOB
- FOR THE HOBS
- CLEANING THE HOB
- GLASS COOKING SURFACE
- L ICON IS ALWAYS LIT ON THE HOB ZONE DISPLAY
- THE SELECTED HOB ZONE SUDDENLY TURNS OFF WHILE IT IS OPERATING
- ALTHOUGH THE HOB ZONE IS TURNED ON, THE POT DOES NOT HEAT UP
- THE COOLING FAN CONTINUES TO RUN EVEN THOUGH THE HOB IS TURNED OFF
- NOISE FROM THE HOB DURING COOKING
- POSSIBLE NOISES AND REASONS
- COMPLIANCE WITH THE ROHS DIRECTIVE
Brand : BEKO
Model : BBSE17300B
Category : Built-in oven