
Plus AP-23F - Compressor Avantco - Free user manual and instructions
Find the device manual for free Plus AP-23F Avantco in PDF.


| Product Type | Reciprocating Compressor |
| Brand | Avantco |
| Model | Plus AP-23F |
| Application | Commercial Refrigeration |
| Dimensions (L x W x H) | 20 x 20 x 24 inches |
| Weight | 110 lbs |
| Power Source | 115V / 60Hz / 1-Phase |
| Horsepower | 1/2 HP |
| Refrigerant | R-404A or R-134a |
| Oil Type | POE (Polyolester) Oil |
| Main Functions | Compresses refrigerant vapor to high pressure for cooling cycle |
| Maintenance | Check oil level quarterly; clean condenser coils monthly |
| Cleaning | Wipe exterior with damp cloth; do not use harsh chemicals |
| Safety Features | Overload protector, pressure relief valve, thermal cutoff |
| Spare Parts | Start relay, overload, gaskets, valves available from Avantco |
| Repairability | Field-serviceable with standard tools; consult manual |
| Warranty | 1-year limited warranty from Avantco |
| Certifications | ETL/UL listed |
Frequently Asked Questions - Plus AP-23F Avantco
User questions about Plus AP-23F Avantco
0 question about this device. Answer the ones you know or ask your own.
Ask a new question about this device
Download the instructions for your Compressor in PDF format for free! Find your manual Plus AP-23F - Avantco and take your electronic device back in hand. On this page are published all the documents necessary for the use of your device. Plus AP-23F by Avantco.
USER MANUAL Plus AP-23F Avantco
natural_image
Two large stainless steel refrigerators with open doors, one labeled '447AP23R' and the other '447AP49F', shown in side profile (no additional text or symbols visible on the main subjects).A Plus Reach-In Refrigerators & Freezers
Refrigerator Models:
447AP23R 27½" Single Solid Door
447AP49R 55 ^3/8 " Double Solid Door
Freezer Models:
447AP23F 27½" Single Solid Door
447AP49F 55 ^3/8 " Double Solid Door
Note:
You should read this manual in its entirety prior to equipment setup, operation, and maintenance.
Table of Contents
Warnings....3
Installation 4
Electrical 6
Temperature Controls....7
Operation....7
Maintenance 9
Troubleshooting 10
Warnings
DANGER – RISK OF FIRE OR EXPLOSION. FLAMMABLE REFRIGERANT USED. TO BE REPAIRED ONLY BY TRAINED SERVICE PERSONNEL. DO NOT PUNCTURE REFRIGERANT TUBING.
PELIGRO – RRIESGO DE INCENDIO O EXPLOSION. REFRIGERANTE INFLAMABLE UTILIZADO. PARA SER REPARADO SOLAMENTE POR PERSONAL DE SERVICIO CALIFICADO. NO PINCHAR LA TUBERÍA REFRIGERANTE.
DANGER – RISQUE DE FEU OU D'EXPLOSION. LE FRIGORIGÈNE EST INFLAMMABLE. CONFIER LES RÉPARATIONS À UN TECHNICIEN SPÉCIALISÉ. NE PAS PERFORER LA TUBULURE CONTENANT LE FRIGORIGENE.
CAUTION – RISK OF FIRE OR EXPLOSION. FLAMMABLE REFRIGERANT USED. CONSULT REPAIR MANUAL/OWNER'S GUIDE BEFORE ATTEMPTING TO SERVICE THIS PRODUCT. ALL SAFETY PRECAUTIONS MUST BE FOLLOWED.
Please read this manual thoroughly prior to equipment setup, operation, and maintenance.
This unit is intended for use in a temperature-controlled environment of less than 75^ F and 60% relative humidity.
Before Installation
- If the shelf has a raised lip, the lip needs to be installed facing up towards the rear of the cabinet to promote proper air flow. Failure to install the shelves properly is considered user error and is not covered by warranty.
- If the unit has recently been transported on its side, please let unit stand upright for a minimum of 24 hours before plugging it in.
- Make sure that the unit has reached the desired temperature before loading the unit with products. This unit is meant for keeping cold products cold, not chilling warm products.
• Make sure that there is proper ventilation around the unit in the area where it will operate. - Make sure all accessories are installed (i.e., shelves, shelf clips, casters) before plugging in the unit.
- Do not attempt to remove or repair any component of the unit. Consult an authorized service technician for servicing/repair.
• Do not hang on doors or stand inside the unit.
Installation of Casters
- Cut the four straps which attach the unit to the pallet.
- Adjust the unit on the pallet until the pre-drilled holes are exposed.
- Using wedges or team-lift, lift the unit high enough that there is enough clearance to affix the casters.

natural_image
Wooden cardboard box filled with small metallic components, placed on a metal rack (no text or symbols visible)CAUTION! NEVER LAY UNIT ON ITS BACK OR SIDES! UNIT SHOULD ONLY BE PLUGGED IN WHEN IT HAS RESTED IN THE CORRECT, UPRIGHT POSITION FOR AT LEAST 24 HOURS.
Failure to meet this requirement will void warranty coverage if compressor damage ensues.
-
Ensure the unit will sit level on a sloped or uneven floor by using the shims provided.
a. Insert any necessary shims between the caster and the frame rail.
b. Make sure the slot of the shim is in contact with the threaded stem of the caster.
c. If using more than one shim, it is necessary to place them in opposite direction. If multiple shims are placed side by side in the same direction, they may dislodge. -
Turn the bearing race clockwise to tighten and secure the caster. Use provided tool to secure all casters properly.

natural_image
Close-up of hands assembling a car air conditioner unit with visible wiring and fan (no text or symbols)Field Convertible Doors
The Avantco AP-23R and AP-23F ship with a right-hinged door design. These single door models have the ability to be switched to a left-hinged door design. Please follow instructions below:
Tools Needed:
• Phillips Head Screwdriver
- 10mm Wrench

natural_image
Technical line drawing of a mechanical assembly with wheels and a sliding door (no text or symbols)- Use the phillips head screwdriver to remove the front panel screws, followed by the front panel.

natural_image
Mechanical assembly diagram showing a bracket with bolts and a rod (no text or symbols)- Use the wrench to remove the bottom hinge hex screw, then loosen the hinge screws and carefully remove the door.

natural_image
Technical line drawing of a mechanical assembly with mounting holes and a central bracket (no text or symbols)- Use the screwdriver to remove the bottom and top hinges.

natural_image
Technical line drawing of a mechanical bracket with bolts and a cylindrical pin (no text or symbols)- Use the wrench to remove the bolt of the top left hinge, then install the bolt in to the bottom hinge.
natural_image
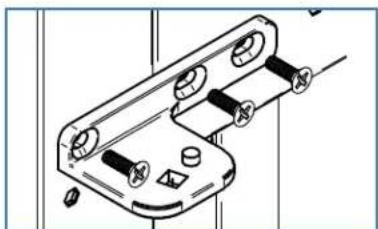
Technical line drawing of a mechanical clamp or bracket assembly (no text or symbols)- Install the bottom right hinge in the top left side of the equipment. Then, install the top right hinge in the bottom left side of the equipment.
natural_image
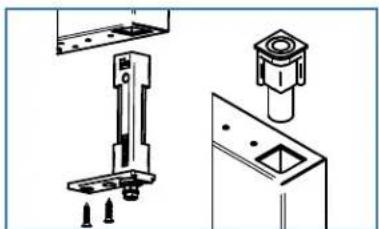
Technical line drawing of mechanical components including a bracket, nut, and mounting bracket (no text or symbols)- Remove the bottom cartridge and bolt housing from the door, install the cartridge at the top of the door and the bolt housing in the bottom.
natural_image
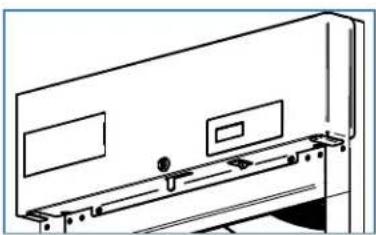
Pure technical line drawing of a mechanical assembly without any text, numbers, or symbols- Remove the top head screws, then move the hinge cap to the right side. Reinstall the top head screws.
natural_image
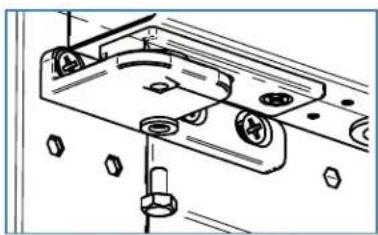
Technical line drawing of a mechanical assembly with bolts and mounting holes (no text or symbols)- Install the hinges on the left side, but do not tighten screws. Then, install the door and cartridge screw. Tighten all screws.

natural_image
Technical line drawing of a mechanical lifting or assembly component (no text or symbols)- Reinstall the front panel with the hinge cap on the right side.
Cabinet Location Guidelines
• Install the unit on strong and leveled surfaces.
- If the surface is uneven, the unit may be noisy.
- The unit may malfunction if the surface is uneven.
• Install the unit in an indoor, well-ventilated area.
- For best performance, please maintain clearance of 6" on the back of the unit.
- Brackets should be attached on the back of the unit.
- Do not use outdoors. For indoor use only.
- Avoid direct sunlight.
- Avoid installation in a high humidity and/or dusty area.
- Humidity above 60% can cause the unit to rust, collect condensation, and may decrease efficiency.
- Dust collected on condenser coil will cause unit to malfunction.
- Select a location away from heat and moisture-generating equipment.
- Ambient temperatures above 75 degrees Fahrenheit may cause the compressor to malfunction.
- For optimal performance, this unit should not be used in environments with ambient temperatures exceeding 75 degrees Fahrenheit.
- The unit should not be placed in areas with an ambient temperature over 90 degrees Fahrenheit.
- Equipment malfunctions due to ambient temperatures above 90 degrees could void the warranty.
- Do not install this unit inside a closet or alcove.
Electrical
- Ensure that the required voltage is being supplied at all times.
- The unit should be plugged into a grounded and properly-sized electrical outlet with appropriate over-current protection. Refer to the electrical requirements on the unit's nameplate.
• The unit should have its own dedicated outlet.
• DO NOT use extension cords. - Ensure the unit is not resting on or against the electrical cord.
• If the unit is not in use for a long period of time, unplug from the outlet.
• To avoid shock and fire hazards, DO NOT plug in or unplug the unit with wet hands. - After unplugging the unit, wait at least 10 minutes before plugging it back in. Failure to do so could cause damage to the compressor.
Temperature Controls
Adjusting the Temperature
- Your new refrigerator or freezer is already factory-set to run at optimum temperatures for food safety and should require no adjustments.
- Refrigerators are set to cycle between a minimum temperature of 32^ F and a maximum temperature of 38^ F.
- Freezers are set to cycle between a minimum temperature of -8°F and a maximum temperature of 0°F.
- Adjusting the temperature changes the minimum temperature at which your unit will run. Your unit will not run constantly at this setting. To change it, follow these instructions:
Digital Control Units
- Hold "SET" for 1 second. The display will flash the current minimum temperature.
- Use the arrow buttons to adjust the minimum temperature you'd like the unit to run at.
- Press "SET" again to save your settings.
Always remember to calculate the differential if you change the minimum temperature setting. The cabinet temperature will fluctuate up to 6°F for refrigerators and 8°F for freezers over your set minimum temperature as the compressor runs and shuts off. Setting the temperature too high will result in unsafe maximum temperatures and possible health code violations.
Operation

ECO Mode
Your new A Plus Reach-in Refrigerator or Freezer is equipped with Eco Mode which will cut down on energy costs and support longevity of your unit. When the unit automatically detects a time of no use, it will switch into a power saving mode: Eco Mode. After two hours of no door openings, your unit will automatically select a more efficient food-safe temperature to maintain for four hours. The compressor will work less during the downtime of your kitchen. You can also enable Eco Mode manually at any time you choose via the electronic controller. Eco Mode will stop when the door opens or when it is toggled off on the controller.
Automatic Mode
- Your unit's setting is to automatically detect times to implement eco mode.
- When your unit detects no door openings for two consecutive hours, the temperature set point will be slightly higher, allowing the compressor to run less.
- Eco Mode will run for four consecutive hours or until the door is opened for more than 6 seconds, then it will toggle off.
Manual Activation
- Press the "ECO" button on the controller.
• The screen will display "ECO." - The temperature will be set to a slightly higher maintenance temperature, allowing the compressor to run less.
- If you wish to end Eco Mode, press the "ECO" button again.
- Alternatively, Eco Mode will automatically end when the unit's door is opened for more than 6 seconds or after four hours of being in Eco Mode.
Defrost System
Automatic Defrost Cycle
• Refrigerator coils are kept below the freezing point (32°F).
- During compressor downtime, the evaporator fan continues to circulate air through the evaporator coil. This air circulation raises the coil temperature above the freezing point, melting any accumulated frost.
- Run-off water is drained into the evaporator pan and evaporated.
• Automatic defrost timers initiate at pre-set intervals and for a pre-determined duration.
Running a Manual Defrost Cycle
- Units are pre-programmed to run automatic defrost cycles at preset intervals. However, if you would like to run a manual defrost cycle at any time, follow the steps below. Only models with digital controls can run a manual defrost cycle. Units with mechanical controls cannot run a manual defrost cycle.
- Refrigerators: Press the defrost button (▼) for approximately 3 seconds. Repeat to stop the defrost cycle.
- Freezers: Press the defrost button (▼) for approximately 5 seconds. Repeat to stop the defrost cycle.
Loading Product
• DO NOT block the air duct/fan at the top of the unit.
- ALWAYS maintain a minimum of 4" of clearance between products and the fan.
- Ensure all shelves are sitting level and properly secured before loading products.
• DO NOT store flammable/explosive gas or liquids inside the unit.
Maintenance
DISCONNECT POWER CORD BEFORE CLEANING ANY PARTS OF THE UNIT.
It is strongly recommended that any servicing of the unit be performed by an authorized service technician.
Fan Blades & Motor
• If necessary, clean the fan blades and motor with a soft cloth.
- If it is necessary to wash the fan blades more thoroughly, cover the fan motor to prevent moisture damage, then use a damp cloth to clean the fan blades.
Interior
- Use warm water and a mild soap with a clean cloth to wipe down the interior of the unit.
- DO NOT use steel wool, caustic soap, abrasive cleaners, or bleach that may damage the interior finish.
- Wash door gaskets on a regular basis, preferably weekly. Simply remove door gasket from the frame of the door, soak in warm water and soap for thirty (30) minutes, dry with soft cloth, and replace.
- Check door gaskets for proper seal after they are replaced.
- Periodically remove the shelves and pilasters from the unit and clean them with mild soap and warm water.
- To remove the pilasters, first remove the shelves and shelf brackets. Then, simply lift the pilaster up and out.
Cleaning the Condenser Coil
- A dusty condenser may lead to high energy consumption, less cooling effectiveness, and compressor damage.
- For efficient operation, keep the condenser surface free of dust, dirt, and lint.
• We recommend cleaning the condenser coil at least once per month. - The condenser coil is located at the bottom behind the panel.
Cleaning the Condenser Coil Instructions
- Disconnect the electrical power from the unit.
- Remove the front cover and base cover with a screwdriver.
- Using a soft brush and/or vacuum, remove the dirt, lint, etc. from the finned condenser coil in a vertical direction.
- Clean the condenser with a commercial condenser coil cleaner, available from any kitchen equipment retailer. Ex. Noble Chemical Tech Line Coil Cleaners (148TLECCCLNR, 148TLHDCCLNR, 148TLECOILDD, 148TLFMCCLNR, 147TLEVPCLNR, or 147TLHDCCLNR).
- After cleaning, straighten any bent condenser fins with a fin comb.
- When finished, be sure to reinstall the front cover and base cover.
- Reconnect the electrical power to the unit.
Troubleshooting
| Problem | Possible Cause | Possible Solution |
| Compressor not running. | Fuse blown or circuit breaker tripped. Replace fuse or reset circuit breaker. | |
| Power cord unplugged. Plug in power cord. | ||
| Thermostat set too high. Set thermostat to lower temperature. | ||
| Cabinet in defrost cycle. Wait for defrost cycle to finish. | ||
| Condensing units run for long periods of time. | Excessive amount of warm product placed in cabinet. | Allow adequate time for product to cool down. |
| Prolonged door opening or door ajar. | Ensure doors are closed when not in use. Avoid opening doors for long periods of time. | |
| Door gasket(s) not sealing properly. | Ensure gaskets are snapped in completely. Remove gasket and wash with soap and water. Check condition of gasket and replace if necessary. | |
| Dirty condenser coil. Clean the condenser coil. (Page 7) | ||
| Evaporator coil iced over. | Unplug unit and allow coil to defrost. Make sure thermostat is not set too cold. Ensure that door gasket(s) are sealing properly. | |
| Cabinet temperature is too warm. | Thermostat set too warm. Set thermostat to lower temperature. | |
| Airflow blocked. | Re-arrange product to allow for proper air flow. Make sure there is at least four inches of clearance from evaporator. | |
| Excessive amount of warm product placed in cabinet. | Allow adequate time for product to cool down. | |
| Fuse blown or circuit breaker tripped. Replace fuse or reset circuit breaker. | ||
| Dirty condenser coil. Clean the condenser coil. (Page 7) | ||
| Evaporator coil iced over. | Ensure doors are closed when not in use. Avoid opening doors for long periods of time. | |
| Low refrigerant levels. Contact a service technician to check refrigerant levels. | ||
| Door is slightly ajar. Make sure door is completely closed. | ||
| Condensation is collecting on the cabinet and/or floor. | Gasket is not sealing properly. Clean, repair, or replace the gasket as necessary. | |
| Relative humidity is above 60%. | Move unit to area below relative humidity or lower humidity level. | |
| Interior light is not working. | Poor switch connection. Turn off light switch and turn it back on. | |
| Bulb is not connected. Make sure the bulb is correctly inserted in the socket. | ||
| Bulb has burned out. Replace the bulb. | ||

- A Plus Reach-In Refrigerators & Freezers
- 447AP23R 27½" Single Solid Door
- 447AP49R 55 3/8 " Double Solid Door
- 447AP23F 27½" Single Solid Door
- 447AP49F 55 3/8 " Double Solid Door
- Table of Contents
- Warnings
- Before Installation
- Installation of Casters
- Field Convertible Doors
- Tools Needed:
- Cabinet Location Guidelines
- Electrical
- Temperature Controls
- Adjusting the Temperature
- Digital Control Units
- Operation
- ECO Mode
- Automatic Mode
- Manual Activation
- Defrost System
- Automatic Defrost Cycle
- Running a Manual Defrost Cycle
- Loading Product
- Maintenance
- Fan Blades & Motor
- Interior
- Cleaning the Condenser Coil
- Cleaning the Condenser Coil Instructions
Brand : Avantco
Model : Plus AP-23F
Category : Compressor