
ASD-1R - Digital music player DENON - Free user manual and instructions
Find the device manual for free ASD-1R DENON in PDF.

| Product Type | Digital Music Player |
| Brand | DENON |
| Model | ASD-1R |
| Supported Audio Formats | MP3, WAV, FLAC, AAC, WMA |
| Storage Capacity | 64 GB (internal) |
| Storage Expansion | microSD card up to 128 GB |
| Battery Life | Approximately 15 hours |
| Battery Type | Built-in rechargeable lithium-ion |
| Dimensions (L x W x H) | 110 x 65 x 16 mm |
| Weight | 150 g |
| Screen | 2.4-inch Color LCD |
| Connectivity | USB-C, Bluetooth 5.0, 3.5mm Headphone Jack |
| Main Functions | Audio playback, folder navigation, playlists, equalizer |
| Power | USB-C (5V, 1A) |
| Operating Temperature | 0°C to 40°C |
| Maintenance and Cleaning | Clean with a dry, soft cloth. Do not use chemicals. |
| Safety | Compliant with CE, FCC Class B standards |
| Spare Parts and Repairability | Battery and screen replaceable by a professional |
| Box Contents | ASD-1R player, USB-C cable, quick start guide |
| Warranty | 2 years |
| General Information | Class B device, compliant with Canadian ICES-003 |
Frequently Asked Questions - ASD-1R DENON
User questions about ASD-1R DENON
0 question about this device. Answer the ones you know or ask your own.
Ask a new question about this device
Download the instructions for your Digital music player in PDF format for free! Find your manual ASD-1R - DENON and take your electronic device back in hand. On this page are published all the documents necessary for the use of your device. ASD-1R by DENON.
USER MANUAL ASD-1R DENON
Control Dock for iPod®
ASD-1R
OPERATING INSTRUCTIONS
| FCC INFORMATION (For US customers) |
| 1.PRODUCTThis product complies with Part 15 of the FCC Rules. Operation is subject to the following two conditions: (1) this product may not cause harmful interference, and (2) this product must accept any interference received, including interference that may cause undesired operation. |
| 2.IMPORTANT NOTICE: DO NOT MODIFY THIS PRODUCTThis product, when installed as indicated in the instructions contained in this manual, meets FCC requirements. Modification not expressly approved by DENON may void your authority, granted by the FCC, to use the product. |
| 3. NOTEThis product has been tested and found to comply with the limits for a Class B digital device, pursuant to Part 15 of the FCC Rules. These limits are designed to provide reasonable protection against harmful interference in a residential installation. This product generates, uses and can radiate radio frequency energy and, if not installed and used in accordance with the instructions, may cause harmful interference to radio communications. However, there is no guarantee that interference will not occur in a particular installation. If this product does cause harmful interference to radio or television reception, which can be determined by turning the product OFF and ON, the user is encouraged to try to correct the interference by one or more of the following measures:·Reorient or relocate the receiving antenna.·Increase the separation between the equipment and receiver.·Connect the product into an outlet on a circuit different from that to which the receiver is connected.·Consult the local retailer authorized to distribute this type of product or an experienced radio/TV technician for help. |
To completely disconnect this product from the mains, disconnect the plug from the wall socket outlet.
When setting up this product, make sure that the AC outlet you are using is easily accessible.
NOTE ON USE:
- Avoid high temperatures.
Allow for sufficient heat dispersion when installed in a rack. - Handle the power cord carefully.
- Hold the plug when unplugging the cord.
- Keep the apparatus free from moisture, water, and dust.
- Unplug the power cord when not using the apparatus for long periods of time.
- Do not obstruct the ventilation holes.
- Do not let foreign objects into the apparatus.
- Do not let insecticides, benzene, and thinner come in contact with the apparatus.
- Never disassemble or modify the apparatus in any way.
CAUTION:
- Minimum distances around the apparatus for sufficient ventilation.
- The ventilation should not be impeded by covering the ventilation openings with items, such as newspapers, table-cloths, curtains, etc..
- No naked flame sources, such as lighted candles, should be placed on the apparatus.
- Attention should be drawn to the environmental aspects of battery disposal.
The use of apparatus in tropical and/or moderate climates.
- DECLARATION OF CONFORMITY
We declare under our sole responsibility that this product, to which this declaration relates, is in conformity with the following standards: EN60065, EN55022, EN55024, EN61000-3-2 and EN61000-3-3. Following the provisions of 73/23/EEC, 2004/108/EC and 93/68/EEC Directive.
A NOTE ABOUT RECYCLING:
This product's packaging materials are recyclable and can be reused. Please dispose of any materials in accordance with the local recycling regulations.
When discarding the unit, comply with local rules or regulations. Batteries should never be thrown away or incinerated but disposed of in accordance with the local regulations concerning chemical waste.
This product and the accessories packed together constitute the applicable product according to the WEEE directive except batteries.
Getting Started
Contents
Getting Started
Accessories 1
Before using 2
Part names and functions 2
Top panel/Rear panel 2
Bottom panel 2
Connecting Other Sources
Mounting the universal adapter on the control dock 3
Connection to devices equipped with
DOCK CONTROL terminals 4
Connecting the ASD-1R and a device equipped with
a system control (SYSTEM CONNECTOR) terminal 5
Functions and operation
When the ASD-1R and a device equipped with a
DOCK CONTROL terminal are connected 6
When the ASD-1R and a device equipped with a system control (SYSTEM CONNECTOR) terminal are connected
Remote control buttons and operations 7
Troubleshooting 8
Specifications 9
Accessories
Check that the following parts are attached in addition to the main unit:
① Operating Instruction 1
② Service Station List
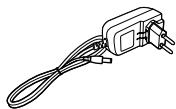
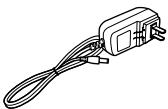
③ AC Adapter (KSAFD1200120W1UV)
(4) Universal Adapter (5 types) 1 each
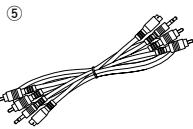
⑤ AV/Control Cable (Cable length: Approx. 6 ft/2 m) .1
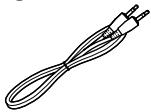
⑥ System Connector Cable (Cable length: Approx. 3 ft/1 m)

(For U.S.A. & Canada model)
(4)
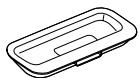
(For Europe model)
(For China model)
6
NOTE:
- Do not use any AC adapter other than the specified one. Doing so could result in fires or electric shock.
- The included AC adapter is exclusively for use with this unit. Never use it with other equipment.
Getting Started
Before using
Pay attention to the following before using this unit:
- Moving the unit
To prevent short-circuits or damaged wires in the connection cables, always unplug the power supply cord and disconnect the connection cables between all other audio components when moving the unit.
- Cautions on using mobile phones
Using a mobile phone near this unit may result in noise. If so, move the mobile phone away from this unit when using it.
- Store these instructions in a safe place.
After reading, store this instructions along with the warranty card in a safe place.
- Note that the illustrations in these instructions may differ from the actual unit for explanation purposes.
Part names and functions
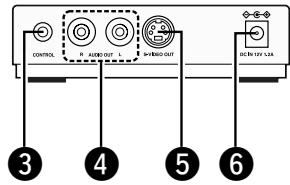
Top panel/Rear panel
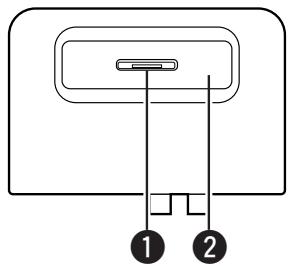
1 Dock connector
Universal adapter slot
CONTROL terminal (stereo mini plug)
4 AUDIO OUT terminals
S-VIDEO OUT terminal
DC IN terminal
Bottom panel
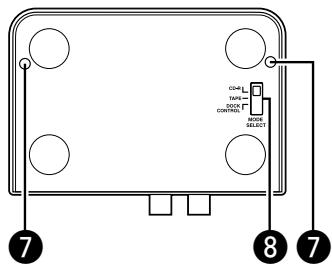
Fixing screw holes
Use the fixing screw holes (two) to fix the control dock by screw.
(Usable screws: M3, max. 15 mm in length)
3 Communication mode selector (MODE SELECT)
Brand : DENON
Model : ASD-1R
Category : Digital music player