
XEPHIA 42 PXW 110-6721 DOLBY - Television GRUNDIG - Free user manual and instructions
Find the device manual for free XEPHIA 42 PXW 110-6721 DOLBY GRUNDIG in PDF.

| Product type | Plasma screen television |
| Brand | Grundig |
| Model | XEPHIA 42 PXW 110-6721 DOLBY |
| Screen size (diagonal) | 42 inches (107 cm) |
| Screen resolution | 1366 x 768 pixels (HD Ready) |
| Display technology | Plasma |
| Sound | Dolby Digital, built-in speakers |
| Connectivity | SCART, HDMI, component input, composite input, headphone jack |
| Remote control | Included, infrared |
| Power supply | 100-240 V, 50/60 Hz |
| Power consumption (max) | Approximately 250 W |
| Weight (without stand) | Approximately 18 kg |
| Dimensions (without stand) | 102 x 62 x 8 cm (W x H x D) |
| Wall mount standard | VESA 400 x 200 mm |
| Main features | Analog and digital channels (DVB-T), teletext, timer, parental control |
| Maintenance and cleaning | Soft dry cloth, non-abrasive product |
| Safety | Stability on stand, wall mounting recommended |
| Spare parts | Remote control, stand, cables available from after-sales service |
| Repairability | Repairability index not communicated |
| General information | User manual available in French, 38 pages |
Frequently Asked Questions - XEPHIA 42 PXW 110-6721 DOLBY GRUNDIG
User questions about XEPHIA 42 PXW 110-6721 DOLBY GRUNDIG
0 question about this device. Answer the ones you know or ask your own.
Ask a new question about this device
Download the instructions for your Television in PDF format for free! Find your manual XEPHIA 42 PXW 110-6721 DOLBY - GRUNDIG and take your electronic device back in hand. On this page are published all the documents necessary for the use of your device. XEPHIA 42 PXW 110-6721 DOLBY by GRUNDIG.
USER MANUAL XEPHIA 42 PXW 110-6721 DOLBY GRUNDIG
Connection/Preparation
Mounting the table base
Connecting the loudspeakers
Setting up and connecting the loudspeakers
Connecting the antenna and the mains cable
Connecting the Hi-fi system/AV receiver
Inserting batteries in the remote control
Overview
Connections on the television
Controls on the television
The remote control
Settings
Setting television channels automatically
Changing stored channels
Picture settings
Audio settings
Television operation
Basic functions
Zap function
Zoom function
Changing the picture format
PIP mode
Teletext mode
TOP text or FLOF text mode
Normal text mode
Additional functions
Convenience functions
Convenience functions with the »Features« menu
Using external devices
DVD player, DVD recorder, video recorder or set-top box
Headphones
Decoder or satellite receiver
Camcorder
PC Monitor Mode
Connecting a PC
Selecting the channel position for the PC
Settings for the PC
Special settings
Setting television channels
Information
Technical data, Service information for dealers, Environmental note
Troubleshooting
Additional Information for units sold in the UK.
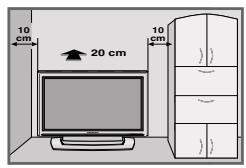
SET-UP AND SAFETY


natural_image
Illustration of a computer monitor with a warning symbol and crossed-out X marks (no text or labels)
natural_image
Illustration of a flat-screen monitor with two black X marks, placed on a wall with diagonal light beams (no text or symbols)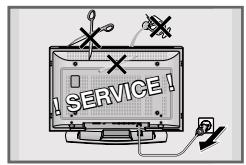
natural_image
Illustration of a computer monitor with electrical connections and lightning bolts (no text or symbols)Please note the following information when setting up your television set.
This television set is designed to receive and display video and audio signals.
Any other use is expressly prohibited.
The ideal viewing distance is 5 times the screen diagonal.
External light falling on the screen impairs picture quality.
To assure sufficient ventilation make sure there is enough space around it in the wall unit.
The television set is designed for use in dry rooms. If you do use it in the open, please ensure that it is protected from moisture, such as rain or splashing water. Do not expose the television set to any moisture.
Do not place any vessels such as vases on the television, as they may spill liquid, thus presenting a safety risk.
Place the television set on a solid, level surface. Do not place any objects such as newspapers on the television set or cloth or similar items beneath it.
Do not place the television set close to heating units or in direct sunlight, as this will impair cooling.
Heat build-up can be dangerous and shortens the operating life of the television set. For reasons of safety, have a specialist remove any dirt deposits in the set from time to time.
Do not open the television set under any circumstances. Warranty claims are excluded for damage resulting from improper handling.
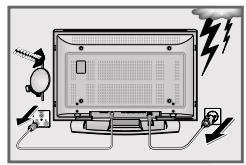
Ensure that the mains cable and the mains adapter are not damaged.
The television set may only be operated with the mains cable/adapter supplied.
Thunderstorms are a danger to all electrical devices. Even if the television set is switched off, it can be damaged by a lightning strike to the mains or the antenna cable. Always disconnect the mains and antenna plugs during a storm.
Only clean the plasma screen with a chamois leather and commercially available glass cleaner.
Only clean the housing of the plasma television with a damp, soft cloth, and plain water.
The Plasma screen is equipped with a glass plate. If the device is subjected to excessive strain, for example through vibration, bending or heat shocks the glass plate can break.
Do not hit or put pressure on the glass plate.
Should the glass plate be damaged, pull out the main plug immediately.
SET-UP AND SAFETY
Plasma screens use the principle of luminescent material. This technology can suffer sticking effects under certain operating conditions. This can include:
– Prolonged display of a freeze-frame
- Constant display of the same background
- Use of a picture format (such as 4:3) which does not fill the screen.
Once these sticking effects occur, they cannot normally be reversed. To avoid sticking effects please note:
– During the first 100 operating hours, ensure that the television displays mostly moving pictures or frequently changing stills which fill the screen
- Use a picture format which fills the screen (16:9)
- Always activate the screensaver when using a PC
– Decrease the contrast and brightness as much as possible
- Switch off the device when it is not in use
If a freeze-frame is on the Plasma screen for a very long time (several hours), it is possible that this will be visible as a ghosting effect for some time when you switch to another channel. However, after a certain amount of time this ghosting disappears again.
This can be caused by a type of memory effect. In order to prevent this effect, we recommend activating the screen saver when using a PC.
After a lengthy period without use (longer than one year) a temporary colour discrepancy is possible in some circumstances.
This effect is normal for plasma screens. After a while these colour discrepancies disappear again.
A plasma screen is made up of around. 1.2 million colour pixels.
Within the industrial standard tolerance, a very small number of pixels (0.001 %) can be defective. This is not regarded as a device defect under the terms of the warranty.
The plasma screen functions with inert gases and air pressure.
At 2,000 m above sea-level or higher, the picture can become unstable and the picture quality is reduced. However, when the device is returned to below 2,000 m above sea-level, this effect disappears and the device functions perfectly.
Please note when deciding where to put the device that furniture surfaces are covered by various types of lacquer and plastic, most of which contain chemical additives. These may cause corrosion to the feet of the device, thus resulting in stains on the surface of the furniture which can be difficult or impossible to remove.
Note:
Do not connect any other equipment while the device is switched on. Switch off the other equipment as well before connecting it.
Only plug the device into the mains socket after you have connected the external devices and the antenna.
CONNECTION/PREPARATION
Mounting the table base
Diagrams are contained in the assembly instructions enclosed with the table base.
1 Fasten the two brackets to the table base using the hex socket screws supplied.
2 Remove four fixing screws for each bracket from the back of the device.
3 Place the stand on a level surface.
4 Put the device on top of the stand.
5 Fasten the stand to the device by screwing four screws to the back of the device for each bracket.
CONNECTION/PREPARATION
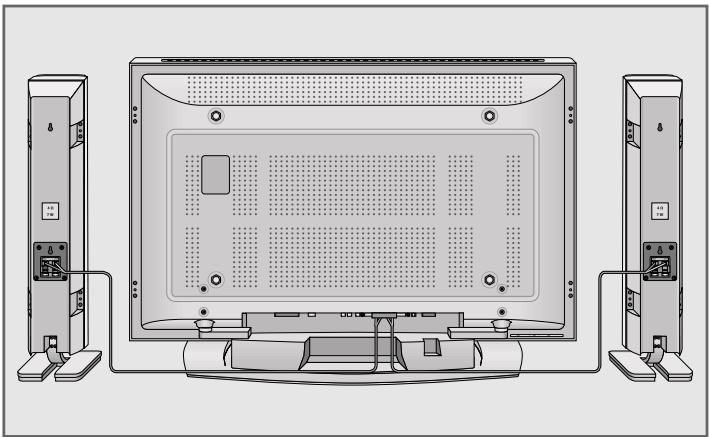
Connecting the loudspeakers
natural_image
Line drawing of a flat-screen TV unit with two side-mounted speakers and front-mounted screens (no text or symbols)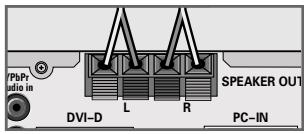
1 Use the speaker cable supplied to connect the »SPEAKER OUT - +« terminals on the device to the »INPUT - +« terminals on each speaker.
Connect the cables marked in red to the red terminal.
Setting up and connecting the loudspeakers

natural_image
Technical line drawing of a flat-screen TV unit with rear panel and side connectors (no text or symbols)1 Fasten the brackets to the speakers using the screws supplied.
2 Screw the speakers to the brackets on the device using the screws supplied.
3 Use the speaker cable supplied to connect the »SPEAKER OUT - +« terminals on the device to the »INPUT - +« terminals on each speaker.
Connect the cables marked in red to the red terminal.
CONNECTION/PREPARATION
Connecting the antenna and the mains cable
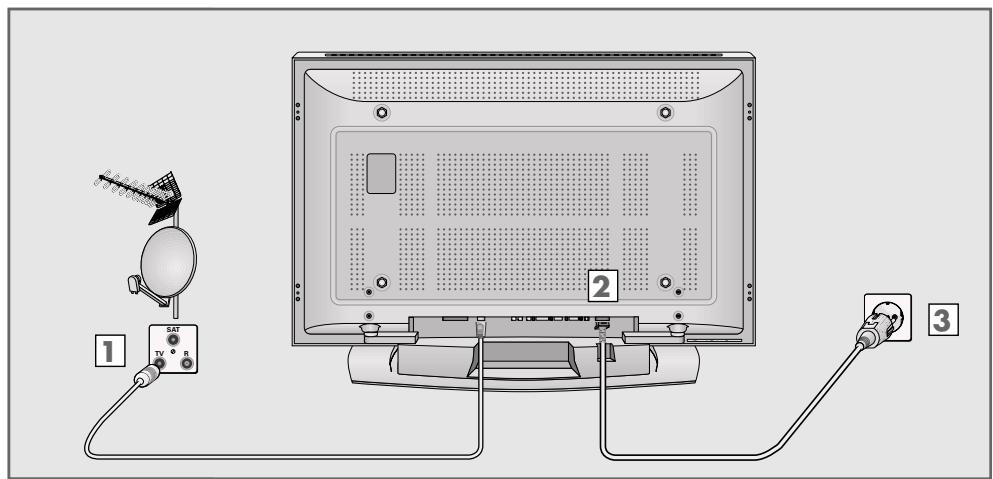
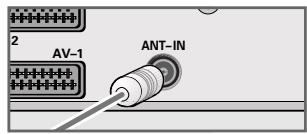
1 Plug the antenna cable of the rooftop antenna into the »ANT-IN« antenna socket on the television.
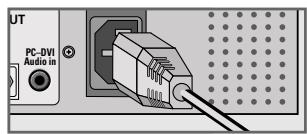
2 Plug the mains cable supplied into the mains socket of the television.
3 Plug the power cord into a wall socket.
Note:
Only plug the device into the mains socket after you have connected the external devices and the antenna.
Only connect the television using the power cord supplied to a suitable earthed safety socket.
Do not use an adapter plug or extension lead which does not meet the applicable safety standards. Do not tamper with the power cord.
CONNECTION/PREPARATION
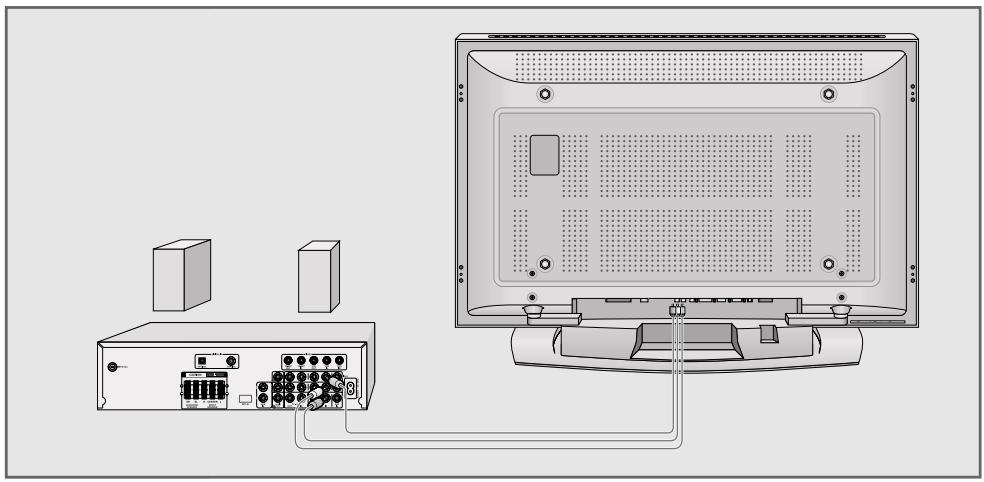
Connecting the Hi-fi system/AV receiver
If you wish to have sound of a quality that matches the ideal picture provided by your television, we recommend connecting the television to a hi-fi system/AV receiverHiFi system.
natural_image
Diagram of a computer setup with an external monitor, ports, and connected cables (no text or symbols visible)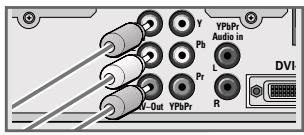
1 Connect the white and red sockets »AV-Out L R« on the television and the corresponding sockets on the hi-fi system/ AV receiver with a cinch cable.
2 Connect the yellow »AV-Out Video« socket on the television to the corresponding socket on the AV receiver using a cinch cable (video signal).
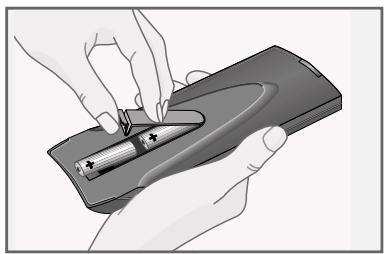
Inserting batteries in the remote control
natural_image
Illustration of hands holding a battery pack with a pen inserted (no text or symbols visible)1 Open the battery compartment by removing the lid.
2 Insert the batteries (Mignon type, for example UM-3 or AA, 2x1,5V). Observe the polarity (marked on the base of the battery compartment).
3 Close the battery compartment.
Note:
If the television no longer reacts properly to remote control commands, the batteries may be flat. Be sure to remove used batteries.
The manufacturer accepts no liability for damage resulting from used batteries.
Environmental note
Batteries, including those which contain no heavy metal, may not be disposed of with household waste. Please dispose of used batteries in an environmentally sound manner. Find out about the legal regulations which apply in your area.
Connections on the television
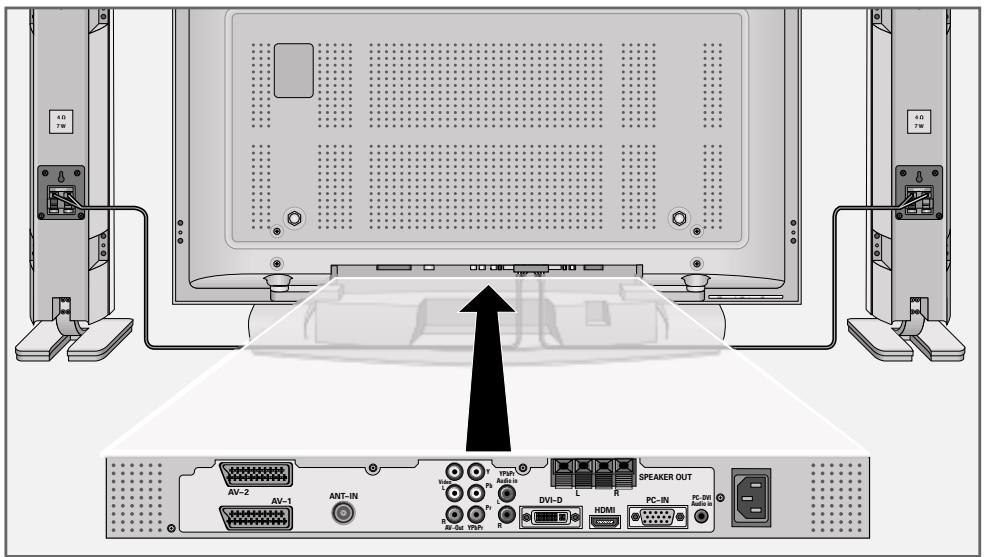
AV-2 Euro/AV socket (FBAS signal).
AV-1 Euro/AV socket (FBAS signal, RGB signal).
ANT-IN Antenna socket.
AV-Out Video L R Audio and video output.
Y Pb/Pr Video signal input (YUV signal).
Y Pb/Pr Audio In L R Audio signal input (YUV signal).
SPEAKER OUT L R Terminals for connecting external loudspeakers (2 x 20 W music power, 2 x 10 W sine wave, impedance 4 Ω);
R = right channel, L = left channel.
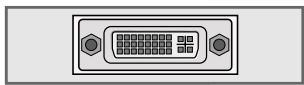
DVI-D DVI-D socket, video signal input for PC (DVI).
HDMI HDMI socket, audio/video signal input (HDMI).
PC-IN VGA socket, video signal input for PC.
PC-DVI Audio In Audio signal input for PC.

Socket for the mains cable.
Controls on the television

natural_image
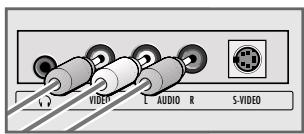
Illustration of a desktop computer setup with two speakers and a monitor, showing front panel and control buttons (no text or symbols on main components)Headphone connection (3.5 mm jack).
VIDEO Video signal input for camcorder.
L AUDIO R Audio signal input for camcorder.
S-VIDEO Video signal input for S-Video camcorder.
① Power switch, switches the device to and from standby mode.
TV/AV Opens the pre-selection for AV channels.
Select within the menu with »P +« or »- P«, confirm with »- ▲«.
MENU Opens the »INFO« menu
Press »- ▲« to select an item
- P + Switch the television on from standby
Channel selection
Select a function in the menu
- ▲ + Adjust the volume
Select menu functions
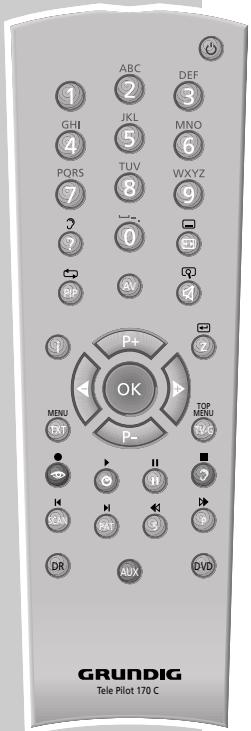
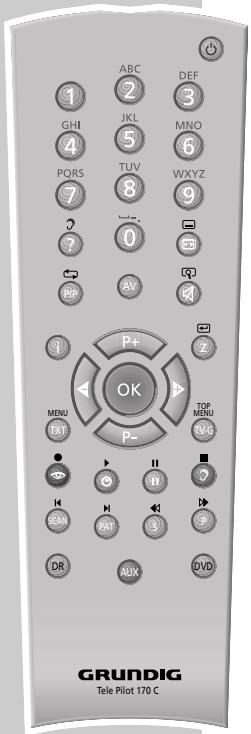
The remote control

| Switches off the television set (stand-by). | |
| 1...0 | Switches the television on from standby modeSelects channels directly. |
| ? | Displays the number and name of a station.Switches to double character size in teletext mode. |
| Switches between picture formats.Page stop in teletext mode. | |
| PIP | Shows an inset picture;activates the double window function (two different TV programmes on separate halves of the screen);switches back to normal size. |
| AV | Opens the pre-selection for AV channels.Then selection with P+ or P-. |
| Sound on/off (mute). | |
| i | Calls up the »Main menu«. |
| Z | Zap function. |
| P+, P- | Switches the television on from standby;selects stations step by step;moves the cursor in the menus up and down. |
| Adjusts the volume;moves the cursor left/right. | |
| OK | Calls up the preset channels;activates various functions. |
| TXT | Switches between teletext and TV modes |
| TV-G | Key has no function. |
| Selects various picture settings;scrolls back a page in teletext mode. | |
| Displays the time;selects the next page in teletext mode. | |
| Freeze-frame;selects the desired chapter in teletext mode. | |
| Selects various audio settings;selects the desired topic in teletext mode. |
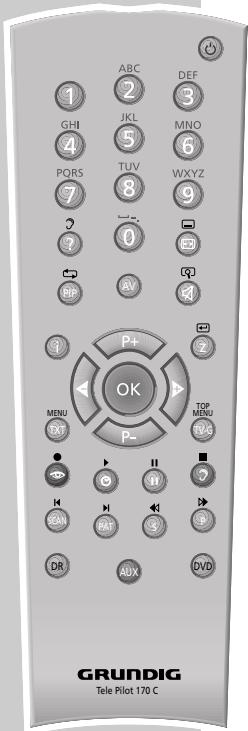
SCAN Reveals answers in teletext mode.
PAT Selects the Double Window function.
S Selects the sub-pages in teletext mode.
P Updates a page in teletext mode.
DR, DVD Switches to operation of a GRUNDIG digital receiver, GRUNDIG digital receiver with hard disk (PDR), GRUNDIG DVD player or GRUNDIG DVD recorder.
Keep the appropriate button (»DR«, »DVD«) pressed down. Then press the appropriate button.
Note:
The »DR« button has been programmed for operating a GRUNDIG digital receiver (remote control level 1). The »DVD« button has been programmed for operating a GRUNDIG DVD player.
You can change this programming, see »AUX« button. The functions available depend on the model of the device you are using. Just try it out.
AUX Programming the remote control for the operation of external devices.
Press »AUX« and hold it down and press three numerical buttons to enter the appropriate code:
Setting television channels automatically
| Sprache | ||
| Deutsch | Português | Türkçe |
| Dansk | Svenska | Еллгикá |
| Español | Suomi | Hrvatski |
| Français | Česky | Русский |
| English | Slovenščina | Româna |
| Italiano | Slovensko | Српски |
| Norsk | Magyar | Български |
| Dutch | Polski | |

Auswählen
und bestätigen

Ende
| Country | ||
| Germany | Greece | Romania |
| Austria | Hungary | Slovakia |
| Belgium | Iceland | Slovenia |
| Bulgaria | Ireland | Spain |
| Croatia | Italy | Sweden |
| Czech | Luxembourg | Switzerland |
| Denmark | Netherlands | Turkey |
| United Kingdom | Norway | Yugoslavia |
| Finland | Poland | |
| France | Portugal | |

Select
and confirm

Back
Exit
The television set is equipped with an automatic channel search system.
You start the search and can then sort the television channels into your order of preference.
99 preset positions are provided, to which you can assign television channels from the antenna or from the cable connection.
1 Switch on the television with »①« on the television set, then press »P+« on the remote control.
- The »Sprache« (Menu language) menu appears when the television is first switched on.
Hint:
If the »Sprache« (Menu language) menu does not appear on the screen, then set it in accordance with the chapter on resetting all television channels on page 34.
– The search begins. It may last a few minutes, depending on the number of television stations found.
- After the search the television switches to channel position 1 and the »Program table« menu appears.
Changing stored channels
You can delete channels that have been stored more than once during the automatic search. You can also store channels in a different preset position, change or enter the name of a channel as well as skip channels.
| Program Table | |||
| 01 ARD | 09 | 17 ---- S | |
| 02 ZDF | 10 | 18 ---- S | |
| 03 BR | 11 S | 19 ---- S | |
| 04 RTL | 12 ---- S | 20 ---- S | |
| 05 SAT 1 | 13 ---- S | 21 ---- S | |
| 06 PRO 7 | 14 ---- S | 22 ---- S | |
| 07 BR | 15 ---- S | 23 ---- S | |
| 08 TEL5 | 16 ---- S | 24 ---- S | |

Select
Exit
Skip
Move
Delete
Name
Deleting channels
1 In the »Program table« menu, select the station to be deleted with »P+«, »P-«, »◀« or »▶«.
2 Highlight the channel with »□□« (yellow).
3 Press »□□« (yellow) to delete the channel.
Note:
To delete other stations, repeat steps 1 and 3.
| Program Table | |||
| 01 ARD | 09 | 17 ---- | S |
| 02 ZDF | 10 | 18 ---- | S |
| 03 BR | 11 S | 19 ---- | S |
| 04 RTL | 12 ---- | 20 ---- | S |
| 05 SAT 1 | 13 ---- | 21 ---- | S |
| 06 PRO 7 | 14 ---- | 22 ---- | S |
| 07 BR | 15 ---- | 23 ---- | S |
| 08 TEL5 | 16 ---- | 24 ---- | S |

| Skip |
| Move |
| Delete |
| Name |
| Program Table | |||
| 01 ARD | 09 | 17 ---- S | |
| 02 ZDF | 10 | 18 ---- S | |
| 03 BR | 11 | S | 19 ---- S |
| 04 RTL | 12 ---- | S | 20 ---- S |
| 05 SAT 1 | 13 ---- | S | 21 ---- S |
| 06 PRO 7 | 14 ---- | S | 22 ---- S |
| 07 BR | 15 ---- | S | 23 ---- S |
| 08 TEL5 | 16 ---- | S | 24 ---- S |

| Skip |
| Move |
| Delete |
| Name |
| Program Table | |||
| 01 ARD S | 09 | 17 ---- | S |
| 02 ZDF | 10 | 18 ---- | S |
| 03 BR | 11 S | 19 ---- | S |
| 04 RTL | 12 ---- | 20 ---- | S |
| 05 SAT 1 | 13 ---- | 21 ---- | S |
| 06 PRO 7 | 14 ---- | 22 ---- | S |
| 07 BR | 15 ---- | 23 ---- | S |
| 08 TEL5 | 16 ---- | 24 ---- | S |

| Skip |
| Move |
| Delete |
| Name |
Sorting television channels
1 In the »Program table« menu, select the channel to be moved with with »P+«, »P-«, »◀« or »▶«.
2 Highlight the channel with »©« (green).
3 Select a new channel position by pressing »P+«, »P-«, »◀« or »▶« and then press »♪« to confirm.
- All of the channels that follow move up one position.
Note:
To sort the other television channels repeat steps 1 to 3.
Entering the channel names (maximum of 5 characters)
1 In the »Program table« menu, select the desired channel with »P+«, »P-«, »◀« or »▶«.
2 Highlight the channel with »?« (blue).
3 Select letters or numbers with »P+« or »P-«, move to the next position with »◀« or »▶« and repeat.
4 Store the channel name with »OK«.
Note:
To enter additional channel names, repeat steps 1 to 4.
Skipping television channels
You can mark television channels which should be skipped during selection with »P+« or »P-«. A selection with the number keys is also possible.
1 In the »Program table« menu, select the desired channel with »P+«, »P-«, »◀« or »▶«.
2 Highlight the channel with » eye« (red).
- An »S« appears behind the name of the television station.
- You can deselect the selected channel by pressing the red button again.
Concluding the settings
1 Press »i« to finish the settings.
Picture settings
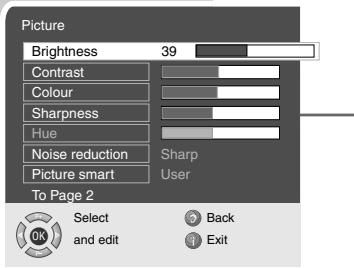
The setting »Hue« only applies to NTSC programmes (e.g. for playback of American television programmes on the video recorder).
5 Press »◀« or »▶« to select the level, and then press »OK« to confirm.
6 Press »i« to finish the settings.
Audio settings

1 Press »i« to open the »MAIN MENU«.
– The »MAIN MENU« appears.
2 Select »Sound« with »P+« or »P-« and confirm with »OK«.
– The »Sound« menu appears.
Note:
Further operation is explained in the following sections.
Volume
1 Select »Volume« with »P+« or »P-« and adjust the setting with »◀« or »▶«.
Balance
Stereo / two channel, mono
If the device receives two channel programmes, e.g. a film with the original sound on sound channel B (display: »Dual B«) and the dubbed version on sound channel A (display: »Dual A«), you can select the sound channel you desire.
If the device receives stereo or Nicam programmes, it switches automatically to stereo sound (display: »Stereo«).
You can switch the sound to »Mono« if the stereo reception quality is poor.
Dolby Virtual is an innovative electronic solution, which is integrated in the television set and only requires the built-in speakers to produce Dolby Surround effects.
Widens the audio output for stereo programmes and improves the sound with mono reception.
The television channels broadcast at different volumes. The automatic volume limiting (AVL) function means the volume is kept the same when you switch between channels.
The equaliser offers you four preset sound settings (Music, Sport, Cinema and Dialogue) and one which you can create yourself (User).
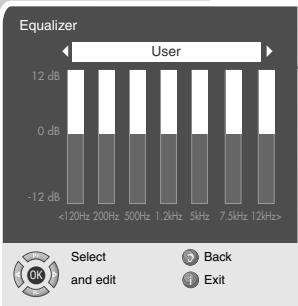
bar
Equalizer | Frequency Range | Back (dB) | Exit (dB) | | :--- | :--- | :--- | | <120Hz | 8 | 10 | | 200Hz | 7 | 9 | | 500Hz | 6 | 8 | | 1.2kHz | 5 | 7 | | 5kHz | 4 | 6 | | 7.5kHz | 3 | 5 | | 12kHz> | 2 | 4 | User1 Select »Equalizer« with »P+« or »P-« and confirm with »OK«.
– The »Equalizer« menu appears.
2 Select the audio setting »User« with »P+« or »P-« and confirm with »OK«.
- The frequency band »120 Hz« is activated.
3 Set the desired value with »P+« or »P-« and select the next frequency band with »◀« or »▶«.
4 Press »?« (blue) to save the setting.
Concluding the settings
1 Press »i« to finish the settings.
Switching on and off
1 Press »①« on the television set to switch it to standby.
2 Press »1...0« or »P+« or »P-« to switch on the device from standby mode.
3 Press the »◀« button to switch the television to standby mode.
4 Press »①« on the television set to switch it off completely. – This saves electricity.
Selecting channels
1 Use »1...0« to select channels directly.
2 Press »P+« or »P-« to move up and down channels.
3 Open the channel list by pressing »OK«, select the station with »P+« or »P-« and press »OK« to switch off the channel list.
Selecting AV channels
1 Call up the »Source table« menu with »AV«.
2 Select the desired AV channel position with »P+« or »P-« and press »OK« to confirm.
3 Switch back to the television channel with »1...0«.
Adjusting the volume
1 Adjust the volume with »◀« or »▶«.
Muting
1 Use » « to switch the sound off (mute) and to switch it on again.
Displaying time
1 You can display the time by pressing the »♪« button (only for channels with teletext).
Displaying information
1 Press »?« to display the information. – The display disappears automatically after a short while.
Freeze-frame
If you wish to view a particular scene for longer, you can freeze the frame of the current programme.
1 Press »□□« (yellow).
2 To quit this function, press »□□« again.
You can select four different picture settings.
1 Select the desired picture setting from »User«, »Natural«, »Rich« or »Soft« with »
- You can alter the »User« picture setting, see the "Picture settings" chapter on page 15.
Audio settings
You can select six different audio settings.
1 Select the desired sound setting from »User«, »Music«, »Sport«, »Cinema« or »Speech« with »?«.
- You can alter the »User« sound settings, see the "Equaliser" chapter on page 16.
Zap function
This function allows you to save the television channel which you are currently watching and switch to other channels (zapping).
1 Select the channel you want to save in the zap memory with »1...0« or »P+« »P-«, (e.g. channel 1, BBC 1) and save by pressing »Z«.
– The display »BBC 1« appears in the screen.
2 Change channels with »1...0« or »P+« »P-«.
3 You can now use »Z« to switch between the saved channel (in the example, BBC1) and the channel you were watching before.
4 Press »i« to quit the zap function.
– The display disappears.
This function enables you to enlarge the television or PC picture.
1 Press »i« to open the »MAIN MENU« menu.
– The »MAIN MENU« menu appears.
2 Select »Picture« with »P++« or »P-« and press »OK« to confirm.
– The »Picture« menu appears.
3 Select »Brightness« with »P+« or »P-« and press »P+« again. – »Zoom« is selected.
4 Press »OK« to activate the zoom function.
5 Press »P+« or »P-« to change the size of the picture.
6 To change the picture section press »OK« and then »◀«, »▶«, »P+« or »P-« to select the section.
7 Press »i« to quit the zoom function.
– The display disappears.
Changing the picture format
The television automatically switches to the 16:9 format if this format is detected via the Euro-AV socket.
1 Select the picture format with »[t]«. The selected picture format, for example »16:9«, appears on the screen.
- You can choose between the following picture formats:
»4:3« format
The picture is shown in 4:3 format.
»Auto« format
The picture format is automatically switched to »16:9« for 16:9 programmes.
For programmes in 4:3 format, the picture automatically fills the screen.

natural_image
Abstract geometric pattern with grayscale squares and a white circle, no text or symbols presentDuring programmes in 4:3 format, the picture is stretched horizontally if »16:9« or »14:9« is selected.
The picture geometry is stretched horizontally.
With actual 16:9 signal sources (from a set-top box on the Euro-AV socket) the picture fills the screen completely and with the correct geometry.
natural_image
Abstract pixelated pattern with grayscale blocks and a circular outline (no text or symbols)»Letterbox« format
The letterbox setting is especially suitable for programmes in 16:9 format.
The black borders which are usually at the top and bottom of the screen are eliminated, 4:3 pictures fill the screen.
The transmitted pictures are enlarged, but are slightly cropped at the top and bottom. The picture geometry remains unchanged.
The »Auto Letterbox« message appears for PAL Plus television programmes.
natural_image
Abstract pixelated pattern with grayscale blocks on a grid background, no text or symbols present»Panorama« format
This setting is suited to films with a large width/height ratio.
During programmes in 4:3 format the picture is stretched horizontally if the »Panorama« function is selected. The picture geometry is stretched horizontally.
»Subtitles« format
If you cannot read the subtitles which appear on the bottom of the screen (especially during programmes with 4:3 format and if the »Subtitles« format is selected), then select »Subtitles«.
PIP mode
PIP (picture in picture) allows you to watch an inset picture from a second picture source in addition to the current channel.
Other television stations, DVD players, video recorders or satellite receivers can be used as video sources. They must be connected to the input sockets on the back of the device.
Displaying the inset picture
1 To display the inset picture, press »PIP« once.
Double window
1 To activate the double window function (split screen), keep pressing »PIP«.
– The last selected main and inset pictures are shown next to each other.
Selecting the channels for the inset picture and the left side of the screen (double window)
1 Press »P+« or »P-« to move up and down channel positions one at a time.
Selecting the channels for the main picture and the right side of the screen (double window)
1 Press »1...0« to select channels directly, or select the video source (DVD player, video recorder, SAT receiver); then call the »Source table« menu by pressing »AV«, select the desired AV channel position with »P+« or »P-« and press »OK« to confirm.
Swapping the main and inset pictures
1 Press »Z« to swap the main and inset pictures.
Changing the position of the inset picture
1 Press »P« to move the inset picture.
Changing the size of the inset picture
1 Press »S« to change the size of the inset picture.
Ending the PIP function
1 To hide the inset picture, press »PIP« twice.
Quitting the double window
1 To quit the double window, press »PIP«.
TOP text or FLOF text mode
1 Press »TXT« to switch to teletext mode.
2 You can directly select teletext pages with »1...0«.
Note:
At the bottom of the screen, you will see an information line consisting of a red, green and, depending on the station, yellow and blue text field. Your remote control has buttons with the corresponding colours.
4 Press »♪« (green) to scroll to the next page.
5 Press »□□« (yellow) to select chapters.
6 Press »?« (blue) to select topics.
7 Press »TXT« to switch off teletext mode.
Normal text mode
1 Press »TXT« to switch to teletext mode.
2 You can directly select teletext pages with »1...0«.
3 Press »P-« to scroll back a page.
4 Press »P+« to scroll to the next page.
5 Press »TXT« to switch off teletext mode.
Additional functions
Skipping the waiting time
While a page is being searched for, you can switch to the television channel.
1 Enter the teletext page number using »1...0« and then press »P«.
- As soon as the page is found, the page number is displayed.
2 Press »P« to switch to the teletext page.
Increasing character size
If you have difficulty reading the text on the screen, you can double the character size.
To enlarge the character size of a teletext page, press »?« repeatedly.
TELETEXT MODE
Page stop
A multiple page may contain several sub-pages, which are automatically scrolled by the transmitting station.
1 Stop the sub-pages with »«.
2 Press »◀◀ to quit the function.
Calling up a sub-page directly
If the selected teletext page contains further pages, the number of the current sub-page as well as the total number of pages is displayed.
1 Call up the sub-pages with »S«.
2 Press »P-« to scroll back a page.
3 Press »P+« to scroll to the next page.
4 Press »S« to quit the function.
Reveal answer
Certain teletext pages contain "hidden answers" or information which can be called up.
1 Display information with »SCAN«.
2 Conceal information with »SCAN«.
Split screen
With this function you can see the television channel on the left and the teletext page on the right.
1 To activate the split screen function, press »PAT«.
- The television channel and the teletext page appear next to each other on the screen.
2 To deactivate the split screen function, press »PAT«.
CONVENIENCE FUNCTIONS
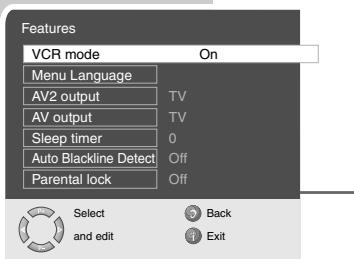
Convenience functions with the »Features« menu
1 To open the »MAIN MENU« press »i«.
2 Select »Features« with »P+« or »P-« and confirm with »OK«.
Note:
Further operation is explained in the following sections.
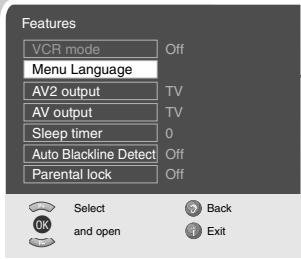
Changing the menu language
3 Press »i« to finish the setting.
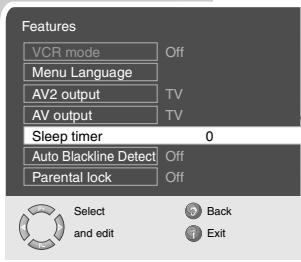
Entering the switch-off time for the sleep timer
You can enter a switch-off time. After this time has elapsed, the television switches to standby mode.
1 Select »Sleep timer« with »P+« or »P-« and press »OK« to confirm.
2 To enter the switch-off time (from 15 to 120 minutes), press »« or »+«.
3 Press »i« to conclude the setting.
Child lock
If the child lock is activated, the buttons on the television are not operable.
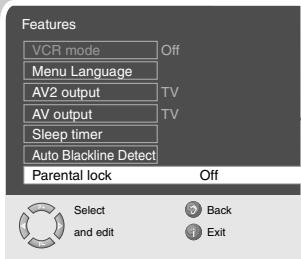
1 Select »Parental lock« with »P+« or »P-«.
2 Press »◀« or »▶« to activate or deactivate the child lock (On or Off).
3 Press »i« to conclude the setting.
Automatic picture format modification (Auto Blackline Detect)
If this function is activated and a programme with black bars at the top and bottom is showing, the picture is enlarged proportionally.
1 Select »Auto Blackline Detect« with »P+« or »P-«.
2 Press »◀« or »▶« to activate or deactivate the function.
3 Press »i« to finish the setting.

Back
Exit
USING EXTERNAL DEVICES
DVD player, DVD recorder, video recorder or set-top box
Note:
Which television socket(s) you connect your external devices to depends on the sockets the external device is equipped with and the signals which are available.
Note that with many external devices the resolution of the video signal must be adapted to the input sockets on the television (check the external device's instruction manual). You can find out which values you need to set by referring to the guidelines in the section about connection options.
Note:
Do not connect any other equipment while the device is switched on. Switch off the other equipment as well before connecting it.
Only plug the device into the mains socket after you have connected the external devices.

High definition – HD ready
Your television can receive high-definition television signals (HDTV).
You can connect the input sources (HDTV set-top box or HDTV DVD player) to the »HDMI« socket (digital HDTV signal).
This ensures that you can view digital HDTV programmes, even if they are copy-protected (HDCP High-Definition Copy Protection).
Connecting a DVD player, DVD recorder, video recorder or set-top box

natural_image
Pure electrical connector diagram without any text or symbolsWith a digital audio/video signal
Video signal: digital video; resolution: standard 576p; HDTV 720p, 1080i.
Audio signal: digital audio (stereo, multi-channel compression, uncompressed).
Channel position »HDMI«.
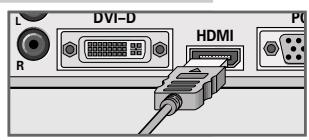
1 Connect the »HDMI« socket on the television and the corresponding HDMI socket on the external device using a standard HDMI cable (digital video and audio signal).
natural_image
Front view of a D-sub connector (no text or symbols visible)

natural_image
Three identical circular shapes arranged horizontally on a plain background (no text or symbols)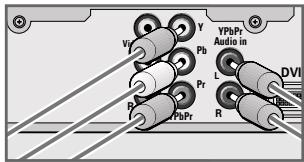

natural_image
Pure electrical connector pinout diagram without any text or symbols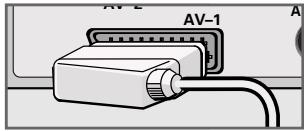
natural_image
Diagram of an electronic device with labeled pins (AV-1, AV-2) and cable, no readable text or symbols beyond labels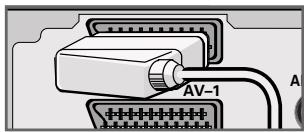
natural_image
Close-up of an electronic component with labeled pins (AV-1) and connection points A and B, no readable text or symbols beyond labelsWith a digital audio/video signal
Video signal: digital video; resolution: standard 576p; HDTV 720p, 1080i.
Audio signal: stereo, analogue.
Channel position »DVI«.
1 Connect the »DVI-D« socket on the television and the corresponding DVI socket on the external device using a standard DVI cable (digital video and audio signal).
2 Connect the »PC-DVI Audio In« socket (3.5 mm jack) on the television to the corresponding sockets on the external device with cinch cables (audio signal).
With an analogue video signal (progressive)
Video signal: YUV; resolution: standard 576p; HDTV 720p, 1080i.
Audio signal: stereo, analogue.
Channel position »YPBPR«.
1 Connect the »Y Pb Pr« sockets on the television and the corresponding sockets on the external device using cinch cables (video signal).
2 Connect the »Y Pb Pr Audio In« sockets on the television to the corresponding sockets on the external device using cinch cables (audio signal).
Using the Euro/AV socket
Video signal: FBAS/RGB (AV-1), FBAS (AV-2).
Audio signal: stereo, analogue.
Channel position »AV1« or »AV2«.
1 Connect the »AV-1« or »AV-2« socket on the television and the corresponding socket on the external device using a EURO-AV cable (video and audio signal).
Note:
You can copy recordings via the television from one external device to another by connecting the playback device to the »AV 1« socket and the recording device to the »AV-2« socket, then selecting the »AV1« channel. However, you will not be able to watch a television channel.
Using the EURO/AV socket (S-Video signal)
Video signal: Y/C.
Audio signal: stereo, analogue.
Preset »AV2S«.
1 Connect the »AV-2« socket on the television and the corresponding socket on the external device using a EURO-AV cable (video and audio signal).
USING EXTERNAL DEVICES

natural_image
Simple diagram with a circular symbol containing a grid pattern inside a square frame (no text or labels)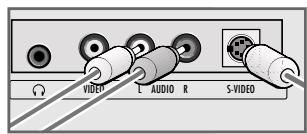

natural_image
Simple geometric shape: a black circle centered inside a gray rectangle (no text or symbols)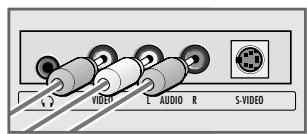
With S-Video signal
Video signal: Y/C.
Audio signal: stereo, analogue.
Channel position »SVHS«.
1 Connect the »S-VIDEO« socket on the television and the corresponding socket on the external device using an S-Video cable (video signal).
2 Connect the »L AUDIO R« sockets on the television to the corresponding sockets on the external device using cinch cables (audio signal).
With an analog TV signal
Video signal: FBAS.
Audio signal: stereo, analogue.
Channel position »AV3«.
1 Connect the »VIDEO« cinch socket on the television and the corresponding socket on the external device using cinch cables (video signal).
2 Connect the »L AUDIO R« sockets on the television to the corresponding sockets on the external device using cinch cables (audio signal).
Using a video recorder, DVD player or set-top box
1 Switch on the video recorder, DVD player or set-top box and select the function you wish to use.
2 Press »AV«, select the input signal channel with »P++ or »P-« (»AV1«, »AV2«, »AV3«, »SVHS«, »HDMI«, »DVI« or »YPBPR«) and press »OK« to confirm.
Switching VCR mode on and off
On certain video recorders, you can improve the picture stability of the playback using this mode.
1 Press »AV«, select the channel with the connected VCR with »P+« or »P-« and press »OK« to confirm.
2 Call up the »MAIN MENU« menu with »i«. – The »MAIN MENU« menu appears.
3 Select »Features« with »P+« or »P-« and press »OK« to confirm.
4 Select »VCR mode« with »P+« or »P-« and select »On« with »◀« or »▶«.
5 Press »i« to conclude the setting.
USING EXTERNAL DEVICES
Selecting the signal for the AV output
With this setting you can select which signal is output at the Euro-AV socket AV1 or at the AV OUT V L R cinch sockets.
The television station or the video/audio signal from connected devices.
This enables you to transmit recordings from one external device (e.g. a DVD player) to another using the television. Connect the playback device to Euro-AV socket AV1 and the recording device to Euro-AV socket AV2 and select the setting you require in the »Special functions« menu.
- AV 2 output:
»TV« – the television channel that you are viewing or
»AV3« – the audio/video signal from the cinch sockets (AV3).
- AV output:
»TV« – the television channel that you are viewing or
»AV2« – the audio/video signal from the Euro-AV socket AV2.
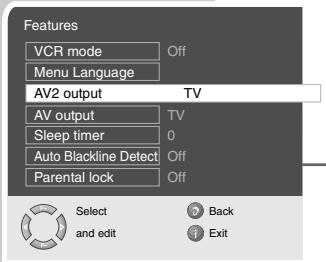
1 Call up the »MAIN MENU« menu with »i«.
2 Select »Features« with »P+« or »P-« and press »OK« to confirm.
3 Select »AV2 output« or »AV output« with »P+« or »P-«.
4 Select the desired option with »◀« or »▶«.
5 Press »i« to conclude the setting.
Headphones
natural_image
Illustration of a computer monitor connected to an earphone (no text or symbols visible)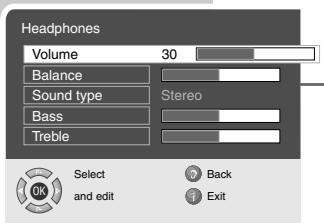
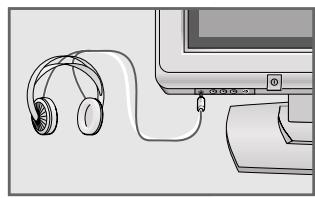
Connecting headphones
1 Plug the headphone jack (3.5 mm jack plug) into the headphone socket on the left side of the television.
Selecting the sound settings for the headphones
Decoder or satellite receiver
In order for the television to receive encoded programs from a privately operated station, a decoder is needed.
Connecting a decoder or satellite receiver
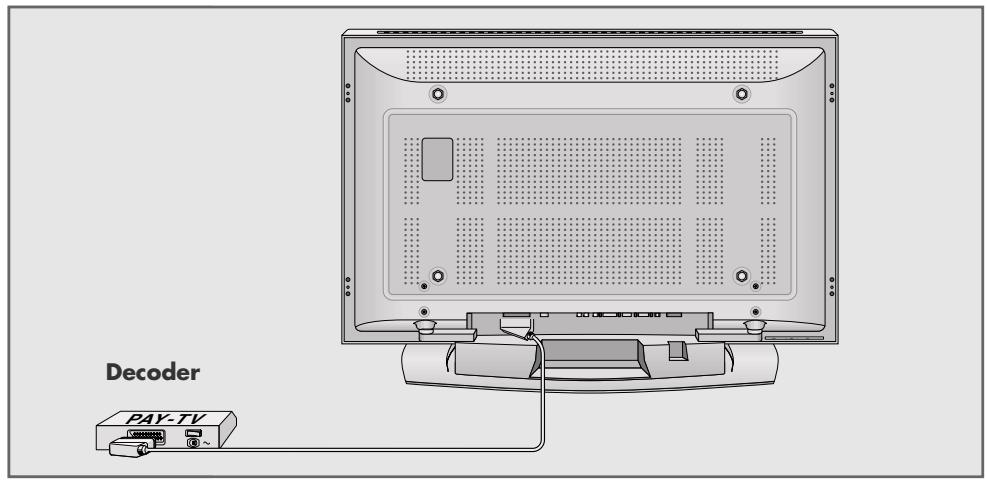
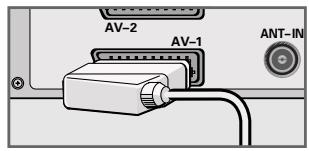
1 Connect the »AV-1« socket on the television set and the appropriate socket on the decoder using a EURO-AV cable.
Using a decoder or satellite receiver
1 Switch on the television and the decoder or the satellite receiver.
2 Press »AV«, select the channel »AV1« with »P+« or »P-« and press »OK« to confirm.
USING EXTERNAL DEVICES
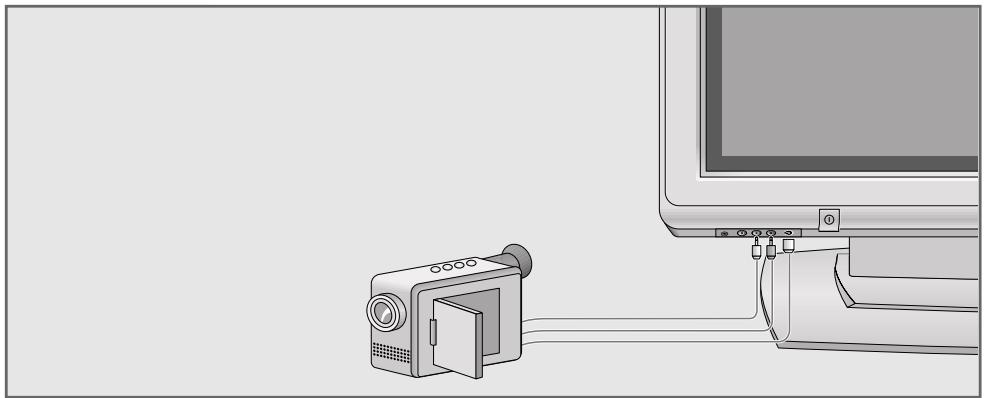
Camcorder
Connecting the camcorder
natural_image
Illustration of a small video camera connected to a computer monitor (no text or symbols visible)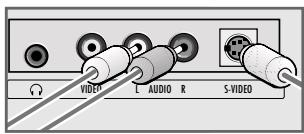
1 Connect the yellow socket »VIDEO« on the television and the corresponding socket on the camcorder (VHS, Video 8) with a cinch cable (picture signal);
or
connect the »S-VIDEO« socket (picture signal) on the television and the corresponding socket on the camcorder (S-VHS, Hi 8) with a S-Video cable.
2 Connect the white and red sockets »L AUDIO R« on the television and the corresponding sockets on the camcorder with a cinch cable (audio signal).
Note:
There must not be video signals at »VIDEO« and »S-VIDEO« sockets at the same time. This could lead to picture disturbances.
Operating with a camcorder
1 Switch on the camcorder, insert a cassette and start playback.
2 Press »AV«, select the »AV3« or SVHS« channel with »P+« or »P-« and press »OK« to confirm.
- You will see the picture and hear the sound of the camcorder on the television.
PC MONITOR MODE
Connecting a PC

natural_image
Diagram showing a desktop computer connected to a tower, with no visible text or symbols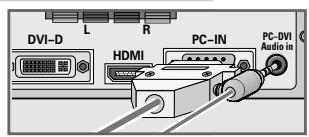
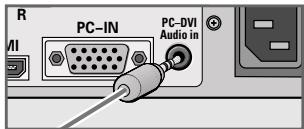
1 Connect the socket »PC-IN« or »DVI-D« on the television to the corresponding socket on the PC using a VGA cable.
2 Connect the socket »PC-DVI Audio In« on the television to the corresponding socket on the PC using a cinch cable (audio signal).
Note:
Adjust your PC to the monitor (for example, picture resolution 852 x 480, picture frequency 60 Hz).
Selecting the channel position for the PC
1 Press »AV«, select the »PC« or »DVI« channel with »P+« or »P-« and press »OK« to confirm.
Settings for the PC
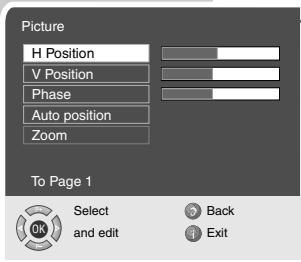
1 Press »i« to open the »MAIN MENU« menu.
– The »MAIN MENU« menu appears.
2 Select »Picture« with »P++« or »P-« and press »OK« to confirm.
– The »Picture« menu appears.
3 Select »Brightness« with »P+« or »P-« and press »P+« again.
– The second page of the picture menu appears.
4 Press »P+« or »P-« to select the function or setting.
– Options:
»H Position« – adjust the horizontal picture position
»V Position« – adjust the vertical picture position
»Phase« – removes horizontal flicker, blurring and horizontal lines
»Auto position« – for automatic adjustment to the PC
5 Press »OK« to activate the function and »◀« or »▶« to adjust.
6 Press »i« to finish the setting.
SPECIAL SETTINGS
Setting television channels
This setting is only necessary if a new channel comes on air and you do not want to change the order of your channels. The television channel can be set directly or using the search.
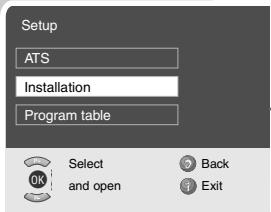
Setting channels using the search
1 Press »i« to open the »MAIN MENU«. – The »MAIN MENU« appears.
2 Select »Setup« with »P+« or »P-« and confirm with »OK«. – The »Setup« menu appears.
3 Select »Installation« with »P+« or »P-« and confirm with »OK«.
4 Select »Program no« with »P+« or »P-« and set the preset channel with »◀« or »▶«.
5 Select »Search« with »P+« or »P-« and start the search with »◀« or »▶«.
- If a strong station signal is received, the search is interrupted and the picture appears. Repeat the search until the channel you want appears on the screen.
Note:
The current system is automatically displayed in the »System« line. Select »System« with »P+« or »P-« if the colour or sound are incorrect. Select the setting required with »◀« or »▶«.
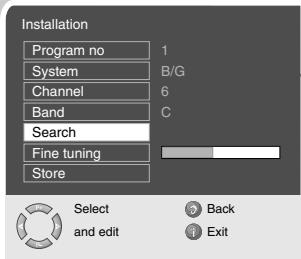
6 Select »Store« with »P+« or »P-« and confirm with »OK«. – The »Stored« message appears.
Note:
To set other television stations, repeat steps 3 to 6.
7 Press »i« to finish the setting.
SPECIAL SETTINGS
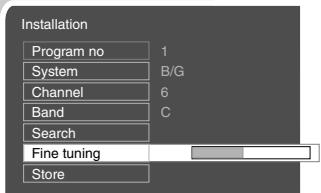
Fine tuning television channels
The television automatically tunes itself to the best possible reception. You may need to carry out manual fine tuning in areas where there is poor reception.

Select
and edit

Back

Exit


Select
and open

Back

Exit

Select
and edit

Back

Exit

Select
and edit

Back

Exit
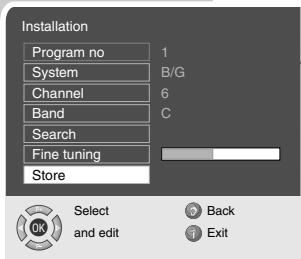
1 Press »i« to open the »MAIN MENU«.
– The »MAIN MENU« appears.
2 Select »Setup« with »P+« or »P-« and confirm with »OK«. – The »Setup« menu appears.
3 Select »Installation« with »P+« or »P-« and confirm with »OK«.
4 Select »Fine tuning« with »P+« or »P-« and set it with »◀« or »▶«.
5 Select »Store« with »P+« or »P-« and confirm with »OK«. – The »Stored« message appears.
6 Press »i« to finish the setting.
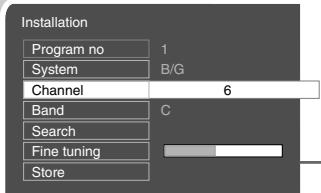
Setting the television channels by entering the channel numbers
1 Press »i« to open the »MAIN MENU«.
– The »MAIN MENU« appears.
2 Select »Setup« with »P+« or »P-« and confirm with »OK«.
– The »Setup« menu appears.
3 Select »Installation« with »P+« or »P-« and confirm with »OK«.
4 Select »Program no« with »P+« or »P-« and set the preset channel with »◀« or »▶«.
5 Select »Band« with »P+« or »P-«.
6 Press »◀« or »▶« to choose between »S« (special channel) and »C« (channel).
7 Select »Channel« with »P+« or »P-«.
8 Press »◀« or »▶« to switch up and down channels or use »1...0« to enter the channel number directly.
Note:
The current system is automatically displayed in the »System« line. Select »System« with »P+« or »P-« if the colour or sound are incorrect. Select the setting required with »◀« or »▶«.
9 Select »Store« with »P+« or »P-« and confirm with »OK«. – The »Stored« message appears.
Note:
To set the other television stations, repeat steps 3 to 9.
10 Press »i« to finish the setting.
SPECIAL SETTINGS
Re-tuning all television channels
You can re-tune all the television stations, for example if you move to another town.
1 Press »i« to open the »MAIN MENU«.
2 Select »Setup« with »P+« or »P-« and confirm with »OK«. – The »Setup« menu appears.
3 Select »ATS« with »P+« or »P-« and confirm with »OK«. – The »ATS« menu appears.
4 Press »◀« or »▶« to select the country.
5 Select »Autoprogram« with »P+« or »P-« and confirm with »OK«.
– A warning message appears.
6 Press »©« (green) to start the search.
- The search begins. It may last a few minutes, depending on the number of television stations found.
- The automatic search may last a few minutes, depending on the number of television channels received.
Note:
You can interrupt the search by pressing »OK«.


INFORMATION
Technical data
Operating voltage: 100 - 240V, 50/60 Hz
Power consumption: 330 W during operation approx. 2,5 W in standby mode
Sound output: 2 x 20 W music power (2 x 10 W sine wave)
Reception range: C01 - C80, special channels S01 - S41
Preset channels: 99 and 8 AV
Screen size: 106 cm/42"
Viewing angle: 160^ hor./ 160^ vert.
Max. resolution: WXGA 1024 x 768
Weight (WEEE): approx. 39,61 kg
Service information for dealers
The television set may only be operated with the mains adapter supplied.
The product complies with the following EU directives:
73/23/EEC directive for electrical equipment to be used within defined voltage ranges. 89/336/EEC directive on electromagnetic compatibility.
The device complies with the following standards: EN 60065, EN 55013, EN 55020.
Environmental note
This product has been made from high-quality parts and materials which can be re-used and recycled.
Therefore, do not throw the product away with normal household waste at the end of its life. Take it to a collection point for recycling electrical and electronic devices. This is indicated by this symbol on the product, in the operating manual and on the packaging.
Please find out about collection points operated by your local authority.
Help protect the environment by recycling used products.
Troubleshooting
If the remedies given below do not work, please consult an authorised GRUNDIG dealer. Please bear in mind that malfunctions can also be caused by external devices such as video recorders or satellite receivers.
| Fault | Possible cause | Remedy |
| Screen lit (snow), but no station | Antenna cable | Is the antenna cable connected? |
| No television station programmed | Start the station search | |
| Poor picture contrast | Picture settings incorrectly set | Adjust the brightness, contrast or colour setting |
| Problem at station | Test with another channel | |
| Interference to picture and/or sound | Interference from other devices | Change the position of the device |
| Ghosts, reflection | Channel setting | Automatic or manual channel setting/fine tuning |
| Antenna | Have antenna cable or system checked | |
| No colour | Colour intensity at minimum | Turn up the colour |
| TV standard setting (if setting option is available) | Select the correct colour standard | |
| Problem at station | Test with another channel | |
| Picture but no sound | Volume set to minimum | Turn up or switch on the volume |
| Problem at station | Test with another channel | |
| Teletext missing or faulty | Television station (has no teletext) or antenna system | Test another channel for fine tuning and ghosts |
| Station signal too weak | Check the antenna system | |
| Remote control does not work | No optical connection | Point the remote control at the television set |
| Remote control batteries | Check the batteries, change if necessary | |
| Operating condition undefined | Switch off the television with the main power button for approximately 2 minutes | |
| Picture is dark in PC mode | Incorrect setting for picture resolution and picture frequency on the PC | Change the setting on the PC (for example, picture resolution 1024 x 768, picture frequency 60Hz) |
Additional Information for units sold in the UK.
Units sold in the UK are suitable for operation from a 240V ac, 50Hz mains supply.
The range of multi-system receivers is built to work in most European countries. However, the mains plug and socket system for the UK differs from many European countries.
This appliance has been supplied with a fitted, non-removable, approved converter plug for use in the UK. This converter plug is fitted with a 5A rated fuse.
In case this appliance is supplied with a moulded 2-pin Euro plug only, which is unsuitable for UK operation, this must be cut off and immediately disposed of. An approved 13A, 3-pin UK plug should then be fitted by a qualified electrician.
Note:
The severed Euro plug must be destroyed to avoid a possible shock hazard should it be inserted into a socket elsewhere.
If a non-rewireable 3-pin plug or a rewireable 13A (BS1363) 3-pin plug is used, it must be fitted with a 5A ASTA or BSI approved BS1362 fuse. If any other type of plug is used it must be protected by a 5A fuse either in the plug, or at the distribution board. If this type of plug becomes defective, ensure that the fuse is removed before disposal, to eliminate potential shock hazard.
If it is necessary to change the fuse in the non-rewireable plug, the correct type and rating (5A ASTA or BSI approved BS1362) must be used and the fuse cover must be refitted. If the fuse cover is lost or damaged, the lead and plug must not be used until a replacement is obtained. Replacement fuse covers should be obtained from your dealer.
Important:
The wires in the mains lead are colour coded in accordance with the following code:
BLUE - NEUTRAL
BROWN - LIVE
As the colours of the wires in the mains lead of your appliance may not correspond with the coloured marking identifying terminals in your plug, proceed as follows:
Connect the BLUE coloured wire to plug terminal marked with the letter "N" or coloured black.
Connect the BROWN coloured wire to the plug terminal marked with the letter "L" or coloured red.
In no circumstance must any of the wires be connected to the terminal marked with the letter "E", earth symbol "m", coloured green, or green & yellow.
- Connection/Preparation
- Overview
- Settings
- Television operation
- Teletext mode
- Convenience functions
- Using external devices
- PC Monitor Mode
- Special settings
- Information
- SET-UP AND SAFETY
- Note:
- Mounting the table base
- Connecting the loudspeakers
- Setting up and connecting the loudspeakers
- Connecting the antenna and the mains cable
- Connecting the Hi-fi system/AV receiver
- Inserting batteries in the remote control
- Environmental note
- Connections on the television
- Controls on the television
- The remote control
- Setting television channels automatically
- Hint:
- Changing stored channels
- Deleting channels
- Sorting television channels
- Entering the channel names (maximum of 5 characters)
- Skipping television channels
- Concluding the settings
- Picture settings
- Audio settings
- Volume
- Balance
- Stereo / two channel, mono
- Switching on and off
- Selecting channels
- Selecting AV channels
- Adjusting the volume
- Muting
- Displaying time
- Displaying information
- Freeze-frame
- Zap function
- Changing the picture format
- »4:3« format
- »Auto« format
- »Letterbox« format
- »Panorama« format
- »Subtitles« format
- PIP mode
- Displaying the inset picture
- Double window
- Selecting the channels for the inset picture and the left side of the screen (double window)
- Selecting the channels for the main picture and the right side of the screen (double window)
- Swapping the main and inset pictures
- Changing the position of the inset picture
- Changing the size of the inset picture
- Ending the PIP function
- Quitting the double window
- TOP text or FLOF text mode
- Normal text mode
- Additional functions
- Skipping the waiting time
- Increasing character size
- Page stop
- Calling up a sub-page directly
- Reveal answer
- Split screen
- Convenience functions with the »Features« menu
- Changing the menu language
- Entering the switch-off time for the sleep timer
- Child lock
- Automatic picture format modification (Auto Blackline Detect)
- DVD player, DVD recorder, video recorder or set-top box
- High definition – HD ready
- Connecting a DVD player, DVD recorder, video recorder or set-top box
- With a digital audio/video signal
- With an analogue video signal (progressive)
- Using the Euro/AV socket
- Using the EURO/AV socket (S-Video signal)
- With S-Video signal
- With an analog TV signal
- Using a video recorder, DVD player or set-top box
- Switching VCR mode on and off
- Selecting the signal for the AV output
- Headphones
- Connecting headphones
- Selecting the sound settings for the headphones
- Decoder or satellite receiver
- Using a decoder or satellite receiver
- Camcorder
- Connecting the camcorder
- Operating with a camcorder
- Selecting the channel position for the PC
- Settings for the PC
- Setting television channels
- Setting channels using the search
- Fine tuning television channels
- Setting the television channels by entering the channel numbers
- Re-tuning all television channels
- Technical data
- Service information for dealers
- Troubleshooting
- Additional Information for units sold in the UK.
- Important:
Brand : GRUNDIG
Model : XEPHIA 42 PXW 110-6721 DOLBY
Category : Television