
NWZ-S745 - Mp3 player SONY - Free user manual and instructions
Find the device manual for free NWZ-S745 SONY in PDF.


| Product Type | MP3 Player / Digital Media Player |
| Model | NWZ-S745 |
| Brand | Sony |
| Internal Storage | 8 GB (NWZ-S745) or 16 GB (NWZ-S746) |
| Display | 2.0-inch QVGA (320x240 pixels) TFT color LCD |
| Supported Audio Formats | MP3, WMA (non-DRM), AAC, WAV, FLAC |
| Supported Video Formats | AVC (H.264/AVC), MPEG-4, WMV (converted via Media Go) |
| Supported Image Formats | JPEG, BMP, PNG |
| FM Radio | Yes, with presets |
| Voice Recording | Built-in microphone, recording in WMA format |
| Battery Life | Up to 42 hours of music playback, up to 8 hours of video playback |
| Battery Type | Built-in rechargeable lithium-ion battery |
| Charging | Via USB (computer) or AC adapter (sold separately) |
| Dimensions (H x W x D) | Approx. 43.3 x 83.4 x 8.6 mm |
| Weight | Approx. 53 g (including battery) |
| Connectivity | USB 2.0 (proprietary connector), 3.5mm headphone jack |
| Operating System Compatibility | Windows XP/Vista/7/8, Mac OS X (via Media Go) |
| Accessories Included | Headphones, USB cable, Quick Start Guide |
| Maintenance & Cleaning | Clean with a soft dry cloth; avoid solvents or abrasive cleaners |
| Safety | Avoid exposure to extreme temperatures, moisture, and direct sunlight. Do not disassemble. |
| Spare Parts & Repairability | Battery replacement by qualified service center; other parts not user-replaceable. |
Frequently Asked Questions - NWZ-S745 SONY
User questions about NWZ-S745 SONY
0 question about this device. Answer the ones you know or ask your own.
Ask a new question about this device
Download the instructions for your Mp3 player in PDF format for free! Find your manual NWZ-S745 - SONY and take your electronic device back in hand. On this page are published all the documents necessary for the use of your device. NWZ-S745 by SONY.
USER MANUAL NWZ-S745 SONY
Click! You can directly jump
▶ Transferring Music ▶ Transferring Videos/Photos/Podcasts ▶ Troubleshooting
Operation Guide
NWZ-S744 / S745
Note
- Depending on the country/region in which you have purchased the player, some models may not be available.
Browsing the Operation Guide
To use the buttons in the Operation Guide
Click the buttons located in the upper right of the pages of this manual to jump to “Table of Contents,” “About the Home Menu” or “Index.”
![graph TD A["Index"] --> B["Home Menu"] B --> C["Table of Contents"] C --> D["Jumps to the table of contents\nFind what you are looking for from a list of topics in the manual."] B --> E["Jumps to the Home menu list\nFind what you are looking for from a list of the option items in the player's menu."…](/content/2026/06/1353501/images/28f965e7ca442c504a36c491f095acb48f1b61ccee857a0d6136141341a44fe9.jpg)

Hint
- You can jump to the indicated page by clicking a page number in the table of contents or in the index.
- You can jump to the indicated page by clicking a page reference indication (e.g., p. 6) on each page.
- To search for a reference page by keyword, enter the keyword into the find text field on the Adobe Reader window.
- Operation procedures may differ, depending on your Adobe Reader version.
To change the page layout
The buttons on the Adobe Reader window enable you to select how pages are displayed.


Continuous
Pages are displayed as a continuous roll of pages, fitting the page width inside the window. When you scroll, the previous or next pages scroll up or down continuously.

Single Page
Pages are displayed one at a time, fitting the page into the window. When you scroll, the display changes to the previous or next page.
Table of Contents
Basic Operations and Screens
Parts and Controls ....6
Turning the Player On and Off ......9
About the Home Menu ....10
How to Use the Home Menu .....13
How to Use the Option Menu ....16
About the Software ....18
Bundled Software ....18
Compatible Software ....18
Preparing the Player
Charging the Battery ....19
Selecting the Display Language .....21
Setting the Date and Time ......22
Transferring Music
Selecting the Way to Transfer Music .....23
A Transferring Music Using Windows Media Player 11....24
Importing music from CDs ....24
Transferring Music 26
B Transferring Music Using Content Transfer ....28
© Transferring Music Using Windows Explorer ....30
Transferring Videos/Photos/Podcasts
Selecting the Way to Transfer Videos/Photos/Podcasts ....32
A Transferring Videos/Photos/Podcasts Using Content Transfer ....33
B Transferring Videos/Photos/Podcasts Using Windows Explorer ....35
Playing Music
Playing Music [Music] 38
Music playback screen ....39
Music list screen ....40
Searching for Songs ....41
Browsing cover arts to select an album (Album Scroll) 42
Enjoying Music Playback on a Television 44
Outputting the music playback screen and audio to a television [TV Output(Music)] 44
Switching the television signal format [NTSC/PAL settings] ....45
Deleting Songs ....46
Using the Music Option Menu ......47
Displaying the detailed information screen [Detailed Information] ....48
Changing the Music Settings ....49
Setting the play mode [Play Mode] ....49
Setting the playback range [Playback Range]...50
Setting the sound quality [Equalizer] .....50
Customizing the surround sound [VPT(Surround)] ....52
Listening with DSEE (Sound Enhance) [DSEE(Sound Enhance)] ....53
Listening with Clear Stereo [Clear Stereo] .....53
Adjusting the volume level [Dynamic Normalizer] ....54
Selecting the album display format [Album Display Format] ....54
Using the Language Learning Function
Using the Language Learning Function 55
Activating the language learning function ....55
Rewinding slightly [Quick Replay] ....56
Playing back a specified section repeatedly (A-B Repeat) 56
Adjusting the playback speed (DPC) .....57
Watching Videos
Playing a Video [Videos] 58
Video playback screen ....59
Video list screen 60
Searching for Videos ......61
Browsing scenes (Scene Scroll) ......61
Enjoying Videos on a Television ......63
Outputting videos to a television [TV Output(Video)] ......63
Selecting the television aspect ratio [TV Output Size] ....64
Switching the television signal format [NTSC/PAL settings] ....64
Deleting Videos 65
Deleting currently playing video .....65
Deleting videos by selecting from a list .....65
Using the Video Option Menu ......66
Changing the Video Settings ....67
Setting the zoom function [Zoom Settings] ....67
Playing only video sound [On-Hold Display] ....70
Arranging the video list [Order of Video List] ....70
Enjoying Podcast
Playing Podcast [Podcasts] 71
What is a podcast? 71
Playing podcast ....71
Podcast playback screen 72
Episode list screen ....74
Podcast list screen ....75
Deleting Podcasts ....76
Deleting the currently playing episode .....76
Deleting an episode in the episode list .....76
Deleting a podcast ....76
Deleting all podcasts ....77
Using the Podcast Option Menu .....78
Viewing Photos
Viewing Photos [Photos] 80
Photo display screen 81
Photo list screen 82
Deleting Photos ....83
Using the Photo Option Menu ....84
Changing the Photo Settings ....85
Setting the photo list display format [Photo List Format] ....85
FM Listening to FM Radio
Listening to FM Radio [FM Radio] ......86
FM Radio screen 87
Presetting broadcast stations automatically [Auto Preset]....88
Presetting broadcast stations manually [Save to Preset] 89
Deleting preset broadcast stations .....89
Using the FM Radio Option Menu .....90
Changing the FM Radio Settings .....91
Setting the reception [Scan Sensitivity] .....91
Setting monaural/stereo [Mono/Auto] .....91
Using the Noise Canceling Function
About Noise Canceling .....92
Playing Back with the Noise Canceling Function [Noise Canceling] ......94
Listening to External Audio Sources [External Input Mode] ....95
Reducing Ambient Noise without Playing Back Music [Quiet Mode] .....97
Changing the Noise Canceling Settings....98
Adjusting the Noise Canceling effect [Set Noise Cancel Level] ....98
Common Settings
Changing the Common Settings .....99
Displaying the player information [Unit Information] 99
Limiting the volume [AVLS (Volume Limit)] .... 100
Turning off the beep sound [Beep Settings] .... 100
Setting the time for blanking the screen [Screen Off Timer] 101
Adjusting the brightness of the screen [Brightness] 102
Setting up wallpaper [Wallpaper Settings] ..... 103
Setting the current time [Set Date-Time] ..... 104
Setting the date format [Date Display Format] .... 105
Setting the time format [Time Display Format] .... 105
Limiting the charge amount [Battery Care] 106
Returning to the factory settings [Reset All Settings] .... 106
Formatting memory [Format] 107
Using USB connection mode [USB Connection Mode] .... 107 Selecting the display language [Language Settings] .... 108
Useful Facts
About Battery Life ....109
What are Format and Bit Rate? .....110
What is audio format? 110
What is video format? 111
What is photo format? 111
Storing Data ....112
Upgrading the Player's Firmware .....113
Troubleshooting
Troubleshooting....114
Messages ....127
Additional Information
Precautions ......129
License and Trademark Notice .....135
Specifications....153
Index 160
Parts and Controls
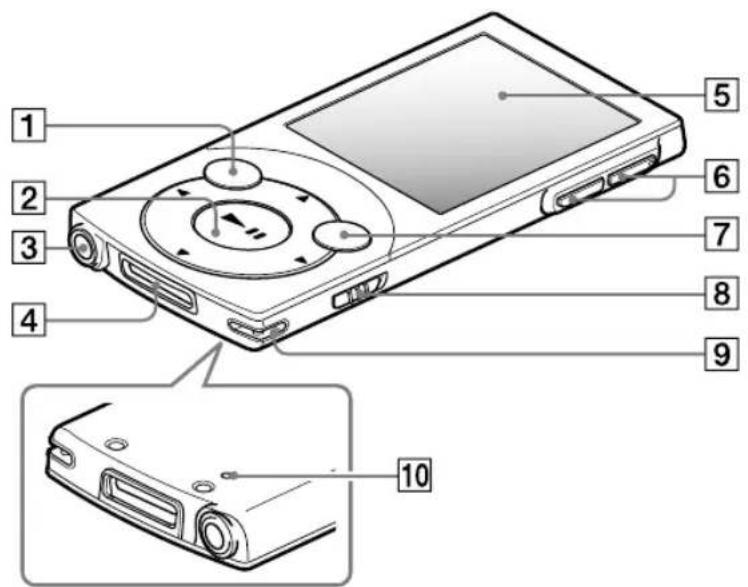
1 BACK/HOME button
Press to go up one list screen level, or to return to the previous menu. Press and hold the BACK/HOME button to display the Home menu (p. 10).
2 5-way button *1
Starts playback and enables navigation of the player's on-screen menus (p. 13, 16).
3 Headphone jack
Insert the headphone plug until it clicks into place. If the headphones are connected improperly, the sound from the headphones will be impaired.
About the Noise Canceling function
The Noise Canceling function is available only when using the supplied headphones. The supplied headphones can only be used for these models, and cannot be used for other equipment.
4 WM-PORT jack
Connect the supplied USB cable, or optional peripheral devices. You can also connect the player to a television using the optional video/audio output cable (p. 44, 63).
5 Display
See p. 39, 59, 72, 81, 87.
6 VOL + *1/- button
Adjusts the volume.
7 OPTION/PWR OFF button
Press to display the option menu (p. 16, 47, 66, 78, 84, 90). If you press and hold the OPTION/PWR OFF button, the screen turns off and the player enters standby mode (p. 9).
8 HOLD switch
You can protect the player against accidental operation during transportation by setting the HOLD switch. By sliding the HOLD switch in the direction of the arrow, all operation buttons are disabled. If you slide the HOLD switch in the opposite position, the HOLD function is released.
9 Strap hole
This is used to attach a strap (sold separately).
10 RESET button
Press the RESET button with a small pin, etc., to reset the player (p. 114).
*1 There are tactile dots. Use them to help with button operations.
Installing the earbuds
If the earbuds do not fit your ears correctly, the noise canceling effect will not be optimal. To optimize noise canceling and to enjoy better sound quality, change the earbuds to another size, or adjust the earbud position to fit your ears comfortably and snugly.
The M size earbuds are attached to the headphones before shipment. If you feel the M size earbuds do not suit your ears, replace them with the supplied S or L size earbuds. Confirm the size of the earbuds by checking the color inside. When you change the earbuds, turn to install them firmly on the headphones to prevent the earbud from detaching and remaining in your ear.
Earbud sizes (inside color)

Colored parts

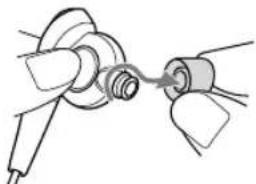
To detach an earbud
While holding the headphone, twist and pull the earbud off.

Hint
- If the earbud slips and cannot be detached, wrap it in a dry soft cloth.
To attach an earbud
Twist and push the inside parts of the earbud into the headphone until the projecting part of the headphone is fully covered.

Turning the Player On and Off

To turn on the player
Press any button to turn the player on.

Hint
- If HOLD appears on the top of the screen, slide the HOLD switch in the opposite direction of the arrow to cancel the HOLD function.
To turn off the player
Press and hold the OPTION/PWR OFF button. [POWER OFF] appears, then the player enters standby mode, and the screen turns off.

Hint
- Set the date and time on the player before using it (p. 22, 104).
- During pause, if there is no operation for about 10 minutes, the player automatically enters standby mode, and the screen turns off. In standby mode, press any button to turn on the screen again.
- While the player is in standby mode, if there is no operation for about a day, the player completely turns off automatically.
Note
- You cannot operate the player when it is connected to a computer. Disconnect the USB cable before operating the player.
- After connecting to a computer with the USB cable, the resume information of the last played song, video, photo, etc., is cleared. Reselect the desired content from the list screen.
- The player consumes battery power very slightly even when it is in standby mode. Therefore, the player might turn completely off unexpectedly depending on the power remaining in the battery.
About the Home Menu
The following table shows the items of the Home menu. For details on the item list of each menu, see p. 11.
For details about each menu item, refer to the specified reference page.
![[FM Radio] [Go to video playback screen] [Photos] [Music] [Settings] [Music] [Information area] [Noise Canceling] [Videos] [Go to song playback screen] [Podcasts]](/content/2026/06/1353501/images/768b952867bc99990940331c49d615f4793d2bc359c78fd4d77af7ce93321978.jpg)
 | [Go to video playback screen] | Display the video playback screen. |
 | [FM Radio] | Listen to FM radio broadcasting (p. 86). |
 | [Noise Canceling] | Reduce unwanted ambient noise by active noise control technology (p. 92). Select this icon to enable or disable the Noise Canceling function. |
 | [Photos] | View photos transferred to the player (p. 80). |
 | [Music] | Listen to songs transferred to the player (p. 38). |
 | [Videos] | Watch videos transferred to the player (p. 58). |
 | [Settings] | Set up the player and its applications (p. 99). |
 | [Podcasts] | Play back podcast episodes transferred to the player (p. 71). |
 | [Go to song playback screen] | Display the music playback screen. |

[Go to video playback screen] ... 59

[FM Radio] 86

[Noise Canceling]
[Noise Canceling: On/Off] .....94 L [NC Modes] .....95, 97

[Photos] 80

[Music]....38

[Videos] 58

[Settings]
[Music Settings] [Play Mode] 49 [Playback Range] 50 [Equalizer].... 50 [VPT(Surround)] 52 [DSEE(Sound Enhance)] ..... 53 [Clear Stereo] 53 [Dynamic Normalizer] ..... 54 [Album Display Format] ..... 54 [Language Learning Mode] .... 55 [DPC (Speed Control)] ..... 57 [TV Output(Music)] 44 L [NTSC/PAL settings] ...... 45
[Video Settings]
[Zoom Settings]...... 67
[On-Hold Display] 70
[Order of Video List] 70
[TV Output(Video)] 63
[NTSC/PAL settings] ...... 64
[TV Output Size] 64
[Photo Settings] [Photo List Format] 85 [FM Radio Settings] [Scan Sensitivity] 91 [Mono/Auto] 91 [NC Settings] [Set Noise Cancel Level]...... 98 [Common Settings] [Unit Information] 99 [AVLS (Volume Limit)] .....100 [Beep Settings] 100 [Screen Off Timer] .....101 [Brightness] 102 [Wallpaper Settings] ......103 [Clock Settings] ......104, 105 [Battery Care] 106 [Reset/Format] .....106, 107 [USB Connection Mode] ...107 [Language Settings] .....21, 108
[Podcasts] 71
[Go to song playback screen] .... 39
Continued ↓
About the information area
The icons shown in the table below appear in the information area. The icons vary according to the playback status, setting or screen.
For details about the icons, see each reference page.
| Icons Description | |
| ▶, II, ▶▶, ◀◀, ▶▶I, ◀◀, etc | Playback status (☎ p. 39, 59, 81) |
| HOLD | Hold indication (☎ p. 7) |
| ▽C | Noise Canceling indication (☎ p. 94) |
| ⇨ TV output indication ( ☎ p. 44) | |
| ▽Z | Remaining battery power (☎ p. 19) |
How to Use the Home Menu
The Home menu is the starting point of each application, such as searching for songs, changing settings, etc.
You can display the Home menu by pressing and holding the BACK/HOME button of the player.

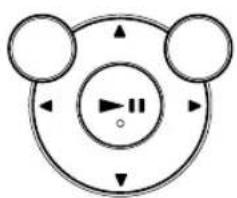
From the Home menu, you can select the desired item on the screen by using the 5-way button.
- ▲/▼/◄/► button: Selects an item.
- ▶II button: Confirms an item.
Continued ↓
In this manual, operating instructions from the Home menu are described as below.
Example: From the Home menu, select ⌘[Music] → [Album] → desired album → desired song.
The actual operations for the example above are shown below.
1 Press and hold the BACK/HOME button.
The Home menu appears.

BACK/HOME button
2 Press the ▲/▼/◄/► button to select ♪ [Music], and then press the ►II button to confirm.
The [Music] screen appears.

3 Press the ▲/▼/◄/► button to select [Album], and then press the ►II button to confirm.
The album list appears.

Continued ↓
4 Press the ▲/▼/◄/► button to select an album, and then press the ►II button to confirm.
The song list for the selected album appears.
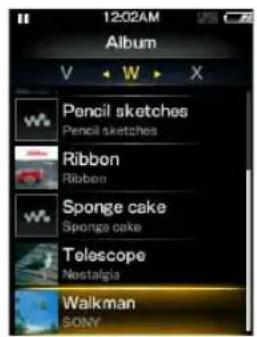
5 Press the ▲/▼/◄/► button to select a song, and then press the ►II button to confirm.
The music playback screen appears and playback begins.


To return to the Home menu during operation
Press and hold the BACK/HOME button.
To return to the previous screen during operation
Press the BACK/HOME button.
How to Use the Option Menu
The option menu items vary depending on the function, allowing you to change the settings of each application.
You can display the option menu by pressing the OPTION/PWR OFF button. Press the OPTION/PWR OFF button once more to dismiss the option menu.


From the option menu, you can select the desired item on the screen by using the 5-way button.
- ◀/▶ buttons: Select a menu from among the option menu, 🔒 (Search) menu, and [To Playback Screen] menu. 1
- ▲/▼ buttons: Select a menu item.
- ▶ button: Confirms an item. *1 The (search) menu or the [▶Playback Screen] icon is not displayed depending on the screen.

For example, the operations for setting [Play Mode] option to [Shuffle] are shown below.
1 From the music playback screen, press the OPTION/PWR OFF button.
The option menu appears.

OPTION/PWR OFF button
2 Press the ▲/▼/◄/► button to select [Play Mode], and then press the ►II button to confirm.
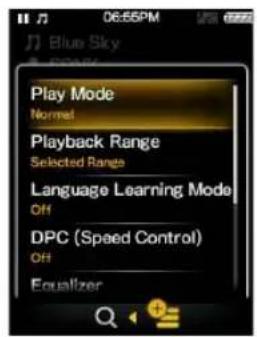
3 Press the ▲/▼/◄/► button to select [Shuffle], and then press the ►II button to confirm.
The play mode changes to [Shuffle].
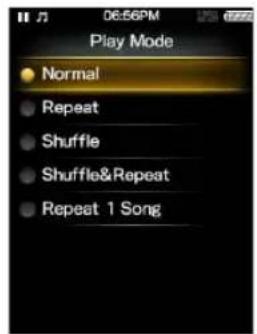

The items in the option menu differ, depending on the screen on which you press the OPTION/PWR OFF button.
For details, see the following pages.
- "Using the Music Option Menu" (p. 47)
- "Using the Video Option Menu" (p. 66)
- "Using the Podcast Option Menu" (p. 78)
- "Using the Photo Option Menu" (p. 84) • "Using the FM Radio Option Menu" (p. 90)
About the Software
Bundled Software
Content Transfer
Content Transfer can transfer music, videos or photos from a computer to the player by a simple drag-and-drop operation. You can use Windows Explorer or iTunes, etc., to drag-and-drop data to Content Transfer. Content Transfer can also convert a video file of a format not supported by the player into a playable format. For details on operation, refer to the Help of the software.
Transferable files: Music (MP3, WMA, AAC, WAV), Photo (JPEG), Video (MPEG-4 Simple Profile, AVC (H.264/AVC) Baseline Profile, WMV1)
* Some WMV files cannot be played back after being transferred by Content Transfer. If you retransfer them using Windows Media Player 11, they may become playable.

Hint
- ATRAC files managed by SonicStage can be transferred to the player after conversion to MP3 file format.
WALKMAN Guide
The Operation Guide (this PDF file) and the useful list of links are available to you.
Compatible Software
Windows Media Player 11
Windows Media Player can import audio data from CDs and transfer data to the player.
Transferable files: Music (MP3, WMA), Video (WMV), Photo (JPEG)
For details on operation, refer to the Help of the software or visit the following website.
http://support.microsoft.com/
Charging the Battery
The player's battery is recharged while the player is connected to a running computer.
When you connect the player to your computer, use the supplied USB cable. When the remaining battery indication in the upper right corner of the display shows: [FULL], charging is completed (charging time is approx. 3 hours).

When you use the player for the first time, or if you have not used the player for a long time, recharge it fully (to FULL in the remaining battery indication of the display).
About the [Battery Care] mode
In the [Battery Care] mode, the player stops recharging a short time before the battery is fully charged. When you do not need the extended use over many hours, you can set [Battery Care] to [On] to increase the available number of cycles of charge and discharge which affects the battery lifespan, i.e., extend the battery lifespan.
For how to set the [Battery Care] mode, see “Limiting the charge amount [Battery Care]” (p. 106).
About the battery indicator
The battery indicator in the information area shows remaining battery charge.

As the battery power gets lower, the bars of the icon disappear. If [LOW BATTERY. Please Charge.] appears, you cannot use the player. In this case, charge the battery by connecting to your computer. See ☎ p. 157 on battery duration.

Hint
- While charging, after a lapse of time of the [Screen Off Timer] setting (p. 101), the screen turns off. To see the charging status or other indications, press any button to turn on the screen.
Note
- If you charge the player when it has not been used for a long period, your computer may not recognize the player or nothing may appear on the display. Charge the player for about 5 minutes, and it starts operating properly.
- Charge the battery in an ambient temperature of between 5 °C to 35 °C (41 °F to 95 °F). If you try to charge the battery in an ambient temperature outside this range, the icon may appear, and charging cannot be performed.
- The number of times the battery can be recharged before it is used up is approximately 500 times. This number may vary, depending on the conditions under which you use the player.
- The battery indicator on the display is only an estimate. For example, one section of black in the indicator will not always indicate exactly one-fourth of the battery's charge.
- [Do not disconnect.] appears in the display while the computer accesses the player. Do not disconnect the supplied USB cable while [Do not disconnect.] appears. Otherwise, data being transferred or data in the player may be damaged.
- The control buttons on the player become inoperative while it is connected to a computer.
- If you do not intend to use the player for over half a year, charge the battery at least once during this time to maintain battery performance.
- Some USB devices connected to the computer may interfere with proper operation of the player.
- We do not guarantee battery recharging using a personally assembled/modified computer.
- If the computer enters a power saving mode, such as the Sleep or Hibernation mode, while the player is connected via the USB cable, the player's battery will not be charged. Instead, the player continues to draw power from the battery, discharging it.
- Do not leave the player connected for extended periods to a laptop computer that is not connected to AC power, since the player may discharge the computer's battery.
- While the player is connected to a computer, do not turn on, restart, wake up from sleep mode, or shut down the computer. These operations may cause the player to malfunction. Disconnect the player from the computer before performing these operations.
- Heat may build up in the player while charging. This is not malfunction.
- After connecting to a computer with the USB cable, the resume information of the last played song, video, photo, etc., is cleared. Reselect the desired content from the list screen.
Selecting the Display Language
You can select from a variety of languages for menus and messages.

![06:56PM Settings [Settings]](/content/2026/06/1353501/images/13424ffd4df995537c9398d60687ddc48806e777b3d5d42086d2fc49a9b3b62e.jpg)
1 From the Home menu, select [Settings] desired language setting.
→[Language Settings] →
| Language Messages and menus are displayed in | |
| [Deutsch] German | |
| [English] English | |
| [Espanol] Spanish | |
| [Français] French | |
| [Italiano] Italian | |
| [Português] Portuguese | |
| [Русский] Russian | |
| [한국어] | Korean |
| [简体中文] | Simplified Chinese |
| [繁體中文] | Traditional Chinese |
Setting the Date and Time
Some applications of the player do not work correctly until the date and time are set. Set the current date and time before using the player.

![D8:56PM Settings [Settings]](/content/2026/06/1353501/images/e2f1082fa69c3b5f4fb812ef196f83165ef64aa2cb3f7783790787a405da6377.jpg)
1 From the Home menu, select Settings] [Clock Settings] → [Set Date-Time].
[Common Settings]
2 Press the ◀/▶ button to select a year, and then press the ▲/▼ button to change the value.
3 As in step 2, adjust the settings for month, date, hour, and minutes, and then press the ▶II button to confirm.

Hint
- You can select the date format from among [YYYY/MM/DD], [MM/DD/YYYY], and [DD/MM/YYYY]. Furthermore, you can select the time format from either [12-hour] or [24-hour]. For details, see “Setting the date format [Date Display Format]” (p. 105), or “Setting the time format [Time Display Format]” (p. 105).
Note
- If the battery power is used up because, for example, the player has not been used for a long time, your settings for date and time may be lost and “-” will be displayed instead of the current date and time.
- The clock may gain or lose up to 60 seconds per month. In this case, set the clock again.
Selecting the Way to Transfer Music
You can import music from audio CDs or from the Internet, etc. To import music into your computer, use appropriate software.
You can transfer music to the player in the following three ways.
A Transferring music from CDs using Windows Media Player 11 (p. 24)
You can import music from your CDs, etc., to your computer, and transfer them to the player using Windows Media Player 11.
![graph LR A[" globe "] --> B[" document "] C[" CD "] --> D[" output "] B --> E[" device screen "] D --> E E --> F[" mobile device "] style A fill:#f9f,stroke:#333 style C fill:#f9f,stroke:#333 style B fill:#ccf,stroke:#333 style D fill:#ccf,stroke:#333 style E fill:#cfc,stroke:#333 style F fill:#fcc,…](/content/2026/06/1353501/images/5178f94f99593d3e8ec4f0b8a1284f0d990fa0299aa1c10c7c6d43b553e233d1.jpg)
B Transferring music from iTunes, etc., using Content Transfer (p. 28)
If you have already managed music with iTunes, etc., you can transfer them to the player using Content Transfer.
![graph LR A["Input Image"] --> B["File Pickup"] B --> C["Video Player"] C --> D["Display Monitor"]](/content/2026/06/1353501/images/3a5cd43b736c902e4e9f097258ede4eb36acd504dd03833014782f450d8cf99a.jpg)
Transferring music by drag-and-drop using Windows Explorer (p. 30)
You can directly transfer music stored on your computer by drag-and-drop using Windows Explorer.
![graph TD A["File Selection"] --> B["Processing Step"] B --> C["Output Display Icon"]](/content/2026/06/1353501/images/78de2e7971527b1faea45f9c657ba82ed3d8a0bb78a037f974bdc1bd57e26b01.jpg)
Hint
- For detailed information on how to import music, refer to the Help of each software.
- For details about supported file formats, see "Supported file format" (p. 153).
- The player does not use SonicStage software (SonicStage software, developed by Sony, manages music on a computer or transfers music to other types of players). For this player, you can transfer music in the above three ways, not using SonicStage. ATRAC files managed by SonicStage can be transferred to the player after conversion to MP3 file format.
Note
- Do not leave the player connected for extended periods to a laptop computer that is not connected to AC power, since the player may discharge the computer's battery.
A Transferring Music Using Windows Media Player 11
You can import songs from your CDs, etc., to your computer, and transfer them to the player using Windows Media Player 11.

Hint
- For details about usage, or support on Windows Media Player, refer to the Windows Media Player information from the following web site: http://support.microsoft.com/
Importing music from CDs
You can use Windows Media Player 11 to copy (rip) music from your CDs. Follow these instructions to rip songs from a CD to your computer.

1 Insert an audio CD. 2 Start up Windows Media Player 11, and then click the [Rip] tab at the top of the window.
When connected to the Internet, Windows Media Player 11 obtains CD information (CD title, song name or artist name, etc.), and displays it in the window.

Click [Start Rip].
Windows Media Player 11 begins to import the CD.
The imported songs are indicated as [Ripped to library]. Wait until all songs have been imported.
![SONY NWZ-S745 - Click [Start Rip]. - 1](/content/2026/06/1353501/images/2c57b851b9fa92ac99c0e979efb3b0a78f65df2c9239c893040aa331cdc5b265.jpg)
Hint
- Imported songs are stored in the [My Music] folder (Windows XP) or [Music] folder (Windows Vista) of the computer. Click the [Library] tab of the Windows Media Player 11 window to find them.
- Windows Media Player 11 obtains the CD information from a database on the Internet. However, depending on the CD, information may not be available in the database. If your CDs' information is missing, you can add it after importing. For information about adding and editing CD information, refer to the Help of Windows Media Player 11. If you want a song not to be imported, uncheck the checkbox to the left of the song title.
Note
- Imported songs are limited to private use only. Use of a song beyond this limitation requires permission of the copyright holders.
Transferring Music
You can use Windows Media Player 11 to transfer music from your computer to the player.

Note
- Do not disconnect the USB cable while [Do not disconnect.] appears on the player, as the data being transferred may be damaged.
- If Content Transfer starts automatically after connecting the player to your computer using the supplied USB cable, close or ignore Content Transfer as Content Transfer need not be used. For details on setting automatic start of Content Transfer, refer to the Help of Content Transfer.
- If you turn on or restart the computer while the player is connected to the computer, the player may malfunction. In this case, press the RESET button of the player to reset it (p. 114). Disconnect the player from the computer before turning on or restarting the computer.
1 Start up Windows Media Player 11, and then connect the player to your computer using the supplied USB cable.
Insert the connector of the USB cable into the player with the mark facing up.
The [Device Setup] window appears.
2 Click [Cancel].
Close the auto play window, if it appears, by clicking [Cancel] or the Close icon.
- If you click [Finish] instead of [Cancel], the entire library data of Windows Media Player is automatically copied to the player. If the library data size is larger than the available storage space on the player, the copy process will not start.
- You can open the [Device Setup] window at any time. To open it, right-click [WALKMAN] on the left side of the Windows Media Player window, and then click [Set Up Sync].
3 Click the [Sync] tab on the Windows Media Player 11 window. 4 Drag-and-drop the desired songs to the Sync List on the right side of the window.
The songs are added to the Sync List.
5 Click [Start Sync] to start synchronization.
When synchronization is complete, a message confirming you can disconnect the player appears on the Sync List. After completion, close Windows Media Player 11, and disconnect the player from the computer.
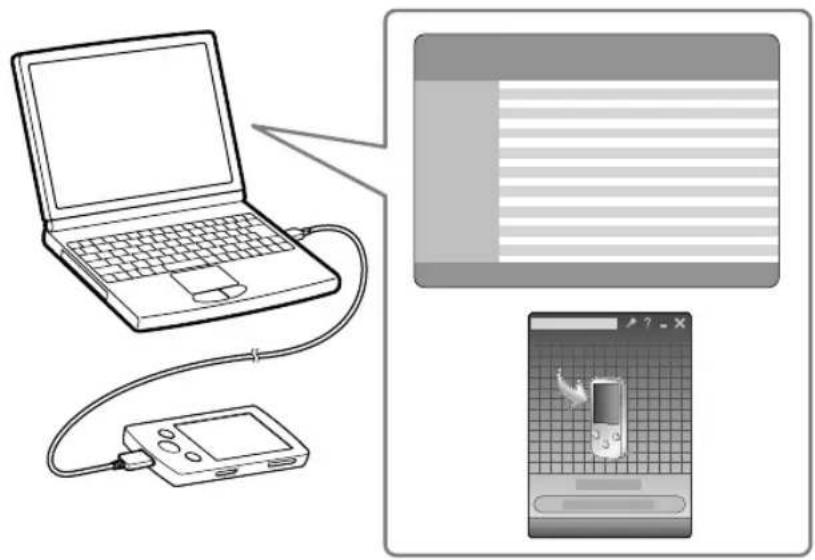
B Transferring Music Using Content Transfer
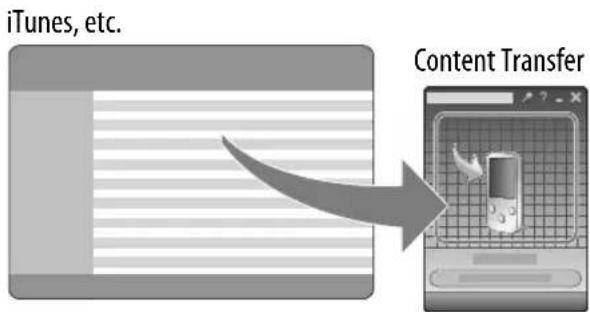
If you have already managed music with iTunes, etc., you can transfer them to the player using Content Transfer. You can use iTunes, etc., to drag-and-drop music to Content Transfer.
Note
- Do not disconnect the USB cable while [Do not disconnect.] appears on the player, or the data being transferred may be damaged.
- Content Transfer cannot be used for Windows Media Player contents.
- Contents with copyright protection cannot be transferred.
- Content Transfer supports data transfer from iTunes 8.1 to the player. For details on restrictions on transferring songs from iTunes, visit the customer support Web sites (p. 134).
1 Connect the player to your computer using the supplied USB cable.
Insert the connector of the USB cable into the player with the w mark facing up.
Content Transfer starts automatically.
- For details on setting automatic start and general operation of Content Transfer, refer to the Help of Content Transfer.
- You can also click [All programs] in the [start] menu, and then [Content Transfer] - [Content Transfer] to start the software.
2 Start up iTunes, etc.
3 Select the desired songs from iTunes, etc., and drag-and-drop them to Content Transfer.
Content Transfer recognizes the type of data by filename extension, and sends it to the appropriate folder of the player.
© Transferring Music Using Windows Explorer
You can directly transfer data by drag-and-drop using Windows Explorer on your computer.

1 Connect the player to your computer using the supplied USB cable.
Insert the connector of the USB cable into the player with the w mark facing up.
2 Click [start] – [My Computer] or [Computer] – [WALKMAN] – [Storage Media], and then select the [MUSIC] folder.
Data hierarchy may differ, depending on your computer environment.
Continued ↓
3 Drag-and-drop files or folders into the [MUSIC] folder, or one of its subfolders.
Music files or folders in your computer![[MUSIC] folder in your player](/content/2026/06/1353501/images/3309891a8bbec130056090917f3df3f1a09aae67d114cd296831248e54aa82c5.jpg)
- Accessibility to files and folders beyond the 8th level is not guaranteed.
![graph TD A["MUSIC"] --> B["Level 1 0001.wma"] B --> C["Level 7 0002.wma"] C --> D["Level 8 0003.wma"] D --> E["Level 9 0004.wma"] style A fill:#f9f,stroke:#333 style B fill:#ccf,stroke:#333 style C fill:#cfc,stroke:#333 style D fill:#fcc,stroke:#333 style E fill:#cff,stroke:#333](/content/2026/06/1353501/images/356d70bbaca00424eba9437ce1d04f293ae7373cecf52ebe01f5c49516f3165d.jpg)
Note
- Do not disconnect the USB cable while [Do not disconnect.] appears on the player. Otherwise, data being transferred or stored on the player may be damaged. If the player is disconnected while files are being transferred, unnecessary files may be left in the player. In this case, transfer usable files back to the computer and format the player (p. 107).
- Do not change folder names or delete the [MUSIC], [MP_ROOT], [MPE_ROOT], [VIDEO], [DCIM], [PICTURE], [PICTURES] and [PODCASTS] folders.
- Do not change folder or file names directly under the [MP_ROOT] or [MPE_ROOT] folders, otherwise, they will not be displayed on the player.
- Some files may not be played back on the player due to copyright protection.
- If Content Transfer starts automatically after connecting the player to your computer using the supplied USB cable, close or ignore Content Transfer as Content Transfer need not be used. For details on setting automatic start of Content Transfer, refer to the Help of Content Transfer.
Selecting the Way to Transfer Videos/Photos/Podcasts
Before transferring videos/photos/podcasts to the player, you need to import them into your computer. You can import videos from recorded videos or from the Internet, etc., or photos from a digital camera, etc., and import podcast episodes from the Internet.
To import videos/photos/podcasts into your computer, use appropriate software.
You can transfer videos/photos/podcasts to the player in the following three ways.
A Transferring videos/photos/podcasts using Content Transfer (p. 33)
You can transfer videos/photos/podcasts stored on your computer to the player using Content Transfer.
![graph LR A["Web Browser"] --> B["Smart Phone"] B --> C["Smart Device"] C --> D["Mobile Device"]](/content/2026/06/1353501/images/b8c1e796b9a424120f7c58dbb0cd7d2d40a98e272ab2d40789bfa469e06bc41f.jpg)
B Transferring videos/photos/podcasts by drag-and-drop using Windows Explorer (p. 35)
You can directly transfer videos/photos/podcasts stored on your computer by drag-and-drop using Windows Explorer.
![graph LR A["File Selection"] --> B["Processing"] B --> C["Mobile Device"]](/content/2026/06/1353501/images/afa6d04bd1b447e06acf0d7550486f7882314f645a992d9553b05557fc64fd57.jpg)
Transferring videos/photos using Windows Media Player 11
You can transfer videos/photos managed with Windows Media Player 11 to the player using Windows Media Player 11.
For details about usage, or support on Windows Media Player, refer to the Windows Media Player information from the following web site:
http://support.microsoft.com/

Hint
- For detailed information on how to import videos/photos/podcasts, refer to the Help of each software.
- For details about supported file formats, see “Supported file format” (p. 153).
Note
- Commercial DVDs and Blu-ray Discs are copyright protected and cannot be transferred to the player.
A Transferring Videos/Photos/Podcasts Using Content Transfer
You can transfer videos/photos/podcasts stored on your computer to the player using Content Transfer. You can transfer videos/photos/podcasts by drag-and-drop of the desired videos/photos/podcasts from Windows Explorer to Content Transfer.

Note
- Do not disconnect the USB cable while [Do not disconnect.] appears on the player, as the data being transferred may be damaged.
- Contents with copyright protection cannot be transferred.
1 Connect the player to your computer using the supplied USB cable.
Insert the connector of the USB cable into the player with the w mark facing up.
Content Transfer starts automatically.
- For details on setting automatic start and general operation of Content Transfer, refer to the Help of Content Transfer.
- You can also click [All programs] in the [start] menu, and then [Content Transfer] - [Content Transfer] to start the software.
2 Select the desired videos/photos/podcasts from Windows Explorer, and drag-and-drop them to Content Transfer.
Content Transfer recognizes the type of data by filename extension, and sends it to the appropriate folder of the player.

B Transferring Videos/Photos/Podcasts Using Windows Explorer
You can directly transfer data by drag-and-drop using Windows Explorer on your computer.


Hint
- Some WMV files can be played back only by transferring using Windows Media Player 11.
1 Connect the player to your computer using the supplied USB cable.
Insert the connector of the USB cable into the player with the w mark facing up.
2 Click [start] – [My Computer] or [Computer] – [WALKMAN] – [Storage Media], and then select the [VIDEO], [PICTURE], [PICTURES], [DCIM] or [PODCASTS] folder.
Data hierarchy may differ, depending on your computer environment.
Continued ↓
3 Drag-and-drop files or folders into the [VIDEO], [PICTURE], [PICTURES], [DCIM] or [PODCASTS] folder or one of its subfolders.
- Video files or folders: drag-and-drop into the [VIDEO] folder, or one of its subfolders.
- Photo files or folders: drag-and-drop into the [PICTURE], [PICTURES] or [DCIM] folder, or one of their subfolders.
- Podcast folders and episode files: drag-and-drop podcast folders into the [PODCASTS] folder and episode files into the podcast folders.
Video/photo/podcast files or folders in your computer![graph TD A["Browser Window"] --> B["File Selection"] B --> C["Grid Layout"] C --> D["Desktop Layout"] D --> E["Final Desktop Layout"]](/content/2026/06/1353501/images/822bd71e26c74a332b4adb9511be291120542a99629a2e652589d928c8eae5d8.jpg)
Video: [VIDEO] folder in your player Photo: [PICTURE], [PICTURES] or [DCIM] folder in your player Podcast: [PODCASTS] folder in your player
Note
- Do not disconnect the USB cable while [Do not disconnect.] appears on the player. Otherwise, data being transferred or stored on the player may be damaged. If the player is disconnected while files are being transferred, unnecessary files may be left in the player. In this case, transfer usable files back to the computer and format the player (p. 107).
- Do not change folder names or delete the [MUSIC], [MP_ROOT], [MPE_ROOT], [VIDEO], [DCIM], [PICTURE], [PICTURES] and [PODCASTS] folders.
- Do not change folder or file names directly under the [MP_ROOT] or [MPE_ROOT] folders. Otherwise, they will not be displayed on the player.
- Drag and drop files or folders into the correct folder as shown in the following illustrations.
The player can play back videos on the 1st to 8th level of the [VIDEO] folder, and can display photos on the 1st to 8th level of the [PICTURE], [PICTURES] and [DCIM] folders. The player can play back podcast episodes on the 2nd level of the [PODCASTS] folder.
Videos Photos Podcasts
- Some files may not be played back on the player due to copyright protection.
- If Content Transfer starts automatically after connecting the player to your computer using the supplied USB cable, close or ignore Content Transfer as Content Transfer need not be used. For details on setting automatic start of Content Transfer, refer to the Help of Content Transfer.
Playing Music [Music]
To play music, select [Music] on the Home menu to display the [Music] screen.
![BACK/HOME button, 5-way button, [Music], Music](/content/2026/06/1353501/images/123ae0463db7180169d10947bbf0855b0e6c17709a5b1176b34fc1cba7d57692.jpg)
1 From the Home menu, select [Music].
The music menu appears.
- You can select the desired search method to display the music list screen and search for songs. For details, see “Search method” of “Searching for Songs” (p. 42).
2 Select desired search method → desired song.
The music playback screen appears and playback of the songs begins.
- Select items until a song list appears.
- For details on how to operate the music playback screen, see “Music playback screen” (p. 39).

Music playback screen

Play Mode (p. 49), Playback Range (p. 50), Equalizer (p. 50), VPT (Surround) (p. 52), A-B repeat (p. 56) indication icons
*1 While playing back variable bit rate (VBR) songs, the elapsed time indication and the progress bar indicator may be unstable and inaccurate.
Operations on the music playback screen
| To (screen indication) Do this | |
| Play (▶)/pause (■)1 | Press the ▶■ button. |
| Fast forward (▶▶)/fast rewind (◀◀) | Press and hold the ◀/▶ button. |
| Find the beginning of the previous (or current) song (■◀◀)/find the beginning of the next song (▶▶I) | Press the ◀/▶ button. |
| Browse album covers to select an album2 | Press the ▲/▼ button. |
| Return to the list screen Press the B | ACK/HOME button |
*1 During pause, if there is no operation for a while, the player automatically enters standby mode.
*2 You can browse album covers only when [Language Learning Mode] is set to [Off] (p. 55).
Icons which appear by pressing the OPTION/PWR OFF button
| Icon Description | |
| Q (Search) | Shows the search menu. You can select the desired search method to display the list screen and search for songs. For details, see “Searching for Songs” (p. 41). |
| ⊕ (Option Menu) | Shows the option menu. For details on the music option menu, see “Using the Music Option Menu” (p. 47). |
Music list screen
The following are examples of music list screens.

Index
The initials of song and album, etc., names in the list section appear.

Song list screen Album list screen
Hint
- You can change the display format of the album list to display the cover arts only (p. 54).
Operations on the music list screen
| To | Do this |
| Confirm an item in the list | Press the ▶II button. |
| Move the cursor up or down | Press the ▲/▼ button.• Press and hold the ▲/▼ button to scroll up or down faster. |
| Move the cursor left/right when an index is displayed | Press the ◀/► button. |
| Display the previous/next screen of the list when an index is not displayed | Press the ◀/► button. |
| Move the cursor left/right when displaying cover arts only | Press the ◀/► button. |
| Return to the list screen of the next upper level | Press the BACK/HOME button. |
Icons which appear by pressing the OPTION/PWR OFF button
| Icon | Description |
| Q (Search)*1 | Shows the search menu. You can select the desired search method to display the list screen and search for songs. For details, see “Searching for Songs” (p. 41). |
| + = (Option Menu)*1 | Shows the option menu. For details on the music option menu, see “Using the Music Option Menu” (p. 47). |
| ▶, [To Playback Screen] | Returns to the music playback screen. |
*1 These icons may not appear depending on the screen.
Searching for Songs
When you select (Search) on the music playback screen or the list screen, the search menu appears. You can select the desired search method on the search menu to search the music list for a desired song.


1 On the music playback screen or the list screen, press the OPTION/PWR OFF button. 2 Select (Search) → the desired search method → the desired song.
- Select items as follows until a song list appears.
Continued ↓
Search method
| Method Description | |
| [All Songs] Select a song | from the all songs list. |
| [Album] | Select an album ➔ song. |
| [Artist]*1 | Select an artist ➔ an album ➔ song. |
| [Genre] | Select a genre ➔ an artist ➔ an album ➔ song. |
| [Release Year] | Select a release year ➔ an artist ➔ song. |
| [Playlists]*2 | Select a playlist ➔ a song. |
| [Folder] | Select a folder ➔ song. |
*1 "The" at the beginning of the artist name is omitted when arranging the list. *2 Playlists are created by using Windows Media Player 11. For information on how to create a playlist, refer to the Help of the Windows Media Player 11. Cover art images registered to a playlist are not displayed on the player.

Hint
- [All Songs], [Album], [Artist] and [Genre] lists are arranged in alphanumeric order. [Release Year] list is arranged in reverse chronological order. In [Folder] list, folders are displayed in name order first, then files are displayed in name order. In this case, upper or lower case letters are not distinguished.
Browsing cover arts to select an album (Album Scroll)
On the music playback screen, you can press the ▲/▼ button to scroll the cover art up or down and select the album.
Note
- When [Language Learning Mode] is set to [On], you cannot use the album scroll function (p. 55).
From the Home menu, select [Music] → desired item to display the playback screen. 2 Press the ▲/▼ button on the music playback screen.
The album scroll screen appears.
Continued ↓
3 Press the ▲/▼ button to browse album covers.
The cover art images are arranged by title in alphabetical order.

4 Select the cover art of the desired album, then press the ▶II button.
The music playback screen reappears and playback of the selected album begins.
To cancel the browsing
Press the BACK/HOME button.

Hint
- Cover art only appears if cover art information is available. You can set cover art using Windows Media Player 11, or another transfer capable software for setting cover art. For details on operation, refer to the Help or maker of the software. Cover art may not be displayed, depending on the cover art file format.
Note
- The cover art only appears when the cover art information is included in the song file.
- The cover art may not appear depending on its format.
Enjoying Music Playback on a Television
You can connect the player to a television to output the music screen and audio. You can view cover art, etc., on a larger screen.
Outputting the music playback screen and audio to a television [TV Output(Music)]
1 Connect the player and a television using the optional video/audio output cable (WMC-NWV10).
- For details, refer to the manual of the video/audio output cable.
- Depending on the country/region, the video/audio output cable (WMC-NWV10) may not be available.

2 From the Home menu, select Settings] [Music Settings] [TV Output(Music)] [On].
Setting type
| Type | Description |
| [On] | Outputs the music screen to a television connected to the player. |
| [Off] | Displays the music screen on the player's screen. (Default setting) |
Continued ↓
Note
- If you connect the player to a computer while outputting to a television, the TV output stops because the USB connection has precedence over the TV output.
- Some televisions may suffer screen burn if you continue to display a still image on the screen for a long time. Refer to the operation guide of your television, and if it is vulnerable to screen burn, avoid displaying the same image on the television.
- The [TV Output Size] setting (p. 64) takes effect on video output but does not affect music screen output.
- Pixel length-to-width ratio differs between the player and television. As a result, the height of the music screen on the television may be slightly stretched.
- Depending on song, playback volume may be low compared to television broadcast programs. If the volume is too low, turn up the television. Be sure to turn it down before watching television programs.
Switching the television signal format [NTSC/PAL settings]
You can select the player's video output signal. Select the signal format that is appropriate to the television you intend to connect, if necessary.
![SONY NWZ-S745 - Switching the television signal format [NTSC/PAL settings] - 1](/content/2026/06/1353501/images/fff19b449a6d1d83759425589e414330c190acd016df1b07c8dc91ca159cd452.jpg)
From the Home menu, select [Settings]
[NTSC/PAL settings] → appropriate setting for the television.
→ [Music Settings] →
| Type Description | |
| [NTSC] Outputs video signal in NTSC format. | |
| [PAL] Outputs video signal in PAL format. | |
Deleting Songs
When you delete songs from the player, use the software you used to transfer the songs, or Windows Explorer.
For details about using the software, see the Help of the software.
Note
- The player itself cannot delete songs without connecting to a computer.
Using the Music Option Menu
You can bring up the music option menu by pressing the OPTION/PWR OFF button on the music list or on the music playback screen. For details on how to use the option menu, see ☎ p. 16.
The option items shown on the option menu vary depending on the screen from which you bring it up. See the reference page for settings and usage.
Option items appearing on the music list screen
| Option items Description/reference page | |
| [Album Display Format] | Selects the album list format ( ☑ p. 54). |
Option items appearing on the music playback screen
| Option items Description/reference page | |
| [Play Mode] | Sets the play mode ( p. 49). |
| [Playback Range] | Sets the playback range ( p. 50). |
| [Language Learning Mode] Allows you to use the [Quick Replay] function and the A-B repeat function ( p. 55). | |
| [DPC (Speed Control)] | Adjusts the playback speed of songs ( p. 57). |
| [Equalizer] | Customizes the sound quality ( p. 50). |
| [VPT(Surround)] | Customizes the [VPT(Surround)] settings ( p. 52). |
| [Add to Wishlist/Remove from Wishlist] | Adds the song to the wish list to purchase it on the service corresponded software./ Removes the song from the wish list. |
| [Detailed Information] Displays | detailed information of a song, such as playing time, audio format, bit rate, and file name ( p. 48). |
Displaying the detailed information screen [Detailed Information]
From the music playback screen, press the OPTION/PWR OFF button to bring up the option menu. 2 Select [Detailed Information].
Detailed information screen![06:58PM Detailed Information Song name: Blue Sky Artist name: SONY Album title: Walkmare Genre: Pop Release year: 2008 Length of Song: 04:57 Codec: MP3 Bit Rate: 192 kbps File Name: Blue Sky.mp3 While playing back copyright protected songs, [Secured] appears. While playing back variable bit rate son…](/content/2026/06/1353501/images/1eb85f2a7bec902e060dcdfa97f2b3b22bcc12bc13c5c507809b8119483eb64c.jpg)
Changing the Music Settings
To change the music settings, select [Settings] from the Home menu, then select [Music Settings].

![D:\66PM Settings [Settings]](/content/2026/06/1353501/images/bfccc4d833b8f500c7292b16a4aa27259576ebb066923087af1ed98445edc429.jpg)
Setting the play mode [Play Mode]
The player offers a variety of play modes, including random play and selected repeat play.
1 From the Home menu, select [Settings] → [Music Settings] → [Play Mode] → desired play mode type.
Note
| Type (icon) | Description |
| [Normal] (No icon) | The songs within the playback range are played back in the song list order. (Default setting) |
| [Repeat] (→) | The songs within the playback range are played back in the song list order and then repeated. |
| [Shuffle] (SHUF) | The songs within the playback range are played back in random order. |
| [Shuffle&Repeat](→SHUF) | The songs within the playback range are played back in random order and then repeated. |
| [Repeat 1 Song] (→1) | The current song or the song selected from a song list is played back repeatedly. |
- Songs to be played back differ depending on the [Playback Range] settings (p. 50).
- Songs to be played back differ depending on the [Playback Range] settings (p. 50).
You can set the playback range of songs.
1 From the Home menu, select [Settings] → [Music Settings] → [Playback Range] → desired playback range type.
1 From the Home menu, select Settings] → [Music Settings] → [Playback Range] → desired playback range type.
| Type (icon) Description | |
| [All Range] (No icon) | Plays back all the songs in all the lists of the selected search method.For example, if you start playback from an album list, all the albums in the player are played back. |
| [Selected Range] ( [IMAGE]) | Plays back songs only in the lists from which playback starts. (Default settings)For example, if you start playback from an album list, the songs in the album only are played back. |
You can set the sound quality according to the music genre, etc.
You can set the sound quality according to the music genre, etc.
From the Home menu, select Settings] [Music Settings] [Equalizer] desired equalizer type.
| Type (icon) Description | |
| [None] (No icon) | Sound quality setting is not activated. (Default setting) |
| [Heavy] (H) | Emphasizes high and low ranges for a powerful sound. |
| [Pop] (P) | Stresses the middle range audio, ideal for vocals. |
| [Jazz] (J) | Emphasizes high and low ranges for a lively sound. |
| [Unique] (U) | Emphasizes high and low ranges, so that even soft sounds can be heard easily. |
| [Custom 1] (I) | User-customizable sound settings for which you can adjust each frequency range individually. See p. 51 for details. |
| [Custom 2] (2) |
Note
- If your personal settings saved as [Custom 1] and [Custom 2] seem to produce a different volume level than other settings, you may have to adjust the volume manually to compensate.
- The [Equalizer] setting is not applied while playing a video, FM radio, a video podcast, or external input audio.
Customizing sound quality
You can preset the value of CLEAR BASS (bass) and 5 band Equalizer as [Custom 1] or [Custom 2].
1 From the Home menu, select Settings] [Music Settings] [Equalizer] [Custom 1] or [Custom 2]. 2 Press the ◀/▶ button to select CLEAR BASS or the frequency range setting, and press the ▲/▼ button to adjust the setting level, and then press the ▶II button to confirm.
The [Music Settings] screen reappears.
- CLEAR BASS can be set to any of 4 sound levels, and the 5 frequency ranges can be set to any of 7 sound levels.
- After you have adjusted the setting level, be sure to press the ▶II button to confirm. If you press the BACK/HOME button before you confirm, the setting will be canceled.
Note
- The [Equalizer] setting is not applied while playing a video, FM radio, a video podcast, or external input audio.
Customizing the surround sound [VPT(Surround)]
You can customize the surround sound by using the VPT 1 (Surround) function to enrich the sound reproduction quality of the audio playback. The sense of realism is more enhanced in the order of [Studio] → [Live] → [Club] → [Arena] (most enhanced).
1 From the Home menu, select Settings] → [Music Settings] → [VPT(Surround)] → desired VPT (Surround) type.
| Type (icon) | Description |
| [None] (No icon) | [VPT(Surround)] setting is not activated. (Default setting) |
| [Studio] (00S) | Creates the sound of a recording studio. |
| [Live] (00L) | Creates the sound of a concert hall. |
| [Club] (00C) | Creates the sound of a club. |
| [Arena] (00A) | Creates the sound of an arena. |
| [Matrix] (00M) | Reproduces an additional surround effect, and creates a natural, yet richly enhanced sound. |
| [Karaoke] (00K) | Creates a stage-like sound field by suppressing vocal sounds, and adding a surround effect to the music. |
*1 VPT, which stands for Virtual Phone Technology, is a proprietary sound processing technology developed by Sony.
Note
- The [VPT(Surround)] setting is not applied while playing a video, FM radio, a video podcast, or external input audio.
Listening with DSEE (Sound Enhance) [DSEE(Sound Enhance)]
By activating the [DSEE(Sound Enhance)] *1 feature, you can hear a rich and natural sound almost exactly like the original source.
1 From the Home menu, select Settings] → [Music Settings] → [DSEE(Sound Enhance)] → desired DSEE (Sound Enhance) type.
| Type | Description |
| [On] | Activates the [DSEE(Sound Enhance)]*1 function, and plays back naturally extended sound that is close to the original sound. |
| [Off] | Disables the [DSEE(Sound Enhance)] function and plays back normal sound. (Default setting) |
*1 DSEE, which stands for Digital Sound Enhancement Engine, is a technology developed by Sony, to enhance the sound quality of compressed audio files by restoring high-range sound removed by the compression process.
Note
- The [DSEE(Sound Enhance)] setting is not applied while playing a video, FM radio, a video podcast, or external input audio.
- The [DSEE(Sound Enhance)] function is not effective for songs with a file format that is not compressed, or songs that are of a high bit rate with no treble loss.
- In the case of songs of very low bit rate, the [DSEE(Sound Enhance)] function will not be effective.
Listening with Clear Stereo [Clear Stereo]
[Clear Stereo] enables individual left and right digital processing of the sound.
1 From the Home menu, select Settings] → [Music Settings] → [Clear Stereo] → desired Clear Stereo type.
| Type | Description |
| [On] | Activates the [Clear Stereo] function when you use the supplied headphones. |
| [Off] | Disables the [Clear Stereo] function and plays back normal sound. (Default setting) |
Note
- The [Clear Stereo] setting is not applied while playing a video, FM radio, a video podcast, or external input audio.
- The [Clear Stereo] function is designed to obtain maximum effect with the supplied headphones. The [Clear Stereo] effect may not be obtained with other headphones. When using other headphones, set [Clear Stereo] to [Off].
Adjusting the volume level [Dynamic Normalizer]
You can reduce the volume level between songs. With this setting, when listening to album songs in the shuffle play mode, the volume level between songs is moderated to minimize the difference in their recording levels.
1 From the Home menu, select Settings] → [Music Settings] → [Dynamic Normalizer] → desired Dynamic Normalizer type.
| Type Description | |
| [On] | Minimizes the difference in volume level between songs. |
| [Off] | Plays back songs at their original transferred volume level. (Default setting) |
Note
- The [Dynamic Normalizer] setting is not applied while playing a video, FM radio, a video podcast, or external input audio.
Selecting the album display format [Album Display Format]
You can select the album display format.
1 From the Home menu, select Settings] → [Music Settings] → [Album Display Format] → desired Album Display Format type.
| Type | [Title & Cover Art] (Default setting) | [Cover Art Only] | ||
| Screen | ![SONY NWZ-S745 - Selecting the album display format [Album Display Format] - 1](/content/2026/06/1353501/images/d512ee00490893202506ddad31de38d3fa8846b735124adca0f10c536b0a983f.jpg) | ![SONY NWZ-S745 - Selecting the album display format [Album Display Format] - 2](/content/2026/06/1353501/images/f2d120edea6c59855639b79baba9927dd9138cbd12d422526e4b2ca4e60ee488.jpg) | ||
Hint
- The cover art does not appear if there is no cover art information for the album. You can set cover art using the Windows Media Player 11. For details on operation, refer to the Help of Windows Media Player 11. Note that the player does not display cover art attached to playlists.
Using the Language Learning Function
When you set [Language Learning Mode] to [On], you can use the [Quick Replay] function and the A-B repeat function. This section also explains about the playback speed control function.

Hint
- You can adjust the playback speed regardless of whether [Language Learning Mode] is set to [On] or [Off] (p. 57).
- When [Language Learning Mode] is set to [On], you can also use the [Quick Replay] function and the A-B repeat function in the podcast's audio playback screen (p. 72). The [DPC (Speed Control)] setting also affects the playback speed of the audio podcast.
Activating the language learning function

From the Home menu, select [Settings] → [Music Settings] → [Language Learning Mode] → [On].
| Type | Description |
| [On] Activates the [Language Learning Mode], allowing you to use the [Quick Replay] function and the A-B repeat function. | |
| [Off] Disables the [Language Learning Mode]. (Default setting) | |
Note
- When [Language Learning Mode] is set to [On], the ▲/▼ button works for the language learning function and you cannot use the album scroll function (⑤ p. 42).
Music playback screen with language learning activated

Rewinding slightly [Quick Replay]
You can rewind about 3 seconds to listen to audio again.
1 Press the ▲ button during playback on the music playback screen.

Hint
- When point A (starting point of A-B repeat) is set, if you press the ▲ button within 3 seconds of point A, playback returns to point A.
Playing back a specified section repeatedly (A-B Repeat)
You can play back a specified section of audio repeatedly.
1 Press the ▼ button to specify the starting point of A-B repeat.
The point A (starting point of A-B repeat) indicator appears. The section from point A to the end of the song is played back repeatedly.
2 Press the ▼ button to specify the ending point of the A-B repeat.
The point B (ending point of A-B repeat) indicator appears. The section from point A to point B is played back repeatedly.
Note
- Put an interval of more than 1 second between point A and B. If you press the ▼ button within 1 second from point A, you cannot set point B.
A-B repeat operations
During A-B repeat, you can pause, resume playback, fast forward, fast rewind and [Quick Replay] as usual (p. 39). In addition to that, you can perform the following operations.
| To | Do this |
| Return to the point A | Press the ◀ button. |
| Proceed to the point B and exit the A-B repeat | Press the ▶ button. |
| Exit the A-B repeat | Press the ▼ button. |
Adjusting the playback speed (DPC)
You can adjust the playback speed between half and double normal speed by using the DPC (Digital Pitch Control) function. The audio is played back in natural tones by means of the digital processing function.

Hint
- You can adjust the playback speed regardless of the [Language Learning Mode] setting.
- The [DPC (Speed Control)] setting also affects the playback speed of an audio podcast (p. 72).
1 From the Home menu, select [Settings] → [Music Settings] → [DPC (Speed Control)] → desired setting type.
| Type | Description |
| [x0.5] Plays back at half speed. | |
| [x0.75] Plays back at 0.75 times normal speed. | |
| [x0.9] Plays back at 0.9 times normal speed. | |
| [Off] Plays back at normal speed. (Default setting) | |
| [x1.1] Plays back at 1.1 times normal speed. | |
| [x1.25] Plays back at 1.25 times normal speed. | |
| [x1.5] Plays back at 1.5 times normal speed. | |
| [x1.75] Plays back at 1.75 times normal speed. | |
| [x2.0] Plays back at double speed. | |
Playing a Video [Videos]
To play a video, select Videos on the Home menu to display the [Videos] screen.


1 From the Home menu, select [Videos].
The [Videos] screen appears.
- You can select the desired search method to display the video list screen and search for videos. For details, see “Search method” of “Searching for Videos” (p. 61).
2 Select desired item → desired video.
The video playback screen appears and playback of the video begins.
- Select items until a video list appears.
- For details on how to operate the video playback screen, see “Video playback screen” (p. 59).

Hint
- When the [On-Hold Display] option is set to [No], you can turn off the screen to enjoy sound only by setting the HOLD switch to on during video playback. By this operation, you can reduce power consumption for longer battery life.
- You can arrange the video list by transfer date or by video title (p. 70).
- You can set JPEG files as thumbnails of video files. When you display the video list, you can see the thumbnails (small pictures to display on the list) for the video files on the player. Use a computer to create a thumbnail, observing the following rules:
- The thumbnail image file must be in JPEG format.
- The image's dimension must be horizontal 160 × vertical 120 dots.
- The file name must be the same as the video file, with extension ".jpg".
- The thumbnail and video file must be placed in the same folder of the player.
- The maximum video size playable on the player is 720 × 480. For detailed specifications, see “Specifications” (p. 153).
Video playback screen

Operations on the video playback screen
While the player is playing back a video in landscape orientation, the ▲/▼ buttons and ◀/▶ buttons swap functions. While the player outputs video to a television (p. 63), the 5-way button works in the normal portrait orientation.
| To (Screen indication) Do this | |
| Play (▶)/pause (■)*1 | Press the ▶|| button. |
| Fast forward (▶▶)/fast rewind (◀◀) | Press and hold the ◀/▶ button.*2 |
| Fast forward (▶▶)/fast rewind (◀◀) during pause*3 | Press and hold the ◀/▶ button during pause. |
| Move to the previous scene*4 or chapter (I◀◀)/move to the next scene or chapter (▶▶) | Press the ▲ (previous)/▼ (next) button. |
| Forward slightly/rewind slightly | Press the ◀/▶ button during pause. |
| Return to the list screen Press the BA | CK/HOME button. |
1 During pause, if there is no operation for a while, the player automatically enters standby mode. 2 Forward speed changes through 3 levels by repeatedly pressing ▶ (▶▶1(×10), ▶▶2(×30), ▶▶3(×100)). Also, rewind speed changes through 3 levels by repeatedly pressing ◀ (◀◀1(×10), ◀◀2(×30), ◀◀3(×100)). Release the ◀/▶ button to exit the operation and resume normal playback. 3 The speed of fast forward/fast rewind during pause varies depending on the length of the video. 4 If there is only one chapter in the video, the playback position moves with an interval of 5 minutes.
Icons which appear by pressing the OPTION/PWR OFF button
| Icon Description | |
| Q (Search) | Shows the search menu. You can select the desired search method to display the list screen and search for videos. For details, see “Searching for Videos” (p. 61). |
| ⊕ (Option Menu) | Shows the option menu. For details on the video option menu, see “Using the Video Option Menu” (p. 66). |
| ↔ [Scene Scroll] | Shows the scene scroll screen. You can browse scenes or chapters by scrolling the thumbnail*1 on the screen, to select the desired scene. For details, see “Browsing scenes (Scene Scroll)” (p. 61). |
1 Thumbnail refers to a reduced size image of one scene of a video.
Video list screen
The following is an example of video list screens.

Icons of videos
The following icons are displayed in the video field.
| Icon Description | |
| NEW (New icon) | Shows that the video has never been played back. |
| (Playback icon) | Shows that the video is currently playing. |
Operations on the video list screen
| To Do this | |
| Select an item | Press the ▶II button. |
| Move the cursor up or down | Press the ▲/▼ button.• Press and hold the ▲/▼ button to scroll up or down faster. |
| Display the previous/next screen of the list | Press the ◀/► button. |
| Return to the list screen of the next upper level | Press the BACK/HOME button. |
Icons which appear by pressing the OPTION/PWR OFF button
| Icon Description | |
| (Q (Search)‘1 | Shows the search menu. You can select the desired search method to display the list screen and search for videos. For details, see “Searching for Videos” (p. 61). |
| (Option Menu)‘1 | Shows the option menu. For details on the video option menu, see “Using the Video Option Menu” (p. 66). |
| [To Playback Screen] | Returns to the video playback screen. |
1 These icons may not appear depending on the screen.
Searching for Videos
When you select (Search) on the video playback screen or the list screen, the search menu appears. You can select the desired search method on the search menu to search the video list for a desired video.


1 On the video playback screen or the list screen, press the OPTION/PWR OFF button. 2 Select (Search) → desired search method → desired video.
The video playback screen appears and playback of the video begins.
- Select items as follows until a video list appears.
Search method
| Method Description | |
| [All Videos] | Select a video from the video list. |
| [VIDEO] | Select a folder ➔ video. |
Browsing scenes (Scene Scroll)
You can display thumbnails1 to select a scene or chapter to play back.
*1 Thumbnail refers to a reduced size image of one scene of a video.
1 On the video playback screen, press the OPTION/PWR OFF button. 2 Select [Scene Scroll].
The scene scroll screen appears.
3 Press the ◀/▶ button to scroll the images.

Scene interval setting
You can set the interval of scenes displayed as thumbnails.
You can set the interval to [15 Sec], [30 Sec], [1 Min], [2 Min] or [5 Min].
Press the ▲/▼ button to select the desired interval.
4 Select the desired image, then press the ▶II button to confirm.
The video playback screen reappears and playback begins from the beginning of the scene you selected.

Hint
- Use the scene thumbnails as a guide (because each thumbnail may have a deviation from the exact time interval).
To cancel the browsing
Press the BACK/HOME button.
Enjoying Videos on a Television
You can connect the player to a television to output video and audio. You can watch videos on the larger screen.
Outputting videos to a television [TV Output(Video)]
Note
- Set the [TV Output Size] setting in accordance with your television before outputting videos to the television (p. 64).
1 Connect the player to a television using the optional video/audio output cable (WMC-NWV10).
- For details, refer to the manual of the video/audio output cable.
- Depending on the country/region, the video/audio output cable (WMC-NWV10) may not be available.

2 From the Home menu, select [Settings] → [Video Settings] → [TV Output(Video)] → [On].
Setting type
| Type Description | |
| [On] Outputs video to a | television connected to the player. |
| [Off] Displays video on | the player’s screen. (Default setting) |
Note
- The outer edges of the video image may not be visible on the television screen.
- Only the video image is displayed on the television screen. Information such as the player's message, etc., is displayed on the player's screen.
- You cannot output video podcasts to a television.
- While outputting videos to a television, use the 5-way button in normal (portrait) orientation (p. 59).
- While outputting videos to a television, you cannot bring up the option menu. Stop video playback and press the BACK/HOME button to return to the list screen before using the option menu.
- When [TV Output(Video)] is set to [On], copyright protected videos may not be played back. Set the option to [Off] to play them back on the player's screen.
- Depending on video, playback volume may be low compared to television broadcast programs. If the volume is too low, turn up the television. Be sure to turn it down before watching television programs.
Selecting the television aspect ratio [TV Output Size]
Select [16:9] or [4:3] according to the television you intend to connect.
From the Home menu, select Settings] [Video Settings] [TV Output Size] appropriate setting for the television.
| Type Description | |
| [16:9] | Adjusts the video image size for wide screen (16:9). |
| [4:3] | Adjusts the video image size for normal screen (4:3). (Default setting) |
Switching the television signal format [NTSC/PAL settings]
You can select the player's video output signal. Select the signal format that is appropriate to the television you intend to connect, if necessary.
From the Home menu, select Settings] → [Video Settings] → [NTSC/PAL settings] → desired setting type.
| Type Description | |
| [NTSC] | Outputs the video signal in NTSC format. |
| [PAL] | Outputs the video signal in PAL format. |
Deleting Videos
You can delete videos from the player.
Deleting currently playing video
From the playback screen of the video, press the OPTION/PWR OFF button to bring up the option menu. 2 Select [Delete Video] → [Yes]. The video is deleted.
Deleting videos by selecting from a list
From the video list screen, press the OPTION/PWR OFF button to bring up the option menu. 2 Select [Delete Video] → video you intend to delete → [Yes]. The video is deleted.

Hint
- While selecting a video to be deleted, you can press BACK/HOME button to cancel deleting and return to the previous list screen.
Using the Video Option Menu
You can bring up the video option menu by pressing the OPTION/PWR OFF button on the video list or on the video playback screen. For details on how to use the option menu, see ☎ p. 16.
The option items shown on the option menu vary depending on the screen from which you bring it up. See the reference page for settings and usage.
Option items appearing on the video list screen
| Option items Description/reference page | |
| [Order of Video List] | Arranges the video list by date or by title (p. 70). |
| [TV Output] | Outputs videos to a television (p. 63). |
| [NTSC/PAL settings] | Sets the television signal format (p. 64). |
| [TV Output Size] | Sets the television screen size (p. 64). |
| [Delete Video] | Deletes videos (p. 65). |
Option items appearing on the video playback screen
| Option items Description/reference page | |
| [Zoom Settings] | Sets the zoom function ( p. 67). |
| [Brightness] | Adjusts the brightness of the screen ( p. 102). |
| [On-Hold Display] Sets to turn off the video screen while the player is on hold ( p. 70). | |
| [Detailed Information] Displays file information, such as file size, resolution, video/audio compression format, and file name, etc. | |
| [Delete Video] | Deletes the videos from the player ( p. 65). |
Changing the Video Settings
To change the video settings, select Settings] on the Home menu, then select [Video Settings].


Setting the zoom function [Zoom Settings]
You can zoom in on the currently playing video. When the video is output to a television, it is enlarged in accordance with the [TV Output Size] setting (p. 63, 64).
1 From the Home menu, select [Settings] → [Video Settings] → [Zoom Settings] → desired zoom setting type.
Continued ↓
| Type Description | ||
[Auto] The video image is resized to fit the display area, maintaining the original aspect ratio (Default setting).When a 16:9 (wide size) video image is displayed on the player's screen or a 4:3 television, black bands appear on the top and bottom of the screen. When a 4:3 video image is displayed on a wide television, black bands appear on the right and left of the screen.The player or a 4:3 television![SONY NWZ-S745 - Setting the zoom function [Zoom Settings] - 1](/content/2026/06/1353501/images/b63be356f730d1407db779bc719c4254b3cf9e5a2ea6e6477e170fa3aa62c784.jpg) ![SONY NWZ-S745 - Setting the zoom function [Zoom Settings] - 2](/content/2026/06/1353501/images/d8493685647d6ee6c56a3008dac585ee60700b2c14ab6fe4af246963f6da5309.jpg) 16:9 source 4:3 sourceA wide television 16:9 source 4:3 sourceA wide television![SONY NWZ-S745 - Setting the zoom function [Zoom Settings] - 3](/content/2026/06/1353501/images/a1bf35314ae49ecf7497fa6ee9a1b5d2e9723224e3c4d665f0e2dd226c501043.jpg) ![SONY NWZ-S745 - Setting the zoom function [Zoom Settings] - 4](/content/2026/06/1353501/images/decb6e03bae96769a6ace77728633a9611dcb6a8d53e2cb7e1cf11146d29923e.jpg) 16:9 source 4:3 source 16:9 source 4:3 source | ||
Continued ↓
| Type Description | |
| [Full] The video image | age is resized to fill the available display area, maintaining the aspect ratio.When a 16:9 (wide size) video image is displayed on the player's screen or a 4:3 television, the right/left sides of the image are trimmed to fit. When a 4:3 video image is displayed on a wide television, the top and bottom of the video image are trimmed to fit.The player or a 4:3 television![SONY NWZ-S745 - Setting the zoom function [Zoom Settings] - 5](/content/2026/06/1353501/images/f9630d4f47a449a55dcb4a25faefcdc80d098e0ce61467a3396e70886a8c2123.jpg) ![SONY NWZ-S745 - Setting the zoom function [Zoom Settings] - 6](/content/2026/06/1353501/images/93a0472662799b4243a2019222946b5c6bfead12eca630ffe23bd20f81e36f1a.jpg) 16:9 source 4:3 sourceA wide television 16:9 source 4:3 sourceA wide television![SONY NWZ-S745 - Setting the zoom function [Zoom Settings] - 7](/content/2026/06/1353501/images/f000577040cb8d5c04999616c6f103e4a170d9066403b4f9f5c61a338dac63b5.jpg) ![SONY NWZ-S745 - Setting the zoom function [Zoom Settings] - 8](/content/2026/06/1353501/images/5cd914c1830ac20a59ec65a02daafaae37894e48602abf07f04ec47f43ff9fb4.jpg) 16:9 source 4:3 sourceThe dotted line frame represents the original video image size. 16:9 source 4:3 sourceThe dotted line frame represents the original video image size. |
| [Off] The video image | age is not resized, and appears in the original resolution. If video resolution is too large, the left, right, top and bottom of the screen will be cut. If video resolution is too small, black bars will appear on the right, left, top and bottom of the screen. |
Playing only video sound [On-Hold Display]
You can set to turn off the video screen while the player is on hold, allowing you to enjoy the sound of videos only.
Setting this option to [No] saves battery power for longer battery life.
1 From the Home menu, select [Settings] → [Video Settings] → [On-Hold Display] → desired On-Hold Display setting type.
| Type Description | |
| [Yes] | When the player is on hold, the buttons are deactivated, but videos will be played back normally. (Default setting) |
| [No] | When the player is on hold, the buttons are deactivated and the screen turns off, but the sound of the current video is played back. |
Arranging the video list [Order of Video List]
Arranges the video list by date or by title.
1 From the Home menu, select [Settings] → [Video Settings] → [Order of Video List] → desired order of video list type.
| Type Description | |
| [Date/Time (Oldest)] | Arranges the video list by transfer/record date in ascending order. |
| [Date/Time (Newest)] | Arranges the video list by transfer/record date in descending order. (Default setting) |
| [Title (A>Z)] | Arranges the video list by title in ascending order. |
| [Title (Z>A)] | Arranges the video list by title in descending order. |
Playing Podcast [Podcasts]
To play a podcast, select [Podcasts] on the Home menu to display the [Podcast List] screen.

![07:01PM Podcasts [Podcasts]](/content/2026/06/1353501/images/657c2bd56f084775639e90f9b63d548d8312dd5ddbf1a0d4ee92f80c8611280e.jpg)
What is a podcast?
A “podcast” is a group of audio or video files that is published on the Internet. The files, called episodes, can be downloaded to a computer automatically by using RSS, to play back. Many news sites, corporations, or individuals publish podcasts by using RSS. You can subscribe to a podcast by using your computer. When the latest episodes are added to the podcast, you can download them to your computer. After downloading, you can transfer them to the player by using Windows Explorer or Content Transfer, and play them back on the player.
Playing podcast
From the Home menu, select @Podcasts] desired podcast desired episode.
The podcast playback screen appears.
Note
- You cannot play back podcast episodes continuously.

Hint
- When [Language Learning Mode] is set to [On], you can use the [Quick Replay] function and the A-B repeat function in the podcast's audio playback screen (p. 55). The [DPC (Speed Control)] setting also affects the playback speed of the audio podcast (p. 57).
Podcast playback screen
Audio playback screen

Operations on the audio playback screen
| To (Screen indication) Do this | |
| Play (▶)/pause (■)*1 | Press the ▶|| button. |
| Fast forward (▶▶)/fast rewind (◀◀) | Press and hold the ◀/▶ button. |
| Find the beginning of the episode*2 | Press the ◀/▶ button. |
| Return to the list screen Press the BA | CK/HOME button. |
*1 During pause, if there is no operation for a while, the player automatically enters standby mode.
*2 Both of the ◀/▶ buttons find the beginning of the episode. To play back the next episode, press the BACK/HOME button to display the episode list to select the desired episode.
Continued ↓
Video playback screen

Operations on the video playback screen
While the player is playing back a video in landscape orientation, the ▲/▼ buttons and ◀/▶ buttons interchange their functions with each other.
| To (Screen indication) Do this | |
| Play (▶)/pause (■)1 | Press the ▶II button. |
| Fast forward (▶▶)/fast rewind (◀◀)*2*3 | Press and hold the ◀/▶ button.*4 |
| Fast forward (▶▶)/fast rewind (◀◀) during pause*5 | Press and hold the ◀/▶ button during pause. |
| Move to the previous scene*6 (I◀◀)/move to the next scene (▶▶I) | Press the ▲ (previous)/▼ (next) button. |
| Rewind slightly/forward slightly | Press the ◀/▶ button during pause. |
| Return to the list screen Press the BACK/HOME button. | |
1. During pause, if there is no operation for a while, the player automatically enters standby mode. 2. If you fast-forward to the end of the episode, the playback pauses. If you fast-rewind to the beginning of the episode during playback, the playback restarts automatically. If you fast-rewind to the beginning of the episode during pause, the playback remains paused. 3. These buttons may not work as described above depending on the episode. 4. Forward speed changes through 3 levels by repeatedly pressing ▶ (▶▶ 1 (×10), ▶▶ 2 (×30), ▶▶ 3 (×100)). Also, rewind speed changes through 3 levels by repeatedly pressing ◀ (◀◀ 1 (×10), ◀◀ 2 (×30), ◀◀ 3 (×100)). Release the ◀/▶ button to exit the operation and resume normal playback. 5. The speed of fast forward/fast rewind during pause varies depending on the length of the video. 6. If there is only one chapter in the video, the playback position moves with an interval of 5 minutes.
Icons which appear by pressing the OPTION/PWR OFF button
| Icon Description | |
| [CARB2] (Option Menu) | Shows the option menu. For details on the podcast option menu, see “Using the Podcast Option Menu” (p. 78). |
| [AOTS] . [Scene Scroll] *1 | Shows the scene scroll screen. You can browse scenes or chapters by scrolling the thumbnail *2 on the screen, to select the desired scene. For details, see “Browsing scenes (Scene Scroll)” (p. 61). |
1. Scene Scroll icon appears on the video playback screen only.
2. Thumbnail refers to a reduced size image of one scene of a video.
Episode list screen
Episodes are displayed in the episode list screen in name order.

Icons of episodes
The following icons are displayed in the episode field.
| Icon Description | |
| (Audio icon) | Shows that the episode is an audio episode. |
| (Video icon) | Shows that the episode is a video episode. |
| (New icon) | Shows that the episode has never been played back yet. |
| (Playback icon) | Shows that the episode is currently playing. |
Operations on the episode list screen
| To (Screen indication) Do this | |
| Select an item | Press the ▶II button. |
| Move the cursor up or down | Press the ▲/▼ button.• Press and hold the ▲/▼ button to scroll up or down faster. |
| Display the previous/next screen of the list | Press the ◀/► button. |
| Return to the [Podcast List] screen P | Press the BACK/HOME button. |
Icons which appear by pressing the OPTION/PWR OFF button
| Icon Description | |
| (Option Menu) | Shows the option menu. For details on the podcast option menu, see “Using the Podcast Option Menu” (p. 78). |
| [To Playback Screen] | Returns to the podcast playback screen. |
Podcast list screen
Podcasts are displayed in the [Podcast List] screen in name order.

Operations on the [Podcast List] screen
| To (Screen indication) Do this | |
| Select an item | Press the ▶II button. |
| Move the cursor up or down | Press the ▲/▼ button.• Press and hold the ▲/▼ button to scroll up or down faster. |
| Display the previous/next screen of the list | Press the ◀/► button. |
Icons which appear by pressing the OPTION/PWR OFF button
| Icon Description | |
| (Option Menu) | Shows the option menu. For details on the podcast option menu, see “Using the Podcast Option Menu” (p. 78). |
| [To Playback Screen] | Returns to the podcast playback screen. |
Deleting Podcasts
You can delete an episode, a podcast, or all transferred podcasts.
Deleting the currently playing episode
From the playback screen of the episode you intend to delete, press the OPTION/PWR OFF button to bring up the option menu. 2 Select [Delete This Episode] → [Yes].
Deleting an episode in the episode list
From the episode list, press the OPTION/PWR OFF button to bring up the option menu. 2 Select [Delete Episode] → episode you intend to delete → [Yes].
Deleting a podcast
The following operations delete all episodes of a podcast and delete the podcast itself.
From the [Podcast List] screen, press the OPTION/PWR OFF button to bring up the option menu. 2 Select [Delete Podcast] → podcast you intend to delete → [Yes].
or,
From the episode list of the podcast you intend to delete, press the OPTION/PWR OFF button to bring up the option menu.
2 Select [Delete This Podcast] → [Yes].
Deleting all podcasts
This operation deletes all episodes and podcasts.
From the [Podcast List] screen, press the OPTION/PWR OFF button to bring up the option menu. ② Select [Delete All Podcasts] → [Yes].
Using the Podcast Option Menu
You can bring up the podcast option menu by pressing the OPTION/PWR OFF button on the podcast playback screen or on the list screen. For details on how to use the option menu, see ☎ p. 16.
The option items shown on the option menu vary depending on the screen from which you bring it up. See the reference page for settings and usage.
Option items appearing on the podcast playback screen
| Option items Description/reference page | |
| [Language Learning Mode] (audio only) | Allows you to use the [Quick Replay] function and the A-B repeat function (p. 55). |
| [DPC (Speed Control)] (audio only) | Adjusts the playback speed of songs (p. 57). |
| [Equalizer] (audio only) | Customizes the sound quality (p. 50). |
| [VPT(Surround)] (audio only) | Customizes the [VPT(Surround)] settings (p. 52). |
| [Zoom Settings] (video only) | Sets the zoom function (p. 67). |
| [Brightness] (video only) | Adjusts the brightness of the screen (p. 102). |
| [On-Hold Display] (video only) | Sets to turn off the video screen during the player is on hold (p. 70). |
| [Detailed Information] | Displays detailed information of an episode. |
| [Delete This Episode] | Deletes the episode (p. 76). |
Option items appearing on the episode list screen
| Option items Description/reference page | |
| [Delete Episode] Displays the delete episode screen to select an episode to delete (p. 76). | |
| [Delete This Podcast] | Deletes the podcast (p. 76). |
Option items appearing on the [Podcast List] screen
| Option items Description/reference page | |
| [Delete Podcast] Displays the [Delete Podcast] screen to select a podcast to delete (p. 76). | |
| [Delete All Podcasts] | Deletes all podcasts and episodes (p. 77). |
Viewing Photos [Photos]
To view photos, select [Photos] on the Home menu to display the [Photos] screen.
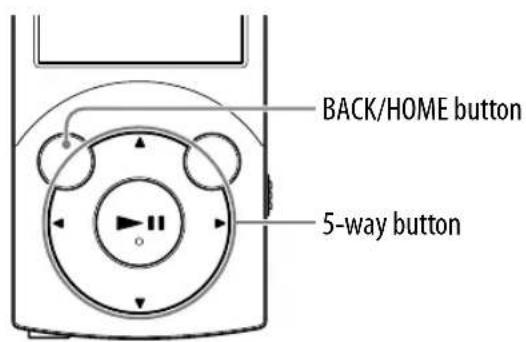
![07:04PM [Photos] Photos](/content/2026/06/1353501/images/8b4a9eb20110fd8002b9ebf730c2ec8876115859a0a04d4f0afb7fb985b3f9c5.jpg)
1 From the Home menu, select [Photos] → desired folder → desired photo.
The photo display screen appears.
- Press the ◀/▶ button to display the previous or next photo.
- For details on how to operate the photo display screen, see "Photo display screen" (p. 81).

![SONY NWZ-S745 - From the Home menu, select [Photos] → desired folder → desired photo. - 2](/content/2026/06/1353501/images/1ecaf8b8e6f10c760e6193867afe93c99eec72543769d5c57fa445663383666d.jpg)
Hint
- Playback of songs continues even while you are searching for photos in the photo folder lists or photo lists, or when the photo display screen is displayed.
- You can arrange photos transferred to the player by folder. Select the player (as [WALKMAN]) using Windows Explorer, and drag-and-drop a new folder just under the [DCIM], [PICTURE] or [PICTURES] folder. For details on data hierarchy, see ☑ p. 32.
- Photo files are displayed in alphabetical order. The files under the [PICTURE], [PICTURES] and [DCIM] folders are displayed in the [PICTURE], [PICTURES] and [DCIM] folders respectively.
Note
- If the size of a photo is too large, or the photo file is damaged, 📋 appears, and the photo cannot be displayed.
Photo display screen
When a photo appears on the screen, information such as the photo's file name is displayed for a few seconds.
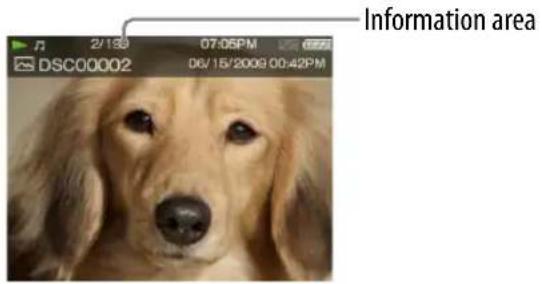

Operations on the photo display screen
| To (Screen indication) Do this | |
| Display the next/previous photo | Press the ◀ (previous)/▶ (next) button. |
| Display the following/previous photos consecutively | Press and hold the ◀ (previous)/▶ (next) button. |
| Return to the list screen Press the BACK | /HOME button. |
Icons which appear by pressing the OPTION/PWR OFF button
| Icon Description | |
| (Q (Search) | Shows the search menu. You can select the desired search method to display the list screen and search for photos. |
| (Option Menu) | Shows the option menu. For details on the photo option menu, see “Using the Photo Option Menu” (p. 84). |
Photo list screen
The following are examples of photo list screens.

[Thumbnail Only] [Thumbnail + Title]
Icon of photos
The following icon is displayed in the photo field.
| Icon Description | |
| (Playback icon) | Shows that the photo is currently displayed. |
Operations on the photo list screen
| To (Screen indication) Do this | |
| Select an item | Press the ▶II button. |
| Move the cursor up or down | Press the ▲/▼ button.• Press and hold the ▲/▼ button to scroll up or down faster. |
| Display the previous/next screen of the list ([Thumbnail + Title]) | Press the ◀/► button. |
| Move the cursor right or left ([Thumbnail Only]) | Press the ◀/► button. |
| Return to the list screen of the next upper level | Press the BACK/HOME button. |
Icons which appear by pressing the OPTION/PWR OFF button
| Icon Description | |
| (Search)1 | Shows the search menu. You can select the desired search method to display the list screen and search for photos. |
| (Option Menu)1 | Shows the option menu. For details on the photo option menu, see “Using the Photo Option Menu” (p. 84). |
| [To Playback Screen] | Returns to the photo display screen. |
1 These icons may not appear depending on the screen.
Deleting Photos
When you delete photos from the player, use the software you used to transfer the photos, or Windows Explorer.
For details about using the software, see the Help of the software.
Note
- The player itself cannot delete photos without connecting to a computer.
Using the Photo Option Menu
You can bring up the photo option menu by pressing the OPTION/PWR OFF button on the photo folder list or photo list, or on the photo display screen. For details on how to use the option menu, see ☎ p. 16.
The option items shown on the option menu vary depending on the screen from which you bring it up. See the reference page for settings and usage.
Option item appearing on the photo folder/photo list screen
| Option items Description/reference page | |
| [Photo List Display Frmt.] | Sets the photo list display format (☎ p. 85). |
Option items appearing on the photo display screen
| Option items Description/reference page | |
| [Brightness] | Adjusts the brightness of the screen (p. 102). |
| [Detailed Information] Displays file information, such as file size, resolution, and file name, etc. | |
| [Set as Wallpaper] | Sets the currently displayed photo as the wallpaper (p. 103). |
Changing the Photo Settings
To change the photo settings, select Settings] on the Home menu, then select [Photo Settings].

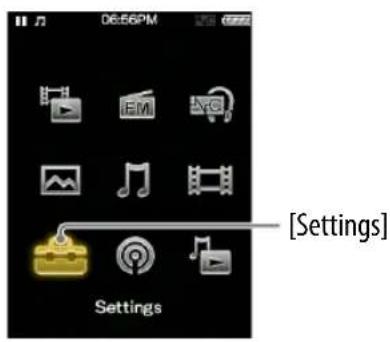
Setting the photo list display format [Photo List Format]
The player offers 2 display formats. You can set the display format of the photo list as [Thumbnail + Title] 1 or [Thumbnail Only].
![SONY NWZ-S745 - Setting the photo list display format [Photo List Format] - 1](/content/2026/06/1353501/images/f1bbc58b6d1e70fc2130b250da2e0053a307c26673ec75af11f9382bbe317d4d.jpg)
From the Home menu, select Settings.
Photo Settings
Photo List Format → desired photo list format type.
| Type | Description |
| [Thumbnail + Title] | Displays a photo title with a thumbnail image in the photo list. |
| [Thumbnail Only] | Displays only thumbnails in the photo list. (Default setting) |
*1 Thumbnail refers to a reduced size image of a photo.
Note
- Thumbnails may not be displayed, depending on the file format.
Listening to FM Radio [FM Radio]
To listen to FM Radio, select [FM Radio] on the Home menu to display the [FM Radio] screen.


Note
- The headphone cord serves as an antenna, so extend it as far as possible.
1 From the Home menu, select FM Radio.
The [FM Radio] screen appears.
2 Press the ▲/▼ button to select the desired frequency, or press the ◀/► button to select the desired preset number.
The FM radio broadcasting of the selected frequency or preset number is received.
- For details on how to operate the FM Radio screen, see “FM Radio screen” (p. 87).
Note
- You cannot select a preset number if no preset station is stored. Preset receivable stations using [Auto Preset] (p. 88), or preset the receivable stations manually (p. 89).
FM Radio screen

Note
- Depending on the country/region in which you have purchased the player, the screen appearance may differ.
Operations on the [FM Radio] screen
| To Do this | |
| Select the previous/next frequency | Press the ▲/▼ button. |
| Select the previous/next receivable station*1 | Press and hold the ▲/▼ button. |
| Select the previous/next preset number*2 | Press the ◀/► button. |
*1 If sensitivity is too high, change the [Scan Sensitivity] setting (p. 91) to [Low].
*2 You cannot select a Preset number if no preset station is stored. Preset receivable stations using [Auto Preset] (p. 88).
Icon which appears by pressing the OPTION/PWR OFF button
| Icon Description | |
| (Option Menu) | Shows the option menu. For details on the FM radio option menu, see “Using the FM Radio Option Menu” (p. 90). |
Presetting broadcast stations automatically [Auto Preset]
You can preset (up to 30) receivable broadcast stations in your area automatically by selecting [Auto Preset]. When you use the FM radio for the first time, or when you move to a new area, we recommend you preset receivable broadcast stations by selecting [Auto Preset].
1 On the [FM Radio] screen, press the OPTION/PWR OFF button.
The option menu appears.
2 Select [Auto Preset] → [Yes].
Receivable broadcast stations will be preset in order of frequency (low to high).
[Auto Preset completed.] appears when presetting is completed, and the first preset station is received.
- Select [No] to cancel automatic presetting.
![SONY NWZ-S745 - Select [Auto Preset] → [Yes]. - 1](/content/2026/06/1353501/images/ff479c76f6ab5ecfc35c723c39603774ac3cc5c5da22dbb735647ce88e4be3b6.jpg)
Hint
- If high sensitivity causes the player to receive many unwanted broadcast stations, change the [Scan Sensitivity] setting ( ⑨ p. 91) to [Low].
Note
- The [Auto Preset] operation will delete already preset broadcast stations.
Presetting broadcast stations manually [Save to Preset]
You can manually preset broadcast stations that [Auto Preset] cannot detect (p. 88).
1 On the [FM Radio] screen, select the desired frequency. 2 Press the OPTION/PWR OFF button to bring up the option menu. 3 Select [Save to Preset].
The frequency you select in step 1 is preset and the assigned preset number appears below the frequency.
![SONY NWZ-S745 - Presetting broadcast stations manually [Save to Preset] - 1](/content/2026/06/1353501/images/42fd1755cbc1ed67a0e213ebc3a1b6493c3536859fcd365cc277292848e87ef8.jpg)
Hint
- You can preset up to 30 stations.
Note
- The preset numbers are stored in order, from low to high frequency.
Deleting preset broadcast stations
On the [FM Radio] screen, select the preset number you intend to delete. 2 Press the OPTION/PWR OFF button to bring up the option menu. 3 Select [Delete from Preset].
The preset broadcast station is deleted.
Using the FM Radio Option Menu
You can bring up the FM radio option menu by pressing the OPTION/PWR OFF button on the [FM Radio] screen. For details on how to use the option menu, see ☎ p. 16.
The option items shown on the option menu vary depending on the screen from which you bring it up. See the reference page for settings and usage.
| Option items Description/reference page | |
| [Save to Preset] | Presets the currently tuned-in broadcast station (p. 89). |
| [Delete from Preset] | Deletes a broadcast station from a preset station (p. 89). |
| [Auto Preset] | Presets a broadcast stations automatically (p. 88). |
| [Scan Sensitivity] | Adjusts the sensitivity of radio reception (p. 91). |
| [Mono/Auto] | Changes to either monaural or stereo (p. 91). |
Changing the FM Radio Settings
To change the FM radio settings, select Settings] on the Home menu, then select [FM Radio Settings].

![Settings [Settings]](/content/2026/06/1353501/images/33c89a5b8d84f4936f61d4932fb88a70285b907bc09bf666e766e026b1b42fd8.jpg)
Setting the reception [Scan Sensitivity]
When you select stations using the [Auto Preset] function (p. 88) or the ▲/▼ button, the FM receiver may receive unwanted broadcast stations as a result of sensitivity being too high. In this case, set the reception to [Low]. [High] is set by default.
1 From the Home menu, select Settings] [Scan Sensitivity] → [Low].
→ [FM Radio Settings] →
- To set the reception sensitivity back to the default, select [High].
Setting monaural/stereo [Mono/Auto]
If noise occurs during FM reception, set the receiver to [Mono] for monaural. If you set it to [Auto], monaural/stereo reception is selected automatically, depending on reception conditions. [Auto] is set by default.
1 From the Home menu, select Settings] [Mono/Auto] → [Mono].
→ [FM Radio Settings] →
- To return to automatic setting, select [Auto].
About Noise Canceling
The internal microphone embedded in the headphones picks up ambient noise. The player generates an antiphase sound wave against the ambient noise to reduce it. The Noise Canceling function can reduce unwanted ambient noise especially in a vehicle such as an airplane, train, bus, etc., allowing you to enjoy music at a low volume.

1 The waveform of the ambient noise (original sound).
The internal microphone embedded in the headphones picks up the ambient noise. Then, the Noise Canceling circuit analyzes the waveform of the noise.
2 The antiphase waveform against the noise.
The player generates the antiphase waveform against the noise to cancel it out.
3 The composite waveform. Two waveforms have canceled each other out.
The original waveform and antiphase waveform combine to cancel each other out, reducing ambient noise.
Note
- If the supplied headphones are not used properly, the effect of the Noise Canceling function may be degraded. To make the most of the function, use the correct size earbuds to fit your ears and insert the headphones into your ears snugly.

- Rubbing noises may occur while wearing headphones. It is not a malfunction.
- The Noise Canceling function mainly reduces the ambient noise in the low frequency bands and has less effect on ambient noise in the higher frequency bands, such as speaking voices and ringing tones. It has no effect on certain sounds.
- Do not cover the microphone part of the headphones with your hands, etc., otherwise the Noise Canceling function may not work.

- You may hear a slight noise when the Noise Canceling function is active. This is operational noise of the Noise Canceling function and not a malfunction.
- You may feel the Noise Canceling function does not work or noise is louder in a quiet environment or certain noises may not be canceled as effectively as others. In this case, release the Noise Canceling function.
- Mobile phones may affect noise. In that case, keep the player away from mobile phones.
- Make sure to remove the headphones from your ears before you connect or disconnect the headphones from the headphone jack of the player. If the headphones are connected or disconnected from the player during playback, or while the Noise Canceling function is active, noise may be generated. This is not a malfunction.
- When the Noise Canceling function is turned on or off, a switching sound will be generated. This sound is generated by the switch of the Noise Canceling circuit, and is not a malfunction.
Playing Back with the Noise Canceling Function [Noise Canceling]
The internal microphone of the headphones catches the ambient noise, and the player outputs an antiphase sound wave to cancel the noise.
![BACK/HOME button 5-way button 12:00AM Icon indication [Noise Canceling] Noise Canceling](/content/2026/06/1353501/images/4a2f7cffa0553e2eb6a30a4b008f8f93bc25cf283d4e8d10dbfe93eefde4ae1a.jpg)
Note
- If headphones other than those supplied are used, the Noise Canceling function will not work even if [Noise Canceling: On/Off] is set to [On].
1 From the Home menu, select Noise Canceling] → [Noise Canceling: On/Off] → [On].
appears in the information area.
• [On] is set by default.

Hint
- When the Noise canceling function is active, C appears on the screen. If the headphones other than those supplied are used, the Noise Canceling function will not work even if [Noise Canceling: On/Off] is set to [On]. In this case, C appears in the information area.
- You can adjust the effect of the Noise Canceling function. For details, see p. 98.
Listening to External Audio Sources [External Input Mode]
You can enable the Noise Canceling function when you listen to audio from external audio sources, such as audio devices in airplanes.
Using with external audio devices

Using with in-flight entertainment systems
![Supplied plug adaptor Supplied audio input cable To in-flight entertainment systems BACK/HOME button 5-way button [Noise Canceling] 12:00AM Noise Canceling](/content/2026/06/1353501/images/d9171a6e080bd20b0dc6f0161daa2cccfd2f860d43f890162d5f40c262c7219d.jpg)
1 Connect the supplied headphones to the player, and from the Home menu, select [Noise Canceling] → [Noise Canceling: On/Off] → [On]. 2 Connect the audio source device to the player using the supplied audio input cable. 3 From the Home menu, select [Noise Canceling] → [NC Modes]. You can listen to the audio source device with reduced ambient noise.

Hint
- You can change between [External Input Mode] and [Quiet Mode] (p. 97) by pressing the ▶ button.
- If you disconnect the supplied audio input cable, the Noise Canceling function enters [Quiet Mode] (p. 97) automatically.
Note
- Some in-flight entertainment systems may not be connectable to the player.
- When connecting to an audio device, plug the supplied audio input cable into the headphone jack of the device. Do not plug it into the LINE OUT jack.
Reducing Ambient Noise without Playing Back Music [Quiet Mode]
You can use the Noise Canceling effect to obtain some peace and quiet.
![BACK/HOME button 5-way button [Noise Canceling] 12:00AM Noise Canceling](/content/2026/06/1353501/images/a4d7cdb64e68e255889b6f13c2f4b4f05ebfc07821fe00f68c1f1acca9d98048.jpg)
1 Connect the supplied headphone to the player, and from the Home menu, select [Noise Canceling] → [Noise Canceling: On/Off] → [On].
2 From the Home menu, select [Noise Canceling] → [NC Modes].
![SONY NWZ-S745 - Reducing Ambient Noise without Playing Back Music [Quiet Mode] - 2](/content/2026/06/1353501/images/a1172754799dbb96294ee1af2a0310ab0165c9f65de2f99ddf4292370d6b6fb6.jpg)
Hint
- When the player receives an audio input signal from the supplied audio input cable connected to the WM-PORT, the player enters [External Input Mode] (p. 95). You can change between [External Input Mode] and [Quiet Mode] by pressing the ▶ button. Also, if you disconnect the supplied audio input cable during [External Input Mode], the Noise Canceling function enters [Quiet Mode] automatically.
Note
- The Noise Canceling function mainly reduces the ambient noise in the low frequency bands and has less effect on ambient noise in the higher frequency bands, such as speaking voices and ringing tones. It has no effect on certain sounds.
Changing the Noise Canceling Settings
To change the Noise Canceling settings, select [Settings] from the Home menu, then select [NC Settings].

![D:\56PM Settings [Settings]](/content/2026/06/1353501/images/f2ff297d20c6d7430b7b0f04bd4de348496eb25013a718a67f9080f10bdda1d0.jpg)
Adjusting the Noise Canceling effect [Set Noise Cancel Level]
The player is designed to obtain the maximum effect of the Noise Canceling function (p. 92). However, you may be able to enhance the effect depending on your ear shape or usage environment by increasing (or decreasing) the sensitivity of the microphone installed in the headphones. You can adjust the microphone sensitivity by setting the Noise Cancel level. Adjust the function when the Noise Canceling effect is poor.
![SONY NWZ-S745 - Adjusting the Noise Canceling effect [Set Noise Cancel Level] - 1](/content/2026/06/1353501/images/20f984016e290ac05c1d89a0a8650487bd21e7f645022a876fb0a0b67e0d7b4b.jpg)
From the Home menu, select [Settings] → [NC Settings] → [Set Noise Cancel Level].
![SONY NWZ-S745 - Adjusting the Noise Canceling effect [Set Noise Cancel Level] - 2](/content/2026/06/1353501/images/9479e1bb731a7786e56ca46824e29277e8561ebb10e9ee1d788b74717287ac78.jpg)
[NC Settings] → [Set Noise Cancel Level]
![SONY NWZ-S745 - Adjusting the Noise Canceling effect [Set Noise Cancel Level] - 3](/content/2026/06/1353501/images/946a87f48d15f68e013b98d218efcb560a667e18c3a99257ae13d8a70085d6b4.jpg)
Press the ◀/▶ button to adjust the setting level, and then press the ▶II button to confirm.
- The setting can be adjusted in 31 steps. The center position of the indicator will obtain the maximum effect under normal ambience. Move the position of the indicator to adjust the desired value.
![SONY NWZ-S745 - Adjusting the Noise Canceling effect [Set Noise Cancel Level] - 4](/content/2026/06/1353501/images/8341820d142d27844b70d80c2c41a51b46e11ea636445d6605509fe6acee0fed.jpg)
Hint
- You can also adjust the setting from the [NC Modes] screen, by selecting [Set Noise Cancel Level] from the option menu.
Note
- This function is only effective when [Noise Canceling: On/Off] is set to [On].
- The default setting (center position of the indicator) will obtain the maximum effect under normal ambience. The effect of the Noise Canceling function is not necessarily enhanced by maximizing the microphone sensitivity.
Changing the Common Settings
To change the common settings of the player, select [Settings] from the Home menu, then select [Common Settings].

![D:\66PM Settings [Settings]](/content/2026/06/1353501/images/9d35420a3046ad630d6aa9b0fbdc6548d608d82634903aa10c02ad42a07ffd00.jpg)
Displaying the player information [Unit Information]
Information such as model name, firmware version, etc., is displayed.
1. From the Home menu, select [Settings] → [Unit Information].
[Common Settings]
| Item | Description |
| [Model:] | Displays the model name of the player. |
| [Firmware:] | Displays version information for the player's firmware. |
| [Free/Total Memory Space:] | Displays the available free space size/total capacity of the player. |
| [Total Songs:] | Displays the total number of songs (including audio podcasts) stored on the player. |
| [Total Videos:] | Displays the total number of videos (including video podcasts) stored on the player. |
| [Total Photos:] | Displays the total number of photos stored on the player. |
| [WM-PORT:] | Displays the version information for WM-PORT. |
Limiting the volume [AVLS (Volume Limit)]
You can set [AVLS (Volume Limit)] (Automatic Volume Limiter System) to limit the maximum volume to prevent auditory issues or distraction. With [AVLS (Volume Limit)], you can listen to music at a comfortable volume level.
1. From the Home menu, select [Settings] → [Common Settings] → [AVLS (Volume Limit)] → desired setting type.
| Type Description | |
| [On] | Maintains a moderate volume level. |
| [Off] | Plays back audio at the original volume. (Default setting) |
Turning off the beep sound [Beep Settings]
You can turn on or off the operation sounds of the player.
1. From the Home menu, select [Settings] → [Common Settings] → [Beep Settings] → desired setting type.
| Type Description | |
| [On] | Produces beep sounds. (Default setting) |
| [Off] | Does not produce beep sounds. |
Setting the time for blanking the screen [Screen Off Timer]
When there is no operation for a while, the player turns off the screen. You can set the waiting time for turning off the screen.
1 From the Home menu, select [Settings] [Common Settings] [Screen Off Timer] → desired setting type.
→ [Common Settings] →
| Type Description | |
| [Off] | Does not turn off the screen even if there is no operation. |
| [After 15 Sec] | Turns off the screen when there is no operation for 15 seconds. |
| [After 30 Sec] | Turns off the screen when there is no operation for 30 seconds. (Default setting) |
| [After 1 Min] | Turns off the screen when there is no operation for 1 minute. |
| [After 3 Min] | Turns off the screen when there is no operation for 3 minutes. |
| [After 5 Min] | Turns off the screen when there is no operation for 5 minutes. |
| [After 30 Min] | Turns off the screen when there is no operation for 30 minutes. |
Note
- The player does not turn off the screen during the following situations.
- Playing back a video with [TV Output(Video)] set to [Off]. — Playing back a video podcast. — Searching for a receivable FM radio station and using [Auto Preset] function of the FM radio. — Transferring data via the USB connection. — Deleting a video, podcast episode, etc.
Adjusting the brightness of the screen [Brightness]
You can set the display brightness to one of 5 levels.
1 From the Home menu, select [Settings] [Common Settings] [Brightness]. 2 Press the ◀/▶ button to select desired setting, and then press the ▶II button to confirm.
You can adjust to any of 5 levels. The larger the number, the brighter the screen. [3] is set by default.
Note
- After selecting a setting value, be sure to press the ▶II button to confirm. If you press the BACK/HOME button before confirming, the setting is canceled.

Hint
- If you adjust the brightness of the screen to a lower level, the battery will last longer (p. 109).
- While the player is connected via the USB cable, the brightness of the screen may be adjusted to a lower level regardless of the setting.
Setting up wallpaper [Wallpaper Settings]
You can set the wallpaper of the screen.
From the Home menu, select Settings] → [Common Settings] → [Wallpaper Settings] → desired wallpaper type.
| Type Description | |
| [No Wallpaper] | Displays the default wallpaper. |
| [User's Wallpaper] | Displays a photo that is set as the wallpaper. (See the following instructions.) |
| [User's W.p.(dark)] | Displays a photo that is set as the wallpaper. (See the following instructions.)This option reduces the brightness of the photo so that you can easily recognize the menu items or icons. |
To set a desired photo as the wallpaper
You need to designate a photo on the player for the wallpaper before selecting [User's Wallpaper] or [User's W.p.(dark)] to set the photo as the wallpaper.
From the Home menu, select [Rphotos] → desired search method → desired photo. 2 Press the OPTION/PWR OFF button to bring up the option menu. 3 Select [Set as Wallpaper].
Setting the current time [Set Date-Time]
You can set the date and time.
1 From the Home menu, select Settings] [Common Settings] [Clock Settings] [Set Date-Time]. 2 Press the ◀/▶ button to select the year, and then press the ▲/▼ button to change the value. 3 As in step 2, adjust the settings for month, date, hour, and minutes, and then press the ▶II button to confirm.
![SONY NWZ-S745 - Setting the current time [Set Date-Time] - 1](/content/2026/06/1353501/images/26d060c941c848210eca2ccaa9fde02de0c2309f3e90b3cdd08fe820f77f512e.jpg)
Hint
- You can select the date format from [YYYY/MM/DD], [MM/DD/YYYY], or [DD/MM/YYYY]. Furthermore, you can select the time format from either [12-hour] or [24-hour]. For details, see “Setting the date format [Date Display Format]” (p. 105), or “Setting the time format [Time Display Format]” (p. 105).
Note
- If battery power is used up because, for example, the player has not been used for a long time, your settings for date and time may be lost and “-” will be displayed instead of the current date and time.
- The clock may gain or lose up to 60 seconds per month. In this case, set the clock again.
Setting the date format [Date Display Format]
You can set the date format displayed for the current date (p. 104) as [YYYY/MM/DD], [MM/DD/YYYY], or [DD/MM/YYYY].
1 From the Home menu, select Settings] → [Common Settings] → [Clock Settings] → [Date Display Format] → desired format type.
| Type Description | |
| [YYYY/MM/DD] | Displays the date as year/month/day. |
| [MM/DD/YYYY] | Displays the date as month/day/year. |
| [DD/MM/YYYY] | Displays the date as day/month/year. |
Setting the time format [Time Display Format]
You can select the format to display the current time (p. 104) from either a [12-hour] or [24-hour] display.
1 From the Home menu, select Settings] → [Common Settings] → [Clock Settings] → [Time Display Format] → desired format type.
| Type Description | |
| [12-hour] | Displays the current time in the 12-hour format. |
| [24-hour] | Displays the current time in the 24-hour format. |
Limiting the charge amount [Battery Care]
In the [Battery Care] mode, the player stops recharging when the battery is charged to 90%. You can use this mode to reduce deterioration caused by charge and discharge, i.e., extend the battery lifespan.
1 From the Home menu, select [Settings] [Battery Care] → desired setting type.
→ [Common Settings] →
| Type Description | |
| [On] | Uses the [Battery Care] mode. |
| [Off] | Uses the normal recharge mode. (Default setting) |
Note
- When [Battery Care] is set to [On], the maximum recharge capacity is limited to 90%. As a result, the battery life between charges is shortened about 10%.
Returning to the factory settings [Reset All Settings]
You can reset the player to the default settings. Resetting the player will not delete data such as music, video, and photo data.
Note
- If you select this function during playback, the player pauses playback before performing the reset process.
1 From the Home menu, select Settings]
→ [Common Settings] →
[Reset/Format] → [Reset All Settings] → [Yes].
[Restored factory settings.] appears.
- To cancel the operation, select [No] on the confirmation screen.
Formatting memory [Format]
You can format the built-in flash memory of the player.
Note
- If the memory is formatted, all data (songs, videos, photos, etc., including sample data installed at the factory, bundled software installer, and the Operation Guide) will be erased. Be sure to verify the data stored in memory prior to formatting, and export any important data to the hard disk of your computer.
- Be sure not to initialize (format) the built-in flash memory of the player using Windows Explorer. If you have formatted with Windows Explorer, format again using the player.

From the Home menu, select Settings] [Reset/Format] → [Format].
→ [Common Settings] →
[All data including songs will be deleted. Proceed?] appears.

Select [Yes].
[All data will be deleted. Proceed?] appears.
- To cancel the operation, select [No].

Select [Yes].
When initialization finishes, [Memory formatted.] appears.
- To cancel the operation, select [No].
Using USB connection mode [USB Connection Mode]
When connecting to a computer by the USB cable, some computers may fail to establish USB connection with the player, causing the player to not display [Connecting].
In such case, you can display the USB connection standby screen before connecting so that USB connection is established with more reliability.
![SONY NWZ-S745 - Using USB connection mode [USB Connection Mode] - 1](/content/2026/06/1353501/images/f3c22d462bee9887e5831f326fab0f34717c39553d7e314719aec59a7e37396b.jpg)
From the Home menu, select Settings] [USB Connection Mode].
→ [Common Settings] →
[Use when USB connection cannot be established. Use this mode?] appears.
![SONY NWZ-S745 - Using USB connection mode [USB Connection Mode] - 2](/content/2026/06/1353501/images/f083bfedff0d951b2089dda02091b14b1d2b6edb57d0164443b0056b3e36314e.jpg)
Select [Yes].
The player enters USB connection standby mode, displaying the USB connection standby screen. After connecting to a computer with the USB cable, [Connecting] appears.
Selecting the display language [Language Settings]
You can select from a variety of languages for menus and messages.
From the Home menu, select Settings → Language Settings → desired language setting.
| Language Messages and menus are displayed in | |
| [Deutsch] | German |
| [English] | English |
| [Espanöl] | Spanish |
| [Français] | French |
| [Italiano] | Italian |
| [Português] | Portuguese |
| [Русский] | Russian |
| [한국어] | Korean |
| [简体中文] | Simplified Chinese |
| [繁體中文] | Traditional Chinese |
About Battery Life
By adjusting the settings or managing the power supply properly, it is possible to save battery power for longer usage time between charges.
The following hints will yield a longer battery life.
Turn off the player manually
If you press and hold the OPTION/PWR OFF button, the player enters standby mode and the screen turns off to save battery power. Furthermore, if standby mode continues for more than about a day, the player turns completely off automatically.
Longer battery life settings
You can save battery power by changing the default to “Longer battery life setting” items. For details on the battery life in longer battery life setting, see “Battery life (continuous playback)” (p. 157).
| Setting Default setting Basic setting of | battery life measurement (Longer battery life setting) | ||
| Noise Canceling [No | Noise Canceling: On/Off] [On] [Off] | ||
| Common settings [Screen Off Timer] [After 30 Sec] | [After 30 Sec] | ||
| Music settings | [Equalizer] | [None] | [None] |
| [VPT(Surround)] | [None] | [None] | |
| [DSEE(Sound Enhance)] | [Off] | [Off] | |
| [Clear Stereo] | [Off] | [Off] | |
| [Dynamic Normalizer] | [Off] | [Off] | |
| [DPC (Speed Control)] | [Off] | [Off] | |
| [TV Output(Music)] | [Off] | [Off] | |
| Video Settings | [TV Output(Video)] | [Off] | [Off] |
Adjust data format and bit rate
Playing time will vary, as battery charge can be affected by the format and bit rate of songs, videos or photos that are played.
For details on charging time and usage time, see p. 156, 157.
What are Format and Bit Rate?
What is audio format?
Audio format refers to the method used to import audio data from the Internet or audio CDs to a computer, and then save it as an audio file.
Common formats include MP3 and WMA, etc.
MP3: MP3 (MPEG-1 Audio Layer3) is a common audio compression technology developed by the MPEG working group of the ISO (International Organization for Standardization).
MP3 can compress audio files to about 1/10 the size of standard CD audio files.
WMA: WMA (Windows Media Audio) is a common audio compression technology developed by Microsoft Corporation. The WMA format produces the same sound quality as that of the MP3 format with a smaller file size.
AAC: AAC (Advanced Audio Coding) is a common audio compression technology developed by the MPEG working group of the ISO (International Organization for Standardization). The AAC format produces the same sound quality as that of the MP3 format, with a smaller file size.
Linear PCM: Linear PCM is an audio recording format without digital compression. You can achieve the same quality as CD music by recording with this format.
What is copyright protection?
Certain music files or video files, etc., that you purchase from a music download service site, etc., may apply access control technologies, such as encryption, to limit usage and duplication of material, in accordance with copyright laws.
What is bit rate?
Bit rate refers to the amount of data used to store each second of audio, expressed in kbps (kilo bits per second), such as 64 kbps. Generally, higher bit rates provide better sound quality, but require more storage space for the same length of audio.
Continued ↓
What is the relationship between bit rate, sound quality, and storage size?
Generally, higher bit rates provide better sound quality, but require more storage space for the same length of audio, so you can store fewer songs on the player.
Lower bit rates enable you to store more songs, but at a lower sound quality.
Note
- If you import a song from a CD to your computer at a low bit rate, you cannot improve the song's sound quality by selecting a high bit rate when further transferring the song from the computer to the player.
What is video format?
Video format refers to the method used when importing video and audio data to a computer and saving it as a video file.
Common formats include MPEG-4 and AVC, etc.
MPEG-4: MPEG-4 refers to Moving Picture Experts Group phase 4, developed by the MPEG working group of the ISO (International Organization for Standardization). The compression format is for video and audio data.
AVC: AVC refers to Advanced Video Coding, developed by the MPEG working group of the ISO (International Organization for Standardization). It enables reproduction of more vivid images at a lower bit rate. AVC files include four profiles, and “AVC Baseline Profile” is one of them. AVC format is based on the MPEG-4 AVC standard of the ISO (International Organization for Standardization), and since AVC is standardized as the MPEG-4 Part 10 Advanced Video Coding, it is commonly referred to as MPEG-4 AVC/H.264 or H.264/AVC.
WMV: WMV (Windows Media Video) is a video compression format developed by Microsoft Corporation. It was built upon MPEG-4, achieves a high compression rate, and supports copy control by DRM.
What is photo format?
Photo format refers to the method used when importing images to a computer and saving them as image files. JPEG is one example of a commonly used format.
JPEG: JPEG (Joint Photographic Experts Group) is a common image compression format developed by the JPEG. JPEG can compress an image file to between 1/10 and 1/100 the size of original image files.

Hint
- For details on supported file formats and bit rates, see ☑ p. 153.
Storing Data
You can store computer data into the built-in flash memory of the player by transferring the data from your computer using Windows Explorer, or another transfer capable software. If the player is connected to the computer, the built-in flash memory appears in Windows Explorer as [WALKMAN].
Note
- Do not use the bundled software while using Windows Explorer to interact with the built-in flash memory of the player.
- Do not disconnect the supplied USB cable while [Do not disconnect.] appears during data transfer. The data could be damaged.
- Do not format the built-in flash memory using Windows Explorer. If you want to format the built-in flash memory, format it on the player (p. 107).
- Do not rename the [MUSIC], [MP_ROOT], [MPE_ROOT], [VIDEO], [DCIM], [PICTURE], [PICTURES] and [PODCASTS] folders. Also, do not rename files and folders under them. Otherwise, they will not be displayed on the player.
Upgrading the Player's Firmware
You can update the player's firmware. Installing the latest player's firmware allows you to add new features to the player. For details on the latest firmware information and how to install it, visit the customer support Web sites (p. 134).
1. Download the update program to your computer from the Web site. 2. Connect the player to your computer, and then start the update program. 3. Follow the on-screen instructions to update the player's firmware. Firmware update is complete.

Hint
- Version information for the player's firmware can be displayed by selecting [Settings] → [Common Settings] → [Unit Information] from the Home menu (p. 99).
Troubleshooting
If the player does not function as expected, try the following steps to resolve the issue.
1. Find the symptoms of the issue in the following troubleshooting tables, and try any corrective actions listed. 2. Connect the player to your computer to charge the battery.
You may be able to resolve some issues by charging the battery.
3. Press the RESET button with a small pin, etc.
If you press the RESET button while operating the player, stored data and player settings may be lost.

4. Check information on the issue in the Help of each software. 5. Look up information on the issue on one of the customer support Web sites (p. 134). 6. If the approaches listed above fail to resolve the issue, consult your nearest Sony dealer.
Operation
There is no sound.
- The volume level is set to zero.
→ Turn the volume up (p. 6).
- The headphone plug is not connected properly.
→ If the headphones are connected improperly, the sound from the headphones will be impaired. Insert the headphone plug until it clicks into place (p. 6).
• The headphone plug is dirty.
→ Clean the headphone plug with a soft dry cloth.
Data cannot be played.
• The battery is consumed.
→ Charge the battery fully (p. 19).
→ If the player does not react, even after charging the battery, press the RESET button to reset the player (p. 114).
• [TV Output(Video)] is set to [On].
→ Set the setting to [Off] (☑ p. 63).
- After transferring by drag-and-drop in Windows Explorer, data hierarchy levels do not correspond to the player.
→ Place the data in the correct place by drag-and-drop (p. 30, 35).
- Transferred files are not in a playable format.
→ For information on the playable formats, see “Supported file format” of “Specifications” (p. 153). Some files may not be played back, depending on certain file specifications.
- You are placing audio MP4 files in a video folder by drag-and-drop.
→ Place them in the [MUSIC] folder by drag-and-drop.
- The playback limitation period of the song has expired due to subscription conditions, etc.
→ Songs with an expired playback limitation period cannot be played back. Update them using the software used for transferring.
Songs or photos cannot be deleted on the player.
- You cannot delete songs or photos on the player.
→ Delete them using the software you used to transfer the data, or Windows Explorer.
Transferred data is not displayed in its list.
- Videos and photos in unsupported format may not be recognized by the player and may not appear in a list (p. 153).
- If you rename a video file that is transferred from a computer to the player, or move it to another folder, it may not be recognized by the player and may not appear in a video list.
- Data was placed in the wrong location by drag-and-drop. → Place the data in the correct place by drag-and-drop (p. 30, 35).
- The built-in flash memory of the player was formatted using Windows Explorer. → Format the built-in flash memory on the player (p. 107).
- The supplied USB cable was disconnected from the player while data was being transferred. → Transfer usable files back to your computer and format the built-in flash memory on the player (p. 107).
When [All Songs] or [Album] is selected, all the songs will appear, but some songs do not appear when [Folder] is selected.
- The audio files are not in folders under the [MUSIC] folder. → Place them in folders under the [MUSIC] folder by drag-and-drop.
Songs are played back within a limited playback range only, such as within one album.
• [Playback Range] (p. 50) is set to [Selected Range].
→ Change the playback range setting.
Noise is generated.
- Noise Canceling is set in a quiet place. → Noise tends to be more noticeable in a quiet place or depending on the noise type. Release Noise Canceling (p. 94). Furthermore, the supplied headphones are designed for fairly high sensitivity to maximize the effectiveness of Noise Canceling in noisy places such as outside or in a train. For this, you may hear white noise in a quiet place even if you release Noise Canceling.
- A device emitting radio signals, such as a mobile phone is being used near the player. → When using devices such as mobile phones, keep them away from the player. • Music data imported from CDs, etc., is damaged. → Delete the data, then import and transfer it again. When importing data to your computer, close any other applications to avoid data damage.
- Transferred files are not in a playable format. For details, see “Supported file format” of “Specifications” (p. 153). → Some songs may not be played back, depending on certain file specifications.
Noise Canceling function is not effective.
- The Noise Canceling function is disabled. → Set [Noise Canceling: On/Off] to [On] (p. 94).
- You are using headphones other than the supplied ones. → Use the supplied headphones.
- The supplied headphones are not being used properly. → Change the size of the earbuds or adjust the earbud position to fit your ears snugly and comfortably (p. 8). If you change the size of earbuds, turn to install them firmly on the headphones to prevent from detaching and remaining in your ears.
- The microphone sensitivity is not properly adjusted. → The player is adjusted at the factory to maximize the effect of the Noise Canceling function. However, you may attain more effectiveness by heightening or lowering the sensitivity of the microphone embedded in the supplied headphones. Readjust the Noise Canceling function (p. 98).
- The player is used in a quiet place. → The Noise Canceling function may not be effective in a quiet place or depending on the type of noise.
[VPT(Surround)] setting or [Clear Stereo] function is not effective.
- When outputting to external audio speakers using the optional cradle, [VPT(Surround)] settings and the [Clear Stereo] function may not be effective because the player is designed for compatible headphones only. This is not a malfunction.
The player does not work. (It does not respond to any button operations.)
- The HOLD switch is set to the HOLD position. → Slide the HOLD switch in the opposite position (p. 7).
- The player contains moisture condensation. → Wait a few hours to let the player dry out.
- The remaining battery power is low or insufficient. → Charge the battery by connecting the player to a running computer (p. 19). → If you charge the battery and nothing changes, press the RESET button to reset the player (p. 114).
- While [Connecting] or [Connected USB (MTP)] is being displayed, you cannot operate the player. → Disconnect the USB connection, then operate the player.
Playback does not stop.
- With this player, there is no difference between stopping and pausing. When you press the ▶■ button, ■ appears and playback pauses/stops.
There is insufficient volume.
• [AVLS (Volume Limit)] is enabled. → Disable [AVLS (Volume Limit)] (p. 100).
There is no sound from the right channel of the headphones.
Or the right channel sound is heard from both sides of the headphones.
- The headphone plug is not fully inserted.
If the headphones are not connected correctly, sound will not be output properly. Insert the headphone plug into the jack until it clicks (p. 6).
Playback has stopped suddenly.
The remaining battery power is insufficient.
Charge the battery by connecting the player to a running computer (p. 19).
The songs or video files that cannot be played are played.
Play back another song or video file.
Thumbnails (such as cover arts) are not displayed.
Songs of a file format supported by the player do not have cover art information. Thumbnails are displayed only when songs have cover art information and whose file format is supported by the player.
Transfer again using Windows Media Player 11, or another transfer capable software.
Thumbnail name does not match its video, or the video is not in the correct location.
Place a JPEG file of the same name as the video into the folder under the [VIDEO] folder.
If photos do not have thumbnails that comply with Exif file format, the thumbnails cannot be displayed.
The player's power turned off, and then on again.
If a malfunction occurs, the player turns off, and then on again automatically.
The player does not work properly.
- The computer was started or restarted with the player connected to it.
→ Reset the player by pressing the RESET button on the player. Disconnect the player when you start or restart the computer.
Display
“□” appears for a title.
- Characters that cannot be displayed on the player are included in the title.
[Unknown] is displayed for an album or artist name, etc.
- Information such as album or artist name, etc., is not contained in the data.
Garbled characters are displayed.
- The wrong language is selected.
→ Select the correct language from [Language Settings] (p. 21, 108), and then transfer data to the player again.
The screen darkens while displaying a photo.
- There was no operation attempted for the time selected in [Screen Off Timer] (p. 101).
→ Press any button.
The screen turns off.
- There was no operation attempted for the period you set in [Screen Off Timer] (p. 101).
→ Press any button.
• [On-Hold Display] is set to [No].
→ Set [On-Hold Display] to [Yes] (p. 70).
The ⬇ (TV output) icon is blinking in the information area of the music playback screen.
- The video/audio output cable is not connected.
→ Connect the cable properly.
Power
Battery life is short.
• The operating temperature is below 5 °C (41 °F). → Battery life becomes shorter as a result of the battery characteristics. This is not a malfunction. - Battery charging time is not sufficient. → Charge the battery until 📋FULL appears. - By adjusting the settings or managing the power supply properly, it is possible to save the battery power and use the player for a longer time (p. 109). - You have not used the player for a prolonged period. → The efficiency of the battery will improve by repeatedly charging and discharging it. - When usable battery life becomes half the usual time, even after charging the battery fully, the battery should be replaced. → Consult your nearest Sony dealer.
The player cannot charge the battery.
- The USB cable is not connected to a USB connector on your computer properly. → Disconnect the USB cable, and then reconnect it. → Use the supplied USB cable.
- The battery is charged in an ambient temperature out of the range of 5 °C (41 °F) to 35 °C (95 °F). → You cannot charge the battery when 📄icon appears. Charge the battery in an ambient temperature of 5 °C (41 °F) to 35 °C (95 °F).
• The computer is not on.
→ Turn on the computer.
- Your computer has entered Sleep or Hibernation status.
Release the computer from Sleep or Hibernation status.
A USB hub is being used.
Connecting the player via a USB hub may not work. Connect the player to your computer using the supplied USB cable.
The operating system installed on the computer is not supported by the player.
To charge the player, connect the player to a computer with the operating system that is supported by the player.
After prescribing the remedies above, if the problem still persists, press the RESET button of the player and reconnect it to the computer by using the supplied USB cable.
The player turns off automatically.
To avoid unnecessary battery consumption, the player automatically turns off.
Press any button to turn the player on.
Charging completes very quickly.
If the battery is already almost fully charged when charging begins, little time is needed to reach full charge.
Connection to a computer
Cannot install the software.
- Your computer is installed with an operating system that is not supported by the player. Check the operating system of your computer (p. 159).
- Other software is running on Windows. If another software is running, it may interfere with installation. Particularly, be sure to stop security software as it can put a heavy load on the computer.
- There is not enough free space on the hard drive. → Check the required hard drive space for installing the application, and delete unnecessary files.
- Your account has no administrator privileges, or you have not logged in as the computer's administrator. → To install the software, log in with an account that has administrator privileges or log in as the computer's administrator.
- A message dialog is covered from your site by the install screen. → Press and hold the [Alt] key and press the [Tab] key several times until the message dialog appears. Then follow the message.
The progress bar on the install screen does not proceed. Or, the access lamp of the hard drive does not light for several minutes.
- Wait until the installation is completed, because it is progressing properly. The installation may take 30 minutes or more depending on the computer.
[Connecting] or [Connected USB (MTP)] does not appear when connected to the computer with the supplied USB cable (The computer does not recognize the player).
- The USB cable is not connected to a USB connector on your computer properly. → Disconnect the USB cable, and then reconnect it. → Use the supplied USB cable. • A USB hub is being used. → Connecting the player via a USB hub may not work. Connect the player directly to your computer using the supplied USB cable.
- The USB connector on your computer may have a problem. → Connect the player to another USB connector on your computer.
- When you use the player for the first time, or when the battery is low, it may take the player about 30 seconds to display the message after connected to a computer. This is not a malfunction.
- The software authentication may be performed and it may take rather a long time. Wait for a while.
- The software installation has been failed. → Reinstall the software by using the installer. The imported data will remain untouched.
- By setting the player to the USB connection standby mode before connecting it to a computer, you may be able to establish connection between the player and the computer with more reliability. → Select [Yes] for the [USB Connection Mode] (p. 107). The player enters the USB connection standby mode and the USB connection standby screen appears.
- The computer is running another software other than the one used for transferring.
→ Disconnect the USB cable, wait a few minutes, and reconnect it. If the problem persists, disconnect the USB cable, restart the computer, and then reconnect the USB cable.
- [Connecting] or [Connected USB (MTP)] may not appear on the player, depending on the software environment that is running on your computer.
→ Activate Windows Media Player, or Windows Explorer.
- After prescribing the remedies above, if the problem still persists, press the RESET button of the player and reconnect it to the computer by using the supplied USB cable.
Data cannot be transferred to the player from your computer.
- Transferring may be stopped due to noise, such as static electricity, etc. This happens to protect data information.
→ Disconnect the player, then reconnect it.
- If you transfer files by drag-and-drop on a computer that does not have Windows Media Player 11 installed, only a limited amount of files (AAC, video files, etc.) may be transferrable by drag-and-drop.
→ Install Windows Media Player 11 from the Windows Media Player download site, then transfer files by drag-and-drop again. Before installing Windows Media Player 11 on your computer, make sure to check whether your software or service corresponds to Windows Media Player 11. For details on usage, or support on Windows Media Player, visit the following web site: http://support.microsoft.com/
- The USB cable is not connected to a USB connector on your computer properly.
→ Disconnect the USB cable, and then reconnect it.
- There is not enough free space in the built-in flash memory.
→ Delete any unnecessary data to increase free space.
- Songs with a limited playing period or play count may not be transferred due to restrictions set by copyright holders. For details on the settings of each audio file, contact the distributor.
- Abnormal data exists on the player.
→ Transfer usable files back to your computer and format the built-in flash memory on the player (p. 107).
- You may not be using the supported software to transfer data to the player.
Install the supported software and use it to transfer data.
Continued ↓
The data may be damaged.
Delete the data that cannot be transferred from your computer, then import it to your computer again. When importing data to your computer or transferring data to the player, close any other applications to avoid data damage.
You may be attempting to transfer a file that is not in a playable format.
For information on the supported file format, see “Supported file format” of “Specifications” (p. 153). You may not transfer a file depending on the file specification.
The transferable limit of files and folders has been exceeded. See “Supported file format” of “Specifications” (p. 153) for the maximum number of songs, videos, photos, podcast episodes and podcasts that can be transferred to the player.
Delete unnecessary data.
You are trying to transfer .m4a, .mp4, .3gp or .m4v files on a computer that already has Windows Media Player 10 installed.
Install Windows Media Player 11 from the Windows Media Player download site.
If you transfer data using appropriate software for transferring, but the transfer is not made, refer to the manufacturer.
The transfer takes too long time.
You are transferring a large file.
It may take a long time to transfer a large file.
Only a small amount of data can be transferred to the player.
- There is not enough free space in the built-in flash memory.
→ Delete any unnecessary data to increase free space.
- Data that cannot be played on the player is stored on the player.
→ If data other than song, video, or photo data is stored on the player, less data can be transferred. Transfer back data that cannot be played on the player to the computer to increase the available space.
Cannot return a song on the player to the computer.
- You may attempt return a song to a computer that was not used to transfer the song to the player.
→ If you transfer a song from a computer to the player by using software, you cannot return the song to another computer. Return the song to the computer from which you transferred the song to the player. If you cannot return the song to the computer and intend to delete the song, use software to select and delete it.
- You may have deleted the song on the computer from which you transferred the song to the player.
→ If you delete the song on the computer from which you transferred the song to the player, you cannot return the song to the computer.
The player becomes unstable while it is connected to the computer.
- A USB hub or USB extension cable is being used.
→ Connecting the player via a USB hub or extension cable may not work. Connect the player directly to your computer using the supplied USB cable.
Folders cannot be renamed or deleted.
- You cannot delete or rename the [MUSIC], [MP_ROOT], [MPE_ROOT], [VIDEO], [DCIM], [PICTURE], [PICTURES] and [PODCASTS] folders.
FM Radio
FM broadcasts are unclear.
- The received station is not fully tuned in.
→ Tune the station in manually using the ▲/▼ button (☐ p. 87).
Reception is weak and sound quality is poor.
• The radio signal is weak.
→ Listen to the FM broadcast near a window since the signal may be weak inside buildings or in vehicles.
- The headphone cord is not fully extended.
→ The headphone cord functions as an antenna. Extend the headphone cord as far as possible.
- Setting the receiver to monaural may reduce noise.
→ Set the [Mono/Auto] option to [Mono] (p. 91).
FM broadcasts are affected by interference.
- A device emitting radio signals, such as a mobile phone, is being used near the player.
→ When using devices such as mobile phones, keep them away from the player.
FM broadcasts cannot be heard.
- The headphones are not connected.
The headphone cord functions as an antenna. When an optional peripheral device is connected to the WM-PORT jack and the headphones cannot be connected, FM broadcast reception is unavailable.
Podcast
Cannot play back an episode.
- The player does not support the file format of the episode. → Check the file format playable on the player (p. 153).
TV output
Music screen or video is not displayed on the television's screen.
- Set the [NTSC/PAL settings] setting according to the television you intend to connect (☎ p. 45, 64). • [TV Output(Music)] or [TV Output(Video)] is not set to [On]. → Set [TV Output(Music)] (p. 44) or [TV Output(Video)] (p. 63) to [On].
- You do not use the optional video/audio output cable (WMC-NWV10) to connect the player and television. → Use the optional video/audio output cable (WMC-NWV10) to connect the player and television. For details, refer to the video/audio output cable's manual.
- Your television's input is not set to display image from the video/audio output cable. → Make sure that your television's input is correctly chosen to display image from the video/audio output cable.
Video image on the television screen is abnormal (e.g. black bars which seem to be unnecessary appear, or image is stretched unnaturally).
- The [Zoom Settings] setting of the player is wrong. → Change [Zoom Settings] of the player (p. 67).
- The [TV Output Size] setting of the player is not set in accordance with your television. → Change [TV Output Size] of the player according to your television's screen (p. 64).
- The wide mode setting of your television is wrong. → Change the wide mode setting of your television.
Other
There is no beep sound when the player is operated.
• [Beep Settings] is set to [Off]. → Set [Beep Settings] to [On] (p. 100). - The beep does not sound when the player is connected to the optional cradle, or another device.
The player gets warm.
- The player may become warm when the battery is being charged and just after charging. The player also may get warm when a large amount of data is transferred. This behavior is normal and not cause for a concern. Set the player aside for a while to allow it to cool down.
The date and time have been reset.
- If you left the player for a while with the battery used up, the date and time may be reset. This is not a malfunction. Charge the battery until Pears on the screen, and set the date and time again (p. 22, 104).
Noise is generated when plugging or unplugging the headphones.
- Take off the headphones when plugging or unplugging the headphones. If you plug or unplug the headphones while playing a song or using the Noise Canceling function, you may hear noise from the headphones. This is not a malfunction.
Messages
Follow the instructions below if a message appears in the display.
[Cannot play; file format is not supported.]
- You are trying to play a file that cannot be played on the player. → You cannot play a song in an unsupported format file (p. 153).
[Cannot play; license has expired.]
- The playback limitation period of the song has expired. → Update the license information of songs using the software used for transferring.
[Delete failed.]
- You attempted to delete a video but the player failed to delete it. → Delete the video by using Content Transfer or Windows Explorer.
[Do not disconnect.]
- The player is connected to a computer or other external devices to transfer data. → This is not an error message. Do not disconnect the USB cable until transferring completes.
[Firmware update failed.]
- Updating the firmware failed to complete. → Follow the instructions displayed on your computer to retry updating the firmware.
[LOW BATTERY. Please Charge.]
- The player's battery is running low. → Charge the battery (p. 19).
[Noise Canceling unavailable. Unable to execute.]
- [NC Modes] is unavailable because the usage environment does not meet the requirement for this function. → Make sure that [Noise Canceling: On/Off] is set to [On] (p. 94), and the supplied headphones are used.
Continued ↓
[Not enough free space in memory. Delete files to ensure free space.]
- The player's available capacity is insufficient.
→ Connect the player to your computer using the supplied USB cable, and then delete any unnecessary data from the player using another software used for transferring, or Windows Explorer.
[Unable to set photo as wallpaper.]
- The selected photo cannot be designated as the wallpaper.
→ Make sure the photo is not a damaged file or the size is not too large.
Precautions
On safety
- Be sure not to short-circuit the terminals of the player with other metallic objects.
- Do not touch the rechargeable battery with bare hands if it is leaking. Since battery liquid may remain in the player, consult your nearest Sony dealer if the battery has leaked. If the liquid gets into your eyes, do not rub your eyes as it may lead to blindness. Wash out your eyes with clean water, and consult a doctor.
Also, if the liquid gets on to your body or clothes, wash it off immediately. If you do not, it may cause burns or injury. If you get burned or injured by the liquid from the battery, consult a doctor.
- Do not pour water or put any foreign object in the player. Doing so may cause fire or electric shock.
If this occurs, turn off the player immediately, disconnect the USB cable from the player, and consult your nearest Sony dealer or Sony Service Center.
- Do not put the player into fire.
- Do not take apart or remodel the player. Doing so can result in electric shock. Consult your nearest Sony dealer or Sony Service Center for exchange of rechargeable batteries, internal checks or repair.
Continued ↓
On installation
- Do not put any heavy object on top of the player or apply a strong shock to the player. It may cause a malfunction or damage.
- Never use the player where it will be subjected to extremes of light, temperature, moisture or vibration. The player may become discolored, distorted or damaged.
- Never leave the player exposed to high temperature, such as in a car parked in the sun or under direct sunlight.
- Do not leave the player in a place subject to excessive dust.
- Do not leave the player on an unstable surface or in an inclined position.
- If the player causes interference to radio or television reception, turn the player off and move it away from the radio or television.
- When using the player, remember to follow the precautions below in order to avoid warping the cabinet or causing the player to malfunction.
- Make sure not to sit down with the player in your back pocket.

- Make sure not to put the player into a bag with the headphones/earphones cord wrapped around it and then subject the bag to strong impact.

- Do not expose the player to water. The player is not waterproof. Remember to follow the precautions below.
- Be careful not to drop the player into a sink or other container filled with water.
- Do not use the player in humid locations or bad weather, such as in the rain or snow.
- Do not get the player wet.
If you touch the player with wet hands, or put the player in a damp article of clothing, the player may get wet and this may cause a malfunction of the player.

- When you unplug the headphones from the player, make sure to hold the headphone plug to unplug it. Pulling the headphone cord itself may cause damage to the headphone cord.
Note on static electricity
In particularly dry air conditions, mild tingling may be felt on your ears. This is a result of static electricity accumulated in the body, and not a malfunction of the player.
The effect can be minimized by wearing clothes made from natural materials.
On heat build-up
Heat may build up in the player while charging if it is used for an extended period of time.
On the headphones
Road safety
Avoid listening with your headphones in situations where hearing must not be impaired.
Preventing hearing damage
Avoid using the headphones at a high volume. Hearing experts advise against continuous, loud and extended play. If you experience a ringing in your ears, reduce the volume or discontinue use.
Do not turn the volume up high all at once, especially when using headphones. Turn up the volume gradually so that loud sound will not hurt your ears.
Caring for others
Keep the volume at a moderate level. This will allow you to hear outside sounds and to be considerate to the people around you.
Warning
If there is lightning when you are using the player, take off the headphones immediately.
If you experience an allergic reaction to the supplied headphones, stop using them at once and contact a doctor.
Continued ↓
On the use
- When using a strap (sold separately), be careful to avoid hooking it on objects you pass by. Furthermore be careful not to swing the player by the strap to avoid bumping people.
- Refrain from using the player according to the in-flight announcements during take off or landing in an aircraft.
- Note that condensation may form temporarily in cases such as when the player is moved quickly from a low-temperature environment to a high temperature environment or used in a room that has a heater just turned on. Condensation creates a phenomenon where moisture in the air adheres to surfaces such as metal panels, etc., and then changes to liquid. If condensation forms in the player, leave it turned off until the condensation disappears. If you use the player with condensation present, a malfunction may result.
On the LCD
- Do not apply strong force to the surface of the LCD. This may cause a distortion in colors or brightness, or cause a malfunction of the LCD.
- If you use the player in a cold location, images may appear with black bands around them. This is not a malfunction of the player.
On cleaning
- Clean the player's case with a soft cloth, such as a cleaning cloth for eyeglasses.
- If the player's case becomes very dirty, clean it with a soft cloth slightly moistened with water or a mild detergent solution.
- Do not use any type of abrasive pad, scouring powder, or solvent, such as alcohol or benzene, as it may mar the finish of the case.
- Be careful not to let water get into the player from the opening near the connector.
- Clean the headphone plug periodically.
If you have any questions or problems concerning the player, please consult your nearest Sony dealer.
Continued ↓
On Software
- Copyright laws prohibit reproducing the software or the manual accompanying it in whole or in part, or renting the software without the permission of the copyright holder.
- In no event will SONY be liable for any financial damage, or loss of profits, including claims made by third parties, arising out of the use of the software supplied with this player.
- The software provided with this player cannot be used with equipment other than that to which it is so designated.
- Please note that, due to continued efforts to improve quality, the software specifications may be changed without notice.
- Operation of this player with software other than that provided is not covered by the warranty.
- The ability to display the languages on supplied software will depend on the installed OS on your computer. For better results, please ensure that the installed OS is compatible with the desired language you want to display.
- We do not guarantee all the languages will be able to be displayed properly on the supplied software.
- User-created characters and some special characters may not be displayed.
- The explanations in this manual assume that you are familiar with the basic operations of Windows.
For details on the use of your computer and operating system, please refer to the respective manuals.
Notice for users
- The recorded song is limited to private use only. Use of the song beyond this limit requires permission of the copyright holders.
- Sony is not responsible for incomplete recording/downloading or damaged data due to problems of the player or computer.
- Depending on the types of the text and characters, the text shown on the player may not be displayed properly on device. This is due to:
- The capacity of the connected player.
- The player is not functioning normally.
- Content information is written in a language or with characters that are not supported by the player.
Continued ↓
About sample data *1
The player is pre-installed with sample data.
If you delete the sample data, you cannot restore it, and we will not supply any replacement data.
*1 In some countries/regions, some sample data is not installed.
- The recorded song is limited to private use only. Use of the song beyond this limit requires permission of the copyright holders.
- Sony is not responsible for incomplete recording/downloading or damaged data due to problems of the player or computer.
- Depending on the type of text and characters, the text shown on the player may not be displayed properly on the device. This is due to:
- The capacity of the connected player.
- The player is not functioning normally.
- Content information is written in a language or with characters that are not supported by the player.
About the customer support Web site
If you have any questions or issues with this product, or would like information on compatible items with this product, visit the following Web sites.
For customers in the USA: http://www.sony.com/walkmansupport
For customers in Canada: http://www.sony.ca/ElectronicsSupport/
For customers in Europe: http://support.sony-europe.com/DNA
For customers in Latin America: http://www.sony-latin.com/index.crp
For customers in other countries/regions: http://www.sony-asia.com/support
For customers who purchased the overseas models:
http://www.sony.co.jp/overseas/support/
License and Trademark Notice
- ATRAC is trademark of Sony Corporation.
- "WALKMAN" and "WALKMAN" logo are registered trademarks of Sony Corporation.
- CLEAR is trademark of Sony Corporation.
- Microsoft, Windows, Windows Vista and Windows Media are trademarks or registered trademarks of Microsoft Corporation in the United States and/or other countries.
- Adobe, Adobe Reader and Adobe Flash Player are trademarks or registered trademarks of Adobe Systems Incorporated in the United States and/or other countries.
- MPEG Layer-3 audio coding technology and patents licensed from Fraunhofer IIS and Thomson.
- IBM and PC/AT are registered trademarks of International Business Machines Corporation.
- Apple, Macintosh and iTunes are trademarks of Apple Inc., registered in the U.S. and other countries.
- Pentium is a trademark or a registered trademark of Intel Corporation.
- This software is based in part on the work of the Independent JPEG Group.
- THIS PRODUCT IS LICENSED UNDER THE MPEG-4 VISUAL PATENT PORTFOLIO LICENSE FOR THE PERSONAL AND NON-COMMERCIAL USE OF A CONSUMER FOR (i) ENCODING VIDEO IN COMPLIANCE WITH THE MPEG-4 VISUAL STANDARD (“MPEG-4 VIDEO”) AND/OR (ii) DECODING MPEG-4 VIDEO THAT WAS ENCODED BY A CONSUMER ENGAGED IN A PERSONAL AND NON-COMMERCIAL ACTIVITY AND/OR WAS OBTAINED FROM A VIDEO PROVIDER LICENSED BY MPEG LA TO PROVIDE MPEG-4 VIDEO. NO LICENSE IS GRANTED OR SHALL BE IMPLIED FOR ANY OTHER USE. ADDITIONAL INFORMATION INCLUDING THAT RELATING TO PROMOTIONAL, INTERNAL AND COMMERCIAL USES AND LICENSING MAY BE OBTAINED FROM MPEG LA, LLC. SEE HTTP://WWW.MPEGLA.COM
- THIS PRODUCT IS LICENSED UNDER THE AVC PATENT PORTFOLIO LICENSE FOR THE PERSONAL AND NON-COMMERCIAL USE OF A CONSUMER TO
(i) ENCODE VIDEO IN COMPLIANCE WITH THE AVC STANDARD ("AVC VIDEO") AND/OR (ii) DECODE AVC VIDEO THAT WAS ENCODED BY A CONSUMER ENGAGED IN A PERSONAL AND
NON-COMMERCIAL ACTIVITY AND/OR WAS OBTAINED FROM A VIDEO PROVIDER LICENSED TO PROVIDE AVC VIDEO. NO LICENSE IS GRANTED OR SHALL BE IMPLIED FOR ANY OTHER USE.
ADDITIONAL INFORMATION MAY BE OBTAINED FROM MPEG LA, L.L.C. SEE HTTP://MPEGLA.COM
- THIS PRODUCT IS LICENSED UNDER THE VC-1 PATENT PORTFOLIO LICENSE FOR THE PERSONAL AND NON-COMMERCIAL USE OF A CONSUMER TO
(i) ENCODE VIDEO IN COMPLIANCE WITH THE VC-1 STANDARD ("VC-1 VIDEO") AND/OR (ii) DECODE VC-1 VIDEO THAT WAS ENCODED BY A CONSUMER ENGAGED IN A PERSONAL AND NON-COMMERCIAL ACTIVITY AND/OR WAS OBTAINED FROM A VIDEO PROVIDER LICENSED TO PROVIDE VC-1 VIDEO.
NO LICENSE IS GRANTED OR SHALL BE IMPLIED FOR ANY OTHER USE. ADDITIONAL INFORMATION MAY BE OBTAINED FROM MPEGLA, L.L.C. SEE HTTP://WWW.MPEGLA.COM
- All other trademarks and registered trademarks are trademarks or registered trademarks of their respective holders. In this manual, TM and (R) marks are not specified.
This product is protected by certain intellectual property rights of Microsoft Corporation. Use or distribution of such technology outside of this product is prohibited without a license from Microsoft or an authorized Microsoft subsidiary.
Content providers are using the digital rights management technology for Windows Media contained in this device (“WM-DRM”) to protect the integrity of their content (“Secure Content”) so that their intellectual property, including copyright, in such content is not misappropriated.
This device uses WM-DRM software to play Secure Content (“WM-DRM Software”). If the security of the WM-DRM Software in this device has been compromised, owners of Secure Content (“Secure Content Owners”) may request that Microsoft revoke the WM-DRM Software’s right to acquire new licenses to copy, display and/or play Secure Content. Revocation does not alter the WM-DRM Software’s ability to play unprotected content. A list of revoked WM-DRM Software is sent to your device whenever you download a license for Secure Content from the Internet or from a PC. Microsoft may, in conjunction with such license, also download revocation lists onto your device on behalf of Secure Content Owners.
Program ©2009 Sony Corporation
Documentation ©2009 Sony Corporation
Information on Expat
Copyright ©1998, 1999, 2000 Thai Open Source Software Center Ltd and Clark Cooper.
Copyright ©2001, 2002, 2003, 2004, 2005, 2006 Expat maintainers.
Permission is hereby granted, free of charge, to any person obtaining a copy of this software and associated documentation files (the “Software”), to deal in the Software without restriction, including without limitation the rights to use, copy, modify, merge, publish, distribute, sublicense, and/or sell copies of the Software, and to permit persons to whom the Software is furnished to do so, subject to the following conditions:
The above copyright notice and this permission notice shall be included in all copies or substantial portions of the Software.
THE SOFTWARE IS PROVIDED "AS IS", WITHOUT WARRANTY OF ANY KIND, EXPRESS OR IMPLIED, INCLUDING BUT NOT LIMITED TO THE WARRANTIES OF MERCHANTABILITY, FITNESS FOR A PARTICULAR PURPOSE AND NONINFRINGEMENT.
IN NO EVENT SHALL THE AUTHORS OR COPYRIGHT HOLDERS BE LIABLE FOR ANY CLAIM, DAMAGES OR OTHER LIABILITY, WHETHER IN AN ACTION OF CONTRACT, TORT OR OTHERWISE, ARISING FROM, OUT OF OR IN CONNECTION WITH THE SOFTWARE OR THE USE OR OTHER DEALINGS IN THE SOFTWARE.
Information on ncurses
Copyright (c) 1998-2004,2006 Free Software Foundation, Inc.
Permission is hereby granted, free of charge, to any person obtaining a copy of this software and associated documentation files (the “Software”), to deal in the Software without restriction, including without limitation the rights to use, copy, modify, merge, publish, distribute, distribute with modifications, sublicense, and/or sell copies of the Software, and to permit persons to whom the Software is furnished to do so, subject to the following conditions:
The above copyright notice and this permission notice shall be included in all copies or substantial portions of the Software.
THE SOFTWARE IS PROVIDED "AS IS", WITHOUT WARRANTY OF ANY KIND, EXPRESS OR IMPLIED, INCLUDING BUT NOT LIMITED TO THE WARRANTIES OF MERCHANTABILITY, FITNESS FOR A PARTICULAR PURPOSE AND NONINFRINGEMENT. IN NO EVENT SHALL THE ABOVE COPYRIGHT HOLDERS BE LIABLE FOR ANY CLAIM, DAMAGES OR OTHER LIABILITY, WHETHER IN AN ACTION OF CONTRACT, TORT OR OTHERWISE, ARISING FROM, OUT OF OR IN CONNECTION WITH THE SOFTWARE OR THE USE OR OTHER DEALINGS IN THE SOFTWARE.
Except as contained in this notice, the name(s) of the above copyright holders shall not be used in advertising or otherwise to promote the sale, use or other dealings in this Software without prior written authorization.
Information on netkit-ftp
Copyright (c) 1985, 1989 Regents of the University of California.
All rights reserved.
Redistribution and use in source and binary forms, with or without modification, are permitted provided that the following conditions are met:
- Redistributions of source code must retain the above copyright notice, this list of conditions and the following disclaimer.
- Redistributions in binary form must reproduce the above copyright notice, this list of conditions and the following disclaimer in the documentation and/or other materials provided with the distribution.
- All advertising materials mentioning features or use of this software must display the following acknowledgement:
This product includes software developed by the University of California, Berkeley and its contributors.
- Neither the name of the University nor the names of its contributors may be used to endorse or promote products derived from this software without specific prior written permission.
THIS SOFTWARE IS PROVIDED BY THE REGENTS AND CONTRIBUTORS "AS IS" AND ANY EXPRESS OR IMPLIED WARRANTIES, INCLUDING, BUT NOT LIMITED TO, THE IMPLIED WARRANTIES OF MERCHANTABILITY AND FITNESS FOR A PARTICULAR PURPOSE ARE DISCLAIMED. IN NO EVENT SHALL THE REGENTS OR CONTRIBUTORS BE LIABLE FOR ANY DIRECT, INDIRECT, INCIDENTAL, SPECIAL, EXEMPLARY, OR CONSEQUENTIAL DAMAGES (INCLUDING, BUT NOT LIMITED TO, PROCUREMENT OF SUBSTITUTE GOODS OR SERVICES; LOSS OF USE, DATA, OR PROFITS; OR BUSINESS INTERRUPTION) HOWEVER CAUSED AND ON ANY THEORY OF LIABILITY, WHETHER IN CONTRACT, STRICT LIABILITY, OR TORT (INCLUDING NEGLIGENCE OR OTHERWISE) ARISING IN ANY WAY OUT OF THE USE OF THIS SOFTWARE, EVEN IF ADVISED OF THE POSSIBILITY OF SUCH DAMAGE.
Information on strace
Copyright (c) 1991, 1992 Paul Kranenburg pk@cs.few.eur.nl Copyright (c) 1993 Branko Lankester branko@hacktic.nl Copyright (c) 1993 Ulrich Pegelow pegelow@moorea.uni-muenster.de Copyright (c) 1995, 1996 Michael Elizabeth Chastain mec@durancef.shout.net Copyright (c) 1993, 1994, 1995, 1996 Rick Sladkey jrs@world.std.com Copyright (c) 1998-2001 Wichert Akkerman wakkerma@deephackmode.org All rights reserved.
Redistribution and use in source and binary forms, with or without modification, are permitted provided that the following conditions are met:
- Redistributions of source code must retain the above copyright notice, this list of conditions and the following disclaimer.
- Redistributions in binary form must reproduce the above copyright notice, this list of conditions and the following disclaimer in the documentation and/or other materials provided with the distribution.
- The name of the author may not be used to endorse or promote products derived from this software without specific prior written permission.
THIS SOFTWARE IS PROVIDED BY THE AUTHOR "AS IS" AND ANY EXPRESS OR IMPLIED WARRANTIES, INCLUDING, BUT NOT LIMITED TO, THE IMPLIED WARRANTIES OF MERCHANTABILITY AND FITNESS FOR A PARTICULAR PURPOSE ARE DISCLAIMED.
IN NO EVENT SHALL THE AUTHOR BE LIABLE FOR ANY DIRECT, INDIRECT,
INCIDENTAL, SPECIAL, EXEMPLARY, OR CONSEQUENTIAL DAMAGES (INCLUDING, BUT NOT LIMITED TO, PROCUREMENT OF SUBSTITUTE GOODS OR SERVICES; LOSS OF USE, DATA, OR PROFITS; OR BUSINESS INTERRUPTION) HOWEVER CAUSED AND ON ANY THEORY OF LIABILITY, WHETHER IN CONTRACT, STRICT LIABILITY, OR TORT (INCLUDING NEGLIGENCE OR OTHERWISE) ARISING IN ANY WAY OUT OF THE USE OF THIS SOFTWARE, EVEN IF ADVISED OF THE POSSIBILITY OF SUCH DAMAGE.
Important information on software
Included with this product is software, of which permission for use is obtained either directly or indirectly by Sony Corporation (hereafter Sony) through a third party. Make sure to read this important information on software.
Information on software applicable to GNU GPL/LGPL
Included with this product is software (refer to the following “Package List”) which is subject to the following GNU General Public License (hereafter GPL) or GNU Lesser General Public License (hereafter LGPL). Users have the right to obtain, modify and redistribute the source code of software in accordance with the attached GPL/LGPL. Sony provides these source codes on the following web site. Please visit the following web site to obtain the source codes.
http://www.sony.net/Products/Linux/
Please do not make direct requests for the contents of the source codes.
Package List
busybox dosfstools mdadm sysvinit
udev u-boot linux-kernel procps
e2fsprogs alsa-lib alsa-utils gcc
glibc lrzsz coreutils net-tools
nfs-utils
GNU LESSER GENERAL PUBLIC LICENSE
Version 2.1, February 1999
Copyright (C) 1991, 1999 Free Software Foundation, Inc. 59 Temple Place, Suite 330, Boston, MA 02111-1307 USA. Everyone is permitted to copy and distribute verbatim copies of this license document, but changing it is not allowed.
[This is the first released version of the Lesser GPL. It also counts as the successor of the GNU Library Public License, version 2, hence the version number 2.1.]
Preamble
The licenses for most software are designed to take away your freedom to share and change it. By contrast, the GNU General Public Licenses are intended to guarantee your freedom to share and change free software--to make sure the software is free for all its users.
This license, the Lesser General Public License, applies to some specially designated software packages--typically libraries--of the Free Software Foundation and other authors who decide to use it. You can use it too, but we suggest you first think carefully about whether this license or the ordinary General Public License is the better strategy to use in any particular case, based on the explanations below.
When we speak of free software, we are referring to freedom of use, not price. Our General Public Licenses are designed to make sure that you have the freedom to distribute copies of free software (and charge for this service if you wish); that you receive source code or can get it if you want it; that you can change the software and use pieces of it in new free programs; and that you are informed that you can do these things.
To protect your rights, we need to make restrictions that forbid distributors to deny you these rights or to ask you to surrender these rights. These restrictions translate to certain responsibilities for you if you distribute copies of the library or if you modify it.
For example, if you distribute copies of the library, whether gratis or for a fee, you must give the recipients all the rights that we gave you. You must make sure that they, too, receive or can get the source code. If you link other code with the library, you must provide complete object files to the recipients, so that they can relink them with the library after making changes to the library and recompiling it. And you must show them these terms so they know their rights.
We protect your rights with a two-step method: (1) we copyright the library, and (2) we offer you this license, which gives you legal permission to copy, distribute and/or modify the library. To protect each distributor, we want to make it very clear that there is no warranty for the free library. Also, if the library is modified by someone else and passed on, the recipients should know that what they have is not the original version, so that the original author's reputation will not be affected by problems that might be introduced by others.
Finally, software patents pose a constant threat to the existence of any free program. We wish to make sure that a company cannot effectively restrict the users of a free program by obtaining a restrictive license from a patent holder. Therefore, we insist that any patent license obtained for a version of the library must be consistent with the full freedom of use specified in this license.
Most GNU software, including some libraries, is covered by the ordinary GNU General Public License. This license, the GNU Lesser General Public License, applies to certain designated libraries, and is quite different from the ordinary General Public License. We use this license for certain libraries in order to permit linking those libraries into non-free programs.
When a program is linked with a library, whether statically or using a shared library, the combination of the two is legally speaking a combined work, a derivative of the original library. The ordinary General Public License therefore permits such linking only if the entire combination fits its criteria of freedom. The Lesser General Public License permits more lax criteria for linking other code with the library.
We call this license the “Lesser” General Public License because it does Less to protect the user’s freedom than the ordinary General Public License. It also provides other free software developers Less of an advantage over competing non-free programs. These disadvantages are the reason we use the ordinary General Public License for many libraries. However, the Lesser license provides advantages in certain special circumstances.
For example, on rare occasions, there may be a special need to encourage the widest possible use of a certain library, so that it becomes a de-facto standard. To achieve this, non-free programs must be allowed to use the library. A more frequent case is that a free library does the same job as widely used non-free libraries. In this case, there is little to
gain by limiting the free library to free software only, so we use the Lesser General Public License.
In other cases, permission to use a particular library in non-free programs enables a greater number of people to use a large body of free software. For example, permission to use the GNU C Library in non-free programs enables many more people to use the whole GNU operating system, as well as its variant, the GNU/Linux operating system.
Although the Lesser General Public License is Less protective of the users' freedom, it does ensure that the user of a program that is linked with the Library has the freedom and the wherewithal to run that program using a modified version of the Library.
The precise terms and conditions for copying, distribution and modification follow. Pay close attention to the difference between a “work based on the library” and a “work that uses the library”. The former contains code derived from the library, whereas the latter must be combined with the library in order to run.
TERMS AND CONDITIONS FOR COPYING, DISTRIBUTION AND MODIFICATION
- This License Agreement applies to any software library or other program which contains a notice placed by the copyright holder or other authorized party saying it may be distributed under the terms of this Lesser General Public License (also called “this License”). Each licensee is addressed as “you”.
A “library” means a collection of software functions and/or data prepared so as to be conveniently linked with application programs (which use some of those functions and data) to form executables.
The “Library”, below, refers to any such software library or work which has been distributed under these terms. A “work based on the Library” means either the Library or any derivative work under copyright law: that is to say, a work containing the Library or a portion of it, either verbatim or with modifications and/or translated straightforwardly into another language. (Hereinafter, translation is included without limitation in the term “modification”.)
“Source code” for a work means the preferred form of the work for making modifications to it. For a library, complete source code means all the source code for all modules it contains, plus any associated interface definition files, plus the scripts used to control compilation and installation of the library.
Activities other than copying, distribution and modification are not covered by this License; they are outside its scope. The act of running a program using the Library is not restricted, and output from such a program is covered only if its contents constitute a work based on the Library (independent of the use of the Library in a tool for writing it). Whether that is true depends on what the Library does and what the program that uses the Library does.
- You may copy and distribute verbatim copies of the Library's complete source code as you receive it, in any medium, provided that you conspicuously and appropriately publish on each copy an appropriate copyright notice and disclaimer of warranty; keep intact all the notices that refer to this License and to the absence of any warranty; and distribute a copy of this License along with the Library.
You may charge a fee for the physical act of transferring a copy, and you may at your option offer warranty protection in exchange for a fee.
- You may modify your copy or copies of the Library or any portion of it, thus forming a work based on the Library, and copy and distribute such modifications or work under the terms of Section 1 above, provided that you also meet all of these conditions: a) The modified work must itself be a software library. b) You must cause the files modified to carry prominent notices stating that you changed the files and the date of any change. c) You must cause the whole of the work to be licensed at no charge to all third parties under the terms of this License. d) If a facility in the modified Library refers to a function or a table of data to be supplied by an application program that uses the facility, other than as an argument passed when the facility is invoked, then you must make a good faith effort to ensure that, in the event an application does not supply such function or table, the facility still operates, and performs whatever part of its purpose remains meaningful.
(For example, a function in a library to compute square roots has a purpose that is entirely well-defined independent of the application. Therefore, Subsection 2d requires that any application-supplied function or table used by this function must be optional: if the application does not supply it, the square root function must still compute square roots.)
These requirements apply to the modified work as a whole. If identifiable sections of that work are not derived from the Library, and can be reasonably considered independent and separate works in themselves, then this License, and its terms, do not apply to those sections when you distribute them as separate works. But when you distribute the same sections as part of a whole which is a work based on the Library, the distribution of the whole must be on the terms of this License, whose permissions for other licensees extend to the entire whole, and thus to each and every part regardless of who wrote it.
Thus, it is not the intent of this section to claim rights or contest your rights to work written entirely by you; rather, the intent is to exercise the right to control the distribution of derivative or collective works based on the Library.
In addition, mere aggregation of another work not based on the Library with the Library (or with a work based on the Library) on a volume of a storage or distribution medium does not bring the other work under the scope of this License.
- You may opt to apply the terms of the ordinary GNU General Public License instead of this License to a given copy of the Library. To do this, you must alter all the notices that refer to this License, so that they refer to the ordinary GNU General Public License, version 2, instead of to this License. (If a newer version than version 2 of the ordinary GNU General Public License has appeared, then you can specify that version instead if you wish.) Do not make any other change in these notices.
Once this change is made in a given copy, it is irreversible for that copy, so the ordinary GNU General Public License applies to all subsequent copies and derivative works made from that copy.
This option is useful when you wish to copy part of the code of the Library into a program that is not a library.
- You may copy and distribute the Library (or a portion or derivative of it, under Section 2) in object code or executable form under the terms of Sections 1 and 2 above provided that you accompany it with the complete corresponding machine-readable source code, which must be distributed under the terms of Sections 1 and 2 above on a medium customarily used for software interchange.
If distribution of object code is made by offering access to copy from a designated place, then offering equivalent access to copy the source code from the same place satisfies the requirement to distribute the source code, even though third parties are not compelled to copy the source along with the object code.
- A program that contains no derivative of any portion of the Library, but is designed to work with the Library by being compiled or linked with it, is called a “work that uses the Library”. Such a work, in isolation, is not a derivative work of the Library, and therefore falls outside the scope of this License.
However, linking a “work that uses the Library” with the Library creates an executable that is a derivative of the Library (because it contains portions of the Library), rather than a “work that uses the library”. The executable is therefore covered by this License. Section 6 states terms for distribution of such executables.
When a “work that uses the Library” uses material from a header file that is part of the Library, the object code for the work may be a derivative work of the Library even though the source code is not. Whether this is true is especially significant if the work can be linked without the Library, or if the work is itself a library. The threshold for this to be true is not precisely defined by law.
If such an object file uses only numerical parameters, data structure layouts and accessors, and small macros and small inline functions (ten lines or less in length), then the use of the object file is unrestricted, regardless of whether it is legally a derivative work. (Executables containing this object code plus portions of the Library will still fall under Section 6.)
Otherwise, if the work is a derivative of the Library, you may distribute the object code for the work under the terms of Section 6. Any executables containing that work also fall under Section 6, whether or not they are linked directly with the Library itself.
- As an exception to the Sections above, you may also combine or link a “work that uses the Library” with the Library to produce a work containing portions of the Library, and distribute that work under terms of your choice, provided that the terms permit modification of the work for the customer’s own use and reverse engineering for debugging such modifications.
You must give prominent notice with each copy of the work that the Library is used in it and that the Library and its use are covered by this License. You must supply a copy of this License. If the work during execution displays copyright notices, you must include the copyright notice for the Library among them, as well as a reference directing the user to the copy of this License. Also, you must do one of these things:
a) Accompany the work with the complete corresponding machine-readable source code for the Library including whatever changes were used in the work (which must be distributed under Sections 1 and 2 above); and, if the work is an executable linked with the Library, with the complete machine-readable “work that uses the Library”, as object code and/or source code, so that the user can modify the Library and then relink to produce a modified executable containing the modified Library. (It is understood that the user who changes the contents of definitions files in the Library will not necessarily be able to recompile the application to use the modified definitions.) b) Use a suitable shared library mechanism for linking with the Library. A suitable mechanism is one that (1) uses at run time a copy of the library already present on the user's computer system, rather than copying library functions into the executable, and (2) will operate properly with a modified version of the library, if the user installs one, as long as the modified version is interface-compatible with the version that the work was made with. c) Accompany the work with a written offer, valid for at least three years, to give the same user the materials specified in Subsection 6a, above, for a charge no more than the cost of performing this distribution. d) If distribution of the work is made by offering access to copy from a designated place, offer equivalent access to copy the above specified materials from the same place. e) Verify that the user has already received a copy of these materials or that you have already sent this user a copy.
For an executable, the required form of the “work that uses the Library” must include any data and utility programs needed for reproducing the executable from it. However, as a special exception, the materials to be distributed need not include anything that is normally distributed (in either source or binary form) with the major components (compiler, kernel, and so on) of the operating system on which the executable runs, unless that component itself accompanies the executable.
It may happen that this requirement contradicts the license restrictions of other proprietary libraries that do not normally accompany the operating system. Such a contradiction means you cannot use both them and the Library together in an executable that you distribute.
- You may place library facilities that are a work based on the Library side-by-side in a single library together with other library facilities not covered by this License, and distribute such a combined library, provided that the separate distribution of the work based on the Library and of the other library facilities is otherwise permitted, and provided that you do these two things: a) Accompany the combined library with a copy of the same work based on the Library, uncombined with any other library facilities. This must be distributed under the terms of the Sections above. b) Give prominent notice with the combined library of the fact that part of it is a work based on the Library, and explaining where to find the accompanying uncombined form of the same work.
- You may not copy, modify, sublicense, link with, or distribute the Library except as expressly provided under this License. Any attempt otherwise to copy, modify, sublicense, link with, or distribute the Library is void, and will automatically terminate your rights under this License. However, parties who have received copies, or rights, from you under this License will not have their licenses terminated so long as such parties remain in full compliance.
- You are not required to accept this License, since you have not signed it. However, nothing else grants you permission to modify or distribute the Library or its derivative works. These actions are prohibited by law if you do not accept this License. Therefore, by modifying or distributing the Library (or any work based on the Library), you indicate your acceptance of this License to do so, and all its terms and conditions for copying, distributing or modifying the Library or works based on it.
- Each time you redistribute the Library (or any work based on the Library), the recipient automatically receives a license from the original licensor to copy, distribute, link with or modify the Library subject to these terms and conditions. You may not impose any further restrictions on the recipients' exercise of the rights granted herein. You are not responsible for enforcing compliance by third parties with this License.
- If, as a consequence of a court judgment or allegation of patent infringement or for any other reason (not limited to patent issues), conditions are imposed on you (whether by court order, agreement or otherwise) that contradict the conditions of this License, they do not excuse you from the conditions of this License. If you cannot distribute so as to satisfy simultaneously your obligations under this License and any other pertinent obligations, then as a consequence you may not distribute the Library at all. For example, if a patent license would not permit royalty-free redistribution of the Library by all those who receive copies directly or indirectly through you, then the only way you could satisfy both it and this License would be to refrain entirely from distribution of the Library.
If any portion of this section is held invalid or unenforceable under any particular circumstance, the balance of the section is intended to apply, and the section as a whole is intended to apply in other circumstances.
It is not the purpose of this section to induce you to infringe any patents or other property right claims or to contest validity of any such claims; this section has the sole purpose of protecting the integrity of the free software distribution system which is implemented by public license practices. Many people have made generous contributions to the wide range of software distributed through that system in reliance on consistent application of that system; it is up to the author/donor to decide if he or she is willing to distribute software through any other system and a licensee cannot impose that choice.
This section is intended to make thoroughly clear what is believed to be a consequence of the rest of this License.
- If the distribution and/or use of the Library is restricted in certain countries either by patents or by copyrighted interfaces, the original copyright holder who places the Library under this License may add an explicit geographical distribution limitation excluding those countries, so that distribution is permitted only in or among countries not thus excluded. In such case, this License incorporates the limitation as if written in the body of this License.
- The Free Software Foundation may publish revised and/or new versions of the Lesser General Public License from time to time. Such new versions will be similar in spirit to the present version, but may differ in detail to address new problems or concerns.
Each version is given a distinguishing version number. If the Library specifies a version number of this License which applies to it and “any later version”, you have the option of following the terms and conditions either of that version or of any later version published by the Free Software Foundation. If the Library does not specify a license version number, you may choose any version ever published by the Free Software Foundation.
- If you wish to incorporate parts of the Library into other free programs whose distribution conditions are incompatible with these, write to the author to ask for permission. For software which is copyrighted by the Free Software Foundation, write to the Free Software Foundation; we sometimes make exceptions for this. Our decision will be guided by the two goals of preserving the free status of all derivatives of our free software and of promoting the sharing and reuse of software generally.
NO WARRANTY
- BECAUSE THE LIBRARY IS LICENSED FREE OF CHARGE, THERE IS NO WARRANTY FOR THE LIBRARY, TO THE EXTENT PERMITTED BY APPLICABLE LAW. EXCEPT WHEN OTHERWISE STATED IN WRITING THE COPYRIGHT HOLDERS AND/OR OTHER PARTIES PROVIDE THE LIBRARY “AS IS” WITHOUT WARRANTY OF ANY KIND, EITHER EXPRESSED OR IMPLIED, INCLUDING, BUT NOT LIMITED TO, THE IMPLIED WARRANTIES OF MERCHANTABILITY AND FITNESS FOR A PARTICULAR PURPOSE. THE ENTIRE RISK AS TO THE QUALITY AND PERFORMANCE OF THE LIBRARY IS WITH YOU. SHOULD THE LIBRARY PROVE DEFECTIVE, YOU ASSUME THE COST OF ALL NECESSARY SERVICING, REPAIR OR CORRECTION.
- IN NO EVENT UNLESS REQUIRED BY APPLICABLE LAW OR AGREED TO IN WRITING WILL ANY COPYRIGHT HOLDER, OR ANY OTHER PARTY WHO MAY MODIFY AND/OR REDISTRIBUTE THE LIBRARY AS PERMITTED ABOVE, BE LIABLE TO YOU FOR DAMAGES, INCLUDING ANY GENERAL, SPECIAL, INCIDENTAL OR CONSEQUENTIAL DAMAGES ARISING OUT OF THE USE OR INABILITY TO USE THE LIBRARY (INCLUDING BUT NOT LIMITED TO LOSS OF DATA OR DATA BEING RENDERED INACCURATE OR LOSSES SUSTAINED BY YOU OR THIRD PARTIES OR A FAILURE OF THE LIBRARY TO OPERATE WITH ANY OTHER SOFTWARE), EVEN IF SUCH HOLDER OR OTHER PARTY HAS BEEN ADVISED OF THE POSSIBILITY OF SUCH DAMAGES.
END OF TERMS AND CONDITIONS
How to Apply These Terms to Your New Libraries
If you develop a new library, and you want it to be of the greatest possible use to the public, we recommend making it free software that everyone can redistribute and change. You can do so by permitting redistribution under these terms (or, alternatively, under the terms of the ordinary General Public License).
To apply these terms, attach the following notices to the library. It is safest to attach them to the start of each source file to most effectively convey the exclusion of warranty; and each file should have at least the “copyright” line and a pointer to where the full notice is found.
Copyright (C)
This library is free software; you can redistribute it and/or modify it under the terms of the GNU Lesser General Public License as published by the Free Software Foundation; either version 2.1 of the License, or (at your option) any later version.
This library is distributed in the hope that it will be useful, but WITHOUT ANY WARRANTY; without even the implied warranty of MERCHANTABILITY or FITNESS FOR A PARTICULAR PURPOSE. See the GNU Lesser General Public License for more details.
You should have received a copy of the GNU Lesser General Public License along with this library; if not, write to the Free Software Foundation, Inc., 59 Temple Place, Suite 330, Boston, MA 02111-1307 USA
Also add information on how to contact you by electronic and paper mail.
You should also get your employer (if you work as a programmer) or your school, if any, to sign a “copyright disclaimer” for the library, if necessary. Here is a sample; alter the names:
Yoyodyne, Inc., hereby disclaims all copyright interest in the library ‘Frob’ (a library for tweaking knobs) written by James Random Hacker.
signature of Ty Coon, 1 April 1990
Ty Coon, President of Vice
That's all there is to it!
GNU GENERAL PUBLIC LICENSE
Version 2, June 1991
Copyright (C) 1989, 1991 Free Software Foundation, Inc. 59 Temple Place - Suite 330, Boston, MA 02111-1307, USA
Everyone is permitted to copy and distribute verbatim copies of this license document, but changing it is not allowed.
Preamble
The licenses for most software are designed to take away your freedom to share and change it. By contrast, the GNU General Public License is intended to guarantee your freedom to share and change free software--to make sure the software is free for all its users. This General Public License applies to most of the Free Software Foundation's software and to any other program whose authors commit to using it. (Some other Free Software Foundation software is covered by the GNU Library General Public License instead.) You can apply it to your programs, too.
When we speak of free software, we are referring to freedom, not price. Our General Public Licenses are designed to make sure that you have the freedom to distribute copies of free software (and charge for this service if you wish), that you receive source code or can get it if you want it, that you can change the software or use pieces of it in new free programs; and that you know you can do these things.
To protect your rights, we need to make restrictions that forbid anyone to deny you these rights or to ask you to surrender the rights. These restrictions translate to certain responsibilities for you if you distribute copies of the software, or if you modify it.
For example, if you distribute copies of such a program, whether gratis or for a fee, you must give the recipients all the rights that you have. You must make sure that they, too, receive or can get the source code. And you must show them these terms so they know their rights.
We protect your rights with two steps: (1) copyright the software, and (2) offer you this license which gives you legal permission to copy, distribute and/or modify the software.
Also, for each author's protection and ours, we want to make certain that everyone understands that there is no warranty for this free software. If the software is modified by someone else and passed on, we want its recipients to know that what they have is not the original, so that any problems introduced by others will not reflect on the original authors' reputations.
Finally, any free program is threatened constantly by software patents. We wish to avoid the danger that redistributors of a free program will individually obtain patent licenses, in effect making the program proprietary. To prevent this, we have made it clear that any patent must be licensed for everyone's free use or not licensed at all.
The precise terms and conditions for copying, distribution and modification follow.
TERMS AND CONDITIONS FOR COPYING, DISTRIBUTION AND MODIFICATION
- This License applies to any program or other work which contains a notice placed by the copyright holder saying it may be distributed under the terms of this General Public License. The "Program", below, refers to any such program or work, and a "work based on the Program" means either the Program or any derivative work under copyright law: that is to say, a work containing the Program or a portion of it, either verbatim or with modifications and/or translated into another language. (Hereinafter, translation is included without limitation in the term "modification".) Each licensee is addressed as "you".
Activities other than copying, distribution and modification are not covered by this License; they are outside its scope. The act of running the Program is not restricted, and the output from the Program is covered only if its contents constitute a work based on the Program (independent of having been made by running the Program). Whether that is true depends on what the Program does.
- You may copy and distribute verbatim copies of the Program's source code as you receive it, in any medium, provided that you conspicuously and appropriately publish on each copy an appropriate copyright notice and disclaimer of warranty; keep intact all the notices that refer to this License and to the absence of any warranty; and give any other recipients of the Program a copy of this License along with the Program. You may charge a fee for the physical act of transferring a copy, and you may at your option offer warranty protection in exchange for a fee.
- You may modify your copy or copies of the Program or any portion of it, thus forming a work based on the Program, and copy and distribute such modifications or work under the terms of Section 1 above, provided that you also meet all of these conditions: a) You must cause the modified files to carry prominent notices stating that you changed the files and the date of any change.
b) You must cause any work that you distribute or publish, that in whole or in part contains or is derived from the Program or any part thereof, to be licensed as a whole at no charge to all third parties under the terms of this License. c) If the modified program normally reads commands interactively when run, you must cause it, when started running for such interactive use in the most ordinary way, to print or display an announcement including an appropriate copyright notice and a notice that there is no warranty (or else, saying that you provide a warranty) and that users may redistribute the program under these conditions, and telling the user how to view a copy of this License. (Exception: if the Program itself is interactive but does not normally print such an announcement, your work based on the Program is not required to print an announcement.)
These requirements apply to the modified work as a whole. If identifiable sections of that work are not derived from the Program, and can be reasonably considered independent and separate works in themselves, then this License, and its terms, do not apply to those sections when you distribute them as separate works. But when you distribute the same sections as part of a whole which is a work based on the Program, the distribution of the whole must be on the terms of this License, whose permissions for other licensees extend to the entire whole, and thus to each and every part regardless of who wrote it.
Thus, it is not the intent of this section to claim rights or contest your rights to work written entirely by you; rather, the intent is to exercise the right to control the distribution of derivative or collective works based on the Program.
In addition, mere aggregation of another work not based on the Program with the Program (or with a work based on the Program) on a volume of a storage or distribution medium does not bring the other work under the scope of this License.
- You may copy and distribute the Program (or a work based on it, under Section 2) in object code or executable form under the terms of Sections 1 and 2 above provided that you also do one of the following:
a) Accompany it with the complete corresponding machine-readable source code, which must be distributed under the terms of Sections 1 and 2 above on a medium customarily used for software interchange; or, b) Accompany it with a written offer, valid for at least three years, to give any third party, for a charge no more than your cost of physically performing source distribution, a complete machine-readable copy of the corresponding source code, to be distributed under the terms of Sections 1 and 2 above on a medium customarily used for software interchange; or, c) Accompany it with the information you received as to the offer to distribute corresponding source code. (This alternative is allowed only for noncommercial distribution and only if you received the program in object code or executable form with such an offer, in accord with Subsection b above.)
The source code for a work means the preferred form of the work for making modifications to it. For an executable work, complete source code means all the source code for all modules it contains, plus any associated interface definition files, plus the scripts used to control compilation and installation of the executable. However, as a special
exception, the source code distributed need not include anything that is normally distributed (in either source or binary form) with the major components (compiler, kernel, and so on) of the operating system on which the executable runs, unless that component itself accompanies the executable.
If distribution of executable or object code is made by offering access to copy from a designated place, then offering equivalent access to copy the source code from the same place counts as distribution of the source code, even though third parties are not compelled to copy the source along with the object code.
- You may not copy, modify, sublicense, or distribute the Program except as expressly provided under this License. Any attempt otherwise to copy, modify, sublicense or distribute the Program is void, and will automatically terminate your rights under this License. However, parties who have received copies, or rights, from you under this License will not have their licenses terminated so long as such parties remain in full compliance.
- You are not required to accept this License, since you have not signed it. However, nothing else grants you permission to modify or distribute the Program or its derivative works. These actions are prohibited by law if you do not accept this License. Therefore, by modifying or distributing the Program (or any work based on the Program), you indicate your acceptance of this License to do so, and all its terms and conditions for copying, distributing or modifying the Program or works based on it.
- Each time you redistribute the Program (or any work based on the Program), the recipient automatically receives a license from the original licensor to copy, distribute or modify the Program subject to these terms and conditions. You may not impose any further restrictions on the recipients' exercise of the rights granted herein. You are not responsible for enforcing compliance by third parties to this License.
- If, as a consequence of a court judgment or allegation of patent infringement or for any other reason (not limited to patent issues), conditions are imposed on you (whether by court order, agreement or otherwise) that contradict the conditions of this License, they do not excuse you from the conditions of this License. If you cannot distribute so as to satisfy simultaneously your obligations under this License and any other pertinent obligations, then as a consequence you may not distribute the Program at all. For example, if a patent license would not permit royalty-free redistribution of the Program by all those who receive copies directly or indirectly through you, then the only way you could satisfy both it and this License would be to refrain entirely from distribution of the Program.
If any portion of this section is held invalid or unenforceable under any particular circumstance, the balance of the section is intended to apply and the section as a whole is intended to apply in other circumstances.
It is not the purpose of this section to induce you to infringe any patents or other property right claims or to contest validity of any such claims; this section has the sole purpose of protecting the integrity of the free software distribution system, which is implemented by public license practices. Many people have made generous contributions to the wide range of software distributed through that system in reliance on consistent application of that system; it is up to the author/donor to decide if he or she is willing to distribute software through any other system and a licensee cannot impose that choice.
This section is intended to make thoroughly clear what is believed to be a consequence of the rest of this License.
- If the distribution and/or use of the Program is restricted in certain countries either by patents or by copyrighted interfaces, the original copyright holder who places the Program under this License may add an explicit geographical distribution limitation excluding those countries, so that distribution is permitted only in or among countries not thus excluded. In such case, this License incorporates the limitation as if written in the body of this License.
- The Free Software Foundation may publish revised and/or new versions of the General Public License from time to time. Such new versions will be similar in spirit to the present version, but may differ in detail to address new problems or concerns.
Each version is given a distinguishing version number. If the Program specifies a version number of this License which applies to it and “any later version”, you have the option of following the terms and conditions either of that version or of any later version published by the Free Software Foundation. If the Program does not specify a version number of this License, you may choose any version ever published by the Free Software Foundation.
- If you wish to incorporate parts of the Program into other free programs whose distribution conditions are different, write to the author to ask for permission. For software which is copyrighted by the Free Software Foundation, write to the Free Software Foundation; we sometimes make exceptions for this. Our decision will be guided by the two goals of preserving the free status of all derivatives of our free software and of promoting the sharing and reuse of software generally
NO WARRANTY
- BECAUSE THE PROGRAM IS LICENSED FREE OF CHARGE, THERE IS NO WARRANTY FOR THE PROGRAM, TO THE EXTENT PERMITTED BY APPLICABLE LAW. EXCEPT WHEN OTHERWISE STATED IN WRITING THE COPYRIGHT HOLDERS AND/OR OTHER PARTIES PROVIDE THE PROGRAM "AS IS" WITHOUT WARRANTY OF ANY KIND, EITHER EXPRESSED OR IMPLIED, INCLUDING, BUT NOT LIMITED TO, THE IMPLIED WARRANTIES OF MERCHANTABILITY AND FITNESS FOR A PARTICULAR PURPOSE. THE ENTIRE RISK AS TO THE QUALITY AND PERFORMANCE OF THE PROGRAM IS WITH YOU. SHOULD THE PROGRAM PROVE DEFECTIVE, YOU ASSUME THE COST OF ALL NECESSARY SERVICING, REPAIR OR CORRECTION.
- IN NO EVENT UNLESS REQUIRED BY APPLICABLE LAW OR AGREED TO IN WRITING WILL ANY COPYRIGHT HOLDER, OR ANY OTHER PARTY WHO MAY MODIFY AND/OR REDISTRIBUTE THE PROGRAM AS PERMITTED ABOVE, BE LIABLE TO YOU FOR DAMAGES, INCLUDING ANY GENERAL, SPECIAL, INCIDENTAL OR CONSEQUENTIAL DAMAGES ARISING OUT OF THE USE OR INABILITY TO USE THE PROGRAM (INCLUDING BUT NOT LIMITED TO LOSS OF DATA OR DATA BEING RENDERED INACCURATE OR LOSSES SUSTAINED BY YOU OR THIRD PARTIES OR A FAILURE OF THE PROGRAM TO OPERATE WITH ANY OTHER PROGRAMS), EVEN IF SUCH HOLDER OR OTHER PARTY HAS BEEN ADVISED OF THE POSSIBILITY OF SUCH DAMAGES.
END OF TERMS AND CONDITIONS
How to Apply These Terms to Your New Programs
If you develop a new program, and you want it to be of the greatest possible use to the public, the best way to achieve this is to make it free software which everyone can redistribute and change under these terms.
To do so, attach the following notices to the program. It is safest to attach them to the start of each source file to most effectively convey the exclusion of warranty; and each file should have at least the “copyright” line and a pointer to where the full notice is found.
Copyright (C)
This program is free software; you can redistribute it and/or modify it under the terms of the GNU General Public License as published by the Free Software Foundation; either version 2 of the License, or (at your option) any later version.
This program is distributed in the hope that it will be useful, but WITHOUT ANY WARRANTY; without even the implied warranty of MERCHANTABILITY or FITNESS FOR A PARTICULAR PURPOSE. See the GNU General Public License for more details.
You should have received a copy of the GNU General Public License along with this program; if not, write to the Free Software Foundation, Inc., 59 Temple Place - Suite 330, Boston, MA 02111-1307, USA.
Also add information on how to contact you by electronic and paper mail.
If the program is interactive, make it output a short notice like this when it starts in an interactive mode:
Gnomovision version 69, Copyright (C) year name of author
Gnomovision comes with ABSOLUTELY NO WARRANTY; for details
type ‘show w’. This is free software, and you are welcome to redistribute it under certain conditions; type ‘show c’ for details.
The hypothetical commands ‘show w’ and ‘show c’ should show the appropriate parts of the General Public License. Of course, the commands you use may be called something other than ‘show w’ and ‘show c’; they could even be mouse-clicks or menu items--whatever suits your program.
You should also get your employer (if you work as a programmer) or your school, if any, to sign a “copyright disclaimer” for the program, if necessary. Here is a sample; alter the names:
Yoyodyne, Inc., hereby disclaims all copyright interest in the program ‘Gnomovision’ (which makes passes at compilers) written by James Hacker.
, 1 April 1989
Ty Coon, President of Vice
This General Public License does not permit incorporating your program into proprietary programs. If your program is a subroutine library, you may consider it more useful to permit linking proprietary applications with the library. If this is what you want to do, use the GNU Library General Public License instead of this License.
Specifications
Supported file format
| Music (including podcasts*1) | |
| Audio Formats (Codec) | MP3 Media File format: MP3 (MPEG-1 Layer3) file formatFile extension: .mp3Bit rate: 32 to 320 kbps (Supports variable bit rate (VBR))Sampling frequency*2: 32, 44.1, 48 kHz |
| WMA Media File format: ASF file formatFile extension: .wmaBit rate: 32 to 192 kbps (Supports variable bit rate (VBR))Sampling frequency*2: 44.1 kHz* Compatible with WM-DRM 10 | |
| AAC-LC*3 Media File format: MP4 file formatFile extension: .mp4, .m4a, .3gpBit rate: 16 to 320 kbps (Supports variable bit rate (VBR))*4Sampling frequency*2: 8, 11.025, 12, 16, 22.05, 24, 32, 44.1, 48 kHz | |
| Linear PCM Media File format: Wave-Riff file formatFile extension: .wavBit rate: 1,411 kbpsSampling frequency*2: 44.1 kHz | |
| Video (including podcasts*1 ) | ||
| Video Formats (Codec) | Frame rate: Max. 30 fpsResolution: Max. 720 × 480*5 | |
| AVC(H.264/AVC) | Media File format: MP4 file format, “Memory Stick” Video FormatFile extension: .mp4, .m4vProfile: Baseline ProfileLevel: 1.2, 1.3, 2, 2.1, 2.2, 3Bit rate: Max. 10 Mbps | |
| MPEG-4 Media | File format: MP4 file format, “Memory Stick” Video FormatFile extension: .mp4, .m4vProfile: Simple ProfileBit rate: Max. 6 Mbps | |
| WindowsMedia Video 9*6 | Media File format: ASF file formatFile extension: .wmvProfile: VC1 Simple Profile, Main ProfileBit rate: Max. 6 Mbps | |
| Audio Formats (Codec) | AAC-LC(for AVC,MPEG-4) | Channel number: Max. 2 channelsSampling frequency *2 : 24, 32, 44.1, 48 kHzBit rate: Max. 288 kbps / channel |
| WMA(for WindowsMedia Video9) | Bit rate: 32 to 192 kbps (Supports variable bit rate (VBR))Sampling frequency *2 : 44.1 kHz* Compatible with WM-DRM 10 | |
| File size Max. 2 GB | ||
| The number of files Max. 2,000 | ||
Photo*7
| Photo Format (Codec) | JPEG Media File format: Compatible with DCF2.0/Exif 2.21 file formatFile extension: .jpgProfile: Baseline ProfileNumber of pixels: Max. 4,096 × 4,096 pixels (16,000,000 pixels) |
The number of files Max. 20,000
*1 The maximum recordable number of podcasts is 10,000.
2 Sampling frequency may not correspond to all encoders.
3 Copyright protected AAC-LC files cannot be played back.
4 Non-standard bit rates or non-guaranteed bit rates are included depending on the sampling frequency.
5 These numbers indicate the maximum resolution of playable video, and do not indicate the player's display resolution. The display resolution is 320 × 240.
6 Some WMV files can be played back only by transferring using Windows Media Player 11.
Some photo files cannot be played back, depending on their file formats.
Maximum recordable number of songs and time (Approx.)
The approximate times are based on the case in which you transfer or record only 4-minute songs (not including videos and photos) in the MP3 format. Other playable audio file format song numbers and times may differ from MP3 format.
NWZ-S744 NWZ-S745
| Bit rate Number Time Number Time | ||
| 48 kbps 4,950 330 hr. 00 min. 10,000 666 hr. 40 min. | ||
| 64 kbps 3,650 243 hr. 20 min. 7,450 496 hr. 40 min. | ||
| 128 kbps 1,800 120 hr. 00 min. 3,700 246 hr. 40 min. | ||
| 256 kbps 925 | 61 hr. 40 min. | 1,850 123 hr. 20 min. |
| 320 kbps 740 | 49 hr. 20 min. | 1,500 100 hr. 00 min. |
Continued ↓
Maximum recordable time of videos (Approx.)
The approximate recordable times are estimated in the case where only videos are transferred. The time may differ, depending on the conditions under which the player is used.
| NWZ-S744 NWZ-S745 | |
| Bit rate Time Time | |
| Video Format: 384 kbpsAudio Format: 128 kbps | 29 hr. 20 min. 59 hr. 40 min. |
| Video Format: 768 kbpsAudio Format: 128 kbps | 16 hr. 40 min. 34 hr. 00 min. |
Maximum recordable number of photos that can be transferred (Approx.)
Max. 20,000
Recordable number of photos may be less depending on file sizes.
Capacity (User available capacity) *1
NWZ-S744: 8 GB (Approx. 6.99 GB = 7,513,243,648 bytes)
NWZ-S745: 16 GB (Approx. 14.1 GB = 15,224,668,160 bytes)
*1 Available storage capacity of the player may vary.
A portion of the memory is used for data management functions.
Output (headphones)
Frequency response
20 to 20,000 Hz (when playing data file, single signal measurement)
Total Noise Suppression Ratio (TNSR) *1
Approx. 10 dB 4
*1 Under the Sony measurement standard.
*2 Equivalent to approx. 90.0% reduction of energy of sound compared with not wearing headphones.
FM radio
FM Frequency range
87.5 to 108.0 MHz
IF (FM)
128 kHz
Antenna
Headphone cord antenna
Interface
Headphone: Stereo mini-jack WM-PORT (multiple connecting terminal): 22 pins Hi-Speed USB (USB 2.0 compliant)
Operating temperature
5°C to 35°C (41°F to 95°F)
Power source
• Built-in rechargeable lithium-ion battery - USB power (from a computer via the supplied USB cable)
Charging time
USB-based charging Approx. 3 hours (full charge), Approx. 1.5 hours (approx. 80%)
Continued ↓
Battery life (continuous playback)
Actual battery life may vary depending on settings. The estimated battery usage hours shown below are based on typical usage conditions with “Basic setting of battery life measurement (Longer battery life setting)” as shown in the table below. Note that even if the player is turned off for an extended period, a small amount of battery power is still consumed. Battery life may vary depending on volume setting, conditions of use, and ambient temperature.
| Music | |
| Playback at MP3 128 kbps Approx. 42 hours | |
| Playback at WMA 128 kbps Approx. 43 hours | |
| Playback at AAC-LC 128 kbps Approx. 42 hours | |
| Playback at Linear PCM 1,411 kbps Approx. 37 hours | |
| Video | |
| Playback at MPEG-4 384 kbps Approx. 10 hours | |
| Playback at AVC Baseline 384 kbps Approx. 10 hours | |
| Playback at WMV 384 kbps Approx. 10 hours | |
| At receiving FM broadcasting | Approx. 20 hours |
| Setting Default setting Basic setting of battery | |||
| life measurement (Longer battery life setting) | |||
| Noise Canceling [Noise Canceling: On/Off] | *1 | [On] [Off] | |
| Common settings [Screen Off Timer] | *2 | [After 30 Sec] [After 30 Sec] | |
| [Brightness]*3 | [3] [3] | ||
| [Battery Care]*4 | [Off] | [Off] | |
| Music settings | [Equalizer]*5 | [None] [None] | |
| [VPT(Surround)]*5 | [None] [None] | ||
| [DSEE(Sound Enhance)]*5 | [Off] | [Off] | |
| [Clear Stereo]*5 | [Off] | [Off] | |
| [Dynamic Normalizer]*5 | [Off] | [Off] | |
| [DPC (Speed Control)]*6 | [Off] | [Off] | |
| [TV Output(Music)]*7 | [Off] | [Off] | |
| Video Settings | [TV Output(Video)]*8 | [Off] | [Off] |
*1 The [On] setting shortens the battery life about 25% compared with the [Off] setting.
*2 The [Off] setting shortens the battery life about 75% compared with the [After 30 Sec] setting.
*3 The [5] setting shortens the battery life about 45% compared with the [3] setting.
*4 The [On] setting shortens the battery life about 10% compared with the [Off] setting.
*5 Setting [Equalizer] to other than [None], [VPT(Surround)] to other than [None], [DSEE(Sound Enhance)] to [On], [Clear Stereo] to [On] and [Dynamic Normalizer] to [On] shortens the battery life about 50% compared with setting them to [None] or [Off].
The [x2.0] setting shortens the battery life by about 70% compared with the [Off] setting.
The [On] setting with displaying the player's screen on a television shortens the battery life by about 25% compared with the [Off] setting.
The [On] setting with displaying the player's screen on a television shortens the battery life by about 50% compared with the [Off] setting.
Display
2-inch, TFT color display with white LED-backlight, QVGA (240 × 320 pixels), 262,144 colors
Dimensions (w/h/d, projecting parts not included)
39.7 × 92.0 × 7.5 mm (1 5/8 × 3 5/8 × 5/16 inches)
Dimension (w/h/d)
41.0 × 92.0 × 7.9 mm (1 5/8 × 3 5/8 × 5/16 inches)
Mass
Approx. 53 g (Approx. 1.9 oz)
Supplied items
- Headphones (1)
- Earbuds (Size S, L) (1)
- USB cable (1)
- Attachment (1) Use when connecting the player to the optional cradle, etc. • Audio input cable (1)
- Plug adaptor for in-flight use (single/dual) (1)
- Quick Start Guide (1)
- Software (1) The software is stored in the built-in flash memory of the player, and includes the following items. For details on how to install, refer to “Quick Start Guide.”
- Content Transfer
- WALKMAN Guide
- Operation Guide, etc.
Continued ↓
System Requirements
- Computer
IBM PC/AT or compatible computer preinstalled with the following Windows operating systems *1 :
Windows XP Home Edition (Service Pack 2 or later) / Windows XP Professional (Service Pack 2 or later) / Windows Vista Home Basic (Service Pack 1 or later) / Windows Vista Home Premium (Service Pack 1 or later) / Windows Vista Business (Service Pack 1 or later) / Windows Vista Ultimate (Service Pack 1 or later)
Supported 64 bit version OS for Windows Vista.
Not supported by OSs other than above.
*1 Excluding OS Versions not supported by Microsoft.
- CPU: Pentium III 450 MHz or higher (Pentium III 800 MHz or higher for Windows Vista) • RAM: 256 MB or more (512 MB or more for Windows Vista)
- Hard Disk drive: 380 MB or more of available space
- Display:
- Screen Resolution: 800 x 600 pixels (or higher) (recommended 1,024 x 768 or higher)
- Colors: 8 bit or higher (16 bit recommended)
- CD-ROM drive (supporting Digital Music CD playback capabilities using WDM)
- Sound board
- USB connector (Hi-Speed USB is recommended)
- Internet Explorer 7.0 and Windows Media Player 11 are required.
- Broadband Internet connection is required to use Electronic Music Distribution (EMD) or to visit the web site.
We do not guarantee operation for all computers even if they meet the above System Requirements.
Not supported by the following environments:
– Personally constructed computers or operating systems - An environment that is an upgrade of the original manufacturer-installed operating system - Multi-boot environment - Multi-monitor environment - Macintosh
Index
Symbols
5-way button 6,13
(Repeat) 49
SHUF (Shuffle) 49
SHUF (Shuffle&Repeat) 49
1(Repeat 1 Song) 49
++H(Heavy) 50
++P (Pop) 50
J(Jazz) 50
++U (Unique) 50
111 1 (Custom 1) 50
++2 (Custom 2) 50
00S (Studio) 52
Coll (Live) 52
C (Club) 52
(Arena) 52
CDM (Matrix) 52
( Karaoke ) 52
□(Selected Range) 50
[16:9] 64
[4:3] 64
A
A-B repeat 56
AAC 110
AAC-LC 153
Adobe Reader 2
[Album] 42
[Album Display Format] 54
Album scroll 42
[All Range] 50
[All Songs] 42
[Arena] 52
[Artist] 42
Attachment 158
Audio format ....110, 153
[Auto Preset] 88
AVC 111,153
[AVLS (Volume Limit)] .....100
B
BACK/HOME button 6
Battery 19,109
[Battery Care] 106
[Beep Settings] 100
Bit Rate 110
[Brightness] 102
C
Capacity 155
Charge 19
[Clear Stereo] 53
[Clock Settings] ......22, 104
[Club] 52
Computer 159
Content Transfer 18
Cover art 42
[Custom 1] 50
[Custom 2] 50
D
Data 112
Date and Time 22
[Date Display Format] 105
Delete Photo 83
Podcast 76
Song 46
Video 65
[Delete All Podcasts] 77
[Delete Episode] 76
[Delete Podcast] 76
[Delete This Episode] 76
[Delete This Podcast] 76
[Detailed Information] 48
Display 6,10,119
[DPC (Speed Control)] 57
[DSEE (Sound Enhance)] 53
[Dynamic Normalizer] 54
E
Earbuds 8
Episode 71
Episode list 74
[Equalizer] 50
Explorer 30, 35, 112
[External Input Mode] 95
Continued ↓
F
Firmware 113
[FM Radio] 10,86
FM Radio 124
[Folder] 42
[Format] 107
G
[Genre] 42
H
Headphone jack 6
Headphones 6,8
[Heavy] 50
HOLD switch 7
Home menu 10, 13
1
Information 99
Information area 12
Initialize (Format) 107
Interval 62
J
[Jazz] 50
JPEG 111,154
K
[Karaoke] 52
L
[Language Learning Mode] ..... 55
[Language Settings] .....21, 108
Linear PCM 110, 153
[Live] 52
M
[Matrix] 52
Messages 127
[Model:] 99
[Mono/Auto] 91
MP3 110,153
MPEG-4 111, 153
[Music] 10,38
N
[NC Modes] 95, 97
[Noise Canceling] 94
[NTSC] 45,64
[NTSC/PAL settings] .....45, 64
0
[On-Hold Display] 70
OPTION/PWR OFF button ...... 6
Option menu ... 16, 47, 66, 78, 84, 90
[Order of Video List] 70
P
[PAL] 45,64
Photo format 111, 154
[Photo List Display Frmt.] 84
[Photo List Format] 85
[Photos] 10,80
[Playback range] 50
Playback screen 39,59,72
[Playlists] 42
[Play Mode] 49
Podcast 71,125
Podcast list 75
[Podcasts] 71
[Pop] 50
Power 6,9,19,109,120
Q
Quick Replay 56
[Quiet Mode] 97
R
Radio 86
Recharge 19
[Release Year] 42
Remaining battery 19
[Repeat] 49
[Repeat 1 Song] 49
[Reset All Settings] 106
RESET button 7
Reset the player 114
RSS 71
S
[Scan Sensitivity] 91
[Scene Scroll] 61
Screen (display) 6,119
[Screen Off Timer] 101
Search for songs 41
[Selected Range] 50
[Set Date-Time] ......22, 104
[Set Noise Cancel Level] 98
[Settings] 10
Common 99
FM Radio 91
Music 49
Noise Cancel 98
Photo 85
Video 67
[Shuffle] 49
[Shuffle&Repeat] 49
Software 18
Sound quality 50
Store computer data 112
Strap hole 7
[Studio] 52
Supplied items 158
T
Thumbnail (cover art) 42
Thumbnail (photo) 85
Thumbnail (video) 61
[Time Display Format] 105
Time setting 22,104
[To Playback Screen] 16
[Total Photos:] 99
[Total Songs:] 99
[Total Videos:] 99
Transferring data 23, 32
Troubleshooting 114
Turn on and off 9
[TV Output (Music)] 44
[TV Output (Video)] 63
[TV Output Size] 64
U
[Unique] 50
[Unit Information] 99
Upgrading 113
USB cable 6,26
V
Video format ....111, 153
[Videos] 10,58
VOL+/- button 6
Volume 6
[VPT (Surround)] 52
W
[Wallpaper Settings] 103
Windows Explorer ......30, 35, 112
Windows Media Player 18
WM-PORT 6
WMA 18,110,153
WMV 18,111,153
Z
[Zoom Settings] 67


- NOTE
- BROWSING THE OPERATION GUIDE
- TO USE THE BUTTONS IN THE OPERATION GUIDE
- HINT
- TO CHANGE THE PAGE LAYOUT
- CONTINUOUS
- SINGLE PAGE
- TABLE OF CONTENTS
- BASIC OPERATIONS AND SCREENS
- PREPARING THE PLAYER
- TRANSFERRING MUSIC
- TRANSFERRING VIDEOS/PHOTOS/PODCASTS
- PLAYING MUSIC
- USING THE LANGUAGE LEARNING FUNCTION
- WATCHING VIDEOS
- ENJOYING PODCAST
- VIEWING PHOTOS
- FM LISTENING TO FM RADIO
- USING THE NOISE CANCELING FUNCTION
- COMMON SETTINGS
- USEFUL FACTS
- TROUBLESHOOTING
- ADDITIONAL INFORMATION
- PARTS AND CONTROLS
- BACK/HOME BUTTON
- WAY BUTTON
- HEADPHONE JACK
- ABOUT THE NOISE CANCELING FUNCTION
- WM-PORT JACK
- DISPLAY
- VOL + *1/- BUTTON
- OPTION/PWR OFF BUTTON
- HOLD SWITCH
- STRAP HOLE
- RESET BUTTON
- INSTALLING THE EARBUDS
- EARBUD SIZES (INSIDE COLOR)
- TO DETACH AN EARBUD
- TO ATTACH AN EARBUD
- TURNING THE PLAYER ON AND OFF
- TO TURN ON THE PLAYER
- TO TURN OFF THE PLAYER
- ABOUT THE HOME MENU
- ABOUT THE INFORMATION AREA
- HOW TO USE THE HOME MENU
- PRESS AND HOLD THE BACK/HOME BUTTON
- PRESS THE ▲/▼/◄/► BUTTON TO SELECT ♪ [MUSIC], AND THEN PRESS THE ►II BUTTON TO CONFIRM
- PRESS THE ▲/▼/◄/► BUTTON TO SELECT [ALBUM], AND THEN PRESS THE ►II BUTTON TO CONFIRM
- HOW TO USE THE OPTION MENU
- FROM THE MUSIC PLAYBACK SCREEN, PRESS THE OPTION/PWR OFF BUTTON
- ABOUT THE SOFTWARE
- BUNDLED SOFTWARE
- CONTENT TRANSFER
- WALKMAN GUIDE
- COMPATIBLE SOFTWARE
- WINDOWS MEDIA PLAYER
- CHARGING THE BATTERY
- ABOUT THE [BATTERY CARE] MODE
- ABOUT THE BATTERY INDICATOR
- SELECTING THE DISPLAY LANGUAGE
- FROM THE HOME MENU, SELECT [SETTINGS] DESIRED LANGUAGE SETTING
- →[LANGUAGE SETTINGS] →
- SETTING THE DATE AND TIME
- SELECTING THE WAY TO TRANSFER MUSIC
- A TRANSFERRING MUSIC FROM CDS USING WINDOWS MEDIA PLAYER 11 (P. 24)
- B TRANSFERRING MUSIC FROM ITUNES, ETC., USING CONTENT TRANSFER (P. 28)
- TRANSFERRING MUSIC BY DRAG-AND-DROP USING WINDOWS EXPLORER (P. 30)
- A TRANSFERRING MUSIC USING WINDOWS MEDIA PLAYER
- IMPORTING MUSIC FROM CDS
- CLICK [START RIP]
- START UP WINDOWS MEDIA PLAYER 11, AND THEN CONNECT THE PLAYER TO YOUR COMPUTER USING THE SUPPLIED USB CABLE
- CLICK [CANCEL]
- B TRANSFERRING MUSIC USING CONTENT TRANSFER
- CONNECT THE PLAYER TO YOUR COMPUTER USING THE SUPPLIED USB CABLE
- START UP ITUNES, ETC
- SELECT THE DESIRED SONGS FROM ITUNES, ETC., AND DRAG-AND-DROP THEM TO CONTENT TRANSFER
- © TRANSFERRING MUSIC USING WINDOWS EXPLORER
- DRAG-AND-DROP FILES OR FOLDERS INTO THE [MUSIC] FOLDER, OR ONE OF ITS SUBFOLDERS
- SELECTING THE WAY TO TRANSFER VIDEOS/PHOTOS/PODCASTS
- A TRANSFERRING VIDEOS/PHOTOS/PODCASTS USING CONTENT TRANSFER (P. 33)
- B TRANSFERRING VIDEOS/PHOTOS/PODCASTS BY DRAG-AND-DROP USING WINDOWS EXPLORER (P. 35)
- TRANSFERRING VIDEOS/PHOTOS USING WINDOWS MEDIA PLAYER
- A TRANSFERRING VIDEOS/PHOTOS/PODCASTS USING CONTENT TRANSFER
- SELECT THE DESIRED VIDEOS/PHOTOS/PODCASTS FROM WINDOWS EXPLORER, AND DRAG-AND-DROP THEM TO CONTENT TRANSFER
- B TRANSFERRING VIDEOS/PHOTOS/PODCASTS USING WINDOWS EXPLORER
- CLICK [START] – [MY COMPUTER] OR [COMPUTER] – [WALKMAN] – [STORAGE MEDIA], AND THEN SELECT THE [VIDEO], [PICTURE], [PICTURES], [DCIM] OR [PODCASTS] FOLDER
- DRAG-AND-DROP FILES OR FOLDERS INTO THE [VIDEO], [PICTURE], [PICTURES], [DCIM] OR [PODCASTS] FOLDER OR ONE OF ITS SUBFOLDERS
- PLAYING MUSIC [MUSIC]
- FROM THE HOME MENU, SELECT [MUSIC]
- SELECT DESIRED SEARCH METHOD → DESIRED SONG
- MUSIC PLAYBACK SCREEN
- OPERATIONS ON THE MUSIC PLAYBACK SCREEN
- ICONS WHICH APPEAR BY PRESSING THE OPTION/PWR OFF BUTTON
- MUSIC LIST SCREEN
- SEARCHING FOR SONGS
- BROWSING COVER ARTS TO SELECT AN ALBUM (ALBUM SCROLL)
- PRESS THE ▲/▼ BUTTON TO BROWSE ALBUM COVERS
- SELECT THE COVER ART OF THE DESIRED ALBUM, THEN PRESS THE ▶II BUTTON
- TO CANCEL THE BROWSING
- ENJOYING MUSIC PLAYBACK ON A TELEVISION
- OUTPUTTING THE MUSIC PLAYBACK SCREEN AND AUDIO TO A TELEVISION [TV OUTPUT(MUSIC)]
- CONNECT THE PLAYER AND A TELEVISION USING THE OPTIONAL VIDEO/AUDIO OUTPUT CABLE (WMC-NWV10)
- FROM THE HOME MENU, SELECT SETTINGS] [MUSIC SETTINGS] [TV OUTPUT(MUSIC)] [ON]
- SWITCHING THE TELEVISION SIGNAL FORMAT [NTSC/PAL SETTINGS]
- DELETING SONGS
- USING THE MUSIC OPTION MENU
- DISPLAYING THE DETAILED INFORMATION SCREEN [DETAILED INFORMATION]
- CHANGING THE MUSIC SETTINGS
- SETTING THE PLAY MODE [PLAY MODE]
- SONGS TO BE PLAYED BACK DIFFER DEPENDING ON THE [PLAYBACK RANGE] SETTINGS (P. 50)
- YOU CAN SET THE PLAYBACK RANGE OF SONGS
- YOU CAN SET THE SOUND QUALITY ACCORDING TO THE MUSIC GENRE, ETC
- CUSTOMIZING SOUND QUALITY
- CUSTOMIZING THE SURROUND SOUND [VPT(SURROUND)]
- LISTENING WITH DSEE (SOUND ENHANCE) [DSEE(SOUND ENHANCE)]
- FROM THE HOME MENU, SELECT SETTINGS] → [MUSIC SETTINGS] → [DSEE(SOUND ENHANCE)] → DESIRED DSEE (SOUND ENHANCE) TYPE
- LISTENING WITH CLEAR STEREO [CLEAR STEREO]
- FROM THE HOME MENU, SELECT SETTINGS] → [MUSIC SETTINGS] → [CLEAR STEREO] → DESIRED CLEAR STEREO TYPE
- ADJUSTING THE VOLUME LEVEL [DYNAMIC NORMALIZER]
- SELECTING THE ALBUM DISPLAY FORMAT [ALBUM DISPLAY FORMAT]
- ACTIVATING THE LANGUAGE LEARNING FUNCTION
- MUSIC PLAYBACK SCREEN WITH LANGUAGE LEARNING ACTIVATED
- REWINDING SLIGHTLY [QUICK REPLAY]
- PRESS THE ▲ BUTTON DURING PLAYBACK ON THE MUSIC PLAYBACK SCREEN
- PLAYING BACK A SPECIFIED SECTION REPEATEDLY (A-B REPEAT)
- PRESS THE ▼ BUTTON TO SPECIFY THE STARTING POINT OF A-B REPEAT
- PRESS THE ▼ BUTTON TO SPECIFY THE ENDING POINT OF THE A-B REPEAT
- A-B REPEAT OPERATIONS
- ADJUSTING THE PLAYBACK SPEED (DPC)
- FROM THE HOME MENU, SELECT [SETTINGS] → [MUSIC SETTINGS] → [DPC (SPEED CONTROL)] → DESIRED SETTING TYPE
- PLAYING A VIDEO [VIDEOS]
- FROM THE HOME MENU, SELECT [VIDEOS]
- SELECT DESIRED ITEM → DESIRED VIDEO
- VIDEO PLAYBACK SCREEN
- OPERATIONS ON THE VIDEO PLAYBACK SCREEN
- VIDEO LIST SCREEN
- ICONS OF VIDEOS
- OPERATIONS ON THE VIDEO LIST SCREEN
- SEARCHING FOR VIDEOS
- BROWSING SCENES (SCENE SCROLL)
- ENJOYING VIDEOS ON A TELEVISION
- OUTPUTTING VIDEOS TO A TELEVISION [TV OUTPUT(VIDEO)]
- CONNECT THE PLAYER TO A TELEVISION USING THE OPTIONAL VIDEO/AUDIO OUTPUT CABLE (WMC-NWV10)
- FROM THE HOME MENU, SELECT [SETTINGS] → [VIDEO SETTINGS] → [TV OUTPUT(VIDEO)] → [ON]
- SELECTING THE TELEVISION ASPECT RATIO [TV OUTPUT SIZE]
- DELETING VIDEOS
- DELETING CURRENTLY PLAYING VIDEO
- DELETING VIDEOS BY SELECTING FROM A LIST
- USING THE VIDEO OPTION MENU
- CHANGING THE VIDEO SETTINGS
- SETTING THE ZOOM FUNCTION [ZOOM SETTINGS]
- PLAYING ONLY VIDEO SOUND [ON-HOLD DISPLAY]
- ARRANGING THE VIDEO LIST [ORDER OF VIDEO LIST]
- PLAYING PODCAST [PODCASTS]
- WHAT IS A PODCAST
- PLAYING PODCAST
- FROM THE HOME MENU, SELECT @PODCASTS] DESIRED PODCAST DESIRED EPISODE
- PODCAST PLAYBACK SCREEN
- AUDIO PLAYBACK SCREEN
- OPERATIONS ON THE AUDIO PLAYBACK SCREEN
- EPISODE LIST SCREEN
- ICONS OF EPISODES
- OPERATIONS ON THE EPISODE LIST SCREEN
- PODCAST LIST SCREEN
- DELETING PODCASTS
- DELETING THE CURRENTLY PLAYING EPISODE
- DELETING AN EPISODE IN THE EPISODE LIST
- DELETING A PODCAST
- DELETING ALL PODCASTS
- USING THE PODCAST OPTION MENU
- VIEWING PHOTOS [PHOTOS]
- FROM THE HOME MENU, SELECT [PHOTOS] → DESIRED FOLDER → DESIRED PHOTO
- PHOTO DISPLAY SCREEN
- OPERATIONS ON THE PHOTO DISPLAY SCREEN
- PHOTO LIST SCREEN
- ICON OF PHOTOS
- OPERATIONS ON THE PHOTO LIST SCREEN
- DELETING PHOTOS
- USING THE PHOTO OPTION MENU
- CHANGING THE PHOTO SETTINGS
- SETTING THE PHOTO LIST DISPLAY FORMAT [PHOTO LIST FORMAT]
- FROM THE HOME MENU, SELECT SETTINGS
- PHOTO SETTINGS
- LISTENING TO FM RADIO [FM RADIO]
- FROM THE HOME MENU, SELECT FM RADIO
- PRESS THE ▲/▼ BUTTON TO SELECT THE DESIRED FREQUENCY, OR PRESS THE ◀/► BUTTON TO SELECT THE DESIRED PRESET NUMBER
- FM RADIO SCREEN
- OPERATIONS ON THE [FM RADIO] SCREEN
- ICON WHICH APPEARS BY PRESSING THE OPTION/PWR OFF BUTTON
- PRESETTING BROADCAST STATIONS AUTOMATICALLY [AUTO PRESET]
- ON THE [FM RADIO] SCREEN, PRESS THE OPTION/PWR OFF BUTTON
- SELECT [AUTO PRESET] → [YES]
- PRESETTING BROADCAST STATIONS MANUALLY [SAVE TO PRESET]
- DELETING PRESET BROADCAST STATIONS
- USING THE FM RADIO OPTION MENU
- CHANGING THE FM RADIO SETTINGS
- SETTING THE RECEPTION [SCAN SENSITIVITY]
- SETTING MONAURAL/STEREO [MONO/AUTO]
- ABOUT NOISE CANCELING
- PLAYING BACK WITH THE NOISE CANCELING FUNCTION [NOISE CANCELING]
- LISTENING TO EXTERNAL AUDIO SOURCES [EXTERNAL INPUT MODE]
- USING WITH EXTERNAL AUDIO DEVICES
- USING WITH IN-FLIGHT ENTERTAINMENT SYSTEMS
- REDUCING AMBIENT NOISE WITHOUT PLAYING BACK MUSIC [QUIET MODE]
- CHANGING THE NOISE CANCELING SETTINGS
- ADJUSTING THE NOISE CANCELING EFFECT [SET NOISE CANCEL LEVEL]
- CHANGING THE COMMON SETTINGS
- DISPLAYING THE PLAYER INFORMATION [UNIT INFORMATION]
- FROM THE HOME MENU, SELECT [SETTINGS] → [UNIT INFORMATION]
- LIMITING THE VOLUME [AVLS (VOLUME LIMIT)]
- TURNING OFF THE BEEP SOUND [BEEP SETTINGS]
- SETTING THE TIME FOR BLANKING THE SCREEN [SCREEN OFF TIMER]
- FROM THE HOME MENU, SELECT [SETTINGS] [COMMON SETTINGS] [SCREEN OFF TIMER] → DESIRED SETTING TYPE
- ADJUSTING THE BRIGHTNESS OF THE SCREEN [BRIGHTNESS]
- SETTING UP WALLPAPER [WALLPAPER SETTINGS]
- TO SET A DESIRED PHOTO AS THE WALLPAPER
- SETTING THE CURRENT TIME [SET DATE-TIME]
- SETTING THE DATE FORMAT [DATE DISPLAY FORMAT]
- SETTING THE TIME FORMAT [TIME DISPLAY FORMAT]
- LIMITING THE CHARGE AMOUNT [BATTERY CARE]
- FROM THE HOME MENU, SELECT [SETTINGS] [BATTERY CARE] → DESIRED SETTING TYPE
- RETURNING TO THE FACTORY SETTINGS [RESET ALL SETTINGS]
- FROM THE HOME MENU, SELECT SETTINGS]
- FORMATTING MEMORY [FORMAT]
- USING USB CONNECTION MODE [USB CONNECTION MODE]
- SELECTING THE DISPLAY LANGUAGE [LANGUAGE SETTINGS]
- ABOUT BATTERY LIFE
- TURN OFF THE PLAYER MANUALLY
- LONGER BATTERY LIFE SETTINGS
- ADJUST DATA FORMAT AND BIT RATE
- WHAT ARE FORMAT AND BIT RATE
- WHAT IS AUDIO FORMAT
- WHAT IS COPYRIGHT PROTECTION
- WHAT IS BIT RATE
- WHAT IS THE RELATIONSHIP BETWEEN BIT RATE, SOUND QUALITY, AND STORAGE SIZE
- WHAT IS VIDEO FORMAT
- WHAT IS PHOTO FORMAT
- STORING DATA
- UPGRADING THE PLAYER'S FIRMWARE
- OPERATION
- THERE IS NO SOUND
- DATA CANNOT BE PLAYED
- SONGS OR PHOTOS CANNOT BE DELETED ON THE PLAYER
- TRANSFERRED DATA IS NOT DISPLAYED IN ITS LIST
- WHEN [ALL SONGS] OR [ALBUM] IS SELECTED, ALL THE SONGS WILL APPEAR, BUT SOME SONGS DO NOT APPEAR WHEN [FOLDER] IS SELECTED
- SONGS ARE PLAYED BACK WITHIN A LIMITED PLAYBACK RANGE ONLY, SUCH AS WITHIN ONE ALBUM
- NOISE IS GENERATED
- NOISE CANCELING FUNCTION IS NOT EFFECTIVE
- [VPT(SURROUND)] SETTING OR [CLEAR STEREO] FUNCTION IS NOT EFFECTIVE
- THE PLAYER DOES NOT WORK. (IT DOES NOT RESPOND TO ANY BUTTON OPERATIONS.)
- PLAYBACK DOES NOT STOP
- THERE IS INSUFFICIENT VOLUME
- THERE IS NO SOUND FROM THE RIGHT CHANNEL OF THE HEADPHONES
- OR THE RIGHT CHANNEL SOUND IS HEARD FROM BOTH SIDES OF THE HEADPHONES
- PLAYBACK HAS STOPPED SUDDENLY
- THUMBNAILS (SUCH AS COVER ARTS) ARE NOT DISPLAYED
- THE PLAYER'S POWER TURNED OFF, AND THEN ON AGAIN
- THE PLAYER DOES NOT WORK PROPERLY
- APPEARS FOR A TITLE
- [UNKNOWN] IS DISPLAYED FOR AN ALBUM OR ARTIST NAME, ETC
- GARBLED CHARACTERS ARE DISPLAYED
- THE SCREEN DARKENS WHILE DISPLAYING A PHOTO
- THE SCREEN TURNS OFF
- THE ⬇ (TV OUTPUT) ICON IS BLINKING IN THE INFORMATION AREA OF THE MUSIC PLAYBACK SCREEN
- POWER
- BATTERY LIFE IS SHORT
- THE PLAYER CANNOT CHARGE THE BATTERY
- THE PLAYER TURNS OFF AUTOMATICALLY
- CHARGING COMPLETES VERY QUICKLY
- CONNECTION TO A COMPUTER
- CANNOT INSTALL THE SOFTWARE
- THE PROGRESS BAR ON THE INSTALL SCREEN DOES NOT PROCEED. OR, THE ACCESS LAMP OF THE HARD DRIVE DOES NOT LIGHT FOR SEVERAL MINUTES
- [CONNECTING] OR [CONNECTED USB (MTP)] DOES NOT APPEAR WHEN CONNECTED TO THE COMPUTER WITH THE SUPPLIED USB CABLE (THE COMPUTER DOES NOT RECOGNIZE THE PLAYER)
- DATA CANNOT BE TRANSFERRED TO THE PLAYER FROM YOUR COMPUTER
- THE TRANSFER TAKES TOO LONG TIME
- ONLY A SMALL AMOUNT OF DATA CAN BE TRANSFERRED TO THE PLAYER
- CANNOT RETURN A SONG ON THE PLAYER TO THE COMPUTER
- THE PLAYER BECOMES UNSTABLE WHILE IT IS CONNECTED TO THE COMPUTER
- FOLDERS CANNOT BE RENAMED OR DELETED
- FM RADIO
- FM BROADCASTS ARE UNCLEAR
- RECEPTION IS WEAK AND SOUND QUALITY IS POOR
- FM BROADCASTS ARE AFFECTED BY INTERFERENCE
- FM BROADCASTS CANNOT BE HEARD
- PODCAST
- CANNOT PLAY BACK AN EPISODE
- TV OUTPUT
- MUSIC SCREEN OR VIDEO IS NOT DISPLAYED ON THE TELEVISION'S SCREEN
- VIDEO IMAGE ON THE TELEVISION SCREEN IS ABNORMAL (E.G. BLACK BARS WHICH SEEM TO BE UNNECESSARY APPEAR, OR IMAGE IS STRETCHED UNNATURALLY)
- OTHER
- THERE IS NO BEEP SOUND WHEN THE PLAYER IS OPERATED
- THE PLAYER GETS WARM
- THE DATE AND TIME HAVE BEEN RESET
- NOISE IS GENERATED WHEN PLUGGING OR UNPLUGGING THE HEADPHONES
- MESSAGES
- [CANNOT PLAY; FILE FORMAT IS NOT SUPPORTED.]
- [CANNOT PLAY; LICENSE HAS EXPIRED.]
- [DELETE FAILED.]
- [DO NOT DISCONNECT.]
- [FIRMWARE UPDATE FAILED.]
- [LOW BATTERY. PLEASE CHARGE.]
- [NOISE CANCELING UNAVAILABLE. UNABLE TO EXECUTE.]
- [NOT ENOUGH FREE SPACE IN MEMORY. DELETE FILES TO ENSURE FREE SPACE.]
- [UNABLE TO SET PHOTO AS WALLPAPER.]
- PRECAUTIONS
- ON SAFETY
- ON INSTALLATION
- NOTE ON STATIC ELECTRICITY
- ON HEAT BUILD-UP
- ON THE HEADPHONES
- ROAD SAFETY
- PREVENTING HEARING DAMAGE
- CARING FOR OTHERS
- WARNING
- ON THE USE
- ON THE LCD
- ON CLEANING
- ON SOFTWARE
- NOTICE FOR USERS
- ABOUT SAMPLE DATA
- ABOUT THE CUSTOMER SUPPORT WEB SITE
- LICENSE AND TRADEMARK NOTICE
- IMPORTANT INFORMATION ON SOFTWARE
- INFORMATION ON SOFTWARE APPLICABLE TO GNU GPL/LGPL
- PACKAGE LIST
- GNU LESSER GENERAL PUBLIC LICENSE
- VERSION 2.1, FEBRUARY
- PREAMBLE
- TERMS AND CONDITIONS FOR COPYING, DISTRIBUTION AND MODIFICATION
- NO WARRANTY
- END OF TERMS AND CONDITIONS
- HOW TO APPLY THESE TERMS TO YOUR NEW LIBRARIES
- GNU GENERAL PUBLIC LICENSE
- VERSION 2, JUNE
- HOW TO APPLY THESE TERMS TO YOUR NEW PROGRAMS
- SPECIFICATIONS
- MAXIMUM RECORDABLE NUMBER OF SONGS AND TIME (APPROX.)
- MAXIMUM RECORDABLE TIME OF VIDEOS (APPROX.)
- MAXIMUM RECORDABLE NUMBER OF PHOTOS THAT CAN BE TRANSFERRED (APPROX.)
- CAPACITY (USER AVAILABLE CAPACITY)
- OUTPUT (HEADPHONES)
- TOTAL NOISE SUPPRESSION RATIO (TNSR)
- IF (FM)
- ANTENNA
- INTERFACE
- OPERATING TEMPERATURE
- POWER SOURCE
- CHARGING TIME
- BATTERY LIFE (CONTINUOUS PLAYBACK)
- DIMENSIONS (W/H/D, PROJECTING PARTS NOT INCLUDED)
- DIMENSION (W/H/D)
- MASS
- SUPPLIED ITEMS
- SYSTEM REQUIREMENTS
- COMPUTER
- INDEX
- SYMBOLS
- A
- B
- C
- D
- E
- F
- G
- H
- J
- K
- L
- M
- N
- P
- Q
- R
- S
- T
- U
- V
- W
- Z
Brand : SONY
Model : NWZ-S745
Category : Mp3 player