
CT-21Q20E - Television LG - Free user manual and instructions
Find the device manual for free CT-21Q20E LG in PDF.


| Product Type | CRT Television |
| Brand | LG |
| Model | CT-21Q20E |
| Screen Size (Diagonal) | 21 inches (53 cm) |
| Aspect Ratio | 4:3 |
| Display Technology | CRT (Cathode Ray Tube) |
| Dimensions (W x H x D) | Approx. 20.5 x 17.3 x 18.9 inches (520 x 440 x 480 mm) |
| Weight | Approx. 55.1 lb (25 kg) |
| Power Supply | AC 110-240V, 50/60 Hz |
| Power Consumption | 90 W (typical) |
| Audio Output | 2 x 5W (Mono/Stereo) |
| Speakers | Built-in, 1 or 2 depending on variant |
| Inputs | RF Antenna (75 ohm), Composite Video/Audio (RCA) |
| Outputs | Headphone jack (3.5 mm) |
| Remote Control | Included (batteries not included) |
| On-Screen Menu | Yes, with channel and volume controls |
| Auto Search Channels | Yes |
| Sleep Timer | Available (30/60/90/120 min) |
| Child Lock | Yes, via remote or menu |
| Cleaning Instructions | Wipe with a soft dry cloth; do not use liquid cleaners |
| Safety Notes | Do not open the casing; ensure proper ventilation; avoid magnetic fields |
| Spare Parts Available | Remote control, power cord, stand (if applicable) |
| Repairability | Serviceable by qualified technician; do not attempt DIY repairs |
| Manual Format | Available in PDF (48 pages, English) |
Frequently Asked Questions - CT-21Q20E LG
User questions about CT-21Q20E LG
0 question about this device. Answer the ones you know or ask your own.
Ask a new question about this device
Download the instructions for your Television in PDF format for free! Find your manual CT-21Q20E - LG and take your electronic device back in hand. On this page are published all the documents necessary for the use of your device. CT-21Q20E by LG.
USER MANUAL CT-21Q20E LG
Color Television
Owner's Instruction Manual
Please read this manual carefully before operating the unit. Keep it for future reference.
future reference.
Record the model number and serial number of the unit. See the label attached to the
back cover of the unit. Record this information and provide it to your dealer when
service is needed.
Model number:
Serial number:
Contents
| ٢ | التركيب |
| ٤ | أماكن ووظLfaff أنظمة التحكم( الوحدة اليدوية لل比较高 عن بعد (ريموت كترول) retirement الطاريةاللوحة الأمامية |
| ٧ | التشغير الأساسيالتشغير والإيقاف-acختيار البرنامجضبط درجة الصوت Trumpيفة الإuskات / الرؤية السreviewة(-acختيار اللغة على الشاشة) |
| ٨ | القوائم على الشاشة-acختيار القائمة |
| ٩ | ضبط محطات التليفرزيونضبط توليف البرنامج أوتومانيكياًضبط توليف البرنامج يدوياالготовف_Idقيقت civil begrب Monacoج |
| ١٢ | ضبط الصورةضبط الصورة(عين) |
| ١٣ | ضبط الصوت (-acختياري)ضبط الصوت( استقبال استربو / مزدوج) (-acختياري)استقبال NICAM (-acختياري) |
| ١٦ | الوظLfaff الأخرىال Operating Agricultural Affairs/الإيقاف الابوتومانيكي /Toقيت الإيقاف(الللاعاب الإلكترونية) |
| ١٩ | أ Opediaع التليفرزيون والصوت والصورة (الخلفية الزرقاء)ال AVG / (الخنتياري) |
| ٢١ | النصوص الإخبارية (-acختيارية)شغيل/ إيقافالنصوص البسيطة / النصوص العلوية (-acختيارية)النصوص السreviewة قاست تكستوظLfف النصوص الإخبارية الخاصة |
| ٢٣ | توصل المعدات الخارجيةمقبس اللهوائى(م quarterbacks الصوت والصورة، المدخل / المخرج (-acختياري)مقبس بورو سکارت (-acختياري)مقبس سماعة الراس (-acختياري)قائمة الفحص ل侬اح الأعصال |
Installation
Power Requirements
This unit is designed to operate on the main AC power source, with the voltage as indicated on the label on the back cover. Do not use a DC power source for this unit. In case of thunderstorms or power outages, please unplug the power cord and the antenna.
Warning
To prevent fire or electric shock, do not expose the unit to rain or moisture.
Service
Do not remove the rear cover of the device as this may expose very high voltage and other risks.
If the device does not work properly, disconnect the power and contact your dealer.
Antenna
Connect the antenna cable to the 75 ohm socket on the rear cover. For best reception, use an outdoor antenna.
Location
Place the device so that no reflected light or direct sunlight falls on the screen. Take precautions to avoid exposing the device to vibrations, moisture, dust, or excessive heat. Also, ensure that the device is positioned to allow free air circulation and do not cover the ventilation openings on the back of the device.
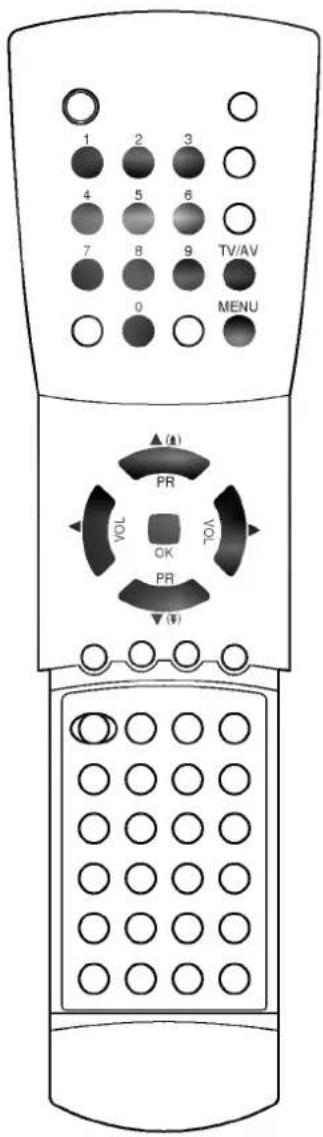
Location of control functions
All functions can be controlled using the remote control. The functions can also be set using the buttons on the device's front panel.
Remote control Before using the remote control, please install the batteries. See the following page.
- Power This switch turns the device on from standby or off to standby.
Mute This switch opens or closes the sound.
2- Number buttons They switch the device from standby to operation or select a number directly.
4- Program view To view the program, see it.
5- Teletext buttons (optional) These buttons are used for teletext. For more details, see the section on teletext.
- 6 - Program button up/down: tests the program or menu item. It also switches the device from standby mode.
Volume down/up: to adjust the volume, to adjust menu settings.
OK: to accept your selection or to display the current status.
Eye (optional): toggles the Eye function on or off.
- Surround sound (optional): to select surround sound.
- 9 - Video buttons (optional): for controlling a VCR.


(with teletext)
Control functions of the systems


(without teletext)
(Aspect ratio control) ARC - 1.
To adjust the picture aspect ratio.
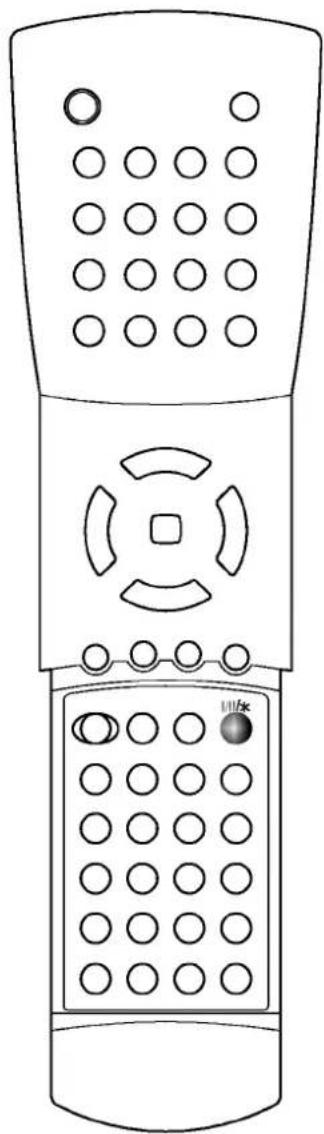
(Picture status memory) PSM - 11
To recall your preferred picture settings.
12 - TV / audio and video terminals
To switch the TV to audio/video mode.
To clear the menu from the screen
To switch the device from standby mode to operating mode
- 13
Mitsubishi AC menu
(Sound status memory) (optional) SSM - 14
To recall the detailed settings for adjusting the sound
( *) / 2 / 1 - 15 * / dual (* (optional)
To select the language during broadcast in dual language
To select the individual sound during broadcast in stereo
Note:
★ : This function is not available on this device.
Installing the batteries
The remote control unit operates with two AA batteries. To install the batteries, pull the remote control back and open the battery cover. Then install the two batteries as shown by the polarity marks ⭕ and ⭕ inside the battery compartment.

Note: To avoid damage from possible battery leakage, remove the batteries if you do not intend to use the remote control for an extended period.
Control locations
The control panel
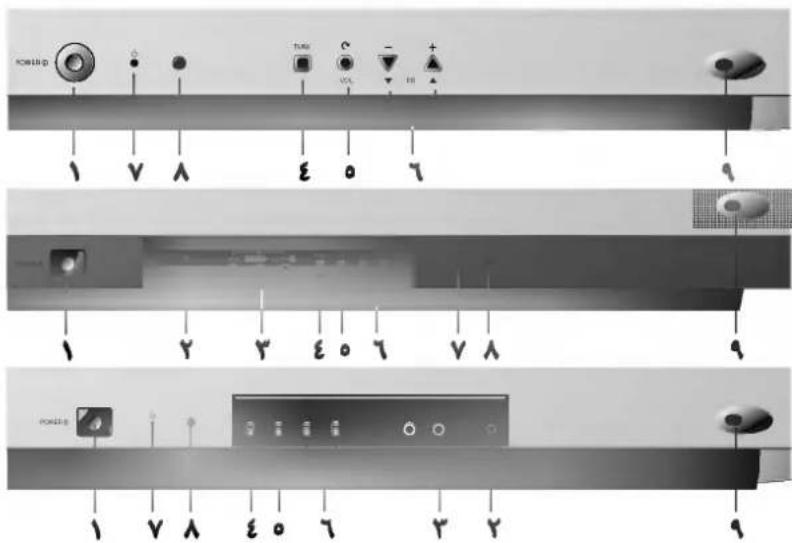

The control panel buttons
1 - Main power switch It turns the device on or off.
2 - Headphone jack (optional) For connecting headphones to this jack.
2 - Audio/Video input (AV2) (optional) For connecting external audio/video equipment to this input.
- TV / AV To select TV or AV mode. To display the menu on the screen. To switch the device from standby to on.
(Function) - 5 To adjust sound and picture (optional) and picture items or auto program while menus are not displayed.
(▲|▼) - / + - 7 To adjust functions or select programs. To switch the device from standby to on.
7 - Power/standby indicator. It lights up brightly when the device is in standby mode and goes out when the device is turned on.
8 - Remote control sensor
9 - Light sensor (optional) to adjust the picture according to ambient conditions.
Basic operation
Turning on and off

1 - Press the main power switch to turn the device on. 2 - If the device is in standby mode, press the power button, program selection buttons, TV/AV button, or number buttons on the remote control to turn it on. 3 - Press the power button on the remote control. The device will return to standby mode. 4 - Press the main power switch on the device again. It will turn the device off, and the power/standby indicator will go out after a few seconds.
Note: If the device is turned on and the main power plug is disconnected, the device will switch to standby mode or power-on mode when the plug is reconnected to the power outlet.
-ac Mitsubishi program
You can select the program number using the program button or the number buttons.
Adjusting the volume
Press the volume button to adjust the volume.
Mute function
Press the mute button. When the sound is turned off, the mute indicator appears. To cancel this, press the mute button, the volume button, or the SSM (* / 2 / 1) (or dual / (*) or the stereo sound button).
Quick view
Press the quick view button to view the last channel you were watching.
Selecting the on-screen language (optional)
This is an optional function. It allows the menu to be displayed on the screen in the desired language. You must choose your language first.
1 - Press the menu button to display menu 1.
2 - Press the up or down button to select the language.
3 - Press the OK button to display the submenu.
4 - Press the program selection button or the volume button to select the desired language.
5 - Press the OK button.
All on-screen displays will appear in the selected language.
6- Press the TV/AV button to return to normal viewing.
For TV
On-Screen Menus
Communication between you and the device is done on the screen with a menu. The required buttons for setup steps are also displayed.
Menu Operation 1- Press the MENU button to display each menu. 2- Press the PROGRAM +/- button to select an item in the menu. The selected menu items change from green to purple. 3- Press the SELECT button to adjust the setting of a menu item, or press the OK button to display the submenu. Note: a- The menus disappear automatically after one minute if you do not press any button. b- In the AV mode, menu 1 is not displayed. c- In the teletext mode, the menus are not displayed. d- In the menu, the current selection is indicated at the bottom of the menu. If the function is in the setting mode. e- In some models (mono), menu 3 is not displayed. f- In some models, the menu items: Auto Tuning, AV, Language, Color Temperature, and System are not displayed on the on-screen menu. g- In some models, the menu items: Auto Tuning, AV, Language, Color Temperature, and System are not displayed on the on-screen menu.
![graph TD A["AUTOOPROGRAMME\nMANUALOPROGRAMME\nPROGRAMMEDEDIT\nLANGUAGE"] --> B["OLCAN"] C["STORAGEFROM 1\nSYSTEM BG\nNORMALSEARCH\nTURBOOOSEARCH"] --> B D["PROGRAMME 1\nSYSTEM BG\nCHANNEL U/UHF 2\nFINE ▶▶▶\nSEARCH"] --> E["PROG.0200PROG.0--\nSKIP00000000000FF\nAUTODAVOOOOOO0FF"] F["CHILDOLOCK OFF\nA…](/content/2026/06/1352380/images/aa31165e85be498f7df4e39472214a817045a8cd409477efa882b2ef82adb8d9.jpg)

TV Station Tuning
Menu 1

Up to 100 TV stations can be stored in this device with program numbers (1) to (99). After the stations are tuned, you will be able to use the program +/- buttons or the number buttons to select the stations you have programmed. Stations can be tuned using either the automatic or manual mode.
Automatic Tuning
All receivable stations are stored in this way. We recommend using the automatic tuning during installation of this device. 1- Press the MENU button to display menu 1. 2- Press the PROGRAM +/- button to select "Auto Tuning". 3- Press the OK button to display the auto tuning menu.


4- Press the PROGRAM +/- button to start storage. To select the program number, use the VOLUME +/- button or the number buttons. Any number from 1 to 99 can be selected; numbers below 10 are displayed with a leading zero (e.g., 05). 5- Press the PROGRAM +/- button to select the TV system using the VOLUME +/- button. (ASA) / New Zealand / Middle East / Africa / Australia (I) (Hong Kong BG / South Africa) and DK (Eastern Europe, China, Africa, and the former Soviet Union) or M (USA, Korea, or Philippines).
The system is set automatically. (In some models, the system menu item is not displayed on the screen, and there is no need to set it at that time.) 6- Press the PROGRAM +/- button to start normal search or fast search.
a- Normal search (slow/fast) for storing all receivable channels. b- Fast search is faster than normal search, but it stores only the selected system. c- If the received signal has poor sound quality, select the system again in the manual program menu. 7- Press the OK button to start automatic programming.

(Normal search)

Quick search
All receivable stations are stored.
To stop the automatic programming, press the Menu button.
When automatic programming is complete, the program review list appears on the screen. See the section on Airways and Touchdown Regression to adjust the stored program. 8 - Press the TV/AV button to return to normal TV mode.
Erase program automatically.
To automatically erase the stored program image, press the Program button for about 2 seconds. To stop automatic program erasure, press any button except the video buttons.
TV station setup
Manual program tuning
Manual programming gives you the ability to tune manually and arrange stations in any order you want.
1 - Press the Menu button to display Menu 1
2 - Press the Program button to select manual program.
3 - Press the OK button to display the manual programming menu.


4 - Press the Program button to select the program. Use the Program button to select the program number. Then use the number buttons to enter the channel number. For example, press 1 for channel 1.
next to it, i.e. 0 instead of 0.
5 - Press the Program button to confirm. The selected program is stored.
BG (Asia / New Zealand / Middle East / Africa / Australia) and 1 (Hong Kong
/ South Africa) and DK (Eastern Europe, China, and Africa Oregon)
previous) or M (United States or Korea or Philippines).
: Selection
In some modes, the system menu item is not displayed on the screen
and there is no need to select it at that time.
6 - Press the program button to select Quintaña. Press the volume button to select the very high frequency
or ultra high frequency or book channels as required. If possible, the
channel number is selected directly with the number buttons.
7 - Press the program button to select search.
8 - Press the volume button to start the search. (If a station is detected, the search will stop).
9 - Press the OK button. Then the storage display appears.
- To store another station, repeat steps 4 to 9.
- 11 - Press the TV/AV button to return to normal TV viewing.
Fine tuning adjustment
Fine tuning is usually only necessary if reception is poor.
1- Manual program tuning is repeated in steps 1 to 2.
2- Press the program button to select the program. Select the desired program number using
the volume button or the number buttons. Any number from 1 is entered with the number next to it.
e.g., 5 instead of 5.
2- Press the program button to select fine tuning.
4- Press the volume button for fine tuning for the best picture and best sound.
- Press the OK button. The storage display then appears.
6- Press the TV/AV button to return to the normal mode.
TUNING.
The program that has been fine-tuned is indicated by the yellow number during program selection.
program.

Setting TV stations
The function 1

Program Review
This function allows you to rearrange the programs stored by automatic programming in any order you wish. You can also skip program numbers that have been stored.
by automatic programming.
1. Press the MENU button to display menu 1.
2. Press the PROGRAM button to enter program review.
3. Press the OK button to display the program review and edit menu.

Program Exchange
1. Press the volume button to adjust the left program number. The station currently being viewed
corresponds to the new program number and is shown on the screen.
2. Press the number buttons to enter the program number.
Enter it with a number, next to it a 0, instead of 0.
2. Press the OK button. The station stored in the program number will appear on the screen.
as the left program number.
4. Repeat steps 1 to 2 for other programs.
to be stored.
1. Press the SKIP button to select the program you want to skip. The station that is
being watched corresponds to the selected program number and is displayed on the screen.
2. Press the PROGRAM button to select the skip.
3. Press the SKIP button to enable or disable. If you select enable,
the selected station will be skipped.
4. Press the OK button. The storage display then appears.
5. Repeat steps 1 to 4 for other programs.
Selecting skipped programs using the number buttons is still possible, and this is indicated
by the numbers in purple during program selection.
Note: Program number 1 cannot be skipped.
The automatic audio and video adjustment function is optional.
If your video device produces a voltage for switching when switching to playback mode,
automatic audio and video playback is selected when connecting the video device with
the Euro-SCART cable. The device is automatically switched to AVI mode when inserting
Audio and video signal. But if you want to continue watching in the mode
of television, set the audio and video to automatic off.
1- Press the program number button to select the desired program number.
2- Press the program button to select the audio and video automatic.
2- Press the volume button to adjust the volume or mute.
4- Press the button to display the storage word.
5- Repeat steps 1 to 4 to adjust other programs.
Press the TV/AV button to return to the normal TV modes.
Picture adjustment
Picture adjustment
You can adjust the contrast, brightness, color intensity, and sharpness to your preferred levels.
Note: You can select the color tint for the NTSC system.
1- Press the menu button to display menu 2.
2- Press the button to select the desired picture item.
2 - Press the volume button to make the appropriate adjustments.
4 - Press the button again. The storage display will then appear.
To view your detailed accounts, press the PSM button until the desired picture appears (standard, user, dynamic, or mild). The desired standard, dynamic, or mild picture is programmed in the factory to produce the appropriate good picture.
The characteristics of each program cannot be modified.
Note: If you press the PSM button after making the appropriate adjustment in menu 2, the user picture will appear, or if the adjustment is standard, dynamic, or mild, it will be as set from the factory.
Eye (automatic)
Eye is an optional function.
This function automatically adjusts the picture line according to the surrounding conditions. This allows
you to enjoy the most suitable picture according to the surrounding conditions.
Press the Eye button to turn the Eye function on or off.

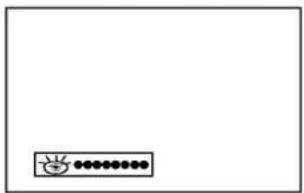
When the Eye function is turned on, the most suitable picture is adjusted automatically according to the surrounding conditions.
At that time, the green display does not appear continuously, but the yellow display appears each time the picture condition changes.
Note: If you press the PSM button while the Eye function is active, the Eye function is turned off automatically.
- Mitsubishi picture mode
You can watch television with three picture modes: standard, wide, and zoom. Press the aspect ratio control button ARC to switch to the desired picture mode.
Standard, wide, or zoom.
Standard 4:3
This is the usual picture size 4:3 as displayed on all television screens. Wide (16:9)
This is a cinema screen picture format. TV stations broadcast this format for the picture. For receiving the picture with a 16:9 aspect ratio, the wide scale is selected.
Zoom
This is a picture format where the standard picture is enlarged to fill the screen, but with the top, bottom, left, and right edges hidden.
To adjust the picture size, press the program button or the volume button, then the OK button.
The storage display then appears.
Note: In PIP (Picture-in-Picture) mode, the wide picture format is not available. a. In manual PIP mode, the wide picture format is not available.
The vertical magnification of the zoom picture format is adjusted up to the standard 4:3 format. b. When switching to standby or stop, the wide or zoom picture format
returns to the standard 4:3 format.


Sound adjustment (optional)
Menu 2
Sound adjustment is an optional function.
Only the device equipped with the sound adjustment feature can perform this function.
Sound adjustment

You can choose your preferred sound mode: normal, music, movies, or speech, as you prefer. You can also adjust the sound frequency to the levels you prefer. The surround sound produces a group of sounds as in opera halls. 1 - Press the menu button to display menu 2. 2 - Press the channel buttons (vertical movement) to select the desired sound item: equalizer, speaker balance, or surround sound. 3 - Press the volume button to make the desired adjustment.
Sound balance - Equalizer. The sound is selected (normal, music, movies, or speech) or the user's test by pressing the channel buttons (vertical movement).

(AV STEREO, FLAT)

(RF STEREO, FLAT)
In the case of normal sound, music, movies, or speech, each equalizer unit is displayed on the screen. Normal sound, music, movies, or speech are programmed at the factory to produce the good sound suitable for the characteristics of each program. In the case of user selection, the sound range is selected with the volume button (horizontal movement) while adjusting the appropriate sound level with the channel buttons (vertical movement) to the degree you prefer. Press the OK button, and then the word (data saved) appears.
Speaker balance
Adjust the balance level between the speakers by pressing the volume button (horizontal movement).
Surround sound It is turned on or off by pressing the volume button (horizontal movement) or the surround sound button.
40 - Press the TV/AV button to return to the normal TV screen. To recall your favorite selection in the future, press the SSM button until you reach the desired sound (normal, music, movies, speech, or user selection). Normal, music, movies, and speech sounds are programmed at the factory to produce the good sound suitable for the characteristics of each program and cannot be modified.
Note: If you press the SSM button after the appropriate adjustment in menu 2, the word (user selection) appears automatically even if there was a previous adjustment from the factory for normal, music, movies, or speech sound.
Sound adjustment (optional)
Stereo / dual reception (optional)
When selecting a program, the station's sound information appears after the program number and station name disappear.
Radio display on screen
MONO Mono
STEREO Stereo
DUAL Dual
Mitsubishi - Mono audio
When receiving stereo, if the stereo signal is weak, you can switch to mono by pressing the / 1 / 2 / * or dual / ★ button. In mono reception, the sound depth is improved. To switch back to stereo, press the / 1 / 2 / * button again.
Mitsubishi - Language for bilingual broadcasts
When receiving a program in two languages (bilingual), you can switch between Dual 1, Dual 2, or (Dual 1 - 2) by repeatedly pressing the / 1 / 2★ / or dual / button. Dual 1 sends the primary broadcast language to the speakers. Dual 2 sends the secondary broadcast language to the speakers. Dual 1 - 2 sends a separate language to each speaker.
Sound adjustment (optional)
NICAM reception
If your device is equipped with a NICAM receiver, high-quality digital audio (the composite multi-channel sound unit) can be received. NICAM quality (press the / 1 / 2 * / ★ / dual ★ button repeatedly).

Audio output selection (optional)
In Audio/Video mode, you can select the audio output for the right and left speakers. Press repeatedly on buttons 1 / 2 / * or the double button to select the audio output. The audio signal from the left audio input is sent to the left speaker, and the audio signal from the right audio input is sent to the right speaker. The audio signal from the left audio input is sent to the right and left speakers. The audio signal from the right audio input is sent to the right and left speakers.
Other functions
Child lock
The TV can be set so that the remote control is necessary for operating the TV. This can be used to prevent unauthorized viewing.
1. Press the Menu button to display the menu. 2. Press the Program button to select the child lock. 3. Press the Volume button to select the activation mode. 4. Press the TV/AV button to return to normal TV viewing.
When this lock is activated, the child lock activation display appears on the screen when any button on the front panel is pressed while watching TV.
Note: This child lock display does not appear on the screen when any button on the front panel is pressed while the menu is displayed.
Automatic shutdown with the timer
If you select the automatic shutdown, the device will turn itself off automatically and switch to standby mode approximately 1 minute after the TV broadcast stops. 2. Press the Menu button to display the menu. 3. Press the Program button to select the automatic shutdown. 4. Press the Volume button to select the activation mode. 5. Press the TV/AV button to return to normal TV viewing.
Sleep timer
The device will turn on automatically after a preset time period has elapsed. 1. Press the Menu button to display the menu. 2. Press the Program button to select the sleep timer. 3. Set the desired time period using the Volume button. 4. Press the TV/AV button to return to normal TV viewing.
Timer for shutdown
The shutdown timer puts the device into standby mode after a preset time period has elapsed. 1. Press the Menu button to display the menu. 2. Press the Program button to select the shutdown timer. 3. Set the desired time period using the Volume button. 4. Press the TV/AV button to return to normal TV viewing.
You can set the sleep/shutdown timer from 1 minute up to 12 hours. The timer counts down from the selected time period.
Note:
a - This small device must be placed in the Raptares position with electricity on the value control to enable the timer function. b - When opening the small device using the timer function for a duration of two hours, it will automatically turn off and return to the Raptares position unless one of the buttons is pressed. c - To view the remaining time for operation/stop, select menu 40. d - To cancel the timer for operation/stop of the small device, set the timer for operation/stop. e - When the main power is turned off, the timer for operation/stop is reset.


Other functions
Menu 4
Electronic game (-ac Mitsubishi)
This is an optional function.
You can enjoy the electronic game with this small device. To achieve a high score, you must prevent the moving butterfly from descending to the bottom using the volume buttons
(horizontal movement) and the buttons (vertical movement).
1. Press the menu button to display menu 4.
2. Press the buttons (vertical movement) to select the electronic game.
2. Press the MOUACK button to start the game. Move the aiming gun right and left with the horizontal movement button and adjust the direction of the gun with the vertical movement button and fire the gun with the MOUACK button while playing the game. The score you achieve in the game is displayed
automatically.

Remote control in the language (-ac Mitsubishi)
This remote control is supplied optionally.
If you have it, you can use it when using the electronic language.

Power switch: to switch the device from standby mode to standby mode or from standby mode to operation.
Mute key: to turn the audio on or off.
Menu: to display the language menu and exit language playback mode.
Channel buttons (vertical movement) - Volume buttons (horizontal movement) -
OK button: to confirm or start the game when playing.
Note:
a- If you want to exit this mode while the game program is running, press the TV/AV button or the Menu button.
TV/AV or Menu button.
b- If you want to continue the game, press the OK button to start the game.
Other functions
TV/AV setup
You can set the input to TV mode or AV mode. AV mode is used when connecting a VCR or other equipment to the device.
Note: When connecting a video device via the antenna jack, the device is used in TV mode. See the section on connecting external equipment.
1 - Press the Menu button to display menu 5. 2 - Press the Program button to select the input. 3 - Press the Volume button to select TV, AV1, or AV2.
There are two AV inputs: - Video device connected to the SCART or jack on the TV. AV1 - Video device connected to AV2 on the TV (optional). AV2 - Press the OK button or the TV/AV button. To return to TV mode from AV mode, press the Program button, the TV/AV button, or the number buttons.
Alternatively, you can select TV or AV mode by pressing the TV/AV button.
If you have a device with a blue background, the blue background appears on the screen when there is no broadcast.
1 - Press the MENU button to display menu 5. 2 - Press the PROGRAM button to select the blue background option. 3 - Press the VOLUME button to select ON or OFF. 4 - Press the OK button or the TV/AV button to return to normal TV viewing.
(Color Status Memory) CSM You can select the standard picture colors and adjust them to red, green, or blue according to your preference.
1 - Press the MENU button to display menu 5. 2 - Press the PROGRAM button to select the Color Status Memory. 3 - Press the VOLUME button to select the standard colors or those leaning toward red, green, or blue. 4 - Press the OK button or the TV/AV button to return to normal TV viewing.
AVL (Automatic Volume Level). Provides automatic volume adjustment, maintaining a consistent volume level even when you change channels.
1 - Press the MENU button to display menu 5. 2 - Press the PROGRAM button to select AVL. 3 - Press the VOLUME button to select ON or OFF. 4 - Press the OK button or the TV/AV button to return to normal TV viewing.

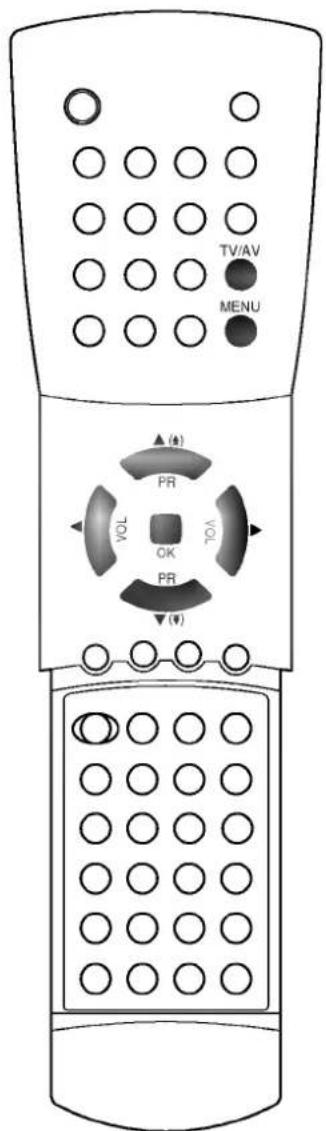
Teletext (optional)

Teletext is an optional feature, so only a device equipped with this system can receive teletext broadcasts. Teletext is a free service provided by TV stations that offers useful and detailed information about news, TV programs, stock prices, and other topics.
The teletext decoder in this TV can support both simple and fast text systems. The simple system (standard teletext) consists of a number of pages and topics that are selected by entering the page number directly. The other system, Fast Text (quick teletext system), uses modern methods that allow you to quickly access and select teletext information.
ON/OFF Press the TEXT button to turn on teletext. The first or last selected page will appear on the screen. Two page numbers, the TV station name, date, and time are displayed at the top of the screen. The first page number indicates your selection, while the second indicates the current page being displayed. Press the TEXT button or the TV/AV button to turn off teletext. The previous viewing mode will then reappear.
Menu mode - Mini page
1 4- The colored buttons can be used to select the previous or next page.
Setting the color code in the menu mode (list) If the TV is in simple text mode or top text mode (TOP text) or fast text mode (FAST text), press the mode selection button to switch to menu mode. You can set a four-digit color code for test text pages according to your choice, and you can easily select it by pressing the colored button on the remote control. 1. Use the number buttons to select the page you want to display. 2. The page is displayed on the screen and the button is pressed briefly. When you press the number buttons, the color boxes along the bottom of the screen are set to zero. 3. Press the color button to display the page number. From this point on, you can select this page with the colored button. 4. The other three colored buttons are set in the same way.
Top text (TOP text) (optional). The user manual shows some of the four color fields: red, green, yellow, and blue at the bottom of the screen. The yellow field goes to the next group, and the blue field goes to the next block. Group / block / page test. - Using the blue button, you can go from one block to the next. - Use the yellow button to go to the next group with automatic flow to the next blocks. - Using the green buttons, you can go to the next page with automatic flow to the next group. In addition, the program button can be used. - The red button allows you to return to the previous page. In addition, the page down button can be used.
Direct page selection Through the direct page selection method, you can select a page in the text mode by entering the page number using the number buttons or the mode.
Text pages (optional)
Fast text - FAST TEXT
Text pages with color code along the bottom of the screen and can be selected
by pressing the colored button.
Text pages
1. Press the index button to select the index page.
2. You can select the color-coded pages along the bottom line using the colored buttons.
3. In simple text mode, you can select a page by entering the page number
of three digits using the number buttons in fast text mode.
4. You can use the program button to select the previous or next page.
Special functions for text pages
Reveal
Press this button to display hidden information such as puzzle solutions or truncated words.
Press this button again to remove the information from the screen.

Scale (Zoom)
Text is selected with a double click.
Press this button to enlarge the upper half of the page.
Press this button again to enlarge the lower half of the page.
Press this button again to return to the normal view.

Select settings
To display the television image on the screen while waiting for the new
news text page.
At that time, the display shown on the screen appears in the upper left corner of
the screen. When the page with updated data is available, the display shown
changes to the page number.
Press this button to view the updated news text page.

Pause (Stop)
To stop the automatic page turning that occurs if the page
of the test texts consists of two or more sub-pages. The number of sub-pages
and the sub-page currently displayed are usually shown on the screen
below the time display. When this button is pressed, a stop icon is displayed in the
upper left corner of the screen, and automatic page turning is prevented.
To continue, press this button again.

Mix
To display the pages of the news texts on the television screen.
To turn off the television picture, press this button again.

Time
When watching a TV program, press this button to display the time in the upper
right corner of the screen. Press this button again to remove the display.
News text mode: Press this button to select the sub-page number.
The sub-page number is displayed at the bottom of the screen. To fix or adjust
the sub-page, press the red/green button, the program button, or the number buttons.
Press again to exit this function.

Connecting External Equipment

You can connect additional equipment such as video devices and video cameras to the device. The shapes shown may differ from your device.
Antenna Socket
1. Connect the antenna output socket on the video device to the antenna socket on the back of the TV. 2. Connect the antenna cable to the wireless antenna on the video socket. 3. Store the video channel on a program number using the manual program tuning section. 4. Select the program number where the video channel is stored. 5. Press the power button on the video device.

Audio/Video Input/Output Socket (Optional)
1. Connect the audio/video output of the video device to the audio/video input of the TV, and the audio/video input of the video device to the audio/video output of the TV. 2. If the video device is connected to the audio/video output, press the AV1 or AV2 button on the TV. 3. Press the play button on the video device. 4. The video image appears on the screen.

You can also record programs received on the TV onto a video tape using the audio/video output sockets.
Euro Scart Socket (Optional)

1. Connect the Euro Scart socket on the video device to the Euro Scart socket on the TV. 2. Press the power button on the video device. If your video device outputs a switching voltage, the TV will automatically switch to AV1 audio/video mode. Otherwise, press the TV/AV button on the remote control to select AV1. The video image appears on the screen. You can also record programs received on the TV onto a video tape.
Note:
Signals of the type, i.e., signals with red, green, and blue colors, can be selected via the Euro Scart. These signals are sent, for example, to a computer, TV, game console, or other devices.

Connecting External Equipment
Headphone Socket (Optional)
On some models with a headphone socket, this function can be performed. Connect the headphone plug to the headphone socket on the TV. You can listen to the sound through the headphones. To adjust the volume in the headphones, press the volume button (horizontal arrows). If you press the mute button, the sound in the headphones is turned off. Volume adjustment is an optional function. Only the device equipped with the volume adjustment feature can perform this function.


LG

LG
Colour Television OWNER'S MANUAL
Please read this manual carefully before operating your set. Retain it for future reference. Record model number and serial number of the set. See the label attached on the back cover and quote this information to your dealer when you require service.
Model number :
Serial number :
Contents
Installation 3
Location and function of controls 4
Remote control handset
Battery installation
Front panel
Basic operation 7
On and off
Program selection
Volume adjustment
Mute function / Quick view
On-screen language selection (option)
On-screen menus 8
Menu selection
Setting up TV stations 9
Auto program tuning
Manual program tuning
Fine tuning
Program edit
Picture adjustment 12
Picture adjustment
Eye (option)
Picture format selection
Sound adjustment (option) 13
Sound adjustment
Stereo/Dual reception (option)
NICAM reception (option)
Sound output selection (option)
Other functions 16
Child lock / Auto sleep / On timer / Off timer
Game (option)
TV and AV modes / Blue back
CSM (Colour Status Memory) / AVL (option)
Teletext (option) 19
Switch on/off
SIMPLE text / TOP text (option) / FASTEXT
Special teletext functions
Connection of external equipment 21
Aerial socket
Audio/Video in/out sockets (option)
Euro scart socket (option)
Headphone socket (option)
Troubleshooting check list 23
Installation
Power
This set operates on an AC mains supply, the voltage is as indicated on the label on the back cover. Never apply DC power to the set. In the event of thunderstorms or powercuts, please pull out the aerial and mains plugs.
Warning
To prevent fire or shock hazard, do not expose the set to rain or moisture.
Service
Never remove the back cover of the set as this can expose you to very high voltage and other hazards. If the set does not operate properly, unplug it and call your dealer.
Aerial
Connect the aerial cable to the socket marked 1175 Ω on the back cover. For the best reception an outdoor aerial should be used.
Location
Position your set so that no bright light or sunlight falls directly onto the screen. Care should be taken not to expose the set to any unnecessary vibration, moisture, dust or heat. Also ensure that the set is placed in a position to allow a free flow of air. Do not cover the ventilation openings on the back cover.
Location and function of controls

All the functions can be controlled with the remote control handset. Some functions can also be adjusted with the buttons on the front panel of the set.
Remote control handset
Before you use the remote control handset, please install the batteries. See the next page.
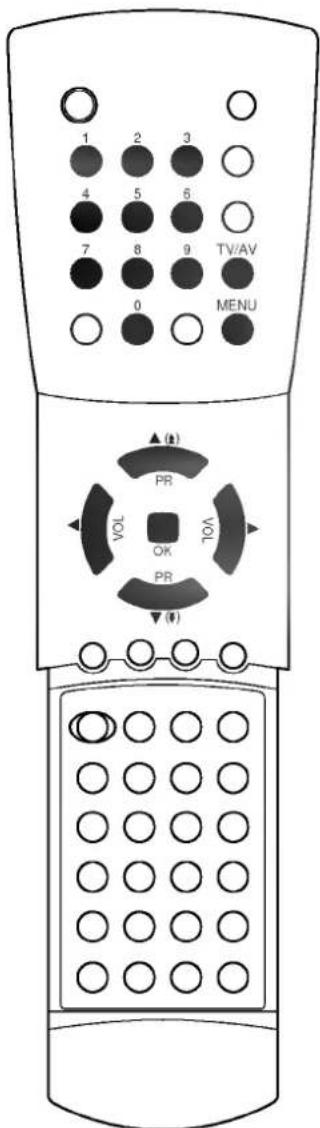
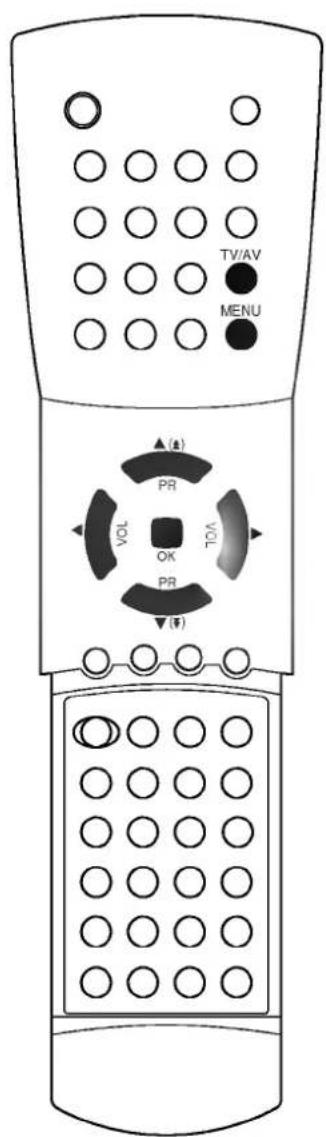
- POWER switches the set on from standby or off to standby.
- MUTE switches the sound on or off.
- NUMBER BUTTONS switch the set on from standby or directly select a number.
- Q.VIEW returns to the previously viewed programme.
- TELETEXT BUTTONS (option) These buttons are used for teletext. For further details, see the 'Teletext' section.
- ▲(▲) / ▼(▼) (Programme Up/Down) selects a programme or a menu item. switches the set on from standby. scans programmes automatically.
◀ / ▶ (Volume Down/Up) adjusts the volume. adjusts menu settings.
OK accepts your selection or displays the current mode.
- EYE (option) switches the Eye function on or off.
- SURROUND (option) selects surround sound.
- VCR BUTTONS (option) control a LG/Goldstar video cassette recorder.

Location and function of controls
10. ARC (Aspect Ratio Control)
changes the picture format.
11.PSM (Picture Status Memory)
recalls your preferred picture setting.
12. TV/AV
Selects TV or AV mode. Clears the menu from the screen. Switches the set on from standby.
13. MENU
Selects a menu.
14. SSM (Sound Status Memory) (option)
Recalls your preferred sound setting.
15. I/II/* or DUAL/* (option)
Selects the language during dual language broadcast. Selects mono sound during stereo broadcast. Selects the sound output.
Note:
* : No function.
Battery installation
The remote control handset is powered by two AA type batteries. To load the batteries, turn the handset over and slide open the battery compartment. Install two batteries as indicated by the polarity symbols (⊕ and ⊙) marked inside the compartment.

Note: To avoid damage from possible battery leakage, remove the batteries if you do not plan to use the remote control handset for an extended period of time.


(Without TELETEXT)
Location and function of controls

Front panel
- MAIN POWER (POWER ①)
switches the set on or off.
- HEADPHONE SOCKET (option)
Connect the headphone plug to this socket.
- AUDIO/VIDEO IN SOCKETS (AV2) (option)
Connect the audio/video out sockets of external equipment to these sockets.
- TV/AV
selects TV or AV mode.
clears the menu from the screen.
switches the set on from standby.
- Ⓗ (Function)
selects volume, Eye, picture items or brief auto programme while the menus not display.
- / - (▲ / ▼)
adjusts the function or selects a programme.
switches the set on from standby.
- POWER/STANDBY INDICATOR
illuminates brightly when the set is in standby mode.
dims when the set is switched on.
- REMOTE CONTROL SENSOR
- EYE (option)
adjusts picture according to the surrounding conditions.
Basic operation
On and off
- Press the main power button to switch the set on.
- If the set is in standby mode, press the POWER, ▲ / ▼, TV/AV or NUMBER buttons on the remote control handset to switch it on fully.
- Press the POWER button on the remote control handset. The set reverts to standby mode.
- Press the main power button on the set again. It switches the set off and the power/standby indicator goes out in a few seconds.
Note: If, while the set is switched on, the mains plug is disconnected, the set will switch to standby or power on when the mains plug is replaced in the mains power socket.
Programme selection
You can select a programme number with the ▲ / ▼ or NUMBER buttons.
Volume adjustment
Press the ◀ / ▶ button to adjust the volume.
Mute function
Press the MUTE button. The sound is switched off and the display appears. You can cancel it by pressing the MUTE, ◀ / ▶, SSM, I/II/* (or DUAL/*) or SURROUND button.
Quick view
Press the Q.VIEW button to view the last programme you were watching.
On screen language selection (option)
This is an optional function. The menu can be displayed on the screen in the desired language. First select your language.
- Press the MENU button to display MENU 1.
- Press the ▲ / ▼ button to select LANGUAGE.
- Press the OK button to display the sub menu.
- Press the ▲ / ▼ or ◀ / ▶ button to select the desired language.
- Press the OK button. All on-screen displays will appear in the selected language.
- Press the TV/AV button to return to normal TV viewing.

On-screen menus
The dialogue between you and your set takes place on screen with an operator menu. The buttons required for the operating steps are also displayed.
Menu selection
- Press the MENU button to display each menu.
- Press the ▲ / ▼ button to select a menu item. The selected menu item changes from green to purple.
- Press the ◀ / ▶ button to change the setting of a menu item or OK button to display the submenu.
Note:
a. The menus automatically disappear in about 1 minute if you do not press a button. b. In the AV mode, MENU 1 is not displayed. c. In the teletext mode, menus are not displayed. d. In MENU 2, the display ⚙️ ●●●●●● appears at the bottom of the menu if the eye function is on. e. In mono models, MENU 3 does not appear. f. In some models, the menu items AUTO AV, LANGUAGE, TINT, AVL, GAME, and SYSTEM are not displayed on the screen menu.

![graph TD A["AUTOPROGRAMME\nMANUALPROGRAMME\nPROGRAMMEDIT\nLANGUAGE"] --> B["MENU 1"] B --> C["OCONTRAST 75\nOBRIGHTNESS0050\nOCOLURO00000050\nOSHARPNESS00050\nOTINTOOOOOO0000"] B --> D["MENU 2"] D --> E["EQUALIZEROFLAT\nOBALANCE0000000\nOSURROUND0000FF"] D --> F["MENU 3"] F --> G["CHILDLOCK OFF\nAUT…](/content/2026/06/1352380/images/2fda25b9b2bfe831ff0ea3f6a3f0b29602377f4a4620e194c397a3fbf55c94dd.jpg)
Setting up TV stations
Up to 100 TV stations can be stored in this set by programme numbers (00 to 99). Once you have preset the stations, you will be able to use the ▲ / ▼ or NUMBER buttons to scan the stations you programmed. Stations can be tuned using automatic or manual modes.
Auto programme tuning
All stations that can be received are stored by this method. It is recommended that you use auto programme during installation of this set.
- Press the MENU button to display MENU1.
- Press the ▲ / ▼ button to select AUTO PROGRAMME.
- Press the OK button to display the AUTO PROGRAMME menu.
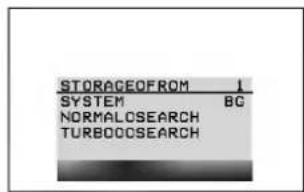
- Press the ▲ / ▼ button to select STORAGE FROM. Select the beginning programme number with the ◀ / ▶ button or NUMBER buttons. Any number under 10 is entered with a numeric '0' in front of it, i.e. '05' for 5.
- Press the ▲ / ▼ button to select SYSTEM. Select a TV system with the ◀ / ▶ button; BG (Asia/New Zealand/M.East/Africa/Australia), I (Hong Kong/South Africa), DK (East Europe/China/Africa/CIS) or M (USA/Korea/Philippines).
Option:
SYSTEM is an optional function.
In some models, the menu item SYSTEM is not displayed on the screen, so that there is no necessity for selecting it at that time.
- Press the ▲ / ▼ button to select NORMAL SEARCH or TURBO SEARCH.
Note:
a. NORMAL SEARCH (Stereo / NICAM reception models only) will automatically store all receivable systems. b. TURBO SEARCH is further faster than NORMAL SEARCH. TURBO SEARCH is faster but will only store the system selected. c. If the programmed signal has poor quality sound, select the system again in the MANUAL PROGRAMME menu.
- Press the OK button to begin auto programming.

(Normal search)

(Turbo search)
All receivable stations are stored. To stop auto programming, press the MENU button. When auto programming is completed, the PROGRAMME EDIT menu appears on the screen. See the 'Programme edit' section to edit the stored programme.
- Press the TV/AV button to return to normal TV viewing.
Auto programme scan
To automatically scan the pictures of stored programmes, press the ▲(▲) or ▼(▼) button for about 3 seconds. The picture of stored programmes appears on the screen one by one.
To stop auto programme scanning, press any button except VCR buttons.

MENU 1
Setting up TV stations
MENU 1
Manual programme tuning
Manual programme lets you manually tune and arrange the stations in whatever order you desire.
- Press the MENU button to display MENU1.
- Press the ▲ / ▼ button to select MANUAL PROGRAMME.
- Press the OK button to display the MANUAL PROGRAMME menu.


- Press the ▲ / ▼ button to select PROGRAMME. Select the desired programme number with the ◀ / ▶ button or NUMBER buttons. Any number under 10 is entered with a numeric '0' in front of it, i.e. '05' for 5.
- Press the ▲ / ▼ button to select SYSTEM. Select a TV system with the ◀ / ▶ button; BG (Asia/New Zealand/M.East/Africa/Australia), I (Hong Kong/South Africa/U.K), DK (East Europe/China/Africa/CIS) or M (USA/Korea/Philippines). In some models, the menu item SYSTEM is not displayed on the screen, so that there is no necessity for selecting it at that time.
- Press the ▲ / ▼ button to select CHANNEL. Press the ◀ / ▶ button to select V/UHF or CABLE as required. If possible, then select the channel number directly with the NUMBER buttons.
- Press the ▲ / ▼ button to select SEARCH.
- Press the ◀ / ▶ button to commence searching. If a station is found the search will stop.
- Press the OK button. The display STORED will appear.
- To store another station repeat steps 4 to 9.
- Press the TV/AV button to return to normal TV viewing.
Option:
Fine tuning
Normally fine tuning is only necessary if reception is poor.
- Repeat 'Manual programme tuning' steps 1 to 3.
- Press the ▲ / ▼ button to select PROGRAMME. Select the desired programme number with the ◀ / ▶ button or NUMBER buttons. Any number under 10 is entered with a numeric '0' in front of it, i.e. '05' for 5.
- Press the ▲ / ▼ button to select FINE.
- Press the ◀ / ▶ button to fine tune for the best picture and sound.
- Press the OK button. The display STORED will appear.
- Press the TV/AV button to return to normal TV viewing. The finely tuned programme will be indicated by a yellow number during programme selection.
Setting up TV stations
Programme edit
This function enables you to rearrange the programmes stored by auto programming in whatever order you desire. Also, you can skip particular programme numbers stored by auto programming.
- Press the MENU button to display MENU 1.
- Press the ▲ / ▼ button to select PROGRAMME EDIT.
- Press the OK button to display the PROGRAMME EDIT menu.
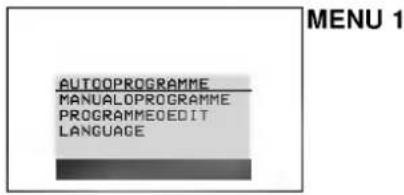

Exchanging programmes
- Press the ◀/▶ button to change the left-hand programme number. The viewing station corresponding to the new programme number is shown on the screen.
- Press the NUMBER buttons to enter the desired right-hand programme number. Any number under 10 is entered with a numeric '0' in front of it, i.e. '05' for 5.
- Press the OK button. The station stored in the right-hand programme number will now appear as the left-hand programme number.
- Repeat steps 1 to 3 to exchange other programmes.
Skipping a stored programme
- Press the ◀ / ▶ button to select the programme you want to skip. The viewing station corresponding to the selected programme number is shown on the screen.
- Press the ▲ / ▼ button to select SKIP
- Press the ◀ / ▶ button to select ON or OFF. If you select ON, the selected station is skipped.
- Press the OK button. The display STORED will appear.
- Repeat steps 1 to 4 to skip another programme. The selection of the skipped programme numbers with the NUMBER buttons is still possible and they will be indicated by cyan numbers during programme selection. Note: The programme number 1 cannot be skipped.
Auto AV setting (option)
Auto AV is an optional function.
If your VCR outputs a switching voltage when it is switched to play-back, select AUTO AV ON with the VCR connected to Euro scart. The set is automatically switched to AV1 mode when an AV signal is input. But if you want to keep on watching TV mode, set AUTO AV to OFF.
- Press the ◀ / ▶ button to select your desired programme number.
- Press the ▲ / ▼ button to select AUTO AV.
- Press the ◀ / ▶ button to select ON or OFF.
- Press the OK button. The display STORED will appear.
- Repeat steps 1 to 4 to set another programme.
Press the TV/AV button to return to normal TV viewing.

Picture adjustment
MENU 2

Picture adjustment
You can adjust picture contrast, brightness, colour intensity, sharpness and tint (NTSC only) to the levels you prefer.
- Press the MENU button to display MENU 2.
- Press the ▲ / ▼ button to select the desired picture item.
- Press the ◀ / ▶ button to make appropriate adjustments.
- Press the OK button. The display STORED will appear.
To recall your preferred setting, press the PSM button until the desired picture (STANDARD, USER, DYNAMIC or MILD) appears. STANDARD, DYNAMIC and MILD are programmed at the factory for good picture reproduction appropriate to each programme character and cannot be changed.
Note: If you press the PSM button after making appropriate adjustment in MENU 2, the display USER automatically appears even though you have already set a factory preset setting; STANDARD, DYNAMIC or MILD.
Eye (option)
Eye is an optional function.
This set will automatically adjust the picture according to the surrounding conditions. This will enable you to enjoy the most suitable picture according to the surroundings.
Press the EYE button to switch the eye function on or off.


When the eye function is on, the most suitable picture automatically is adjusted according to the surrounding conditions.
At this time the display ⚪⋯⋯⋯ in green does not appear continuously but the display ⚪⋯⋯⋯ in yellow appears each time the picture condition changes.
Note: If you press the PSM button with the eye function, the eye function is automatically switched off.
Picture format selection
You can watch the TV in three picture formats; STANDARD, WIDE and ZOOM.
Press the ARC button to switch to STANDARD, WIDE or ZOOM picture format.
STANDARD (4:3)
This is the normal picture size 4 by 3 as displayed on all TV sets.
WIDE (16:9)
This is the cinema screen picture format. Some TV stations broadcast in this picture format. To receive the picture size 16 by 9, select WIDE.
ZOOM
This is the picture format the STANDARD picture is magnified to fill the whole screen but the extreme top, bottom, left and right of the picture are lost.
To adjust the picture size, press the ▲ / ▼ or ◀ / ▶ button then OK button.
The display STORED will appear.
Note :
a. In the manual AV mode, WIDE picture format is not available. b. When you switch the set to standby or off, the WIDE or ZOOM picture format is reset to the STANDARD (4:3).
Sound adjustment (option)
The sound adjustment is an optional function.
Only a set with the sound adjustment option can perform this function.
Sound adjustment
You can select your preferred sound setting; Flat, Music, Movie or Speech as you prefer. Also you can adjust the sound frequency to the levels you prefer. The surround sound creates an all around sound as in a concert hall.
- Press the MENU button to display MENU 3.
- Press the ▲ / ▼ button to select the desired sound item; EQUALIZER, BALANCE or SURROUND.
- Press the ◀ / ▶ button to make desired adjustment.
EQUALIZER
Select FLAT, MUSIC, MOVIE, SPEECH or USER by pressing the ▲ / ▼ button.
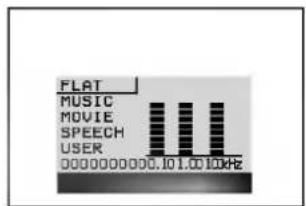
(AV STEREO, FLAT)

(RF STEREO, FLAT)
In case of FLAT, MUSIC, MOVIE, SPEECH, each corresponding equalizer is displayed on the screen. FLAT, MUSIC, MOVIE, SPEECH are programmed at the factory for good sound reproduction appropriate to each programme character.
In case of USER, select the sound band with the ◀ / ▶ button and make appropriate sound level with the ▲ / ▼ button as you prefer. Press the OK button and the display STORED will appear.
BALANCE
Adjust the balance level by pressing the ◀ / ▶ button.
SURROUND
Select ON or OFF by pressing the ◀ / ▶ button or SURROUND button.
- Press the TV/AV button to return to normal TV viewing.
To recall your preferred setting, press the SSM button until the desired sound (FLAT, MUSIC, MOVIE, SPEECH or USER) appears. FLAT, MUSIC, MOVIE and SPEECH are programmed at the factory for good sound reproduction appropriate to each programme character and cannot be changed.
Note: If you press the SSM button after making appropriate adjustment in MENU 3, the display USER automatically appears even though you have already set a factory preset setting; FLAT, MUSIC, MOVIE or SPEECH.


Sound adjustment (option)
Stereo/Dual reception (option)
When a programme is selected, the sound information for the station appears after the programme number and station name disappear.
| Broadcast | On Screen Display |
| Mono | MONO |
| Stereo | STEREO |
| Dual | DUAL I |

Mono sound selection
In stereo reception if the stereo signal is weak, you can switch to mono by pressing the I/II/* or DUAL/* button. In mono reception the depth of sound is improved. To switch back to stereo, press the I/II/* or DUAL/* button again.
Language selection for dual language broadcast
If a programme received in two languages (dual language), you can switch to DUAL I, DUAL II or DUAL I II by pressing the I/II/* or DUAL/* button repeatedly.
DUAL I sends the primary broadcast language to the loudspeakers.
DUAL II sends the secondary broadcast language to the loudspeakers.
DUAL I II sends a separate language to each loudspeaker.
Sound adjustment (option)
NICAM reception (option)
If your set is equipped with the receiver for NICAM reception, the high quality NICAM (Near Instantaneous Companding Audio Multiplex) digital sound can be received.
Sound output can be selected according to the type of received broadcast as follows by pressing the I/II/* or DUAL/* button repeatedly.
- When NICAM mono is received, you can select NICAM MONO or FM MONO.
- When NICAM stereo is received, you can select NICAM STEREO or FM MONO. If the stereo signal is weak, switch to FM MONO.
- When NICAM dual is received, you can select NICAM DUAL I, NICAM DUAL II or NICAM DUAL III or MONO. When FM mono is selected the display MONO appears on the screen.
Sound output selection (option)
In AV mode, you can select output sound for the left and right loudspeakers.
Repeatedly press the I/II/* or DUAL/* button to select the sound output.
L+R : Audio signal from audio L input is sent to left loudspeaker and audio signal from audio R input is sent to right loud-speaker. L+L : Audio signal from audio L input is sent to left and right loudspeakers. R+R : Audio signal from audio R input is sent to left and right loudspeakers.
Other functions
MENU 4
Child lock
The TV can be set so that the remote control handset is needed to control it. This feature can be used to prevent unauthorised viewing.

- Press the MENU button to display MENU 4.
- Press the ▲ / ▼ button to select CHILD LOCK.
- Press the ◀ / ▶ button to select ON.
- Press the TV/AV button to return to normal TV viewing.
With the lock on, the display CHILD LOCK ON appears on the screen if any button on the front panel is pressed while viewing the TV.
Note: The display CHILD LOCK ON does not appear on the screen if any button on the front panel is pressed while displaying the menus.
Auto sleep
If you select AUTO SLEEP ON, the set will automatically switch itself to standby mode approximately ten minutes after a TV station stops broadcasting.
- Press the MENU button to display MENU 4.
- Press the ▲ / ▼ button to select AUTO SLEEP.
- Press the ◀ / ▶ button to select ON.
- Press the TV/AV button to return to normal TV viewing.
On timer
The set automatically switches on after the preset time elapses.
- Press the MENU button to display MENU 4.
- Press the ▲ / ▼ button to select ON TIMER.
- Set the desired time period with the ◀ / ▶ button.
- Press the TV/AV button to return to normal TV viewing.
Off timer
The off timer automatically switches the set to standby after the pre-set time elapses.
- Press the MENU button to display MENU 4.
- Press the ▲ / ▼ button to select OFF TIMER.
- Set the desired time period with the ◀ / ▶ button.
- Press the TV/AV button to return to normal TV viewing.
You can set the on/off timer from 10 minutes up to 12 hours 50 minutes in 10 minute steps. The timer begins to count down from the selected time period.
Note:
a. This set must be put into standby mode with the POWER button on the remote control to operate the on timer function. b. Two hours after the set is switched on by the on timer function it will automatically switch back to standby mode unless a button has been pressed. c. To view the remaining on/off time, select MENU 4. d. To cancel the set on/off time, set the on/off timer to --:--. e. When you switch the main power off, the on/off time is reset.
Other functions
Game (option)
This is an optional function.
You can enjoy the game with this set. To make a good score, try to remove insects coming down from above with ◀ / ▶, ▲ / ▼ and OK button.

- Press the MENU button to display MENU 4.
- Press the ▲ / ▼ button to select GAME.
- Press the OK button to start the game. Move the gun left and right with the ◀ / ▶ button, and adjust the direction of the gun with the ▲ / ▼ button, and shoot with the OK button while playing the game. The game score will automatically be displayed.
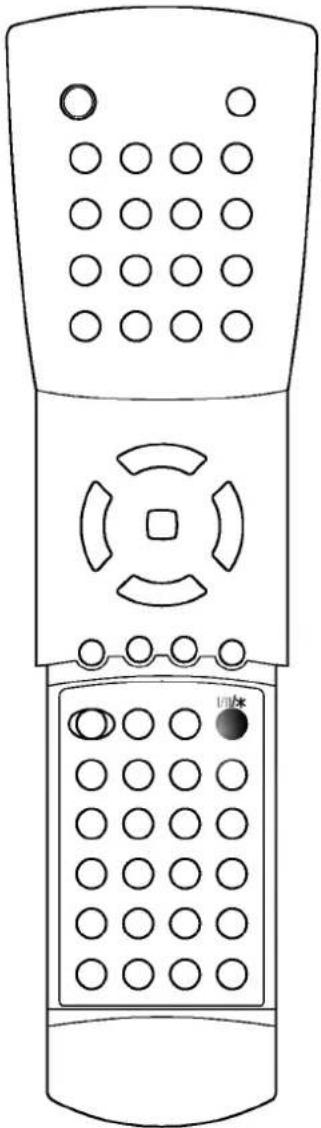
Remote control for Game (option)
This remote control is optional supply. If it's supplied to you, use it when playing the game.

POWER : switches the set on from stand-by or off to standby MUTE : switches the sound on or off
TV/AV : exit game mode
MENU : display game menu and exit game mode
PR ▲ / ▼ / VOL ◀ / ▶ / OK ■ : control or shoot a gun when playing the game
Note :
a. If you want to exit this mode while the game is being played, press the TV/AV or MENU button. b. If you want to continue the game, press the OK button to start.
Other functions
MENU 5


TV and AV modes
Inputs can be set for TV or AV mode. AV mode is used when a video cassette recorder (VCR), or other equipment is connected to the set.
Note : When a VCR is connected via the aerial socket the set is used in TV mode. See the 'Connection of external equipment' section.
- Press the MENU button to display MENU 5.
- Press the ▲ / ▼ button to select INPUT.
- Press the ◀ / ▶ button to select TV, AV 1 or AV 2.
The two AV modes are :
AV 1 : VCR connected to the Euro scart socket or phone jack of the set.
AV 2 : VCR connected to the AV2 sockets of the set (option).
- Press the OK or TV/AV button.
To return to TV mode from AV mode press the ▲ / ▼, TV/AV or NUMBER buttons.
Alternatively you can select the TV or AV mode by pressing the TV/AV button.
Blue back
If you have set BLUE BACK ON, the blue background appears on the screen when there is no broadcasting signal.
- Press the MENU button to display MENU 5.
- Press the ▲ / ▼ button to select BLUE BACK.
- Press the ◀ / ▶ button to select ON or OFF.
- Press the OK or TV/AV button to return to normal TV viewing.
CSM (Colour Status Memory)
You can select the picture colour status; standard, reddish, greenish or bluish, as you prefer.
- Press the MENU button to display MENU 5.
- Press the ▲ / ▼ button to select CSM
- Press the ◀ / ▶ button to select STANDARD, REDDISH, GREENISH or BLUISH.
- Press the OK or TV/AV button to return to normal TV viewing.
AVL (Auto Volume Leveler) (option)
AVL automatically keeps on an equal volume level even if you change programmes.
- Press the MENU button to display MENU 5.
- Press the ▲ / ▼ button to select AVL.
- Press the ◀ / ▶ button to select ON or OFF.
- Press the OK or TV/AV button to return to normal TV viewing.
Teletext (option)
Teletext or TOP text is an optional function, therefore only a set with the teletext system can receive the teletext broadcast.
Teletext is a free service broadcast by most TV stations which gives up-to-the-minute information on news, weather, television programmes, share prices and many other topics.
The teletext decoder of this TV can support the SIMPLE, TOP and FASTEXT systems. SIMPLE (standard teletext) consists of a number of pages which are selected by directly entering the corresponding page number. TOP and FASTEXT are more modern methods allowing quick and easy selection of teletext information.
Switch on/off
Press the TEXT button to switch to teletext. The initial page or last selected page appears on the screen.
Two page numbers, TV station name, date and time are displayed on the screen headline. The first page number indicates your selection, while the second shows the current page displayed.
Press the TEXT or TV/AV button to switch off teletext. The previous mode reappears.
SIMPLE text
Page selection
- Enter the desired page number as a three digit number with the NUMBER buttons. If during selection you press a wrong number, you must complete the three digit number and then re-enter the correct page number.
- The ▲ / ▼ button can be used to select the preceding or following page.
Programming a colour button in LIST mode
If the TV is in SIMPLE text, TOP text or FASTEXT, press the MODE button to switch to LIST mode.
Four teletext page numbers of your choice can be colour coded and easily selected by pressing the corresponding coloured button on the remote control handset.
- Using the NUMBER buttons, select the page you wish to programme.
- Wait until the page is displayed on the screen and press the OK button. The page numbers in the colour boxes along the bottom of the screen change to "000?".
- Press a colour button to store the page number. From now on, you can select this page with the same coloured button.
- The three other coloured buttons are programmed in the same way.
TOP text (option)
The user guide displays four fields—red, green, yellow, and blue—at the bottom of the screen. The yellow field denotes the next group, and the blue field indicates the next block.
Group/block/page selection
- With the blue button, you can progress from block to block.
- Use the yellow button to proceed to the next group, with automatic overflow to the next block.
- With the green button, you can proceed to the next existing page, with automatic overflow to the next group. Alternatively, the ▲ button can be used.
- The red button permits returning to the previous selection. Alternatively, the ▼ button can be used.
Direct page selection
Corresponding to the SIMPLE teletext mode, you can select a page by entering it as a three-digit number using the NUMBER buttons in TOP mode.

Teletext (option)
FASTEXT
The teletext pages are colour-coded along the bottom of the screen and are selected by pressing the corresponding coloured button.
Page selection
- Press the INDEX button to select the index page.
- You can select the pages which are colour coded along the bottom line with the same coloured buttons.
- Corresponding to the SIMPLE teletext mode, you can select a page by entering its three digit page number with the NUMBER buttons in FASTEXT mode.
- The ▲ / ▼ button can be used to select the preceding or following page.

Special teletext functions

REVEAL
Press this button to display concealed information, such as solutions of riddles or puzzles.
Press this button again to remove the information from the display.

SIZE (EXPAND)
Selects double height text. Press this button to enlarge the top half of the page. Press this button again to enlarge the bottom half of the page. Press this button again to return to the normal display.

UPDATE
Displays the TV picture on the screen while waiting for the new teletext page. The display ☐ or □ will appear at the top left hand corner of the screen. When the updated page is available then display ☐ or □ will change to the page number. Press this button to view the updated teletext page.

HOLD (STOP)
Stops the automatic page change which will occur if a teletext page consists of 2 or more sub pages. The number of sub pages and the sub page displayed is, usually, shown on the screen below the time. When this button is pressed the stop symbol is displayed at the top left-hand corner of the screen and the automatic page change is inhibited. To continue press this button again.

MIX
Displays the teletext pages superimposed on the TV picture. To switch the TV picture off press this button again.

TIME
When viewing a TV programme, press this button to display the time at the top right hand corner of the screen. Press this button again to remove the display. In the teletext mode, press this button to select a sub page number. The sub page number is displayed at the bottom of the screen. To hold or change the sub page, press the RED/GREEN, ▲ / ▼ or NUMBER buttons. Press again to exit this function.
Connection of external equipment
You can connect additional equipment, such as VCRs, camcorders etc. to your set.
Here shown may be somewhat different from your set.
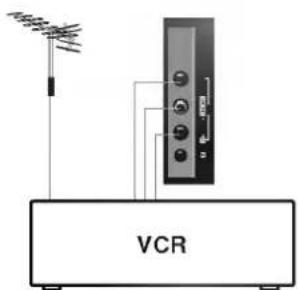
Aerial socket
- Connect the RF out socket of the VCR to the aerial socket on the back of the set.
- Connect the aerial cable to the RF aerial in socket of the VCR.
- Store the VCR channel on a desired programme number using the 'Manual programme tuning' section.
- Select the programme number where the VCR channel is stored.
- Press the PLAY button on the VCR.
Audio/Video in/out sockets (option)
- Connect the audio/video out sockets of the VCR to audio/video in sockets of the set and in sockets of the VCR to out sockets of the set.
- If the VCR is connected to the AV sockets of the set, press the TV/AV button to select AV 1 or AV 2.
- Press the PLAY button on the VCR. The VCR playback picture appears on the screen.
You can also record programmes received by the TV on video tape via audio/video out sockets.
Euro scart socket (option)
- Connect the Euro scart socket of the VCR to the Euro scart socket of the set.
- Press the PLAY button on the VCR. If your VCR outputs a switching voltage the set will switch to AV1 (AV) mode automatically. Otherwise press the TV/AV button on the remote control handset to select AV 1. The VCR playback picture appears on the screen.
You can also record programmes received by the TV on video tape.
Note: Signal type RGB, i.e. the signals red, green and blue can only be selected for the Euro scart socket. These signals are transmitted, for example, by a computer, pay TV decoder, game machine or photo CD unit, etc.
![graph TD A["Input Air"] --> B["VCR"] B --> C["Component 1"] C --> D["VCR"] D --> E["Component 2"] E --> F["VCR"] F --> G["Component 3"] G --> H["VCR"] H --> I["Output Air"]](/content/2026/06/1352380/images/69a7c3b21e06b4ce2537cb248cde8d1c794a0781512422d2a20a6edd7c7e2042.jpg)
Connection of external equipment

Headphone socket (option)
In some models which have a headphone socket can perform this function.
Insert the headphone plug to the headphone socket of the set. You can listen to the sound through the headphone. To adjust the headphone volume, press the ◀ / ▶ button.
If you press the MUTE button, the sound from the headphone and TV's speakers are switched off.
Troubleshooting check list
Symptoms ( ? )
No picture, no sound
![graph TD A["Sound OK, poor picture"] --> B["Picture OK, poor sound"] B --> C["Picture blurred"] C --> D["Lines or streaks in picture"] D --> E["Poor reception on some channels"] E --> F["No colour"] F --> G["Poor colour"] G --> H["Remote control does not work"] style A fill:#f9f,stroke:#333 style H…](/content/2026/06/1352380/images/17023ee2987d5ededb044900379b17b2bc6fe32a266db79018d02fcc0cb319f5.jpg)


Check these items and try to adjust these (√)
The mains plug (plugged in and switched on)
Is the TV switched on?
Try another channel (weak signal)
Check aerial (plugged into TV?)
Check aerial (broken lead?)
Check aerial
Check for local interference
Adjust contrast
Adjust brightness
Adjust colour
Adjust volume
Check the batteries in remote control
Check Audio/Video sockets (VCR only)

LG
- COLOR TELEVISION
- OWNER'S INSTRUCTION MANUAL
- INSTALLATION
- LOCATION OF CONTROL FUNCTIONS
- CONTROL FUNCTIONS OF THE SYSTEMS
- CONTROL LOCATIONS
- BASIC OPERATION
- TURNING ON AND OFF
- ON-SCREEN MENUS
- TV STATION TUNING
- MENU
- TV STATION SETUP
- MANUAL PROGRAM TUNING
- FINE TUNING ADJUSTMENT
- SETTING TV STATIONS
- THE FUNCTION
- PROGRAM REVIEW
- PROGRAM EXCHANGE
- TO BE STORED
- PICTURE ADJUSTMENT
- SOUND ADJUSTMENT (OPTIONAL)
- OTHER FUNCTIONS
- CHILD LOCK
- AUTOMATIC SHUTDOWN WITH THE TIMER
- SLEEP TIMER
- TIMER FOR SHUTDOWN
- NOTE
- TV/AV SETUP
- TELETEXT (OPTIONAL)
- TEXT PAGES (OPTIONAL)
- SPECIAL FUNCTIONS FOR TEXT PAGES
- CONNECTING EXTERNAL EQUIPMENT
- LG
- COLOUR TELEVISION OWNER'S MANUAL
- CONTENTS
- LOCATION AND FUNCTION OF CONTROLS
- SETTING UP TV STATIONS
- SOUND ADJUSTMENT (OPTION)
- TELETEXT (OPTION)
- CONNECTION OF EXTERNAL EQUIPMENT
- TROUBLESHOOTING CHECK LIST
- POWER
- WARNING
- SERVICE
- AERIAL
- LOCATION
- REMOTE CONTROL HANDSET
- ARC (ASPECT RATIO CONTROL)
- PSM (PICTURE STATUS MEMORY)
- TV/AV
- SSM (SOUND STATUS MEMORY) (OPTION)
- I/II/* OR DUAL/* (OPTION)
- BATTERY INSTALLATION
- ON AND OFF
- PROGRAMME SELECTION
- VOLUME ADJUSTMENT
- MUTE FUNCTION
- QUICK VIEW
- ON SCREEN LANGUAGE SELECTION (OPTION)
- MENU SELECTION
- AUTO PROGRAMME TUNING
- OPTION
- AUTO PROGRAMME SCAN
- MANUAL PROGRAMME TUNING
- FINE TUNING
- PROGRAMME EDIT
- EXCHANGING PROGRAMMES
- SKIPPING A STORED PROGRAMME
- AUTO AV SETTING (OPTION)
- EYE (OPTION)
- PICTURE FORMAT SELECTION
- ZOOM
- SOUND ADJUSTMENT
- EQUALIZER
- BALANCE
- SURROUND
- STEREO/DUAL RECEPTION (OPTION)
- MONO SOUND SELECTION
- LANGUAGE SELECTION FOR DUAL LANGUAGE BROADCAST
- NICAM RECEPTION (OPTION)
- SOUND OUTPUT SELECTION (OPTION)
- AUTO SLEEP
- ON TIMER
- OFF TIMER
- GAME (OPTION)
- REMOTE CONTROL FOR GAME (OPTION)
- TV AND AV MODES
- BLUE BACK
- CSM (COLOUR STATUS MEMORY)
- AVL (AUTO VOLUME LEVELER) (OPTION)
- SWITCH ON/OFF
- SIMPLE TEXT
- PAGE SELECTION
- PROGRAMMING A COLOUR BUTTON IN LIST MODE
- TOP TEXT (OPTION)
- GROUP/BLOCK/PAGE SELECTION
- DIRECT PAGE SELECTION
- FASTEXT
- SPECIAL TELETEXT FUNCTIONS
- REVEAL
- SIZE (EXPAND)
- UPDATE
- HOLD (STOP)
- MIX
- TIME
- AERIAL SOCKET
- AUDIO/VIDEO IN/OUT SOCKETS (OPTION)
- EURO SCART SOCKET (OPTION)
- HEADPHONE SOCKET (OPTION)
- SYMPTOMS ( ? )
- CHECK THESE ITEMS AND TRY TO ADJUST THESE (√)
Brand : LG
Model : CT-21Q20E
Category : Television