
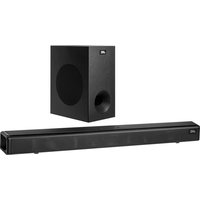
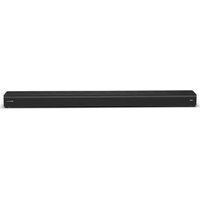
TH-S320B - Soundbar JVC - Free user manual and instructions
Find the device manual for free TH-S320B JVC in PDF.


| Product Type | Soundbar |
| Brand | JVC |
| Model | TH-S320B |
| Dimensions (W x H x D) | 900 x 76 x 95 mm |
| Weight | 2.5 kg |
| Power Supply | AC 100-240V, 50/60 Hz |
| Power Consumption | 35 W (standby <0.5 W) |
| Bluetooth | Yes, version 5.0 |
| Audio Inputs | Optical, AUX, USB |
| Audio Output | Built-in speakers (2 channels) |
| Remote Control | Included (IR) |
| Controls | Power, Volume, Source buttons on device |
| Speaker Configuration | 2.0 channel |
| Frequency Response | 40 Hz - 20 kHz |
| Impedance | 8 ohms |
| Sensitivity | 85 dB |
| Mounting | Tabletop or wall-mountable (brackets not included) |
| Cleaning | Wipe with a soft, dry cloth |
| Storage Conditions | Temperature: -10°C to 60°C, humidity <80% |
| Safety | Do not expose to rain or moisture; unplug during storms |
| Repair | Refer to qualified service personnel; no user-serviceable parts |
| Accessories | Remote control, optical cable, power cord |
Frequently Asked Questions - TH-S320B JVC
User questions about TH-S320B JVC
0 question about this device. Answer the ones you know or ask your own.
Ask a new question about this device
Download the instructions for your Soundbar in PDF format for free! Find your manual TH-S320B - JVC and take your electronic device back in hand. On this page are published all the documents necessary for the use of your device. TH-S320B by JVC.
USER MANUAL TH-S320B JVC
NOTE: For Spanish and French Manual, please visit www.jvcproducts.com/support
www.jvcproducts.com/support
FCC Warning
This device complies with part 15 of the FCC Rules. Operation is subject to the following two conditions: (1) This device may not cause harmful interference, and (2) this device must accept any interference received, including interference that may cause undesired operation.
Note: This equipment has been tested and found to comply with the limits for a Class B digital device, pursuant to part 15 of the FCC Rules. These limits are designed to provide reasonable protection against harmful interference in a residential installation. This equipment generates, uses and can radiate radio frequency energy and, if not installed and used in accordance with the instructions, may cause harmful interference to radio communications. However, there is no guarantee that interference will not occur in a particular installation. If this equipment does cause harmful interference to radio or television reception, which can be determined by turning the equipment off and on, the user is encouraged to try to correct the interference by one or more of the following measures:
—Reorient or relocate the receiving antenna.
—Increase the separation between the equipment and receiver.
—Connect the equipment into an outlet on a circuit different from that to which the receiver is connected.
—Consult the dealer or an experienced radio/TV technician for help.
Note: The Grantee is not responsible for any changes or modifications not expressly approved by the party responsible for compliance. Such modifications could void the user's authority to operate the equipment.
The device has been evaluated to meet general RF exposure requirement.
To maintain compliance with FCC's RF exposure guidelines, the distance must be at least 20 cm between the radiator and your body, and fully supported by the operating and installation configurations of the transmitter and its antenna(s).
IC Warning
This device complies with Industry Canada license-exempt RSS standard(s). Operation is subject to the following two conditions: (1) this device may not cause interference, and (2) this device must accept any interference, including interference that may cause undesired operation of the device.
Supplier's Declaration of Conformity
Model No. TH-S320B
Trade Name: JVC
Responsible Party: Russell Distribution Company
Address: 7801 Hayvenhurst Avenue, Van Nuys, CA 91406 USA
Telephone No. 888-582-8870
Contact Information: https://jvcproducts.com
Important Safety Instructions
Thank you for purchasing the TH-S320B Soundbar. Please read this user manual carefully and keep it for future reference.
Warning

Caution:
To reduce the risk of electric shock, do not dismantle the product and do not expose the apparatus to rain or moisture. No user-serviceable parts inside. Refer servicing to qualified personnel only. The plug on the power cord is used as the disconnect device; the disconnect device shall be easily accessible.

The lightning flash within an equilateral triangle is intended to alert you to the presence of uninsulated dangerous voltage within the product's enclosure that may be of sufficient magnitude to constitute an electric shock to a person or persons.
Important! This symbol alerts you to read and observe important warnings and instructions on the unit or in this manual.
Notice:
This appliance is not intended for use by persons (including children) with reduced physical, sensory, or mental capabilities, unless they are under supervision or instruction concerning use of the appliance by a person responsible for their safety. Children should be supervised to ensure that they do not damage the appliance.
- To prevent possible hearing damage, do not listen at high volume levels for prolonged periods or at sudden high volume levels.

- Do not leave the device unattended. Switch off the device whenever it is not in use.
- The appliance is not intended to be operated by means of an external remote control system, other than the branded remote, or as advised in the user manual.
- If the supply cord is damaged, it must be replaced by the manufacturer, its service agent, or similarly qualified persons in order to avoid a hazard.
- Before operating this system, check the voltage of this system to see if it is identical to the voltage of your local power supply.
- The unit should not be impeded by covering the ventilation opening with items such as newspaper, tablecloths, curtains, etc. Make sure that there are at least 20 cm of space above and at least 5 cm of space on each side of the unit.
- The apparatus must not be exposed to dripping or splashing liquids, and objects filled with liquids, such as vases, must not be placed on the apparatus.
- To prevent fire or shock hazard, do not expose this equipment to direct heat, rain, moisture, or dust.
- Do not place this unit near any water sources, e.g., taps, bathtubs, washing machines, or swimming pools. Ensure that you place the unit on a dry, stable surface.
- Do not place this unit close to a strong magnetic field. This may damage the system.
- Do not place the unit on an amplifier or receiver.
- Do not place this unit in a damp area, as moisture will affect the life of electric components.
- Do not attempt to clean the unit with chemical solvents as this might damage the finish. Wipe with a clean, dry or slightly damp cloth.
- When removing the power plug from the wall outlet, always pull directly on the plug, never pull on the cord.
- Depending on the electromagnetic waves used by a television broadcast, if a TV is turned on near this unit while it is also on, there may be a disturbance on the TV screen. Neither this unit nor the TV is malfunctioning. If you see such disturbance, keep this unit some distance away from the TV set.
- The mains plug is used to disconnect the device, the disconnected device should remain readily operable.
Important Safety Instructions
- Read these instructions carefully and follow accordingly.
- Do not place this apparatus under running water. It may adversely affect the electronic components inside.
- Clean only with dry cloth.
- Do not block any ventilation openings. Install in accordance with the manufacturer's instructions.
- Do not install near any heat sources such as radiators, heaters, stoves, or other apparatus (including amplifiers) that produce heat.
- Do not damage the power cord by walking over it or pinching it, particularly at plugs, convenience receptacles or at the point where they exit from the apparatus.
- Only use attachments/accessories specified by the manufacturer.
- Unplug this apparatus during lightning storms or when unused for long periods of time.
- Ensure the servicing is done by a qualified service personal. Servicing is required when the apparatus has been damaged in any way, for example, when the power-supply cord or plug is damaged, liquid has been spilled or objects have fallen into the apparatus, the apparatus has been exposed to rain or moisture. Does not operate normally, or has been dropped and is not functioning properly.
- The AC plug is used to disconnect the device; the disconnected device should remain readily operable. In order to disconnect the apparatus from the AC power completely, the AC plug must be removed from the AC outlet completely.
Preparation for Use
Unpacking and Set Up
- Remove the Sound bar from the carton and remove all packing material from the Sound bar. Save the packing material, if possible, in case the Sound bar needs to be serviced or transported. The original carton and packing material is the only safe way to pack your Sound bar to protect it from damage in-transit.
HDMI® HIGH DEFINITION MULTIMEDIA INTERFACE
The Adopted Trademarks HDMI, HDMI High-Definition Multimedia Interface, and the HDMI Logo are trademarks of HDMI Licensing Administrator, Inc. in the United States and other countries.
Bluetooth®
The Bluetooth® word mark and logos are registered trademarks owned by Bluetooth SIG, Inc. and any use of such marks by AJS Electronics Limited is under license. Other trademarks and trade names are those of their respective owners.
This product is manufactured, distributed, serviced and warranted exclusively by E & S International Enterprises, Inc. "JVC" is the trademark of JVCKENWOOD Corporation, used by such company under license.
- Place your Sound bar on a level surface such as a table, desk or shelf, conveniently nearby an AC outlet, out of direct sunlight, and away from sources of excess heat, dirt, dust, moisture, humidity or vibration.
- Unwind the Line cord connecting the AC adapter and extend it to its full length.
Protect Your Furniture
This model is equipped with non-skid rubber 'feet' to prevent the product from moving when you operate the controls. These 'feet' are made from non-migrating rubber material specially formulated to avoid leaving any marks or stains on your furniture. However certain types of oil based furniture polishes, wood preservatives, or cleaning sprays may cause the rubber 'feet' to soften, and leave marks or a rubber residue on the furniture. To prevent any damage to your furniture we strongly recommend that you purchase small self-adhesive felt pads, available at hardware stores and home improvement center everywhere, and apply these pads to the bottom of the rubber 'feet' before you place the unit.
Power Source
This sound bar is designed to operate on normal AC Power source. For India, it works on a normal operating voltage of 110V-240V~50Hz/60Hz. Do not attempt to operate the Sound bar on any other power source. You could cause damage to the Sound bar that is not covered by your warranty.
Important Notes
- This sound bar was especially developed for LED/LCD/Plasma TVs. It should not be used in combination with CRT TVs (Cathode Ray Tube TVs) in order to avoid image interference.
- The safety and operating instruction manual should be retained for future reference.
- The apparatus should not be exposed to dripping, splashing, or placed in a humid atmosphere such as a bathroom.
- Do not install the product in the following areas:
- Places exposed to direct sunlight or close to radiators.
- On top of other stereo equipment that radiates too much heat, blocking ventilation, or in a dusty area.
- Areas where there is constant vibration. Humid or moist places.
- Do not place near candles or other flames.
- Operate the product only as instructed in this manual.
- Before turning on the power for the first time, make sure the sound bar is plugged into a power outlet.
- For safety reasons, do not remove any covers or attempt to gain access to the inside of the product. Refer any servicing to qualified personnel.
- Do not attempt to remove any screws or open the casing of the unit; there are no user serviceable parts inside. Refer all servicing to qualified service personnel.


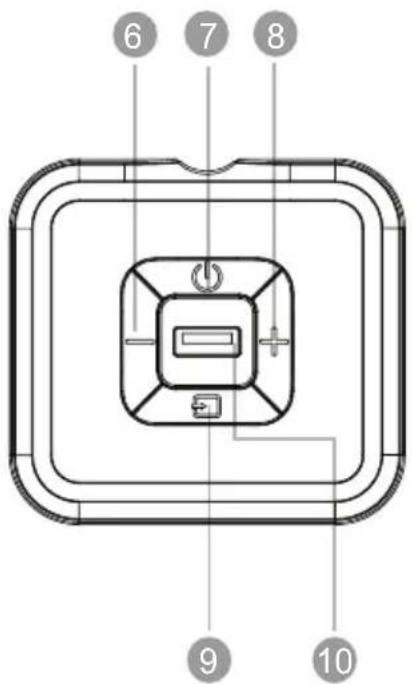
1 DISPLAY 2 HDMI(ARC) 3 OPTICAL 4 AUX 5 DC IN 6 VOL- 7 POWER/STANDBY 8 VOL+ 9 INPUT 10 USB
REMOTE CONTROL

- Power button: Press to switch the sound bar on/off or standby mode.
- Pair button: Press the pair button for more than 2 seconds to connect and disconnect the last device.
- VOL+: To increase the volume.
- Previous button: Skip to the previous track in USB & BT mode.
- VOL-: To decrease the volume.
- Music button: To select and activate the music EQ effect and mode.
- Treble-up button: To increase the treble volume.
- Treble-down button: To decrease the treble volume.
- Mute button: To temporarily turn off the sound. Press the button again to turn the sound back on.
- Source input button: To select an input source for playback: HD: sound from connected HDMI ARC device; BT: sound from connected Bluetooth device; AU: sound from connected Auxiliary Line-in; OP: sound from connected Digital Optical device; US: sound from connected USB device.
- Next button: Skip to the next track in USB & BT mode.
- Play/Pause button: Start, pause, or resume play in USB & BT mode. Reset button: Press and hold the button for more than 2 seconds to restore factory default settings.
- Movie button: To select and activate the movie EQ effect and mode.
- News button: To select and activate the news voice EQ effect and mode.
- Bass+ button: To increase the bass.
- Bass- button: To decrease the bass.
- 3D button: to select and activate the 3D EQ effect and mode.
REMOTE CONTROL BATTERY REPLACEMENT
Please insert the batteries as indicated below
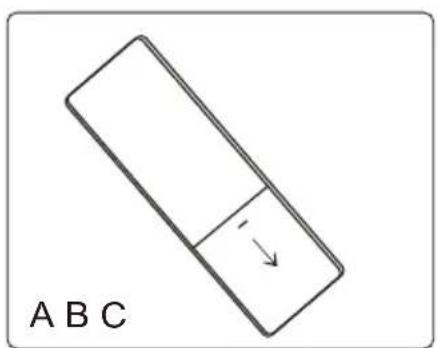


A: Remove the battery cover. B: Insert 2*AAA batteries according to the markings inside the battery slot. C: Close the battery cover.
CAUTION: Risk of explosion if the battery is replaced by an incorrect type.
Handling the battery
- Improper or incorrect use of batteries may cause corrosion or battery leakage, which could cause fire, personal injury or damage to property.
- Only use the battery type indicated in this manual.
- Do not install new batteries with used ones and do not mix different types of batteries.
- Do not dispose of used batteries as domestic waste. Dispose of them in accordance with local regulations.
Handling the Remote Control
- Do not drop the remote control.
- Do not allow anything to impact the remote control.
- Do not spill water or any liquid on the remote control.
- Do not place the remote control on a wet object.
- Do not place the remote control under direct sunlight or near sources of excessive heat.
- Remove the battery from the remote control when not in use for a long period of time, as corrosion or battery leakage may occur and result in physical injury, and/or property damage, and/or fire.
- When the battery is exhausted, the remote control will not be functional.
Operating range of the remote control
- When the unit is mounted on a wall, point the remote control at the remote control sensor on the front panel. The provided remote control allows the unit to be operated from a distance. Even if the remote control is operated within the effective range of 26.2 feet (8m), remote control operation may be impossible if there are any obstacles between the unit and the remote control.
- If the remote control is operated near other products that generate infrared rays, or if other remote control devices using infrared rays are used near the unit, it may operate incorrectly. Conversely, the other products may operate incorrectly.

Positioning the Sound Bar
Table Placement
- Place the sound bar horizontally on a solid surface such as a TV unit or shelves and align it centrally with the TV screen.
- For best sound output and good airflow around the soundbar, place your soundbar and subwoofer as shown on the right.

Follow the steps below to mount the sound bar on the wall.
Note: Brackets, EVA foam, and screws are included in the box.
Step 1: Paste 2 pieces of EVA foam (with holes) on the two wall brackets, aligning them with the hole positions of the wall brackets. Step 2: Remove 4 screws from the rear housing of the sound bar, then insert the 4 screws over the wall bracket screw holes (on the side where the EVA foam is pasted), and then fasten the screws again. Step 3: According to the two hanging wall positions on the rear of the soundbar, calibrate and mark the two hanging bracket hole positions on the wall. Then drill two holes on the wall, first insert two expansion plastic screws into the wall, then fasten the hanging screws into the expansion screw holes. Step 4: Then paste the 2 pieces of EVA foam (without holes) on the two wall brackets downward. Then place the hollow cross in the center of the bracket against the screws on the wall and hang the sound bar on the wall finally.
Please note
- Wipe off any dirt such as oil on the adhesive surface of the sound bar before adhering. Make sure that the adhesive is securely attached.
- When peeling off the release paper of the double-sided tape, be careful not to get dirt such as finger oil on the adhesive surface.
- Be careful of deterioration of double-sided tape due to storage conditions.


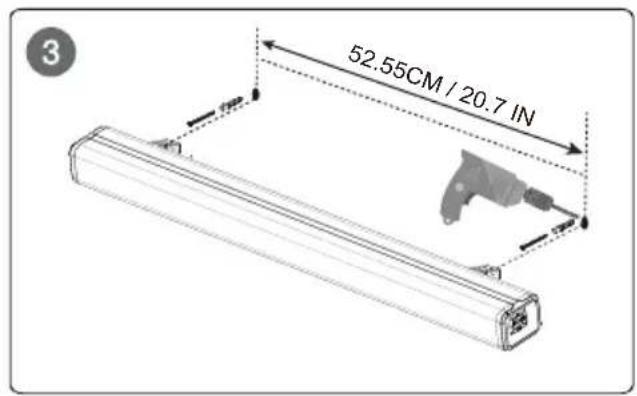

Mount the unit on a wall

CAUTION
- When mounting the soundbar on a wall, all installation must be performed in the right way. The customer must never attempt to install it without authorization. Improper or inadequate installation may cause the sound bar to fall, resulting in personal injury.
- To prevent the sound bar from falling, attach it to a wall constructed of drywall (plasterboard). Make sure that commercially available screws are used so that they can support the weight of the installation.
- Fix the cables in place where they will not become loose. If your foot or hand accidentally gets caught on a loose cable, the sound bar may fall.
- Do not lean on the sound bar or apply excessive force to the top of the sound bar, which may cause it to fall.
OPERATING INSTRUCTIONS
Setting the Soundbar
1: Plug in the power cord of the subwoofer and sound bar, and the display will light up (Standby mode). 2: Switch on the soundbar by using the STANDBY button on the soundbar or by using the POWER button on the remote. After switching on, the default input mode will appear on the display. 3: Input mode can be changed by pressing the STANDBY button again or by using the INPUT button on the remote. 4: Below are input mode names appearing in the soundbar display: bt - Bluetooth Pairing mode, RU - AUX mode, OP - Optical mode, Hd - HDMI TV (ARC) mode, US - USB mode.
Volume value: the volume value is 00-32, and the factory set value is "10". It has last volume memory function. Mode switching: BT/OP/HD/AU/US connection modes can be switched; meanwhile, the selected mode will be displayed on the display screen.
Auto Standby
- The unit will automatically switch to standby mode when no audio input is received for 20 minutes.
The soundbar will wake up from standby mode when any button is pressed or source input is received.
- If the TV or the external unit is disconnected, switch it off
- To switch the unit off completely, remove the adapter from the mains socket.
- Please turn the unit off completely to save energy when not in use.
- The screen will be turned off for around 10 seconds without any operation, when pressing the buttons on the sound bar or on remote control or the using iphone's volume increase or decrease, the display will be waken up again.
Powering On/Off
- Put adapter plug of the sound bar into a wall outlet, it will automatically enter standby mode.
- Short-press the STANDBY button to turn on the sound bar.
- To turn off, press the STANDBY button on remote control or unplug adapter from wall outlet.
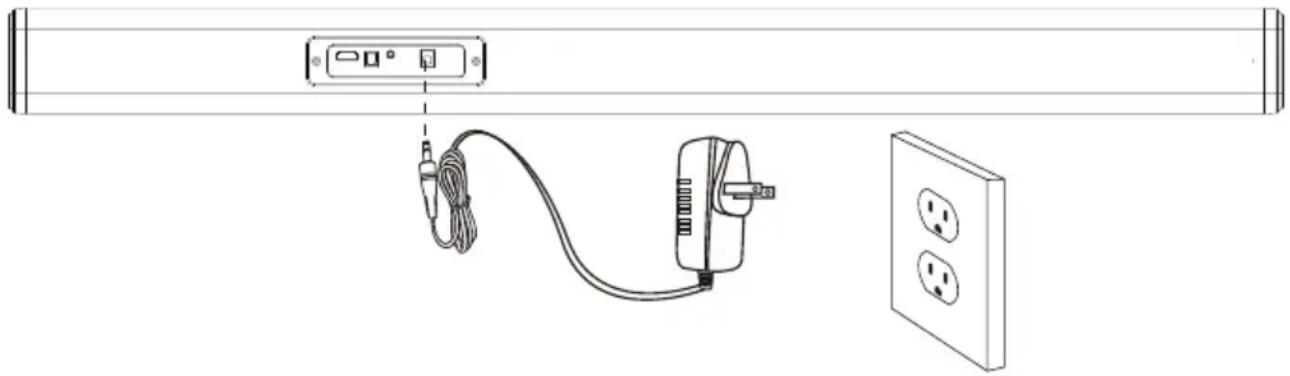
Playing Audio via BT Connection
- Turn on the sound bar and then short-press the STANDBY button on sound bar or POWER button on remote control and switch the sound bar to Bluetooth mode and LED display "be" on the sound bar will flicker in the bluetooth pairing mode with a double deep sound.
- Turn on Bluetooth of your device, search for "TH-S320B" on your Bluetooth list, and then select Bluetooth connection.
- When successfully paired, you will hear a tone and the "bt" on the screen stops flickering. Then the music on your phone or other compatible device that you selected can be played on the sound bar.
- Use the volume buttons on the sound bar or on the remote controller to adjust the volume.
- The remote controller includes Bluetooth mode playback controls. Press and hold PAIR button on the remote controller more than two seconds to disconnect paired Bluetooth device or connect back last disconnected Bluetooth device.
- If you wish, you can change the audio settings by using the relevant buttons on the remote controller.
Notes:
- In Bluetooth mode, the remote can control music play/pause or select previous or next track. PREV/NEXT/PLAY & PAUSE button only work in Bluetooth and USB mode; they have no function in other modes.
- The above pairing procedure doesn't need to be repeated with the same connected device once paired.
- If the connected device is switched off or manually disconnected, the sound bar will automatically enter pairing mode.
- If the connected device is moved away from wireless range (up to 10 meters) of the sound bar, then it will get disconnected, and it will successfully connect to the device once you re-enter Bluetooth range.
To connect to other devices, repeat the above pairing steps.
- If a Bluetooth device has been connected before, the sound bar will connect to the last connected device.
Unpair this connection to connect a new device.
- There is no automatic shutdown in pairing mode. The sound bar will remain in pairing mode even if no device is paired, so switch it off if not in use.
Playing Audio via USB Port
- The sound bar automatically switches to USB input mode with the LED display "US" when a USB flash drive is inserted.
- When a USB flash drive is inserted and the sound bar is powered on, then short-press the INPUT key on the remote controller or the STANDBY button on the sound bar to switch to USB input mode (in case it doesn't change automatically) with the LED display lighting up "US". And music in the USB will be automatically played.
- This mode cannot be used on the sound bar until a USB flash drive is connected.
- Ensure that your USB flash drive contains MP3 audio files (other file types are not supported).
- Connect the USB flash drive to the USB port on the sound bar or by USB adapter (or your own USB extension cable connected to the USB port) and the music will be played automatically.
- The remote control includes USB input mode playback controls.
Audio Input (AUX) Connection
- Use a 3.5mm to 3.5mm audio cable (not included) to connect the PC, tablet, smartphone, or TV's headphone socket to the AUX socket on the soundbar.
- Use an RCA to 3.5mm audio cable (included) to connect the Blu-ray DVD player / TV's audio output sockets to the AUX socket on the soundbar.
- Then short-press the power button on the sound bar or on the remote controller to switch to audio input mode with LED display lighting up RU.
- In this mode, playback can only be controlled on your connected device.
Note: For some computers, you may need to access the audio control panel to manually set the soundbar as shown in the picture above.

Optical Mode
Remove the cap of the optical cable (keep the cap for future use); check the direction of the plug. Connect the sound bar and TV with the optical cable.
Use this mode to play music from a TV with optical digital output on the sound bar. In TV sound settings, select the sound bar optical connection (output for audio). When the optical cable is connected, the TV audio output is set to PCM format.
The TV must have an optical digital output. Use the supplied optical cable to make the connection as follows:
- Connect the optical cable to the optical digital output of your TV.
- Connect the optical cable to the optical digital input of your sound bar.
- Switch on the TV set and the sound bar. Set the connected TV to "PCM Stereo". Set the audio output mode as <decoded output as PCM state>.
- Start playing on the TV.
- Press "INPUT" button on the remote control or "STANDBY" button on the sound bar to select OPTICAL mode.
- Use the volume buttons to adjust the volume to your requirements.
- You can also change the audio settings by using the relevant buttons on the remote control.
Note:
- When connecting a device such as a TV/Set-top box/DVD/game console with an optical cable, set the audio output mode of the device to PCM mode (digital optical output).
- Do not bend the optical cable, otherwise the cable inside will be damaged.

HDMI(ARC) Mode
- The sound bar supports HDMI(ARC) with audio return channel (ARC). You can hear the TV audio through your sound bar by using a single HDMI(ARC) cable. But on condition that your TV is ARC compliant.
- Using a high speed HDMI(ARC) cable, connect the HDMI(ARC) connector on the sound bar to the HDMI(ARC) connector on the TV. The HDMI(ARC) connector on the TV might be labeled differently. For details, see the user manual of your TV.
- When HDMI(ARC) is connected, TV sound setting in "sound output" mode should be set as , in addition, digital audio output mode should be set as or < decoded output as PCM state>. When the HDMI(ARC) cable is connected, the TV digital audio output is set as PCM format. Then start playing music on the TV.
- Press "INPUT" button on the remote control or "STANDBY" button on sound bar to select HDMI(ARC) mode. Different TV might be different setting, please refer to your TV User Manual.
- Use the volume buttons to adjust the volume to your requirements.
- You can also change the audio settings by using the relevant buttons on the remote control.
Note:
- When connecting a device such as a TV/Set-top box/DVD/game console with HDMI(ARC) cable, set the audio output mode of the device to PCM mode .
- The TV is connected to a HDMI(ARC) port with sound bar. Different TVs might have different setup menus, but the operation approach is the same.
- If needs to connect set-up box meanwhile, please firstly connect the HDMI(ARC) connector and paired to the sound bar. Then connect the set-top box.

| PROBLE/TROUBLE POSSIBLE CAUSE SOLUTION | ||
| There is no sound output from sound bar. | Another input source is selected. | Select an appropriate input source. |
| The mute function is activated. | Cancel the mute function. | |
| The volume of sound bar or TV/other device is adjusted too low. | Increase the volume level on sound bar or by remote control or on TV. | |
| The power cable of the unit is not connected properly. | Make sure that the power cable of the unit is connected to an AC wall outlet securely. | |
| Input jacks on a playback device are connected. | Connect the input jack on the sound bar and the output jack on the playback device. | |
| Signals that the sound bar cannot playback when being input. | When sound bar and TV or other devices are connected by an audio cable through TV (ARC) port output, Select the correct audio input and output. Make sure the digital audio output setting on the playback device to PCM format. Since the output format of our sound bar is PCM, if it is used, the decoding format of TV or other devices will be adjusted to PCM state. | |
| The sound is distorted or echoed. | TV volume is not muted. | If you play audio from TV through the sound bar, make sure that the TV is muted. |
| The volume decreases when the unit is turned on. | The automatic volume adjustment function is activated. To prevent excessive loudness, the unit automatically controls its volume within a certain level when the unit is turned on. | Turn up the volume as required. |
| Noise is heard. | The sound bar is too close to another digital or high-frequency device. | Move those devices away from the sound bar. |
| The unit cannot be operated by using the remote control. | The unit is out of the operating range. Use the remote control within the operating range. | |
| The batteries are weak. Replace with new batteries. | ||
| The remote control sensor of the sound bar is exposed to direct sunlight or strong lighting. | Adjust the lighting angle or reposition the sound bar. Make sure our product cannot be used in sunlight. | |
| The TV cannot be operated by using the TV's remote control. | The unit is blocking the TV's remote control sensor. | Position the unit so that it does not obstruct the TV's remote control sensor. |
| A device cannot connect the sound bar or the unit cannot be connected to a Bluetooth device. | Bluetooth function of the device is not activated, not paired or connected correctly. | Restart the sound bar and try pairing again. You have not enabled the Bluetooth function of the device; see the user manual of the device on how to enable the function and correctly connected the device. The sound bar is already connected with another Bluetooth device. Disconnect the connected device, and then try again. |
| Bluetooth is not selected as the input source. | Select Bluetooth as the input source. | |
| The unit is connected to a different Bluetooth device. | Un-pair the Bluetooth device that is currently connected and pair with the desired Bluetooth device. | |
| The unit is too far away from the Bluetooth device. | Move the Bluetooth device closer to this unit. | |
| A device emitting electromagnetic waves (such as a microwave oven, a wireless device and so on) may be placed nearby. | Do not use this unit near devices that emit electromagnetic waves. | |
| The Bluetooth device that you are using may not support the protocol. | Use a Bluetooth device that supports the protocol. | |
| The connection profile registered in the Bluetooth device may not be functioning correctly for some reason. | Delete the connection profile in the Bluetooth device and then connect the Bluetooth device to this unit. | |
| Sound quality of audio play from a connected Bluetooth device is poor and connection is not stable. | The Bluetooth reception is poor. | Move the device closer to the sound bar, or remove any obstacle between the device and the sound bar. |
| No sound can be heard or sound breaks (Bluetooth mode) | The volume on the Bluetooth device may be too low. | Raise the volume on the Bluetooth device. |
| Bluetooth is not selected as the input source. | Select the Bluetooth as the input source. | |
| Playback on the device has not been performed. | Perform playback on the device. | |
| The sound output on the Bluetooth device may not be set to this unit. | Select this unit as the output device on the Bluetooth device. | |
| The connection to the Bluetooth device was cut off. | Connect with the Bluetooth device one more time. | |
| The unit may be too far away from the Bluetooth device. | Move the Bluetooth device near this unit. | |
| A device emitting electromagnetic waves (such as a microwave oven, a wireless device and so on) may be placed nearby. | Do not use this unit near device that emit electromagnetic waves. | |
| There is no sound from sound bar - HDMI TV (ARC) Mode | No qualified HDMI TV (ARC) cable is used & No signal is input on sound bar & connection and operation method is not correct. | 1. Make sure that the user connected TV and sound bar by a 19-core HD ARC cable.2. The sound bar and TV are connected through TV (ARC) port output; make sure that the TV is ARC compliant.3. Set the TV to HDMI ARC (CEC).Set the audio output mode of TV to PCM format.(Or refer to your TV user manual) |
| There is no sound from sound bar (OPTICAL Mode) | OPTICAL cable maybe damaged & No signal is input on sound bar & connection and operation method is not correct. | 1. Try to replace another OPTICAL cable to connect.2. Set your TV audio output to PCM format.(Pls refer to your TV user manual) |
| There is no sound from sound bar (USB mode) | USB file type is not support & Sound bar doesn't switch to USB input mode automatically when USB is inserted. | Make sure that USB flash drive contains MP3 files because other file types are not support.Switch the input mode once again, then playback again. |
Package Contents


Soundbar X 1 Remote Control X 1
Bracket Sets X 1


Line in to RCA Cable X 1, User Manual X 1, Remote control battery, Wall Mounting
Specifications
| Model | TH-S320B |
| Technology | BT/USB/AUX/HDMI(ARC)/OPT |
| Drivers | 2.5"*2 |
| Audio Output Power | 150W Peak Power |
| Frequency Response | 70Hz-20KHz |
| Signal-to-Noise Ratio | 66dB |
| Impedance | 8Ω*2 |
| Power Input | DC 24V---1.75A |
| Bluetooth Operating Range | Version: 5.0 Range:up to 10m |
| Dimensions | 74H*87D*750L mm |
JVC Limited Warranty
This JVC branded "Product", marketed as new, in the original carton to the original purchaser ("Product"), is warranted by Russell Distribution Company, LLC against manufacturing defects in materials and workmanship for a limited warranty period of One (1) Year for Labor and One (1) year for Parts. This Limited Warranty is conditioned upon proper use of Product by you, the Purchaser.
This Limited Warranty does not apply to store display products and product sold as a "marked down" special, in "as is" condition, "close outs", "liquidation and clearance sales", "open box", products missing accessories, or no fault found.
Proof of purchase in the form of a Bill of Sale, Receipt or Receipted Invoice is evidence the Product is within the limited warranty period. The Bill of Sale, Receipt or Receipted Invoice must be presented as a pre-condition to obtaining the limited warranty service.
This limited warranty begins on the original date of purchase and is valid only on Products purchased through authorized dealers and used in the United States, Canada, and Puerto Rico, by the original Purchaser. To receive warranty service, the Purchaser must first contact us for problem determination and service procedures. The original dated bill of sale, receipt or receipted invoice must be presented upon request as proof of purchase.
We will repair your product or if repairs cannot be made, we will replace it at no charge with the same or similar product. If the Product is defective as specified in this limited warranty during the limited warranty period, we may use new or remanufactured parts to repair the Product. All replaced parts and products become our property and must be returned to us. Replacement parts and products assume the remaining original limited warranty, or ninety (90) days, whichever is longer.
Product freight must be prepaid by you, the original Purchaser and shipped in either its original packaging or packaging affording an equal degree of protection. We will not be responsible for or obligated to replace damaged Products.
If the Product is received damaged, it is your responsibility as the consumer to file a claim against the carrier. We will only store the damaged Product for 30 days and reserve the right, in our sole discretion, to dispose of the damaged Product or ship it back to you at your expense after 30 days.
This limited warranty covers manufacturing defects in materials and workmanship encountered in normal and, except to the extent otherwise expressly provided for in this statement, noncommercial use of this Product and shall not apply to the following, including, but not limited to: damage which occurs in shipment, delivery and installation; applications and use for which this Product was not intended; altered Product or serial numbers; cosmetic damage or exterior finish; accidents, abuse, neglect, fire, water, lightning or other acts of nature; use of products, equipment, systems, utilities, services, hardware, supplies, accessories, applications, installations, repairs, external wiring or connectors not supplied or authorized by us or the manufacturer, which damage this Product or result in service problems; incorrect electrical line voltage, fluctuations and surges; customer adjustments and failure to follow operating instructions, cleaning, maintenance and environmental instructions that are covered and prescribed in the instruction book; reception problems and distortion related to noise, echo, interference or other signal transmission and delivery problems; burned-in images. Uninterrupted or error-free operation of the Product is not warranted.
THERE ARE NO EXPRESS OR IMPLIED WARRANTIES OTHER THAN THOSE LISTED AND DESCRIBED ABOVE AND NO WARRANTIES WHETHER EXPRESS OR IMPLIED, INCLUDING, BUT NOT LIMITED TO ANY IMPLIED WARRANTIES OF MERCHANTABILITY OR FITNESS FOR A PARTICULAR PURPOSE, SHALL APPLY AFTER THE EXPRESS WARRANTY PERIODS STATED ABOVE, AND NO OTHER EXPRESS WARRANTY OR GUARANTY GIVEN BY ANY PERSON, FIRM OR CORPORATION WITH RESPECT TO THIS PRODUCT SHALL BE BINDING ON US. REPAIR OR REPLACEMENT AS PROVIDED UNDER THIS LIMITED WARRANTY IS YOUR EXCLUSIVE REMEDY AS THE CONSUMER. WE SHALL NOT BE LIABLE FOR ANY INCIDENTAL OR CONSEQUENTIAL DAMAGES FOR BREACH OF ANY EXPRESS OR IMPLIED WARRANTY ON THIS PRODUCT; EXCEPT TO THE EXTENT PROHIBITED BY APPLICABLE LAW, ANY IMPLIED WARRANTY OF MERCHANTABILITY OR FITNESS FOR A PARTICULAR PURPOSE ON THIS PRODUCT IS LIMITED FOR THE DURATION OF THIS LIMITED WARRANTY. THIS LIMITED WARRANTY SHALL NOT EXTEND TO ANYONE OTHER THAN THE ORIGINAL PURCHASER OF THIS PRODUCT, IS NONTRANSFERABLE AND STATES YOUR EXCLUSIVE REMEDY.
Some states or provinces do not allow limitations on how long an implied warranty lasts, or the exclusion or limitation of incidental or consequential damages, so the above limitations or exclusions may not apply to you. This limited warranty gives you specific legal rights, and you may also have other rights which vary from state to state. Any provision contained herein which is found contrary to state or local laws shall be deemed null and void and the remaining provisions shall continue in full force and effect.
This product is manufactured, distributed, serviced and warranted exclusively by E & S International Enterprises, Inc. "JVC" is the trademark of JVCKENWOOD Corporation, used by such company under license.
Claims and Dispute Resolution
RUSSELL DISTRIBUTION COMPANY, LLC AND YOU AGREE THAT ALL CLAIMS OR DISPUTES ARISING IN ANY WAY FROM THIS LIMITED WARRANTY OR THE SALE, CONDITION OR PERFORMANCE OF THE PRODUCT, WHETHER BASED IN CONTRACT, TORT, STATUTORY, FRAUD, MISREPRESENTATION OR ANY OTHER LEGAL THEORY, AND ALL CLAIMS THAT ARE SUBJECT OF A PURPORTED CLASS ACTION LITIGATION THAT YOU ARE NOT A MEMBER OF THE CERTIFIED CLASS, SHALL BE RESOLVED THROUGH ARBITRATION AS PROVIDED FOR HEREIN, OR IN SMALL CLAIMS COURT, AND NOT BY A TRIAL BY JURY. YOU WAIVE THE RIGHT TO A TRIAL BY JURY, AND WAIVE THE RIGHT TO PARTICIPATE IN CLASS ACTIONS ARISING FROM OR RELATING TO ANY AND ALL CLAIMS AND DISPUTES WITH RUSSELL DISTRIBUTION. YOU AGREE THAT YOU MAY ARBITRATE CLAIMS AGAINST RUSSELL DISTRIBUTION ONLY IN YOUR INDIVIDUAL CAPACITY AND NOT AS A PLAINTIFF, A CLASS REPRESENTATIVE, OR CLASS MEMBER IN ANY CLASS OR REPRESENTATIVE PROCEEDING. THIS AGREEMENT EVIDENCES A TRANSACTION IN INTERSTATE COMMERCE, AND THUS THE FEDERAL ARBITRATION ACT GOVERNS THE INTERPRETATION AND ENFORCEMENT OF THIS PROVISION. THIS PARAGRAPH SHALL SURVIVE THE TERMINATION OF THIS LIMITED WARRANTY.
RUSSELL DISTRIBUTION REQUIRES THAT YOU ARBITRATE YOUR CLAIMS AGAINST RUSSELL DISTRIBUTION PURSUANT TO THE ARBITRATION DESCRIBED BELOW PRIOR TO YOUR EXERCISE OF YOUR RIGHTS PURSUANT TO TITLE I OF THE MAGNUSON-MOSS WARRANTY ACT. TITLE I OF THE MAGNUSON-MOSS WARRANTY ACT DOES NOT REQUIRE YOU TO PURSUE RIGHTS AND REMEDIES AVAILABLE TO YOU THAT ARE NOT PROVIDED BY TITLE I OF THE MAGNUSON-MOSS WARRANTY ACT.
Any such arbitration shall not be combined or consolidated with a claim or dispute involving any other person's or entity's product or claim or dispute, and specifically, without limitation of the foregoing, shall not under any circumstances proceed as part of a class action or class arbitration. If you intend to seek arbitration you must first email Russell Distribution at support@jspus.com a notice of dispute, at least thirty (30) days in advance of initiating the arbitration. The notice must include: (i) a description of your claim and the basis of the dispute; and (ii) a description of the relief you are seeking. If Russell Distribution and you do not reach an agreement to resolve the claim within thirty (30) days after Russell Distribution receives your notice, you or Russell Distribution may commence an arbitration proceeding.
The arbitration will take place in Los Angeles, California or a mutually agreed upon location. Arbitration shall be administered by JAMS, or alternatively a mutually agreed upon arbitrator or arbitration service, under the applicable commercial arbitration rules for JAMS or the mutually agreed upon arbitration service, excluding any rules or procedures governing or permitting class actions. The arbitrator, and not any federal, state or local court or agency, shall have exclusive authority to resolve all disputes arising out of or relating to the interpretation, applicability, enforceability or formation of this Limited Warranty, including, but not limited to any claim that all or any part of this Limited Warranty is void or voidable, or whether a claim is subject to arbitration. The arbitrator shall be empowered to grant whatever relief would be available in a court under law or in equity. The arbitrator's award shall be written and binding on the parties and may be entered as a judgment in any court of competent jurisdiction. To the extent the filing fee for the arbitration exceeds the cost of filing a lawsuit, Russell Distribution will pay the additional cost. The arbitration rules also permit you to recover attorney's fees in certain cases. The parties understand that, absent this mandatory provision, they would have the right to sue in court and have a jury trial. They further understand that, in some instances, the costs of arbitration could exceed the costs of litigation and the right to discovery may be more limited in arbitration than in court.
This arbitration provision also applies to claims and disputes by you, the purchaser of the Product, and all those in privity with you, including your family members, beneficiaries and assigns against Russell Distribution subsidiaries and affiliates and any person or entity that licensed, supplied, sold or distributed the Product and each of their officers, employees, representatives, licensors/licensees, agents, beneficiaries, predecessors in interest, successors, and/or assigns. You may opt out of this dispute resolution procedure by providing notice to Russell Distribution no later than thirty (30) calendar days after the date of the first consumer purchaser's purchase of the Product. To opt out you must send notice by e-mail to support@jspus.com. The opt-out notice must include (a) your name, email address, mailing address and phone number; (b) the date on which the product was purchased; (c) the product model name or model number; and (d) the Serial Number. Opting out of this dispute resolution procedure will not affect the coverage of the Limited Warranty in any way, and you will continue to enjoy the benefits of the Limited Warranty. If you opt out of these arbitration provisions, Russell Distribution also will not be bound by them.
Use our Customer Service to assist you in setting up your new product.
Visit: jvcproducts.com
1-888-582-8870
Our warranty!


- FCC WARNING
- IC WARNING
- IMPORTANT SAFETY INSTRUCTIONS
- WARNING
- CAUTION
- NOTICE
- PREPARATION FOR USE
- UNPACKING AND SET UP
- HDMI® HIGH DEFINITION MULTIMEDIA INTERFACE
- BLUETOOTH®
- PROTECT YOUR FURNITURE
- POWER SOURCE
- IMPORTANT NOTES
- REMOTE CONTROL
- REMOTE CONTROL BATTERY REPLACEMENT
- CAUTION: RISK OF EXPLOSION IF THE BATTERY IS REPLACED BY AN INCORRECT TYPE
- HANDLING THE BATTERY
- HANDLING THE REMOTE CONTROL
- OPERATING RANGE OF THE REMOTE CONTROL
- POSITIONING THE SOUND BAR
- TABLE PLACEMENT
- FOLLOW THE STEPS BELOW TO MOUNT THE SOUND BAR ON THE WALL
- PLEASE NOTE
- MOUNT THE UNIT ON A WALL
- OPERATING INSTRUCTIONS
- SETTING THE SOUNDBAR
- AUTO STANDBY
- POWERING ON/OFF
- PLAYING AUDIO VIA BT CONNECTION
- NOTES
- PLAYING AUDIO VIA USB PORT
- AUDIO INPUT (AUX) CONNECTION
- OPTICAL MODE
- NOTE
- HDMI(ARC) MODE
- PACKAGE CONTENTS
- JVC LIMITED WARRANTY
- CLAIMS AND DISPUTE RESOLUTION
- OUR WARRANTY
Brand : JVC
Model : TH-S320B
Category : Soundbar