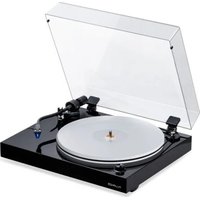
RT85 - Turntable Fluance - Free user manual and instructions
Find the device manual for free RT85 Fluance in PDF.


| Product Type | Turntable |
| Model | RT85 |
| Brand | Fluance |
| Drive System | Manual Belt Drive |
| Speeds | 33 1/3, 45 RPM |
| Cartridge Included | Ortofon 2M Blue |
| Platter Material | Acrylic |
| Tonearm Type | Static Balanced S-Shaped |
| Dimensions (W x D x H) | 16.9 x 13.7 x 5.6 inches |
| Weight | 18.5 lbs |
| Power Supply | AC 120V 60Hz |
| Power Consumption | 2.5W (standby 0.5W) |
| Phono Preamp | Built-in switchable |
| Rumble | -75dB |
| Signal to Noise Ratio | 75dB |
| Wow and Flutter | 0.10% |
| Maintenance | Clean stylus regularly; replace belt every 2-3 years |
| Safety | Keep away from moisture; unplug when not in use for extended periods |
| Spare Parts Availability | Replaceable belt, stylus, cartridge, and platter available |
| Repairability | Modular design; user-replaceable belt and cartridge |
Frequently Asked Questions - RT85 Fluance
User questions about RT85 Fluance
0 question about this device. Answer the ones you know or ask your own.
Ask a new question about this device
Download the instructions for your Turntable in PDF format for free! Find your manual RT85 - Fluance and take your electronic device back in hand. On this page are published all the documents necessary for the use of your device. RT85 by Fluance.
USER MANUAL RT85 Fluance
Reference High Fidelity Vinyl Turntable
User Manual v2.1
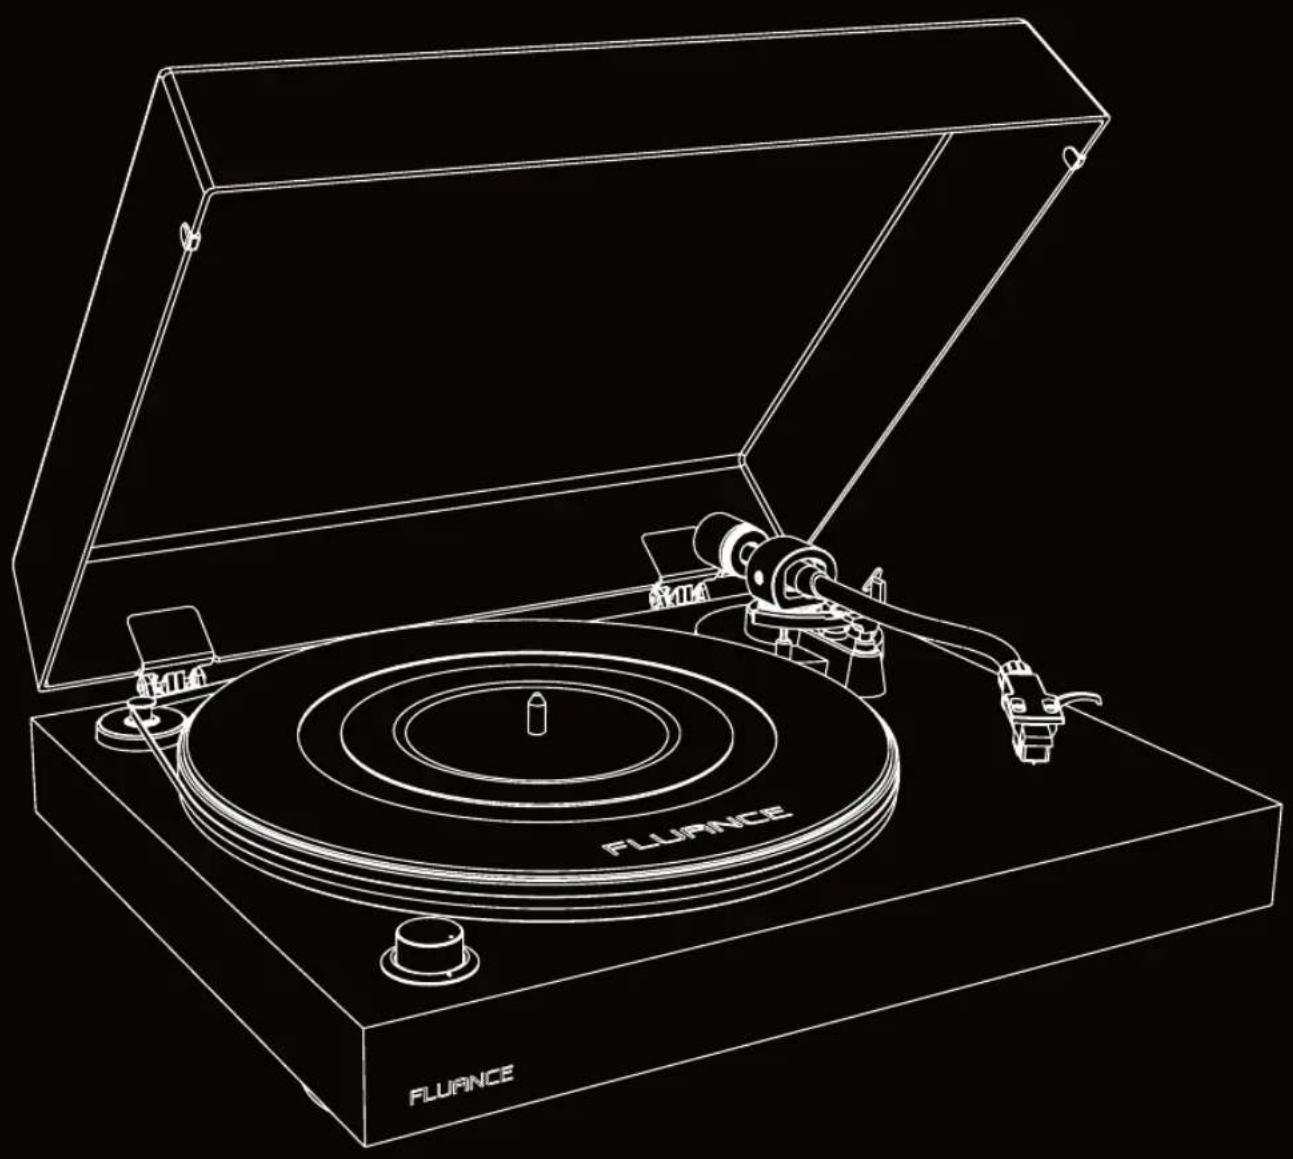
natural_image
Line drawing of a FLURANCE radio with its baseplate and open case (no text or symbols on the instrument itself)Introduction
Fluance believes everyone should experience audio in its truest form, recreating the performance the way the artist intended. Utilizing only superior components and expert audio engineering, their products are a testament to the performance that can be achieved when a passion for music takes center stage. The perfect complement to any audiophile's lifestyle, you'll be enjoying live performances in your home for years to come.
Thank you for your purchase of this Fluance® product. We hope you enjoy your experience.
Questions? Give us a chance to help, we're just a click away.

Fluance.com/resouorces Fluance.com/contactFluance.com/support


Don't forget to register your product with us! Fluance.com/registration
Table Of Contents
Introduction 2
What's Included 4
Components and Connections 5
First Time Setup 6
Step One: Installing the Platter 6
Step Two: Installing the Counterweight 7
Step Three: Installing the Headshell 7
Step Four: Installing the Dust Cover 8
Step Five: Leveling the Turntable 9
Step Six: Balancing the Tonearm 10
Step Seven: Connecting the RCA and Ground Cables 12
Step Eight: Connecting the Power Adapter 12
Step Nine: Playing a Record 13
Auto Stop Function 13
Maintenance 14
Replacing the Stylus 14
Upgrading the Cartridge 14
Replacing the Rubber Belt 14
Parts and Accessories 15
Turntable Care 15
Record Care 15
Stylus Care 15
Troubleshooting 16
Specifications 18
Warranty Information 20
Important Safety Instructions 21
FCC & IC Information 22
Cartridge Alignment Protractor 23
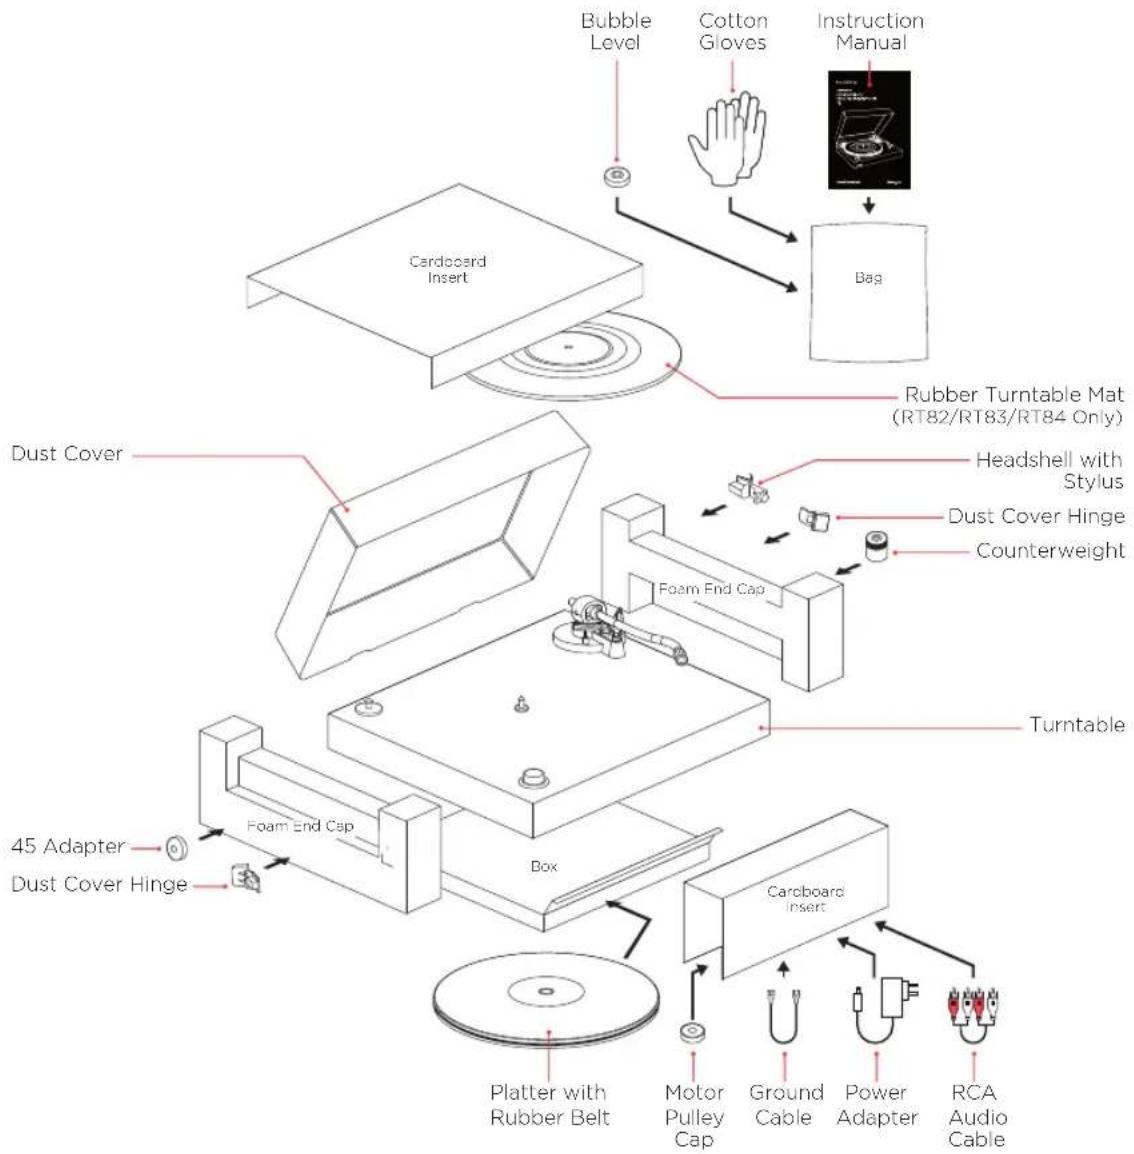
What's Included

natural_image
Line drawing of a mechanical assembly with a transparent housing and a small component on a base (no text or symbols)Turntable with Dust Cover
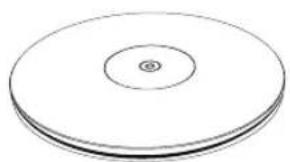
natural_image
Simple line drawing of a circular object with concentric rings and a small spiral at the center (no text or symbols)Platter with Rubber Belt RT82/RT83/RT84 - Metal RT85 - Acrylic
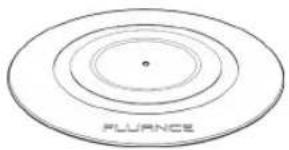
Rubber Turntable Mat RT82/RT83/RT84 Only

Headshell with Stylus
RT82-OM 10
RT83-2M Red
RT84/RT85-2M Blue

Counterweight
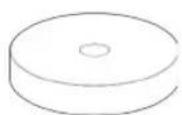
45 Adapter

Power Adapter
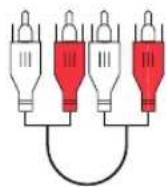
RCA Audio Cable

Dust Cover
Hinges
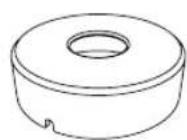
Motor Pulley
Cap

Ground Cable

Bubble Level

natural_image
Simple line drawing of a document with no text, numbers, or symbolsManual

Lifetime Customer Support

natural_image
Simple line drawing of a document with a ribbon seal (no text or symbols)2 Year Warranty
Components and Connections

- Platter
- Motor Pulley
- Motor Pulley Cap
- Rubber Belt
- Spindle
- Rubber Turntable Mat (RT82/RT83/RT84 Only)
- Speed Selection
- Power LED
- Counterweight
-
Anti-Skating Control
-
Cueing Lever
- Tonearm Lock
- Tonearm
- Headshell & Stylus
- RCA Audio Outputs
- Ground Terminal
- Auto Stop Switch
- Power Input
- Motor Servo
- Isolation Feet
- Hinge
First Time Setup
Step One: Installing the Platter
- Remove the protective packaging and ensure the turntable is placed on a sturdy and level surface. Place the platter onto the spindle located in the middle of the turntable.
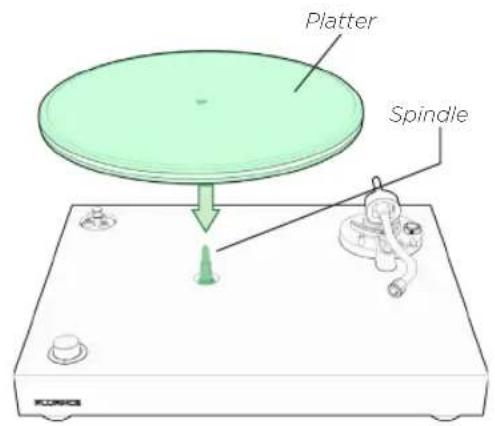
- Lift the rubber belt and place it around the motor pulley. Rotate the platter several times to ensure the rubber belt is secure and not twisted.

natural_image
Diagram of a circular device with a green arrow indicating rotation or direction, connected to a terminal block (no text or symbols)- Place the motor pulley cap over the motor pulley. Ensure the arrows are aligned so that the motor pulley cap is installed properly.
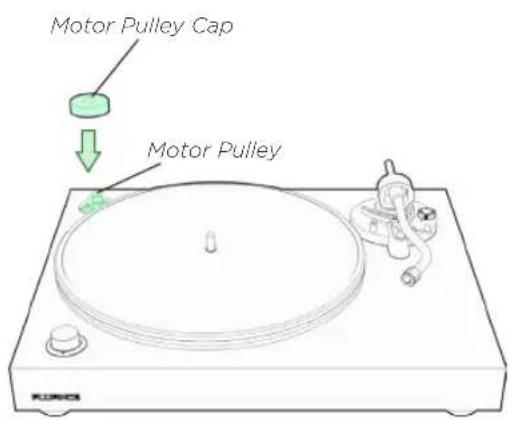
- RT82/83/84: Place the turntable mat on top of the platter. Make sure the logo side is facing up
Note: RT85-Turntable mat is not included. When using an acrylic platter a turntable mat is not required.
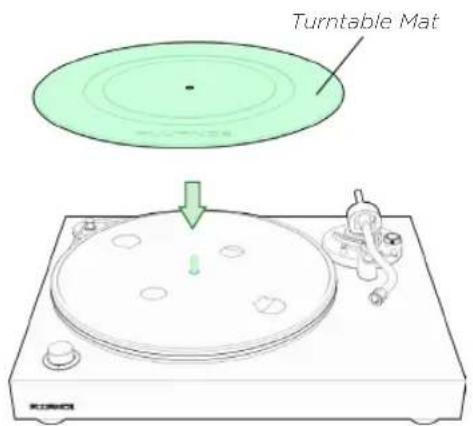
Step Two: Installing the Counterweight
-
Secure the tonearm using the tonearm lock.
-
Slide the counterweight onto the end of the tonearm with numbers facing forward until it clicks on.

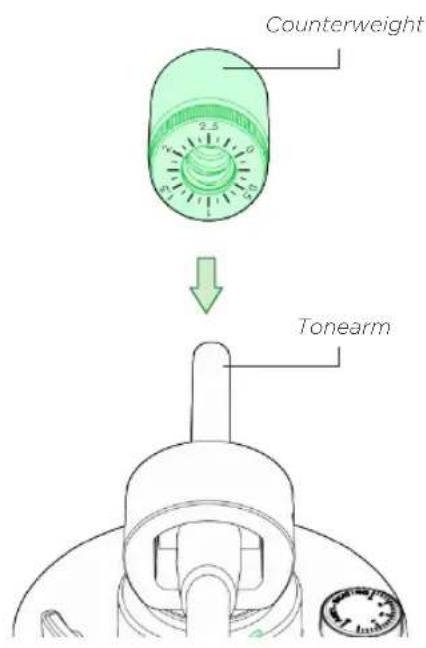
Step Three: Installing the Headshell
-
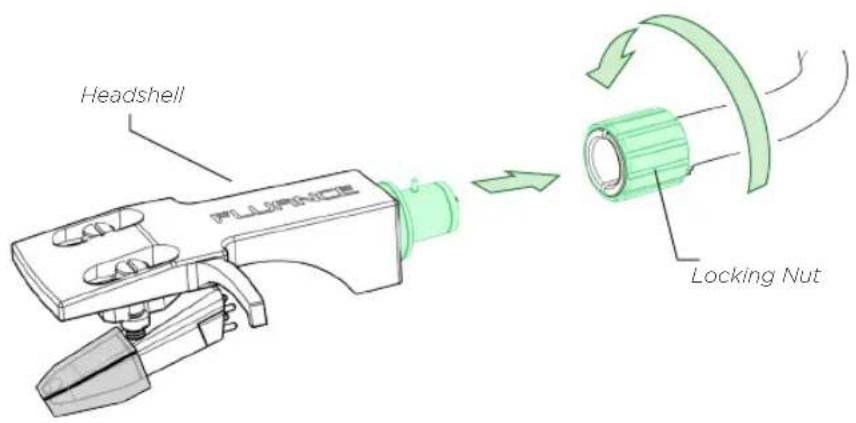
Remove the headshell from the protective packaging and insert into the end of the tonearm.
-
Tighten the locking nut until the headshell is secure.
Step Four: Installing the Dust Cover
- Important: Place dust cover on a soft surface to avoid scratching it. Install the hinges on the provided grooves located on the back of the dust cover. CAUTION: The hinges are spring loaded and can close with strong force. Use caution when installing.

natural_image
Technical line drawing of a mechanical device with an inset showing a component being inserted into a housing (no text or symbols present)- Carefully open the hinges on the dust cover and insert into the hinge mounts pre-installed on the back of the turntable.

natural_image
Technical line drawing of a mechanical device with a circular base and a circular top, showing internal components (no text or symbols)Step Five: Leveling the Turntable
This turntable features 3 adjustable feet to ensure the turntable is level regardless of the surface the turntable is resting upon.
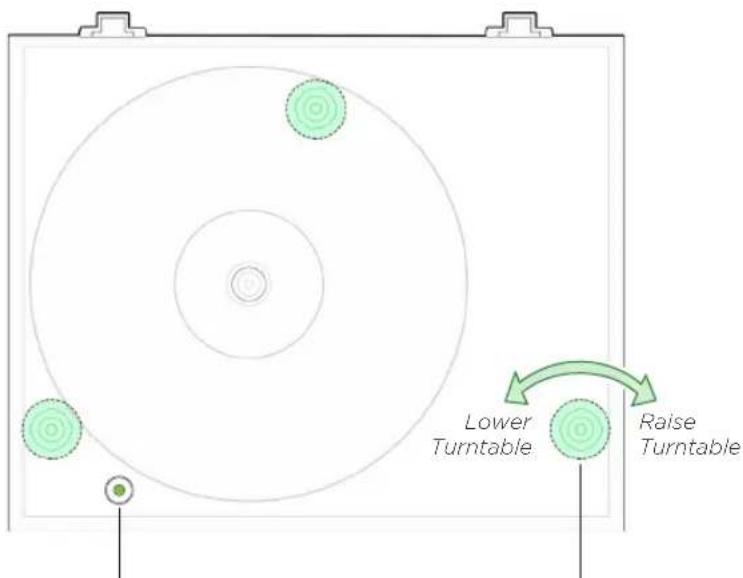
Adjustable FeetBubble Level
Use the table below with the included bubble level to adjust the feet and level the turntable.
Note: The turntable comes in the fully lowered position.
| Bubble Position | Turntable Adjustment |
 | Turntable is level when the bubble is within the circle |
 | Lower Back or Raise Front |
 | Lower Left or Raise Right |
 | Lower Back or Raise Front and Lower Left or Raise Right |
Step Six: Balancing the Tonearm
Important!
Complete all steps for balancing the tonearm. Incorrect tonearm balancing can cause damage to the stylus and to your records. For additional assistance go to www.fluance.com/support to watch a tutorial video for this process.
- Remove the stylus protector.

natural_image
Technical line drawing of a mechanical tool or probe assembly (no text or symbols)- Unlock the tonearm and lift the cueing lever.

- Position the tonearm over the platter.

natural_image
Line drawing of a hand holding a CD inside a rectangular frame (no text or symbols)- Hold the headshell and lower the cueing lever completely. Protect the stylus from touching the platter.

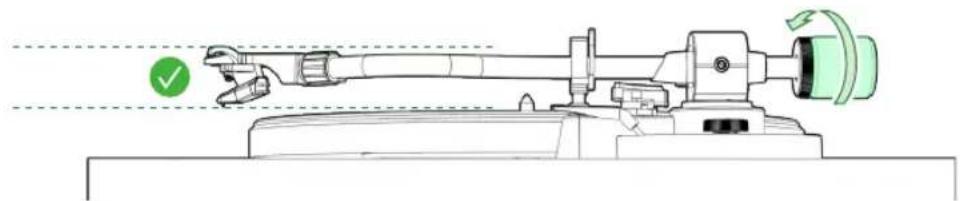
- With the cueing lever now lowered, turn the entire counterweight until the tonearm is balanced and floating horizontally when headshell is released. Do not allow the stylus to touch the platter.
natural_image
Technical line drawing of a mechanical device with a green checkmark indicating a precision measurement (no text or symbols present)Tip: When balancing the tonearm make sure the cueing lever is down and the anti-skating control is set to 0.
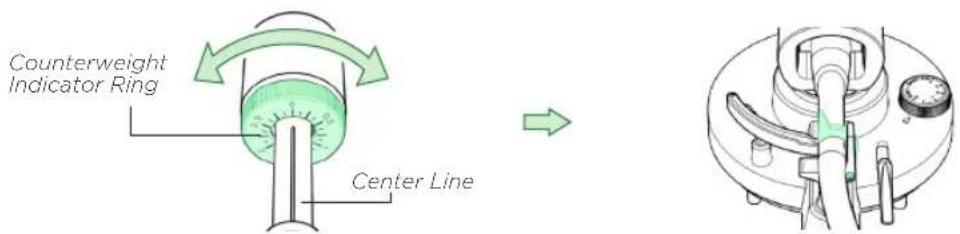
- Set only the counterweight indicator ring to "O" on the center line while keeping the tonearm balanced then lock the tonearm on the tonearm rest.
Step Six (Continued): Balancing the Tonearm
- Use the chart below to determine the recommended tracking force for your cartridge. Rotate the entire counterweight counterclockwise until the indicator ring is set to the correct value on the center line. (fig.1)
- Set the anti-skating control value to match the recommended tracking force. (fig.2)
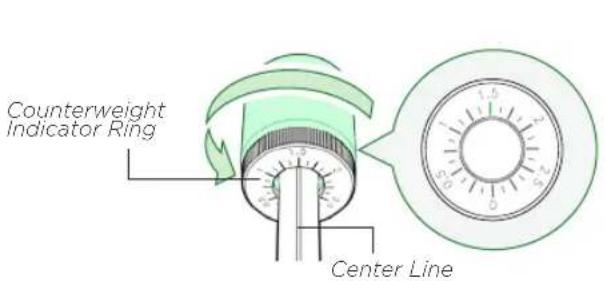

Tip: When setting the counterweight make sure you are turning the entire weight and not just the counterweight indicator ring.
| Model Cartridge Tracking Force | Anti-Skating Value | |
| RT82 OM 10 1.5g 1.5 | ||
| RT83 2M Red 1.8g 1.8 | ||
| RT84 / RT85 2M Blue 1.8g 1.8 |
Step Seven: Connecting the RCA and Ground Cables
This turntable does not have an internal preamp so an external preamp or an amplifier with a PHONO input must be used. Connect the RCA and ground cable to the back of the turntable and then connect the other end to your external preamp or the PHONO input and ground terminal on your amplifier. Ensure the cable colors are matched to the RCA connector colors.
Note: The included RCA cable is a high quality cable with a <90pF capacitance rating. For best performance it is recommended that any other RCA connections use a similarly rated cable. The Fluance RCA cable is available at www.fluance.com/turntable

Important: When using an external preamp one ground cable should be connected between the turntable and the preamp. A second ground cable (Not Included) should be connected between the preamp and the amplifier/powered speakers. Failure to connect both ground cables can result in unwanted noise/hum.

Important: The ground cable must be connected to both turntable and amplifier. Failure to connect to both can result in unwanted noise/humming.
Step Eight: Connecting the Power Adapter
Ensure the power adapter is securely connected to a power outlet. Insert the power cable into the power input on the back of the turntable. It is recommended to reconfirm with the bubble level that the turntable is still level after setup is complete.

Step Nine: Playing a Record
Tip: For best audio performance the dust cover should be removed during playback.
- Lift the dust cover
- Place a record on the spindle (use the 45 Adapter if necessary)
-
Turn the speed selection knob to the correct RPM typically listed on your record (Normal LP playback speed is 33 RPM)
-
Unlock the tonearm lock
- Lift the cueing lever
- Move the tonearm to the desired starting point
- Lower the cueing lever
Note: When the turntable is not in use the speed selection knob should be set to OFF to turn the turntable completely off.
The turntable setup is now complete! Enjoy your Fluance turntable. Should you require any further assistance please visit us at www.fluance.com/support for how-to videos and guides.
Auto Stop Function
The auto stop function is designed to extend the life of your stylus. At the end of a record, the platter will automatically stop spinning if auto stop is enabled. This feature will also require that the tonearm is moved over the record before the platter will start spinning at the selected speed.
If the auto stop switch is set to the OFF position the platter will begin spinning as soon as the speed selection knob is set to 33 or 45. To stop the record from spinning set the speed selection knob to the OFF position.
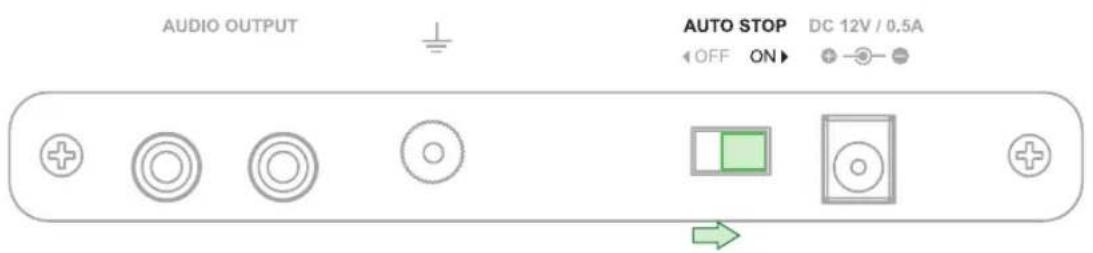
Note: The auto stop function will take approximately 30 seconds at the end of the record before the turntable stops spinning. Due to variances in vinyl record production some records may not work correctly with the auto stop function.
Maintenance
Replacing the Stylus
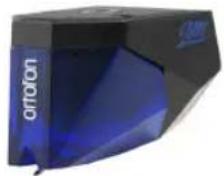
Use the chart below to ensure you replace your stylus with the correct model. Replacement stylus and instructions are available at www.fluance.com/turntables
| Model Cartridge Stylus | |
| RT82 OM 10 Stylus 10 E | |
| RT83 2M Red Stylus 2M Red | |
| RT84 / RT85 2M Blue Stylus 2M Blue |

natural_image
Close-up of a black electrocandescent NMR (no visible text or symbols)OM 10
natural_image
Close-up of a blue glass mineral or crystal sample with engraved 'orofon' text (no other readable symbols)2M RED/2M BLUE
Upgrading the Cartridge
The turntable supports the option of upgrading the cartridge. A complete cartridge replacement guide and video are available at www.fluance.com/resources
There is also a Cartridge Alignment Protractor at the end of the manual for your convenience.
Cartridge Connections Turntable Cartridge Specifications
| Wire Channel |
| White Left (+) |
| Blue Left (-) |
| Red Right (+) |
| Green Right (-) |
| Supported Cartridge Weight | 5.0 to 7.5 grams | |
| Effective Tonearm Mass | RT82 | 21.78 grams |
| RT83 | 27.5 grams | |
| RT84 | ||
| RT85 | ||
| Overhang | 19.2 mm | |
| Effective Tonearm Length | 224 mm | |
| Headshell Cartridge Mount | Half-inch Mount | |
| Fluance Headshell Weight | 9 grams | |
Replacing the Rubber Belt
- With the platter installed remove the defective rubber belt from the motor pulley and platter.
- Wrap the new rubber belt around the platter being careful to not overstretch the belt. Ensure it is not twisted.
- Lift the rubber belt and place it over the motor pulley.
- Rotate the turntable several times to ensure the rubber belt is secure and not twisted.
Parts and Accessories
Replacement parts and turntable accessories are available at www.fluance.com/turntables
| Part Number Description | |
| PA10 High Fidelity | Phono Preamp |
| VB52 Vinyl Record & Stylus Cleaning Kit | |
| AP03 Frosted Acrylic Platter | |
| BL21 Bubble Level | |
| CA03 90pF RCA Cable | |
| CW02 102g Counterweight | |
| CW12 112g Counterweight | |
| GW03 Ground Wire | |
| HS82 RT82-RT85 Headshell with wires | |
| PFHTDU Dust Cover | |
| PFHTRP Rubber Turntable Mat | |
| RB35 RT82-RT85 Rubber Belt | |
| TA21 Cork Turntable Mat | |
Turntable Care
- Use a soft dry microfiber cloth to wipe dust from the turntable surface.
- Keep the dust cover closed to ensure the turntable components remain dust free.
- When cleaning the acrylic platter only use microfiber cloth to avoid scratching the surface.
Record Care
- Records should be stored vertically in a dry environment away from sources of heat.
- An anti-static brush can be used to remove dirt from the record's grooved surface. Use a record cleaning solution to further clean your records to ensure crystal clear playback.
- It is important to use the cueing lever when lifting or lowering the tonearm to prevent accidental slipping and scratching.
Stylus Care
- When the turntable is not in use always keep the provided stylus protector installed to prevent accidental damage.
- A stylus cleaning brush can be used to remove dust and debris from the stylus.
- Enabling the auto stop function will reduce wear and tear on the stylus by stopping the turntable after playback is completed.
Troubleshooting
Turntable Not Spinning
- Turn the speed selection knob to 33 or 45 (power LED should light up). Lift the tonearm over the platter and it should start spinning.
- The turntable should be connected to a known good power outlet and the power cable should be securely inserted into the unit.
- Ensure the rubber belt is intact and hooked around the platter and the motor pulley.
No Power
- The turntable should be connected to a known good power outlet and the power cable should be securely inserted into the unit.
- The power LED should light up when the speed selection knob is set to 33 or 45.
Wrong Speed
- Check the record label for the correct playback speed and that the speed selection knob is set to match it. Normal LP playback speed is 33 1/3 RPM, but some play at 45 RPM.
Skipping
- Ensure the record surface is clear of dirt and debris. Also check that the record is not warped or deformed.
- Inspect the stylus tip for built up dirt or debris. Use a stylus cleaning brush to clean if necessary.
- Ensure the turntable is on a sturdy and level surface and properly leveled using the adjustable feet.
- Use the instructions in step four of the first time setup instructions to confirm the tonearm was balanced correctly and set to the correct tracking force for the included cartridge.
- Check that the anti-skating control is set to match the tracking force.
Audio Feedback
- If audio feedback occurs ensure the speakers are positioned away from the turntable. The turntable should not be placed in front of the speakers or on the same surface as the speakers.
- For best audio performance the dust cover should be removed during playback.
- Playback at excessive volume can cause feedback. If feedback is occurring decrease volume or lower bass levels.
- If using an external preamp with a rumble filter, turn it on to reduce resonance feedback.
Cueing Lever Not Lowering Tonearm
- Use instructions in step four of the first time setup instructions to confirm the tonearm was balanced and set to the correct tracking force.
- Lock the tonearm and lower the cueing lever. Gently press down on the tonearm bridge until fully lowered to reset the tonearm lowering mechanism.
Low Volume
- Check the RCA connections are correct and fully inserted. (See Step Seven)
- If the turntable is directly connected to an amplifier it must have a PHONO input.
- The turntable does not include an internal preamp so an external preamp or amplifier with PHONO input must be used with the turntable. The Fluance High Fidelity Phono Preamp (PA10) is designed for the Reference Series turntables and is available on www.fluance.com.
Humming Sound
- Connect the ground wire to your external preamp or amplifier. If using an external preamp ensure the second ground wire is connected from the preamp to the amplifier /powered speakers.
- Ensure the headshell is fully tightened and secured.
- The turntable and other devices should be directly connected to a power outlet. It is recommended to avoid power bars or extension cables.
- Ensure the speakers are positioned away from the turntable. The turntable should not be placed in front of the speakers or on the same surface as the speakers.
Need Additional Help?
- Do not return this product to the store.
- Please contact Fluance Customer Experience first, regarding any additional information on product features, specifications or assistance with setup.
• Online web chat or Support: www.fluance.com/contact
• Online support videos and guides: www.fluance.com/resources
Specifications
| Specifications RT82 RT83 RT84 RT85 | ||||
| Cabinet Specifications | ||||
| Material MDF | ||||
| Dust Cover Yes - Tinted | ||||
| Turntable Specifications | ||||
| Drive System Belt Drive | ||||
| Motor DC Motor with Servo Controller | ||||
| Motor Isolation Six-Point Rubber Isolation with Decoupling Isolation Ring | ||||
| Speed 33 1/3 RPM, 45 RPM | ||||
| Platter Aluminum Acrylic | ||||
| Diameter of Platter 12" (30 cm) | ||||
| Auto-Stop | Yes | |||
| Turntable Mat | Rubber | None | ||
| Tonearm Specifications | ||||
| Type | Static Balanced, S-Type | |||
| Supported Cartridge Weight | 5.0 to 7.5 grams | |||
| Counterweight | Yes | |||
| Anti-skating Adjustment | Yes | |||
| Pivot Bearing | Yes | |||
| Cueing Lever | Yes | |||
| Material | Aluminum | |||
| Tonearm Wire | 36 AWG Litz Cable / 7 Strand | |||
| Effective Tonearm Mass | 21.78 grams | 27.5 grams | ||
| Overhang | 19.2 mm | |||
| Effective Tonearm Length | 224 mm | |||
| Headshell Mount | H-4 Bayonet Mount | |||
| Cartridge Specifications | ||||
| Type | Moving Magnet (MM) | |||
| Cartridge Model | Ortofon OM10 | Ortofon 2M Red | Ortofon 2M Blue | Ortofon 2M Blue |
| Replacement Stylus | Stylus 10 | Stylus 2M Red | Stylus 2M Blue | Stylus 2M Blue |
| Stylus | 0.3 x 0.7 mil | |||
| Cantilever | Aluminum | |||
| Mount | Half-inch | |||
| Frequency Response | 20-22,000 Hz | 20-22,000 Hz | 20-25,000 Hz | 20-25,000 Hz |
| Channel Separation | 22 dB at 1 kHz | 22 dB | 25 dB | 25 dB |
| Channel Balance | < 1.5 dB | 1.5 dB | 1.5 dB | 1.5 dB |
| Specifications RT82 RT83 RT84 RT85 | |||
| Load Impedance/Capacitance 47 kohms/100 pF | |||
| Output Voltage 4.0 mV 5.5 mV | 5.5 mV 5.5 mV | ||
| Cartridge Weight 5 grams 7.2 grams | 7.2 grams | ||
| Headshell Weight | 9 grams | ||
| Recommended Tracking Force | 1.25 - 1.75 grams | 1.0 - 1.8 grams | 1.0 - 1.8 grams |
| Vertical Tracking Angle | 20° | ||
| Rubber Belt Specifications | |||
| Thickness | 4.5 mm | ||
| Width | 915 mm | ||
| Length | 0.6 mm | ||
| Output Specifications | |||
| Connector | RCA (Gold-plated) | ||
| Preamp | No - Separate Phono Preamp Required | ||
| Phono Output 4 mV 5.5 mV 5.5 mV 5.5 mV | |||
| Ground Terminal | Yes | ||
| Power Specifications | |||
| Input | 100 - 240 V AC (50/60 Hz) | ||
| Output | 12 V / 500 mA | ||
| Consumption | 1.5 W | ||
| Unit Dimensions (W x H x D) | 16.5 x 5.5 x 13.75 inches (419.1 x 139.7 x 349.25 mm) | ||
| Unit Weight | 6.4 kg (14.1 lbs) | 7.4 kg (16.3 lbs) | |
| Optimal Operating Temperature | 5°C to 35°C | ||
Warranty Information
Thank you for choosing Fluance! We guarantee your investment in our products is a solid one. High performance components combined with quality craftsmanship allow us to maintain the highest possible production standards. All items are guaranteed against defects in materials and craftsmanship. Fluance has outstanding quality control; if something should go wrong with any of our products, we will repair it free of charge within the warranty period. If the product cannot be repaired, we will replace the product. If the product has been discontinued, we will replace the product with either the newest version of said product or current equivalent. In the event that Fluance replaces a product under warranty, the replacement would only carry the original warranty from the original date of purchase.
Warranty Period
The Fluance products below are warranted for parts and labor for the stated period from date of original purchase, and are subject to the terms and conditions of the warranty. Any refurbished products that are discontinued hold a 90 day warranty from the date of original purchase. Fluance warranties are valid for the original owner and are non-transferable.
• Home Audio Passive Speakers: Lifetime Warranty
• Active or Powered Speakers: Two Year Warranty
• HiFi Turntables: Two Year Warranty
- Batteries (For Powered Speakers): One Year Warranty
Warranty Exclusions:
- Products purchased from a dealer not authorized by Fluance.
- Products with the serial number defaced, altered, or missing.
- Defects resulting from disaster, accident, abuse, misuse, lightning, power surges, neglect, unauthorized modification or water damage.
- Defect or damage as a result of repairs performed by a person or party not authorized by Fluance.
- Defects of damage occurring during shipping (claims should be made with the shipping company).
- Defect or damage as a result of connecting a product to an outlet with the incorrect voltage. Voltage converters must be used where applicable.
To Obtain Warranty Service
Should your product require warranty service, please contact us at www.fluance.com/contact or call us at 1-888-617-6863 to set up a Return Authorization. Products returned without a valid Return Authorization number will be refused.
Fluance products must be returned in their original packaging. Our products are packaged specially to protect them from any damage during shipping, and without this packaging the return shipment could get damaged.
This warranty does not cover the shipping cost, insurance, or any other incidental charges. Products shipped for warranty service must be pre-paid by the customer, and Fluance will cover the cost to ship the repaired or replaced product back to the customer.
Important Safety Instructions
WARNING:
TO REDUCE THE RISK OF FIRE OR ELECTRIC SHOCK, DO NOT EXPOSE THIS APPARATUS TO RAIN OR MOISTURE
CAUTION:
TO REDUCE THE RISK OF ELECTRIC SHOCK, DO NOT REMOVE COVER (OR BACK). NO USER SERVICEABLE PARTS INSIDE. REFER SERVICING TO QUALIFIED SERVICE PERSONNEL.

WARNING
RISK OF ELECTRIC SHOCK DO NOT OPEN


The lightning flash with arrowhead symbol within an equilateral triangle is intended to alert the user to the presence of uninsulated dangerous voltage within the product's enclosure that may be of sufficient magnitude to constitute a risk of electric shock to persons.

The exclamation point within an equilateral triangle is intended to alert the user to the presence of important operating and maintenance (servicing) instructions in the literature accompanying the appliance.
To prevent fire or shock hazard, do not use this plug with an extension cord, receptacle or other outlet unless the blades can be fully inserted to prevent blade exposure. To prevent fire or shock hazard, do not expose this appliance to rain or moisture.
- Read these instructions.
- Keep these instructions.
- Heed all warnings.
- Follow all instructions.
- Do not use this apparatus near water.
- Clean only with dry cloth.
- Do not block any ventilation openings. Install in accordance with the manufacturer's instructions.
- Do not install near any heat sources such as radiators, heat registers, stoves, or other apparatus (including amplifiers) that produce heat.
- Do not defeat the safety purpose of the polarized or grounding type plug. A polarized plug has two blades with one wider than the other. A grounding type plug has two blades and a third grounding prong. The wide blade or the third prong is provided for your safety. If the provided plug does not fit into you outlet, consult an electrician for replacement of the obsolete outlet.
- Protect the power cord from being walked on or pinched particularly at plugs, convenience receptacles, and point where they exit from the apparatus.
- Only use attachments / accessories specified by the manufacturer.
- Unplug this apparatus during lightning storms or when unused for long periods of time.
- Refer all servicing to qualified service personnel. Servicing is required when the apparatus has been damaged in any way, such as power-supply cord or plug is damaged, liquid has been spilled or objects have fallen into the apparatus, the apparatus has been exposed to rain or moisture, does not operate normally, or has been dropped.
- Water and Moisture - This product should be kept away from direct contact with liquids. The apparatus shall not be exposed to dripping or splashing and that no objects filled with liquids, such as vases, shall be placed on the apparatus.
-
Do not overload wall outlet. Use only power source as indicated.
-
Use replacement parts as specified by the manufacturer.
- The product may be mounted to a wall only if recommended by the manufacturer.
- Upon completion of any service or repairs to this product, ask the service technician to perform safety checks.
- Avoid installing this unit in places exposed to direct sunlight or close to heat radiating appliances such as electric heaters, on top of other stereo equipment that radiates too much heat, places lacking ventilation or dusty areas, places subject to constant vibration and/or humid or moist areas.
- Do not attempt to clean this unit with chemical solvents as this might damage the finish. Use a clean dry cloth.
- Operate controls and switches as described in the manual. Before turning on the power, make certain that power cord is properly installed.
- This symbol means the equipment is a Class II or double-insulated electrical appliance. It has been designed in such a way that it does not require a safety connection to electrical earth.
- Do not install this equipment in a confined or "boxed-in" space such as a bookcase or similar unit, and maintain good ventilation conditions. The ventilation should not be impeded by covering the ventilation openings with items such as newspaper, tablecloths, curtains, etc.
- Power Sources - This product should be connected to a power supply only of the type described in these operating instructions, or as marked on the unit.
- When moving or not using the appliance, secure the power cord (e.g., wrap it with a cable tie). Be careful not to damage the power cord. Before using it again, make sure the power cord has not been damaged. If the power cord has been damaged at all, bring the unit and cord to a qualified service technician for repair or replacement as specified by the manufacturer.
- Unplug this apparatus during lightning storms or when unused for long periods of time power cord has not been damaged. If the power cord has been damaged at all, bring the unit and cord to a qualified service technician for repair or replacement as specified by the manufacturer. Use caution when wearing loose clothing or articles near the spinning turntable.
FCC & IC Information
WARNING: To reduce the risk of fire or electrical shock, do not expose this appliance to rain or moisture. Electrical equipment should NEVER be kept or stored in damp environments.
This equipment has been tested and found to comply with the limits for a Class B digital device, pursuant to Part 15 of the FCC Rules. This digital apparatus does not exceed the Class B limits for radio noise emissions from digital apparatus as set out in the Radio Interference Regulations of Industry Canada.
These limits are designed to provide reasonable protection against harmful interference in a residential installation. This equipment generates, uses and can radiate radio frequency energy and, if not installed and used in accordance with the instructions, may cause harmful interference to radio communications. However, there is no guarantee that interference will not occur in a particular installation. If this equipment does cause harmful interference to radio or television reception, which can be determined by turning the equipment off and on, the user is encouraged to try to correct the interference by one or more of the following measures:
- Re-orient or relocate the receiving antenna.
- Increase the separation between the equipment and receiver.
- Connect the equipment into an outlet on a circuit different from that to which the receiver is connected.
- Consult the dealer or an experienced radio/TV technician for help.
This device complies with Part 15 of the FCC Rules. Operation is subject to the following two conditions:
- This device may not cause harmful interference, and
- This device must accept any interference received, including interference that may cause undesired operation.
NOTICE CONCERNING FCC REGULATIONS:
You are cautioned that changes or modifications not expressly approved by the part responsible for compliance could void the user's authority to operate the equipment.
This unit does not exceed the Class B limits for radio noise emission from digital apparatus set out in the radio interference regulations of the Canadian Department of Communications.
This symbol means the equipment is a Class II or double-insulated electrical appliance. It has been designed in such a way that it does not require a safety connection to electrical earth.
DOUBLE INSULATED - When servicing use only identical replacement parts.
Correct Disposal of this product: This marking indicates that this product should not be disposed with other household wastes through the EU. To prevent possible harm to the environment or human health from uncontrolled waste disposal, recycle it responsibly to promote the sustainable reuse of material resources. To return your used device, please use the return and collection systems or contact the retailer where the product was purchased. They can take this product for environmentally safe recycling.
CAUTION: This product was intended to use for professional person, does not provide power management function. Once don't use/operate the equipment, please power off to save the energy.
IMPORTANT!: Since digital circuitry may cause interference to other radio or television tuners nearby, switch this unit off when not in use or move it away from the affected radio/television tuner.
Correct cartridge alignment ensures the stylus is positioned properly relative to the grooves on the record. Incorrect alignment can cause distortion and can also cause unwanted wear and tear on your stylus. Follow the instructions below to ensure your cartridge is mounted correctly.
A video of the cartridge installation and alignment process is available at
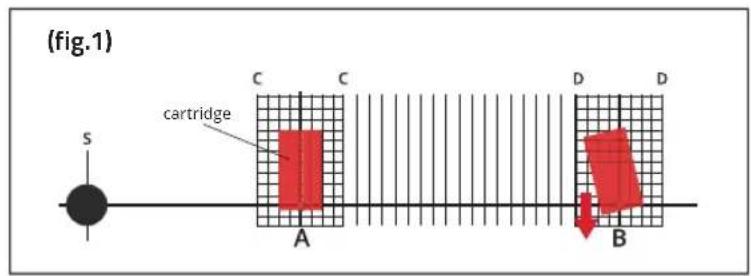
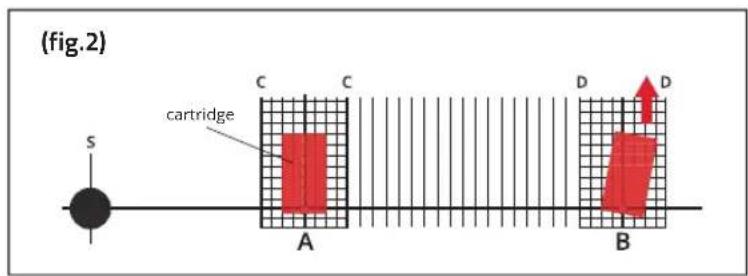
- Cut out the Cartridge Alignment Protractor* and carefully cut out the spindle hole (S). *See beside for cutout.
- Place the protractor on the spindle.
- With the stylus protector removed, gently place the stylus on point A.
- Rotate the cartridge so that the sides of the cartridge are parallel with the grid lines (C).
- Place the stylus on point B and confirm the sides are parallel with the grid lines (D).
- If the cartridge sides are not parallel at point B move the cartridge forward (fig.1) or backward (fig.2) and repeat steps 4-6 until the sides are parallel at both points.
For more information and support please visit www.fluance.com/support
Cartridge Alignment
Protractor Cutout

Fluance.com
- Introduction
- Table Of Contents
- Introduction 2
- What's Included 4
- Components and Connections 5
- First Time Setup 6
- Maintenance 14
- Troubleshooting 16
- Specifications 18
- Warranty Information 20
- Important Safety Instructions 21
- FCC & IC Information 22
- Cartridge Alignment Protractor 23
- What's Included
- Components and Connections
- First Time Setup
- Step One: Installing the Platter
- Step Two: Installing the Counterweight
- Step Three: Installing the Headshell
- Step Four: Installing the Dust Cover
- Step Five: Leveling the Turntable
- Step Six: Balancing the Tonearm
- Step Six (Continued): Balancing the Tonearm
- Step Seven: Connecting the RCA and Ground Cables
- Step Eight: Connecting the Power Adapter
- Step Nine: Playing a Record
- Auto Stop Function
- Maintenance
- Replacing the Stylus
- Upgrading the Cartridge
- Replacing the Rubber Belt
- Parts and Accessories
- Turntable Care
- Record Care
- Stylus Care
- Troubleshooting
- Turntable Not Spinning
- No Power
- Wrong Speed
- Skipping
- Audio Feedback
- Cueing Lever Not Lowering Tonearm
- Low Volume
- Humming Sound
- Need Additional Help?
- Warranty Information
- Warranty Period
- Warranty Exclusions:
- To Obtain Warranty Service
- Important Safety Instructions
- WARNING:
- CAUTION:
- WARNING
- RISK OF ELECTRIC SHOCK DO NOT OPEN
- To prevent fire or shock hazard, do not use this plug with an extension cord, receptacle or other outlet unless the blades can be fully inserted to prevent blade exposure. To prevent fire or shock hazard, do not expose this appliance to rain or moisture.
- FCC & IC Information
- WARNING: To reduce the risk of fire or electrical shock, do not expose this appliance to rain or moisture. Electrical equipment should NEVER be kept or stored in damp environments.
- NOTICE CONCERNING FCC REGULATIONS:
- DOUBLE INSULATED - When servicing use only identical replacement parts.
Brand : Fluance
Model : RT85
Category : Turntable