
MZ-R900DPC - Hi-Fi System SONY - Free user manual and instructions
Find the device manual for free MZ-R900DPC SONY in PDF.


| Product Type | Portable MiniDisc Recorder/Player |
| Brand | Sony |
| Model | MZ-R900DPC |
| Dimensions (approx.) | 109 x 82 x 30 mm |
| Weight (with battery) | Approx. 220 g |
| Power Source | 1 x NH-14WM rechargeable battery or 1 x LR6 (AA) alkaline battery |
| Battery Life (Playback) | Up to 24 hours (NH-14WM) / 12 hours (alkaline) |
| Recording Mode | SP, LP2, LP4 |
| Digital Output | Optical line out |
| Headphone Output | Stereo mini jack (3.5 mm) |
| Remote Control | Included (RM-MZR90) |
| Disc Capacity | 80 minutes (standard) / 160 minutes (LP2) / 320 minutes (LP4) |
| Playback Features | Program play, shuffle, repeat, group play |
| Recording Features | Sync recording, manual recording, track marking |
| Equalizer Presets | Heavy, Pop, Jazz, Custom (2 band) |
| Display | Backlit LCD |
| Connection | Mic input (stereo mini), line input (stereo mini) |
| Repair and Spare Parts | Battery, remote, belt (if applicable) available from Sony service |
| Maintenance | Clean lens with blower, avoid moisture, use only recommended batteries |
| Safety | Do not disassemble, avoid exposure to heat/liquid, use correct voltage |
Frequently Asked Questions - MZ-R900DPC SONY
User questions about MZ-R900DPC SONY
0 question about this device. Answer the ones you know or ask your own.
Ask a new question about this device
Download the instructions for your Hi-Fi System in PDF format for free! Find your manual MZ-R900DPC - SONY and take your electronic device back in hand. On this page are published all the documents necessary for the use of your device. MZ-R900DPC by SONY.
USER MANUAL MZ-R900DPC SONY
Portable MiniDisc Recorder
Operating Instructions GB
To avoid electrical shock, do not open the cabinet. Refer servicing to qualified personnel only.
Do not install the appliance in a confined space, such as a bookcase or built-in cabinet.
Caution
The use of optical instruments with this product will increase eye hazard.
CAUTION - INVISIBLE LASER RADIATION WHEN OPEN
AVOID EXPOSURE TO BEAM
Information
IN NO EVENT SHALL SELLER BE LIABLE FOR ANY DIRECT, INCIDENTAL OR CONSEQUENTIAL DAMAGES OF ANY NATURE, OR LOSSES OR EXPENSES RESULTING FROM ANY DEFECTIVE PRODUCT OR THE USE OF ANY PRODUCT.
Certain countries may regulate disposal of the battery used to power this product. Please consult with your local authority.
WALKMAN and are trademarks of Sony Corporation.

The CE mark on the unit is valid only for products marketed in the European Union.
GB
Table of contents
Looking at controls 8
Getting started! 13
Recording an MD right away! 16
Playing an MD right away! 19
Various ways of recording 21
Two ways of connecting to a sound source ....21
Recording with analog input (line cable required) ......22
Recording for long times 23
To start/stop recording in sync with the source player (Synchro-recording) 24
Recording without overwriting existing material ....25
Recording from a microphone 25
Adding track marks automatically at specified intervals (Auto Time Stamp) 26
Adjusting the recording level manually (Manual recording) .....27
Checking the remaining time or the recording position 28
On the recorder 28
On the remote control 29
Setting the clock to stamp the recorded time ....30
Copying CD text information while recording (Joint Text) .....31
Various ways of playback 34
Selecting a track directly .... 34
Changing the playback order 34
On the recorder 34
On the remote control 35
To adjust the sound quality (Digital Sound Preset) 36
To change playback speed (Speed Control) 38
Storing the settings for individual discs (Personal Disc Memory) ..... 38
On the recorder 39
On the remote control 39
Checking the remaining time or the playing position 40
On the recorder 40
On the remote control 41
Connecting to a stereo system (LINE OUT) 41
Editing recorded tracks 43
Erasing tracks 43
To erase a track 43
To erase the whole disc 43
Adding a track mark 44
Erasing a track mark 44
Moving recorded tracks 45
On the recorder 45
On the remote control 46
Labeling recordings 46
On the recorder 46
On the remote control 48
Storing phrases frequently used in labeling (Phrase Bank) 49
On the recorder 49
On the remote control 51
Other operation 53
Setting the alarm (Melody Timer) 53
On the recorder 53
On the remote control 53
Protecting your hearing (AVLS) 55
Locking the controls (HOLD) 55
Turning off the beep sound 56
Power sources 57
Battery life ....57
Additional information ....58
Precautions ....58
Troubleshooting 61
System limitations ....64
Messages 65
Specifications 68
What is an MD? 69
Looking at controls
See pages in ( ) for more details.
The recorder

1 END SEARCH button (17) (47)
2 Battery compartment (13)
3 Jog lever (L) (MENU/ENTER) (11) (20) (25) (34) (43) (53)
4 VOL +/- button (19) (47)
5 REC MODE button (23)
6 REC indicator (29)
7 Terminals for attaching dry battery case (14)
8 SYNCHRO REC ON/OFF (synchro-recording) switch (at the rear) (24)
9 DC IN 3V jack (13) (16)
10 HOLD switch (at the rear) (14) (55)
11 REC (record) switch (17) (25)
12 OPEN button (15)
13 (pause) button (17) (19) (27) (31) (44) (47) (51)
14 Display window (24) (34) (53)
15 Jog lever (R) (▶, ◀◀/▶▶) (12) (17) (19) (44) (47)
16 ■ (stop)/CHARGE button (13) (17) (19) (23) (43)
17 LINE IN (OPT) jack (16) (22)
18 MIC (PLUG IN POWER) jack (25)
19 T MARK button (44)
20 (headphones/earphones)/LINE OUT jack (14) (31) (41)
The display window of the recorder

1 Alarm indication (53) 2 Character information display (29) (34) Displays the disc and track names, date, error messages, track numbers, etc. 3 AM/PM indication (30) Lights up along with the time indication in the 12-hour system. 4 Time display (29) (40) Shows the recorded time, current time, elapsed time of the track or MD being recorded or played. 5 Battery indication (13) Shows approximate battery condition. 6 Sound indication (36) Lights up when Digital Sound Preset is on. 7 Level meter (28) Shows the volume of the MD being played or recorded. 8 LP2, LP4, MONO (monaural) indication (23) 9 SYNC (synchro-recording) indication (24) Lights up while synchro-recording.
10 REC indication (17) Lights up while recording. When flashing, the recorder is in record standby mode. 11 REC DATE (recorded/current date) indication (40) Lights up along with the date and time the MD was recorded. When only "DATE" lights up, the current date and time are displayed. 12 REMAIN (remaining time/tracks) indication (28) (40) Lights up along with the remaining time of the track, the remaining time of the MD, or the remaining number of tracks. 13 Play mode indication (34) Shows the play mode of the MD. 14 Disc indication (24) (34) Shows that the disc is rotating for recording, playing or editing an MD.
The headphones/earphones with a remote control

1 DISPLAY button (29) (38) (46) (48) (53) 2 PLAYMODE button (35) (48) 3 RPT/ENT (repeat/enter) button (36) (37) 4 SOUND button (36) 5 Clip 6 II (pause) button (19) (48) (51)
7 Control (◀◀/▶▶▶) (12) (19) (36) (46) (48) (51) (53) ▶▶▶: play, AMS, FF ◀◀: REW
8 Control (VOL +/-) (12) (19) (48) Pull and turn to adjust the volume.
9 Display window (29) (36)
10 HOLD switch (14) (55)
11 ■ (stop) button (19) (38) (46) (53)
The display window of the remote control
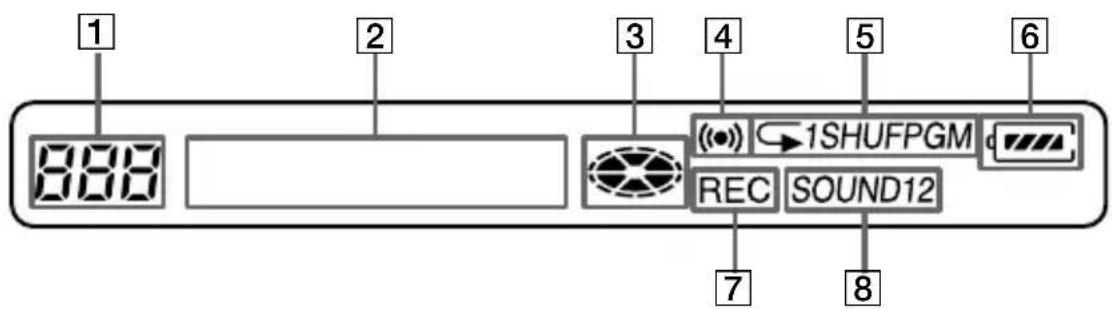
1 Track number display (29) (36) (54) 2 Character information display (29) (36) (54) 3 Disc indication (29) (36) (54) 4 Alarm indication (54)
5 Play mode indication (36) 6 Battery indication (29) (36) (54) 7 REC indication (17) (29) 8 SOUND indication (36)
Before using the recorder
How to use the jog lever
The two jog levers on the recorder can be used to perform various operations during playback, recording, editing, and when the recorder is stopped.

Flip to select

Push to enter

Jog lever functions
Jog lever (L) (MENU/ENTER)
Selecting and entering the menu items.
You can use various functions using the menu items listed below.
| Menu1) | Functions |
| EDIT Selecting editing operations (labeling tracks or discs, erasing tracks or discs, etc.)(page 43, 45 to 47 and 50). | |
| DISPLAY Displaying elapsed playing time, remaining playing time, etc. (page 28 and 40). | |
| PLAY MODE Selecting the play mode (repeat play, shuffle play, etc.) (page 34). | |
| RecVolume Selecting the automatic or manual recording level adjustment (page 27). | |
| M-TIMER Setting the alarm (Melody timer) (page 53). | |
| AUDIO OUT | Selecting ∩/LINE OUT jack output (page 41). |
| SOUND | Selecting “SOUND1” or “SOUND2” (Digital Sound Preset) (page 37). |
| PERSONAL Entering or erasing the disc information in the Personal Disc Memory (page 39). | |
| TIME MARK Selecting the Auto Time Stamp setting (page 26). | |
| MIC SENS Selecting the microphone sensitivity (page 25). | |
| AVLS | Selecting “AVLS ON” or “AVLS OFF” (AVLS (Automatic Volume Limiter System)) (page 55). |
| BEEP | Selecting “BEEP ON” or “BEEP OFF” (headphones/earphones beep) (page 56). |
| REC-Posi Selecting the start point when recording (page 25). | |
| CLOCK SET Setting the clock (page 30) | |
1) The selectable menu items will vary according to the operating status of the recorder. Some menu items will be selectable only on the recorder, only on the remote control, or on both. For details, refer to the page number in the parentheses. - Selecting a track directly.
While playing an MD, you can select the next track by looking at the track number and track name in the display. To select a track, flip the jog lever (L) until the desired track appears, and then press the lever.
Jog lever (R) (▶/I◀◀/▶▶I)
- Play: Press the jog lever (R) (▶).
- AMS: Flip the jog lever (R) towards ◀◀ or ▶▶.
- FF/REW: Flip and hold the jog lever (R) towards ◀◀ or ▶▶.
How to use the control on the remote control
The control on the remote control can be used as follows.
Play/AMS/Search

Turn or turn and hold the control
Adjusting the volume (VOL +/-)

Pull


Turn

Push back
Getting started!
Charge the rechargeable battery before using. Even if the rechargeable battery is not charged, you can use the recorder as long as the AC power adaptor is connected.
1 Insert the rechargeable battery


Insert the rechargeable battery minus end first.
2 Charging the rechargeable battery

①Connect the supplied AC power adaptor. ②Press ■/CHARGE.
“Charging” flashes, ☐ appears in the display, and charging starts. When charging is completed, the battery indication disappears. Full charging of a completely discharged rechargeable battery takes about 3.5 hours. To cancel charging, press ■/CHARGE.
③Disconnect the supplied AC power adaptor.
![graph TD A["Power Supply"] --> B["Charging"] B --> C["Electricity"] C --> D["Battery"] D --> E["Electricity"] E --> F["Battery"] F --> G["Electricity"]](/content/2026/06/1349959/images/cbaad02401074ea33087a234a0ee3b840d5e2471c811163f7afb21100fe5beaf.jpg)
continued
Using the dry battery
Insert a LR6 (size AA) alkaline dry battery.
To operate the recorder for the longest possible time, use the dry battery together with a fully charged rechargeable battery.

Attach the dry battery case to the recorder.

Insert the battery minus end first.
3 Make connections and unlock the control
To 📄/LINE OUT
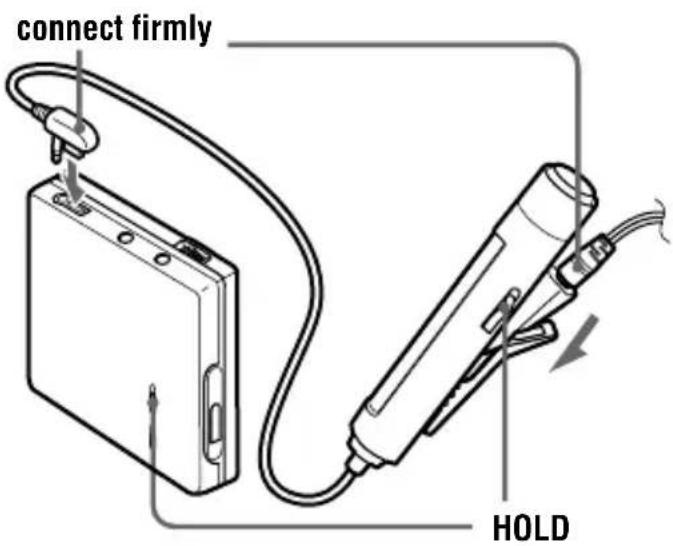
①Connect the headphones/earphones with the remote control ⏻/LINE OUT.
②Slide HOLD to the direction of the arrow (→) in the illustration to unlock the controls.
4 Insert an MD (Use a recordable MD for recording.)

① Press OPEN to open the lid.
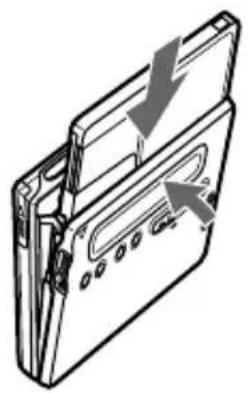
② Insert an MD with the label side facing front, and press the lid down to close.
Notes
- If you press ■/CHARGE immediately after charging has completed, charging will begin again. If this happens, press ■/CHARGE again to stop the charging operation since the battery is already fully charged.
- Charging stops when you try to operate the recorder during charging.
- Be sure to use the supplied AC power adaptor.
- Charging time may vary depending on the battery condition.
- When a rechargeable battery is charged for the first time or charged after a long period of disuse, battery life may be shorter than usual. Repeat discharging and recharging a few times. The battery life should return to normal.
- When the battery life of a fully charged rechargeable battery becomes about half the normal life, replace it.
- Remove the rechargeable battery from the recorder when it is not to be used for a long time.
Recording an MD right away!
Connect to a digital source using an optical cable to make digital recordings. Digital recording is possible even from digital equipment with different sampling rates, such as a DAT deck or a BS tuner, using the built-in sampling rate converter (see “Note on digital recording” (page 59)). To record from an analog source, see “Recording with analog input (line cable required)” (page 22). It is recommended to use the supplied AC power adaptor when recording.
1 Make connections (Insert the cables firmly and completely into the appropriate jacks.)
![graph TD A["AC power adaptor"] -->|to a wall outlet| B["CD player, MD player, DVD video player, etc."] B --> C["Optical plug"] C --> D["Optical mini-plug"] D --> E["Optical cable"] E --> F["to DIGITAL OUT (OPTAL)"] F --> G["to LINE IN (OPT)"] G --> H["to DC IN 3V"]](/content/2026/06/1349959/images/113161d10894e9c9c1e78fe4e70fd85ecc4d30bf5738e5984506f650c6fa4aa1.jpg)
2 Record an MD

①Press and slide REC to the right. "REC" lights up and recording starts.
②Play the CD or tape you want to record.
To stop recording, press ■.
After you press ■, the recorder will automatically turn off in about 10 seconds (when using batteries) or about 5 minutes (when using AC power adaptor).
| To Press | |
| Record from the end of the previous recording1) | END SEARCH, and then press and slide REC to the right. |
| Record partway through the previous recording1) | Press jog lever (R) (▶), or flip the jog lever (R) towards ▶▶▶ or ◀◀◀ to find the start point of recording and press ■ to stop. Then press and slide REC to the right. |
| Pause || | 2)Press || again to resume recording. |
| Remove the MD ■ and open the lid. | 3) (The lid does not open while “TOC Edit” flashing in the display.) |
1) By setting "REC-Posi" to "From End", recording operations will always start from the end of the previously recorded material (page 25). 2) A track mark is added at the point where you press ■ again to resume recording while pausing; thus the remainder of the track will be counted as a new track. 3) If you open the lid while "REC-Posi" is set to "From Here", recording will begin with the first track the next time you record. Check the point to start recording on the display.
If the recording does not start
- Make sure the recorder is not locked (page 55).
- Make sure the MD is not record-protected (page 59).
- Premastered MDs cannot be recorded over.
For models supplied with the AC plug adaptor
If the AC power adaptor does not fit the wall outlet, use the AC plug adaptor.
Notes
- “Data Save” or “TOC Edit” flashes while data of the recording (the track’s start and end points, etc.) is being recorded. Do not move or jog the recorder or disconnect the power source while the indication is flashing in the display.
- The lid does not open until "TOC Edit" disappears in the display.
- If the power supply is disrupted (i.e. the battery is removed or becomes exhausted or the AC power adaptor is disconnected) during a recording or editing operation, or while "TOC Edit" appears in the display, then it will not be possible to open the lid until power is restored.
- You can make digital recording only from an optical type output.
- When recording from a portable CD player, set the CD player to pause, and then do the recording procedure on the recorder.
- Note the following when recording from a portable CD player:
- Some portable CD players may not be capable of digital out unless powered by the AC power.
- Connect the AC power adaptor to the portable CD player and use it on AC power as the power source.
- Disable any anti-skip function (such as ESP*) on the portable CD player.
*Electronic Shock Protection

• LINE IN (OPT) jack is for both digital and analog input. The recorder automatically recognizes the type of line cable and switches to digital or analog input. - The level of the recorded sound is adjusted automatically. - You can monitor the sound during recording. Connect the supplied headphones/earphones with remote control to ○/LINE OUT and adjust the volume by pressing VOL +/-. This does not affect the recording level.
Playing an MD right away!
1 Play an MD

① Press the jog lever (R) (▶). Turn the control towards ▶▶▶▶ on the remote control.
A short beep sounds in the headphones/earphones when you operate on the remote control.
② Press VOL +/- to adjust the volume. Pull and turn the control towards VOL +/- on the remote control.
The volume will be shown in the display. After you adjust the volume, push back the control.
To stop play, press ■.
A long beep sounds in the headphones/earphones when you operate on the remote control.
Playback starts from the point you last stopped playing.
After you press ■, the recorder will automatically turn off in about 10 seconds (when using batteries) or about 5 minutes (when using AC power adaptor).
| To Press (Beeps in the headphones/earphones 2) | |
| Find the beginning of the current track | Flip the jog lever (R) towards ◀◀. Turn the control towards ◀◀ on the remote control. (Three short beeps) |
| Find the beginning of the next track | Flip the jog lever (R) towards ▶▶. Turn the control towards ▶▶▶ on the remote control. (Two short beeps) |
| Go backwards while playing1) | Flip and hold the jog lever (R) towards ◀◀. Turn and hold the control towards ◀◀ on the remote control. |
| Go forward while playing1) | Flip and hold the jog lever (R) towards ▶▶. Turn and hold the control towards ▶▶▶ on the remote control. |
| Pause ■ (Continuous short beeps)Press ■ again to resume play. | |
| Remove the MD ■ and open the lid. 3) | |
1) To go backward or forward quickly without listening, press Ⅱ and flip and hold the jog lever towards ◀◀◀ or towards ▶▶▶ on the recorder, or press and hold the control towards ◀◀◀ or ▶▶▶▶▶ on the remote control.
2) You can turn off the beep sound (page 56).
3) Once you open the lid, the point to start play will change to the beginning of the first track (except when the disc information is stored to the Personal Disc Memory).
G-PROTECTION function
The G-PROTECTION function has been developed to provide excellent protection against sound skipping during many active uses. This function provides a higher level of shock protection during playback than the traditional one.
If the play does not start
Make sure the recorder is not locked (page 55).
When using the headphones/earphones, connect them directly to the recorder.
The VOL +/- buttons and the Digital Sound Preset function may become inoperative. In this case, do the procedure below.
1 Press the jog lever (L), flip the lever until "AUDIO OUT" flashes in the display, and then press the lever again.
2 Flip the jog lever (L) until "HeadPhone" appears in the display.
3 Press the jog lever (L) again.

The playback mode will switch automatically to match the recording mode of the material (stereo, LP2, LP4, or monaural).
Notes
- If the power supply is disrupted (i.e., the battery is removed or becomes exhausted, or the AC power adaptor is disconnected) while the recorder is operating, the lid may not open until the power is restored.
- Sound may skip if: - the recorder receives stronger continuous shock than expected. - a dirty or scratched MiniDisc is played.
Two ways of connecting to a sound source
The input jack of this recorder works as both digital and analog input jacks. Connect the recorder to a CD player or a cassette recorder using either digital (optical) input or analog (line) input. To record, see "Recording an MD right away!" (page 16) to record using digital (optical) input, and "Recording with analog input (line cable required)" (page 22) to record using analog (line) input.
Difference between digital (optical) and analog (line) inputs
| Difference | Digital (optical) input Analog (line) input | |
| Connectable source | Equipment with an digital (optical) output jack | Equipment with an analog (line) output jack |
| Usable cord O | Optical cable (with an optical or an optical-mini plug) (page 16) | Line cable (with 2 phono plugs or a stereo-mini plug) (page 22) |
| Signal from the source | Digital Analog | Even when a digital source (such as a CD) is connected, the signal sent to the recorder is analog. |
| Recorded track numbers | Marked (copied) automatically• at the same positions as the source (when the sound source is a CD or an MD).• after more than 2 seconds of blank or low-level segment (with a sound source other than a CD or an MD).• when the recorder is paused during synchro-recording (the recorder pauses automatically when it encounters a section with no audio signal for 3 seconds or more).You can erase unnecessary marks after recording. (“Erasing a track mark”, page 44). | Marked automatically• after more than 2 seconds of blank or low-level segment.• when the recorder is paused while recording.• automatically at specified intervals when the Auto Time Stamp is on.You can erase unnecessary marks after recording (“Erasing a track mark”, page 44). |
| Recorded sound level | Same as the source.Can also be adjusted manually (Digital REC level control) (“Adjusting the recording level manually (Manual recording)”, page 27). | Adjusted automatically. Can also be adjusted manually (“Adjusting the recording level manually (Manual recording)”, page 27). |
Note
Track marks may be copied incorrectly:
- when you record from some CD players or multi disc players using digital (optical) input.
- when the source is in shuffle or program play mode while recording using digital (optical) input. In this case, play the source in normal play mode.
- when recording BS or CS programs through digital (optical) input.
Recording with analog input (line cable required)
The sound will be sent from the connected equipment as analog signal but will be recorded digitally on the disc.
CD player, cassette recorder, etc. (source)

*Use the connecting cords without an attenuator. To connect to a portable CD player having a stereo mini-jack, use the RK-G136 connecting cord. For more information on connecting cords, see “Optional accessories” (page 68).
1 Insert a recordable MD, and then press and slide REC to the right. "REC" and the REC indicator light up in the display and the recording starts.
2 Play the source you want to record. For other recording operations, see "Recording an MD right away!" (page 16).

LINE IN (OPT) jack is for both digital and analog input.
The recorder automatically recognizes the type of line cable and switches to digital or analog input.
Note
If you temporarily stop a recording operation by pressing Ⅱ, a track mark will be added at that point when you press Ⅲ again to resume recording. The recording continues from on a new track.
Recording for long times
Select each recording mode according to the recording time that you want.
Stereo recording is possible at 2 times (LP2) or 4 times (LP4) the normal recording time.
MDs recorded in monaural, LP2, or LP4 mode can be played back only on MD players or recorders with monaural, LP2, or LP4 playback mode.
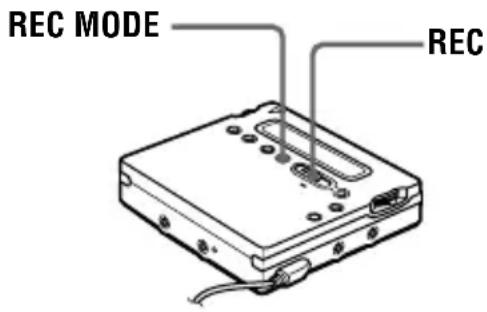
1 Press REC MODE repeatedly to select the desired recording mode.
| Recording mode1) | Display Recording time3) |
| Stereo (none) | approx. 80 min. |
| LP2 stereo LP | 2 approx. 160 min. |
| LP4 stereo LP | 4 approx. 320 min. |
| Monaural2) | MONO approx. 160 min. |
1) For better sound quality, record in normal stereo or LP2 mode. 2) If you record a stereo source in monaural, the sounds from left and right will be mixed. 3) When using an 80-minute recordable MD
2 Press and slide REC to the right.
3 Play the source you want to record.
To stop recording, press ■.
The recorder switches back to stereo recording when you record the next time.

Audio components that support the LP2 or LP4 modes are indicated by the MDLP MDLP logo marks.
Notes
- It is recommended that you use the supplied AC power adaptor for long recordings.
- If you try to play an MD recorded in LP2 or LP4 on a player/recorder that does not support these modes, playback will not start and “LP:” will appear on the display.
- Sound recorded through digital (optical) input can be monitored in stereo through headphones/earphones, etc.
- When you record in LP4 mode, momentary noise may be produced on very rare occasions with certain sound sources. This is because of the special digital audio compression technology that enables a recording time 4 times longer than normal. If noise is produced, it is recommended that you record in normal stereo or LP2 mode to obtain better sound quality.
To start/stop recording in sync with the source player (Synchro-recording)
You can easily make digital recordings of a digital source on an MD.
Before synchro-recording, make connections to the digital source with a digital cable, and insert a recordable MD.
![graph TD A["CD players, etc."] --> B["Device with two USB connectors"] B --> C["Rec"] C --> D["OFF_ON SYNCHRO REC"]](/content/2026/06/1349959/images/0b00642885ace7ba7e99b892aa083573e7a38953299ba702cebee9ade3ff3254.jpg)
1 Slide SYNCHRO REC to ON.

“SYNC” appears in the display. “SYNC” does not appear if optical cable is not connected to the recorder.
2 Press and slide REC to the right. The recorder stands by for recording.
3 Play the source sound. The recorder starts recording when it receives the playing sound.
To stop recording, press ■

- You cannot pause manually during synchro-recording.
- When there is no sound from the player for about 3 seconds during synchro-recording, the recorder goes into the standby mode automatically. When the sound comes from the player again, the recorder resumes synchro-recording. If the recorder is kept in the standby mode for 5 minutes or longer, the recorder stops automatically.
- For longer recording; follow step 1 of "Recording for long times" (page 23) to select the recording mode, and then start the procedure of synchro-recording.
Notes
- Do not switch SYNCHRO REC while recording. Recording may not be done properly.
- Even when there is no recorded sound on the sound source, there may be cases when recording does not pause automatically during synchro-recording due to the noise level emitted from the sound source.
- If a silent portion is encountered for approximately 2 seconds during synchro-recording from a sound source other than a CD or an MD, a new track mark is automatically added at the point where the silent portion ends.
- Synchro-recording cannot be done if the connecting cord is not an optical cable, or if the cable is connected to the MIC (PLUG IN POWER) jack.
- You cannot manually change the recording level or the recording mode during synchro-recording.
Recording without overwriting existing material
If you wish to avoid overwriting the current contents of an MD, do the following procedure. All new material will then be recorded from the end of the current contents.

1 While the recorder is stopped, press the jog lever (L). 2 Flip the jog lever (L) repeatedly until "REC-Posi" flashes in the display, and then press the lever. 3 Flip the jog lever (L) repeatedly until "From End" flashes in the display, and then press the lever.
To start recording from the current point
Select "From Here" in step 3.
Notes
- The setting will remain even after the power is turned off.
- If you start recording while the recorder is in play-pause mode, the recording will begin from the point at which it is paused.
Recording from a microphone
Connect a stereo microphone to the MIC (PLUG IN POWER) jack. For more information on stereo microphones, see "Optional accessories" (page 68).

1 Press and slide REC to the right. For other operations, see “Recording an MD right away!” (page 16).
To stop recording, press ■
To select microphone sensitivity
1 Press the jog lever (L) while the recorder is stopped. 2 Flip the jog lever (L) repeatedly until "MIC SENS" appears in the display, and then press the lever (L). 3 Flip the jog lever (L) repeatedly until "SENS HIGH" or "SENS LOW" appears in the display. When recording a soft sound or a sound in the distance, set to "SENS HIGH". When recording a loud sound or a sound at close range, set to "SENS LOW". 4 Press the jog lever (L).
Notes
- You cannot record through the microphone while an optical cable is connected to the LINE IN (OPT) jack. The recorder automatically switches input in the following order: optical input, microphone input, and analog input.
- The microphone may pick up the operating sound of the recorder itself. Use the microphone away from the recorder in such cases.
Adding track marks automatically at specified intervals (Auto Time Stamp)
Use this feature to add track marks automatically at specified intervals when recording through the analog input connector or a microphone.

1 While the recorder is recording or in recording pause, press the jog lever (L). 2 Flip the jog lever (L) repeatedly until "TIME MARK" flashes in the display, and then press the lever. 3 Flip the jog lever (L) repeatedly until the desired time interval flashes in the display.
Select one of the following intervals.
4 Press the jog lever (L).
To cancel Auto Time Stamp
Select "OFF" in step 3 or stop recording.
Using Auto Time Stamp to add track marks while recording
After you set the time interval in step 4, the recorder will begin adding a track mark whenever the time interval has elapsed. For example, if an Auto Time Stamp interval of 5 minutes is set, and 8 minutes of recording has already been done, then a track mark will be added at a point equivalent to 13 minutes (8 + 5) after the start of recording, and every 5 minutes thereafter.
If, however, the Auto Time Stamp interval is longer than the elapsed recording time, then a track mark will be added when the Auto Time Stamp interval has elapsed. For example, if the Auto Time Stamp interval is set at 5 minutes, but only 3 minutes of recording has been done, then a track mark will be added at the 5-minute point after the start of the recording, and every 5 minutes thereafter.

"T" appears after the track number on the recorder for track marks added by Auto Time Stamp, and "T" appears after the time display on the remote control.
Notes
- Automatic track marking by Auto Time Stamp starts when you add a normal track mark to the disc (i.e., by pressing T MARK or III, etc.).
- The setting will be lost when the recording is stopped.
Adjusting the recording level manually (Manual recording)
When you record, the sound level is adjusted automatically. If necessary, you can set the level manually.
Note
Adjust the recording level while the recorder is in standby mode. You cannot adjust it while recording.

1 While holding down Ⅱ, press and slide REC to the right. The recorder stands by for recording. 2 Press the jog lever (L), flip the lever until “RecVolume” flashes in the display, and then press the lever again. 3 Flip the jog lever (L) repeatedly until "ManualREC" flashes in the display, and then press the lever.

To switch back to the automatic control, follow the procedure from step 2 again, then flip the jog lever (L) repeatedly until “Auto REC” flashes in the display, and then press the lever.
4 Play the source.
5 While observing the level meter in the display, adjust the recording level by flipping the jog lever (L).
Set the level so that the input lights up around the fifth segment on the level meter. If the maximum input lights up the ninth segment, lower the level.

Recording does not start in this step. If your source is an externally connected component, be sure to cue the source to the beginning of the material to be recorded before you start playback.
6 Press II again to start recording.
To stop recording, press ■.
The recording level control is switched back to automatic control when you record the next time.

If you press ■ during recording operation, the recorder will revert to automatic recording level adjustment mode the next time you start a recording operation.
Notes
- The recording level cannot be adjusted while recording is in progress. If you want to adjust the recording level after you have started the recording, press ■ to pause the recorder. Then do the procedure from step 5.
- You cannot adjust the recording level manually during synchro-recording.
Checking the remaining time or the recording position
You can check the remaining time, track number, etc. when recording or during stop.
On the recorder

1 While the recorder is recording or stopped, press the jog lever (L), flip the lever until “DISPLAY” flashes in the display, and then press the lever again. 2 Flip the jog lever (L) until the information you want flashes in the display. Each time you flip the lever, the display changes as follows.
LapTime (The elapsed time of the current track.)
![graph TD A["↓ RecRemain (The remaining recordable time.)"] --> B["↓ AllRemain (The remaining time after the current track.)¹"] B --> C["↓ Clock (Current time.)"]](/content/2026/06/1349959/images/4aa100a00a5e5f9ffe579789a2f3c308d624aad28e5e65a7505a74c453ddc0e3.jpg)
1) Appears only when the recorder is stopped.
3 Press the jog lever (L). The display changes as follows.
Display window on the recorder

| A | B |
| Track number Elapsed time | |
| Track number1) | Remaining time for recording |
| Numbers of tracks after the current track2) | Remaining time after the current location |
| Current date3) | Current time3) |
1) If the track is labeled, “♪” appears in the display followed by the track name (appears only when “RecRemain” is selected while stopped). 2) If the disc is labeled, “➕” appears in the display followed by the disc name (appears only when “AllRemain” is selected while stopped). 3) Appears only when the clock is set (appears only when “Clock” is selected).

The display that appears on the remote control is different from the ones on the recorder. See "On the remote control" (page 29) to check the display that appears on the remote control.
To know the recording condition
The indicator lights up or flashes according to the recording condition.
| Recording condition | REC indicator |
| While recording lights up flashes according to the loudness of the source while recording with a microphone (voice mirror) | |
| Recording standby flashes |
| Recording condition | REC indicator |
| Less than 3 minutes' recording time available | flashes slowly |
| A track mark has been added (when controlling by the recorder only) | goes off momentarily |

If you want to check the playing position or track name while playing, see page 40.
On the remote control

1 Press DISPLAY while recording or in stop mode.
Each time you press the button, the display changes as follows.
Display window on the remote control

Indication ©/D
While recording
Track number/Elapsed time ↓ Track number/Remaining time for recording ↓ - /Current time 1)
1) Appears only when the clock is set.
In stop mode
![graph TD A["Track number/Elapsed time"] --> B["Track number/Track name¹"] B --> C["Number of tracks in the disc/Disc name¹"] C --> D["-/Current time ²"]](/content/2026/06/1349959/images/f1d1dc86852177e1b21c8b4701e318ee813669cffe4d5797ef7eb5d440abaa78.jpg)
1) Appears only if the track has been labeled. 2) Appears only when the clock is set.

- If you want to check the playing position or track name while playing, see page 41.
- The display that appears on the recorder is different from the ones on the remote control. See “On the recorder” (page 28) to check the display that appears on the recorder.
Setting the clock to stamp the recorded time
To stamp the date and time on the MD when you record, you first need to set the clock.
Once you set the clock, the recorder will include a time stamp each time you record something. If you don't want to include a time stamp on the track, skip this operation.

1 Press the jog lever (L) while the recorder is stopped. 2 Flip the jog lever (L) until "CLOCK SET" flashes in the display, and then press the lever.
The digits of the year flash.

3 Change the current year by flipping the jog lever (L), and then press the lever.
The digit of the month flashes.
4 Repeat step 3 to enter the current month, date, hour, and minute.
When you press the jog lever (L) to enter the minute, the clock starts operating.
If you make a mistake while setting the clock
Press ■, and set the clock again from step 2. You can skip a step by pressing the jog lever (L).
To display the current time
When the recorder is not operating or while recording, press the jog lever (L), flip the lever until "DISPLAY" appears in the display, and then press the lever again. Flip the jog lever (L) until "CLOCK" flashes in the display, and then press the lever again. The current time appears in the display.
To display the time in the 24-hour system
While setting the clock, press ■. To display the time in the 12-hour system, press ■ again.
To maintain the correct time
Once you set the clock, it will keep correct time as long as the recorder is connected to a power source, such as the rechargeable battery, alkaline dry battery, or AC power adaptor. However, if no power source is connected, the clock setting will change back to the factory setting after about 3 minutes. When changing the rechargeable battery or alkaline dry battery, make sure to do it within 3 minutes.
Note
Make sure the time is correctly set if you want the time stamp to be accurately recorded for an important recording.
Copying CD text information while recording (Joint Text)
CD text connecting cable, CD that supports CD-TEXT, and CD player that supports Joint Text required
By connecting the recorder to a Sony portable CD player that supports Joint Text (the CD text copying function) (D-E990, etc.), you can copy track and disc names automatically during recording. In addition to the CD text connecting cable (RK-TXT1), make sure to connect the recorder to the portable CD player with an optical cable.

1 Press and slide REC to the right to start recording on the recorder, and start playing the CD in the portable CD player.
“SYNC”, “REC” and “ lights up in the display.
“CD TEXT” appears for a few seconds, then “001 TEXT?” and “PushENTER” alternate in the display.
“NO TEXT” appears at this time if no track name information exists in the CD. In this case, the track name will not be copied.
2 Press the jog lever (L).
Track name scrolls, and then the track name and "PushENTER" alternate in the display.
3 Press the jog lever (L).
Track name scrolls in the display while the name is copied.
4 Follow steps 2 and 3 to copy each new track name that appears.
5 Press ■ on the recorder at the point you want to stop recording.
“ lights up, and then “ 000 TEXT?” and “ PushENTER” alternate in the display.
If you don't want to copy the disc name information, press ■ again. The disc name is not copied and the operation ends.
“NO TEXT” appears at this time if no disc name information exists in the CD. In this case, the operation ends without copying the disc name.
6 Press the jog lever (L).
Disc name scrolls, and then disc name and "PushENTER" alternate in the display.
7 Press the jog lever (L).
"TOC Edit" flashes.
Afterwards, the disc name scrolls in the display.

If the disc or track name appears in the display in step 1, the music tracks and CD text information on some CDs are automatically recorded from start to finish. If the CD is this type, press ■ on the recorder at the point you want to stop recording, or after all tracks have been recorded. "TOC Edit" flashes. Afterwards, the disc name scrolls in the display.
Notes
- If you copy disc name information to a disc with a previously recorded disc name, the old disc name will be overwritten with the new one.
- When the CD text copying function is on, various settings and editing functions cannot be accessed with the jog lever.

You can monitor the sound during recording. Connect the headphones/earphones with remote control on to the CD text connecting cable and adjust the volume by pressing the VOL +/- buttons on the recorder.

Connect the headphones/earphones with remote control
Notes
- The CD text copying function can only be used with components with the logo shown below.
JOINT TEXT
CD→MD
Audio components that support the CD text copying function:
D-EJ01, D-RJ915, D-EJ815, D-EJ715, D-FJ75TR, D-EJ711 (Sept. 2000)
- The CD text copying function can only be used with CDs that support CD-TEXT.


- The RK-TXT1 CD text connecting cable is designed for exclusive use with this recorder and Sony portable CD player (D-E990, etc.). Do not use a connecting cable of another make to copy CD text information.
- The remote becomes inoperative when the CD text connecting cable (RK-TXT1) is connected to the recorder.
- Stopping or pausing playback on the CD player automatically causes recording on the recorder to pause. A new track mark is automatically added when you resume recording.
- The track name of the track currently played will not be recorded if you stop or pause CD playback in the middle of the copying process on the recorder.
Selecting a track directly
You can select a desired track directly by using the jog lever (L).

1 Flip the jog lever (L) until the desired track appears in the display, and then press the jog lever (L).
![graph TD A["Window Frame"] --> B["Closed Window Frame"] style A fill:#f9f,stroke:#333 style B fill:#bbf,stroke:#333](/content/2026/06/1349959/images/0e7ff39ea20e0e24324a30074c1e4237cd6eaf57ace39607122c48ed24573134.jpg)
Flip to select, press to enter.
The selected track name appears in the display and the recorder starts playing by pressing the jog lever. If the track has no name, the track number appears in the display.

If you do step 1 while the recorder is shuffling the tracks, shuffle play starts from the track that you selected.
Note
If you select a track directly during program play, the playback mode returns to normal.
Changing the playback order
You can play tracks repeatedly in three ways: all repeat, single repeat, and shuffle repeat.
On the recorder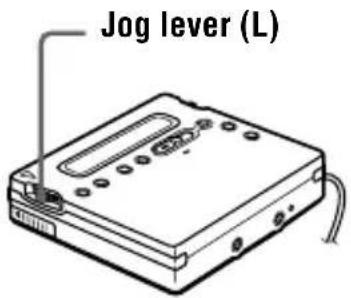
Selecting a play mode
1 While the recorder is playing or stopped, press the jog lever (L), flip the lever until “PLAY MODE” flashes in the display, and then press the lever again.
2 Flip the jog lever (L) to select the play mode, and then press the lever.
Each time you flip the lever, the display item indicated by Ⓐ changes as shown below.
Pressing the jog lever while Ⓐ is flashing causes the play mode to change.
The new mode then appears in the window indicated by Ⓑ.
⊂ indicates that repeat play has been activated for playback.
Display window on the recorder
![graph TD A["Indication A/B (Play mode)\nNormal/-(All the tracks are played once.)"] --> B["AllRepeat/(All the tracks are played repeatedly.)"] B --> C["1 Track/1 (A single track is played.)"] C --> D["1 Repeat/⊂ 1 (A single track is played repeatedly.)"] D --> E["Shuffle/SHUF (After the currently se…](/content/2026/06/1349959/images/f7cc37519f86f985cdfed33b8c4a6d2980b8d234521188e324d90d71e7721ab8.jpg)
Creating a Program (Program play)
1 Press the jog lever (L) while "PGM" flashes in the display in step 2 of "Selecting a play mode" (page 34).
2 Flip the jog lever (L) to select a track. Track number Program number

3 Press the jog lever (L) to enter a track number.
4 Repeat steps 2 and 3 to program more tracks. 5 Press the jog lever (L) for 2 seconds or more. The program is set and playback starts.

- The program play setting will remain in memory even after playback finishes or is stopped. - You can set the program play up to 20 tracks. - The settings can be stored to the Personal Disc Memory (page 38).
Notes
- All program settings are lost when the disc is removed from the recorder. - If the recorder is stopped and left inactive for 5 minutes in the middle of a programming operation, the tracks selected up to that point are entered as the program.
On the remote control
You can select various play modes using the PLAYMODE and RPT/ENT buttons on the remote control.

Selecting a play mode
1 Press PLAYMODE while the recorder is playing or stopped. Each time you press the button, the play mode indication changes as follows.
Display window on the remote control
Play mode indication
Indication (Play mode)
- (All the tracks are played once.) ↓ 1 (A single track is played.) ↓ SHUF (After the currently selected track finishes playing, the remaining tracks are played in random order) ↓ PGM (Tracks are played in the order that you specified.)
Creating a Program (Program play)
1 While the recorder is stopped, playing, or play-paused, press PLAYMODE repeatedly until “PGM” flashes in the display. 2 Turn the control towards ◀◀◀ or towards ▶▶▶▶▶ to select a track.


- PORTABLE MINIDISC RECORDER
- CAUTION
- INFORMATION
- TABLE OF CONTENTS
- LOOKING AT CONTROLS
- GETTING STARTED
- RECORDING AN MD RIGHT AWAY
- PLAYING AN MD RIGHT AWAY
- VARIOUS WAYS OF RECORDING
- VARIOUS WAYS OF PLAYBACK
- EDITING RECORDED TRACKS
- OTHER OPERATION
- POWER SOURCES
- ADDITIONAL INFORMATION
- THE RECORDER
- THE DISPLAY WINDOW OF THE RECORDER
- THE HEADPHONES/EARPHONES WITH A REMOTE CONTROL
- THE DISPLAY WINDOW OF THE REMOTE CONTROL
- BEFORE USING THE RECORDER
- HOW TO USE THE JOG LEVER
- JOG LEVER FUNCTIONS
- JOG LEVER (L) (MENU/ENTER)
- JOG LEVER (R) (▶/I◀◀/▶▶I)
- HOW TO USE THE CONTROL ON THE REMOTE CONTROL
- PLAY/AMS/SEARCH
- ADJUSTING THE VOLUME (VOL +/-)
- INSERT THE RECHARGEABLE BATTERY
- CHARGING THE RECHARGEABLE BATTERY
- USING THE DRY BATTERY
- MAKE CONNECTIONS AND UNLOCK THE CONTROL
- INSERT AN MD (USE A RECORDABLE MD FOR RECORDING.)
- NOTES
- MAKE CONNECTIONS (INSERT THE CABLES FIRMLY AND COMPLETELY INTO THE APPROPRIATE JACKS.)
- RECORD AN MD
- TO STOP RECORDING, PRESS
- IF THE RECORDING DOES NOT START
- FOR MODELS SUPPLIED WITH THE AC PLUG ADAPTOR
- PLAY AN MD
- TO STOP PLAY, PRESS
- G-PROTECTION FUNCTION
- IF THE PLAY DOES NOT START
- WHEN USING THE HEADPHONES/EARPHONES, CONNECT THEM DIRECTLY TO THE RECORDER
- TWO WAYS OF CONNECTING TO A SOUND SOURCE
- NOTE
- RECORDING WITH ANALOG INPUT (LINE CABLE REQUIRED)
- RECORDING FOR LONG TIMES
- TO START/STOP RECORDING IN SYNC WITH THE SOURCE PLAYER (SYNCHRO-RECORDING)
- SLIDE SYNCHRO REC TO ON
- RECORDING WITHOUT OVERWRITING EXISTING MATERIAL
- TO START RECORDING FROM THE CURRENT POINT
- RECORDING FROM A MICROPHONE
- TO SELECT MICROPHONE SENSITIVITY
- ADDING TRACK MARKS AUTOMATICALLY AT SPECIFIED INTERVALS (AUTO TIME STAMP)
- TO CANCEL AUTO TIME STAMP
- USING AUTO TIME STAMP TO ADD TRACK MARKS WHILE RECORDING
- ADJUSTING THE RECORDING LEVEL MANUALLY (MANUAL RECORDING)
- CHECKING THE REMAINING TIME OR THE RECORDING POSITION
- ON THE RECORDER
- DISPLAY WINDOW ON THE RECORDER
- TO KNOW THE RECORDING CONDITION
- ON THE REMOTE CONTROL
- DISPLAY WINDOW ON THE REMOTE CONTROL
- INDICATION ©/D
- WHILE RECORDING
- IN STOP MODE
- SETTING THE CLOCK TO STAMP THE RECORDED TIME
- IF YOU MAKE A MISTAKE WHILE SETTING THE CLOCK
- TO DISPLAY THE CURRENT TIME
- TO DISPLAY THE TIME IN THE 24-HOUR SYSTEM
- TO MAINTAIN THE CORRECT TIME
- COPYING CD TEXT INFORMATION WHILE RECORDING (JOINT TEXT)
- CD TEXT CONNECTING CABLE, CD THAT SUPPORTS CD-TEXT, AND CD PLAYER THAT SUPPORTS JOINT TEXT REQUIRED
- JOINT TEXT
- AUDIO COMPONENTS THAT SUPPORT THE CD TEXT COPYING FUNCTION
- SELECTING A TRACK DIRECTLY
- CHANGING THE PLAYBACK ORDER
- SELECTING A PLAY MODE
- CREATING A PROGRAM (PROGRAM PLAY)
- INDICATION (PLAY MODE)
Brand : SONY
Model : MZ-R900DPC
Category : Hi-Fi System