
WKWF75GGFWT - Washing machine White-Westinghouse - Free user manual and instructions
Find the device manual for free WKWF75GGFWT White-Westinghouse in PDF.


| Product Type | Freestanding Washing Machine |
| Brand | White-Westinghouse |
| Model | WKWF75GGFWT |
| Capacity | 7.5 kg |
| Spin Speed | 1200 rpm |
| Energy Class | A++ |
| Dimensions (H x W x D) | 85 x 60 x 55 cm |
| Weight | 65 kg |
| Power Supply | 220-240 V ~ 50 Hz |
| Water Consumption per Cycle | 45 L |
| Noise Level (Wash/Spin) | 56 / 76 dB(A) |
| Number of Programs | 15 |
| Delay Start | Up to 24 hours |
| Child Lock | Yes |
| Overheating Protection | Yes |
| Filter Cleaning | Required every 2 months |
| Descaling | Recommended every 3 months |
| Spare Parts Availability | 7 years after purchase |
| Display Type | LED |
| Drum Material | Stainless Steel |
Frequently Asked Questions - WKWF75GGFWT White-Westinghouse
User questions about WKWF75GGFWT White-Westinghouse
0 question about this device. Answer the ones you know or ask your own.
Ask a new question about this device
Download the instructions for your Washing machine in PDF format for free! Find your manual WKWF75GGFWT - White-Westinghouse and take your electronic device back in hand. On this page are published all the documents necessary for the use of your device. WKWF75GGFWT by White-Westinghouse.
USER MANUAL WKWF75GGFWT White-Westinghouse
CONTENTS
IMPORTANT SAFETY WARNINGS
BEFORE USING YOUR MACHINE
- General warnings 8
- Safety warnings 9
-Danger of scalding/burning 12
- Risk of death due to electrical shock 12
- Explosion hazard 13
- Danger of fire 13
- Fall and injury hazard 15
- Child safety 16
PACKAGING and the ENVIRONMENT
• Environmental awareness and the removal of old dryer-washing machine 17
- Removal of packaging materials 17
- Disposal of the old appliance 17
SAVINGS INFORMATION 18
OVERVIEW OF THE APPLIANCE 19
• Overview 19
• Overview 20
• Technical Specifications 21
SETTING UP THE MACHINE 22
- Removing the transport safety screws 22
- Placing the machine and adjusting the feet 24
• Electrical connection 26
• Water inlet connection 27
• Water draining connection 28
CONTROL PANEL
• Detergent drawer general view 30
• Detergent drawer compartments 31
• Programme Knob 32
WASHING OPERATION
- Sorting the laundry 33
- Explanation of washing symbols 34
- Placing laundry into the machine 35
• Choice of detergent and placing into the machine 37
• Programme selection 38
• Auxiliary Functions 39
• Half load detection system 40
• Temperature selection 41 - Spin speed selection 42
• Drying level selection 43
• Drying duration selection 44
• Drying level selection 45 - Delay timer 46
- Start Pause button 47
- Child lock 48
• Cancelling the programme 49
• Finishing the programme 50 - Programme table 51-58
- Cleaning and maintenance (warning) 59
- Cleaning and maintenance (water inlet filters) 60
- Cleaning and maintenance (pump filter) 61-62
- Cleaning and maintenance (detergent drawer) 63
- Flush stopper/body/drum 64
- Troubleshooting 65
• Automatic fault warnings and what needs to be done 70
• Practical information 71-72-73-74
• Describing energy label and saving energy 75 - Disposal information 76
IMPORTANT SAFETY WARNINGS

Read the instructions.
This appliance is intended for domestic household use only and should not be used for any other purpose or in any other application, such as for non-domestic use or in a commercial environment.
This appliance can be used by children aged from 8 years and above and persons with reduced physical, sensory or mental capabilities or lack of experience and knowledge if they have been given supervision or instruction concerning use of the appliance in a safe way and understand the hazards involved.
Children shall not play with the appliance. Cleaning and user maintenance shall not be made by children without supervision.
If the supply cord is damaged, it must be replaced by the manufacturer, its service agent or similarly qualified persons in order to avoid a hazard.
For the details concerning the method and frequency of cleaning, please see section “Cleaning and maintenance” on pages 59 to 64.
The maximum mass of dry textile material in kilograms to be used in the appliance is 7 kg.
The tumble dryer is not to be used if industrial chemicals have been used for cleaning.
The lint trap has to be cleaned frequently.
Lint must not be allowed to accumulate around the tumble dryer.
Adequate ventilation has to be provided to avoid the back flow of gases into the room from appliances burning other fuels, including open fires.
Do not dry unwashed items in the tumble-dryer.
Items that have been soiled with substances such as cooking oil, acetone, alcohol, petrol, kerosene, spot removers, turpentine, waxes and wax removers should be washed in hot water with an extra amount of detergent before being dried in the tumble dryer.
Items such as foam rubber (latex foam), shower caps, waterproof textiles, rubber backed articles and clothes or pillows fitted with foam rubber pads should not be dried in the tumble dryer.
Fabric softeners, or similar products, should be used as specified by the fabric softener instructions.
The final part of a tumble dryer cycle occurs without heat (cool down cycle) to ensure that the items are left at a temperature that ensures that the items will not be damaged.
Remove all objects from pockets such as lighters and matches.
WARNING: Never stop a tumble dryer before the end of the drying cycle unless all items are quickly removed and spread out so that the heat is dissipated.
A carpet must not obstruct the openings.
Exhaust air must not be discharged into a flue which is used for exhausting fumes from appliances burning gas or other fuels.
This appliance must not be installed behind a lockable door, a sliding door or a door with hinges on the opposite side to that of the tumble dryer, in such a way that a full opening of the tumble dryer door is restricted.
BEFORE USING YOUR MACHINE
- Do not let your pets near the machine.
- Please check the packaging of your machine before installation, and the outer surface of the machine after the packaging has been removed. Do not operate damaged machines or machines with opened packaging.
- Have your machine installed only by an authorised service company. Any interference to your machine by anyone other than authorized services shall cause your warranty to be void.
- Please use your machine for laundry that is specified as washable and dryable after washing by their manufacturer on their label.
- You must remove the transportation safety screws before your machine’s first use. The machine will malfunction if it is operated with the transportation safety screws still in place and this will void your warranty.
- Your machine warranty does not cover damage caused by external factors (floods, fire, rodents etc.) - Please do not throw away this user manual. Store it in a safe place. It might be needed by you or the next user.
General warnings
- The necessary ambient temperature for your machine's ideal operation is 15-25°C.
- Frozen hoses can tear and explode. In regions where the temperature is below zero, the electronic card may not operate safely.
- Please ensure that the clothes you will load into your machine do not have foreign substances (nails, needles, coins, lighters, matches, clips etc.) in their pockets. These foreign substances can damage your machine.
- It is recommended to perform the first washing operation in 95° White Cotton programme and without laundry by inserting 1/2 scale of detergent in the 2nd compartment of the detergent drawer.
- As detergent or softener exposed to air for a long time may cause residues, only put your detergent or softener in the detergent drawer at the beginning of each wash.
- It is advised that you unplug your machine and close the water inlet tap if you will not use your machine for a long time. You should also leave the door of your machine open to prevent bad odours forming due to humidity.
- Some water might be left in your machine due to trials and tests conducted for Quality Control procedures during production. This causes no harm to your machine.
- Keep the document bag that came inside your machine that contains the user manual out of the reach of children and babies to prevent the risk of suffocation.
- Keep small parts found in the document part away from the reach of children and babies.
- Use pre-wash programmes only for very dirty laundry.
- When loading your machine, do not exceed the maximum amount of laundry specified for the programme you have chosen.
- In case of any malfunction, unplug the machine and close the tap first. Do not attempt to repair by yourself and consult the nearest authorized service company.
- Never open the detergent compartment when the appliance is running.
- Never force the door open when the machine is running.
- Please adhere to the manufacturers' advice regarding the use of fabric conditioner or similar products you will use in your machine.
- While your machine is in the drying process, please do not stop your machine before the programme ends.
If you have to do this, remove all your laundry fast and spread them on an appropriate place immediately to allow them to cool down.
- Set up your machine in a place where its door can be completely opened. (Do not set up your machine in places where its door cannot be fully opened.)
- Set up your machine in locations that can be ventilated and might have constant air circulation.

Safety warnings
You must read these warnings. Ignoring these warnings may put you or your loved ones at risk of fatal injuries.

Burn risk!
- Do not touch the discharge hose or the water discharged during the discharging process as the appliance may reach high temperatures when running.
- Open the door of the machine all the way after the drying process. Do not touch the door glass. Burn hazard may occur due to high temperature.

Electrocution risk!
- Do not use multiple plugs or extension cords.

- Do not plug in damaged plugs or plugs with torn cables.
- Never pull from the cable when unplugging.
• Grab the plug when unplugging.
- Do not plug-in or out the plug from the receptacle with wet hands to prevent electric shock.
- Never touch the machine with a wet or damp hand or foot.
- Call the nearest authorized service company for assistance if the power cord malfunctions.

Explosion risk!
- As there is a drying function on your machine, make sure that materials like stain removing chemicals or washing gas that you might have applied on your laundry earlier are properly rinsed and purged. There might be a risk of explosion when you run your machine with the drying function otherwise.

- Unwashed dry laundry must not be dried in your machine.
- Do not keep flammable or explosive liquids near your machine.
- If you're going to choose a washing and drying programme, do not place a detergent dose adjustment device/ball into your machine. They might pose a fire risk.
- Laundry must not be dried in the machine under the conditions specified below due to the risk of fire:
- Stuffed and damaged parts (pillows or jackets). The sponge parts dangling outside these stuffings might catch fire during the drying process.
- The sulphur in paint-removing materials might cause corrosion. Thus, never use paint-removing materials in your machine.
- Please ensure that detergent cups are not left inside the laundry. These plastic cups might melt during drying and damage your machine and laundry.
- Laundry that has had a stain removal process applied must be rinsed thoroughly before washing.
- Never use products that contain solvent material (like washing gas) in your machine.

Fall and injury risk!
- Do not climb on your machine. The upper table of your machine may break and you might get injured.
- Tidy the hose, cable and packaging of your machine during installation. You might trip over and fall.
- Do not turn your machine upside down, or on its side.
- Do not lift your machine by holding it from extruding parts (detergent drawer, door). These parts might break and cause you injury.
- There’s a risk of tripping and injury if the materials like hoses and cables are not properly stored after your machine is installed.
Machine! must be carried by 2
people or more.


Child safety!
- Do not allow your children to play with the machine. It is an electrically driven appliance.
- Do not leave children unattended near the machine. Children might lock themselves into the machine.
- The door glass and machine surface might be extremely hot during your machine’s operation.
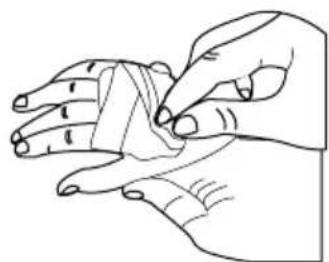
- It is therefore especially important that children do not touch the machine as it may damage their skin.
- Keep packaging material away from children.
- Poisoning might occur if the detergent and other washing aids are consumed, and eye or skin irritation might occur if they come into contact with the skin. Keep the cleaning materials where children cannot reach them.
PACKAGING AND THE ENVIRONMENT
DISPOSING OF PACKAGING AND YOUR OLD MACHINE RESPONSIBLY
Removal of packaging materials
Packaging materials protect your machine from the damage that might occur during transportation. Please recycle your packaging materials.
Recycled material provides both raw material savings and decreases waste production
Removal of old machine
Old electrical devices might still contain salvageable parts. So, never throw your old devices that you do not use into the w a s t e .

Ensure the parts of your old electronic or electrical devices are reused by giving them to your local recycling centre.
Please ensure your old appliances are kept in an appropriate place for the safety of children until they are taken outside the house.
SAVINGS & EFFICIENCY INFORMATION
Some important information to get more efficiency out of your machine:
- The amount of laundry you put in your washing machine should not exceed the maximum amount indicated. By avoiding overloading, your machine shall run more efficiently.
- Not using the pre-wash feature for normal and lightly soiled laundry shall save electricity and water.
OVERVIEW OF YOUR DEVICE
General Appearance
Front view
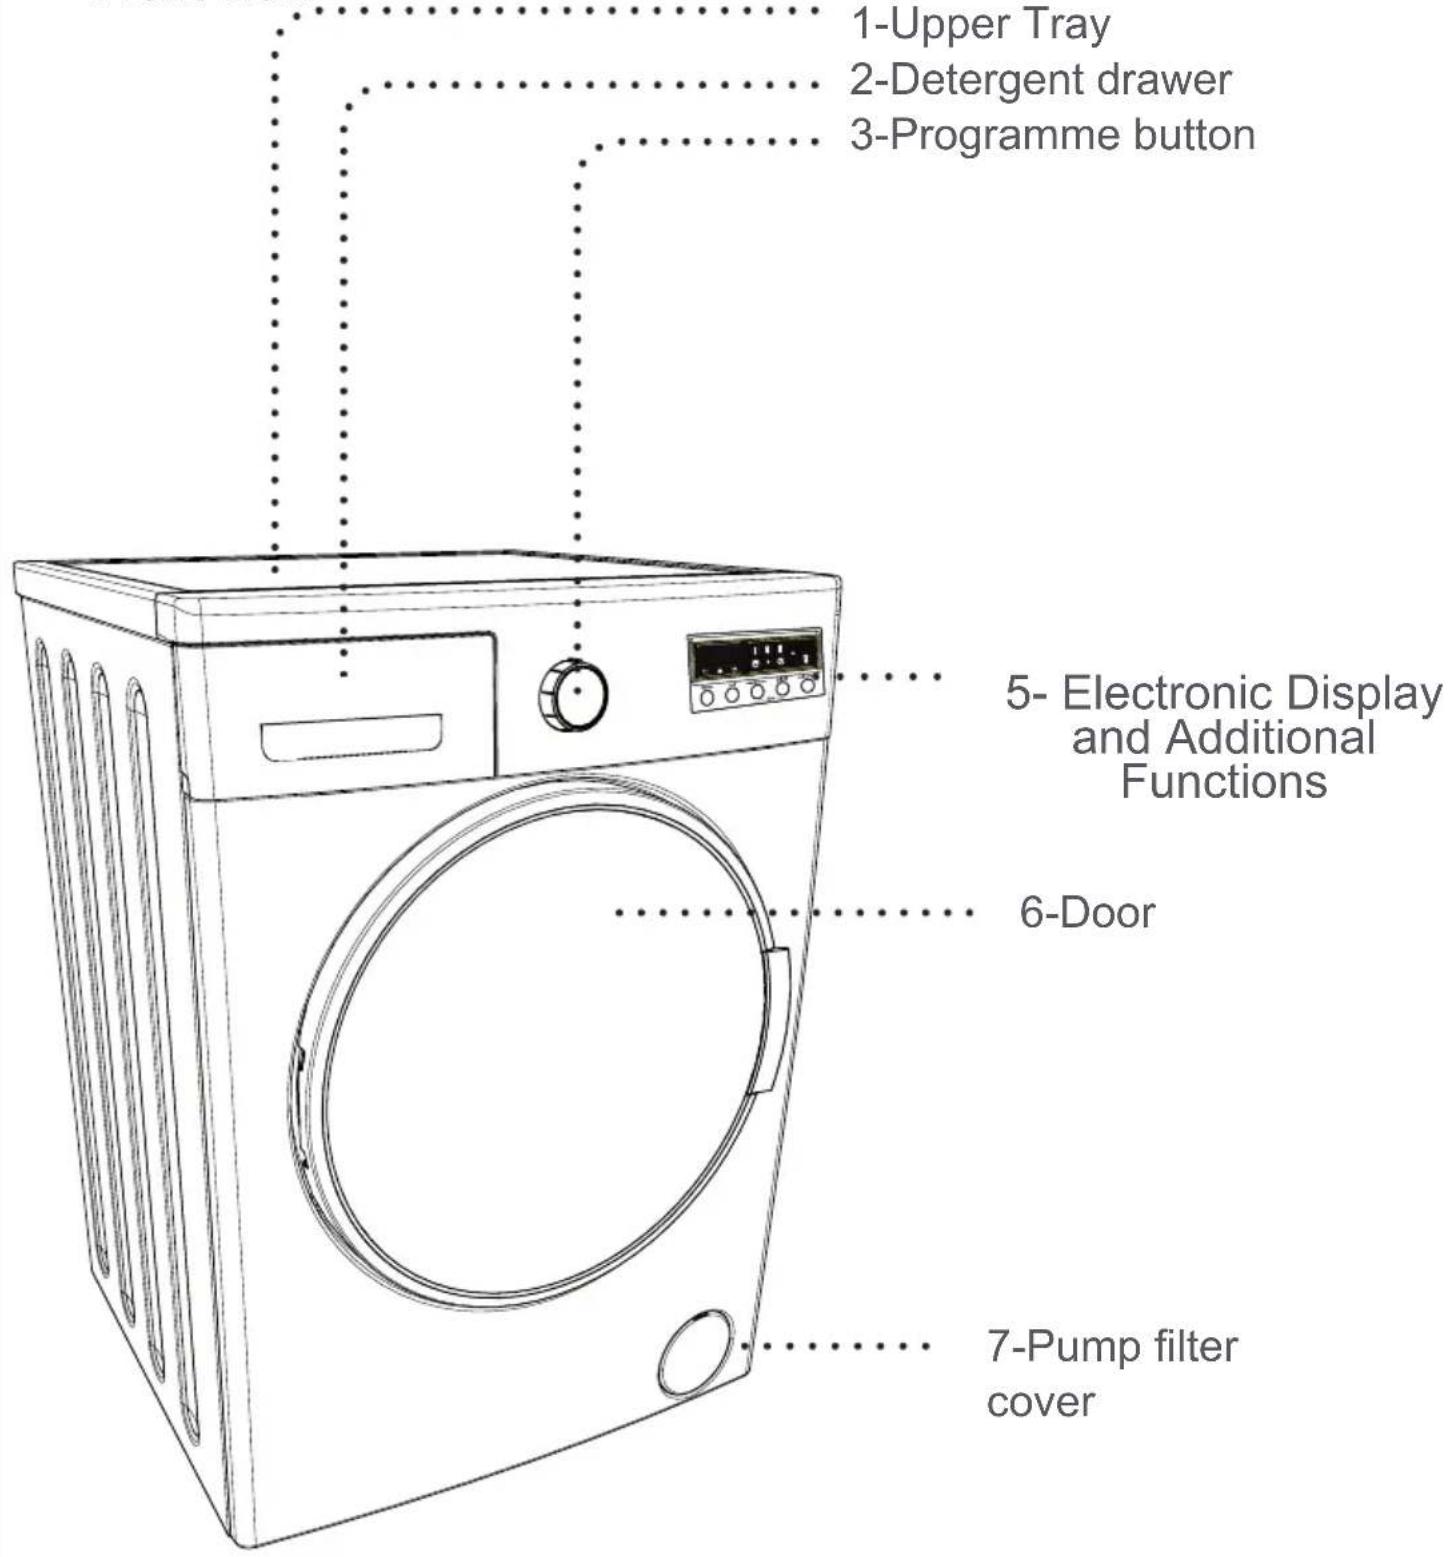
General Appearance
Rear view
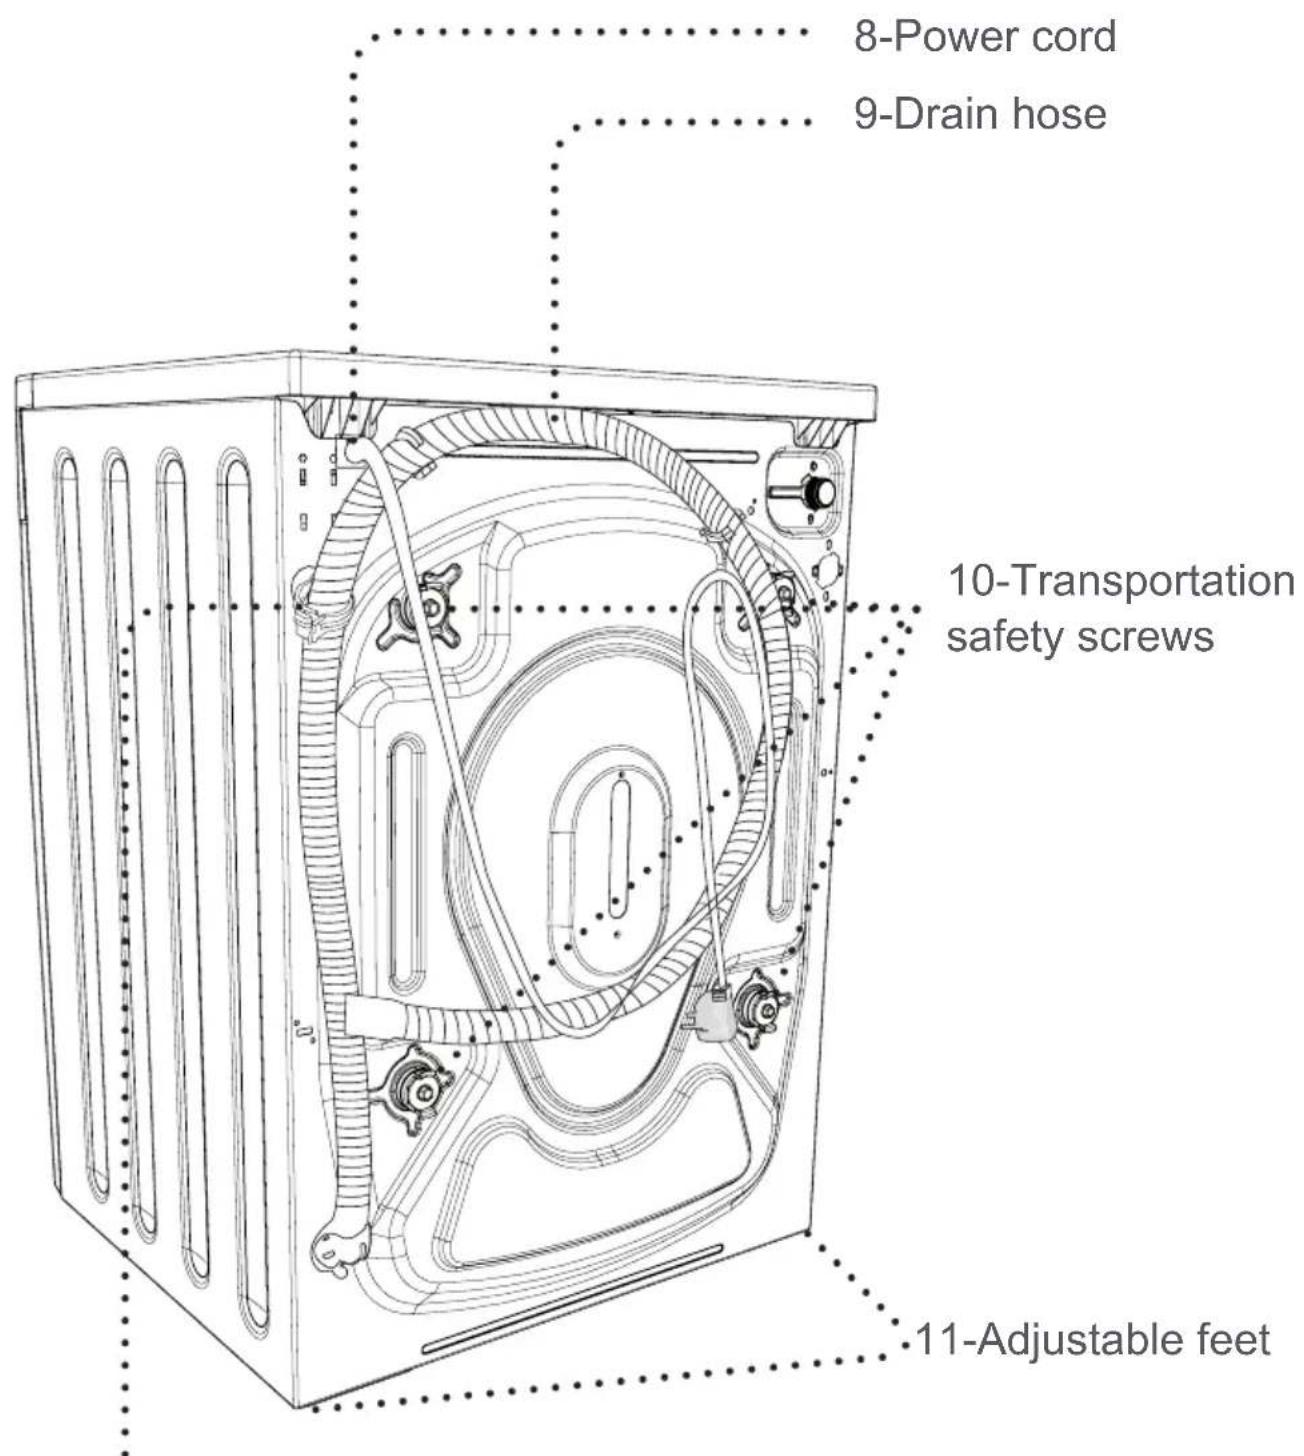
12-Drain hose holding plastic:
(The operation of the machine will be affected if this plastic part is removed. So please don't remove this plastic part under any condition.)
Technical specifications
| Maximum washing capacity (dry laundry)(kg) 7.0 | |
| * Maximum drying capacity (kg) 5.0 | |
| Spin speed (rpm) 1200 | |
| Number of programmes 15 | |
| Operation voltage / Frequency (v / hz) | 220-240 / 50 |
| Water pressure (mpa) | Maximum:1 Minimum:0.1 |
| Dimensions (HxWxD)(mm) 845x597x582 | |
| * You should not put dry laundry in your machine for drying. | |
| Energy consumption (washing, spinning, drying) (kWh/cycle) | 5.67 |
| Energy consumption (only washing and spinning) (kWh/cycle) | 1.23 |
| Water consumption (washing, spinning, drying) (l/cycle) | 118 |
| EN 50229 standard-compliant control programmes | |
| Washing programme : | |
| • 2. Programme "Cotton Eco", temperature 60°C, maximum spinning speed 1200 rpm, 7 kg laundry. | |
| Drying Programmes : | |
| • 1. Drying : 13. Programme "Cotton dry" | |
| Drying level auxiliary function selection: Drying Level 2 ( ) | |
| Load group: (~ 3.5 kg) (with a load group including 1 sheet + 6 pillowcases + 12 hand towels.) | |
| • 2. Drying : 13. Programme "Cotton dry" | |
| Drying level auxiliary function selection: Drying Level 2 ( ) | |
| Load group: (~ 3.5 kg) (with a load group including 1 sheet + 6 pillowcases + remaining towels.) | |
SETTING UP THE MACHINE
Have your machine installed only by an authorized service company.
Removing transportation safety screws


Before operating your machine, you must remove the transportation safety screws on the backside of the machine.
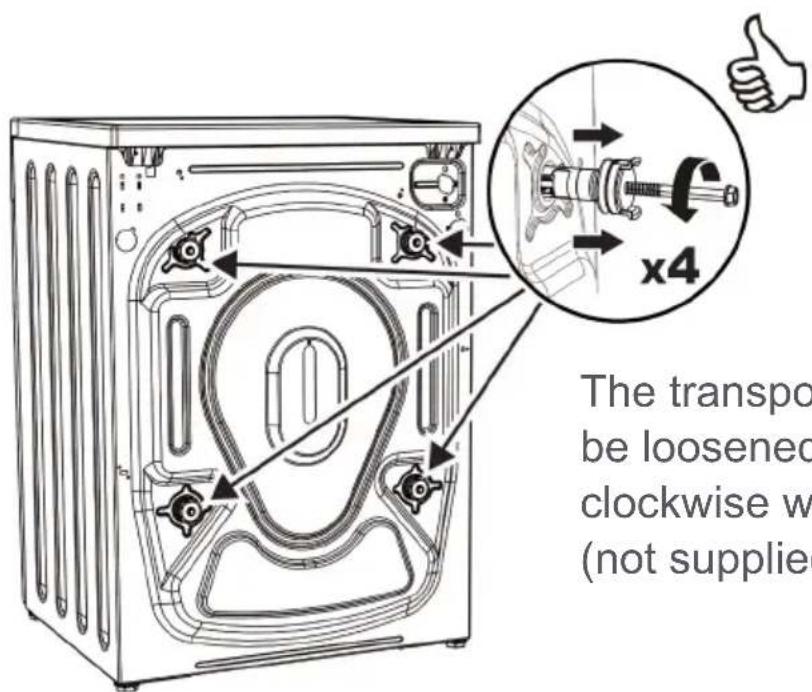
The transportation safety screws should be loosened by rotating them counter clockwise with an appropriate wrench. (not supplied).

Transportation safety screws should then be removed by pulling them out. The removed transportation safety screws should be stored to be used again in case the machine needs to be transported again, e.g. if moving house.
NOTE: You must remove the transportation screws from your machine before first use. Faults occurring in machines operated with transportation safety screws still fitted shall be out of the scope of the warranty.
Place the plastic transportation screw caps found in the accessory bag in the gaps left by the transportation screws.

Placing the machine and adjusting the feet
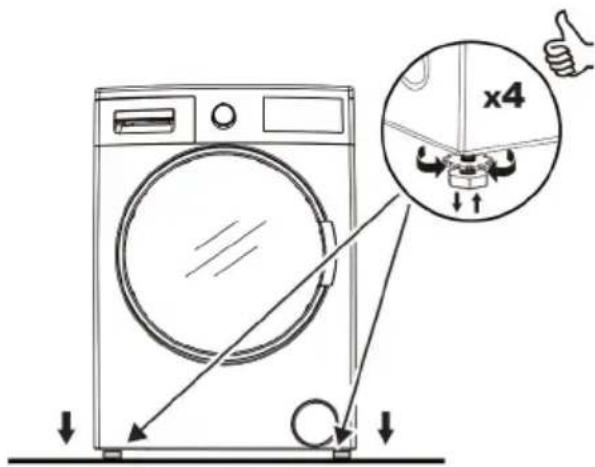
Do not install your machine on a carpet or such ground that will block ventilation from the base.
To ensure silent and vibration-free operation of your machine, it should be deployed on a non-sliding and firm ground.

You can adjust the balance of your machine by a gauge from the top.
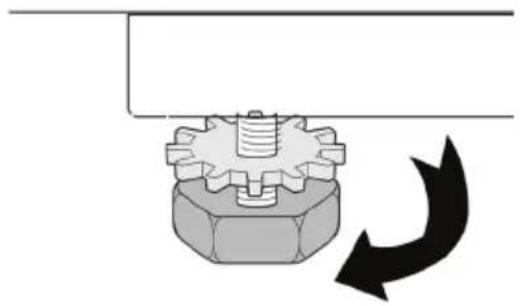
You can adjust the balance of your machine by the adjustable feet.
- Loosen the plastic adjustment nut.
- Adjust the feet upward and downward by rotating them.
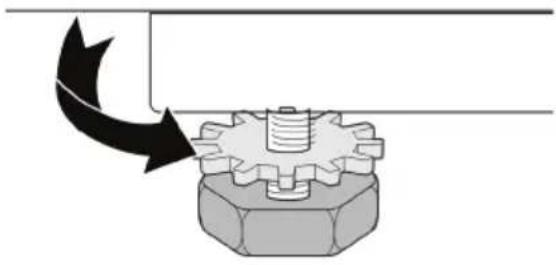
- Tighten the plastic adjustment nut after balance is achieved.
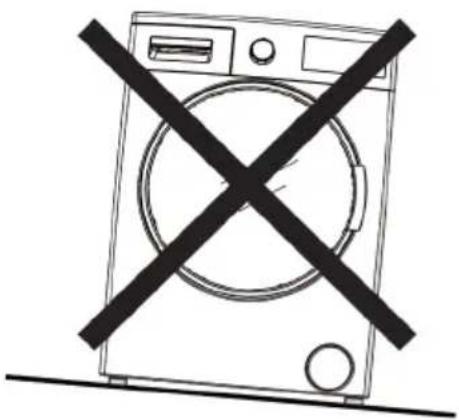

- Never put cardboard, wood or suchlike materials under your machine if you are intending to stabilize the distortions on the ground. - When cleaning the ground, on which your machine rests, be careful not to disrupt the machine's stability.

Electrical connection
Your washer-dryer is adjusted for 220-240V and 50Hz.
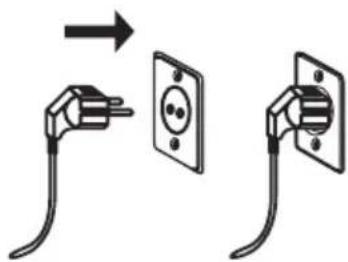
- The mains cord of your machine is equipped with a specific grounded plug.
- The mains plug should always be inserted to a grounded receptacle of 10 amperes. The fuse current value of the power line connected to this plug should also be 10 amperes.
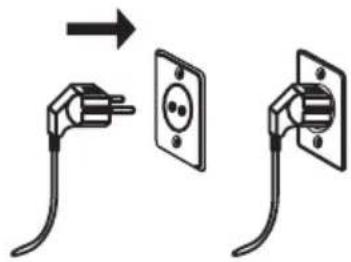
- If you don't have such a receptacle and fuse conforming with this, please have it done by a qualified electrician.
• We do not take responsibility for damages that occur due to ungrounded usage.
Note: Operating your machine under low voltage will cause the life cycle of your machine to be reduced and its performance to be restricted.
Water inlet connection
- Operate your machine with cold water only.
- Use only the new water inlet hoses given with your machine or purchased through authorized dealers.

- 1 gasket is included in the hose packaging to prevent water leaks in connections. Fit this gasket to the end of new water inlet hose on the side of faucet.
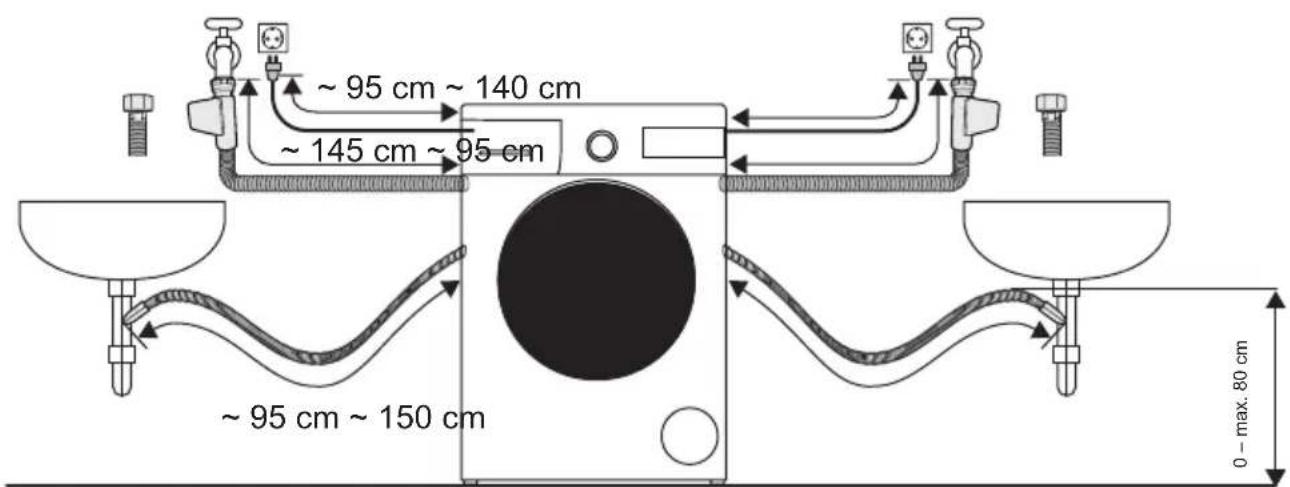
- Connect the white end of the water inlet hose to the water entrance valve on the back of the machine. Tighten plastic parts on the hose using your hand.
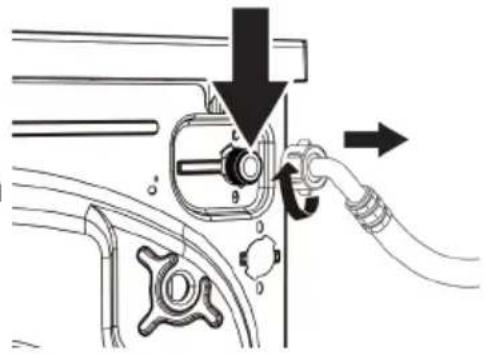
- Connect the other end of the water inlet hose to a 3/4" water tap with threads. Tighten plastic parts on the hose using your hand.
- In uncertain conditions, have the connection works done by a qualified plumber.
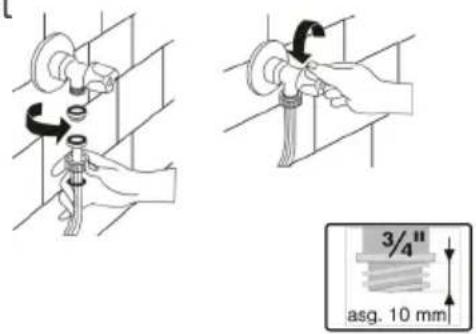
- Ensure that points of contact do not leak after you have made the connections.
- Flow of water with pressure of 0.1-1 Mpa will allow your machine to operate more efficiently (0.1 Mpa pressure means that more than 8 litres of water will flow through a fully-opened faucet per minute).
- Ensure that the new water inlet hoses are not bent, broken, crushed or resized.
Note: Use only the new water inlet hose coming with your machine when making the water inlet connections. Never use old, used or damaged water inlet hoses.
Water draining connection
- Connect the water drain hose to a waste water drain hole or a special apparatus connected to the outlet elbow of the sink placed at a maximum height of 80 cm above the ground.

- Never attempt to extend the water discharge hose by jointing.
- Do not put your machine's water discharge hose into any container, bucket or bathtub.
- Make sure that the water discharge hose does not bend, buckle, get crushed and check that it is not extended.

CONTROL PANEL
1- Detergent drawer
2 - Programme Knob: Using the programme knob, you can
select the washing / drying programme for your laundry. You can
select a programme by turning the programme knob to either
direction. Please ensure that the programme knob is set exactly
to the programme you want.
3- Auxiliary Function Buttons: To make a selection just simply
push the buttons of your machine.
4-Start/Pause button: Using this button, you can
start/pause the machine.
Detergent drawer general view

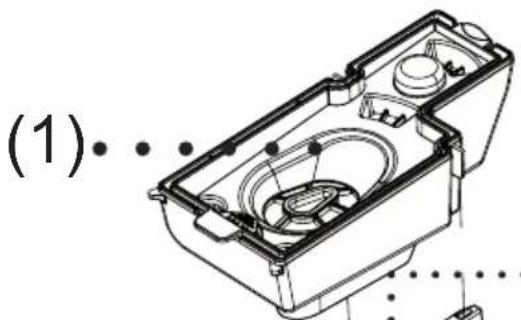
When you want to wash your laundry with liquid detergent, you can use the liquid detergent apparatus. You can use your liquid detergent in all programmes without pre-wash. For this, insert the liquid detergent apparatus to second compartment of the detergent drawer and adjust the liquid detergent amount (use liquid detergent in the amounts the detergent manufacturers foresee). Do not exceed the part that is labeled Max., use only for liquid detergent, remove this from its place during powder detergent use.)
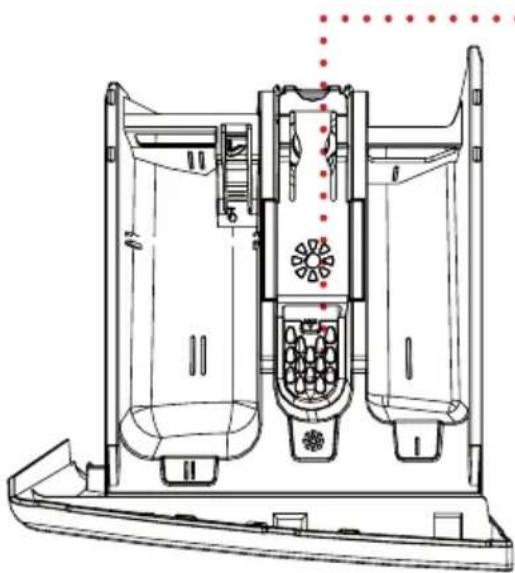
Main Wash
Detergent Compartment
Softener
Compartment
Pre-Wash
Detergent Compartment

Powder detergent level steps


Powder detergent scoop
Detergent drawer compartments
Main wash detergent compartment:

In this compartment, use only materials like detergent (liquid or powder) or anti-lime. You can find the liquid detergent apparatus for your liquid detergent inside your machine during the first set up.(*)
Softener, starching, detergent compartment:
In this compartment, materials like softener for your wash laundry can be used (it is advised that you use the amount and type the manufacturer recommends). The softeners you use may sometimes remain in this compartment. The reason for this is that softener is too viscous. To prevent this, it is recommended to use liquid softeners that are less viscous, or dilute the softener.

Pre-Wash detergent compartment:
This compartment should be used only when the pre-wash feature is selected. It is recommended that the pre-wash feature is used only for very dirty laundry. Please refer to page 63 for the maintenance of detergent drawer.
(*) Model dependant
Programme Knob
![graph TD A["Quick Wash 15 min"] --> B["60 min"] B --> C["Quick"] C --> D["Cotton"] D --> E["Wash & Dry"] E --> F["Off Cotton"] F --> G["Cotton"] G --> H["60°C ECO"] H --> I["Cotton"] I --> J["20°C ECO"] J --> K["Synthetics"] K --> L["Wool"] L --> M["Curtains"] M --> N["Spin Anti-allergy Rinse"] N --…](/content/2026/06/1345345/images/d53bd63e092dd258f092205090c81a27dd8d82a11789fdf2797f207784e89725.jpg)
Turn the programme knob to the desired washing programme. You may set the programme selection operation by rotating the programme knob in both directions. Ensure that the programme button is exactly on the programme you want to select.
- You can see page 51 to 58 the programme table for programme features.
WASHING OPERATION
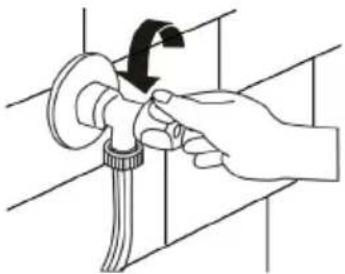
- Open the tap. - Plug in your machine.
Sorting laundry
Your laundry has product labels on them that specify

their appropriate washing conditions. Wash or dry your laundry according to the specifications on the product label.
- Sort your laundry according to their type (cotton, synthetic, delicates, wool, etc.), washing temperature (cold, 30°C, 40°C, 60°C, 90°C), their level of dirtiness (less dirty, dirty, very dirty).
- Never wash your coloured and white laundry together.
- Wash your coloured laundries separately in the first washing as they may bleed.
- Ensure that there are no metallic parts on your laundries or in the pockets; if so, take them out.
WARNING: Any malfunctions occurring due to foreign materials getting in your machine are not covered by warranty.
- Zip up and button up your laundries.
- Remove the metallic or plastic hooks of curtains or place them in a washing net or bag and then muzzle them.
- Reverse textiles such as pants, knitwear, t-shirts and sweat suits.
- Wash socks, handkerchiefs and suchlike small laundries in a washing net.

Explanation of washing symbols
Ironing temperature maximum 110°C
No ironing
Can be dry cleaned with all kinds of solvents
Can be cleaned only with
perchloride, lighter gas, alcohol or R113.
Can be cleaned only with
perchloride, lighter gas, alcohol or R113.
No dry cleaning
Leave on flat surface
Hang when wet
Dry by hanging
Drying in normal temperature dryer
Low temperature
Do not dry in drying



Sturdy Material
Delicates fabric
Maximum washing temperature is 95°C
Maximum washing water temperature 60°C
Maximum washing water temperature 40°C
Maximum washing water temperature 30°C
Hand washing
Dry cleaning only
Can be bleached in cold water
Do not use bleacher.
Ironing temperature maximum 200°C
Ironing temperature maximum 150°C






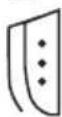

Placing laundry into the machine
- Open the loading door of your machine.
- Check inside the drum of your machine. There might be laundry left inside from previous washes. If there is, empty your machine before selecting your programme.
- Place your laundry into the machine by spreading them well. Fold objects like quilts and blankets that you will load into the machine as shown below.


- Put each item of laundry in separately.
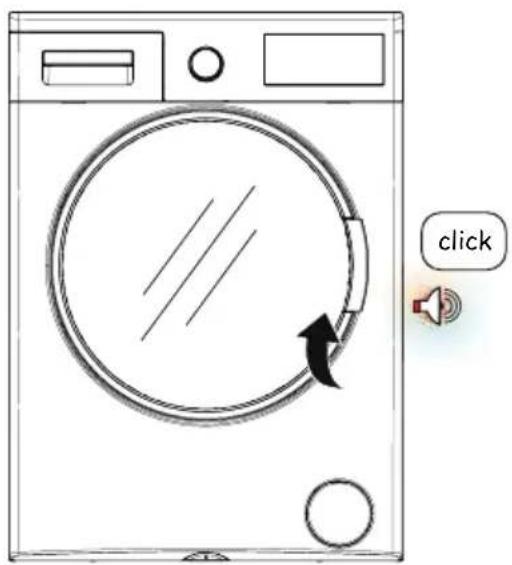
- Ensure that no laundry is stuck between the cover and bellow seal when closing the door of your machine.
- Ensure that the machine door is completely closed.
- Tightly shut the door of your machine or the machine won’t start the washing operation.
Choice of detergent and placing into the machine
The amount of detergent you will put in your machine will depend on the following criteria:
- Your detergent utilization will be based on the degree of contamination of your laundries.
- Do not prewash your less stained laundries and put the correct amount of detergent in the 2nd compartment of the detergent drawer.
- The Pre-wash feature might be used for your very dirty laundry. If you are going to do a pre-wash, place 1/4 of the detergent you would normally put in the detergent compartment into the compartment numbered 1, and put the remaining 3/4 to the compartment numbered 2.
- Use detergents produced for automatic washing machines in your machine. Adhere to the advice of detergent manufacturers while determining the amount of detergent you should use with your laundry.
• The higher the degree of hardness of the water the more detergent you will use.
• The amount of the detergent you will use will increase as the amount of your laundry increases.
- Put the softener in the softener compartment in the detergent drawer. Do not exceed the MAX level. Otherwise, softener will flow into washing water through flushing.
- Softeners with high density are required to be thinned to a degree before being put in the drawer. Because high-density softener will clog the flush and block the flow of the softener.
- You can use your liquid detergent in all programmes without pre-washing. For this, insert the liquid detergent apparatus to the second compartment of the detergent drawer and adjust the liquid detergent amount (use liquid detergent in the amounts the detergent manufacturers foresee). Do not exceed the part that is labeled Max, use only for liquid detergent, remove this from its place during powder detergent use.)
For positioning detergent apparatus in the detergent box, see the page 30.(*)
Programme selection
- Turn the knob to select the desired washing programme.
![graph TD A["Quick Wash"] --> B["60 min"] B --> C["Quick"] C --> D["Cotton"] D --> E["60°C ECO"] E --> F["Cotton"] F --> G["Off"] G --> H["Wash & Dry"] H --> I["Cotton"] I --> J["60°C ECO"] J --> K["Cotton"] K --> L["20°C ECO"] L --> M["Synthetics"] M --> N["Wool"] N --> O["Curtains"] O --> P["Synthe…](/content/2026/06/1345345/images/1ebcb71c76f86eacac6bd77752f98ca8035317d70ed1a9b6ee20ab427d6a6e83.jpg)
AUXILIARY FUNCTIONS
Before starting the programme, you can optionally select an auxiliary function.

- Press on the button of auxiliary function you would like to select.
- If auxiliary function symbol on electronic display is on the auxiliary function you have selected will be activated.
- If auxiliary function symbol on electronic display blinks, the auxiliary function you have selected will not be activated.
Reason for non-activation:
- The auxiliary function you want to use is not applicable for the washing programme you selected.
- Your machine has passed over the stage, during which the auxiliary function you would like to select can be implemented.
- The auxiliary function you want to use is not compatible with an auxiliary function you have selected previously.
HALF-LOAD DETECTION SYSTEM
Your machine features a half-load detection system.
In case you put approximately half or less amount of laundries of maximum laundry capacity in your machine, your machine will run so as to save washing time, water consumption and energy in some programmes. When the half-load function is active, the machine can complete the programme you have set in a shorter time.
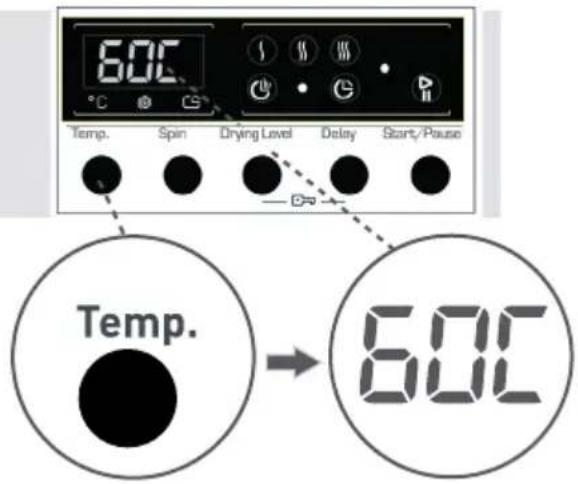
1- Temperature selection
You can select the washing water temperature with the washing water temperature adjustment button.
Whenever you select a new programme, the maximum washing water temperature is shown on the washing water temperature display.
You can gradually decrease the washing water temperature between the maximum temperature and cold washing (--) by pressing washing water temperature adjustment button.
If you have skipped the washing water temperature you wanted, you can return to the intended temperature by continuously pressing the washing water temperature adjustment button.


2- Spin speed selection
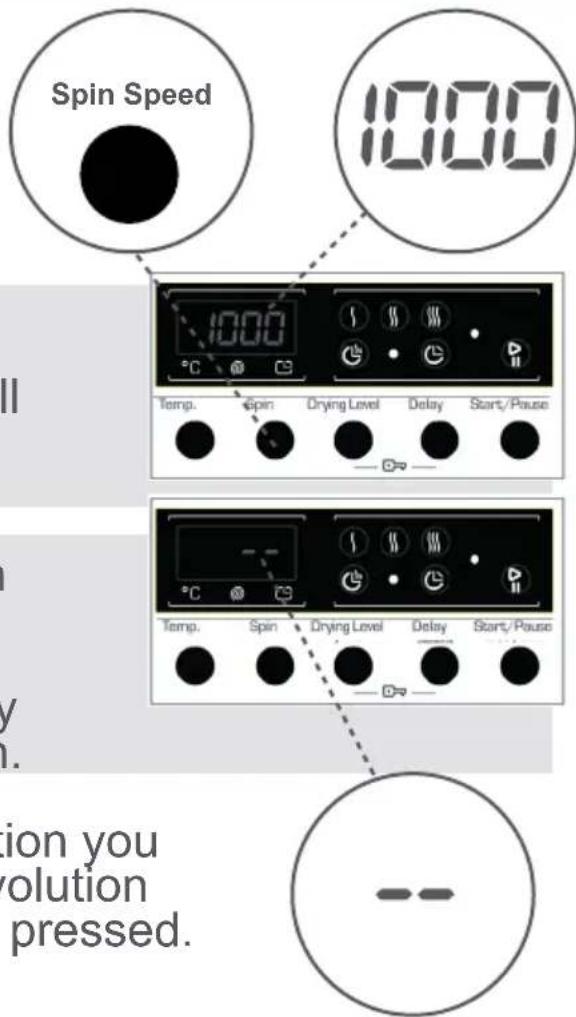
You can set the spin revolution for your laundries via revolution speed setting button.
When you select a new programme, the maximum spin revolution speed of the programme you have selected will be viewed on the display of revolution speed.
You can gradually reduce the revolution speed between cancel spinning (--) options through the maximum spin revolution of the programme selected by pressing revolution speed setting button.
If you have skipped the spinning revolution you want to set, you can re-switch to the revolution by keeping the revolution setting button pressed.
Note: Select the drying level according to the load distribution indicated in the table. Table: Recommended drying durations for load amounts
| 1 - 2 kg 3 - | 4 kg 5 kg | ||
| Level 1 X | √ | √ | |
| Level 2 X | √ | √ | |
| Level 3 X | √ | √ |
3- Drying level selection:
If you want your laundry dried at the end of the washing cycle:
- Press the drying level button to select the level of dryness you want.
- When you press the drying level button, on the display level 1 "", level 2 "", level 3 " " symbols will be shown.

- Level 1 "": Recommended for laundry that will be ironed before using. If you want to select "s" drying option press the drying level button until "t" symbol is displayed.
- Level 2 “”: Recommended for laundry that requires hanging. If you want to select “” drying option press the drying level button until “” symbol is displayed.
- Level 3 “”: Recommended for laundry that will be folded and put to the wardrobe at the end of the programme. If you want to select “” drying option press the drying level button until “” symbol is displayed.
Note: After you press the drying level button, if the drying level symbol does not change then it means that no drying level selection exist for the selected programme.
If you want your laundry dried for a period of time at the end of the washing cycle:
- Press the drying level button to select the desired drying duration.
- When you press the drying level button, on the display level 1 "7", level 2 "7" level 3 " " symbols will be shown.
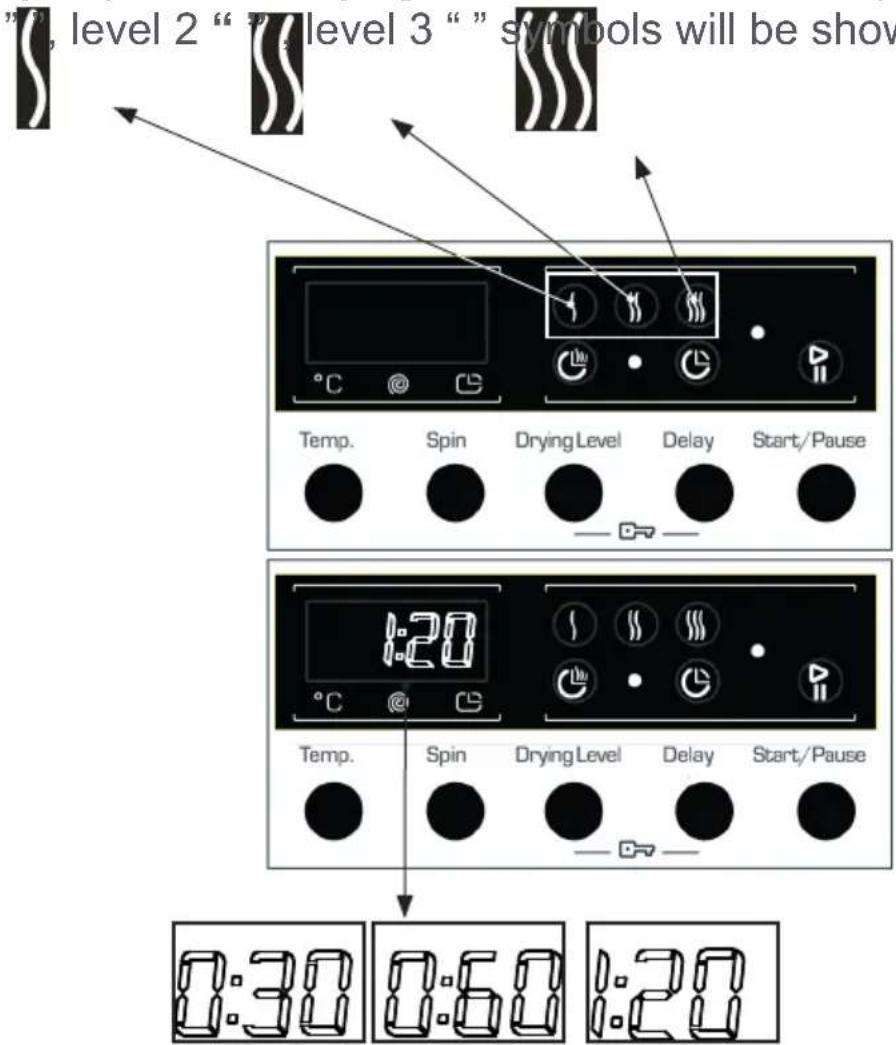
If you continue pressing, duration options (0:30, 0:60, 120 minutes) will be displayed. You can select any drying duration you want.
Note: When you want to select drying duration if 0:30, 0:60, 120 minutes durations are not shown then it means this drying option cannot be used for the selected programme.
Table: Recommended drying durations for load amounts
| 1 - 2 kg 3 - | 4 kg 5 kg | ||
| Level 1 X | √ | √ | |
| Level 2 X | √ | √ | |
| Level 3 X | √ | √ |
Drying level selection:
Please see selection table for drying level and duration.
| PROGRAMMES | STATUS OF SELECTABILITY | DRYING PROFILE | FACTORY PRESET | SELECTABLE LEVELS | ||
| Cotton S Cotton dry - Level 1 Level 2 Level 3 | ||||||
| Cotton eco S Cotton dry - Level 1 Level 2 Level 3 | ||||||
| Eco 20°C S Cotton dry - Level 1 Level 2 - | ||||||
| Synthetics S Gentle dry - Level 1 Level 2 Level 3 | ||||||
| Wool NS -- | - | -- | ||||
| Curtain | NS | - | - | - | - | - |
| Rinse | S Cotton dry - Level 1 Level 2 Level 3 | |||||
| Anti allergic | S | Cotton dry | - | Level 1 | Level 2 | - |
| Spin | S Cotton dry - Level 1 Level 2 Level 3 | |||||
| Super Rapid 15' | S | Cotton dry | - | Level 1 | - | - |
| Daily 60'/60° | S | Cotton dry | - | Level 1 | Level 2 | - |
| Gentle dry S Gentle dry | Level 2 Level 1 | Level 3 | ||||
| Cotton Dry | S | Cotton dry | Level 2 | Level 1 | Level 3 | |
| Quick Wash & Dry | NS | Cotton dry | Level 1 | - | - | - |
| Cotton Wash & Dry | S | Cotton dry | Level 2 | Level 1 | - | Level 3 |
| S: Selectable NS: No Selection | ||||||
| Selectable drying duration levels | |||
| Cotton | 30 | 60 | 120 |
| Cotton eco | 30 | 60 | 120 |
| Eco 20°C | 30 | 60 | 120 |
| Synthetics | 30 | 60 | 120 |
| Wool | - | - | - |
| Curtain | - | - | - |
| Rinse | 30 | 60 | 120 |
| Anti allergic | 30 | 60 | 120 |
| Spin | 30 | 60 | 120 |
| Super Rapid 15' | 30 | 60 | 120 |
| Daily 60'/60° | 30 | 60 | 120 |
| Gentle dry | 30 | 60 | 120 |
| Cotton Dry | 30 | 60 | 120 |
| Quick Wash & Dry | - | - | - |
| Cotton Wash & Dry | 30 | 60 | 120 |
4- Delay timer
This auxiliary function enables you to delay the start time of your machine from 1 up to 23 hours.
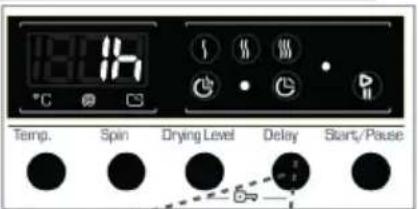
To use auxiliary function of delay timer
- Press the Delay button once.
- Expression of "1 h" will appear on the display. - Symbol ⏻ will flash on electronic display.
- Press the Delay button until the desired delayed time appears on the display.
- To activate the selected delayed time, press any auxiliary function button you like except "Start/Standby" button.
If you have skipped the desired delayed time, you can go back to the time desired by keeping the Delay button pressed.
If you want to cancel the delayed time, you are required to press the Delay button once. ⏻ symbol will no longer flash on electronic display.
For the delayed timer function to work, your machine must be swichted on by pressing the Start/Pause button.
5- Start/Pause button
Press the Start/Pause button to start the programme you have selected or suspend a running programme. If you switch your machine to the standby mode, the Start/Pause led on the electronic display will blink.


Child lock
Child lock function enables you to prevent the appliance from being operated unintentionally or by unsupervised children. To activate child lock, press auxiliary function buttons Drying Level and Delay at the same time for more than 3 seconds.
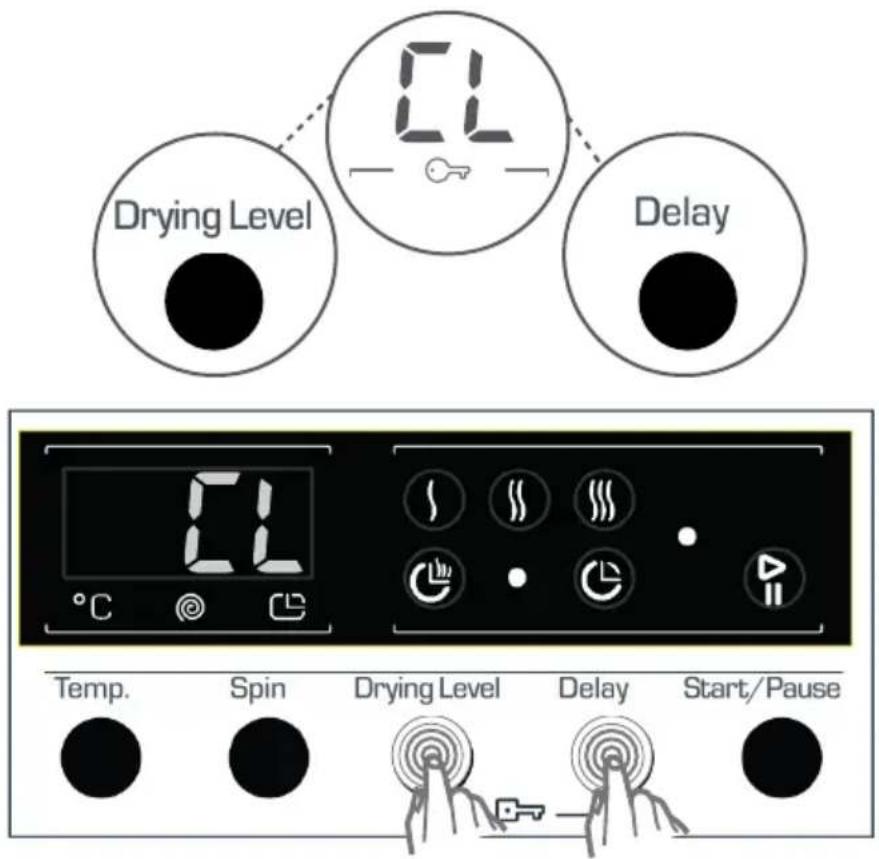
"CL" symbol will flash on the electronic display when activated.
If any button is pressed while child lock is active, the "CL" symbol will blink on the electronic display.
If the child lock function is active and a programme is running, the programme knob is switched to the CANCEL position and another programme is selected, the programme previously selected continues from where it was left.
To deactivate child lock, press the same auxiliary function buttons again for more than 3 seconds. When the child lock is deactivated, the “CL” symbol on the electronic display will go off.
Cancelling a running programme
If you want to cancel any running programme:
1- Switch the programme knob to "CANCEL" position.
2- Your machine will stop the washing operation and the programme will be cancelled.
3- To get rid of the water accumulated in the machine, switch the programme knob to any other programme.
4- Your machine will perform the necessary draining operation and cancel the programme.
5- You can run your machine by selecting a new programme.
Finishing programme
Your machine will stop by itself as soon as the programme you have selected finishes.
- The expression of "END" will flash on the electronic display.
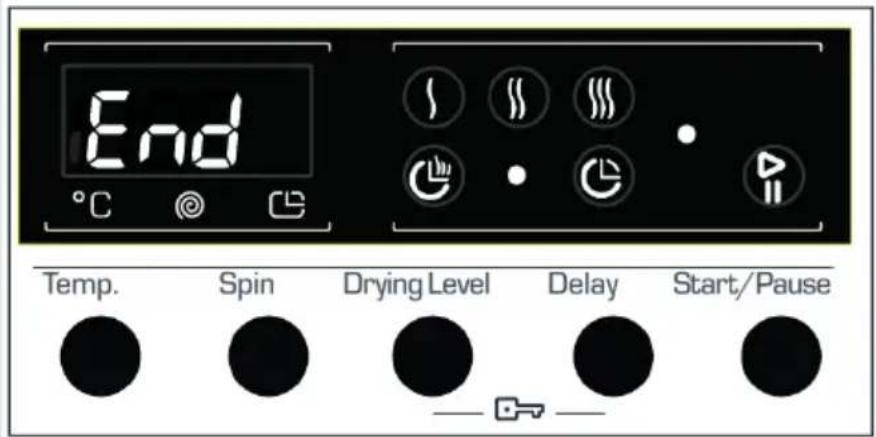
- You can open the machine's door and remove the laundry.
- Leave the door of your machine open to allow the inner part of your machine to dry after removing your laundries.
- Switch the programme knob to CANCEL position.
- Unplug your machine.
- Turn the water faucet off.
PROGRAMME TABLE
COTTON 90°
| Temp. (°C) | *90°-80°-70°-60°-50°-40°-30°--” |
| Maximum washing / drying capacity (kg) | 7.0 / 5.0 |
| Detergent Drawer | 2 |
| Programme duration (min) | 185 |
| Laundry type / Remarks | Heat resistant, cotton and linen textiles. (Underwear, bed sheet, tablecloths, (towels, max. 3.5 kg) |
COTTON ECO
| Temp. (°C) | *60°- 50°-40°- 30°- ”--” |
| Maximum washing / drying capacity (kg) | 7.0 / 5.0 |
| Detergent Drawer | 2 |
| Programme duration (min) | 205 |
| Laundry type / Remarks | Heat resistant, cotton and linen textiles. (Underwear, bed sheet, tablecloths, (towels, max. 3.5 kg) |
(*Black parts are factory presets)
If you want to select more than one auxiliary function, the functions you want to select may have incompatibility among them.
Do not dry towels, cotton and linen textiles, synthetic and synthetic blended laundry together. To dry your laundry, select the drying programme most appropriate for the type of the laundry.
NOTE: PROGRAMME DURATION MAY VARY DEPENDING TO THE AMOUNT OF LAUNDRY, TAP WATER, AMBIENT TEMPERATURE AND SELECTION OF AUXILIARY FUNCTIONS.
PROGRAMME TABLE
ECO 20°
| Temp. (°C) | *20°-”--” |
| Maximum washing / drying capacity (kg) | 3.5 / 3.5 |
| Detergent Drawer | 2 |
| Programme duration (min) | 105 |
| Laundry type / Remarks | Lightly soiled, cottons and linen textiles. (underwears, bed sheet, tablecloth, (towel max. 2 kg.) Bedding, etc.) |
SYNTHETICS
| Temp. (°C) | *60° - 50° - 40° - 30° - ”--” |
| Maximum washing / drying capacity (kg) | 3.5 / 3.5 |
| Detergent Drawer | 2 |
| Programme duration (min) | 122 |
| Laundry type / Remarks | Synthetics and synthetic blended textiles. (synthetic blended shirts, blouses, socks etc.) |
(*Black parts are factory presets)
If you want to select more than one auxiliary function, the functions you want to select may have incompatibility among them.
Do not dry towels, cotton and linen textiles, synthetic and synthetic blended laundry together. To dry your laundry, select the drying programme most appropriate for the type of the laundry. NOTE: PROGRAMME DURATION MAY VARY DEPENDING TO THE AMOUNT OF LAUNDRY, TAP WATER, AMBIENT TEMPERATURE AND SELECTION OF AUXILIARY FUNCTIONS.
PROGRAMME TABLE
WOOL
| Temp. (°C) | 30°--” |
| Maximum washing capacity (kg) | 2.5 |
| Detergent Drawer | 2 |
| Programme duration (min) | 55 |
| Laundry type / Remarks | Woollen and wool blended textiles hav-ing machine washable label |
CURTAIN
| Temp. (°C) | 40°- 30°- ”--” |
| Maximum washing capacity (kg) | 2.5 |
| Detergent Drawer | 2 |
| Programme duration (min) | 115 |
| Laundry type / Remarks | Use this programme for only to wash curtains. |
(*Black parts are factory presets)
If you want to select more than one auxiliary function, the functions you want to select may have incompatibility among them.
Do not dry towels, cotton and linen textiles, synthetic and synthetic blended laundry together.
To dry your laundry, select the drying programme most appropriate for the type of the laundry.
NOTE: PROGRAMME DURATION MAY VARY DEPENDING TO THE AMOUNT OF LAUNDRY, TAP WATER, AMBIENT TEMPERATURE AND SELECTION OF AUXILIARY FUNCTIONS.
PROGRAMME TABLE
RINSE
| Temp. (°C) | ”--” |
| Maximum washing / drying capacity (kg) | 7.0 / 5.0 |
| Detergent Drawer | - |
| Programme duration (min) | 43 |
| Laundry type / Remarks | If you want to get an additional rinse after washing your laundry, you can use this programme for all kinds of laundry. |
ANTI ALLERGIC
| Temp. (°C) | *60° - 50° - 40° - 30° - ”--” |
| Maximum washing / drying capacity (kg) | 3,5 / 3,5 |
| Detergent Drawer | 2 |
| Programme duration (min) | 180 |
| Laundry type / Remarks | Baby dresses |
(*Black parts are factory presets)
If you want to select more than one auxiliary function, the functions you want to select may have incompatibility among them.
Do not dry towels, cotton and linen textiles, synthetic and synthetic blended laundry together. To dry your laundry, select the drying programme most appropriate for the type of the laundry.
NOTE: PROGRAMME DURATION MAY VARY DEPENDING TO THE AMOUNT OF LAUNDRY, TAP WATER, AMBIENT TEMPERATURE AND SELECTION OF AUXILIARY FUNCTIONS.
PROGRAMME TABLE
SPIN
| Temp. (°C) | ”--” |
| Maximum washing / drying capacity (kg) | 7.0 / 5.0 |
| Detergent Drawer | - |
| Programme duration (min) | 20 |
| Laundry type / Remarks | If you want to get an additional spin after washing your laundry, you can use this programme for all kinds of laundry. |
SUPER RAPID 15'
| Temp. (°C) | 30°- ”--” |
| Maximum washing / drying capacity (kg) | 2.0 / 2.0 |
| Detergent Drawer | 2 |
| Programme duration (min) | 15 |
| Laundry type / Remarks | You can wash lightly soiled, cotton, colored and linen textiles shortly in 15 minutes. Note: As the washing period is short, the amount of the detergent should be much less with respect to the other washing programmes. If the machine detects an unbalanced load, the programme duration will extend. |
(*Black parts are factory presets)
If you want to select more than one auxiliary function, the functions you want to select may have incompatibility among them.
Do not dry towels, cotton and linen textiles, synthetic and synthetic blended laundry together. To dry your laundry, select the drying programme most appropriate for the type of the laundry.
NOTE: PROGRAMME DURATION MAY VARY DEPENDING TO THE AMOUNT OF LAUNDRY, TAP WATER, AMBIENT TEMPERATURE AND SELECTION OF AUXILIARY FUNCTIONS.
PROGRAMME TABLE
DAILY FAST 60 MIN.
| Temp. (°C) | 60°-50°-40°-30° --" |
| Maximum washing / drying capacity (kg) | 3.0 / 3.0 |
| Detergent Drawer | 2 |
| Programme duration (min) | 60 |
| Laundry type / Remarks | Soiled, cotton, colored and linen textiles. |
(*Black parts are factory presets)
If you want to select more than one auxiliary function, the functions you want to select may have incompatibility among them.
Do not dry towels, cotton and linen textiles, synthetic and synthetic blended laundry together.
To dry your laundry, select the drying programme most appropriate for the type of the laundry.
NOTE: PROGRAMME DURATION MAY VARY DEPENDING TO THE AMOUNT OF LAUNDRY, TAP WATER, AMBIENT TEMPERATURE AND SELECTION OF AUXILIARY FUNCTIONS.
PROGRAMME TABLE
GENTLE DRY
| Temp. (°C) | ”--” |
| Maximum amount of laun- | 3.5 |
| Detergent Drawer | 2 |
| Programme duration | 60 |
| Laundry type / Remarks | Delicate laundry bearing the suitable for machine dry label. |
COTTON DRY
| Temp. (°C) | ”--” |
| Maximum amount of laun-dry for drying (kg) | 5.0 |
| Detergent Drawer | 2 |
| Programme duration (min) | 60 |
| Laundry type / Remarks | Cotton laundry bearing the suitable for machine dry label. |
(*Black parts are factory presets)
If you want to select more than one auxiliary function, the functions you want to select may have incompatibility among them.
Do not dry towels, cotton and linen textiles, synthetic and synthetic blended laundry together.
To dry your laundry, select the drying programme most appropriate for the type of the laundry.
NOTE: PROGRAMME DURATION MAY VARY DEPENDING TO THE AMOUNT OF LAUNDRY, TAP WATER, AMBIENT TEMPERATURE AND SELECTION OF AUXILIARY FUNCTIONS.
PROGRAMME TABLE
QUICK WASH & DRY
| Temp. (°C) | 30°-”--” |
| Maximum washing / drying capacity (kg) | 0.5 kg. 33 min (3 shirts) (33 minutes) |
| Detergent Drawer | 2 |
| Programme duration (min) | 33 |
| Laundry type / Remarks | Cotton, colored and linen laundry bearing suitable for machine dry label. Note: You machine determine the programme duration based on the amount of laundry that you will load. |
COTTON WASH & DRY
| Temp. (°C) | 90-80-70-60°-50°-40°-30°--” |
| Maximum washing / drying capacity (kg) | 5.0 / 5.0 |
| Detergent Drawer | 2 |
| Programme duration (min) | 285 |
| Laundry type / Remarks | Cotton and linen textiles. (Underwear, bed sheet, tablecloth, |
(*Black parts are factory presets)
If you want to select more than one auxiliary function, the functions you want to select may have incompatibility among them.
Do not dry towels, cotton and linen textiles, synthetic and synthetic blended laundry together.
To dry your laundry, select the drying programme most appropriate for the type of the laundry.
NOTE: PROGRAMME DURATION MAY VARY DEPENDING TO THE AMOUNT OF LAUNDRY, TAP WATER, AMBIENT TEMPERATURE AND SELECTION OF AUXILIARY FUNCTIONS.
CLEANING AND MAINTENANCE (WARNING)

Unplug your machine before starting the maintenance and cleaning of your machine.
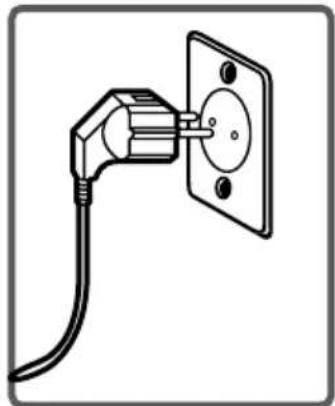
Turn the water tap off before starting the maintenance and cleaning of your machine.
CAUTION: Your machine's parts might be damaged if cleaners with solvent agents are used.
Do not use cleaning materials with solvent agents.
CLEANING AND MAINTENANCE (WATER INLET FILTERS)
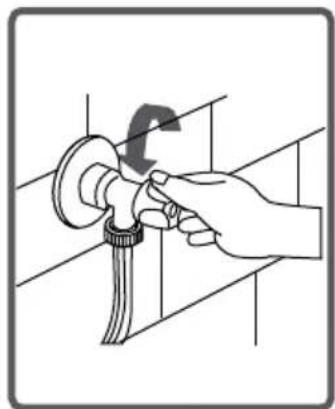
Filters to avoid dirt and foreign substances in the water from penetrating into the machine are available both on the side of faucet and on the ends of water valves along the water inlet hose of your machine.
If your machine cannot intake sufficient amount of water despite water faucet being open, these filters should be cleaned.
(It is recommended that you clean your water inlet once in 2 months.)
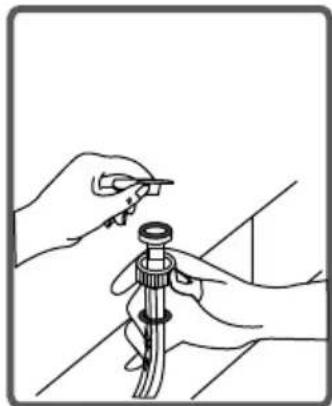
- Detach the water inlet hoses.
- Remove the filters on water inlet valves using pliers and then clean it with a brush in water.
- Disassemble the filters on the side of faucet side of water inlet hoses manually and clean them.
- Once you have cleaned the filters, you can fit them in the same way reversely.


CAUTION:
Filters of water inlet valves may be clogged due to contaminated water faucet or lack of necessary maintenance or valves may be broken down, causing water leaking into your machine continuously.
The breakdowns that may arise due to these reasons are out of the scope of warranty.
CLEANING AND MAINTENANCE (PUMP FILTER)
This appliance is fitted with a filter system which avoids threads remaining from your laundries and tiny materials from entering into the pump during water discharging operation carried out by your machine after completing washing, thus prolonging the life-cycle of your pump. It is recommended that you clean your pump filter once in 2 months.
To clean pump filter:
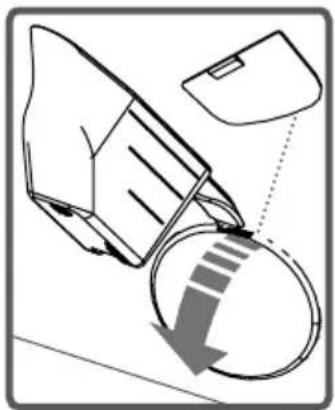
- To open the pump cover, you can use the powder detergent spade (*) or liquid detergent level plate coming out of your machine.
- Fit the end point of the plastic part to the gap of the pump cover and push it back. This will open the cover.
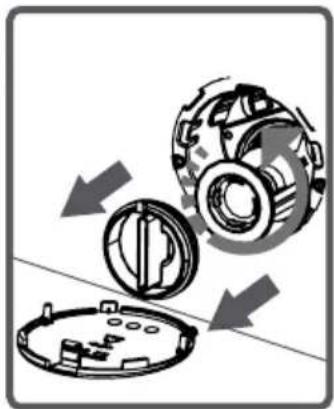
- Before opening the filter cover, settle a vessel in front of the filter cover to prevent the water remained in the machine from flowing on the ground.
- Loosen the filter cover by rotating counter-clockwise and then empty water.
Note: You may have to empty the water collection vessel several times depending on the amount of water in the machine.
(*) Machinery specifications may vary depending on the product purchased.
CLEANING AND MAINTENANCE (PUMP FILTER)
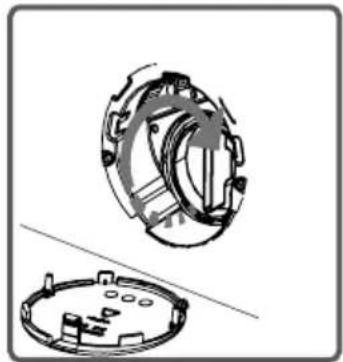
- Clean the foreign materials in the filter with a brush.
• After cleaning the filter, fit the filter cover and tighten it by rotating it in clockwise direction.
- While closing the pump cover, ensure that the parts on the inner side of the cover match the holes on the front panel side.
- You can reattach the pump cover in the reverse order that you removed it.


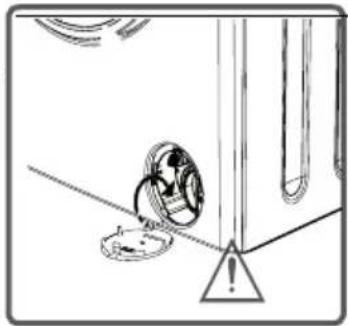
WARNING!
As water in the pump may be hot, wait until it cools down.
CLEANING AND MAINTENANCE (DETERGENT DRAWER)
Your detergents may deposit residue in the detergent drawer and housing of the detergent drawer over time.
To clean the residue formed, disassemble the detergent drawer. It is recommended that you clean your detergent drawer every 2 months.
To eject the detergent drawer:
• Pull the detergent drawer up to the end
- Keep on pulling by depressing on the section shown below in the detergent drawer and keep pulling and then unsettle the detergent drawer.

- Flush it using a brush.
- Collect residues in the housing of the detergent drawer without dropping them inside the machine.
- Assemble the detergent drawer after drying it using a towel or dry cloth.
- Do not wash your detergent drawer in dishwasher.

Liquid Detergent Apparatus (*)
Take out the liquid detergent level apparatus for cleaning and maintenance purposes as shown in the picture and clean well detergent residues. Put the apparatus back into its place. Make sure no residues are left inside.
(*) Machinery specifications may vary depending on the product purchased.
FLUSH STOPPER / BODY / DRUM


Flush stopper
Disassemble the detergent drawer. Disassemble the flush stopper and clean the softener residues completely. Refit the flush stopper after cleaning it. Check whether it has settled properly.
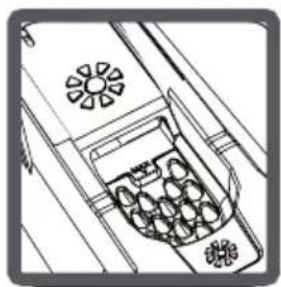


Body
Clean the outer body of your machine with warm water and a non-inflammable cleaning agent that will not abrade the body of your machine. After rinsing with some water, dry it using a soft and dry cloth.

Drum
Do not leave metallic objects such as needles, paper clips, coins etc. in your machine. These objects lead to the formation of rust stains in the drum. To clean such rust stains, use a non-chlorine cleaning agent and follow the instructions of manufacturers of the cleaning agent. Never use wire wool or similar hard objects for cleaning rust stains.

Troubleshooting
All repairing operations required for your machine should be carried out by an authorised service company. If your machine requires a repair or if you cannot solve an issue with the information provided below, then you should:
- Unplug the machine.
- Close the water tap.
- Contact the nearest authorised service company.
FAULT POSSIBLE CAUSE REMOVING METHODS
| Your machine will not start. | It is not plugged in. | Insert the plug into the socket. |
| Your fuse is defective | Change your fuse. | |
| Mains supply is cut off. | Check the mains supply. | |
| Start/Pause button is not pressed. | Press the start/pause button. | |
| The programme knob is in stop (off) position. | Bring the programme knob on the desired position. | |
| The door of your machine is not closed properly. | Close the door of your machine. | |
| No water is entering the machine. | Your tap is closed. | Open the tap. |
| Check the water inlet hose. | Water inlet hose may be twisted. | |
| Water inlet hose may be blocked. | Clean the water inlet hose filters.(*) | |
| Valve inlet filter is blocked. | Clean the valve inlet filters.(*) | |
| The door of your machine is not closed properly. | Close the door of your machine. |
(*) See page 60
| FAULT | POSSIBLE CAUSE | REMOVING METHODS |
| Your machine does not discharge | Discharging hose clogged or twisted. | Check the discharging hose. |
| Pump filter clogged. | Clean the pump (**)filter. | |
| Your machine vibrates. | You machine's feet are not adjusted. | Adjust the feet of your machine. (***) |
| Transportation safety screws are not removed. | Remove the transportation safety screws from your machine (****) | |
| Your machine only has a small amount of laundry inside. | This will not prevent the operation of your machine. | |
| Your machine is overloaded with laundry or the laundry is not distributed evenly. | Do not put more laundry in than the amount recommended and make sure it is loaded evenly. | |
| Your machine rests on a hard surface. | Avoid installing your machine on hard surfaces. When settling your machine, leave 2 cm space between it and walls or hard surfaces. |
(**) See page 62
(***) See page 24
(****) See page 22
| FAULT POSSIBLE CAUSE REMOVING METHODS | ||
| Excessive foam is formed in the detergent drawer. | Excessive amount of detergent used. | Press the Start/Pause button. To eliminate foam formation, mix a spoon of softener with half a litre of water, and pour the mixture in the detergent drawer. After 5-10 minutes press the Start/Pause button again. In your next washing operation, adjust the detergent dose accordingly. |
| Wrong detergent used. | Use detergents produced only for automatic washing machines in your machine. | |
| Unsatisfactory washing result. | The contamination degree of your laundry does not match the programme you have chosen. | Select programmes suitable for your laundry's level of dirtiness. (See 51 to 58 for programme table) |
| Amount of detergent used insufficient. | Adjust the level of detergent according to the amount and level of dirtiness of your laundry. | |
| Your machine has more than the maximum capacity laundry inside the machine. | Load your machine with an amount of laundry that does not exceed the maximum laundry capacity. | |
| As soon as the machine is loaded with water, water discharges. | The end of the water drain hose is too low for the machine. | Set the water drain hose to an appropriate height. (***** ) |
| No water appears in the drum during washing. | No fault.Water is in the unseen part of the drum. | - |
| Laundry has detergent residues on them. | Non-dissolving particles of some detergents may adhere to your laundries as white spots. | Perform an extra rinsing by setting your machine to “Rinsing” programme, or clean the spots using a brush after your laundry dries. |
| Laundry have detergent residues on them. | The reason for these spots may be oil, cream or ointment. | Apply the maximum amount of detergent instructed by the detergent manufacturer in the next washing operation. |
| Spinning operation is not performed or runs late. | No fault.Unbalanced load control system has been activated. | The unbalanced load control system will try to spread your laundry evenly. The spinning operation will begin after your laundry is spread. Place the laundry in the machine in a balanced fashion next time. |
(****) See page 28.
FAULT POSSIBLE CAUSE REMOVING METHODS
| Laundry remains damp after the drying operation. | Appropriate drying programme is not selected.The maximum load capacity for the selected programme might be exceeded. | Select a drying programme appropriate for your laundry (see page 51 to 58 for the programme table) |
Automatic fault warnings and what needs to be done
Your machine is equipped with the systems which are capable of both taking necessary precautions and warning you in case of any breakdown by means of continuous self-checking during washing operations.
| ERROR CODE | POSSIBLE FAULT | WHAT TO DO |
| E01 | The door of your machine is left open. | Close the machine door. If your machine persists to indicate fault, turn off your machine, unplug it and contact the nearest authorised service immediately. |
| E02 | The water pressure or the water level inside the machine is low. | Turn on the faucet. Mains water may be cut-off. If the problem still continues, your machine will stop after a while automatically. Unplug the machine, turn off your faucet and contact the nearest authorised service. |
| E03 | The pump is faulty or pump filter is clogged or electrical connection of the pump is faulty. | Clean the pump filter. If the problem persists, contact the nearest authorised service. (*) |
| E04 | Your machine has excessive amount of water. | Your machine will discharge water by itself. Pursuant to discharging operation, turn off your machine and unplug it. Turn off your faucet and contact the nearest authorised service. |
(*) See the chapter regarding maintenance and cleaning of your machine.
PRACTICAL INFORMATION
Alcoholic drinks: Spotted area should initially be washed using cold water, and then be wiped with glycerine and water and rinsed with vinegar-mixed water.
Shoe shine: Spot should be rubbed out gently without damaging the cloth and be scrubbed and rinsed with detergent. If not removed, it should be scrubbed using the mixture obtained by adding 1 scale of alcohol (96°) into 2 scales of water, and then be washed with warm water.
Tea and coffee: Stretch the spotted area of your laundry throughout the opening of a vessel, and pour hot water as much as the type of your laundry can resist. In case the type of your laundry permits, wash with bleacher.
Chocolate and cocoa: After submerging your laundry in cold water and rubbing it using soap or detergent, wash it in temperature that fabric type of your laundry can resist. In case the oil stain is still visible, wipe with oxygen water (3%).

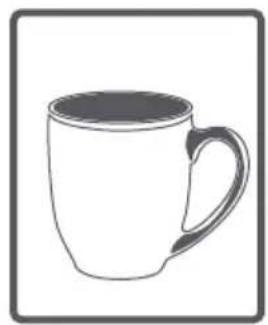
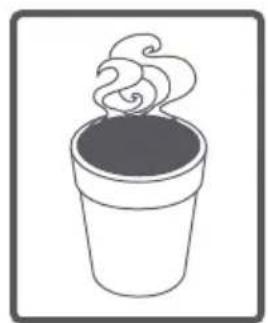
PRACTICAL INFORMATION
Tomato paste: After rubbing out the dried substances without damaging your laundry, submerge it in water for 30 minutes, and then scrub and wash it with detergent.
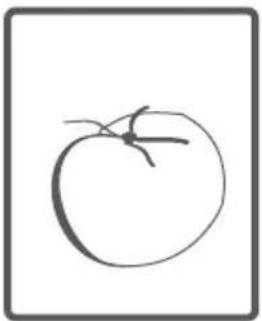
Grease and oil stains: Firstly, wipe the residues. Scrub the spot with detergent and wash it with warm soapy water.

Mustard: Apply glycerine on spotted area. Scrub with detergent and wash. If the spot cannot be removed, wipe with alcohol. (For synthetic and colour fabrics, a mixture of 1 scale of alcohol and 2 scales of water should be used)

PRACTICAL INFORMATION
Fruit: Stretch the spotted area of your laundry throughout the opening of a vessel, and pour cold water on it. Do not pour hot water on the spot. Wipe with cold water and apply glycerine. Allow 1-2 hours, wipe with a few drops of white vinegar, and rinse it.
Grass stain: Wipe the stained part with detergent. If the type of your cloth permits bleacher using, wash with bleacher. Wipe your woollen laundries with alcohol. (For colour fabrics, a mixture of 1 scale of pure alcohol and 2 scales of water)
Oil paint: Spot should be removed by applying thinner before drying. Then it should be wiped with detergent and washed.
Burn stain: If your laundry is suitable for applying bleacher, you can add bleacher into washing water. For wool fabric, a cloth previously submerged in oxygen water should be covered over the stain and it should be ironed after putting a dry cloth on this cloth. It should be washed after being rinsed properly.



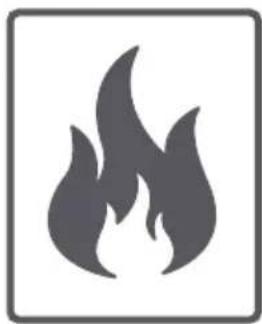
PRACTICAL INFORMATION
Blood stain: Submerge your laundries in cold water for 30 minutes. If the stain is not removed, then submerge in a mixture of water and ammoniac (3 spoons of ammoniac in 4 litres of water) for 30 minutes.
Cream, ice cream and milk: Submerge your laundries in cold water and scrub the spotted area with detergent. If the spot is not removed, apply bleacher to the extent suitable for your laundries. (Do not use bleacher for colour laundries.)
Mould: Mould stains should be cleaned as soon as possible. Stain should be washed with detergent water, nevertheless if it cannot be removed, it should be wiped with oxygen water (3%).
Ink: Subject the spotted area to running water and wait until the flow of inked water ends. Then wipe it with lemon-added water and detergent, and wash it after allowing 5 minutes.


DESCRIBING ENERGY LABEL AND SAVING ENERGY
Energy and water consumption may vary based on water pressure, water hardness, water temperature, ambient temperature, laundry amount, additional function selection, voltage fluctuations. It will reduce energy and water consumption to use your machine with the laundry capacity proposed for the selected programme, wash your laundries less dirty or daily laundries in short programmes, carry out cleaning and maintenance periodically, use your machine in convenient time intervals specified by electricity vendor.

52169444
Disposal information
The symbol on the product or its packaging indicates that this product may not be treated as household waste. Instead it should be handed over to the applicable collection point for the recycling of electrical and electronic equipment. By ensuring this product is disposed of correctly, you will help prevent potential negative consequences for the environment and human health, which could otherwise be caused by inappropriate waste handling of this product. For more detailed information about recycling this product, please contact your local council office, your household waste disposal service or the shop where the product was purchased.
- CONTENTS
- IMPORTANT SAFETY WARNINGS
- BEFORE USING YOUR MACHINE
- PACKAGING AND THE ENVIRONMENT
- SAVINGS INFORMATION 18
- OVERVIEW OF THE APPLIANCE 19
- SETTING UP THE MACHINE 22
- CONTROL PANEL
- WASHING OPERATION
- GENERAL WARNINGS
- SAFETY WARNINGS
- BURN RISK
- ELECTROCUTION RISK
- EXPLOSION RISK
- FALL AND INJURY RISK
- CHILD SAFETY
- DISPOSING OF PACKAGING AND YOUR OLD MACHINE RESPONSIBLY
- REMOVAL OF PACKAGING MATERIALS
- REMOVAL OF OLD MACHINE
- SAVINGS & EFFICIENCY INFORMATION
- OVERVIEW OF YOUR DEVICE
- GENERAL APPEARANCE
- REAR VIEW
- SETTING UP THE MACHINE
- PLACING THE MACHINE AND ADJUSTING THE FEET
- ELECTRICAL CONNECTION
- WATER INLET CONNECTION
- WATER DRAINING CONNECTION
- DETERGENT DRAWER GENERAL VIEW
- DETERGENT DRAWER COMPARTMENTS
- MAIN WASH DETERGENT COMPARTMENT
- SOFTENER, STARCHING, DETERGENT COMPARTMENT
- PRE-WASH DETERGENT COMPARTMENT
- PROGRAMME KNOB
- SORTING LAUNDRY
- EXPLANATION OF WASHING SYMBOLS
- PLACING LAUNDRY INTO THE MACHINE
- CHOICE OF DETERGENT AND PLACING INTO THE MACHINE
- PROGRAMME SELECTION
- AUXILIARY FUNCTIONS
- REASON FOR NON-ACTIVATION
- HALF-LOAD DETECTION SYSTEM
- TEMPERATURE SELECTION
- SPIN SPEED SELECTION
- DRYING LEVEL SELECTION
- IF YOU WANT YOUR LAUNDRY DRIED AT THE END OF THE WASHING CYCLE
- IF YOU WANT YOUR LAUNDRY DRIED FOR A PERIOD OF TIME AT THE END OF THE WASHING CYCLE
- DELAY TIMER
- TO USE AUXILIARY FUNCTION OF DELAY TIMER
- START/PAUSE BUTTON
- CHILD LOCK
- CANCELLING A RUNNING PROGRAMME
- IF YOU WANT TO CANCEL ANY RUNNING PROGRAMME
- FINISHING PROGRAMME
- PROGRAMME TABLE
- (*BLACK PARTS ARE FACTORY PRESETS)
- CLEANING AND MAINTENANCE (WARNING)
- CLEANING AND MAINTENANCE (WATER INLET FILTERS)
- CAUTION
- CLEANING AND MAINTENANCE (PUMP FILTER)
- WARNING
- CLEANING AND MAINTENANCE (DETERGENT DRAWER)
- LIQUID DETERGENT APPARATUS (*)
- FLUSH STOPPER / BODY / DRUM
- FLUSH STOPPER
- BODY
- DRUM
- TROUBLESHOOTING
- AUTOMATIC FAULT WARNINGS AND WHAT NEEDS TO BE DONE
- PRACTICAL INFORMATION
- DESCRIBING ENERGY LABEL AND SAVING ENERGY
- DISPOSAL INFORMATION
Brand : White-Westinghouse
Model : WKWF75GGFWT
Category : Washing machine