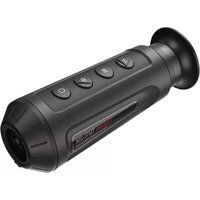
Taipan TM15-256 - Thermometer AGM - Free user manual and instructions
Find the device manual for free Taipan TM15-256 AGM in PDF.


| Product Type | Thermal Imaging Thermometer |
| Brand | AGM |
| Model | Taipan TM15-256 |
| Dimensions (L x W x H) | 205 x 63 x 70 mm |
| Weight | 425 g |
| Power Supply | Rechargeable Li-ion battery, 5V DC via USB-C |
| Display | 0.39-inch OLED, 1024x768 resolution |
| Thermal Sensor | 256x192 resolution, < 35 mK sensitivity |
| Temperature Range | -20°C to +150°C (object), -20°C to +550°C (optional) |
| Detection Distance | Up to 450 m (small target) |
| Field of View | 15° x 11° |
| Frame Rate | 50 Hz |
| Storage | Internal memory (16 GB) for image/video capture |
| Connectivity | Wi-Fi, USB-C, Micro HDMI |
| Waterproof Rating | IP67 |
| Operating Temperature | -20°C to +50°C |
| Maintenance | Clean lens with soft cloth; avoid solvents |
| Safety | Avoid direct eye exposure to laser (if present); do not disassemble |
| Accessories Included | USB cable, carrying case, wrist strap, manual |
Frequently Asked Questions - Taipan TM15-256 AGM
User questions about Taipan TM15-256 AGM
0 question about this device. Answer the ones you know or ask your own.
Ask a new question about this device
Download the instructions for your Thermometer in PDF format for free! Find your manual Taipan TM15-256 - AGM and take your electronic device back in hand. On this page are published all the documents necessary for the use of your device. Taipan TM15-256 by AGM.
USER MANUAL Taipan TM15-256 AGM
TAIPAN
TM10-256
TM15-256
THERMAL IMAGING MONOCULAR
© 2020 AGM Global Vision, LLC. All rights reserved.
This documentation is subject to change without notice.
No parts of this manual, in whole or in part, may be copied, photocopied, translated, or transmitted by any electronic medium or in machine-readable form without the prior written permission of AGM Global Vision, LLC.
Approved for public release, distribution unlimited.
If you have questions that are not covered in this manual, or need service, contact AGM Global Vision customer support for additional information prior to returning a product.
AGM Global Vision, LLC
173 West Main Street
PO Box 962
Springerville, AZ 85938
Tel. 928.333.4300
support@agmglobalvision.com
www.agmglobalvision.com
EXPORT INFORMATION
Buyer acknowledges that all products supplied by AGM Global Vision, LLC are subject to U.S. export control laws, including, but not limited to, the Export Administration Regulations, the International Economic Emergency Powers Act, and various U.S. embargoes and sanctions. AGM Global Vision products may not be exported, re-exported, or transferred contrary to U.S. export control laws. In particular, AGM Global Vision products may not be exported, re-exported, or transferred to prohibited countries, individuals, organizations, or entities, including but not limited to those individuals and entities listed on the List of Specially Designated Nationals and Blocked Persons administered or maintained by the U.S. Office of Foreign Assets Control ("OFAC"), the various lists maintained by the Bureau of Industry and Security of the Department of Commerce, and the U.S. State Department and Buyer represents and warrants that neither Buyer nor any of its officers, directors, or employees are on such lists. Distribution or resale by Buyer to such countries, individuals, organizations, or entities is expressly prohibited. Buyer has and will maintain a positive process to ensure compliance with this Section.
FCC INFORMATION
Please take attention that changes or modification not expressly approved by the party responsible for compliance could void the user's authority to operate the equipment.

This equipment complies with FCC/IC RSS-102 radiation exposure limits set forth for an uncontrolled environment.
FCC compliance: This product has been tested and found to comply with the limits for a Class B digital device, pursuant to Part 15 of
the FCC Rules. These limits are designed to provide reasonable protection against harmful interference in a residential installation. This product generates, uses, and can radiate radio frequency energy and, if not installed and used in accordance with the instructions, may cause harmful interference to radio communications. However, there is no guarantee that interference will not occur in a particular installation. If this product does cause harmful interference to radio or television reception, which can be determined by turning the equipment off and on, the user is encouraged to try to correct the interference by one or more of the following measures:
— Reorient or relocate the receiving antenna.
— Increase the separation between the equipment and receiver.
- Connect the equipment into an outlet on a circuit different from that to which the receiver is connected.
— Consult the dealer or an experienced radio/TV technician for help.
FCC Conditions
This device complies with part 15 of the FCC Rules. Operation is subject to the following two conditions:
- This device may not cause harmful interference.
- This device must accept any interference received, including interference that may cause undesired operation.
EU CONFORMITY STATEMENT

This product and - if applicable - the supplied accessories too are marked with "CE" and comply therefore with the applicable harmonized European standards listed under the EMC Directive 2014/30/EU, the RoHS Directive 2011/65/EU
2012/19/EU (WEEE directive): Products marked with this symbol cannot be disposed of as unsorted municipal waste in the European Union. For proper recycling, return this product to your local supplier upon the purchase of equivalent new equipment, or dispose of it at designated collection points. For more information see: www.recyclethis.info
2006/66/EC (battery directive): This product contains a battery that cannot be disposed of as unsorted municipal waste in the European Union. See the product documentation for specific battery information. The battery is marked with this symbol, which may include lettering to indicate cadmium (Cd), lead (Pb), or mercury (Hg). For proper recycling, return the battery to your supplier or to a designated collection point. For more information see: www.recyclethis.info
INDUSTRY CANADA ICES-003 COMPLIANCE
This device meets the CAN ICES-3 (B)/NMB-3(B) standards requirements.
LIST OF CONTENTS
TITLE
Safety Summary 5
1. GENERAL INFORMATION 6
1.1 System Description 6
1.2 Key Features 7
1.3 Standard Components 7
2. OPERATING INSTRUCTIONS 8
2.1. Basic Operations 8
2.2 Main Function 12
2.3 Client Software Introduction 17
3. MAINTENANCE 19
3.1 Maintenance 19
3.2 Troubleshooting 20
4. WARRANTY INFORMATION 21
4.1 Warranty Information and Registration 21
- SPECIFICATIONS 23
5.1 Specifications 23
SAFETY SUMMARY
- Read and follow all instructions
- Read all warnings
- Only use the attachments/accessories specified by the manufacturer
- All service must be provided by the manufacturer
WARNING:
This product contains natural rubber latex, which may cause potentially fatal allergic reactions! If you are allergic to latex, it is important that you strictly avoid exposure to products that contain it.
WARNINGS AND CAUTIONS:
- All electronic operation should be in strict compliance with the electrical safety regulations, fire prevention regulations and other related regulations in your local region.
- Please use the power adapter, which is provided by a proven manufacturer. The power consumption cannot be less than the required value.
- Do not connect several devices to one power adapter as adapter overload may cause over-heat or fire hazard.
- Do not drop the device or subject it to physical shock, and do not expose it to high electromagnetic radiation. Avoid the device installation on vibrations surface or places subject to shock (ignorance can cause equipment damage).
- Make sure the running environment meets the requirement of the device. The operating temperature shall be -20°C to 55°C (-4°F to 131°F), and the operating humidity shall be 95% or less.
- Do not place the device in extremely hot (refer to the specification of the device for the detailed operating temperature), cold, dusty or damp locations, and do not expose it to high electromagnetic radiation.
- The device cover for indoor use should be kept from rain and moisture.
- Exposing the device to direct sun light, low ventilation or heat source such as heater or radiator is forbidden (ignorance can cause fire danger).
- Do not aim the device at the sun or extra bright places. A blooming or smear may occur otherwise (which is not a malfunction however), and affecting the endurance of sensor at the same time.
- The built-in battery cannot be dismantled. Please contact the manufacture for repair if necessary.
- For long-term storage of the battery, make sure you fully charge it every 6 months, to ensure the battery quality. Otherwise, you may damage the battery.
NOTES:
- The detector spectral band provides better visibility through smoke, dust, rain, smog, etc.
- Infrared radiation does not travel through glass. As a result, the monocular does not detect objects if they are behind glass windows or other barriers.
EMERGENCY:
If smoke, odor, or noise arises from the device, immediately turn off the power, unplug the power cable, and contact the service center.
1 GENERAL INFORMATION
1.1 SYSTEM DESCRIPTION
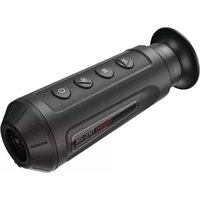
The Taipan TM-256 handheld observational thermal monocular is equipped with a 256×192 infrared detector and a 720×540 LCOS display. It supports functions of observation, highest temperature target tracking, distance measurement, Wi-Fi hotspot, and so on. The high-sensitivity built-in thermal detector provides you with clear view even in total darkness. The monocular is mainly applied to scenarios such as patrolling, law enforcement, searching and rescuing, drug enforcement, anti-smuggling, criminal seizing, hiking, travel, and hunting, etc.

FIGURE 1-1. MAIN PARTS
TABLE 1-1. MAIN PARTS
| ITEM DESCRIPTION ITEM DESCRIPTION | |
| 1 Body 6 Eyepiece | |
| 2 Lens 7 USB Interface Cover | |
| 3 Lens Cap 8 Tripod Screw | |
| 4 Control Buttons 9 Battery Status Indicator | |
| 5 Diopter Adjustment Knob 10 USB Type-C Interface | |
1.2 KEY FEATURES
- 256×192 resolution, 12 μm, high sensitivity detector
• Adaptive AGC, DDE, 3D DNR - 720×540 resolution LCOS display
• Distance measurement
• Highest temperature tracking
• Built-in memory module supports video recording and snapshot capturing - Wi-Fi hotspot
• Built-in rechargeable Lithium battery
• Up to 8 hours continuous running - Limited 3-year warranty
1.3 STANDARD COMPONENTS
The standard components are shown in Figure 1-2 and listed in Table 1-2.
The ITEM NO. column indicates the number used to identify items in Figure 1-2.

FIGURE 1-2. STANDARD COMPONENTS
TABLE 1-2. STANDARD COMPONENTS
| ITEM NO. DESCRIPTION QUANTITY | |
| 1 Monocular 1 | |
| 2 USB Cable 1 | |
| 3 Lanyard 1 | |
| 4 AC Power Adapter/Charger 1 | |
| 5 Lens Cloth 1 | |
| 6 Operation Manual 1 | |
2 OPERATING INSTRUCTIONS
2.1. BASIC OPERATIONS
2.1.1 UNPACKING
The following steps must be completed prior to each mission.
- Open the carrying case, remove the monocular, and verify that all components are included.
- Inspect the monocular for any obvious evidence of damage to the optical surfaces, body, eyecup, operation buttons, etc. Ensure that all optical surfaces are clean and ready for use. Clean all optical surfaces with a lens tissue.
2.1.2 CHARGING THE MONOCULAR
When the monocular is turned on, the OSD (on-screen display) shows the battery status. When you see the Low Battery status, charge the monocular and ensure it's working properly.
NOTE:
Please charge the monocular with the delivered USB cable and power adapter. The charging temperature should be 0° C to 45° C ( 32° F to 113° F).

FIGURE 2-1. TAIPAN CHARGING
- Lift the USB cover.
- Plug in the USB cable and charge the device.
- Plug the power adapter to the power source.
TABLE 2-1. BATTERY LED INDICATOR STATUS
| INDICATORS FUNCTIONS | |
| Flashing Red & Green Error occurred. | |
| Solid Red Battery is properly charged. | |
| Solid Green Battery is fully charged. | |
| Off Battery is not charged. |
2.1.3 CONTROL BUTTONS
The Taipan controls are shown in Figures 2-2 and are defined in Tables 2-2.
Each button is responsible for some functions selected by short press or long press the button. Pushing a button for 2+ second is considered "long press/ hold."

FIGURE 2-2. CONTROL BUTTONS
TABLE 2-2. BUTTON FUNCTIONS
| BUTTON FUNCTIONS | ||
 | POWER | Press: Standby Mode / Device Wake UpHold: Power On/Off |
 | CAPTURE | Press: Capture SnapshotHold: Start/Stop Record VideoMenu Navigation: Cursor Up |
 | Press: Switch PalletHold: Menu OperationMenu Navigation: Confirm | |
 | Press: Digital ZoomHold: FFCMenu Navigation: Cursor Down | |
2.1.4 POWER ON AND OFF
Power On
Hold the POWER button ⏻ for 5 seconds to power on the device. An image will appear on the display.
Refer to the figure below for the main view of the monocular display.

FIGURE 2-3. THE DISPLAY MAIN VIEW
Power Off
When the device is turned on, hold ⏻ button for 2 seconds. The SHUTDOWN window will appear on the display. Press OP button to change selected position from CANCEL to OK. When OK is selected press button to power off the device.
In the "Auto Power Off" menu you can set the time for the automatic shutdown of the device as required (OFF / 30 min. / 45 min.).
2.1.5 SLEEP MODE
In the view mode, press the button. The display will turn off. Press the button again to exit the Sleep Mode.
2.1.6 THERMAL VIEW OBSERVATION
- Power on the monocular.
- Hold the monocular and make sure the eyepiece covers your eye.
- Adjust the diopter adjustment knob until the OSD text or image is clear.

FIGURE 2-4. DIOPTER ADJUSTMENT
- Set palette, brightness, contrast, scene mode and FFC (Flat Field Correction), to display the best image effect.
2.1.7 PALETTE SETTINGS
You can select different palettes to display the same scene in different effects. Press □Mutton to switch palettes.
TABLE 2-3. PALETTE SETTINGS
| PALETTE DESCRIPTION | |
| WHITE HOT | The hot part is white-colored in view. The higher the temperature is, the lighter the color is. |
| BLACK HOT | The hot part is black-colored in view. The higher the temperature is, the more black the color is. |
| FUSION | The hot part is white-colored. From high temperature to low temperature, the image is colored in from white, yellow, red, pink to purple. |
| RED HOT | The hot part is red-colored in view. The higher the temperature is, the redder the color is. |
2.1.8 DIGITAL ZOOM
Press Button in the view mode, the live view will switch between 1×, 2×, 4× and 8× digital zoom (8× option is available only for TM384 model).
2.1.9 RECORD/ CAPTURE
Video Recording
In the main live view, hold 📄 button and start recording. In the upper left corner, the recording time displays.
Hold button again to stop recording.

On the main live view page, press 📄 to capture picture.
NOTE:
- When capturing succeeds, the image freezes for 1 second and a prompt shows on the display.
- For exporting captured pictures, refer to Export Files.
2.1.10 FILE EXPORT
- Before connecting the thermal monocular to a computer, please make sure that the Wi-Fi function of the monocular is disabled.
- Connect the thermal monocular to your PC with USB cable and open the detected disk.
- Enter DCIM>100EZVIZ to view the videos and snapshots.
- Select and copy the videos to PC and play the file with the player.
- Select and copy the snapshots to PC and view the files.
- Disconnect the device from your PC.
NOTE:
- The device displays images when you connect it to PC. But functions such as recording, capturing and hot spot are disabled.
- When you connect the device to PC for the first time, it installs the drive program automatically.
2.2 MAIN FUNCTIONS
When the device powers on, hold button for 4 seconds to display the menu. Press and buttons to move between menu items. The active element is highlighted in orange. Press button to select menu item or change an option.

FIGURE 2-6. THE MAIN MENU
TABLE 2-4. MENU FUNCTION
| MENU ITEM SYMBOL OPTION FUNCTION | |||
| OSD |  | ON | Press M to display or hide the OSD information. |
 | OFF | ||
| BRIGHTNESS |  | 5 Levels of brightness | Press M to adjust the brightness. |
| CONTRAST |  | 5 Levels of contrast | Press M to adjust the contrast. |
| SCENE MODE |  | Recognition | Press M to switch between the Recognition mode and Jungle mode. |
 | Jungle | ||
| NETWORK |  | OFF | Press M to enable or disable the Wi-Fi hotspot. |
 | Hotspot | ||
| FFC |  | Auto / Manual / External | Press M to select the FFC mode. |
| MEASURE |  | 0.8m/1.2m/1.8m/3.0m Target Height | Press M to enter distance measurement mode. |
| HOT TRACKING |  | OFF | Press M to enable/disable hot spot mark (marking the spot of highest temperature). |
 | ON | ||
| DPC |  | --- | Press M to correct dead pixel manually. |
| CVBS |  | OFF | Press M to turn on and off the CVBS Output function. |
 | ON | ||
| LANGUAGE |  | 17 Languages | Press M to select the language of interface. |
| VERSION |  | --- | Press M to view the firmware version number and serial number. |
| RESTORE |  | --- | Press M to restore the device to defaults. |
| AUTO POWER OFF | OFF/30 min/45 min | Set the automatic shutdown time. | |

2.2.2 OSD
- Hold Mutton to go to the menu.
- Select □ / menu item and press button to switch the OSD mode.
When OSD (On-Screen Display) is on the information of Wi-Fi hotspot activation, digital zoom, storage memory status, and battery status displays in top right corner of viewfinder.
2.2.3 BRIGHTNESS ADJUSTMENT
- Hold Mutton to go to the menu.
- Select 📋 Brightness menu item and press 📂 Mutton to adjust the brightness.
In White Hot mode, you can select one of five levels of the brightness to adjust the image lighter or darker.
In Black Hot mode, the brightness of the image turns in the opposite way.
2.2.4 CONTRAST ADJUSTMENT
- Hold Mutton to go to the menu.
- Select Ⓐ Contrast menu item and press 📂 Mutton to adjust the image contrast. You can select one of five levels of the contrast.
2.2.5 SCENE MODE
You can select proper Scene Mode according to environment temperature to improve the display effect.
- Hold M button to go to the menu.
- Select / Scene Mode menu item ( is default option) and press to switch scene.
M
- Recognition mode ( Ⓞ ) improves an image so that the object edge is more distinct.
-
Jungle mode (▲) is more suitable for hunting environment because of the highlight function of small objects.
-
Hold M for 4 seconds to save settings and exit.
2.2.6 NETWORK CONFIGURATION
Connect your phone to the Wi-Fi hotspot of the monocular, you can configure the parameters and realize functions of the device.
- Hold M button to show the menu.
- Select 📷 menu item to enable Wi-Fi hotspot function.
-
Turn on the WLAN and connect to the Wi-Fi hotspot.
-
Hotspot Name: Wlan-IPTS Serial No.
-
Hotspot Password: Last 9 digits of Serial No.
-
Search the client software on App Store (iOS System) or Google Play TM (Android System) to download and install the app. T-Vision APP is recommend.
-
Open the APP and connect your phone with the device. You can view the interface of monocular on your phone.
NOTE:
When the power is less than 15%, the Wi-Fi hotspot function will be turned off automatically.
2.2.7 FLAT FIELD CORRECTION
Flat Field Correction (FFC) function can correct nonuniformity of display.
-
Hold M button to show the menu.
-
Select ⏻ menu item and press 📂Mutton to switch the FFC mode.
Auto: The monocular performs FFC automatically when switching on or rebooting the camera.
Manual: Hold ⏻± button in live view to correct the nonuniformity of display.
External: Cover the lens cap, then hold ⏻± button in live view to correct the nonuniformity of display.
- Hold M button to confirm.
2.2.8 DISTANCE MEASUREMENT
The device can detect the distance between the target and the observation position.
NOTE:
When measuring the distance, keep the hand and the position steady. Otherwise, the accuracy may be affected.
- Hold M button to show the menu.
- Select menu item and press bMton to enter the Distance Measurement mode.
- Press ⏻± button to go to the target setting interface.
1) Press 📄 or 📋 to select the target from Wolf (0.8m), Bear (3.0m), Deer (1.2m), and Custom (from 0.1 to 9.9m).
2) Set the target and press M to confirm.
- Align the center of top mark with the edge of target top. Press M.
The cursor blinks on the top edge of the target.
- Align the center of bottom mark with the edge of target bottom. Press M.
The left top of the image displays the distance measurement result and the height of the target.
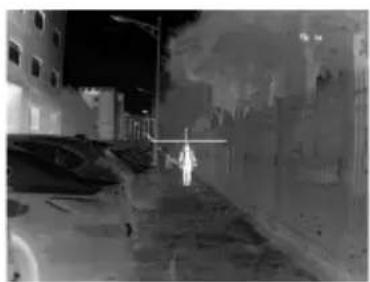
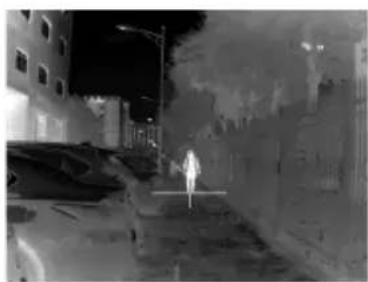

FIGURE 2-7. DISTANCE MEASUREMENT
NOTE:
Go to distance measurement interface, and press M to view the result of the previous measuring target.
2.2.9 HOT TRACKING
The device can detect the highest temperature spot in the scene and mark it on display.
-
Hold M button to show the menu.
-
Select ☑ / ⚙ and press □Mton to enable/disable hot spot mark (marking the spot of highest temperature).
When the hot spot mark is enabled, the -+ mark displays in the spot of the highest temperature. When the scene changes, the -mark moves.
2.2.10 DEFECTIVE PIXELS CORRECTION
Defective Pixels Correction (DPC) function can correct the defective pixels on the screen which are not performed as expected.
Before you start switch the palettes mode to White Hot mode.
- Hold M button to show the menu.
- Select D menu item.
- Press M button to select the offset. The offset refers to the moving length of cursor.
- Press and to select the moving direction.
- Press M to move the cursor to the position of dead pixel.
- Hold 📄 to correct the dead pixel.
NOTE:
If the menu blocks the dead pixel, hold to perform mirror display.
2.2.11 CVBS OUTPUT
You can view the video on CVBS monitor, to get a better and clear image, more convenient to check the detail.
- Connect the USB-CVBS cable to USB port of thermal monocular and to monitor's CVBS port.
NOTE:
USB-CVBS cable need to be purchase separately.
NOTE:
CVBS Output function doesn't support hot plug, so please connect the cable before power on.
- Hold M button to show the menu.
- Select CVBS menu item and press M button to turn on or turn off the CVBS video output.
2.2.12 LANGUAGE SETTING
You can select different languages of user interface.
- Hold M button to show the menu.
- Select Aa Language menu item and press Mton to select the language.
The following languages are supported: English, Russian, German, Czech, French, Spanish, Danish, Norwegian, Swedish, Finnish, Hungarian, Italian, Polish, Portuguese, Romanian, Slovak.
- Hold M to save settings and exit.
2.3 CLIENT SOFTWARE INTRODUCTION
We recommend using T-Vision (V5.4.12 and below) software. Install the client software on your mobile phone first, and then connect your phone to the hotspot of the monocular. Refer to chapter 2.2.6 for details of hotspot connection.
NOTE:
The device password is set by user at first activation. If the password was lost or forgotten, it can be reset. To make a reset, provide the following action:
- When the monocular is turned on, hold the button M for three seconds to activate the OSD menu.
- Move the cursor to ☐ menu item and press the button td restore all parameters to default settings.
- Open the APP and connect the phone or pad with the device.

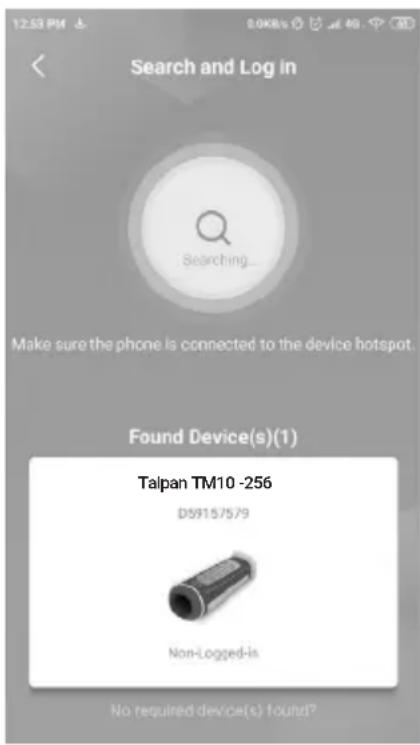
- If the device is inactivated, set the password and activate it. If the device is activated, enter the password to add it to app.
![Enter Device Password Device [ Taipan TM10-256 ] ******** Cancel Confirm](/content/2026/06/1345241/images/f99c9fde2429694cf26b84d049d168c05876b2981db74f41ad9c0c393d728385.jpg)
- When the device is added, the live view can be seen. You can view the interface of the monocular on the software. User can change such image parameters as brightness, contrast, zoom, palettes directly via phone or pad as well as record video on phone/pad memory.

3 MAINTENANCE
3.1 MAINTENANCE
3.1.1 CLEANING PROCEDURES
- Gently brush off any dirt from the body of the device using a clean, soft cloth.
- Moisten the cloth with fresh water and gently wipe down the external surfaces (except lenses).
- Dry any wet surfaces (except lenses) using another dry, clean, soft cloth.
- Using a lens brush, carefully remove all loose dirt from the lenses.
- Dampen a cotton swab with ethanol and slowly, gently wipe down the lenses. Clean the glass surfaces using circular movements, starting from the center of the lens and moving out towards the edge, without touching the lens holder. Change the cotton swab after each circular stroke. Repeat this step until the glass surfaces are clean.
- Clean the accessories with a soft brush (or cloth) dampened with soap and water.
3.1.2 PREPARING FOR EXTENDED STORAGE
CAUTION:
Thoroughly dry each item before placing them into the storage case.
To prepare the monocular for extended storage:
-
Clean the monocular and accessories.
-
Place all items into the storage case.
3.1.3 VIEWING DEVICE INFORMATION
- Hold Button to show the menu of device.
- Select i, and press Button. You can view the device information such as version, and serial No.
3.1.4 UPDATING THE DEVICE FIRMWARE
- Download the firmware update package to your PC and unzip it.
- Connect the thermal device to your PC with USB cable.
- Turn on the thermal device.
- Disable the Wi-Fi Hotspot function in the device menu if WiFi is enabled.
- Open the detected disk (USB drive) in file manager program. Copy the unzipped .dav file and paste it to the root directory of the device.
-
Turn off the device.
-
Turn on the device. After a while, the firmware update process will start automatically. During the update, the screen will display the inscription "Upgrading ...". The update process will be completed when the inscription "Upgrading ..." goes out.
Repeat steps 5-7 for each updating file.
- Turn off the device and disconnect it from your PC.
3.1.5 RESTORE DEVICE
-
Hold Mutton to show the menu of device.
-
Select 📊 and press Ⓜ button to restore the device to defaults according to the prompt.
3.2 TROUBLESHOOTING
Table 3-1 lists the most common malfunctions that may occur with your equipment. Perform the tests, inspections, and corrective actions in the order they appear in the table.
This table does not list all the malfunctions that may occur with your device, or all of the tests, inspections, and corrective actions that may be necessary to fix them. If the equipment malfunction is not corrected by the suggested actions, or a problem occurs that is not listed in this table, please contact AGM Global Vision's Customer Support center or your retailer.
TABLE 3-1. TROUBLESHOOTING
| MALFUNCTION CORRECTIVE ACTION | |
| The charge indicator flashes improperly. | Examine whether the device is charged with standard power adapter and the charging temperature is 0°C to 45°C (32°F to 113°F). |
| Device power indicator is off. | Examine whether the device is off-battery. |
| The image of the monocular is not clear. | Perform the monocular adjustment referring to section 2.1.5. |
| Wi-Fi is not found. | Examine whether the Wi-Fi function is turned on. If not, go to OSD menu and turn on Wi-Fi. |
| Capturing or recording fails. | Examine the items below:1. Whether the device is connected to your PC and disabled the capturing and recording.2. Whether the storage space is full.3. Whether the device is low-battery. |
| The PC cannot identify the monocular. | Examine the items below:1. Whether the device is connected to your PC with standard USB cable.2. If you use other USB cables, make sure the cable length is no longer than 1 m.3. Whether the Wi-Fi function is turned on. If so, go to OSD menu and turn off Wi-Fi. |
4 WARRANTY INFORMATION
4.1 WARRANTY INFORMATION AND REGISTRATION
4.1.1 WARRANTY INFORMATION
This product is guaranteed to be free from manufacturing defects in material and workmanship under normal use for a period of three (3) years from the date of purchase. In the event that a defect covered by the warranty below occurs during the applicable period stated above, AGM Global Vision, at its discretion, will either repair or replace the product; such action on the part of AGM Global Vision shall be the full extent of AGM Global Vision's liability, and the Customer's sole and exclusive reparation. This warranty does not cover a product if it has been (a) used in ways other than its normal and customary manner; (b) subjected to misuse; (c) subjected to alterations, modifications or repairs by the Customer or by any party other than AGM Global Vision without prior written consent of AGM Global Vision; (d) is the result of a special order or categorized as "close-out" merchandise or merchandise sold "as-is" by either AGM Global Vision or the AGM Global Vision dealer; or (e) merchandise that has been discontinued by the manufacturer and either parts or replacement units are not available due to reasons beyond the control of AGM Global Vision. AGM Global Vision shall not be responsible for any defects or damage that in AGM Global Vision's view are a result from the mishandling, abuse, misuse, improper storage or improper operation of the device, including use in conjunction with equipment that is electrically or mechanically incompatible with, or of inferior quality to, the product, as well as failure to maintain the environmental conditions specified by the manufacturer. This warranty is extended only to the original purchaser. Any breach of this warranty shall be enforced unless the customer notifies AGM Global Vision at the address noted below within the applicable warranty period.
The customer understands and agrees that except for the foregoing warranty, no other warranties written or oral, statutory, expressed or implied, including any implied warranty of merchantability or fitness for a particular purpose, shall apply to the product. All such implied warranties are hereby and expressly disclaimed.
4.1.2 LIMITATION OF LIABILITY
AGM Global Vision will not be liable for any claims, actions, suits, proceedings, costs, expenses, damages, or liabilities arising out of the use of this product. Operation and use of the product are the sole responsibility of the Customer. AGM Global Vision's sole undertaking is limited to providing the products and services outlined herein in accordance with the terms and conditions of this Agreement. The provision of products sold and services performed by AGM Global Vision to the Customer shall not be interpreted, construed, or regarded, either expressly or implied, as being for the benefit of or creating any obligation toward any third party of legal entity outside AGM Global Vision and the Customer; AGM Global Vision's obligations under this Agreement extend
solely to the Customer. AGM Global Vision's liability hereunder for damages, regardless of the form or action, shall not exceed the fees or other charges paid to AGM Global Vision by the customer or customer's dealer. AGM Global Vision shall not, in any event, be liable for special, indirect, incidental, or consequential damages, including, but not limited to, lost income, lost revenue, or lost profit, whether such damages were foreseeable or not at the time of purchase, and whether or not such damages arise out of a breach of warranty, a breach of agreement, negligence, strict liability, or any other theory of liability.
4.1.3 PRODUCT REGISTRATION
In order to validate the warranty on your product, the customer must complete and submit AGM Global Vision PRODUCT REGISTRATION FORM on our website (www.agmglobalvision.com/customer-support).
4.1.4 OBTAINING WARRANTY SERVICE
To obtain warranty service on your unit, the End-user (Customer) must notify the AGM Global Vision service department via e-mail. Send any requests to support@agmglobalvision.com to receive a Return Merchandise Authorization number (RMA). When returning any device, please take the product to your retailer, or send the product, postage paid and with a copy of your sales receipt, to AGM Global Vision's service center at the address listed above. All merchandise must be fully insured with the correct postage; AGM Global Vision will not be responsible for improper postage or merchandise that becomes lost or damaged during shipment. When sending product back, please clearly write the RMA# on the outside of the shipping box. Please include a letter that indicates your RMA#, the Customer's Name, a Return Address, reason for the return, contact information (valid telephone numbers and/or an e-mail address), and proof of purchase that will help us to establish the valid start date of the warranty. Product merchandise returns that do not have an RMA# listed may be refused, or a significant delay in processing may occur. Estimated Warranty service time is 10-20 business days. The End-user/Customer is responsible for postage to AGM Global Vision for warranty service. AGM Global Vision will cover return postage/shipping after warranty repair to the End-user/Customer only if the product is covered by the aforementioned warranty. AGM Global Vision will return the product after warranty service by domestic UPS Ground service and/or domestic mail. Should any other requested, required, or international shipping methods be necessary, the postage/shipping fee will be the responsibility of the End-user/Customer.
For service, repair or replacement, please contact:
AGM Global Vision, LLC
173 West Main Street
PO Box 962
Springerville, AZ 85938
Tel. 928.333.4300
support@agmglobalvision.com
www.agmglobalvision.com
5 SPECIFICATIONS
5.1 SPECIFICATIONS
| TAIPAN TM10-256 TAIPAN TM15-256 | ||
| Detector Type 12 μm Vanadium Oxide Uncooled Focal Plane Arrays | ||
| Resolution 256×192 | ||
| Refresh Rate 25 Hz | ||
| Response Waveband 8 μm to 14 μm | ||
| Lens (Focal Length) 10 mm 15 mm | ||
| Aperture F1.0 F1.0 | ||
| Field of View (H×V) 18° × 13.55° 11.69° × 8.78° | ||
| Magnification | 1.0× - 8× | 1.42× - 11.36× |
| Digital Zoom | 1×, 2×, 4×, 8× | |
| Monitor | 720×540, 0.2 inch, LCOS | |
| FFC (Flat Field Correction) | Auto, Manual, External Correction | |
| Palettes | Black Hot, White Hot, Red Hot, Fusion | |
| Highest Temperature Spot Tracking | Yes | |
| Wi-Fi Hotspot | Yes | |
| Standby Mode | Yes | |
| Storage | Built-in memory module (8 GB) | |
| Record Video | On-board video recording | |
| Capture Snapshot | Yes | |
| CVBS Output | Yes (via USB) | |
| Battery Type | Built-in rechargeable Lithium battery | |
| Battery Operating Time (Wi-Fi off) | Up to 8 hours continuous running (@25°C) | |
| Battery Capacity Display | Yes | |
| Power | 5 VDC/2 A, 2.1 W, USB Type-C Interface | |
| Working Temperature | -20°C to 55°C (-4°F to 131°F) | |
| Protection Level | IP67 | |
| Drop Test Height | 1.5 m (4.9 feet) | |
| Dimension | 158 × 61 × 57 mm(6.2 × 2.4 × 2.2 in) | 158 × 61 × 57 mm(6.2 × 2.4 × 2.2 in) |
| Weight | 260 g (0.57 lb) | 280 g (0.62 lb) |
* All data subject to change without notice.
AGM Global Vision, LLC
MAIN OFFICE
173 West Main Street
PO Box 962
Springerville, AZ 85938
USA
Tel. +1.928.333.4300
info@agmglobalvision.com
www.agmglobalvision.com
EUROPEAN OFFICE
Andrey Lyapchev #7
Sofia, P.C. 1756
Bulgaria
Tel. +35.988.412.5573
info@agmglobalvision.eu
www.agmglobalvision.eu



- TAIPAN
- TM10-256
- TM15-256
- EXPORT INFORMATION
- FCC INFORMATION
- FCC CONDITIONS
- EU CONFORMITY STATEMENT
- INDUSTRY CANADA ICES-003 COMPLIANCE
- LIST OF CONTENTS
- TITLE
- SAFETY SUMMARY 5
- GENERAL INFORMATION 6
- OPERATING INSTRUCTIONS 8
- MAINTENANCE 19
- WARRANTY INFORMATION 21
- SAFETY SUMMARY
- WARNING
- WARNINGS AND CAUTIONS
- NOTES
- EMERGENCY
- 1 GENERAL INFORMATION
- 1.1 SYSTEM DESCRIPTION
- 1.2 KEY FEATURES
- 1.3 STANDARD COMPONENTS
- 2 OPERATING INSTRUCTIONS
- BASIC OPERATIONS
- 2.1.1 UNPACKING
- 2.1.2 CHARGING THE MONOCULAR
- NOTE
- 2.1.3 CONTROL BUTTONS
- 2.1.4 POWER ON AND OFF
- POWER ON
- POWER OFF
- 2.1.5 SLEEP MODE
- 2.1.6 THERMAL VIEW OBSERVATION
- 2.1.7 PALETTE SETTINGS
- 2.1.8 DIGITAL ZOOM
- 2.1.9 RECORD/ CAPTURE
- VIDEO RECORDING
- 2.1.10 FILE EXPORT
- 2.2 MAIN FUNCTIONS
- 2.2.2 OSD
- 2.2.3 BRIGHTNESS ADJUSTMENT
- 2.2.4 CONTRAST ADJUSTMENT
- 2.2.5 SCENE MODE
- 2.2.6 NETWORK CONFIGURATION
- 2.2.7 FLAT FIELD CORRECTION
- 2.2.8 DISTANCE MEASUREMENT
- 2.2.9 HOT TRACKING
- 2.2.10 DEFECTIVE PIXELS CORRECTION
- 2.2.11 CVBS OUTPUT
- 2.2.12 LANGUAGE SETTING
- 2.3 CLIENT SOFTWARE INTRODUCTION
- 3 MAINTENANCE
- 3.1 MAINTENANCE
- 3.1.1 CLEANING PROCEDURES
- 3.1.2 PREPARING FOR EXTENDED STORAGE
- CAUTION
- 3.1.3 VIEWING DEVICE INFORMATION
- 3.1.4 UPDATING THE DEVICE FIRMWARE
- 3.1.5 RESTORE DEVICE
- 3.2 TROUBLESHOOTING
- 4 WARRANTY INFORMATION
- 4.1 WARRANTY INFORMATION AND REGISTRATION
- 4.1.1 WARRANTY INFORMATION
- 4.1.2 LIMITATION OF LIABILITY
- 4.1.3 PRODUCT REGISTRATION
- 4.1.4 OBTAINING WARRANTY SERVICE
- 5 SPECIFICATIONS
- AGM GLOBAL VISION, LLC
Brand : AGM
Model : Taipan TM15-256
Category : Thermometer