
Xonar Essence STU - Hi-Fi System ASUS - Free user manual and instructions
Find the device manual for free Xonar Essence STU ASUS in PDF.


| Product Type | External USB DAC & Headphone Amplifier |
| Model | Xonar Essence STU |
| Brand | ASUS |
| Dimensions (W x D x H) | 130 x 120 x 50 mm |
| Weight | Approximately 300 g |
| Power Supply | USB powered, 5V DC |
| Audio Resolution | Up to 24-bit / 192 kHz |
| Headphone Output | 6.3 mm stereo jack, up to 300 mW |
| Line Output | RCA stereo, 2 Vrms |
| Input Interface | USB 2.0 (Type B) |
| Sample Rate | 44.1, 48, 88.2, 96, 176.4, 192 kHz |
| Dynamic Range | 120 dB (DAC) |
| Signal-to-Noise Ratio | 117 dB |
| Chipset | ASUS AV100 high-definition audio processor |
| Features | Hi-Fi grade components, replaceable op-amps |
| Compatible Systems | Windows XP/Vista/7/8/10, Mac OS X |
| Cleaning & Maintenance | Wipe with dry cloth; avoid liquids |
| Safety | Operating temperature: 0-40°C; do not expose to moisture |
| Spare Parts & Repairability | Replaceable op-amp sockets; consult ASUS service centers |
| General Information | External USB sound card for high-fidelity audio |
Frequently Asked Questions - Xonar Essence STU ASUS
User questions about Xonar Essence STU ASUS
0 question about this device. Answer the ones you know or ask your own.
Ask a new question about this device
Download the instructions for your Hi-Fi System in PDF format for free! Find your manual Xonar Essence STU - ASUS and take your electronic device back in hand. On this page are published all the documents necessary for the use of your device. Xonar Essence STU by ASUS.
USER MANUAL Xonar Essence STU ASUS
User manual
Copyright © 2015 ASUSTeK Computer Inc. All Rights Reserved.
No part of this manual, including the products and software described in it, may be reproduced, transmitted, transcribed, stored in a retrieval system, or translated into any language in any form or by any means, except documentation kept by the purchaser for backup purposes, without the express written permission of ASUSTeK COMPUTER INC. ("ASUS").
Product warranty or service will not be extended if: (1) the product is repaired, modified or altered, unless such repair, modification of alteration is authorized in writing by ASUS; or (2) the serial number of the product is defaced or missing.
ASUS PROVIDES THIS MANUAL "AS IS" WITHOUT WARRANTY OF ANY KIND, EITHER EXPRESS OR IMPLIED, INCLUDING BUT NOT LIMITED TO THE IMPLIED WARRANTIES OR CONDITIONS OF MERCHANTABILITY OR FITNESS FOR A PARTICULAR PURPOSE. IN NO EVENT SHALL ASUS, ITS DIRECTORS, OFFICERS, EMPLOYEES OR AGENTS BE LIABLE FOR ANY INDIRECT, SPECIAL, INCIDENTAL, OR CONSEQUENTIAL DAMAGES (INCLUDING DAMAGES FOR LOSS OF PROFITS, LOSS OF BUSINESS, LOSS OF USE OR DATA, INTERRUPTION OF BUSINESS AND THE LIKE), EVEN IF ASUS HAS BEEN ADVISED OF THE POSSIBILITY OF SUCH DAMAGES ARISING FROM ANY DEFECT OR ERROR IN THIS MANUAL OR PRODUCT.
SPECIFICATIONS AND INFORMATION CONTAINED IN THIS MANUAL ARE FURNISHED FOR INFORMATIONAL USE ONLY, AND ARE SUBJECT TO CHANGE AT ANY TIME WITHOUT NOTICE, AND SHOULD NOT BE CONSTRUED AS A COMMITMENT BY ASUS. ASUS ASSUMES NO RESPONSIBILITY OR LIABILITY FOR ANY ERRORS OR INACCURACIES THAT MAY APPEAR IN THIS MANUAL, INCLUDING THE PRODUCTS AND SOFTWARE DESCRIBED IN IT.
Products and corporate names appearing in this manual may or may not be registered trademarks or copyrights of their respective companies, and are used only for identification or explanation and to the owners' benefit, without intent to infringe.
Contents
Introduction......4
Package contents......4
Safety Information....5
Driver installation....6
Functionality 7
- USB DAC (Digital-to-Analog Converter)....7
- Stand alone DAC....8
- Headphone amplifier....8
Front Panel....9
Rear Panel....10
Hardware Introduction ...... 12
Connections....13
Input 13
- NB/PC-USB connections ....13
- Digital audio input connections .....14
Output....15
- With Amplifier and Passive Speaker System....15
- With Active Speaker directly 16
- With Headphone/Headset....16
Specifications 17
Introduction
The Xonar Essence STU USB DAC is ASUS Xonar's innovative response to the worldwide trend of PC Hi-Fi. With the number of PC audiophiles growing fast due to the convenience and high resolution of digitalized audio content, the Xonar Essence product line is committed to providing solutions for their needs to enjoy extreme high-fidelity music with any PC.
The Xonar Essence STU provides the best solution for any PC audiophile or aspiring audiophile to enjoy their music with extreme clarity, detail, and hassle-free controls, helping to rediscover one's music collection.
Package Contents
This package should contain the following:
• ASUS Xonar Essence STU Hi-Fi USB DAC x1 • USB cable (Type B-A) x1 • Power cord x1 (some versions may include 2 power cords for different countries) • Power adapter x1 • User manual x1 • Installation driver CD x1 • Product stand x1
Safety Information
For your own safety, please read the following important safety instructions carefully before attempting to connect this unit to the mains power supply. They will also help you get the best performance from the unit and prolong its life.
- Read these instructions.
- Keep these instructions.
- Heed all warnings.
- Follow all instructions.
- Do not use this apparatus near water.
- Clean the machine surface with a cloth (without any detergent).
- Do not block any ventilation openings. Install in accordance with the manufacturer's instructions.
- Do not install near any heat sources such as radiators, heat registers, stoves, or other apparatus (including amplifiers) that produce heat.
- Do not defeat the safety purpose of the polarized or grounding-type plug. A polarized plug has two blades with one wider than the other. A grounding-type plug has two blades and a third grounding prong. The wide blade or the third prong are provided for your safety. If the provided plug does not fit into your outlet, consult an electrician for replacement of the obsolete outlet.
- Protect the power cord from being walked on or pinched, particularly at plugs, convenience receptacles, and the point where they exit from the apparatus.
- Only use attachments/accessories specified by the manufacturer.
- Use only with the cart, stand, tripod, bracket, or table specified by the manufacturer, or sold with the apparatus. When a cart is used, use caution when moving the cart/apparatus combination to avoid injury from tip-over.

- Unplug this apparatus during lightning storms or when unused for long periods of time.
- Refer all servicing to qualified service personnel. Servicing is required when the apparatus has been damaged in any way, such as the power-supply adaptor having been damaged, liquid has been spilled or objects have fallen into the apparatus, the apparatus has been exposed to rain or moisture, does not operate normally, or has been dropped.
Driver installation
After connecting ASUS Xonar Essence STU with your computer by the bundled USB cable, you need to install the device driver that enables the Xonar Essence STU to work with Windows operating system.

NOTES:
- The driver is only needed when you connect ASUS Xonar Essence STU with PC/NB.
- The version and content of the support CD are subject to change without notice.
To install the device driver:
- Insert the ASUS Xonar Essence STU support CD into your optical drive. If Autorun is enabled, the ASUS Xonar Essence STU driver screen appears automatically. Go to step 4. If Autorun is not enabled in your computer, perform step 2.
- Click My Computer on your desktop and double-click the optical drive icon.
- Double-click the setup.exe icon located on the optical drive.
- Follow the on-screen instructions to complete the installation. Read the END USER LICENSE AGREEMENT in the process and make sure that you understand and accept it before continuing the installation.
- When the installation finishes, you may be prompted to restart your computer. You can choose to restart the computer later if desired.
System requirements
To ensure a successful installation of the ASUS Xonar Essence STU USB DAC, your computer must meet the following requirements:
- IBM compatible PC with one USB2.0 (or higher) compatible port for the USB audio device
- Microsoft Windows 10 / 8.1 / 8 (32/64bit) / Windows 7 (32/64bit) / Windows XP (32/64bit) / MCE2005
- Intel Pentium 4 1.4GHz or AMD Athlon 1400 CPU or faster CPU
- 256 MB DRAM system memory
- 60 MB available HDD space for driver installation package
- CD-ROM drive (or DVD-ROM drive) for software installation
- High-quality headphones or powered analog speakers to enjoy the ultra-high fidelity sound of the card
Functionality
1. USB DAC (Digital-to-Analog Converter)
Clear, detailed, life-like sound for your digital music collection in PC/NB, with all the connections (XLR, RCA) you need for end devices.
Steps:
- Connect PC/NB with a USB cable
- Need to install driver in your PC/NB to work
- Select "USB" in front panel as the input source
![graph TD A["HP GAIN R.L AUX IN TOSLINK COAXIAL"] --> B["Digital Input"] C["Mini-USB B-A type connector"] --> D["Computer"] E["Laptop"] --> F["Microcontroller"] G["Link"] --> H["Switch"] I["Link"] --> J["Switch"] K["Link"] --> L["Switch"]](/content/2026/06/1341867/images/150046709b2f04c967c694babe975c7deea292d3d26a69a63941700822992db8.jpg)
Desktop PC Notebook PC
2. Stand alone DAC
With S/PDIF in and input select, it also serves as an independent DAC which connects with digital inputs such as CD audio source and then plays to the end devices.
Steps:
- Connect with other audio resource with S/PDIF input (by Coaxial/Optical cable)
- Select COA (coaxial input) or TOS (optical input) in the front panel as the input source

3. Headphone amplifier
Grants 100% performance of ALL hi-end headphones, even with impedance up to 600ohms, providing extra dynamics and sound details.
Steps:
- Connect with high-quality headphones/headsets
Front Panel
![graph LR A["ASUS"] --> B["POWER INPUT"] B --> C["USB COA TOS AUX BIT PERFECT"] C --> D["Headphone Gain"] D --> E["1"] D --> F["2"] D --> G["3"] D --> H["4"] D --> I["5"] D --> J["6"] D --> K["7"]](/content/2026/06/1341867/images/201100ba999cdfdcfb961b2ef2a81997ea353b72ef05c8d0cd00db9b54a7f24a.jpg)
1. Power On/Off
Press to turn on and again to turn off.
2. Input selection
Press to select audio input source: USB, Toslink, Coaxial, or AUX audio input.
3. Input selection/Bit perfect indicator
The corresponding LED will light up to show which audio source has been selected.
4. Speaker volume control
The volume control adjusts the output level of unbalanced RCA output.
5. Headphone volume control
The volume control adjusts the output levels of the headphone jack.
6. Headphone Gain indicator
The LED will light up based on the selected headphone gain setting.
7. Headphone output
Connect your high-quality headphones/headsets with 6.3 mm connector. Use a 6.3 mm/3.5 mm connector if your headphones/headsets have 3.5 mm ports.
Rear Panel
![graph TD A["HP GAIN RL AUX IN TOSLINK COAXIAL"] --> B["1"] A --> C["2"] A --> D["3"] A --> E["4"] A --> F["5"] A --> G["6"] A --> H["7"] I["DIGITAL INPUT"] --> J["4"] I --> K["5"] I --> L["6"] I --> M["7"]](/content/2026/06/1341867/images/b155ec613da3a4bef41e9d233698fd7a1808161e7674feb27921f74fd3a6490e.jpg)
1. Headphone Gain Selection
Toggle the switch to change between low or high headphone gain settings.

NOTE: If you have a low impedance headset/headphone, please do not switch to high gain setting. When switching between high and low gain settings, please remove the headphone/headset connected before proceeding.
2. Unbalanced RCA Output (line-out)
Conventional stereo outputs for connection to the line-level phono/RCA inputs of a speaker.
3. Aux In
Connect iDevices such as iPhone, iPod, or iPad into this port.
4. Coaxial S/PDIF Input
Connect your digital source, such as CD/DVD players or computer with S/PDIF output, to digital input. Use either S/PDIF coaxial or Toslink optical type, each being of equal quality.
5. Toslink Optical Input
This port is for Toslink Optical Input.

NOTE: This unit only accepts two-channel LPCM digital audio (e.g. Dolby Digital 2.0). You cannot connect a Dolby Digital 5.1 or a DTS signal as they will not be recognized. If you wish to connect a DVD or similar device, please ensure that the sound output of your player is set to two-channel PCM.
6. USB port
Connect a PC via a Type B to Type A USB lead.

NOTE: You need to install the device driver that enables the Xonar Essence STU to work with Windows operating system.
7. Power port (AC in)
Plug the supplied power adapter into the Xonar Essence STU once you have completed all connections.
Hardware Introduction
- USB Audio processor: C-Media CMI6631A (for USB input)
- S/PDIF receiver: TI PCM9211 (for digital input)
- DAC: TI PCM1792A
- Swappable Op-amps: LME49720 x2
- Swappable Op-amps: LM4562 x1
- Swappable Op-amps: OPA2132 x1
- Film Cap (red ones): WIMA FKP2
- Op-amps: LM4562 (for Speaker out)
- Headphone Amplifier: TPA6120A2 (for Headphone out)
Connections
Input
1. NB/PC-USB connections

NOTE: Do not turn on the machine until all connections have been made.
![graph TD A["HP GAIN R.1.AUX IN TOSLINK COAXAL"] --> B["Digital INPUT"] C["Mini-USB B-A type connector"] --> D["Desktop PC Notebook PC"] B --> E["PC IN"] D --> F["Desktop PC Notebook PC"]](/content/2026/06/1341867/images/c0e290f9c17deb56d6abd8f3db8b159e345439e400223d3a274701e75f29c435.jpg)
(1) Connect a USB 'B-A' type lead (as illustrated at left) from the Xonar Essence STU's USB input to one of the USB ports on the PC/NB. (2) Turn on the Xonar Essence STU using the front panel On/Off switch and make sure that the USB input is selected (USB LED lit). (3) Install the device driver that enables the Xonar Essence STU to work with Windows operating system.

NOTES:
- The PC's previous audio output device should now be temporarily disabled and the Xonar Essence STU becomes the default audio playback device for the PC/NB. This can be confirmed in the Control Panel's Sounds, Speech and Audio Devices properties window under the Volume tab.
- If you wish to disconnect your Xonar Essence STU and return to using your previous soundcard, etc., simply disconnect it or switch off the power on the front panel. If the PC fails to disable the Xonar Essence STU and automatically re-enable your default soundcard, you can manually disable the Xonar Essence STU in the hardware device manager. To do this, navigate to the Device Manager (click Start — Control Panel — (Vista: Performance and Maintenance —) System — Hardware— Device Manager in Windows XP). Scroll down the device manager window and expand the heading Sound, Video and Game Controllers to display a list of the connected devices. Click on this description to highlight in blue and then click on the Disable icon at the top of the window. A warning message will appear: “Disabling this device will cause it to stop functioning. Do you really want to disable it?” Click Yes to disable the Xonar Essence STU. The previous audio playback device will now be re-instated by Windows.
2. Digital audio input connections
![graph TD A["AV Receiver/Amplifier"] --> B["TOSLINK audio cable"] A --> C["Coaxial audio connector (COA)"] A --> D["CD/DVD Player"] B --> E["Coaxial audio connector (COA)"] C --> F["Coaxial audio connector (COA)"] D --> G["Coaxial audio connector (COA)"]](/content/2026/06/1341867/images/db4343e6579ac4a2738d5e8d31f27ca0c026534571082593ba7ecf1a1834d8bb.jpg)
(1) Connect your digital source (ex. CD/DVD players or some PC/NB with SPDIF output) to Digital Input. Either S/P DIF Coaxial or Toslink optical types can be used, each being of equal quality.

NOTE: Both Coaxial and Toslink Inputs can be used to connect and run equipment at the same time.
Output
1. With Amplifier and Passive Speaker System
![graph TD A["HD Gain"] --> B["AUX IN TOSINK COAXM"] B --> C["Digital Input"] C --> D["Unbalanced Input"] D --> E["L"] D --> F["R"]](/content/2026/06/1341867/images/fd62f03e5ed0f90f29232d96240c8a5e94f247a94d7d6c20bacdbb60cb6e031b.jpg)
Amplifier
(1) Connect the unbalanced input of an amplifier to the unbalanced (RCA/Phono) output of the Xonar Essence STU. (2) Connect the amplifier to a Passive Speaker System.
2. With Active Speaker directly

(1) Connect Xonar Essence STU with a set of active speakers directly.
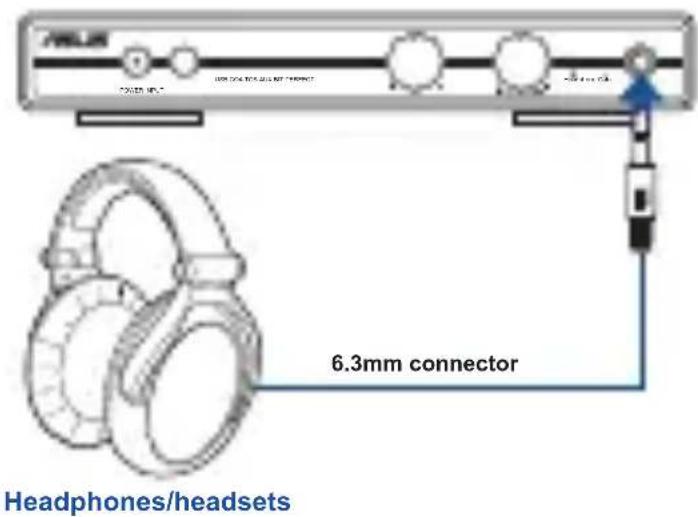
3. With Headphone/Headset

Headphones/headsets
(1) Connect Xonar Essence STU with high-quality headphones/headsets directly.
Specifications
| Items Description | |
| Audio Performance | |
| Output Signal-to-Noise Ratio(A-Weighted): | Line Out: 120dBHeadphone: 117dB |
| Output Total Harmonic Distortion + Noise at 1kHz@-3dB (A-Weighted): | Line Out: -108dBHeadphone: -101dB |
| Output Full-Scale Voltage | Line Out: 2VrmsHeadphone: 7Vrms |
| Frequency Response (-3dB, 24-bit/192kHz output): | <10Hz to 48kHz |
| Bus Compatibility | |
| USB USB 2.0 High speed | |
| S/PDIF IEC 61937 | |
| Main Chipset | |
| Audio Processor C-Media CM6631A | |
| S/PDFI Receiver PCM9211 | |
| D-A Converter for Analog Inputs TI PCM1792A | |
| OP Amp | |
| Balanced / Un-balanced I/V LME49720 | |
| Balanced / Un-balanced LFP LM4562 | |
| Headphone TPA6120A2 | |
| Output impedance | |
| Line out 100 ohm | |
| Headphone out 10 ohm | |
| Clock | |
| Crystal clock 12MHz | |
| Oscillator 45.1584MHz (for 44.1KHz sample rate) | |
continued on the next page
Specifications
| Sample Rate and Resolution | |
| Analog Playback Sample Rate and Resolution | 44.1K/48K/88.2K/96K/176.4K/192KHz @ 16/24bit |
| Power consumption (Max) 12W I/O Ports | |
| Output Jack: | Line Out (Dual RCA) |
| 6.3mm Jack headphone output | |
| Metal with plated gold, black housing | |
| Input Jack: | USB jack |
| Coaxial / Toslink jack | |
| AUX in phone jack | |
| Metal with plated gold, black housing | |
| Power Input Jack: DC in 12V | |
| Volume controller | Balanced Output: Taper A Potentiometer |
| Headphone Output: Taper A Potentiometer | |
| Power input range AC 90~264V | |
| LED Indicator | |
| One color LED ∅3mm Lamp LED White color | |
| Button | |
| Push Button 2-pin Tact switch | |
| Accessories | |
| Accessories | Power cord x1 |
| Power adaptor x1 | |
| USB cable x1 | |
| Product Stand x1 | |
| 6.3mm to 3.5mm adaptor x1 | |
| User manual x1 | |
| Installation driver CD x1 | |
* Specifications are subject to change without notice.
- COPYRIGHT © 2015 ASUSTEK COMPUTER INC. ALL RIGHTS RESERVED
- CONTENTS
- INTRODUCTION
- PACKAGE CONTENTS
- SAFETY INFORMATION
- DRIVER INSTALLATION
- FUNCTIONALITY
- FRONT PANEL
- REAR PANEL
- HARDWARE INTRODUCTION
- CONNECTIONS
- OUTPUT
- SPECIFICATIONS
- NOTES
- SYSTEM REQUIREMENTS
- USB DAC (DIGITAL-TO-ANALOG CONVERTER)
- STEPS
- STAND ALONE DAC
- HEADPHONE AMPLIFIER
- POWER ON/OFF
- INPUT SELECTION
- INPUT SELECTION/BIT PERFECT INDICATOR
- SPEAKER VOLUME CONTROL
- HEADPHONE VOLUME CONTROL
- HEADPHONE GAIN INDICATOR
- HEADPHONE OUTPUT
- HEADPHONE GAIN SELECTION
- UNBALANCED RCA OUTPUT (LINE-OUT)
- AUX IN
- COAXIAL S/PDIF INPUT
- TOSLINK OPTICAL INPUT
- USB PORT
- POWER PORT (AC IN)
- INPUT
- NB/PC-USB CONNECTIONS
- DIGITAL AUDIO INPUT CONNECTIONS
- WITH AMPLIFIER AND PASSIVE SPEAKER SYSTEM
- WITH ACTIVE SPEAKER DIRECTLY
- WITH HEADPHONE/HEADSET
Brand : ASUS
Model : Xonar Essence STU
Category : Hi-Fi System