
W543BX1GB - Washing machine NEFF - Free user manual and instructions
Find the device manual for free W543BX1GB NEFF in PDF.


| Product Type | Freestanding Washing Machine |
| Brand | Neff |
| Model | W543BX1GB |
| Capacity (kg) | 8 |
| Maximum Spin Speed (rpm) | 1400 |
| Energy Class | A+++ |
| Dimensions (H x W x D) (cm) | 84.5 x 60 x 65 |
| Weight (kg) | 75 |
| Power Supply | 230 V / 10 A / 2200 W |
| Water Consumption per Cycle (liters) | 50 |
| Noise Level Wash / Spin (dB) | 55 / 75 |
| Programs | Cotton, Synthetics, Delicates, Wool, Quick 15, etc. |
| Special Features | AquaStop, VarioPerfect, EcoEfficient, Child Lock |
| Dispenser System | Three-compartment detergent drawer |
| Drum Type | Stainless steel, anti-corrosion |
| Door Hinge | Left (user reversible) |
| Control Type | Electronic with LED display |
| Maintenance | Clean filter monthly; clean detergent drawer regularly; descale as needed |
| Safety | Child lock, overflow protection, anti-flood system |
| Spare Parts & Repairability | Available through Neff service centers; typical parts: drum bearing, pump, belt |
| Manufacturer | Neff (part of BSH Group) |
| Country of Origin | Germany |
Frequently Asked Questions - W543BX1GB NEFF
User questions about W543BX1GB NEFF
0 question about this device. Answer the ones you know or ask your own.
Ask a new question about this device
Download the instructions for your Washing machine in PDF format for free! Find your manual W543BX1GB - NEFF and take your electronic device back in hand. On this page are published all the documents necessary for the use of your device. W543BX1GB by NEFF.
USER MANUAL W543BX1GB NEFF

Washing machine
User manual and installation instructions
W543BX1GB
Further information and explanations are available online:

Table of contents
1 Safety 4
1.1 General information...... 4 1.2 Intended use.... 4 1.3 Restriction on user group...... 4 1.4 Safe installation 5 1.5 Safe use 7 1.6 Safe cleaning and maintenance.... 9
2 Preventing material damage ..... 10
3 Environmental protection and saving energy.... 11
3.1 Disposing of packaging ..... 11 3.2 Save energy and conserve resources.... 11 3.3 Energy saving mode 11
4 Installation and connection..... 12
4.1 Unpacking the appliance ..... 12 4.2 Contents of package...... 12 4.3 Requirements for the installation location 12 4.4 Removing the transit bolts ..... 13 4.5 Tools for assembly 15 4.6 Installing the appliance ..... 15 4.7 Connecting the appliance ..... 20 4.8 Aligning the appliance...... 21 4.9 Connecting the appliance to the electricity supply...... 21
5 Familiarising yourself with your appliance.... 22
5.1 Appliance 22 5.2 Detergent drawer.... 22 5.3 Control panel.... 23
6 Before using for the first time ... 24
6.1 Starting an empty washing cycle 24
7 Display 25
8 Buttons 27
9 Programmes 28
10 Accessories.... 31
11 Laundry.... 31
11.1 Preparing the laundry...... 31
12 Detergents and care products 32
13 Basic operation ...... 32
13.1 Switching on the appliance .... 32 13.2 Setting a programme .... 32 13.3 Adjusting the programme settings 32
13.4 Loading laundry.... 32
13.5 Inserting the measuring aid for liquid detergent 32
13.6 Use the measuring aid for liquid detergent 33
13.7 Adding detergent and care product 33
13.8 Starting the programme ..... 34
13.9 Changing the activated "Ready in" time 34
13.10 Soaking laundry 34
13.11 Adding laundry 34
13.12 Cancelling the programme 34
13.13 Resuming the programme when the programme status is Rinse Hold .... 35
13.14 Unloading the laundry ...... 35 13.15 Switching off the appliance.... 35
14 Childproof lock.... 35
14.1 Activating the childproof lock.... 35
14.2 Deactivating the childproof lock.... 35
15 Basic settings.... 36
15.1 Overview of the basic settings.... 36
15.2 Changing the basic settings.... 37
16 Cleaning and servicing...... 37
16.1 Cleaning the drum.... 37
16.2 Cleaning the detergent drawer.... 37
16.3 Cleaning the drain pump...... 38
17 Troubleshooting...... 42
17.1 Emergency release 51
18 Transportation, storage and disposal 51
18.1 Removing the appliance ..... 51 18.2 Inserting the transit bolts...... 51 18.3 Using the appliance again ..... 51 18.4 Disposing of old appliance .... 52
19 Customer Service.... 52
19.1 Product number (E-Nr.) and production number (FD)...... 52
19.2 AQUA-STOP guarantee ..... 53
20 Consumption values...... 54
21 Technical data 54

1 Safety
Observe the following safety instructions.
1.1 General information

- Read this instruction manual carefully.
- Keep the instruction manual and the product information safe for future reference or for the next owner. Do not connect the appliance if it has been damaged in transit.
1.2 Intended use
Only use this appliance:
For washing machine-washable fabrics and hand-washable wool in accordance with the care label. With tap water and commercially available detergents and care products suitable for washing machines. In private households and in enclosed spaces in a domestic environment. Up to an altitude of max. 4000 m above sea level.
1.3 Restriction on user group
This appliance may be used by children aged 8 or over and by people who have reduced physical, sensory or mental abilities or inadequate experience and/or knowledge, provided that they are supervised or have been instructed on how to use the appliance safely and have understood the resulting dangers.
Do not let children play with the appliance.
Cleaning and user maintenance must not be performed by children unless they are being supervised.
Keep children under the age of 3 years and pets away from the appliance.
1.4 Safe installation
Take note of the safety instructions when installing the appliance.
WARNING – Risk of electric shock!
Incorrect installation is dangerous.
- Connect and operate the appliance only in accordance with the specifications on the rating plate.
- Connect the appliance to a power supply with alternating current only via a properly installed socket with earthing. The protective conductor system of the domestic electrical installation must be properly installed. The installation must have a sufficiently large cross section.
- When using a residual current circuit breaker, only use a type with the 📋 mark. Never equip the appliance with an external switching device, e.g. a timer or remote control.
- When the appliance is installed, the mains plug of the power cord must be freely accessible. If free access is not possible, an all-pole isolating switch must be installed in the permanent electrical installation according to the installation regulations.
- When installing the appliance, check that the power cable is not trapped or damaged. If the insulation of the power cord is damaged, this is dangerous. Never let the power cord come into contact with hot appliance parts or heat sources. Never let the power cord come into contact with sharp points or edges. Never kink, crush or modify the power cord.
WARNING – Risk of fire!
It is dangerous to use an extended power cord and non-approved adapters.
Do not use extension cables or multiple socket strips. Only use adapters and power cords approved by the manufacturer.
If the power cord is too short and a longer one is not available, please contact an electrician to have the domestic installation adapted.
WARNING – Risk of injury!
The high weight of the appliance may result in injury when lifted.
Do not lift the appliance on your own.
If this appliance is not correctly installed in a washer-dryer stack, the installed appliance may fall.
Only stack the dryer on a washing machine using the connection kit from the dryer manufacturer. No other installation method is permitted.
Do not install the appliance in a washer-dryer stack if the dryer manufacturer does not offer a suitable connection kit.
Do not install appliances from different manufacturers and with varying depths and widths in a washer-dryer stack.
- Do not install a washer-dryer stack on a platform; the appliances may tip over.
⚠ WARNING – Risk of suffocation!
Children may put packaging material over their heads or wrap themselves up in it and suffocate.
- Keep packaging material away from children.
▶ Do not let children play with packaging material.
⚠️ CAUTION – Risk of injury!
The appliance may vibrate or move when in use.
- Place the appliance on a clean, even, solid surface.
- Align the appliance using the appliance feet and a spirit level. If hoses and power cords have been laid incorrectly, this causes a tripping hazard.
- Lay hoses and power cords in such a way that there is no risk of tripping.
If the appliance is moved by holding onto protruding components, such as the appliance door, the parts may break off.
- Do not move the appliance by holding onto protruding parts.
⚠️ CAUTION – Risk of cutting!
Touching sharp edges on the appliance may lead to cuts.
▶ Do not touch the sharp edges on the appliance. - Wear protective gloves when installing and transporting the appliance.
1.5 Safe use
⚠ WARNING – Risk of electric shock!
If the appliance or the power cord is damaged, this is dangerous.
▶ Never operate a damaged appliance. ▶ Never pull on the power cord to unplug the appliance. Always unplug the appliance at the mains. - If the appliance or the power cord is damaged, immediately unplug the power cord or switch off the fuse in the fuse box and turn off the water tap.
▶ Call customer services. → Page 52
An ingress of moisture can cause an electric shock.
▶ Only use the appliance in enclosed spaces. ▶ Never expose the appliance to intense heat or humidity. - Do not use steam- or high-pressure cleaners, hoses or sprays to clean the appliance.
⚠ WARNING – Risk of harm to health!
Children can lock themselves in the appliance, thereby putting their lives at risk.
- Do not install the appliance behind a door as this may obstruct the appliance door or prevent it from opening.
- With redundant appliances, unplug the power cord. Then cut through the cord and damage the lock on the appliance door beyond repair so that the appliance door will no longer close.
⚠ WARNING – Risk of suffocation!
Children may breathe in or swallow small parts, causing them to suffocate.
- Keep small parts away from children. ▶ Do not let children play with small parts.
⚠ WARNING – Risk of poisoning!
Detergents and care products may result in poisoning if consumed.
▶ If accidentally swallowed, seek medical advice. - Keep detergents and care products out of the reach of children.
⚠ WARNING – Risk of explosion!
Laundry that has been pretreated with cleaning agents that contain solvents may cause an explosion in the appliance.
- Rinse pretreated laundry thoroughly with water before washing.
⚠️ CAUTION – Risk of injury!
The covering plate may break if you stand on or climb onto the appliance.
▶ Do not stand on or climb onto the appliance.
The appliance may tip over if you sit on or lean against the open door.
▶ Do not sit on or lean against the appliance door. ▶ Do not place any objects on the appliance door.
Reaching into the drum while it is still turning may cause hand injuries.
- Wait for the drum to come to a complete stop before reaching inside.
⚠️ CAUTION – Risk of scalding!
When you wash at high temperatures, the detergent solution gets hot.
▶ Do not touch the hot detergent solution.
⚠️ CAUTION – Risk of chemical burns!
If the detergent drawer is opened, detergent and care products may spray out from the appliance. Contact with eyes or skin may cause irritation.
- Rinse eyes and/or skin thoroughly with clean water if they come into contact with detergents or care products. ▶ If accidentally swallowed, seek medical advice.
- Keep detergents and care products out of the reach of children.
1.6 Safe cleaning and maintenance
Take note of the safety instructions when cleaning and performing maintenance work on the appliance.
⚠ WARNING – Risk of electric shock!
Incorrect repairs are dangerous.
▶ Repairs to the appliance should only be carried out by trained specialist staff. ▶ Only use genuine spare parts when repairing the appliance. If the power cord of this appliance is damaged, it must be replaced by the manufacturer, the manufacturer's Customer Service or a similarly qualified person in order to prevent any risk. An ingress of moisture can cause an electric shock.
- Do not use steam- or high-pressure cleaners, hoses or sprays to clean the appliance.
⚠ WARNING – Risk of injury!
The use of non-original spare parts and non-original accessories is dangerous.
- Only use the manufacturer's original spare parts and original accessories.
⚠ WARNING – Risk of poisoning!
Poisonous fumes may be given off if you use cleaning agents that contain solvents.
- Do not use cleaning agents that contain solvents.
2 Preventing material damage
Follow these instructions to avoid material damage and damage to the appliance.
ATTENTION!
The functionality of the appliance may be impaired if you use the wrong quantity of fabric softener, detergent, care product or cleaning agent.
- Follow the dosage recommendations from the manufacturer.
Exceeding the maximum load capacity impairs the function of the appliance.
- Observe the maximum load capacity for each programme and do not exceed it.
→ "Programmes", Page 28
The appliance is secured for transportation using transit bolts. Transit bolts which have not been removed may result in material damage and damage to the appliance.
- Before starting up the appliance, remove the transit bolts completely and keep them in a safe place. - Before transport, fit the transit bolts fully in order to prevent damage in transit.
Material damage may be caused if the water inlet hose is connected incorrectly.
- Tighten the screw connections on the water inlet until they are hand-tight.
- Ideally, connect the water inlet hose directly to the water tap, without any additional connecting elements such as adapters, extensions, valves or similar.
- Make sure that the valve housing for the water inlet hose does not come into contact with its surroundings and is not subjected to any external forces.
- Ensure that the inner diameter of the water tap is at least 17 mm. ▶ Make sure that the length of the thread on the connection to the water tap is at least 10 mm.
If the water pressure is too high or too low, the appliance may not be able to operate properly.
- Ensure that the water pressure in the water supply system is at least 100 kPa (1 bar) and max. 1000 kPa (10 bar).
- If the water pressure exceeds the maximum value specified, a pressure-reducing valve must be installed between the drinking water connection and the hose set of the appliance.
- Do not connect the appliance to the mixer tap of an unpressurised hot-water boiler.
Modified or damaged water hoses may result in material damage and damage to the appliance.
▶ Never kink, crush, modify or cut through water hoses. - Only use the water hoses supplied with the appliance or genuine spare hoses. ▶ Never re-use water hoses that have been used before.
Operating the appliance using water that is dirty or too hot may lead to material damage and damage to the appliance.
- Only operate the appliance with cold mains water.
Unsuitable cleaning products may damage the surfaces of the appliance.
- Do not use harsh or abrasive detergents.
- Do not use cleaning products with a high alcohol content.
- Do not use hard scouring pads or cleaning sponges.
- Clean the appliance with nothing but water and a soft, damp cloth.
- Remove all detergent residue, spray residue or other residues immediately if they come into contact with the appliance.
3 Environmental protection and saving energy
3.1 Disposing of packaging
The packaging materials are environmentally compatible and can be recycled.
- Sort the individual components by type and dispose of them separately.
3.2 Save energy and conserve resources
If you follow these instructions, your appliance will use less electricity and less water.
Choose programmes with low temperatures and longer wash times and use maximum load capacity.
Energy consumption and water consumption is most efficient.
detergent based on the laundry's degree of soiling.
For light to normal soiling, a smaller amount of detergent is sufficient. Observe the dosage recommendation from the detergent manufacturer.
Reduce the washing temperature for lightly and normally soiled laundry.
At lower temperatures, the appliance consumes less energy. For light to normal soiling, lower temperatures than indicated on the care label are also sufficient.
Set the maximum spin speed if you want to dry the laundry in the tumble dryer afterwards.
The drier the laundry, the shorter the programme duration when drying which, in turn, reduces energy consumption. A higher spin speed reduces the residual moisture in the laundry and increases the volume of the spin noise.
Wash the laundry without prewash.
√ Washing with prewash increases the programme duration and increases energy and water consumption.
The appliance has a continuous automatic load adjustment function.
√ Depending on the type of fabric and load capacity, the continuous automatic load adjustment function optimally adjusts the water consumption and programme duration.
3.3 Energy saving mode
If you do not use the appliance for an extended period, it automatically switches to energy-saving mode. Energy-saving mode ends when you use the appliance again.
4 Installation and connection
4.1 Unpacking the appliance
ATTENTION!
Objects remaining in the drum that are not designed for operation with the appliance may cause material damage and damage to the appliance.
- Remove these objects, along with all supplied accessories, from the drum before starting the appliance.
- Remove any packaging and protective covers completely from the appliance. → "Disposing of packaging", Page 11
- Check the appliance for visible damage.
- Open the appliance door. → "Basic operation", Page 32
- Remove any accessories from the drum.
- Close the appliance door.
4.2 Contents of package
After unpacking all parts, check for any damage in transit and completeness of the delivery.
ATTENTION!
If the appliance is operated with incomplete or defective accessories, the appliance may not be able to operate properly, or this may result in material damage or damage to the appliance.
- Do not operate the appliance with incomplete or defective accessories.
- Replace the accessories in question before operating the appliance. → "Accessories", Page 31
Note: The appliance has been tested at the factory to check it is in working order. As a result, water stains may remain in the appliance. These marks will disappear after the first wash cycle.
The delivery consists of the following:
■ Washing machine ■ Accompanying documents ■ Transit bolts → "Removing the transit bolts", Page 13 ■ Cover caps ■ Elbow for securing the water outlet hose ■ Parts required for installation → "Installing the appliance", Page 15
4.3 Requirements for the installation location
WARNING
Risk of electric shock!
The appliance contains live parts. Touching live parts is dangerous.
- Do not operate the appliance without a cover cap.
WARNING
Risk of injury!
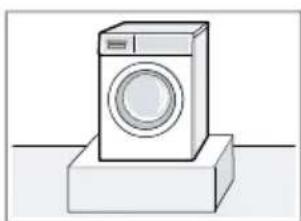
When using the appliance on a base, the appliance may tip over.
▶ Always secure the feet of the appliance to a base using the manufacturer's fixing brackets → Page 31 before using the appliance for the first time.
ATTENTION!
If residual water in the appliance freezes, this may cause damage to the appliance.
- Do not install or operate this appliance anywhere that is liable to experience frost or outdoors.
If the appliance is tilted at an angle greater than 40° , residual water may leak out of the appliance and cause material damage.
▶ Tilt the appliance carefully. - Transport the appliance in an up-right position.
Installation location Requirements
Base Secure the appliance with fixing brackets → Page 31.
Wooden joist floor
Place the appliance on a water-resistant wooden board (minimum thickness of 30 mm) which is screwed tightly to the floor.
Installation location Requirements

Place the appliance on a water-resistant wooden board (minimum thickness of 30 mm) which is screwed tightly to the floor.
Installation location requirements
Kitchen unit: Only install the

appliance underneath a continuous worktop that is securely connected to adjacent cabinets. Required niche width: 60 cm.
Note: The use of sliding plates (see "Accessories", Page 31) makes it easier to slide the appliance into the recess. Moisten the sliding plates with a mixture of water and washing-up liquid before pushing the appliance in. Do not use grease or oil for this.
Against a wall: Do not trap the

hoses and power cord between the wall and the appliance.
4.4 Removing the transit bolts
The appliance is secured for transportation using transit bolts on the rear of the appliance.
Note: Keep the transit bolt screws and the sleeves in a safe place for future transport.
See "Inserting the transit bolts",
Page 51
en Installation and connection
- Pull the hoses out of the holders.

- Unscrew ① and remove ⓐ all the screws for the 4 transit bolts with a WAF 13 wrench.

- Remove the power cable from the holder.

- Remove the 4 sleeves.

- Put on the 4 cover caps.

- Push the 4 cover caps downwards.

Note: To install the transport locks to transport the appliance, perform these steps again in the reverse order.
4.5 Tools for assembly
You require the following tools for the assembly:
■ Spirit level ■ Wrench, WAF 13 ■ Wrench, WAF 17 ■ Forstner 35 mm drill bit ■ 2 mm twist drill - Screwdriver
4.6 Installing the appliance
Preparing the appliance
- To make it easier to slide in the appliance, turn in the appliance's rear feet until the appliance is on the runners.

- Measure the built-in niche.
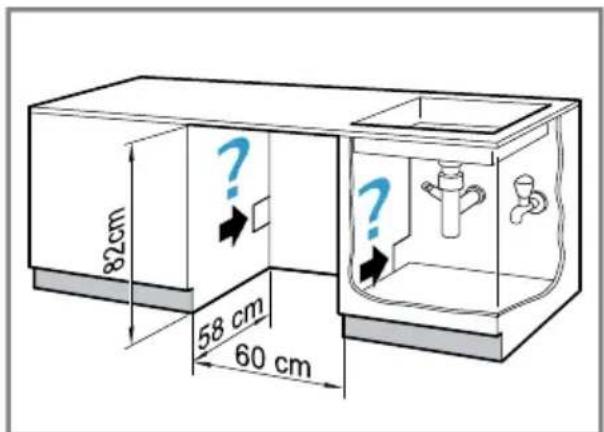
- Lay the power cord as well as the water inlet and water drain hose.
- Slide the appliance in and, at the same time, pull through the power cord, water inlet and water drain hose.

- Connect the water inlet hose. → "Connecting the water inlet hose", Page 20
- Connect the water drain hose. → "Water outlet connection types", Page 20
- Unscrew the rear appliance feet.

Installation and connection
- Align the appliance using a spirit level.
→ "Aligning the appliance", Page 21

Installing the cabinet door
Note: Metal elements may impair the function of the control panel.
Do not use any cabinet doors with metal elements in the area of the control panel.
- Hold the cabinet door at the required height on the appliance and mark the upper edge of the appliance on the inside of the door.

Mark on the top edge of the appliance at the left-hand stop

Mark on the top edge of the appliance at the right-hand stop
- Using the mark for the top edge of the appliance on the inside of the door as a basis, mark the drill holes as follows.
![63.2 - 71.2, 19.9, 33.8, max. 9 kg, 3.4, 52.3, 59.2 - 59.5 [cm], 2.1, 2.6, 2.6, 2.6, 2.6, 2.6, 2.6, 59.2 - 59.5](/content/2026/06/1340033/images/8bd7f03ace45c31f144ad54b01b27858b644524afc4315ddd1cb4f7690da7ff9.jpg)
Mark for the holes at the left-hand stop![max. 9 kg, 2.6, 2.6, 2.6, 2.6, 2.1, 52.3, 3.4, 59.2 - 59.5 [cm], 19.9, 33.8, 63.2 - 71.2](/content/2026/06/1340033/images/9b0d0f29510633c6d5db77a2a14b2562db6c1f34e2cd5f88b9bcac46c4257c19.jpg)
Mark for the holes at the right-hand stop
- At the previously marked points, use a Forstner 35 mm drill to drill the holes for the hinges. At the previously marked points, use a 2 mm twist drill to drill holes for the screws.

- Insert the hinges into the holes and screw them in.

- Screw on the counter plates for the magnetic catches.
Installation and connection
- Insert the hinges into the appliance ① - ②

- Slide in the covering rail ③ and screw it in ④
- Put the magnetic catches on the appliance.

Aligning the cabinet door Vertically aligning the cabinet door

Horizontally aligning the cabinet door
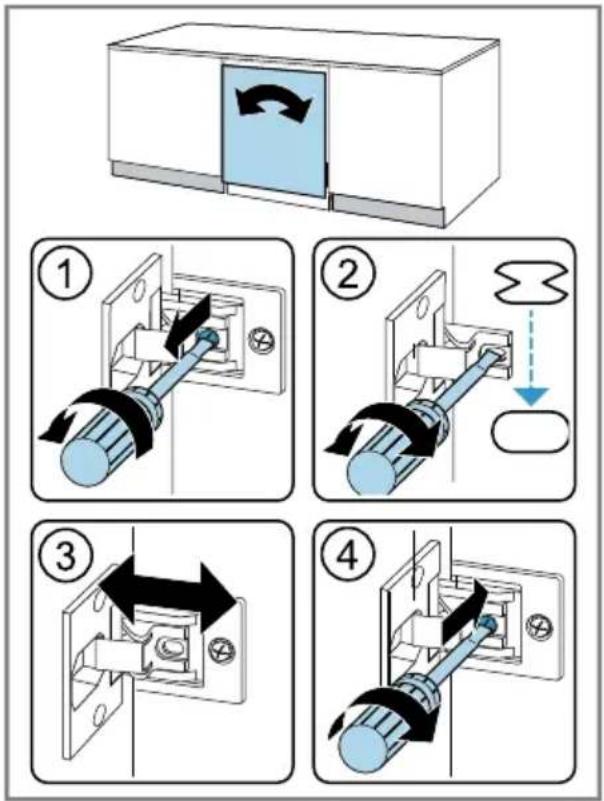
Installing the base panel
- Insert the spacers for the base panel.
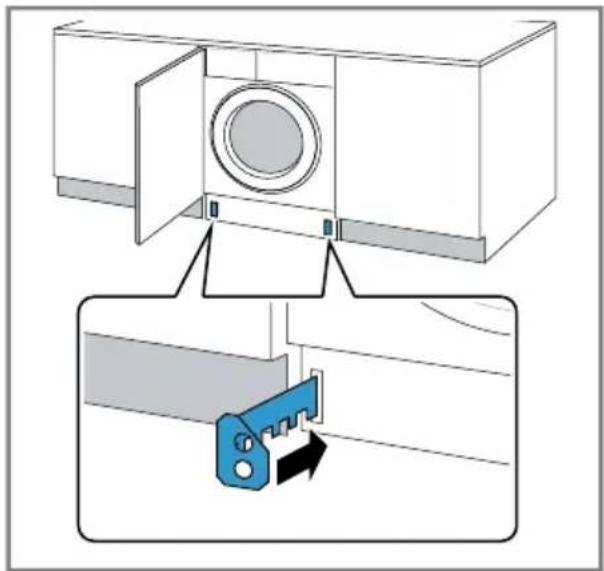
- Measure dimension Z and dimension Y.

- Screw the spacers in as per the dimensions.
![Z-0.2, 19.5, 27.7, Y-0.2, [cm], 59.4 - 59.8](/content/2026/06/1340033/images/47bbb0816f39f70e35c4e02806b9046dc29cd2016c9d2575d7d0903536eb570c.jpg)
- Install the base panel.

Installation and connection
- Connect the appliance to the power supply
→ "Connecting the appliance to the electricity supply", Page 21.

4.7 Connecting the appliance Connecting the water inlet hose
WARNING
Risk of electric shock!
The appliance contains live parts. Touching live parts is dangerous.
- Do not immerse the electrical AquaStop valve in water.
- Connect the water inlet hose to a tap (26.4 mm = 3/4").

- Open the water tap carefully and check that the connection points are tight.
Water outlet connection types
This information is intended to help you to connect this appliance to the water outlet.
ATTENTION!
When draining, the water outlet hose is subject to water pressure and may come loose from the installed connection point.
- Secure the water outlet hose against unintentional loosening.
Note: Observe the draining heights. The maximum draining height is 100 cm.
Siphon Secure the con-

nection point with a (24–40 mm) hose clamp.
Sink Fix and secure

the water outlet hose with an el- bow.
Plastic pipe with rubber sleeve or gully
Fix and secure the water outlet hose with an elbow.

4.8 Aligning the appliance
In order to reduce noise and vibration and to prevent the appliance from moving, align the appliance correctly.
- Loosen the lock nuts using a WAF 17 wrench by turning it in a clockwise direction.

- To align the appliance, turn the appliance feet. Check that the appliance is level using a spirit level.

All appliance feet must stand firmly on the ground.
- Screw the lock nuts tightly against the housing using a WAF 17 wrench.

In doing so, hold the foot tight and do not adjust its height.
4.9 Connecting the appliance to the electricity supply
Note: Your electrical domestic installation for this appliance must comply with the local legal provisions and safety regulations, and should include a residual current circuit-breaker.
- Insert the mains plug of the appliance's power cable in a socket nearby. The connection details of the appliance can be found under Technical data → Page 54.
- Check the mains plug is inserted properly.
5 Familiarising yourself with your appliance
5.1 Appliance
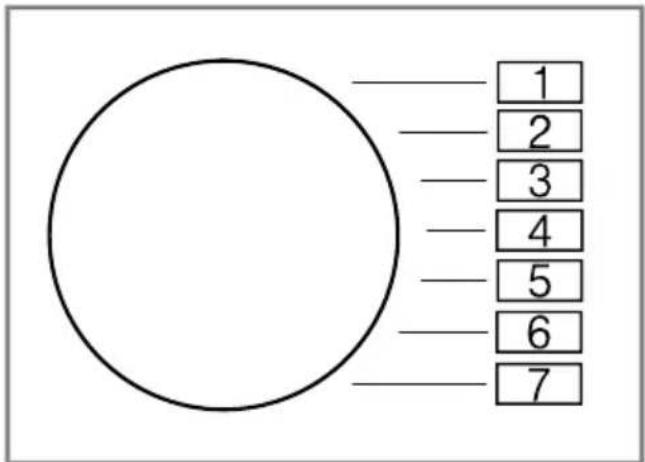
You can find an overview of the parts of your appliance here.
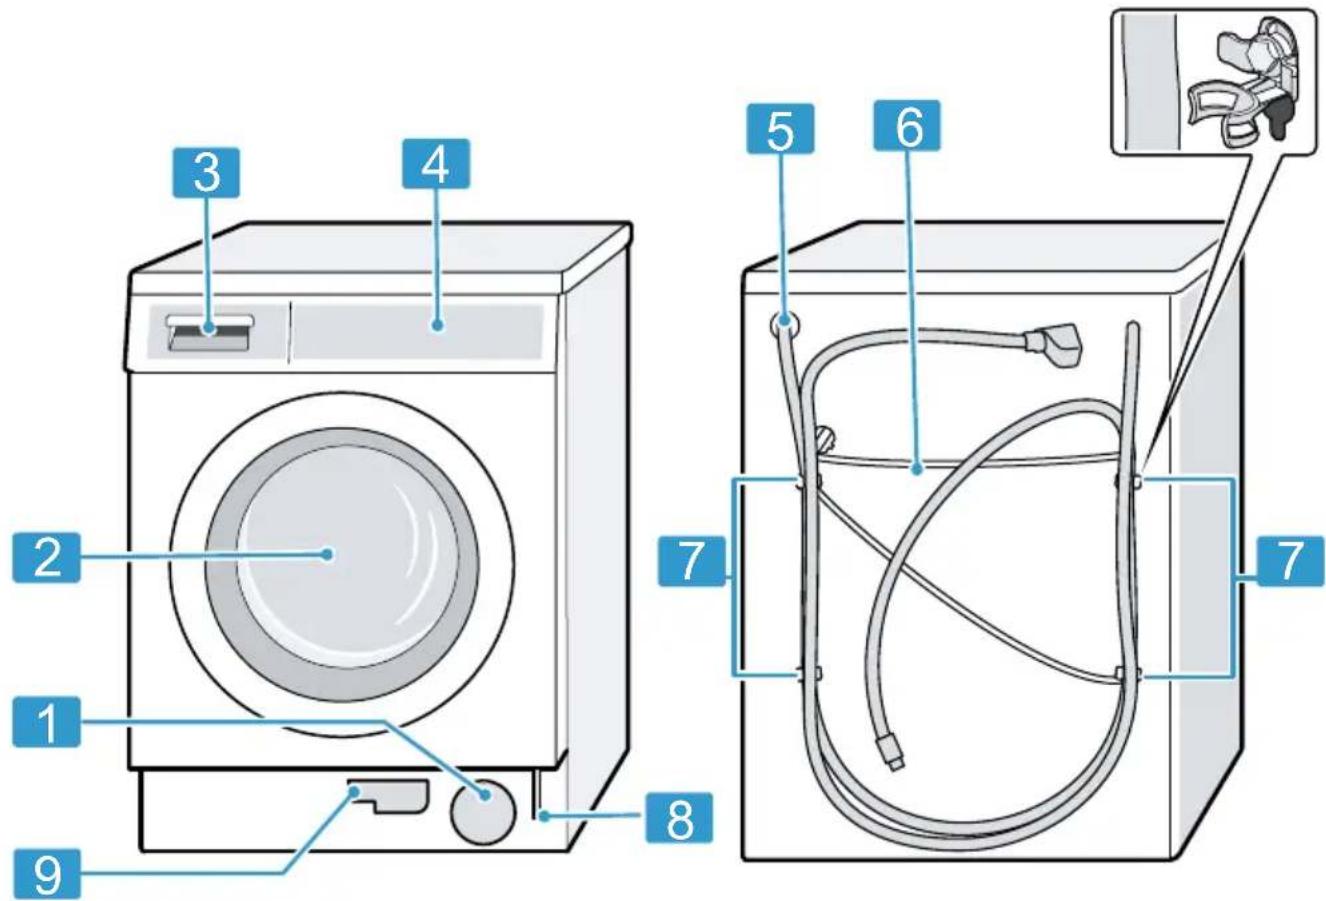
On certain models, specific details such as the colour and shape may differ from those pictured.
| 1 | Maintenance flap for the drain pump → Page 38 |
| 2 | Door |
| 3 | Detergent drawer → Page 22 |
| 4 | Control panel → Page 23 |
| 5 | Water outlet hose → Page 20 |
| 6 | Power cord → Page 21 |
| 7 | Transit bolts → Page 13 |
| 8 | Emergency release → Page 51 |
| 9 | Drain hose → Page 38 |
5.2 Detergent drawer
Note: Observe the manufacturer's instructions on the use and dosage of the detergent and care product and the information in the programme descriptions.
→ "Programmes", Page 28
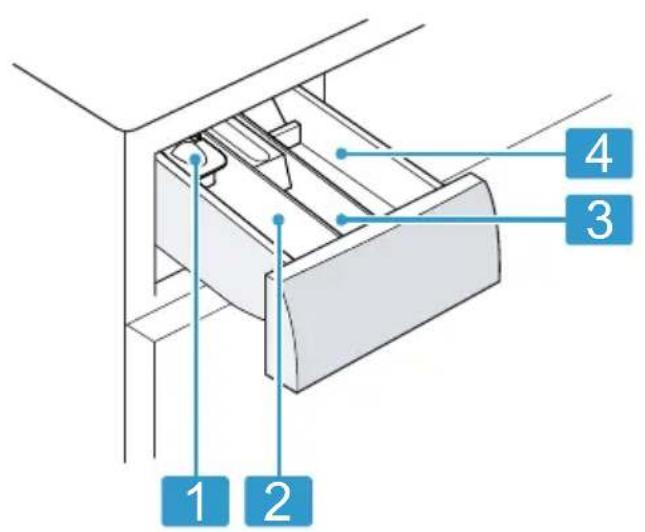
| 1 | Measuring aid for liquid detergent→ "Inserting the measuring aid for liquid detergent", Page 32 |
| 2 | Dispenser II: detergent for the main wash |
| 3 | Compartment ⚙Fabric softener |
| 4 | Compartment I: Detergent for prewash |
5.3 Control panel
You can use the control panel to configure all functions of your appliance and to obtain information about the operating status.

1 Programmes → Page 28 2 Programme selector → Page 32 3 Display → Page 25 4 Buttons → Page 27
6 Before using for the first time
Prepare the appliance for use.
6.1 Starting an empty washing cycle
Your appliance was inspected thoroughly before leaving the factory. To remove any residual water, run the first wash cycle without any laundry.
- Turn the programme selector to Cotton 60°.
- Close the door.
- Pull out the detergent drawer.
- Pour approx. 1 litre of tap water into compartment II.

- Pour washing powder into compartment II.

To prevent foaming, use only half of the amount of detergent recommended by the detergent manufacturer for light soiling. Do not use detergent suitable for woollens or delicates.
- Push in the detergent drawer.
- Press Start/Reload to start the programme.
The display shows the remaining programme duration.
After the programme has ended, the display shows: End.
- Start the first wash cycle or set the programme selector to Off to switch off the appliance.
→ "Basic operation", Page 32
7 Display
The display shows the current settings, options or relevant information.


Display Designation More information
| 0:401 | Programme duration/programme time remaining | Expected programme duration or programme time remaining in hours and minutes. |
| 10h1 | "Ready in" time | → "Buttons", Page 27 |
| 8.01 | Recommended load | The maximum load capacity for the selected programme in kg. |
| - - - - 1400 Spin speed Set spin speed in rpm.→ "Buttons", Page 270= No final spin, only draining-- -: Rinse Hold, no draining | ||
| - Start/Pause Start, cancel or pause■ Lights up: The programme is running and can be cancelled or paused.■ Flashes: The programme can be started or continued. | ||
| ⓧ Wash Programme status | ||
| ⓨ Rinse Programme status | ||
| ◎ Spin Programme status | ||
| - - - Rinse Hold Programme status | ||
| 1 Example | ||
| Display Designation More information | ||
| End End of pro-gramme | Programme status | |
| Childproof lock ■ | lights up: The childproof lock is activated.■ flashes: The childproof lock is activated and the appliance has been operated.→ "Deactivating the childproof lock", Page 35 | |
| ≡∅ | varioSpeed Short wash activated.→ "Buttons", Page 27 | |
| Door ■ Lights up: The door is locked and can-not be opened.■ Flashes: The door is not closed properly.■ Off: The door is unlocked and can be opened. | ||
| Tap ■ No water pressure.■ The water pressure is too low. | ||
| E:35 / -101 | Error Error code, error display, signal. | |
| 1 Example | ||
8 Buttons
The selection of programme settings depends on the programme that is set.
| Button Selection More information | ||
| Start/Reload ■ Start■ Cancel■ Pause | Start, cancel or pause the pro-gramme. | |
| Speed Perfect ■ Activate■ Deactivate | Activate or deactivate a shorter pro-gramme duration.Note: Energy consumption increases.The washing result is not affected by this. | |
| Finished in Up to 24 hours Set the programme end.The programme duration is already in- cluded in the set number of hours.Once the programme has started, the programme duration is displayed. | ||
| Spin Speed - - - - 1400 Adjust the spin speed or activate - - - (Rinse Hold).Set spin speed in rpm.If - - - is selected, the water is not drained at the end of the washing cycle and the spin cycle is deactiv-ated. The laundry remains in the rins-ing water. | ||
| 3 sec. ■ Activate■ Deactivate | → "Childproof lock", Page 35 | |
| Start/Reload Multiple selection | → "Basic settings", Page 36 | |
9 Programmes
Note: The laundry's care labels provide you with additional information on programme selection.
| Programme Description Max. | |
| load(kg) | |
| Cotton Wash hard-wearing items made from cotton, linenor blended fabrics.Also suitable as a short programme for normally soiled laundry when you activate Speed Perfect.Programme setting:Max. 60° °CMax. 1400 rpm | 8.05.0 1 |
| Eco 40-60 Wash items made from cotton, linen or blended fabrics.Note: Fabrics which can be washed from 40 °C up to 60 °C is per the care symbol can be washed together.The washing performance corresponds to the best possible washing performance class according to the legal requirements.For this programme, the washing temperature is automatically adjusted depending on the load size, in order to achieve the best possible energy efficiency with the best possible washing result. You cannot change the washing temperature.Programme setting:Note: The temperature cannot be adjusted in this programme and is set automatically.Max. - °CMax. 1400 rpm | 8.0 |
| Cotton + Wash hard-wearing items made from cotton, linenor blended fabrics.Programme with prewash for heavily soiled laundry.Divide the detergent between the detergent drawer for the prewash and the main wash.→ "Detergent drawer", Page 22Programme setting:Max. 40° °CMax. 1400 rpm | 8.05.0 1 |
1 Speed Perfect activated
| Programme Description Max. | load(kg) |
| Easy-Care Wash items made from synthetic or blended fabrics.Programme setting:Max. 40° °CMax. 1200 rpm | 4.0 |
| Mixed Load Wash items made from cotton, linen, or synthetic or blended fabrics.Suitable for lightly soiled laundry.Programme setting:Max. 40° °CMax. 1400 rpm | 4.0 |
| Delicates/Silk Wash delicate, washable items made from silk, viscose and synthetic fabrics.Use a detergent that is suitable for delicates or silk.Note:Wash especially delicate items or items with hooks, eyelets or clips in a mesh laundry bag.Programme setting:Max. 30° °CMax. 800 rpm | 2.0 |
| Wool Hand- or machine-washable items that are made from wool or contain wool.To prevent the laundry from shrinking, the drum moves the items very gently with long pauses.Use a detergent that is suitable for wool.Programme setting:Max. 30° °CMax. 800 rpm | 2.0 |
| Rinse Rinse and then spin the laundry, and drain the water.Programme setting: Max. 1400 rpm | - |
| Spin/Drain Spin and drain the water.If you only want to drain the water, activate 0. The laundry is not spun.Programme setting: Max. 1400 rpm | - |
| Hygiene Wash hard-wearing items made from cotton, linen or blended fabrics.Suitable for allergy sufferers and for strict hygiene requirements. | 6.5 |
| 1 Speed Perfect activated | |
| Programme Description Max. | load(kg) | |
| Note: Once the set temperature has been reached, it remains constant throughout the entire washing process.Programme setting:Max. 60° °CMax. 1400 rpm | ||
| Shirts Wash non-iron shirts and blouses made from cotton, linen, or synthetic or blended fabrics.Note: Use the Delicates/Silk programme to wash shirts and blouses made from silk or delicate fabrics.Programme setting:Max. 40° °CMax. 800 rpm | 2.0 | |
| Super Quick 15'/30' | Wash items made from cotton, or synthetic or blended fabrics.Short programme for small items of lightly soiled laundry.The programme duration is approx. 30 minutes.If you wish to reduce the programme duration to 15 minutes, activate Speed Perfect. The maximum load is reduced to 2.0 kg.Programme setting:Max. 30° °CMax. 1200 rpm | 4.0 |
| 1 Speed Perfect activated | ||
10 Accessories
Use original accessories. These have been made especially for your appliance.
| Use Order number | ||
| Water inlet hose extension | Extend the water inlet hose for cold water or AquaStop (approx. 2.50 m). | WZ10131 |
| Fixing brackets Improves the stability of the appliance. | Z7080X0 | |
| Liquid detergent insert Measure liquid detergent. | 00605740 | |
| Slide sheets Makes it easier to insert the appliance into the installation recess. | 00661827 | |
| Taller feet Taller feet for installing the appliance under a high worktop. | Z7060X1 | |
11 Laundry
11.1 Preparing the laundry
ATTENTION!
Objects remaining in the laundry may damage the laundry and the drum.
- Remove all items from any pockets in your laundry before using the appliance.
- To protect your appliance and the laundry, prepare the laundry beforehand.
- Empty any pockets
- Brush sand out of all collars and pockets
- Close bed covers and cushion covers
- Close all zips, Velcro fasteners, hooks and eyes
- Tie cloth belts, apron strings, etc. together or use a laundry bag.
- Tie together longer drawstrings, and tie cords with solid end-pieces in hoods or trousers
- Remove curtain hooks and lead strips or use a mesh laundry bag
- Use a mesh laundry bag for small items of laundry, such as children's socks
- Some stubborn or dried-in stains can be removed by washing several times
- Wash large and small items of laundry together
- Do not rub fresh stains but dab them with soapy water
- Separate items of laundry and shake them out, or observe the programme description
12 Detergents and care products
The manufacturer's instructions for use and dosage can be found on the packaging.
Notes
■ Only use liquid detergents that are self-flowing ■ Do not mix different liquid detergents ■ Do not mix detergent and fabric softener ■ Do not use products that have expired or are highly congealed ■ Use dyes sparingly as salt may damage stainless steel ■ Do not use color-bleaching agents in the appliance
13 Basic operation
13.1 Switching on the appliance
Requirement: The appliance has been correctly installed and connected.
→ "Installation and connection", Page 12
- Turn the programme selector to a programme.
Note: The lighting for the drum goes out automatically.
13.2 Setting a programme
- Turn the programme selector and set the required programme. → "Programmes", Page 28
- If required, adjust the programme settings.
→ "Adjusting the programme settings", Page 32
13.3 Adjusting the programme settings
Requirement: A programme has been set.
→ "Setting a programme", Page 32
- Adjust the programme settings. → "Buttons", Page 27
Note: The programme settings are not saved permanently for the programme.
13.4 Loading laundry
Note: To prevent creasing, note the maximum load for the programmes.
→ "Programmes", Page 28
Requirements
■ The laundry is prepared and sorted. → "Laundry", Page 31 ■ The drum is empty.
- Open the door.
- Place the laundry in the drum.
- Close the door. Ensure that there is no laundry trapped in the door.
13.5 Inserting the measuring aid for liquid detergent
If you order the measuring aid as an accessory, you must use the measuring aid.
- Pull out the detergent drawer.
- Press down on the insert and remove the detergent drawer.

- Insert the measuring aid.
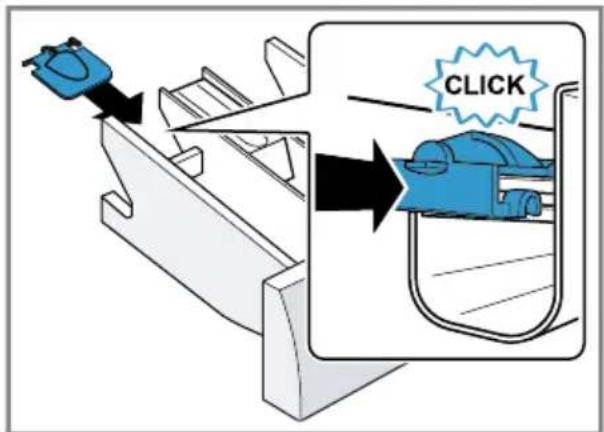
- Insert the detergent drawer.
13.6 Use the measuring aid for liquid detergent
To add liquid detergent, you can use a measuring aid in the detergent drawer.
- Pull out the detergent drawer.
- Slide the measuring aid forwards.

- Fold the measuring aid down and click it into place.

- Push in the detergent drawer.
13.7 Adding detergent and care product
Notes
■ Do not use the measuring aid for liquid detergent for gel detergents, washing powder, or if Prewash or "Ready in" time are activated. ■ Observe the information about detergents and care products → Page 32.
- Pull out the detergent drawer.
- Pour in detergent. → "Detergent drawer", Page 22
- If required, add the care product.
- Push in the detergent drawer.
13.8 Starting the programme
Requirement: A programme is set.
→ "Setting a programme", Page 32
▶ Press Start/Reload. √ The drum rotates and load detection takes place. This can take up to 2 minutes, after which water enters the drum. √ The display shows the programme duration or the "Ready in" time. √ After the programme has ended, the display shows: End.
13.9 Changing the activated "Ready in" time
If you have set and activated a "Ready in" time for a delayed programme start, you can change the "Ready in" time again before the programme starts.
Requirements
■ The programme is set. → "Setting a programme", Page 32 ■ The "Ready in" time is set and activated. → "Buttons", Page 27
- Press Start/Reload.
The activated "Ready in" time is paused.
- Press Finished in repeatedly until the display indicates the desired "Ready in" time.
- Press Start/Reload.
The changed "Ready in" time is activated.
13.10 Soaking laundry
Note: No additional detergent is required. The washing solution is then used for washing.
- Start the programme.
- To pause the programme, after approx. 10 minutes, press Start/Reload.
- To resume the programme, after the desired soaking time, press Start/Reload.
13.11 Adding laundry
After the programme starts, you can remove or add laundry depending on the programme status.
Requirement: A programme has started.
→ "Starting the programme",
Page 34
- Press Start/Reload.
The appliance pauses.
Note: If you want to add laundry, follow the instructions on the display.
→ "Display", Page 26
- Open the door.
- Add or remove laundry.
- Close the door.
- Press Start/Reload.
13.12 Cancelling the programme
- Press Start/Reload.
- Open the appliance door.
The appliance door remains locked for safety reasons if the temperature and water levels are high.
- If the temperature is high, start the Rinse programme.
- If the water level is high, start the Spin programme or select a suitable programme for draining. → "Programmes", Page 28
- Remove the laundry.
→ "Unloading the laundry", Page 35
13.13 Resuming the programme when the programme status is Rinse Hold
Requirements
■ Rinse Stop is activated. → "Buttons", Page 27 ■ The last rinse cycle of the set programme has ended and the laundry is in the rinsing water.
- Set the Spin programme or a programme for draining the water. → "Programmes", Page 28
- Press Start/Reload.
13.14 Unloading the laundry
- Open the door.
- Remove the laundry from the drum.
13.15 Switching off the appliance
- Turn the programme selector to Off.
- Wipe the rubber gasket dry and remove any foreign objects.

- Leave the appliance door and detergent drawer open so that residual water can evaporate.
14 Childproof lock
Secure your appliance against being operated unintentionally using the controls.
14.1 Activating the childproof lock
- Press and hold the two 3 sec. buttons for approx. 3 seconds. The display shows. The controls are locked. The childproof lock remains active even after the appliance has been switched off and in the event of a power failure.
14.2 Deactivating the childproof lock
Requirement: To deactivate the childproof lock, the appliance must be switched on.
- Press and hold the two C=8 sec. buttons for approx. 3 seconds. √ goes out in the display.
15 Basic settings
You can configure the basic settings for your appliance to meet your needs.
15.1 Overview of the basic settings
| Basic setting Programme position | Value Description | |
| End signal 2 0 (off) | 1 (quiet)2 (me-dium)3 (loud)4 (very loud) | Set the volume of the signal at the end of the programme. |
| Button signal 3 0 (off) | 1 (quiet)2 (me-dium)3 (loud)4 (very loud) | The volume of the audible signal emitted when the buttons are pressed. |
15.2 Changing the basic settings
- Set the programme selector to position 1.

- Press Start/Reload and, at the same time, turn the programme selector to position 2.
√ The display shows the current value.
- Set the programme selector to the required position.
→ "Overview of the basic settings", Page 36
- To change the value, press Finished in.
- To save the changes, switch off the appliance.
16 Cleaning and servicing
To keep your appliance working efficiently for a long time, it is important to clean and maintain it carefully.
Note: You can find further information in the digital instruction manual by scanning the QR code in the table of contents or on www.neff-international.com.
16.1 Cleaning the drum
CAUTION
Risk of injury!
Permanently washing at low temperatures and a lack of ventilation for the appliance may damage the drum and cause injury.
▶ Regularly run a programme for cleaning the drum or wash at temperatures of at least 60 °C.
Leave the appliance to dry after every operation with the door open, and leave the detergent drawer to dry.
- Run the Cotton 60° programme without laundry and using washing powder.
16.2 Cleaning the detergent drawer
- Pull out the detergent drawer.
- Press down on the insert and remove the detergent drawer.

en Cleaning and servicing
- Pull out the insert upwards.

- Clean the detergent drawer and insert with water and a brush, and then dry them.
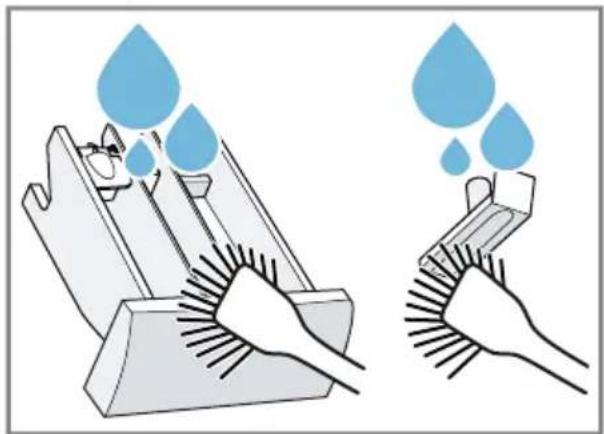
- Fit the insert and click it into place.

- Clean the opening for the detergent drawer.

- Push in the detergent drawer.
16.3 Cleaning the drain pump
Clean the drain pump in the event of faults, e.g. blockages or rattling noises.
Emptying the drain pump
- Turn off the water tap.
- Switch off the appliance.
- Disconnect the appliance's mains plug from the power supply.
- Remove the base panel.

- Slide a sufficiently large receptacle under the opening.

- Take the drain hose out of the holder.

- ⚠️ CAUTION - Risk of scalding!
When you wash at high temperatures, the detergent solution gets hot.
- Do not touch the hot detergent solution.
To allow the detergent solution to flow out into the container, remove the sealing cap.

- Firmly press on the sealing cap.

- Insert the drain hose into the holder.

Cleaning the drain pump
Requirement: The drain pump is empty.
- Since water may remain in the drain pump, unscrew the pump cap carefully.
- The filter insert in the pump housing may become stuck due to coarse particles of dirt. Loosen the dirt and remove the filter insert.

- Clean the interior, the thread on the pump cap and the pump housing.

- Ensure that the impeller in the drain pump can rotate.
- Screw the pump cap as far as it will go.
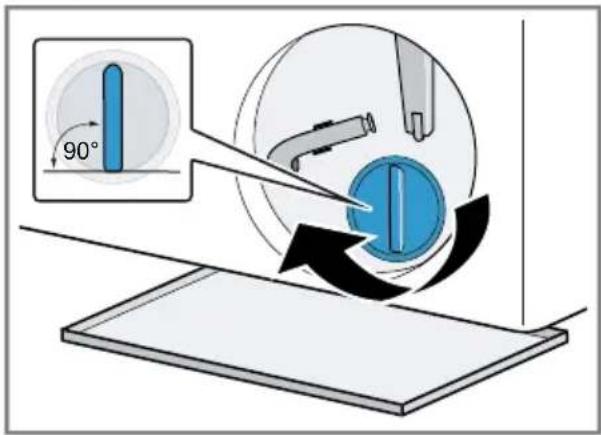
The handle on the pump cap must be in a vertical position.
- Insert the pump cap and screw it on as far as it will go.
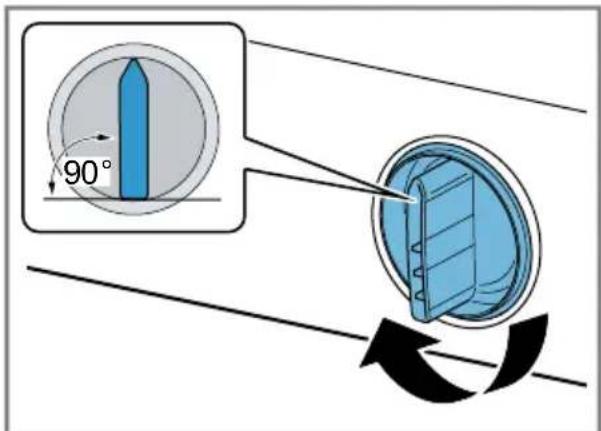
The handle on the pump cap must be in a vertical position.
- Install the base panel.

Before the next wash
To prevent unused detergent from flowing straight into the outlet in the next wash, run a suitable programme for draining after you have emptied the drain pump.
- Open the water tap.
- Insert the mains plug.
- Switch on the appliance.
- Pour 1 litre of water into compartment II.
- Select a suitable programme for draining. → "Programmes", Page 28
17 Troubleshooting
You can rectify minor faults on your appliance yourself. Read the troubleshooting information before contacting after-sales service. This will avoid unnecessary costs.

WARNING
Risk of electric shock!
Incorrect repairs are dangerous.
- Repairs to the appliance should only be carried out by trained specialist staff. ▶ Only use genuine spare parts when repairing the appliance. If the power cord of this appliance is damaged, it must be replaced by the manufacturer, the manufacturer's Customer Service or a similarly qualified person in order to prevent any risk.
Fault Cause and troubleshooting
| The display goes out and Start/Reload flashes. | Energy-saving mode is active▶ Press any button.√ The symbol lights up again. |
| "E:36 / -10" Drain pipe or water outlet hose is blocked.▶ Clean the drain pipe and the water outlet hose. | |
| Detergent dosage is too high.▶ Immediate measure: Mix one tablespoon of fabric softener with 0.5 litres of water and pour the mixture into the left-hand compartment (not for outdoor clothing, sportswear or items stuffed with down).▶ Reduce the amount of detergent for the next washing cycle with the same load. | |
The pump cap is not fully screwed in.
Fault Cause and troubleshooting
| "E:36 / -10" ▶ Ensure that the pump cap is screwed in all the way into the appliance. The handle on the pump cap must be in a vertical position.→ "Cleaning the drain pump", Page 39 | |
| "E:36 / -25 / -26" Drain pump is blocked.→ "Cleaning the drain pump", Page 38. | |
| "E:60 / -2B" The unbalanced load detection system has interrupted the spin cycle because the laundry is unevenly distributed.▶ Redistribute the laundry in the drum.Note: Where possible, mix large and small items in the drum. Different sized items of laundry distribute themselves better during the spin cycle. | |
| "E:30 / -10" and/or The water pressure is low.No remedial action possible. | |
| The filter in the water inflow is blocked.▶ Clean the water inflow filter. | |
| The tap is turned off.▶ Turn on the tap. | |
| The water inlet hose is kinked or jammed.▶ Ensure that the water inlet hose is not kinked or jammed. | |
| Water level measurement system is defective. | |
| Note: With the error message, the appliance starts a draining process. | |
| 1. First wait approx. 5 minutes until the drain process ends. | |
| 2. To reset the error message, switch the appliance off. | |
| 3. Switch the appliance back on. | |
| 4. If the error message is displayed again, call customer service.→ "Customer Service", Page 52 |
"E:35 / -10" There is water in the base trough.
▶ Turn off the water tap.
▶ Call the after-sales service.
→ "Customer Service", Page 52
The appliance is leaking.
▶ Turn off the water tap.
| Fault Cause and troubleshooting | ||
| "E:35 / -10" ▶ Call the after-sales service.→ "Customer Service", Page 52 | ||
| lights up. The temperature is too high.▸ Wait until the temperature has dropped.▸ → "Cancelling the programme", Page 34 | ||
| The programme does not start. | 2. Press Start/Reload to start the programme. | |
| Childproof lock is activated.→ "Deactivating the childproof lock", Page 35 | ||
| Finished in is activated.→ Check whether Finished in is activated.→ "Buttons", Page 27 | ||
| Laundry is caught in the door.1. Open the door again.2. Remove any trapped laundry.3. Close the door.4. Press Start/Reload to start the programme. | ||
| The door cannot be opened. | - - - is activated.→ Continue the programme by selecting Spin or Drain and pressing Start/Reload.→ "Resuming the programme when the programme status is Rinse Hold", Page 35 | |
| The temperature is too high.→ Wait until the temperature has dropped.→ "Cancelling the programme", Page 34 | ||
| Water level is too high.→ Select a suitable programme for draining.→ "Programmes", Page 28 | ||
| Power failure.→ Open the door using the emergency release.→ "Emergency release", Page 51 | ||
| The water is not drain-ing. | Drain pipe or water outlet hose is blocked.→ Clean the drain pipe and the water outlet hose. | |
| Drain pipe or water drain hose is caught or jammed.→ Ensure that the drain pipe and water drain hose are not kinked or trapped. | ||
| Drain pump is blocked.→ "Cleaning the drain pump", Page 38 | ||
| - - - is activated.→ Continue the programme by selecting Spin or Drain and pressing Start/Reload.→ "Resuming the programme when the programme status is Rinse Hold", Page 35 | ||
| The water outlet hose is connected too high. | ||
| The water is not draining. | Install the water outlet hose at a maximum height of 1 metre. | |
| Detergent dosage is too high.Immediate measure: Mix one tablespoon of fabric softener with 0.5 litres of water and pour the mixture into the left-hand compartment (not for outdoor clothing, sportswear or items stuffed with down).Reduce the amount of detergent for the next washing cycle with the same load. | ||
| Unapproved extension installed on the water drain hose.Remove any unapproved extensions from the water hose.→ "Connecting the appliance", Page 20 | ||
| The pump cap is not fully screwed in.Ensure that the pump cap is screwed in all the way into the appliance. The handle on the pump cap must be in a vertical position.→ "Cleaning the drain pump", Page 39 | ||
| Water is not flowing in. Detergent is not being dispensed. | You have not pressed Start/Reload.Press Start/Reload. | |
| The filter in the water inflow is blocked.Clean the water inflow filter. | ||
| The tap is turned off.Turn on the tap. | ||
| The water inlet hose is kinked or jammed.Ensure that the water inlet hose is not kinked or jammed. | ||
| The spin cycle runs several times. | The unbalanced load detection system eliminates an imbalance by repeatedly redistributing the laundry.Not a fault – no action required.Note:When loading, where possible, place large and small items of laundry together in the drum. Different sized items of laundry distribute themselves better during the spin cycle. | |
| The programme duration changes during the wash cycle. | The programme operation is optimised electronically.This may change the programme duration.Not a fault – no action required. | |
| The unbalanced load detection system eliminates an imbalance by repeatedly redistributing the laundry.Not a fault – no action required. | ||
| The programme duration changes during the wash cycle. | Note: When loading, where possible, place large and small items of laundry together in the drum. Different sized items of laundry distribute themselves better during the spin cycle. | |
| Foam detection system switches on a rinse cycle if foam build-up is too high.► Not a fault – no action required. | ||
| No water is visible in the drum. | Water is below the visible area.► Not a fault – no action required.► Do not add any extra water to the appliance while it is operating. | |
| Drum jerks after the programme starts. | This is caused by an internal motor test.► Not a fault – no action required. | |
| Residual water is present in the compartment | Insert in compartment blocks blocked.► → "Cleaning the detergent drawer", Page 37 | |
| Vibrations and movement of the appliance whilst spinning. | Appliance is not correctly aligned.► → "Aligning the appliance", Page 21 | |
| The appliance feet are not fixed.► Secure the appliance feet.→ "Aligning the appliance", Page 21 | ||
| Transit bolts have not been removed.► → "Removing the transit bolts", Page 13. | ||
| Drum rotates, water does not flow in. | Load detection is active.► Not a fault – no action required.Note: The load detection can take up to two minutes. | |
| Heavy foam build-up | Detergent dosage is too high.► Immediate measure: Mix one tablespoon of fabric softener with 0.5 litres of water and pour the mixture into the left-hand compartment (not for outdoor clothing, sportswear or items stuffed with down).► Reduce the amount of detergent for the next washing cycle with the same load. | |
| High spin speed not reached. | A low spin speed is selected.► The next time you run a wash cycle, set a higher spin speed. | |
| Unbalance load detection system is using a reduced spin speed to eliminate an unbalance.► Redistribute the laundry in the drum. | ||
| High spin speed not reached. | Note: Where possible, mix large and small items in the drum. Different sized items of laundry distribute themselves better during the spin cycle.► Start the Spin programme. | |
| The spin programme does not start. | Drain pipe or water outlet hose is blocked.► Clean the drain pipe and the water outlet hose. | |
| Drain pipe or water drain hose is caught or jammed.► Ensure that the drain pipe and water drain hose are not kinked or trapped. | ||
| The unbalanced load detection system has interrupted the spin cycle because the laundry is unevenly distributed.► Redistribute the laundry in the drum. Note: Where possible, mix large and small items in the drum. Different sized items of laundry distribute themselves better during the spin cycle.► Start the Spin programme. | ||
| Rushing, hissing noise. | Water is flushed under pressure into the detergent drawer.► Not a fault – normal operating noise. | |
| Loud noises during the spin cycle. | Appliance is not correctly aligned.► → "Aligning the appliance", Page 21 | |
| The appliance feet are not fixed.► Secure the appliance feet.→ "Aligning the appliance", Page 21 | ||
| Transit bolts have not been removed.► → "Removing the transit bolts", Page 13. | ||
| Banging noises, rat- tling in the drain pump. | Foreign bodies have got into the drain pump.► → "Cleaning the drain pump", Page 38 | |
| Slurping, rhythmical suction noise. | The drain pump is active, the detergent solution is pumped out.► Not a fault – normal operating noise. | |
| Creasing. The spin speed is too high.► The next time you run a wash cycle, set a lower spin speed. | ||
| Creasing. Unsuitable programme for the type of fabric. ▸ Select the programmes that are suitable for the type of fabric. | ||
| Detergent or fabric softener drips off the seal and collects on the door or in the seal fold. | Too much detergent/fabric softener in the detergent drawer. ▸ When dosing liquid detergent and fabric softener, observe the marking in the detergent drawer and do not dose above this. | |
| The spin result is not satisfactory. The laundry is too wet/too damp. | A low spin speed is selected. ▸ The next time you run a wash cycle, set a higher spin speed. ▸ Start the Spin programme. | |
| Drain pipe or water outlet hose is blocked. ▸ Clean the drain pipe and the water outlet hose. | ||
| Drain pipe or water drain hose is caught or jammed. ▸ Ensure that the drain pipe and water drain hose are not kinked or trapped. | ||
| The unbalanced load detection system has interrupted the spin cycle because the laundry is unevenly distributed. ▸ Redistribute the laundry in the drum. Note: Where possible, mix large and small items in the drum. Different sized items of laundry distribute themselves better during the spin cycle. ▸ Start the Spin programme. | ||
| Unbalance load detection system is using a reduced spin speed to eliminate an unbalance. ▸ Redistribute the laundry in the drum. Note: Where possible, mix large and small items in the drum. Different sized items of laundry distribute themselves better during the spin cycle. ▸ Start the Spin programme. | ||
| Detergent residue on the damp washing. | Detergents may contain water-insoluble substances that deposit on the laundry. ▸ Start the Rinse programme. | |
| Detergent residue on the dry laundry. | Detergents may contain water-insoluble substances that deposit on the laundry. ▸ Brush out the laundry after washing and drying. | |
| Water is leaking out at the water inlet hose. | Water inlet hose is not correctly/securely connected.1. Connect the water supply hose correctly.→ "Connecting the water inlet hose", Page 202. Tighten the screw connection. | |
| Water is leaking out at the water outlet hose. | The water outlet hose is damaged.► Replace the damaged water outlet hose. | |
| Water outlet hose is not connected correctly.► Connect the water outlet hose correctly.→ "Water outlet connection types", Page 20 | ||
| Odours have formed in the appliance. | Humidity and detergent residue may promote the formation of bacteria.► → "Cleaning the drum", Page 37► If you are not using the appliance, leave the door and detergent drawer open so that residual water can evaporate. | |
| Fabric softener re-mains in the detergent drawer. | The use of fabric softener is not supported for the selected programme.► Before washing, check whether the use of fabric softener is supported for the selected programme.→ "Programmes", Page 28 | |
17.1 Emergency release
Releasing the door
Requirement: The drain pump is empty.
- ATTENTION! Escaping water may cause material damage.
- Do not open the door if you can see water through the glass. Pull the emergency release downwards with a tool and release.

√ The door lock is released. 2. Insert the maintenance flap and lock it into place. 3. Close the maintenance flap.
18 Transportation, storage and disposal
18.1 Removing the appliance
- Turn off the tap.
- Empty the water inlet hose.
- Switch off the appliance.
- Unplug the appliance's mains plug.
- Drain the water. → "Cleaning the drain pump", Page 38
- Detach the hoses.
18.2 Inserting the transit bolts
Secure the appliance before transportation using transit bolts in order to prevent transport damage.
- Use a screwdriver to remove the 4 cover caps.

Keep the cover caps.
- Insert the 4 transit bolts. → "Removing the transit bolts", Page 13
18.3 Using the appliance again
For further information, see "Installation and connection", page 12, and "Starting an empty washing cycle", page 24.
18.4 Disposing of old appliance
Valuable raw materials can be re-used by recycling.

WARNING
Risk of harm to health!
Children can lock themselves in the appliance, thereby putting their lives at risk.
- Do not install the appliance behind a door as this may obstruct the appliance door or prevent it from opening.
- With redundant appliances, unplug the power cord. Then cut through the cord and damage the lock on the appliance door beyond repair so that the appliance door will no longer close.
- Unplug the appliance from the mains.
- Cut through the power cord.
- Dispose of the appliance in an environmentally friendly manner. Information about current disposal methods are available from your specialist dealer or local authority.

This appliance is labelled in accordance with European Directive 2012/19/EU concerning used electrical and electronic appliances (waste electrical and electronic equipment - WEEE). The guideline determines the framework for the return and recycling of used appliances as applicable throughout the EU.
19 Customer Service
Function-relevant genuine spare parts according to the corresponding Eco-design Order can be obtained from Customer Service for a period of at least 10 years from the date on which your appliance was placed on the market within the European Economic Area.
Note: Under the terms of the manufacturer's warranty the use of Customer Service is free of charge.
Detailed information on the warranty period and terms of warranty in your country is available from our after-sales service, your retailer or on our website.
If you contact Customer Service, you will require the product number (E-Nr.) and the production number (FD) of your appliance.
The contact details for Customer Service can be found in the enclosed Customer Service directory or on our website.
19.1 Product number (E-Nr.) and production number (FD)
You can find the product number (E-Nr.) and the production number (FD) on the appliance's rating plate.
Depending on the model, the rating plate is located:
■ On the inside of the door. ■ On the inside of the maintenance flap. ■ On the rear of the appliance.
Make a note of your appliance's details and the Customer Service telephone number to find them again quickly.
19.2 AQUA-STOP guarantee
In addition to warranty claims against the seller under the purchase agreement and in addition to our manufacturer's warranty, we offer compensation under the following conditions.
■ If our Aqua-Stop system is defective and causes water damage, we will make good the damage for private users. To ensure protection from water damage, the appliance must be connected to the power supply. ■ The liability guarantee is valid for the service life of the appliance. ■ A claim can only be made under the guarantee if the appliance has been correctly installed and connected with Aqua-Stop according to our instructions; this also includes correctly fitting the Aqua-Stop extension (genuine accessory). Our guarantee does not cover defective supply lines or fittings up to the Aqua-Stop connection on the tap. ■ If your appliance is fitted with Aqua-Stop, you can in principle leave your appliance unattended during operation and the tap turned on afterwards. The tap only needs to be turned off if you are away from home for a long period, e.g. on holiday for several weeks.
20 Consumption values
The following information is provided in accordance with the EU Ecodesign Regulation. The values given for programs other than the Eco 40-60 are indicative only and were determined in accordance with the applicable standard EN60456.
| Programme Load (kg) | Pro-gramme dura-tion (h:min) 1 | Energy con-sump-tion (kWh/cycle) 1 | Water con-sump-tion (l/cycle) 1 | Max-imum temper-ature (°C) 5 mins 1 | Spin speed (rpm) 1 | Resid-ual mois-ture (%) 1 |
| Eco 40-60 2 | 8.0 3:16 | 1.090 | 55.0 48 | 1393 | 53.00 | |
| Eco 40-60 2 | 4.0 2:36 | 0.560 | 45.0 | 37 | 1400 | 53.00 |
| Eco 40-60 2 | 2.0 2:22 | 0.170 | 33.0 | 24 | 1400 | 53.00 |
| Cotton 20 °C | 8.0 3:16 | 0.290 | 84.0 | 23 | 1400 | 52.00 |
| Cotton 40 °C | 8.0 3:16 | 1.030 | 84.0 | 45 | 1400 | 52.00 |
| Cotton 60 °C | 8.0 3:16 | 1.200 | 84.0 | 53 | 1400 | 52.00 |
| Cotton + ↓40 °C | 8.0 3:45 | 1.130 | 89.0 | 45 | 1400 | 52.00 |
| Easy-Care 40 °C | 4.0 2:30 | 0.740 | 62.0 | 44 | 1200 | 30.00 |
| Mixed Load 40 °C | 4.0 1:00 | 0.590 | 41.0 | 41 | 1400 | 55.00 |
| Wool 📋30 °C | 2.0 0:45 | 0.200 | 40.0 | 24 | 800 | 27.00 |
1 Due to the influence of water pressure, hardness and inlet temperature, ambient temperature, type, amount and soiling of laundry, detergent used, fluctuations in the power supply and the selected additional functions, the actual values may deviate from the stated values.
2 Test programme in accordance with the EU Ecodesign Directive and the EU Energy Labelling Regulation with cold water (15 °C).
21 Technical data
| Appliance height 81.8 cm |
| Appliance width 59.6 cm |
| Appliance depth 54.4 cm |
| Appliance depth 57.4 cm with door closed |
| Appliance depth with door open | 95.6 cm |
| Weight 71.8 kg | |
| Maximum load 8.0 kg | |
| Mains voltage 220-240 V, 50 Hz | |
| Minimum installation protection | 10A |
| Nominal power 2300 W | |
| Power consumption | Off mode: 0.12 WLeft-on mode: 0.50 W |
| Water pressure | Minimum: 100 kPa (1 bar)Maximum: 1000 kPa (10 bar) |
| Length of the water inlet hose | 220 cm |
| Length of the water outlet hose | 220 cm |
| Length of the power cord | 210 cm |
This product contains light sources from energy efficiency class F. These light sources are available as a spare part and must only be replaced by trained specialist staff. You can find more information about your model online at https://eprel.ec.europa.eu/ 1 . This web address is linked to the official EU EPREL product database. Please then follow the instructions on searching for the model. The model identifier is made up of the characters before the slash in the product number (E-Nr.) on the rating plate. Alternatively, you can also find the model identifier in the first line of the EU energy label.

REGISTER YOUR PRODUCT ONLINE NEFF-HOME.COM
Bollhausgerate GmbH
Carl-Wery-Straße 34
81759 München, GERMANY
Valid within Great Britain
Imported to Great Britain by
BSI Home Appliances Ltd
Grand Union House
Old Wolverton Road
Wolveron Milton Keynes
MK125PT
United Kingdom


- FURTHER INFORMATION AND EXPLANATIONS ARE AVAILABLE ONLINE
- TABLE OF CONTENTS
- SAFETY
- PREVENTING MATERIAL DAMAGE
- ENVIRONMENTAL PROTECTION AND SAVING ENERGY
- INSTALLATION AND CONNECTION
- FAMILIARISING YOURSELF WITH YOUR APPLIANCE
- BEFORE USING FOR THE FIRST TIME
- DISPLAY
- BUTTONS
- PROGRAMMES
- ACCESSORIES
- LAUNDRY
- DETERGENTS AND CARE PRODUCTS
- BASIC OPERATION
- CHILDPROOF LOCK
- BASIC SETTINGS
- CLEANING AND SERVICING
- TROUBLESHOOTING
- TRANSPORTATION, STORAGE AND DISPOSAL
- CUSTOMER SERVICE
- CONSUMPTION VALUES
- TECHNICAL DATA
- GENERAL INFORMATION
- INTENDED USE
- RESTRICTION ON USER GROUP
- SAFE INSTALLATION
- WARNING – RISK OF ELECTRIC SHOCK
- WARNING – RISK OF FIRE
- WARNING – RISK OF INJURY
- ⚠ WARNING – RISK OF SUFFOCATION
- ⚠️ CAUTION – RISK OF INJURY
- ⚠️ CAUTION – RISK OF CUTTING
- SAFE USE
- ⚠ WARNING – RISK OF ELECTRIC SHOCK
- ⚠ WARNING – RISK OF HARM TO HEALTH
- ⚠ WARNING – RISK OF POISONING
- ⚠ WARNING – RISK OF EXPLOSION
- ⚠️ CAUTION – RISK OF SCALDING
- ⚠️ CAUTION – RISK OF CHEMICAL BURNS
- SAFE CLEANING AND MAINTENANCE
- ⚠ WARNING – RISK OF INJURY
- ATTENTION
- DISPOSING OF PACKAGING
- SAVE ENERGY AND CONSERVE RESOURCES
- ENERGY SAVING MODE
- UNPACKING THE APPLIANCE
- CONTENTS OF PACKAGE
- REQUIREMENTS FOR THE INSTALLATION LOCATION
- WARNING
- RISK OF ELECTRIC SHOCK
- RISK OF INJURY
- INSTALLATION LOCATION REQUIREMENTS
- REMOVING THE TRANSIT BOLTS
- EN INSTALLATION AND CONNECTION
- TOOLS FOR ASSEMBLY
- INSTALLING THE APPLIANCE
- PREPARING THE APPLIANCE
- INSTALLING THE CABINET DOOR
- INSTALLING THE BASE PANEL
- CONNECTING THE APPLIANCE CONNECTING THE WATER INLET HOSE
- WATER OUTLET CONNECTION TYPES
- ALIGNING THE APPLIANCE
- CONNECTING THE APPLIANCE TO THE ELECTRICITY SUPPLY
- APPLIANCE
- DETERGENT DRAWER
- CONTROL PANEL
- STARTING AN EMPTY WASHING CYCLE
- PREPARING THE LAUNDRY
- NOTES
- SWITCHING ON THE APPLIANCE
- SETTING A PROGRAMME
- ADJUSTING THE PROGRAMME SETTINGS
- LOADING LAUNDRY
- REQUIREMENTS
- INSERTING THE MEASURING AID FOR LIQUID DETERGENT
- USE THE MEASURING AID FOR LIQUID DETERGENT
- ADDING DETERGENT AND CARE PRODUCT
- STARTING THE PROGRAMME
- CHANGING THE ACTIVATED "READY IN" TIME
- SOAKING LAUNDRY
- ADDING LAUNDRY
- CANCELLING THE PROGRAMME
- RESUMING THE PROGRAMME WHEN THE PROGRAMME STATUS IS RINSE HOLD
- UNLOADING THE LAUNDRY
- SWITCHING OFF THE APPLIANCE
- ACTIVATING THE CHILDPROOF LOCK
- DEACTIVATING THE CHILDPROOF LOCK
- OVERVIEW OF THE BASIC SETTINGS
- CHANGING THE BASIC SETTINGS
- CLEANING THE DRUM
- CAUTION
- CLEANING THE DETERGENT DRAWER
- EN CLEANING AND SERVICING
- CLEANING THE DRAIN PUMP
- EMPTYING THE DRAIN PUMP
- BEFORE THE NEXT WASH
- EMERGENCY RELEASE
- RELEASING THE DOOR
- REMOVING THE APPLIANCE
- INSERTING THE TRANSIT BOLTS
- USING THE APPLIANCE AGAIN
- DISPOSING OF OLD APPLIANCE
- RISK OF HARM TO HEALTH
- PRODUCT NUMBER (E-NR.) AND PRODUCTION NUMBER (FD)
- AQUA-STOP GUARANTEE
Brand : NEFF
Model : W543BX1GB
Category : Washing machine