
SDLT 1500 B1 - Toaster SILVERCREST - Free user manual and instructions
Find the device manual for free SDLT 1500 B1 SILVERCREST in PDF.


| Product Type | Toaster |
| Brand | SilverCrest |
| Model | SDLT 1500 B1 |
| Power Consumption | 1500 W |
| Voltage | 220-240 V ~ 50/60 Hz |
| Number of Slots | 2 |
| Functions | Toast, Defrost, Reheat, Cancel |
| Browning Control | 7-level adjustable |
| Warming Rack | Yes, for rolls and pastries |
| Self-Centering Bread Guides | Yes, for even toasting |
| Removable Crumb Tray | Yes, for easy cleaning |
| Housing Material | Stainless steel and plastic |
| Safety Features | Auto shut-off, overheat protection, cool-touch exterior |
| Dimensions (approx.) | 28.0 x 18.0 x 20.0 cm |
| Weight (approx.) | 1.2 kg |
| Cord Length | Approx. 85 cm |
| Cleaning | Wipe with damp cloth; do not immerse in water |
| Spare Parts Availability | Contact SilverCrest customer service |
| Repairability | Repairable by qualified personnel only |
Frequently Asked Questions - SDLT 1500 B1 SILVERCREST
User questions about SDLT 1500 B1 SILVERCREST
0 question about this device. Answer the ones you know or ask your own.
Ask a new question about this device
Download the instructions for your Toaster in PDF format for free! Find your manual SDLT 1500 B1 - SILVERCREST and take your electronic device back in hand. On this page are published all the documents necessary for the use of your device. SDLT 1500 B1 by SILVERCREST.
USER MANUAL SDLT 1500 B1 SILVERCREST
Operation and Safety Notes
GR CY
GB/IE/NI/CY Operation and Safety Notes
Page

HG03016B-BS


List of pictograms used....Page 6
Introduction......Page 6
Intended use......Page 6
Parts description....Page 6
Technical data....Page 6
Items delivered....Page 7
Safety notes......Page 7
Before use......Page 8
Using the product....Page 9
Stop toasting Page 9
Reheat bread....Page 9
Defrost bread Page 9
Reheat bread rolls....Page 10
Crumb tray....Page 10
Cleaning and care....Page 10
Storage Page 10
Troubleshooting Page 11
Disposal Page 11
Warranty......Page 11
| List of pictograms used | |||
 | Observe caution and safety notes! |  | Hertz (mains frequency) |
 | Danger - Risk of electric shock! |  | Food safe! This product has no adverse effect on taste or smell. |
 | Fire hazard Stop |  | |
 | Caution! Risk of burns due to hot surfaces! |  | Reheating |
 | Voltage (alternating current) Defros |  | |
| [k868] | This product belongs to appliance class I and must therefore be attached to a plug with an earth wire. | ||
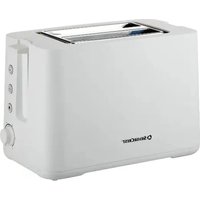
Double long slot toaster
- Introduction
We congratulate you on the purchase of your new product. You have chosen a high quality product. The instructions for use are part of the product. They contain important information concerning safety, use and disposal. Before using the product, please familiarise yourself with all of the safety information and instructions for use. Only use the product as described and for the specified applications. If you pass the product on to anyone else, please ensure that you also pass on all the documentation with it.
Intended use
This product is only intended for toasting slices of bread or bread rolls. This product is only suitable for indoor household use. It is not intended for use with other foodstuffs, other materials or for use in commercial or industrial purposes. Any
other form of use is not permitted and may result in injury or damage to the product. The producer takes no responsibility for damages which occur due to inappropriate use.
Parts description
1 Bread roll rack 2 Toasting slot 3 Bread carriage lever 4 Stop button 5 Reheat button 6 Defrost button 7 Toast setting knob 8 Bread roll rack lever 9 Crumb tray 10 Cable winder
Technical data
Input voltage: 220-240 V~50 Hz Nominal power: 1250-1500 W
Items delivered
Check that the delivery is complete and that the product and all its parts are in perfect condition immediately after unpacking. Remove all packaging materials before use.
1 Double Long Slot Toaster 1 Instruction Manual

Safety notes
Read all safety notes and instructions. Not following the safety notes and instructions could cause an electric shock, fire and / or major injuries.
KEEP ALL SAFETY NOTICES AND INSTRUCTIONS FOR FUTURE REFERENCE!

WARNING! RISK OF ACCIDENTS
AND FATAL INJURY FOR INFANTS AND CHILDREN!
Never leave children alone and unsupervised with the packaging material. It poses a danger of suffocation. Children frequently underestimate the dangers. Always keep children away from the packaging material.
CAUTION! This product is not a toy for children! Children are not aware of the dangers
associated with handling electrical products.
This product may be used by children aged 8 and over as well as persons with physical, sensory or mental impairments or lacking experience and knowledge if supervised or instructed in the safe use of the product and if they understand the associated risks. - Do not let children play with the product. - Do not let children clean and maintain the product unless they are over 8 years old and supervised. - Keep the product and the connection cable away from children under 8. If this product's electricity connection cable is damaged, it must be replaced by the manufacturer, its customer services or another specialist to ensure dangerous situations do not arise.
WARNING! Never
immerse electrical parts of the product in water or other liquids when cleaning or operating the toaster. Never place the product under running water.
WARNING! FIRE
HAZARD! Bread can burn.
Therefore, never use this product around or below flammable materials such as curtains.
■ CAUTION! Use of bread which is not suitable for toasting causes a risk of burns.
- RISK OF BURNS! The smaller size or shape means that you risk touching hot parts of the toaster when you take the toasted bread out.
CAUTION! HOT SURFACES MEAN
RISK OF BURNS! Be aware that accessible surfaces of this product become hot during use.
■ The product is not intended for operation with an external timer switch or a separate remote control system. ■ Do not cover the product during use.

Avoid danger of death by electric current:
- Do not immerse the product in water or other liquids. ■ Never touch the product or the mains plug with wet hands and do not use it in very humid environments.
■ Ensure that the information on the label matches the local mains voltage. In the event of malfunctions, remove the mains plug from the plug socket. - Do not open the product or attempt to repair it yourself. Defective products may only be repaired by qualified staff. ■ Always pull the mains plug out of the plug socket after use and before cleaning the product. - Keep the mains cable away from hot surfaces, sharp edges and mechanical loads. Lay the mains cable in such a way that nobody will step on or trip over it. ■ Leave the product to cool before using it in a different location.
- Before use
Note: Remove all packaging material from the product.
☐ When you first use the product, there may be a light odour and limited emission of smoke. However, this will not last long. Ensure that ventilation is sufficient. Put the product in a room with sufficient ventilation and choose the highest toast setting, as described below. Let the product run 3 toasting cycles without bread.
☐ Plug the mains plug into a suitable plug socket, see section "Technical Specifications".
☐ Turn the toast setting knob 7 clockwise to the highest setting (marking = highest number). ☐ Push the bread carriage lever 3 down to activate the product without bread. The symbol on the stop button 4 lights up. ☐ The product stops automatically and releases the bread carriage lever 3.
● Using the product
☐ Plug the mains plug into an appropriate plug socket. Turn the toast setting knob 7 to the highest setting (lowest number = least toasted, highest number = most toasted).
Note: when first using this product, we recommend that you start with toast setting 2 or 3. Depending on the types of bread used and personal preference, different toast settings can be selected.
Recommendations for toasting:
Toast setting 2 for white bread
Toast setting 5-6 for brown bread.
Note: turn the toast setting knob 7 down somewhat if you put in fewer pieces of bread.
Place the bread in the toasting slot 2 and press the bread carriage lever 3 down until it locks into place. The blue indicator on the stop button 4 lights up. ☐ The automatic bread centring function centres the bread which has been placed in the toasting slot 2.
Note: the bread carriage lever only stays down when the product is connected to the electricity supply.
☐ The toast jumps up automatically when the toasting process is over.
Stop toasting
You can push the stop button 4 at any time to stop the toasting process. The toast jumps up and the device stops automatically.
Pull the plug out of the plug socket.
Note: the intensity of toasting depends on how full the device is and can differ even at the same toast setting 7. The less bread is put in, the more it is toasted. Always choose a somewhat lower toast setting 7 if fewer slices of bread are to be toasted.
Note: always stop the device by pressing the stop button 4 if bread is stuck. Remove the mains plug from the mains socket and carefully remove the bread from the product without damaging the heating element.
Reheat bread
If the toast has gone cold, you can reheat it using the reheating function without toasting it. Put the bread in the toasting slot 2 and press the bread carriage lever 3 down until it locks into place. The blue indicator on the stop button 4 lights up. Press the reheat button 5 to activate the reheating function. The symbol on the reheat button 5 lights up. The toast jumps up automatically when the reheating process has ended.
Defrost bread
To defrost frozen bread, place it in the toasting slot 2 and select the toast setting using the toast setting knob 7. Push the bread carriage lever 3 down until it locks into place. The blue indicator on the stop button 4 lights up. Press the defrost button 6 to activate the defrosting function. The blue indicator on the defrost button 6 lights up. The toast jumps up automatically when the toasting process has ended.
Reheat bread rolls
Do not put bread rolls straight into the device. Instead, always use the bread roll rack 1. To set up the bread roll rack at full height 1, push the bread roll rack lever 8 right down until it locks into place. Put the bread rolls on the bread roll rack 1 and ensure that they do not fall through the bread roll rack 1. Set the toast setting knob 7 to a setting no higher than 2. The toasting intensity depends on the type of bread rolls. Press the bread carriage lever 3 down until it locks into place. The blue indicator on the stop button 4 lights up. Turn the bread rolls over as soon as the desired reheating time is over and the bread carriage lever 3 is released. Push the bread carriage lever 3 down until it locks into place. The blue indicator on the stop button 4 lights up. Push the bread roll rack lever 8 upward to return the bread roll rack 1 to its original position.
Crumb tray
CAUTION! RISK OF BURNS

DUE TO HOT SURFACES! The
9 and the outer
surface of the device may get hot when the device is operating.
When toasting, bread crumbs may fall down. These are then caught in the crumb tray 9.
Remove the crumb tray 9 from the device to empty it.
Tip the crumbs out before sliding the crumb tray 9 back into the device.
Cleaning and care
WARNING! Always remove the mains plug from the socket before cleaning.
WARNING! Never put the product or the mains plug in water or other liquids.
Allow the product to cool down completely. Do not use abrasive, aggressive or chemical cleaning agents to clean the surface of the device. Use a damp, lint-free cloth to clean the device. Use a little mild detergent on the cloth if necessary. Clean the crumb tray 9 with a neutral detergent. Rinse it carefully in clean water and then dry it up.
Storage
Empty the crumb tray as described in Cleaning and care. Clean the device as described in Cleaning and care. Fully wrap the mains cable in the cable winder 10 under the device. Store the device in a clean and dry place if it is not used for a longer period of time.
Troubleshooting
| Malfunction Cause Solution | ||
| The device is not working. The mains plug is not plugged into a socket. | Connect the mains plug to a mains socket. | |
| The device is defective. Contact the Customer Service Department. | ||
| The slices of bread are too dark. | The toast setting is too high. | Set the toast setting knob 7 to a lower setting. |
| The slices of bread have not been toasted. | The toast setting is too low. | Set the toast setting knob 7 somewhat higher. |
| The bread carriage lever 3 does not lock in after being pushed down. | The mains plug is not plugged into a socket. | Connect the mains plug to a mains socket. |
| The device is defective. Contact the Customer Service Department. | ||
Disposal

The packaging is made entirely of recyclable materials, which you may dispose of at local recycling facilities. The Green Dot is not valid for Germany.

Observe the marking of the packaging materials for waste separation, which are marked with abbreviations (a) and numbers (b) with following meaning: 1–7: plastics / 20–22: paper and fibreboard / 80–98: composite materials.

The product and packaging materials are recyclable, dispose of it separately for better waste treatment. The Triman logo is valid in France only.

Contact your local refuse disposal authority for more details of how to dispose of your worn-out product.

To help protect the environment, please dispose of the product properly when it has reached the end of its useful life
and not in the household waste. Information on collection points and their opening hours can be obtained from your local authority.
- Warranty
The product has been manufactured to strict quality guidelines and meticulously examined before delivery. In the event of product defects you have legal rights against the retailer of this product. Your legal rights are not limited in any way by our warranty detailed below.
The warranty for this product is 3 years from the date of purchase. Should this product show any fault in materials or manufacture within 3 years from the date of purchase, we will repair or replace it – at our choice – free of charge to you.
The warranty period begins on the date of purchase. Please keep the original sales receipt in a safe location. This document is required as your proof of purchase. This warranty becomes void if the product has been damaged, or used or maintained improperly.
The warranty applies to defects in material or manufacture. This warranty does not cover product parts subject to normal wear, thus possibly considered consumables (e.g. batteries) or for damage to fragile parts, e.g. switches, rechargeable batteries or glass parts.
CE

- LIST OF PICTOGRAMS USED....PAGE
- INTRODUCTION......PAGE
- SAFETY NOTES......PAGE
- BEFORE USE......PAGE
- USING THE PRODUCT....PAGE
- CLEANING AND CARE....PAGE
- STORAGE PAGE
- TROUBLESHOOTING PAGE
- DISPOSAL PAGE
- WARRANTY......PAGE
- DOUBLE LONG SLOT TOASTER
- INTRODUCTION
- INTENDED USE
- PARTS DESCRIPTION
- TECHNICAL DATA
- ITEMS DELIVERED
- SAFETY NOTES
- KEEP ALL SAFETY NOTICES AND INSTRUCTIONS FOR FUTURE REFERENCE
- WARNING! RISK OF ACCIDENTS
- AND FATAL INJURY FOR INFANTS AND CHILDREN
- WARNING! NEVER
- WARNING! FIRE
- HAZARD! BREAD CAN BURN
- CAUTION! HOT SURFACES MEAN
- AVOID DANGER OF DEATH BY ELECTRIC CURRENT
- BEFORE USE
- ● USING THE PRODUCT
- STOP TOASTING
- REHEAT BREAD
- DEFROST BREAD
- REHEAT BREAD ROLLS
- CRUMB TRAY
- CAUTION! RISK OF BURNS
- DUE TO HOT SURFACES! THE
- CLEANING AND CARE
- STORAGE
- TROUBLESHOOTING
- DISPOSAL
- WARRANTY
Brand : SILVERCREST
Model : SDLT 1500 B1
Category : Toaster