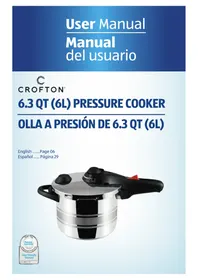
Pressure Cooker - Pressure Cooker Ambiano - Free user manual and instructions
Find the device manual for free Pressure Cooker Ambiano in PDF.


| Product Type | Electric Pressure Cooker |
| Brand | Ambiano |
| Model | Pressure Cooker |
| Capacity | 6 liters |
| Power | 1000 W |
| Dimensions (L x W x H) | 30 x 30 x 30 cm |
| Weight | 4.5 kg |
| Material | Stainless steel inner pot |
| Operating Pressure | 70 kPa |
| Safety Features | Overheat protection, pressure release valve, lid lock |
| Programs | Meat, Soup, Beans, Rice, Stew, Manual |
| Timer | Up to 99 minutes |
| Keep Warm Function | Yes, automatic after cooking |
| Cleaning | Removable lid and inner pot, dishwasher safe |
| Spare Parts Availability | Sealing ring, inner pot, steam basket (available online) |
| Repairability | Modular design; user-replaceable parts |
| Voltage | 120 V (US) / 230 V (EU) |
| Frequency | 60 Hz / 50 Hz |
| Certifications | ETL, CE, RoHS |
| Warranty | 1 year limited |
Frequently Asked Questions - Pressure Cooker Ambiano
User questions about Pressure Cooker Ambiano
0 question about this device. Answer the ones you know or ask your own.
Ask a new question about this device
Download the instructions for your Pressure Cooker in PDF format for free! Find your manual Pressure Cooker - Ambiano and take your electronic device back in hand. On this page are published all the documents necessary for the use of your device. Pressure Cooker by Ambiano.
USER MANUAL Pressure Cooker Ambiano
English .....Page 06

Contents
Overview 3
Use....4
Scope of delivery/device parts......6
General information....7
Reading and storing the instruction manual ......7
Explanation of symbols 7
Safety 8
Proper use....8
Safety notes 8
Safety systems....12
Checking the pressure cooker and product contents......12
Use....13
Cleaning the pressure cooker for the first time ..... 13
Adding food 13
Closing the pressure cooker....14
Pressure cooking 14
Reducing the pressure in the pressure cooker....15
Opening the pressure cooker 15
Pressures and cooking times....16
Pressures....16
Cooking times....16
Notes on preparing food and cooking times 18
Cleaning, care, and storage....20
Cleaning the pressure cooker....20
Cleaning and replacing the sealing ring 20
Cleaning the valves 21
Maintenance and storage 21
Replacement parts and other accessories....22
Troubleshooting....23
Technical data 25
Disposal....26
Disposing of the packaging 26
Disposing of the pressure cooker....26
Warranty card....27
Warranty conditions.... 28





Scope of delivery/device parts
1 Valve cap pressure control valve
2 Safety valve (red)
3 Locking slider
4 Lid handle
5 Pot handle
6 Closing mark
7 Pot
8 Bottom
9 Replacement sealing ring for pressure level indicator (silicone cap), 2×
10 Safety window
11 Side handle
12 Lid
13 Pressure level indicator
14 Indicator: Remove the valve cap
15 Pressure scale
16 Pressure control valve
17 Sealing ring
18 Rings of the pressure level indicator
19 Stewing insert
20 Insert support
General information
Reading and storing the user manual

This user manual accompanies this 6.3 Qt (6 l) pressure cooker. It contains important information on start-up and handling.
For improved readability, the 6.3 Qt (6 l) pressure cooker will be referred to only as pressure cooker below.
Before using the pressure cooker, read the user manual carefully. This particularly applies for the safety notes. Failure to comply with this user manual may result in severe injury or damage to the pressure cooker.
When abroad, you must also observe country-specific guidelines and laws.
Store the user manual for further use. If you pass the pressure cooker on to third parties, be absolutely sure to include this user manual.
A PDF version of this user manual can be downloaded from the Internet via www.schnellkochtopf24.de.
Explanation of symbols
The following symbols and signal words are used in this user manual, on the pressure cooker or on the packaging.
WARNING!
This signal symbol/word designates a hazard with moderate degree of risk which may lead to death or severe injury if not avoided.
CAUTION!
This signal word designates a hazard with low risk which may result in minor or moderate injury if not avoided.
NOTICE!
This signal symbol/word warns against potential damages to property.

This symbol provides you with useful additional information on the product or using it.

This symbol indicates that the pressure cooker is suitable for use on electrical stovetops.

This symbol indicates that the pressure cooker is suitable for use on gas stovetops.

This symbol indicates that the pressure cooker is suitable for use on ceramic glass stovetops.
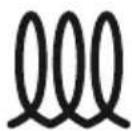
This symbol indicates that the pressure cooker is suitable for use on induction stovetops.

This symbol indicates that the pressure cooker is suitable for use on halogen stovetops.
Safety
Proper use
The pressure cooker is only designed for quickly cooking food under pressure. It is only intended for private use and not suitable for commercial purposes.
Only use the pressure cooker as described in this user manual. Using it in any other way is deemed improper and may result in damage to property or even personal injury. The pressure cooker is not a children's toy.
The manufacturer or vendor cannot be held liable for damages incurred through improper or incorrect use.
Safety notes
WARNING!
Danger of suffocation!
If children play with the packaging wrapper or small parts, they could catch themselves when playing, slip them over their head or swallow them and choke.
- Keep packaging wrapper and the small parts away from children.
WARNING!
Risk of injury!
Pressure is produced inside the pressure cooker when it is heated.
- Close the pressure cooker properly and completely before you heat it.
- Do not open the pressure cooker forcefully, especially if it is under pressure.
- Make sure that the pressure has diminished completely before you open the pressure cooker.
- Keep the pressure cooker away from children if it is under pressure.
- Do not leave the pressure cooker unattended while it is operating or after using it.
- Be very careful when moving pressure cooker if it is under pressure.
WARNING!
Fire and burn hazard!
Hot fat may catch fire and burn at high temperatures. Grease fires cannot be extinguished with water; in fact, contact with water may result in severe burns.
- While heating fat in the pressure cooker, never leave it unattended.
- Never attempt to extinguish grease fires with water.
- Use a fire blanket or a special fire extinguisher for extinguishing grease fires.
WARNING!
Scalding and burn hazard!
While cooking under pressure, hot steam is released from the pressure control valve and the parts of the pressure cooker will become hot. You could burn yourself if you come into contact with the steam or hot parts.
- Avoid direct physical contact with the steam that is emitted.
- Do not touch the hot parts of the pressure cooker with bare fingers.
- Only use the handles to hold the hot pressure cooker and the lid.
- Also always use thermally insulating oven gloves or pot holders to hold the pressure cooker and the lid.
- Let the pressure cooker and the lid cool off completely before each cleaning.
WARNING!
Risk of injury and burn hazard due to explosion!
If the pressure cooker or parts of the lid are damaged and you continue to use these parts or if you use the pressure cooker improperly, this may result in severe injuries as the result of an explosion or burns.
- Stop using the pressure cooker if the parts of the pressure cooker exhibit cracks or breaks or are deformed. Only replace damaged parts with corresponding original spare parts. Contact the manufacturer at the service address specified on the warranty card.
- Check to make sure the safety valve, the pressure control valve, and the lid sealing ring are clean and functional before each use.
- Except for the specified cleaning and care, do not modify any part of the safety systems of the pressure cooker (safety closure and lid valves).
- Do not use the pressure cooker for frying and deep frying with oil when it is under pressure.
- When preparing pasty contents, gently shake the pressure cooker before you open it after cooking.
- Never fill the pressure cooker more than the indicated maximum fill amount (2/3 of the nominal volume).
- When preparing food like rice or dry vegetables that expand during the cooking process, fill the pressure cooker to no more than half of the nominal volume.

CAUTION!
Scalding hazard!
When cooking cold cuts with a synthetic casing, the casing may expand and pop when being cooked under pressure. When cooking meat with skin, the meat expands during the cooking process and if you puncture it, hot water may spray out of it. Contact with hot spraying water may scald you.
- Always puncture cold cuts with a synthetic casing before you cook them to prevent them from popping.
- Do not puncture meat with skin after cooking it; instead always let it shrink down.
NOTICE!
Risk of damage!
Using the pressure cooker with unsuitable heat sources or failure to sufficiently fill the pressure cooker may cause damage to the pressure cooker.
- Only use the heat sources specified in this user manual (see chapter “Explanation of symbols”).
- Do not use the pressure cooker in hot ovens.
- Always observe the minimum fill amount for the pressure cooker.
- Never heat the pressure cooker under pressure unless you have previously filled the pressure cooker with water.
Safety systems
Safety window
If the pressure in the pressure cooker is too high, the sealing ring 17 in the lid 12 will push out through the safety window 10 (see fig. A). This will release any excess steam.
Safety valve
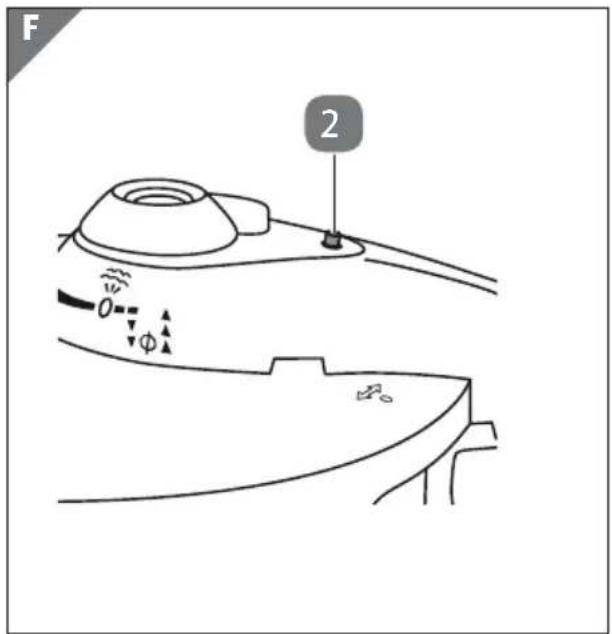
The safety valve 2 in the lid 12 will show whether the pressure cooker is under pressure (see fig. A). If the safety valve is visibly protruding from the lid, pressure has built up in the pressure cooker. The pressure cooker is now locked and can no longer be opened (see fig. F).
As soon as the pressure in the pressure cooker is diminishing, the safety valve will lower back into the lid. If the safety valve is no longer protruding from the lid, the pressure cooker is no longer locked and you can open it.
Checking the pressure cooker and product contents
NOTICE!
Risk of damage!
If you are not cautious when opening the packaging with a sharp knife or other pointy objects, you may quickly damage the pressure cooker.
- For this reason, be very careful when opening it.
- Take the pot 7 and the lid 12 out of the packaging.
- Check whether the delivery is complete (see fig. A, B, and K as well as the list on p.6).
- Check whether the pressure cooker or individual parts thereof exhibit damages. If this is the case, do not use the pressure cooker. Contact the manufacturer at the service address specified on the warranty card.
Use
Cleaning the pressure cooker for the first time
- Clean all parts of the pressure cooker before first use as described in the chapter "Cleaning, care, and storage".
Adding food
NOTICE!
Risk of damage!
The pressure cooker may be damaged if you do not fill the pressure cooker sufficiently or excessively or if you do not add any liquid or too little.
- Always add 8.45 – 10.14 fl. oz. (250-300 ml) of liquid to the pressure cooker regardless of the quantity of food.
- Follow the minimum fill amount of at least 1/3 of the nominal volume and maximum fill amount of 1/2 of the nominal volume for food that expands or 2/3 of the nominal volume for all other meals.
The fill amounts consist of liquid + food.
NOTICE!
Risk of damage!
If you put salt in cold water contained in the pressure cooker, this may damage the bottom of the pot.
- Always be sure to only add salt to water if it is already boiling.
-
Add the liquid needed to form steam (water, stock or sauce) to the pot 7.
-
Add the food.
-
Close the pressure cooker as described in the chapter "Closing the pressure cooker".
Closing the pressure cooker
- Place the lid 12 on the pot 7. The closing marks 6 on the lid and the pot handle 5 must be across from one another (see fig. E).
- Push the lid handle 4 and the handle of the pressure cooker so that they are over one another. The locking slider 3 will audibly lock into place.
The pressure cooker is closed and you can now heat it.
Pressure cooking
NOTICE!
Risk of damage!
The pressure cooker may be damaged if the heat supplied to it is not reduced in the presence of overpressure.
- In the event of overpressure, a red ring will become visible on the pressure level indicator and the pot will release steam. In this case, immediately reduce the heat supplied from the heat source until the red ring is no longer visible.
- Turn the valve cap 1 of the pressure control valve 16 to the position indicating the suitable pressure level for the food added (see the chapter "Pressures and cooking times").
- Place the closed pressure cooker with the selected pressure level on the stove.
- Set the stove to the maximum heat.
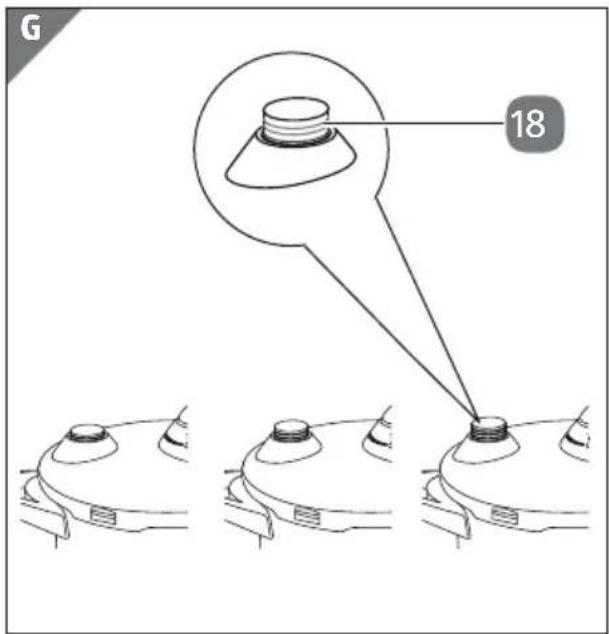
Pressure will build up in the pressure cooker. The red safety valve 2 and the pressure level indicator 13 will display the build-up of pressure in the pressure cooker (see fig. F and fig. G).
Depending on the amount of food added, it will take a few minutes for the pressure cooker to reach the set pressure. If pressure is continually released by the pressure control valve 16 and the green rings on the pressure level indicator 18 are visible, the set pressure level has been reached. The cooking time will then begin.
- Now set the stove to low heat.
- Leave the pressure cooker on the stove for the cooking time indicated in the recipe (see chapter "Pressures and cooking times" and, if applicable, your own recipe).
- Once the cooking time has passed, turn the stove off.
- Release the pressure in the pressure cooker as described in the chapter "Reducing the pressure in the pressure cooker".
Reducing the pressure in the pressure cooker
WARNING!
Scalding hazard!
The steam that is emitted is very hot. The steam is emitted from the top of the pressure cooker.
- Keep your hands, head, and body away from the area where the steam is released.
There are two ways to reduce the pressure in the pressure cooker:
- Let the pressure cooker cool off: This is particularly recommended when preparing foamy and pasty meals.
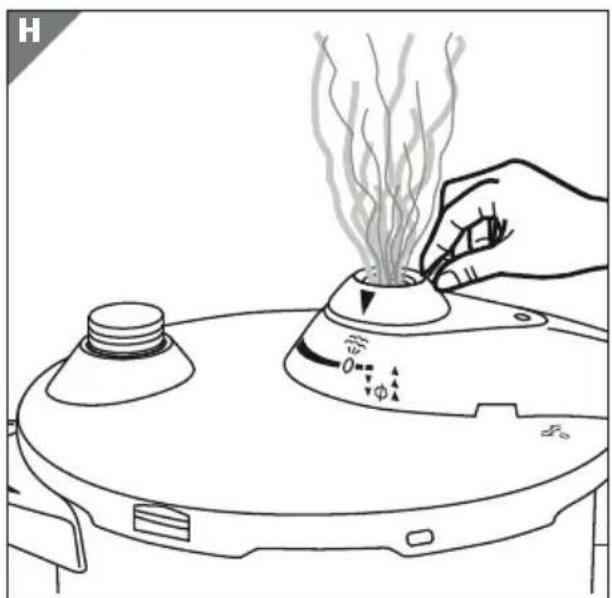
- Slowly release the pressure via the pressure control valve 16 (see fig. H).
Letting the pressure cooker cool off
- Set the pressure cooker on a heat-resistant base, e.g. on a cold stovetop.
- After cooking, wait until the safety valve 2 has completely receded into the lid 12 (see fig. A).
- If the safety valve is no longer protruding from the pressure cooker, open the pressure cooker as described in the chapter "Opening the pressure cooker".
Slowly reducing the pressure via the pressure control valve
-
Slowly turn the valve cap 1 of the pressure control valve 16 gradually to position 0.
-
If the safety valve 2 is no longer protruding from the lid 12, open the pressure cooker as described in the chapter "Opening the pressure cooker".
Opening the pressure cooker
- Push the locking slider 3 towards the lid 12 (see fig. C).
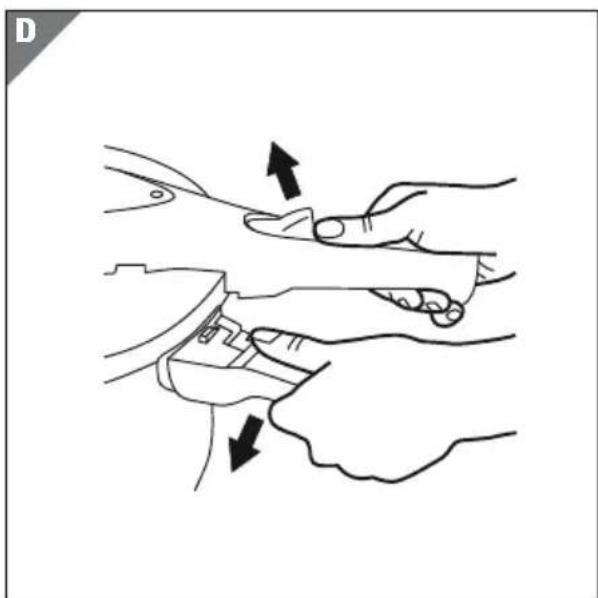
- Using the lid handle 4, turn the lid couterclockwise (see fig. D). The closing marks on the lid and the pot handle 5 must be across from one another (see fig. E).
- Lift the lid off of the pot 7.
Pressures and cooking times
Pressures
| Position Pressure | |
| 1 Low | |
| 2 Fast | |
 | Pressure release |
 | Removing and cleaning the valve |
Cooking times
The following cooking times are approximate values as the exact cooking times always depend on the quality and the amount of the food to be cooked.
Frozen foods do not have to be thawed before cooking. Extending the cooking time is sufficient.
Soups and stews
| Food Cooking time | (minutes) | Pressure |
| Bean soup 20 2 | ||
| Pea soup (peas not soaked) 20 – 25 2 | ||
| Vegetable soup 4 – 8 2 | ||
| Semolina soup 3 – 5 2 | ||
| Goulash soup 10 – 15 2 | ||
| Potato soup | 5 – 6 2 | |
| Bone broth | 20 – 25 2 | |
| Minestrone | 8 – 10 | 2 |
| Rice soup | 6 – 8 2 | |
| Beef broth | 35 – 40 | 2 |
| Boiling hen | 25 – 35 | 2 |
| Tomato soup with rice | 6 – 8 2 | |
| Cabbage stewLentils (soaked) 13 – 15 2 | 15 | 2 |
| Pichelsteiner stew 20 2 | ||
| Serbian beef 8 – 10 2 |
Vegetables
| Food Cooking time | (minutes) | Pressure |
| Cauliflower 3 – 7 l | ||
| Green peas 3 – 5 l | ||
| Carrots 3 – 7 l | ||
| Stuffed peppers 6 – 8 l | ||
| Mushrooms | 6 – 8 l | |
| Red beets | 15 – 25 | l |
| Cabbage | 5 – 15 | l |
| Spinach | 3 – 4 l | |
| Beans | 6 – 10 2 | |
| Potatoes | 6 – 8 2 | |
| Jacket potatoes | 6 – 12 | 2 |
| Celery root | 12 – 15 2 |
Meat
| Food | Cooking time (minutes) | Pressure |
| Knuckle of pork | 30 – 40 | 2 |
| Goulash | 15 – 20 | 2 |
| Ground beef | 5 – 10 | 2 |
| Chicken | 20 – 25 | 2 |
| Veal strips | 6 | 2 |
| Roast veal | 15 – 20 | 2 |
| Veal fricassee | 5 | 2 |
| Turkey drumstick | 25 – 35 | 2 |
| Food Cooking time | (minutes) | Pressure |
| Roast beef 40 – 50 2 | ||
| Spareribs 10 – 12 2 | ||
| Roulades 15 – 20 2 | ||
| Marinated beef 30 – 35 2 | ||
| Roast pork 25 – 30 2 | ||
| Roasted pork shank 25 – 35 2 | ||
| Braised leg of venison 25 – 30 2 |
Fish
| Food Cooking time | (minutes) | Pressure |
| Steamed fish with potatoes 6 – 8 | 1 | |
| Fish in white wine sauce with potatoes | 6 – 8 | 1 |
| Haddock | 4 – 6 | 1 |
Notes on preparing food and cooking times
Soups and stews with roasted meat
- Leave the pressure cooker open when cooking foamy meals; remove the foam before closing the pressure cooker.
- If the cooking times for the ingredients (e.g. meat and vegetables) do not differ considerably: sear the meat and add the vegetables when deglazing it.
- If the cooking times for the ingredients vary greatly: stop cooking the meat and for the last minutes, add the vegetables. This will ensure that the meat and vegetables are finished at the same time.
Vegetables

TIP: First select a shorter cooking time. It can always be cooked further.
The finer the vegetables are cut, the shorter the cooking time.
- If you would like your vegetables crisp: Reduce the cooking time.
- Extend the cooking time for larger quantities.
Meat
- Always roast meat in the pressure cooker without the lid and only add the required liquid when deglazing the meat.
- Cut through pieces of meat that are too large, sear them and stack them until they are finished cooking.
Fish
- As fish stock is very sticky: Immediately take off the lid as soon as the pressure in the pressure cooker has been completely released.
Frozen food
- You do not have to thaw frozen food before cooking it in the pressure cooker; instead, extend the cooking time slightly.
Stewing insert
You can steam or stew food with the stewing insert 19. This will preserve water-soluble vitamins and nutrients in the food while it is cooked.
- Set the insert stand 20 on the bottom of the pot 7 and put the stewing insert on it.
- Add enough liquid so that it does not penetrate the stewing insert.
- Place the food you would like to steam or stew in the stewing insert.
- Close the pressure cooker as described in the chapter "Closing the pressure cooker".
Cleaning, care, and storage
NOTICE!
Improper cleaning!
If you do not clean the pressure cooker properly, you could damage it or parts of it.
- Clean the pressure cooker after each use.
- Do not use any aggressive cleaners such as alkaline or chlorine-based cleaners and do not use sharp or metallic cleaning utensils such as knives, hard scrapers or similar.
- Use lemon or vinegar to remove stains from the bottom of the pot.
- Do not in any case put the lid in the dishwasher.
Cleaning the pressure cooker
-
Let the pot 7, the lid 12 as well as the stewing insert 19 and the insert stand 20 cool off completely.
-
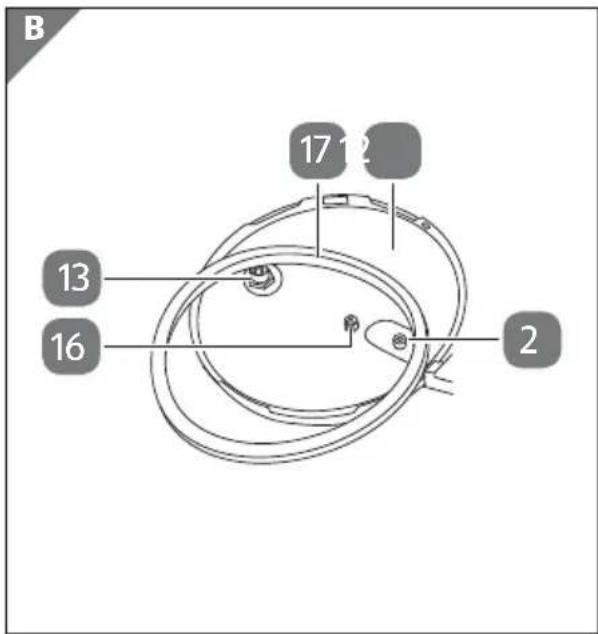
Take the sealing ring 17 out of the lid (see fig. B).
- Clean the pot, the lid, the stewing insert, and the insert stand with hot water and liquid detergent or put the pressure cooker, the stewing insert, and the insert stand in the dishwasher without the lid.
- Clean the sealing ring, the safety valve 2, and the pressure control valve 16 as described in the chapters "Cleaning and replacing the sealing ring" and "Cleaning the valves".
- Let all parts dry completely.
Cleaning and replacing the sealing ring
- Wipe the sealing ring 17 off and rinse it under running water (see fig. B).
- Let the sealing ring dry completely.
- Put the sealing ring back in the lid 12 (see fig. B).
- In the event of normal use of the lid, replace the sealing ring once a year, but no later than when it has become hard or dark.
Cleaning the valves
Cleaning the safety valve
-
Rinse the safety valve 2 under running water (see fig. B).
-
With a pointy object, check whether the pin on the safety valve can be pushed in or whether the safety valve may be plugged (see fig. J).
The safety valve on the bottom of the lid should move easily and must not stuck in place.
Cleaning the pressure control valve
- Push and turn the valve cap 1 of the pressure control valve 16 to the position for removing the valve cap 14 and pull the valve cap up and off the lid 12.
- Pull the pressure control valve 16 up and off (see fig. I).
- Clean the pressure control valve under running water.
- Clean the bottom part of the pressure control valve on the inside of the lid (see fig. J).
- Put the pressure control valve back in the lid.
- Put the valve cap back into the lid.
Make sure that the grooves of the pressure control valve and the grooves of the valve cap are each placed in the corresponding guide in the lid.
- Turn the valve cap of the pressure control valve and check that you have inserted the pressure control valve and valve cap correctly and that they are able to move normally.
Maintenance and storage
Checking that the handles are secure
- Regularly check whether the pot handle 5 and the side handle 11 are still secure (see fig. A).
- If one of the handles is loose, use a commercially available cross-slotted screwdriver to tighten it.
Storing the pressure cooker
- Once clean, always store the pot 7 and the cleaned lid 12 in a clean, dry area like a kitchen cabinet.
- Do not place the lid on the pot, instead e.g. turn it over and then set it on the pot.
Replacing the sealing ring of the pressure level indicator
Regularly check the condition of the sealing ring 9 of the pressure level indicator 13 and replace it with a new one if necessary.
- Pull the sealing ring on the bottom side of the lid 12 off of the pressure level indicator.
- Push the new sealing ring all the way over the pressure level indicator so that it is securely seated in the guide groove of the pressure level indicator.
Replacement parts and other accessories
Repairs may only be performed by authorized persons.
- In the event of a repair, contact our customer service team at the service address specified on the warranty card.
You can order the following replacement parts and accessories on the website www.schnellkochtopf24.de:
| Replacement part/accessory Article number | |
| Sealing ring 507048000 | |
| Pressure control valve 507026000 | |
| Stewing insert 507010000 | |
| Silicone cap 507042000 | |
Troubleshooting
| Fault Possible cause/solution | |
| It takes a very long time to parboil food. | Not enough heat is being supplied.- Set the stove to maximum heat. |
| The red safety valve is not raised during cooking and no steam is emitted from the safety valve. | This is normal during the first minutes of cooking while the pressure builds up in the pressure cooker.If this occurs while cooking, check the following:Is enough heat being supplied?- If necessary, increase the amount of heat supplied.Is there enough liquid in the pressure cooker?- If necessary, increase the amount of liquid.Is the valve cap of the pressure control valve set to the “Reduce pressure” position?- Turn it to the desired pressure.Is the pressure cooker well sealed?- If necessary, close it again.Is the sealing ring or edge of the pot damaged?- Stop cooking and, if necessary, replace the sealing ring or stop using the pressure cooker. |
| The red safety valve is raised while cooking and no steam is emitted from the safety valve. | 1. To reduce the pressure, hold the pressure cooker under cold water.2. Open the pressure cooker.3. Clean the pressure control valve and the safety valve. |
| Steam is emitted around the edge of the lid. | Check the following:Is the lid closed?- If necessary, close the lid again.Has the sealing ring been properly inserted in the lid?- Stop cooking and, if necessary, insert the sealing ring properly.Is the sealing ring functioning properly or does it have to be replaced?- Stop cooking and, if necessary, replace the sealing ring.Are the lid, pressure control valve and safety valve clean?- Stop cooking and, if necessary, clean the pressure control valve and the safety valve.Is the edge of the pot in proper condition?- Stop cooking and, if necessary, stop using the pressure cooker. |
| The lid won't open. | The safety valve has not lowered all the way down.- Release the pressure in the pressure cooker.- If necessary, cool the pressure cooker under cold water. |
| The food has burned onto the pot while cooking or is not done. | Check the following:Was the cooking time too long or too short?Is the output of the heat source correct?Has the pressure control valve been set to the correct cooking level?Was enough liquid added? |
| The food is burned onto the pot after cooking. | - Let the pressure cooker soak in water for a while before you clean it. |
| One of the safety systems (safety valve, sealing ring in the safety window) triggers. | Turn off the heat supply.Let the pressure cooker cool off.Open the pressure cooker.Check and clean the pressure control valve, the safety valve, and the sealing ring. |
| A handle on the pressure cooker is loose. | - Use a commercially-available cross-slotted screw-driver to tighten the handle. |
Technical data
Type: 6.3 Qt (6 l) pressure cooker
Article number: 93596
Pressure cooker:
Material:
Body: non-rusting stainless steel 18 10 SUS304, material number 14301
Handles: plastic
Bottom: non-rusting stainless steel 18 10 SUS430, material number 14016
Material thicknesses:
Bottom: approx. 0.20" (5.2 mm)
Wall: approx. 0.05" (1.2 mm)
Diameter:
Bottom: approx. 7.48" (19 cm)
Wall: approx. 8.66" (22 cm)
Nominal volume: 202.88 fl. oz. (6 l)
Fill amount (max. 2/3): 135.26 fl. oz. (4 l)
Height: approx. 6.5" (16.5 cm)
Weight: approx. 71.96 oz. (2040 g)
Lid:
Material: non-rusting stainless steel 18 10 SUS304, material number 14301
Material thickness: approx. 0.05" (1.2 mm)
Weight: approx. 34.57 oz. (980 g)
Pressures/working pressure (pressure control valve): progressively adjustable spring valve from 8.7 psi (60 kPa) to 14.5 psi (100 kPa), max. 43.51 psi (300 kPa)
Stewing insert including insert support:
Material: non-rusting stainless steel 18 10 SUS304, material number 14301
Disposal
Disposing of the packaging
The packaging consists of recyclable materials. Please dispose of them in an environmentally-friendly manner and sorted into single-type materials via the designated collection bins.
Dispose of the cardboard packaging sorted into single-type materials by making them available to the collection service for waste paper.
Dispose of the packaging wrapper in accordance with the applicable laws and regulations for your country.
Disposing of the pressure cooker
Should the pressure cooker no longer be capable of being used at some point in time, dispose of it in accordance with the regulations in force in your state or country.
Please ensure your recycling information does apply to the local regulations and the EPA recommendations (www.epa.gov).

CROFTON®
WARRANTY CARD
6.3 QT (6L) PRESSURE COOKER
Your details:
Name ____
Address

Date of purchase* ____
* We recommend you keep the receipt with this warranty card.
Location of purchase ____
Description of malfunction
Return your completed warranty card together with the faulty product to:
TM3 Service
533 Church Street #252
Nashville TN 37203
USA
tm3service@outlook.com
Toll-free hotline
Operating hours:
10 am - 6 pm EST

Warranty conditions
Dear Customer,
The ALDI warranty offers you extensive benefits compared to the statutory obligation arising from a warranty:
Warranty period: 3 years from date of purchase.
6 months for wear parts and consumables under normal and proper conditions of use (e.g. rechargeable batteries).
Costs: Free repair/exchange or refund.
No transport costs.
ADVICE: Please contact our service hotline by phone, e-mail or fax before sending in the device. This allows us to provide support in the event of possible operator errors.
In order to make a claim under the warranty, please send us:
• together with the faulty item, the original receipt and the warranty card properly completed.
- the faulty product with all components included in the packaging.
The warranty does not cover damage caused by:
- Accident or unanticipated events (e.g. lightning, water, fire).
- Improper use or transport.
- Disregard of the safety and maintenance instructions.
- Other improper treatment or modification.
After the expiry of the warranty period, you still have the possibility to have your product repaired at your own expense. If the repair or the estimate of costs is not free of charge you will be informed accordingly in advance.
This warranty does not limit the statutory obligation of the seller arising from a warranty. The period of warranty can only be extended in accordance with a legal standard. In countries where a (compulsory) warranty and/or spare part storage and/or a system for compensation are/is required by law, the statutory minimum conditions apply. In the event that a product is received for repair, neither the service company nor the seller will assume any liability for data or settings possibly stored on the product by the customer.
Contenido
Conjunto 4
Uso 5
Pared: aprox. 0.05" (1.2 mm)
Diámetro:
Fondo: aprox. 7.48" (19 cm)
Pared: aprox. 8.66" (22 cm)
Volumen nominal: 6.3 Qt (6 l)
533 Church Street #252
Nashville TN 37203
USA
tm3service@outlook.com
SERVICIO DE POSVENTA

USA 1-877-386-8264

tm3service@outlook.com


- CONTENTS
- SCOPE OF DELIVERY/DEVICE PARTS
- GENERAL INFORMATION
- READING AND STORING THE USER MANUAL
- EXPLANATION OF SYMBOLS
- WARNING
- CAUTION
- NOTICE
- SAFETY
- PROPER USE
- SAFETY NOTES
- DANGER OF SUFFOCATION
- RISK OF INJURY
- FIRE AND BURN HAZARD
- SCALDING AND BURN HAZARD
- RISK OF INJURY AND BURN HAZARD DUE TO EXPLOSION
- SCALDING HAZARD
- RISK OF DAMAGE
- SAFETY SYSTEMS
- SAFETY WINDOW
- SAFETY VALVE
- CHECKING THE PRESSURE COOKER AND PRODUCT CONTENTS
- USE
- CLEANING THE PRESSURE COOKER FOR THE FIRST TIME
- ADDING FOOD
- CLOSING THE PRESSURE COOKER
- PRESSURE COOKING
- REDUCING THE PRESSURE IN THE PRESSURE COOKER
- LETTING THE PRESSURE COOKER COOL OFF
- SLOWLY REDUCING THE PRESSURE VIA THE PRESSURE CONTROL VALVE
- OPENING THE PRESSURE COOKER
- PRESSURES AND COOKING TIMES
- COOKING TIMES
- NOTES ON PREPARING FOOD AND COOKING TIMES
- SOUPS AND STEWS WITH ROASTED MEAT
- VEGETABLES
- MEAT
- FISH
- FROZEN FOOD
- STEWING INSERT
- CLEANING, CARE, AND STORAGE
- IMPROPER CLEANING
- CLEANING THE PRESSURE COOKER
- CLEANING AND REPLACING THE SEALING RING
- CLEANING THE VALVES
- CLEANING THE SAFETY VALVE
- CLEANING THE PRESSURE CONTROL VALVE
- MAINTENANCE AND STORAGE
- CHECKING THAT THE HANDLES ARE SECURE
- STORING THE PRESSURE COOKER
- REPLACING THE SEALING RING OF THE PRESSURE LEVEL INDICATOR
- REPLACEMENT PARTS AND OTHER ACCESSORIES
- TECHNICAL DATA
- DISPOSAL
- DISPOSING OF THE PACKAGING
- DISPOSING OF THE PRESSURE COOKER
- CROFTON®
- WARRANTY CARD
- 6.3 QT (6L) PRESSURE COOKER
- WARRANTY CONDITIONS
- IN ORDER TO MAKE A CLAIM UNDER THE WARRANTY, PLEASE SEND US
- CONTENIDO
- SERVICIO DE POSVENTA
Brand : Ambiano
Model : Pressure Cooker
Category : Pressure Cooker