
12 V Lithium Ion Cordless Drill 44217 - Cordless drill Workzone - Free user manual and instructions
Find the device manual for free 12 V Lithium Ion Cordless Drill 44217 Workzone in PDF.


| Product Type | Cordless Drill |
| Brand | Workzone |
| Model | 44217 |
| Voltage | 12 V |
| Battery Type | Lithium Ion |
| Chuck Size | 3/8 inch (10 mm) |
| Max Torque | 20 Nm |
| No-Load Speed | 0-600 RPM |
| Variable Speed Trigger | Yes |
| Forward/Reverse Switch | Yes |
| LED Work Light | Yes |
| Weight | 1.2 kg (2.6 lbs) |
| Dimensions (L x W x H) | 220 x 60 x 200 mm |
| Charging Time | 3-5 hours |
| Battery Capacity | 1.5 Ah |
| Keyless Chuck | Yes |
| Built-in Battery | Removable |
| Max Drilling Diameter (Wood) | 20 mm |
| Max Drilling Diameter (Metal) | 10 mm |
| Safety Features | Lock-on button, overcharge protection |
| Included Accessories | Charger, 2 drill bits, belt clip |
| Warranty | 2 years |
Frequently Asked Questions - 12 V Lithium Ion Cordless Drill 44217 Workzone
User questions about 12 V Lithium Ion Cordless Drill 44217 Workzone
0 question about this device. Answer the ones you know or ask your own.
Ask a new question about this device
Download the instructions for your Cordless drill in PDF format for free! Find your manual 12 V Lithium Ion Cordless Drill 44217 - Workzone and take your electronic device back in hand. On this page are published all the documents necessary for the use of your device. 12 V Lithium Ion Cordless Drill 44217 by Workzone.
USER MANUAL 12 V Lithium Ion Cordless Drill 44217 Workzone
Workplace/Electrical Safety 4
Technical data 4
Workplace 4
Electrical safety 4
Electrical safety 5
Personal safety 5
Power tool use and care 5
Battery use and care 6
Additional safety rule 7
Symbols 8
Charging & Operation 8-11
Recycling & Warranty 12
Explosive View & part list 13
Warranty Card 26
Warranty Conditions 27
Overview

1 Chuck
2 Torque adjustment ring
3 Forward/Reverse rotation control
4 Soft grip handle
5 Battery pack release button
6 Battery pack
7 On/off switch
8 LED working light
9 Two speed control
10 Belt Buckle
Set includes these parts
1 - Fast Charger
6 - Twist Drills- 1/16", 3/32", 1/8", 5/32", 3/16", 1/4"
6 - Screwdriver bits- SL3/16"、SL1/4"、PH1、PH2、PZ1、PZ2
1 - Bit holder

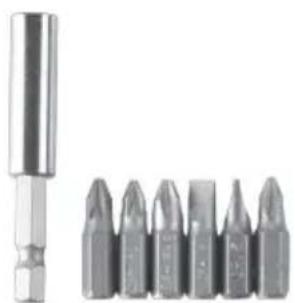

Check if the set is complete and undamaged. Make sure that the plastic parts are not cracked and the cord is not damaged. If you find that parts are missing or damaged, do not use the device but contact customer service at: 1800 505 8311. Keep the packaging or dispose of it in accordance with local regulations.
Caution!
For children's safety do not leave parts of the packaging (plastic bags, cardboard, polystyrene etc.) that could cause suffocation!
Technical data
Voltage: 12 V (LI-ION)
Keyless chuck: 3/8 In.
No-load Speed: 0-350/0-1350 RPM
Max. Torque: 25 Nm
Torque Setting: 18+1
Battery & charger
Battery voltage: 12 V Li-ion
Charger: 1 Hour, Class 2
Will charge battery types:
12 V Li-ion #44217-B
Charger input:
100-120 VAC 60Hz 35 W Max
Charger output: 13.5V d.c 1.8 A
GENERAL SAFETY RULES

WARNING
Read all instructions. Failure to follow all instructions listed below may result in electric shock, fire and/or serious injury. The term “power tool” in all of the warning listed below refers to your mains-operated(corded)power tool or battery-operated(cordless) power tool。
SAVE THESE INSTRUCTIONS
1 Work area
1) Keep work area clean and well lit, cluttered or dark areas invite accidents.
2) Do not operate power tools in explosive atmospheres, such as in the presence of flammable liquids, gases or dust. Power tools create sparks which, may ignite the dust or fumes.
3) Keep children and bystanders away while operating a power tool. Distractions can cause you to lose control.
2 Electrical safety
4) Power tool plugs must match the outlet. Never modify the plug in any way. Do not use any adapter plugs with earthed[ground]power tools.
5) Unmodified plugs and matching outlets will reduce risk of electric shock.
6) Avoid body contact with earthed or grounded surface, such as pipes, radiators, ranges and refrigerators. These are an increased risk of electric shock if your body is earthed or grounded.
7) Do not expose power tools to rain or wet conditions. Water entering a power tool will increase the risk of electric shock.
8) Do not abuse the cord. Never use the cord for carrying, pulling or unplugging the power tool. Keep cord away from heat, oil, sharp edges or moving parts. Damaged or entangled cord increase the risk of electric shock.
9) When operating a power tool outdoors, use an extension cord suitable for outdoor use. Use of a cord suitable for outdoor use reduces the risk of electric shock.
If operating a power tool in a damp location is unavoidable, use a residual current device(RCD) protected supply. Use of an RCD reduce the risk of electric shock
Personal safety
1) Stay alert, watch what you are doing and use common sense when operating a power tool. Do not use a power tool while you are tired or under the influence of drugs, alcohol or medication. A moment of inattention while operating power tools may result in serious personal injury.
2) Use safety equipment. Always wear eye protection. Safety equipment such as dust mask, non-skid safety shoes, hard hat, or hearing protection used for appropriate conditions will reduce personal injuries.
3) Avoid accidental starting, Ensure the switch is in the off-position before plugging in. Carrying power tools with your finger on the switch or plugging in power tools that have the switch on invites accidents.
4) Remove any adjusting key or wrench before turning the power tool on. A wrench or a key left attached to a rotating part of the power tool may result in personal injury.
5) Do not overreach. Keep proper footing and balance at all times. This enables better control of the power tool in unexpected situations.
6) Dress properly. Do not wear loose clothing or jewelry. Keep your hair, clothing and gloves away from moving parts. Loose clothes, jewellery or long hair can be caught in moving parts.
7) If devices are provided for the connection of dust extraction and collection facilities, ensure these are connected and properly used. Use of these devices can reduce dust-related hazards.
Power tool use and care
1) Do not force the power tool. Use the correct power tool for your application. The correct power tool will do the job better and safer at the rate for which it was designed.
2) Do not use the power tool if the switch does not turn it on and off. Any power tool that cannot be controlled with the switch is dangerous and must be repaired.
3) Disconnect the plug from the power source and/or the battery pack from the power tool before making any adjustment, changing accessories or storing power tools. Such preventive safety measures reduce the risk of starting the power tool accidentally.
4) Store idle power tools out of the reach of children and do not allow persons unfamiliar with the power tool or these instructions to operate the power tool. Power tools are dangerous in the hands of untrained users.
5) Maintain power tools. Check for misalignment or binding of moving parts, breakage of parts and any other condition that may affect the power tool's operation. If damaged, have the power tool repaired before use. Many accidents are caused by poorly maintained power tools.
6) Keep cutting tools sharp and clean. Properly maintained cutting tools with sharp cutting edges are less likely to bind and are easier to control.
7) Use the power tool, accessories and tool bits etc. In accordance with these instructions, taking into account the working conditions and the work to be performed. Use of the power tool for operations different from those intended could result in a hazardous situation
Battery tool use and care
1) Endure the switch is in the off position before inserting battery pack. Inserting the battery pack into power tools that have the switch on invites accidents.
2) Recharger only with the charger specified by the manufacturer. A charger that is suitable for one type of battery may create a risk of fire when used with another battery pack.
3) Use power tools only with specifically designated battery packs. Use of any other battery packs may create a risk of injury and fire.
4) When battery pack is not in use, keep it away from other metal objects like paper clips, coins, keys, nails, screws or other small metal object, that can make a connection from one terminal to another. Shorting the battery terminals together may cause burns or a fire.
5) Under abusive conditions, liquid may be ejected from the battery; avoid contact. If contact accidentally occurs, flush with water. If liquid contacts eye, additionally seek medical help. Liquid ejected from the battery may cause irritation or burns
ADDITIONAL SAFETY RULES FOR YOUR CORDLESS DRILL
- Wear ear protectors with cordless drill. Exposure to noise can cause hearing loss.
- Use auxiliary handles supplied with the tool. Always hold the tool with both hands. Less of control can cause personal injury.
- Hold tool by insulated gripping surfaces when performing an operation where the cutting tool may contact hidden wiring. Contact with a "live" and shock the operator.
- Always wear safety goggles or eye protection when using this tool. Use a dust mask or respirator for applications which generate dust.
- Secure the material being drilled. Never hold it in your hand or across legs. Unstable support can cause the drill bit to bind causing loss of control and injury.
- Disconnect battery pack from tool, or place the switch in the locked or off position, before making any assembly, adjustments or changing accessories. Such preventive safety measures reduces the risk of starting the tool accidentally.
- Position yourself to avoid being caught between the tool or side handle and walls or post. Should the bit become bound or jammed in the work, the reaction torque of the tool could crush your hand or leg.
- If the bit becomes bound in the workpiece, release the trigger immediately, reverse the direction of rotation and slowly squeeze the trigger to back out the bit. Be ready for a strong reaction torque. The drill body will tend to twist in the opposite direction as the drill bit is rotating.
- Do not grasp the tool or place your hands too close to the spinning chuck or drill bit. Your hand may be lacerated.
- When installing a drill bit, insert the shank of the bit well within the jaws of the chuck. If the bit is not inserted deep enough, the grip of the jaws over the bit is reduce and the loss of control is increased.
- Do not use dull or damaged bits and accessories. Dull or damaged bits have a greater tendency to bind in the workpiece.
- When removing the bit from the tool avoid contact with skin and use proper protective gloves when grasping the bit or accessory. Accessories may be hot after prolonged use.
SYMBOLS
For your easy reference, here are the tools symbols you may see on your tool label:

CHARGER PROCEDURE

To reduce the risk of injury, user must read and understand instruction manual.
RECHARGING BATTERIES A) CHARGING THE BATTERY
The Li-ion battery is protected against deep discharging. When the battery is empty, the machine is switched off by means of a protective circuit: The chuck no longer rotates.

In a warm environment or after heavy use, the battery pack may become too hot. Allow time for battery to cool down before recharging. [SEE A]
B) IMPORTANT NOTES CHARGING THE BATTERY [SEE A]
a. Connect the power cord of the charger with a wall socket. The charger LED turn green.
b. Slide the battery as far as it will go into the charger, by inserting the battery terminal into the suitable opening of the charger.
c. The charging LED turn red to show the charge starting,
d. when start charging, the three green intelligent battery indicators will illuminate in turn when the capacity reach 30-40%, two indicators will illuminate in turn when the capacity reach70-80%, one indicator will keep flashing when 100% fully charged, three lights will illuminate together. After a few minutes, the indicators will off.
e. After about 1 hour the battery will be fully charged the charging LED will turn to green. Unplug the charger plug from the socket.
![Workzone 12 V Lithium Ion Cordless Drill 44217 - B) IMPORTANT NOTES CHARGING THE BATTERY [SEE A] - 1](/content/2026/06/1322651/images/300f301bf91a84434b08ca7c88fcad4ea81049e08645b1dc7764a71f9e355d6d.jpg)
When battery charge runs out after continuously use or exposure to direct sunlight or heat, allow time for the battery to cool down before recharging to achieve the full charge
REMOVE OR INSTALL THE BATTERY PACK [SEE B]
Locate buttons on side of the battery pack. Depress the battery button to release and slide it out from the tool. After recharge, insert back into the tool. A simple push and slight pressure will be sufficient. [SEE B]

OPERATING INSTRUCTIONS
1. ON/OFF SWITCH [SEE C]
Depress to start and release to stop your drill. The on/off switch is fitted with a brake function which stops your chuck immediately when you quickly release the switch. It is also a variable speed switch that delivers higher speed and torque with increased trigger pressure. Speed is controlled by the amount of switch trigger depression.
![Workzone 12 V Lithium Ion Cordless Drill 44217 - ON/OFF SWITCH [SEE C] - 1](/content/2026/06/1322651/images/108bfa3b8261ac29b61cf89e6e6793f12c6d077580a562d0cd9c386b21c34f7c.jpg)
Do not operate for long periods at low speed because excess heat will be produced internally
Move the lever to the left or right

2. SWITCH LOCK[SEE C]
The On/Off switch trigger can be locked in OFF position. This helps to reduce the possibility of accidental starting when not in use. To lock the switch, place the forward and reverse rotation selector in the center position by pushing it on either side of the drill.
3. REVERSIBLE [SEE C]
The forward/reverse rotation control located above the On/Off switch control the direction of rotation. For drilling and screw driving use forward rotation marked
“ ”(lever is moved to the left). Only use reverse rotation marked “ ” (lever is moved to the right) to remove screws or release a jammed drill bit. When the selector is in the center position, the switch is locked.
4. CHUCK ADJUSTMENT [SEE D]
To open the chuck jaws rotate the front section of the chuck. Insert the drill bit between the chuck jaws and rotates the front section in the opposite direction. Ensure the drill bits is in the center of the chuck jaws.
Finally, firmly rotates the front chuck section in the opposite directions.
Your drill bit is now clamped in the chuck. [SEE D]
5. TORQUE ADJUSTMENT[SEE D]
(Screw driving force of your drill driver) The torque is adjusted by rotating the torque adjustment ring. The torque is greater when the torque adjustment ring is set on a higher setting. The torque is less when the torque adjustment ring is set on a lower setting.

MAKE THE SETTING AS FOLLOWS
1-12 for driving small screws
6-12 for driving medium screws
12-18 for driving larger screws
for heavy drilling

6. SPEED CHANGE [SEE E]
• Always set the speed change lever fully to the correct position. If you
operate the tool with the speed change lever positioned halfway between the "1" side and "2" side, the tool may be damaged.
- Do not use the speed change lever while the tool is running. The tool may be damaged. To change the speed, first switch off the tool and then slide the speed change lever to the "2" side for high speed or "1" side for low speed. Be sure that the speed change lever is set to the correct position before operation. Use the right speed for your job.
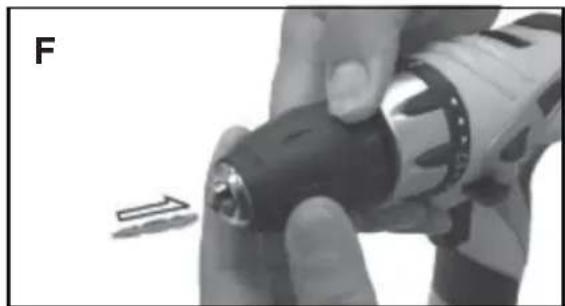
7. INSTALL DRILL BIT INTO THE CHUCK [SEE F]
8. USING THE WORK LIGHT
The sight light allows you to keep a clear view under less illuminated circumstances. To turn on the light simply press the on/off switch. When you release the on/off switch, the light will be off.
9. HOOK
The hook is convenient for temporarily hanging the tool. This can be installed on either side of the tool.
To install the hook, insert it into a groove in the tool housing on either side and then secure it with a screw.
To remove, loosen the screw and then take it out.

10. DRILLING WORK
When drilling into a hard smooth surface, use a center punch to mark the desired hole location. This will prevent the drill bit from slipping off center as the hole is started. Hold the tool firmly and place the tip of the bit at the point to be drilled. Depress the switch trigger to start the tool .Move the drill bit into the workpiece, applying only enough pressure to keep the bit cutting. Do not force or apply side pressure to elongate a hole.
Note:
If your tool stops working when drilling a hole automatically, it's normal. This is the electrical protection for battery. Completely release the ON/OFF switch, then depress it to start the tool again.
Service:
Have your power tool serviced by a qualified repair person using only identical replacement parts.
THE RBRC TM SEAL

The RBRCTM Seal (Rechargeable Battery Recycling Corporation) on the Lithium-ion battery (or battery pack) indicates that the cost of recycling the battery or battery pack have already been paid by the manufacturer.
In some areas, it is illegal to place spent Lithium-ion batteries in the trash or municipal solid waste stream and the RBRC program provides an environmentally conscious alternative.
RBRC in cooperation with the manufacturer and other battery users, has established programs in the United States and Canada to facilitate the collection of spent Lithium-ion batteries. Help protect our environment and conserve natural resources by contacting your local recycling center for information on where to drop off the spent battery, or call 1-877-2-RECYCLE.
WARNING!
Some dust created by power sanding, sawing, grinding, drilling and other construction activities contains chemicals know to the state of California to cause cancer, birth defects or other reproductive harm. Some examples of these chemical are:
- Lead from lead-based paints
- Crystalline silica from bricks and cement and other masonry products
- Arsenic and chromium from chemically-treated lumber.
Your risk from these exposures varies, depending on how often you do this type of work. To reduce your exposure to these chemical: work in a well ventilated area, and work with approved safety equipment, such as those dust masks that are specially designed to Alter out microscopic particles.
CONTAINS NON-SPILLABLE SEALED LITHIUM-ION BATTERY. BATTERY MUST BE RECYCLED OR DISPOSED OF PROPERLY.

Warranty
Warranty terms and conditions are provided in the enclosed Warranty Card. Warranty and post-warranty service of the 12V lithium-ion cordless Cordless drill is provided by American Customer Service. If you have questions regarding this product or its usage, or experience a problem with your purchase, contact Customer Service:
1-800-505-8311
acs@americancustomerservice.com
Monday - Friday
8 a.m. - 8 p.m. Eastern Time (U.S.A.)

| No Parts Description Qty | ||
| 1 Left handed thread screwnail 1 | ||
| 2 Drill chuck 1 | ||
| 3 Torque setting ring 1 | ||
| 4 Plastic Pivot Circle 1 | ||
| 5 Compression spring 1 | ||
| 6 Washer 1 | ||
| 7 Steel ball 12 | ||
| 8 Ball bearing 2 | ||
| 9 Front gearbox casing 1 | ||
| 10 Peg 2 | ||
| 11 Shaft | 1 | |
| 12 Circlip | 1 | |
| 13 Washer | 1 | |
| 14 Lockself core | 1 | |
| 15 Lockself circle | 2 | |
| 16 Peg 6 | ||
| 17 Planet wheel | 1 | |
| 18 Inner-gear ring | 1 | |
| 19 Washer | 1 | |
| 20 Powder metallurgical gear | 5 | |
| 21 Speed-changing Inner gear ring | 1 | |
| 22 Pin | 4 | |
| 23 Speed-changing plastic ring | 1 | |
| 24 Speed-changing plane wheel | 1 | |
| No P | Parts Description Qty | |
| 25 | Powder metallurgical gear | 5 |
| 26 | Plane wheel | 1 |
| 27 | Inner-gear ring | 1 |
| 28 | Powder metallurgical gear | 3 |
| 29 | Washer | 1 |
| 30 | Screwnail | 2 |
| 31 | Back gearbox casing cover | 1 |
| 32 | Motor gear | 1 |
| 33 | Motor | 1 |
| 34 | Plate spring 1 | |
| 35 | Left enclosure | 1 |
| 36 | Speed changing plate | 1 |
| 37 | LED | 1 |
| 38 | Switch lock button 1 | |
| 39 | Switch | 1 |
| 40 | Battery Clip | 1 |
| 41 | Right enclosure | 1 |
| 42 | Screwnail | 9 |
| 43 | Nut | 1 |
| 44 | Bolt | 1 |
| 45 | Hook | 1 |
| 46 | Silver ring | 1 |
| 47 | Screwnail | 4 |
| 48 | Battery pack | 1 |
Contenido
2. BLOQUEAR EL INTERRUPTOR [VER C]
9. GANCHO
Date of purchase* ____
*We recommend you keep the receipt with this warranty card
Location of purchase
Description of malfunction:

Return your completed warranty card to:
American Customer Service
5805C Peachtree Corners
East Norcross,
GA 30092, U.S.A 30092
E-mail:
acs@americancustomerservice.com
AFTER SALES SUPPORT

USA 1800 505 8311

acs@american customerservice.com
PRODUCT CODE: 44217 06/2017
Phone lines available Monday through Friday 8 am - 8 pm EST

Warranty conditions
Dear Customer,
The ALDI warranty offers you extensive benefits compared to the statutory obligation arising from warranty:
Warranty period: 2 year from date of purchase.
6 months for wear parts and consumables under normal and proper conditions of use (e.g. rechargeable batteries).
Costs:: Free repair/exchange or refund.
No transport costs.
ADVICE:
Please contact our service hotline by phone, e-mail or fax before sending in the device. This allows us to provide support in the event of possible operator errors.
In order to make a claim under the warranty, please send us:
- together with the faulty item the original receipt and the warranty card properly completed.
- the faulty product with all components included in the packaging.
The warranty does not cover damage caused by:
- Accident or unanticipated events (e.g. lightning, water, fire).
- Improper use or transport.
- Disregard of the safety and maintenance instructions.
• Other improper treatment or modification.
After the expiry of the warranty period, you still have the possibility to have your product repaired at your own expense. If the repair or the estimate of costs is not free of charge you will be informed accordingly in advance.
This warranty does not limit the statutory obligation of the seller arising from a warranty. The period of warranty can only be extended in accordance with a legal standard. In countries where a (compulsory) warranty and/or spare part storage and/or a system for compensation are/is required by law, the statutory minimum conditions apply. In the event that a product is received for repair, neither the service company nor the seller will assume any liability for data or settings possibly stored on the product by the customer.
TALÁDRO INALÁMBRICO DE 12 V
Sus datos:
Nombre
Dirección

Correo electrónico
Fecha de la compra*
American Customer Service
5805C Peachtree Corners
East Norcross,
GA 30092, U.S.A 30092
Correo electrónico:
acs@americancustomerservice.com
SERVICIO POSVENTA

USA 1800 505 8311

acs@american
customerservice.com
PRODUCT CODE: 44217
06/2017


- OVERVIEW
- SET INCLUDES THESE PARTS
- CAUTION
- TECHNICAL DATA
- BATTERY & CHARGER
- GENERAL SAFETY RULES
- SAVE THESE INSTRUCTIONS
- 1 WORK AREA
- 2 ELECTRICAL SAFETY
- PERSONAL SAFETY
- POWER TOOL USE AND CARE
- BATTERY TOOL USE AND CARE
- ADDITIONAL SAFETY RULES FOR YOUR CORDLESS DRILL
- SYMBOLS
- CHARGER PROCEDURE
- RECHARGING BATTERIES A) CHARGING THE BATTERY
- IMPORTANT NOTES CHARGING THE BATTERY [SEE A]
- REMOVE OR INSTALL THE BATTERY PACK [SEE B]
- OPERATING INSTRUCTIONS
- ON/OFF SWITCH [SEE C]
- SWITCH LOCK[SEE C]
- REVERSIBLE [SEE C]
- CHUCK ADJUSTMENT [SEE D]
- TORQUE ADJUSTMENT[SEE D]
- MAKE THE SETTING AS FOLLOWS
- SPEED CHANGE [SEE E]
- INSTALL DRILL BIT INTO THE CHUCK [SEE F]
- USING THE WORK LIGHT
- HOOK
- DRILLING WORK
- NOTE
- SERVICE
- THE RBRC TM SEAL
- WARNING
- WARRANTY
- CONTENIDO
- BLOQUEAR EL INTERRUPTOR [VER C]
- GANCHO
- WARRANTY CONDITIONS
- ADVICE
- TALÁDRO INALÁMBRICO DE 12 V
Brand : Workzone
Model : 12 V Lithium Ion Cordless Drill 44217
Category : Cordless drill