
MA180 - Modem TP-LINK - Free user manual and instructions
Find the device manual for free MA180 TP-LINK in PDF.


| Product Type | 4G LTE USB Adapter |
| Brand | TP-Link |
| Model | MA180 |
| Dimensions (approx.) | 60 x 25 x 10 mm |
| Weight | 20 g |
| Power Source | USB powered (5V, 500mA) |
| Supported Network | 4G LTE up to 150 Mbps (Cat4) |
| Interface | USB 2.0 |
| MicroSD Card Slot | Yes, up to 32 GB |
| System Compatibility | Windows XP/Vista/7/8/10, Mac OS X, Linux |
| Antenna | Internal |
| LED Indicator | Network status |
| Operating Temperature | 0°C to 40°C |
| Storage Temperature | -20°C to 60°C |
| Humidity | 10% to 90% non-condensing |
| Security Features | PIN code protection for SIM card |
| Maintenance | Keep dry and clean; avoid dust |
| Cleaning | Wipe with soft dry cloth |
| Spare Parts / Repairability | No user-serviceable parts; contact support |
| General Information | Plug and play; requires active SIM card |
Frequently Asked Questions - MA180 TP-LINK
User questions about MA180 TP-LINK
0 question about this device. Answer the ones you know or ask your own.
Ask a new question about this device
Download the instructions for your Modem in PDF format for free! Find your manual MA180 - TP-LINK and take your electronic device back in hand. On this page are published all the documents necessary for the use of your device. MA180 by TP-LINK.
USER MANUAL MA180 TP-LINK
COPYRIGHT & TRADEMARKS
Specifications are subject to change without notice. TP-LINK® is a registered trademark of TP-LINK TECHNOLOGIES CO., LTD. Other brands and product names are trademarks or registered trademarks of their respective holders.
No part of the specifications may be reproduced in any form or by any means or used to make any derivative such as translation, transformation, or adaptation without permission from TP-LINK TECHNOLOGIES CO., LTD. Copyright © 2012 TP-LINK TECHNOLOGIES CO., LTD. All rights reserved.
http://www.tp-link.com
FCC STATEMENT
This equipment has been tested and found to comply with the limits for a Class B digital device, pursuant to part 15 of the FCC Rules. These limits are designed to provide reasonable protection against harmful interference in a residential installation. This equipment generates, uses and can radiate radio frequency energy and, if not installed and used in accordance with the instructions, may cause harmful interference to radio communications. However, there is no guarantee that interference will not occur in a particular installation. If this equipment does cause harmful interference to radio or television reception, which can be determined by turning the equipment off and on, the user is encouraged to try to correct the interference by one or more of the following measures:
- Reorient or relocate the receiving antenna.
- Increase the separation between the equipment and receiver.
- Connect the equipment into an outlet on a circuit different from that to which the receiver is connected.
- Consult the dealer or an experienced radio/TV technician for help.
This device complies with part 15 of the FCC Rules. Operation is subject to the following two conditions:
1) This device may not cause harmful interference. 2) This device must accept any interference received, including interference that may cause undesired operation.
Any changes or modifications not expressly approved by the party responsible for compliance could void the user's authority to operate the equipment.
Note: The manufacturer is not responsible for any radio or TV interference caused by unauthorized modifications to this equipment. Such modifications could void the user's authority to operate the equipment.
CE Mark Warning
CE1588
This is a Class B product. In a domestic environment, this product may cause radio interference, in which case the user may be required to take adequate measures.
Industry Canada Statement:
This device complies with RSS-210 of the Industry Canada Rules. Operation is subject to the following two conditions:
(1) This device may not cause harmful interference, and (2) This device must accept any interference received, including interference that may cause undesired operation.
IMPORTANT NOTE:
Radiation Exposure Statement:
This equipment complies with Canada radiation exposure limits set forth for an uncontrolled environment. This equipment should be installed and operated with minimum distance 20cm between the radiator & your body.
Korea Warning Statements:
DECLARATION OF CONFORMITY
For the following equipment:
Product Description: 3.75G HSUPA USB Adapter
Model No.: MA180
Trademark: TP-LINK
We declare under our own responsibility that the above products satisfy all the technical regulations applicable to the product within the scope of Council Directives:
Directives 1999/5/EC, Directives 2004/108/EC, Directives 2006/95/EC, Directives 1999/519/EC, Directives 2011/65/EU
The above product is in conformity with the following standards or other normative documents
ETSI EN 301 908-1 & ETSI EN 301 908-2
ETSI EN 301 489-1 & ETSI EN 301 489-24
EN60950-1:2006+A11:2009+A1:2010
EN62311:2008
The product carries the CE Mark:
CE1588
Person is responsible for marking this declaration:

Yang Hongliang
Product Manager of International Business
Date of issue: 2012
CONTENTS
Package Contents .... 1
Chapter 1. Product Overview ...... 2
1.1 Introduction ...... 2 1.2 Conventions 2 1.3 Main Features 2 1.4 System Requirement.... 2 1.5 Hardware Overview.... 3
Chapter 2. Installation....4
2.1 Hardware Installation 4 2.2 Software Installation....5
Chapter 3. Connect to Network....9
Chapter 4. Management.... 11
4.1 Interface Introduction ...... 11
4.1.1 Functional Button Icons....11 4.1.2 Status Information Icons 11
4.2 Message 12
4.2.1 Create and Send a Message....13 4.2.2 Search a Message 15 4.2.3 View a Message....15 4.2.4 Message Settings....15
4.3 Phonebook.... 17
4.3.1 Create a Contact....17 4.3.2 Search a Contact ....18 4.3.3 View a contact....18
4.4 Statistic 19
4.4.1 View the Statistics....20 4.4.2 Reset the Statistics 20
4.5 Settings 20
4.5.1 Connecting....20 4.5.2 Security 23 4.5.3 Network....30 4.5.4 Diagnostics 31
4.6 Help....32
Appendix: Specifications.... 33
Package Contents
The following contents should be found in your package:
One MA180 3.75G HSUPA USB Adapter Quick Installation Guide
Note:
Make sure that the above items are contained in the package. If any of the above items are damaged or missing, please contact your distributor.
Chapter 1. Product Overview
1.1 Introduction
TP-LINK's 3.75G HSUPA USB Adapter, MA180 allows you to acquire 3G mobile broadband access simply by inserting a standard 3G SIM/USIM card into the Adapter and plugging it into your laptop or desktop computer. It supports the latest 3.75G HSUPA technology, which provides improved data transfer rates. Equipped with its internal antennas, Micro SD card slot and SIM/USIM card slot, the MA180 is a great choice for you to connect to the Internet in locations that are unable to receive conventional broadband.
1.2 Conventions
The ‘Adapter’ mentioned in this User Guide stands for MA180 3.75G HSUPA USB Adapter without any explanations.
1.3 Main Features
▶ Download speed up to 7.2Mbps ▶ Upload speed up to 5.76Mbps ➢ Micro SD card slot for up to 32GB of storage
1.4 System Requirements
Recommended system configuration:
Operating System: Windows 7/Vista/XP 32/64 bit ▶ CPU: 500MHz Pentium or above ▶ Hard Disk: 20G or above ▶ RAM: 128M or above
1.5 Hardware Overview

LED Explanation:
| Status Indication | |
| Solid Red The Adapter is initializing. | |
| Flashing Red No SIM/USIM card is inserted. | |
| Flashing Green The SIM/USIM card has registered to the network. | |
| Solid Green | The network is available with a successful Internet connection. |
Chapter 2. Installation
2.1 Hardware Installation
Install the Adapter following the steps below:
- Open the cover.
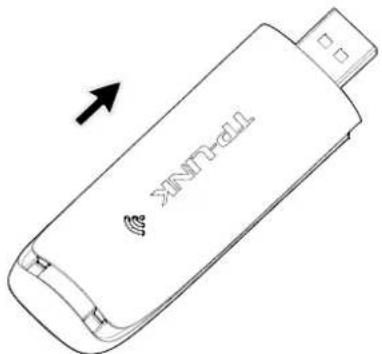
- Insert the SIM card and the Micro SD card in the direction indicated on the Adapter.

Note:
A Micro SD card is an optional accessory. You need to buy one yourself. To remove the Micro SD card, press it to eject it from the Adapter.
- Replace the cover.
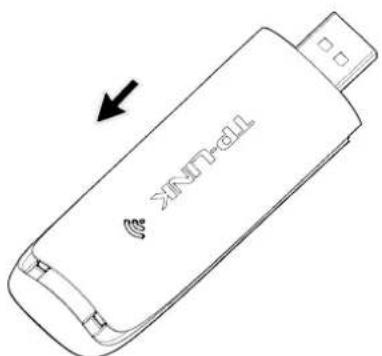
- Plug the Adapter directly into the USB port on your computer.

2.2 Software Installation
The MA180's Setup Wizard will guide you through the installation procedures. The procedures in different systems are quite similar. Here we use the procedures in Windows 7 as an example.
- The window as shown in Figure 2-1 will appear on your desktop. Click Run AutoRun.exe.
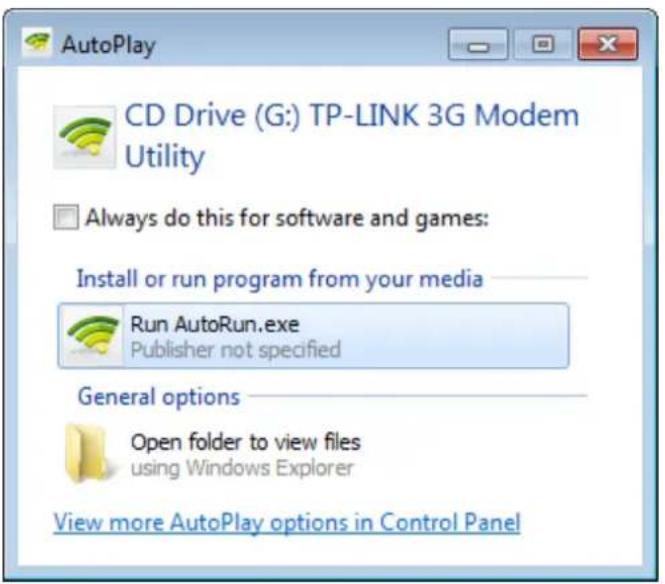
Figure 2-1
Note:
The device will appear as a virtual disk in My Computer. If the above window doesn't appear, please go to My Computer and click the icon to start the installation program.
- The InstallShield Wizard window will appear. Click Next to continue.
Figure 2-2
- Click Change to specify the destination you wish the application to be located or leave it in default location. Click Next to continue.
Figure 2-3
- Click Install to begin the installation.

Figure 2-4
- The installation process may take 1~2 minutes. Please wait.

Figure 2-5
- The screen as shown in Figure 2-6 will then appear. Click Finish to complete the setup.

Figure 2-6

Note:
After installation, the icon will appear on your desktop. Double-clicking it can start the utility.
Chapter 3. Connect to Network
With both the hardware and software successfully installed into your computer, you can quickly connect to network following the steps below.
- After installation, the utility will automatically appear on your desktop. Click on the icon 📋 to display the Network interface.

Figure 3-1
- The network parameters will be configured automatically according to the SIM/USIM card inserted. With successful configuration, a profile name (your ISP name by default) will appear on the interface. Here we use the Profile 1 as an example. Click Connect to establish an Internet connection.
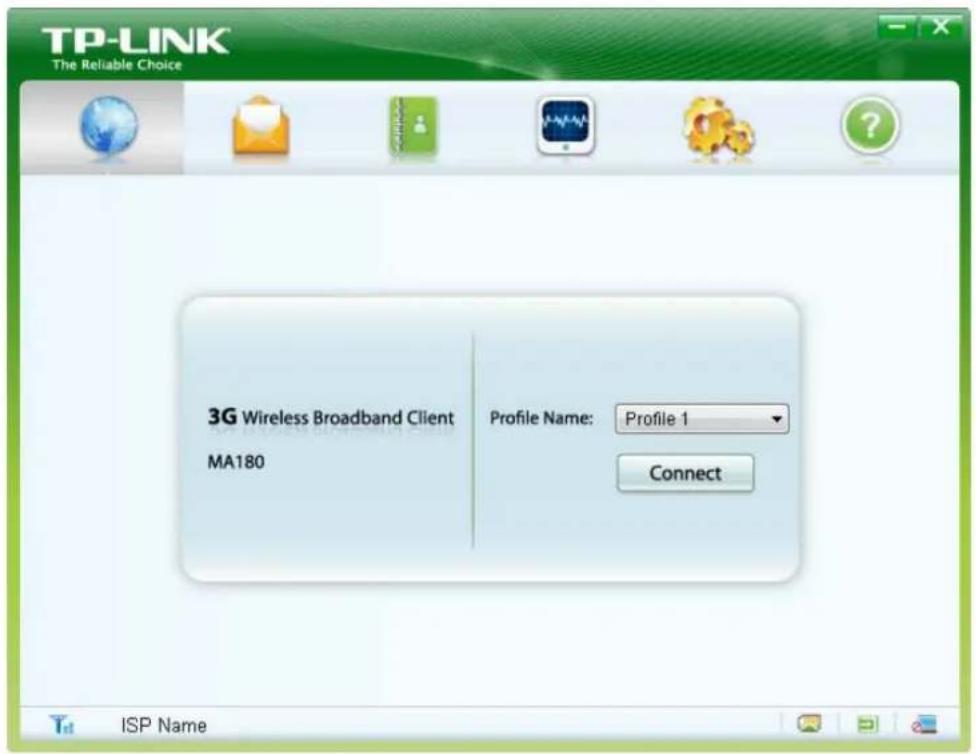
Figure 3-2
- If you see the Disconnect button and the icon 🔒, it indicates that you are now connected to the Internet and can enjoy using it. To disconnect from the Internet, click Disconnect.

Figure 3-3
Chapter 4. Management
This section will show you how to manage the MA180 using the utility.
The MA180 uses utility as the management software. The utility provides you with an easy interface to use various functions and configure the MA180. Double-clicking on the 📋 icon on your desktop will start the utility.
4.1 Interface Introduction
There are various icons on the interface. The followings are detailed descriptions.
4.1.1 Functional Button Icons
There are six functional button icons: Network, Message, Phonebook, Statistic, Settings, and Help. Click any of them to see the corresponding interface.
| Click... To... | |
 | Display the Network interface. |
 | Display the Message interface. |
 | Display the Phonebook interface. |
 | Display the Statistic interface |
 | Display the Settings interface. |
 | Display the Help interface. |
4.1.2 Status Information Icons
These icons indicate the current system status. The following table lists the status information.
| Status | Information |
 | Indicates the network's signal strength. |
| ISP Name | Displays the name of your Internet service provider. |
 | Indicates that the current Internet status is disconnected. |
 | Indicates that the current Internet status is connected. |
 | Indicates that a new message is received (with visual prompt enabled) or there are unread messages. |
 | Indicates that the SIM/USIM card has not been inserted. |
 | Indicates that the SIM/USIM card has been inserted. |
 | Indicates that the PIN protection has been enabled. |
 | Indicates that the Adapter has not been connected to your computer. |
 | Indicates that the Adapter has been connected to your computer. |
4.2 Message
Click the 📋 icon to see the Message interface, as shown in Figure 4-1.

Figure 4-1
Inbox: Saves received messages. Outbox: Saves sent messages. Draftbox: Saves unsent messages.
Note:
Sent and unsent messages can only be saved on the PC.
4.2.1 Create and Send a Message
To create and send a new message, follow these steps:
- Click the 📧 icon above the message list to display the New Message interface, as shown in Figure 4-2.

Figure 4-2
- Enter the recipient's number. There are two methods:
1) Enter the recipient's number directly. 2) Click Send to... and then select a number in the Choose Number interface, as shown in Figure 4-3.

Figure 4-3
- Enter the message content. After editing, you can choose the following options:
Click Send to send the message. Click Save to save the message as a draft. Click Cancel to exit editing of the current message.
Note:
You can also send mass messages following the above steps.
4.2.2 Search a Message
To search for a message, click on the icon 🔒 and then a textbox will appear beside it. Enter the name/phone number of the message sender. Then the matched messages will be displayed in the message list area.
4.2.3 View a Message
To view a message, follow the steps below:
- Select a message to view.
- Click the selected message. The name and phone number of the message sender, message content, and receiving time will be displayed below the message list.
The message cannot be managed by right-clicking it. Please make use of the icons displayed above the message list for the following options:
Delete the selected message.
: Re-edit the content of the selected message.
Reply to the sender of the selected message.
Forward the selected message to other recipients.
Note:
- You can press and hold the Ctrl or Shift key and then click the selected messages. You can also press Ctrl + A to select all the messages in the list. Then you can click on the icon ☑ to delete the selected messages at the same time.
- If you choose to delete a message, it will be deleted permanently. Therefore, be cautious while doing this.
- You can forward only one message at a time.
4.2.4 Message Settings
You can set visual and audio prompt as well as save mode for the received messages. Click on the icon 📋, and then click the Message button to display the interface as shown in Figure 4-4.

Figure 4-4
4.2.4.1 Alert Settings
You can set visual and audio prompt for the received messages in the Text message handling area.
Show a notification when a new text message arrives
With this item checked, when a new message arrives, a dialog box read "New message in!" will appear on the lower-right corner of your computer screen for about three seconds and then disappear. Meanwhile the icon 📧 will appear at the bottom of the utility interface. Click the words or go to the message interface to view the new message.
➢ Play a sound when a new text message arrives
With this item checked, the selected tone will be played when a new message arrives. To select a tone file, follow the steps below:
- Type the path and file name of the tone file into the "Sound file name" field or click the Browse button to locate a tone file.
- Click Test to play the tone; click Stop to stop playing the tone.
4.2.4.2 Save Mode Settings
You can specify a location to save the received messages in the New Message Save Mode area. When a new message arrives, it will be saved in the specified location.
4.3 Phonebook
Click on the icon 📄, and you will see the Phonebook interface, as shown in Figure 4-5.

Figure 4-5
4.3.1 Create a Contact
To create a contact, follow the steps below:
- Choose a location for the new contact by clicking the PC button or the SIM button.
- Click on the icon 📋 above the contact list to display the New Contact interface. It differs according to the location you choose.
1) If you choose to save the contact on the SIM/USIM card, the interface as shown in Figure 4-6 will appear.

Figure 4-6
2) If you choose to save the contact on your PC, the interface as shown in Figure 4-7 will appear.

Figure 4-7
- Enter the above information.
- Click OK to save the contact or click Cancel to exit edition of the current contact.
4.3.2 Search a Contact
To search a contact, click on the icon and a textbox will appear beside it. Enter the name/phone number and then the matched contacts will be displayed in the contact list area.
4.3.3 View a contact
To view a contact, follow the steps below:
- Choose your desired location.
- Select a contact to view.
- Click the selected contact. The contact information will be displayed below the contact list.
The contact can't be managed by right-clicking it. Please make use of the icons above the contact list for the following options:

: Edit the selected contact.

Delete the selected contact.

Send a message to the mobile number of the selected contact.

Note:
If you choose to delete the selected contact, it will be deleted permanently. Therefore, be cautious while doing this.
4.4 Statistic
This function allows you to view the current network traffic. Click on the icon 📋, and you will see the Statistic interface as shown in Figure 4-8. The navigation tree on the left displays traffic statistics. The diagram on the right displays the velocity waveform.

Figure 4-8
4.4.1 View the Statistics
Click the following tabs in the navigation tree to view corresponding statistics.
➢ Transfer Time: Displays the duration of the current connection. Upload: Displays the upload speed and date of the current connection. ➢ Download: Displays the download speed and date of the current connection. Daily: Displays the daily uploaded and downloaded data. Monthly: Displays the monthly uploaded and downloaded data. Yearly: Displays the yearly uploaded and downloaded data.
4.4.2 Reset the Statistics
To reset the statistics, right-click your desired tab and then choose Reset Statistics. Then the dialog box as shown in Figure 4-9 will appear. Click OK.

Figure 4-9
Note:
The daily/monthly/yearly uploaded and downloaded data can be reset while the transfer time, upload/download speed and date cannot be reset.
4.5 Settings
This section introduces how to configure the Adapter. Click on the icon 🎨 to display the Settings interface.
4.5.1 Connecting
There is much ISP information embedded in the Adapter. If the ISP information of the SIM/USIM card inserted is embedded in the Adapter, the parameters will be set automatically. With successful configuration, the dial-up profile named after your ISP by default will appear in the Profile Name field. You just need to click the Connect button to use the Adapter's network-related
functions. Otherwise, nothing will be displayed in the Profile Name field and you need to create a new dial-up profile according to the actual situation. Click the Connecting button, and you will see the interface as shown in Figure 4-10.

Figure 4-10
4.5.1.1 Create a Profile
To create a profile, follow the steps below:
- Click New to set the Profile Name, APN (Access Point Name) and Authentication.
- Click the Advanced button, and you will see the Advanced interface as shown in Figure 4-11. Complete the parameters as required.

Figure 4-11
- Click Save to save the advanced settings and return to the Dial Config interface.
- Click Save to save this profile, or click Cancel to exit the current edition.
Note:
For details about the above parameters, please contact your ISP.
4.5.1.2 Edit a Profile
To edit a profile, follow the steps below:
- Select a profile from the drop-down list.
- Click Edit to modify the Profile Name, APN (Access Point Name) and Authentication.
- Click Advanced to modify the advanced settings.
- Click Save to save the changes and return to the Dial Config interface.
- Click Save to save the changes, or click Cancel to exit the current modification.
4.5.1.3 Delete a Profile
To delete a profile, follow the steps below:
- Select a profile from the drop-down list.
- Click Delete and a dialog box will appear.
- Click Yes to delete the profile or click No to cancel the deletion.
Note:
The default profile can be edited but can not be deleted.
4.5.1.4 Set a Profile default
To set a profile default, follow the steps below:
- Select a profile from the drop-down list.
- Click Default.
When a profile is set default, the word "Default" will appear in the brackets beside its name, as shown in Figure 4-10. Meanwhile, the profile name displayed on the Network interface will also change from the previous one to the specified one without affecting your current Internet connection. When you start the utility next time, you can use the new default profile or choose your desired one from the drop-down list to connect to the Internet.
4.5.2 Security
PIN (Personal Identity Number) code can protect your card from unauthorized use. The followings are detailed instructions about PIN operation.
Note:
The PIN code and the PUK (PIN Unlocking Key) code are provided along with the SIM/USIM card. For details, please contact your ISP.
4.5.2.1 Enable/Disable the PIN Protection
PIN protection is disabled by default.
To enable it, follow the steps below:
- Choose Enable Pin from the drop-down list, as shown in Figure 4-12.
- Enter the PIN Value.
- Click OK.
![TP-LINK The Reliable Choice Settings Connecting Security Network Message Diagnostics Sim PIN Operation: Enable Pin PIN Value: OK Sim Pin State Pin Status: Pin Disabled Pin remaining attempt[s]: 3 Puk remaining attempt[s]: 10 ISP Name](/content/2026/06/1320584/images/4c21ef68ff5eb62e70be64fb8c6741a92a5f28d4a6d90e96237811fb7fcad20f.jpg)
Figure 4-12
To disable it again, follow the steps below:
- Choose Disable Pin from the drop-down list, as shown in Figure 4-13.
- Enter the PIN Value.
- Click OK.
![TP-LINK The Reliable Choice Settings Connecting Security Network Message Diagnostics Sim PIN Operation: Disable Pin PIN Value: OK Sim Pin State Pin Status: Pin Enabled, Verified Pin remaining attempt[s]: 3 Puk remaining attempt[s]: 10 ISP Name](/content/2026/06/1320584/images/698d4f034f73999887604a013cf881f1bc431060c8b958aebb9aa3fd7266c465.jpg)
Figure 4-13
4.5.2.2 Verify the PIN Code
With PIN protection enabled, you need to enter the PIN code when starting the utility again, as shown in Figure 4-14. Enter the correct PIN code and then click OK to use the Adapter.

Figure 4-14
If you click the Cancel button before entering the PIN code, follow the steps below to verify the PIN protection.
- Click on the icon 🎨 to display the Settings interface.
- Click the Security button.
- Choose Verify Pin from the drop-down list, as shown in Figure 4-15.
- Enter the PIN value.
- Click OK and then you can use the Adapter.
![TP-LINK The Reliable Choice Settings Connecting Security Network Message Diagnostics Sim PIN Operation: Verify Pin PIN Value: OK Sim Pin State Pin Status: Pin Enabled, Not Verified Pin remaining attempt[s]: 3 Puk remaining attempt[s]: 10](/content/2026/06/1320584/images/ae9f8530bdb3a6ce25e5f87406db0b9799b7a801d913ae97ab0962ca190cf0eb.jpg)
Figure 4-15

Note:
The remaining number of attempts for entering the PIN code is displayed on the interface. If you enter the wrong PIN code for a preset number of times, the SIM/USIM card will be locked and you cannot use it to access the Internet until you enter the correct PUK code.
4.5.2.3 Unblock the PIN
When the SIM/USIM card is locked, the PUK Unblock dialog box as shown in Figure 4-16 will appear. Enter the PUK code, new PIN, and then click OK to use the Adapter.

Figure 4-16
If you click the Cancel button before entering the PUK code, follow the steps below to unlock the PIN.
- Click on the icon 🎨 to display the Settings interface.
- Click the Security button.
- Choose Unblock Pin from the drop-down list, as shown in Figure 4-17.
- Enter the PUK value.
- Enter a new PIN code.
- Enter the new one again.
- Click OK and then the SIM/USIM card is unlocked.

Figure 4-17
Note:
1) The remaining number of attempts for entering the PUK code is displayed on the interface. 2) The PIN code should be a numeric string of 4~8 digits.
4.5.2.4 Change the PIN Code
To change the PIN code, follow the steps below:
- Choose Change Pin from the drop-down list, as shown in Figure 4-18.
- Enter the old PIN code.
- Enter a new PIN code.
- Enter the new one again.
- Click OK to save the changes.

Figure 4-18
4.5.3 Network
You can select the search and registration mode here. Click the Network button, and you will see the interface as shown in Figure 4-19.
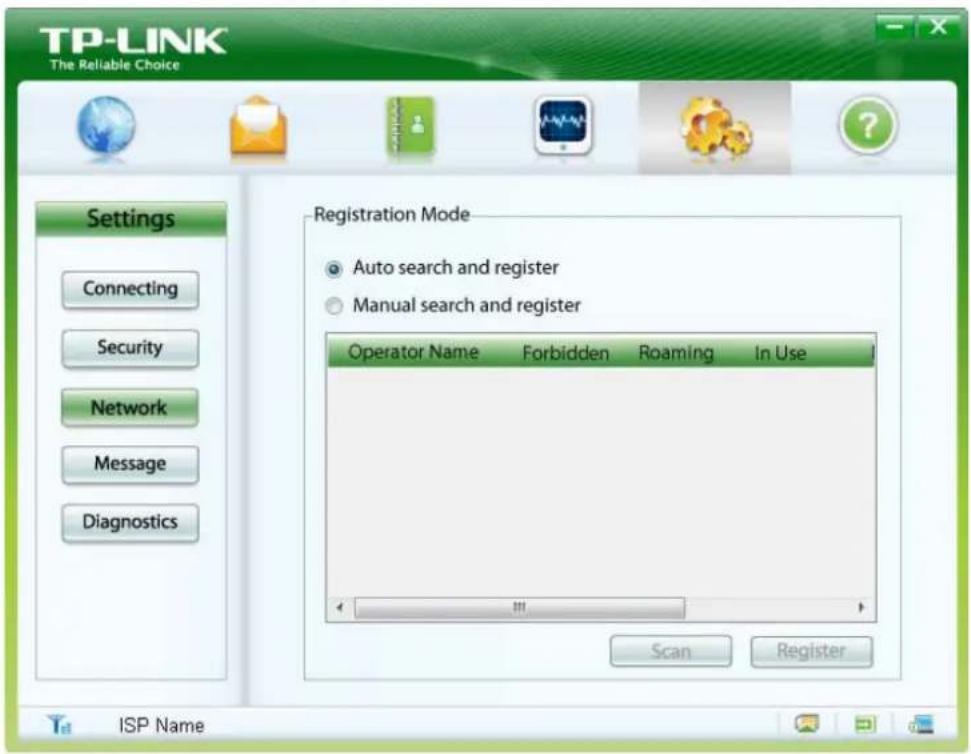
Figure 4-19
Auto search and register: When you select this mode, the Adapter will automatically search and register to an available network. Manual search and register: When you select this mode, follow the steps below to register to an available network.
- Click Scan. After a while, the operator list will appear.
- Select an available operator name in the list.
- Click Register.
Note:
The items above the operator list indicate which network is available. Those with the Forbidden item displayed No are available.
4.5.4 Diagnostics
Click the Diagnostics button, and then you can view the IMEI information about the Adapter, as shown in Figure 4-20. Click Refresh to refresh immediately.

Figure 4-20
4.6 Help
Click on the icon to display the Help interface where you can get information on installation, functions and operation guide, etc.
Appendix: Specifications
| Normal | |
| Network Type WCDMA | |
| Network Services HSUPA, HSDPA, UMTS, GPRS, EDGE and GSM | |
| Bands | GSM (850/900/1800/1900MHz), HSUPA (2100MHz) |
| Data Transfer Rates | Download: 7.2MbpsUpload: 5.76Mbps |
| Antenna Type Internal antenna | |
| Interface USB 2.0 Interface | |
| SIM/USIM Card Slot Supports standard 6-Pin SIM/USIM card | |
| Micro SD Card Slot Supports standard Micro SD card up to 32GB | |
| System Requirement | Windows 7/Vista /XP operating systems |
| Dimensions (W x D x H) | 3.90 x 1.10 x 0.55 in. (99 x 28 x 14 mm) |
| Environmental | |
| Working Temperature | 0°C~40°C (32°F~104°F) |
| Working Humidity | 10% ~ 90% RH, Non-condensing |
| Storage Temperature | -40°C~70°C(-40°F~158°F) |
| Storage Humidity | 5% ~ 90% RH, Non-condensing |
- COPYRIGHT & TRADEMARKS
- FCC STATEMENT
- CE MARK WARNING
- CE
- INDUSTRY CANADA STATEMENT
- IMPORTANT NOTE
- KOREA WARNING STATEMENTS
- DECLARATION OF CONFORMITY
- CONTENTS
- PACKAGE CONTENTS
- CHAPTER 1. PRODUCT OVERVIEW
- CHAPTER 2. INSTALLATION
- CHAPTER 3. CONNECT TO NETWORK
- CHAPTER 4. MANAGEMENT
- NOTE
- INTRODUCTION
- CONVENTIONS
- MAIN FEATURES
- SYSTEM REQUIREMENTS
- HARDWARE OVERVIEW
- HARDWARE INSTALLATION
- SOFTWARE INSTALLATION
- INTERFACE INTRODUCTION
- FUNCTIONAL BUTTON ICONS
- STATUS INFORMATION ICONS
- MESSAGE
- CREATE AND SEND A MESSAGE
- SEARCH A MESSAGE
- VIEW A MESSAGE
- MESSAGE SETTINGS
- ALERT SETTINGS
- SHOW A NOTIFICATION WHEN A NEW TEXT MESSAGE ARRIVES
- ➢ PLAY A SOUND WHEN A NEW TEXT MESSAGE ARRIVES
- SAVE MODE SETTINGS
- PHONEBOOK
- CREATE A CONTACT
- SEARCH A CONTACT
- VIEW A CONTACT
- STATISTIC
- VIEW THE STATISTICS
- RESET THE STATISTICS
- SETTINGS
- CONNECTING
- CREATE A PROFILE
- EDIT A PROFILE
- DELETE A PROFILE
- SET A PROFILE DEFAULT
- SECURITY
- ENABLE/DISABLE THE PIN PROTECTION
- VERIFY THE PIN CODE
- UNBLOCK THE PIN
- CHANGE THE PIN CODE
- NETWORK
- DIAGNOSTICS
- HELP
Brand : TP-LINK
Model : MA180
Category : Modem