
WML 15106 D - Washing machine BEKO - Free user manual and instructions
Find the device manual for free WML 15106 D BEKO in PDF.


| Product Type | Freestanding Washing Machine |
| Loading Type | Front Load |
| Capacity (kg) | 6 kg |
| Maximum Spin Speed (rpm) | 1200 rpm |
| Energy Class | A+++ |
| Noise Level (Wash/Spin) dB(A) | 52 / 74 dB(A) |
| Dimensions (H x W x D) in cm | 84 x 60 x 54 cm |
| Weight (kg) | 63 kg |
| Power Supply | 220-240 V ~50 Hz |
| Programs | Cottons, Synthetics, Delicates, Hand Wash, Quick Wash, Eco, Spin & Drain, Rinse & Hold |
| Key Features | AquaFusion Technology, ProSmart Inverter Motor, Fast Wash 60 min, Child Lock |
| Display | LED Digital Display with Delay Timer |
| Drum Material | Stainless Steel |
| Door Diameter | 32 cm |
| Water Consumption per Cycle (L) | 49 L (for 6 kg cotton 60°C) |
| Annual Energy Consumption (kWh) | 180 kWh |
| Annual Water Consumption (L) | 9200 L |
| Removable Top Panel | Yes (for under counter installation) |
| Warranty (years) | 2 years |
Frequently Asked Questions - WML 15106 D BEKO
User questions about WML 15106 D BEKO
0 question about this device. Answer the ones you know or ask your own.
Ask a new question about this device
Download the instructions for your Washing machine in PDF format for free! Find your manual WML 15106 D - BEKO and take your electronic device back in hand. On this page are published all the documents necessary for the use of your device. WML 15106 D by BEKO.
USER MANUAL WML 15106 D BEKO
1 Important safety instructions
This section contains safety instructions that will help protect from risk of personal injury or property damage. Failure to follow these instructions shall void any warranty.
General safety
- This product should not be used by persons with physical, sensory or mental disorders or unlearned or inexperienced people (including children) unless they are attended by a person who will be responsible for their safety or who will instruct them accordingly for use of the product.
- Never place the product on a carpet-covered floor; otherwise, lack of airflow beneath the machine will cause electrical parts to overheat. This will cause problems with your product.
- Do not operate the product if the power cable / plug is damaged. Call the Authorized Service Agent.
- Have a qualified electrician connect a 16-Ampere fuse to the installation location of the product.
- If the product has a failure, it should not be operated unless it is repaired by the Authorized Service Agent. There is the risk of electric shock!
- This product is designed to resume operating in the event of powering on after a power interruption. If you wish to cancel the programme, see "Cancelling the programme" section.
- Connect the product to a grounded outlet protected by a fuse complying with the values in the "Technical specifications" table. Do not neglect to have the grounding installation made by a qualified electrician. Our company shall not be liable for any damages that will arise when the product is used without grounding in accordance with the local regulations.
- The water supply and draining hoses must be securely fastened and remain undamaged. Otherwise, there is the risk of water leakage.
- Never open the loading door or remove the filter while there is still water in the drum. Otherwise, risk of flooding and injury from hot water will occur.
- Do not force open the locked loading door. The loading door will be ready to open just a few minutes after the washing cycle comes to an end. In case of forcing the loading door to open, the door and the lock mechanism may get damaged.
- Unplug the product when not in use.
- Never wash the product by spreading or pouring water onto it! There is the risk of electric shock!
Never touch the plug with wet hands! Never unplug by pulling on the cable, always pull out by grabbing the plug.
- Use detergents, softeners and supplements suitable for automatic washing machines only.
- Follow the instructions on the textile tags and on the detergent package.
- The product must be unplugged during installation, maintenance, cleaning and repairing procedures.
- Always have the installation and repairing procedures carried out by the Authorized Service Agent. Manufacturer shall not be held liable for damages that may arise from procedures carried out by unauthorized persons.
Intended use
- This product has been designed for domestic use. It is not suitable for commercial use and it must not be used out of its intended use.
- The product must only be used for washing and rinsing of laundry that are marked accordingly.
- The manufacturer waives any responsibility arisen from incorrect usage or transportation.
Children's safety
- Electrical products are dangerous for the children. Keep children away from the product when it is in use. Do not let them to tamper with the product. Use child lock to prevent children from intervening with the product.
- Do not forget to close the loading door when leaving the room where the product is located.
- Store all detergents and additives in a safe place away from the reach of the children.
2 Installation
Refer to the nearest Authorised Service Agent for installation of the product. To make the product ready for use, review the information in the user manual and make sure that the electricity, tap water supply and water drainage systems are appropriate before calling the Authorized Service Agent. If they are not, call a qualified technician and plumber to have any necessary arrangements carried out.
Preparation of the location and electrical, tap water, and waste water installations at the place of installation is under the customer's responsibility. Installation and electrical connections of the product must be carried out by the Authorized Service Agent. The manufacturer shall not be held liable for damages that may arise from procedures carried out by unauthorized persons. ⚠️ Prior to installation, visually check if the product has any defects. If so, do not have it installed. Damaged products cause risks for your safety. Make sure that the water inlet and discharge hoses as well as the power cable are not folded, pinched, or crushed while pushing
the product into its place after installation or cleaning procedures.
Appropriate installation location
- Place the machine on a rigid floor. Do not place it on a long pile rug or similar surfaces.
- The total weight of the washing machine and the dryer - with full load - when they are placed on top of each other reaches approximately 180 kilograms. Place the product on a solid and flat floor that has sufficient load-carrying capacity!
- Do not place the product on the power cable.
- Do not install the product in places where the temperature may fall below 0°C.
- Place the product at least 1 cm away from the edges of other furniture.
Removing packaging reinforcement
Tilt the machine backwards to remove the packaging reinforcement. Remove the packaging reinforcement by pulling the ribbon.
Removing the transportation locks
⚠️ Do not remove the transportation locks before taking out the packaging reinforcement. ⚠️ Remove the transportation safety bolts before operating the washing machine; otherwise, the product will be damaged. 1. Loosen all the bolts with a spanner until they rotate freely (C). 2. Remove the transportation safety bolts by turning them gently. 3. Attach the plastic covers supplied in the User Manual bag into the holes on the rear panel. (P)

Keep the transportation safety bolts in a safe place to reuse when the washing machine needs to be moved again in the future. Never move the product without the transportation safety bolts properly fixed in place!
Connecting water supply
The water supply pressure required to run the product is between 1 to 10 bars (0.1 – 10 MPa). It is necessary to have 10 – 80 liters of water flowing from the fully open tap in one minute to have your machine run smoothly. Attach a pressure reducing valve if water pressure is higher. If you are going to use the double water-inlet product as a single (cold) water-inlet unit, you must install the supplied stopper to the hot water valve before operating the product. (Applies for the products supplied with a blind stopper group.) If you want to use both water inlets of the product, connect the hot water hose after removing the stopper and gasket group from
the hot water valve. (Applies for the products supplied with a blind stopper group.)
⚠️ Models with a single water inlet should not be connected to the hot water tap. In such a case the laundry will get damaged or the product will switch to protection mode and will not operate. Do not use old or used water inlet hoses on the new product. It may cause stains on your laundry.
- Connect the special hoses supplied with the product to the water inlets on the product. Red hose (left) (max. 90 °C) is for hot water inlet, blue hose (right) (max. 25 °C) is for cold water inlet.

⚠ Ensure that the cold and hot water connections are made correctly when installing the product. Otherwise, your laundry will come out hot at the end of the washing process and wear out.
- Tighten all hose nuts by hand. Never use a wrench when tightening the nuts.

- Open the taps completely after making the hose connection to check for water leaks at the connection points. If any leaks occur, turn off the tap and remove the nut. Retighten the nut carefully after checking the seal. To prevent water leakages and damages caused by them, keep the taps closed when the machine is not in use.
Connecting to the drain
- The end of the drain hose must be directly connected to the wastewater drain or to the washbasin. ⚠️ Your house will be flooded if the hose comes out of its housing during water discharge. Moreover, there is risk of scalding due to high washing temperatures! To prevent such situations and to ensure smooth water intake and discharge of the machine, fix the end of the discharge hose tightly so that it cannot
come out.
- The hose should be attached to a height of at least 40 cm, and 100 cm at most.
- In case the hose is elevated after laying it on the floor level or close to the ground (less than 40 cm above the ground), water discharge becomes more difficult and the laundry may come out excessively wet. Therefore, follow the heights described in the figure.
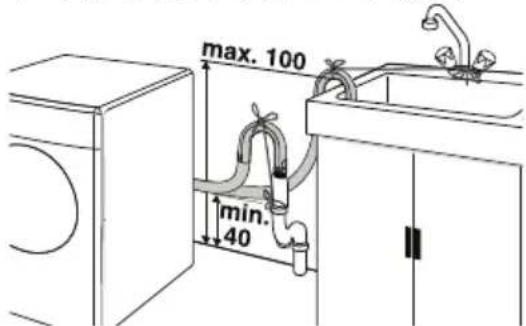
- To prevent flowing of dirty water back into the machine and to allow for easy discharge, do not immerse the hose end into the dirty water or drive it in the drain more than 15 cm. If it is too long, cut it short.
- The end of the hose should not be bent, it should not be stepped on and the hose must not be pinched between the drain and the machine.
- If the length of the hose is too short, use it by adding an original extension hose. Length of the hose may not be longer than 3.2 m. To avoid water leak failures, the connection between the extension hose and the drain hose of the product must be fitted well with an appropriate clamp as not to come off and leak.
Adjusting the feet
In order to ensure that the product operates more silently and vibration-free, it must stand level and balanced on its feet. Balance the machine by adjusting the feet. Otherwise, the product may move from its place and cause crushing and vibration problems.
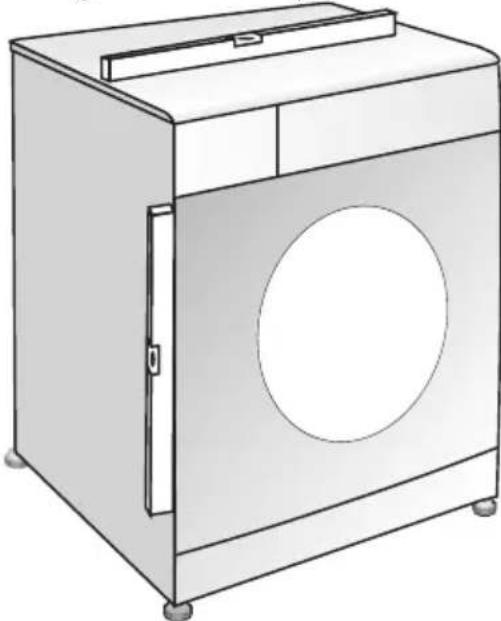
- Loosen the lock nuts on the feet by hand.
- Adjust the feet until the product stands level and balanced.
- Tighten all lock nuts again by hand.

Do not use any tools to loosen the lock nuts. Otherwise, they will get damaged.
Electrical connection
Connect the product to a grounded outlet protected by a fuse complying with the values in the "Technical specifications" table. Our company shall not be liable for any damages that will arise when the product is used without grounding in accordance with the local regulations.
- Connection must comply with national regulations.
- Power cable plug must be within easy reach after installation.
- The voltage and allowed fuse or breaker protection are specified in the “Technical specifications” section. If the current value of the fuse or breaker in the house is less than 16 Amps, have a qualified electrician install a 16 Amp fuse.
- The specified voltage must be equal to your mains voltage.
- Do not make connections via extension cables or multi-plugs.
Damaged power cables must be replaced by the Authorized Service Agents.
First use
Before starting to use the product, make sure that all preparations are made in accordance with the instructions in sections "Important safety instructions" and "Installation".
To prepare the product for washing laundry, first run the Drum Cleaning programme. If your machine does not have a Drum Cleaning programme, use the Cottons-90 programme and also select the Additional Water or Extra Rinse auxiliary functions. Before starting the programme, put a maximum of 100 g of powder anti-limescale into the main wash detergent compartment (compartment II). If the anti-limescale is in tablet form, put only one tablet into compartment II. After the programme has finished, dry the inside of the bellow with a clean cloth.
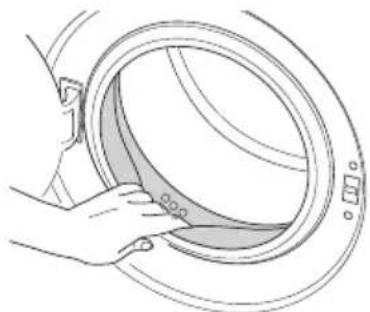
Use an anti-limescale suitable for washing machines. Note: Some water may remain in the product due to quality control processes during production. This is not harmful to the product.
Disposing of packaging material
Packaging materials are dangerous to children. Keep packaging materials in a safe place out of reach of children.
The product's packaging materials are made from recyclable materials. Dispose of them properly and sort them according to recycled waste instructions. Do not dispose of them with normal household waste.
Transportation of the product
Unplug the product before transporting it. Remove the water drain and water supply connections. Drain all remaining water from the product completely; see "Draining remaining water and cleaning the pump filter". Install the transportation safety bolts in the reverse order of the removal procedure; see "Removing the transportation locks".
Note: Never move the product without the transportation safety bolts properly fixed in place!
Disposing of the old product
Dispose of the old product in an environmentally friendly manner.
Refer to your local dealer or solid waste collection centre in your area to learn how to dispose of your product.
For children's safety, cut the power cable and break the locking mechanism of the loading door so that it is nonfunctional before disposing of the product.
3 Preparation
Things to be done for energy saving
The following information will help you use the product in an ecological and energy-efficient manner.
- Operate the product at the highest capacity allowed by the selected programme, but do not overload; see "Programme and consumption table". Always follow the instructions on the detergent packaging.
- Wash slightly soiled laundry at low temperatures.
- Use faster programmes for small quantities of lightly soiled laundry.
- Do not use prewash and high temperatures for laundry that is not heavily soiled or stained.
- If you plan to dry your laundry in a dryer, select the highest spin speed recommended during the washing process.
- Do not use detergent in excess of the amount recommended on the detergent package.
Sorting the laundry
- Sort laundry according to type of fabric, colour, degree of soiling, and allowable water temperature. Always obey the instructions given on the garment tags.
Preparing laundry for washing
- Laundry items with metal attachments such as underwired bras, belt buckles, or metal buttons will damage the machine. Remove the metal pieces or wash the clothes by putting them in a laundry bag or pillowcase.
- Take out all substances in the pockets such as coins, pens, and paper clips, and turn pockets inside out and brush. Such objects may damage the product or cause noise problems.
- Put small size clothes such as infants' socks and nylon stockings in a laundry bag or pillowcase.
- Place curtains in without compressing them. Remove curtain attachment items.
- Fasten zippers, sew loose buttons, and mend rips and tears.
- Wash "machine washable" or "hand washable" labeled products only with an appropriate programme.
- Do not wash colours and whites together. New, dark coloured cottons release a lot of dye. Wash them separately.
- Tough stains must be treated properly before washing. If unsure, check with a dry cleaner.
- Use only dyes/colour changers and limescale removers suitable for machine wash. Always follow the instructions on the package.
- Wash trousers and delicate laundry turned inside out.
- Keep laundry items made of Angora wool in the freezer for a few hours before washing.
This will reduce pilling.
Laundry that is subjected to materials such as flour, lime dust, milk powder, etc. intensely must be shaken off before placing into the machine. Such dusts and powders on the laundry may build up on the inner parts of the machine in time and can cause damage.
Correct load capacity
The maximum load capacity depends on the type of laundry, the degree of soiling and the washing programme desired.
The machine automatically adjusts the amount of water according to the weight of the loaded laundry.
⚠️ Follow the information in the “Programme and consumption table”. When overloaded, machine's washing performance will drop. Moreover, noise and vibration problems may occur.
Loading the laundry
- Open the loading door.
- Place laundry items loosely into the machine.
- Push the loading door to close until you hear a locking sound. Ensure that no items are caught in the door. The loading door is locked while a programme is running. The door can only be opened a while after the programme comes to an end. In case of misplacing the laundry, noise and vibration problems may occur in the machine.
Using detergent and softener
Detergent Drawer
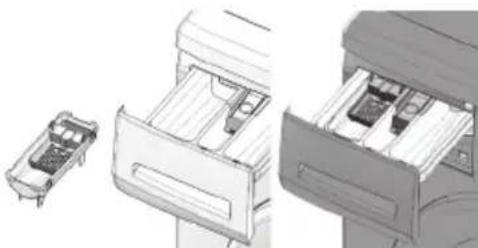
The detergent drawer is composed of three compartments:
- (I) for prewash
- (II) for main wash
- (III) for softener
- (*) In addition, there is a siphon piece in the softener compartment.
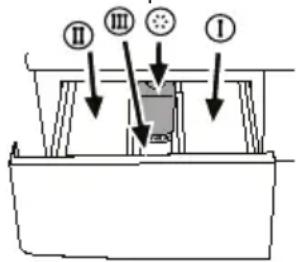

The detergent dispenser may be of two different types depending on the model of your machine, as shown above.
Detergent, softener, and other cleaning agents*
- Add detergent and softener before starting the washing programme.
- Never open the detergent drawer while the washing programme is running!
- When using a programme without prewash, do not put any detergent into the prewash compartment (compartment I).
- In a programme with prewash, do not put liquid detergent into the prewash
compartment (compartment I).
- Do not select a programme with prewash if you are using a detergent bag or dispensing ball. Place the detergent bag or the dispensing ball directly among the laundry in the machine.
- If you are using liquid detergent, do not forget to place the liquid detergent cup into the main wash compartment (compartment nr. II).
Choosing the detergent type
The type of detergent to be used depends on the type and colour of the fabric.
- Use different detergents for coloured and white laundry.
- Wash your delicate clothes only with special detergents (liquid detergent, wool shampoo, etc.) used solely for delicate clothes.
- When washing dark coloured clothes and quilts, it is recommended to use liquid detergent.
- Wash woolens with special detergent made specifically for woolens.
⚠️ Use only detergents manufactured specifically for washing machines.
Do not use soap powder.
Adjusting detergent amount
The amount of washing detergent to be used depends on the amount of laundry, the degree of soiling and water hardness. Read the manufacturer's instructions on the detergent package carefully and follow the dosage values.
- Do not use amounts exceeding the dosage quantities recommended on the detergent package to avoid problems of excessive foam, poor rinsing, financial savings and finally, environmental protection.
- Use lesser detergent for small amounts or lightly soiled clothes.
- Use concentrated detergents in the recommended dosage.
Using softeners
Pour the softener into the softener compartment of the detergent drawer.
- Use the dosages recommended on the package.
- Do not exceed the (>max<) level marking in the softener compartment.
- If the softener has lost its fluidity, dilute it with water before putting it in the detergent drawer.
Using liquid detergents
If the product contains a liquid detergent cup:
Make sure that you have placed the liquid detergent cup in compartment nr. "Il".
- Use the detergent manufacturer's measuring cup and follow the instructions on the package.
- Use the dosages recommended on the package.
- If the liquid detergent has lost its fluidity, dilute it with water before putting in the detergent cup.
If the product does not contain a liquid detergent cup:
- Do not use liquid detergent for the prewash in a programme with prewash.
- Use the detergent manufacturer's measuring cup and follow the instructions on the package.
- Liquid detergent stains your clothes when used with Delayed Start function. If you are going to use the Delayed Start function, do not use liquid detergent.
Using gel and tablet detergent
When using tablet, gel, etc. detergents, read the manufacturer's instructions on the detergent package carefully and follow the dosage values. If there is not any instruction on the package, apply the following.
- If the gel detergent thickness is fluidal and your machine does not contain a special liquid detergent cup, put the gel detergent into the main wash detergent compartment during first water intake. If your machine contains a liquid detergent cup, fill the detergent into this cup before starting the programme.
- If the gel detergent thickness is not fluidal or in the shape of capsule liquid tablet, put it directly into the drum before washing.
- Put tablet detergents into the main wash compartment (compartment nr. II) or directly into the drum before washing. i Tablet detergents may leave residues in the detergent compartment. If you encounter such a case, place the tablet detergent between the laundry, close to the lower part of the drum in future washings. Use the tablet or gel detergent without selecting the prewash function.
Using starch
- Add liquid starch, powder starch or the dyestuff into the softener compartment as instructed on the package.
- Do not use softener and starch together in a washing cycle.
- Wipe the inside of the machine with a damp and clean cloth after using starch.
Using bleaches
- Select a programme with prewash and add the bleaching agent at the beginning of the prewash. Do not put detergent in the prewash compartment. As an alternative application, select a programme with extra rinse and add the bleaching agent while the machine is taking water from the detergent compartment during first rinsing step.
- Do not use bleaching agent and detergent by mixing them.
- Use just a little amount (approx. 50 ml) of bleaching agent and rinse the clothes very well as it causes skin irritation. Do not pour the bleaching agent onto the clothes and do not use it for coloured clothes.
- When using oxygen based bleaches, follow the instructions on the package and select a programme that washes at a lower temperature.
- Oxygen based bleaches can be used together with detergents; however, if its thickness is not the same with the detergent, put the detergent first into the compartment nr. "II" in the detergent drawer and wait until the detergent flows while the machine is taking in water. Add the bleaching agent from the same compartment while the machine is still taking in water.
Using limescale remover
- When required, use limescale removers manufactured specifically for washing machines only. • Always follow instructions on the package.
Tips for efficient washing
| Clothes | |||||
| Light colours and whites | Colors Dark colors | Delicates/Woolens/Silks | |||
| (Recommended temperature range based on soiling level: 40-90C) | (Recommended temperature range based on soiling level: cold-40C) | (Recommended temperature range based on soiling level: cold 40C) | (Recommended temperature range based on soiling level: cold-30C) | ||
| Soiling Level | Heavily Soiled (difficult stains such as grass, coffee, fruits and blood.) | It may be necessary to pre-treat the stains of perform prewash. Powder and liquid detergents recommended for whites can be used at dosages recommended for heavily soiled clothes. It is recommended to use powder detergents to clean clay and soil stains and the stains that are sensitive to bleaches. | Powder and liquid detergents recommended for colours can be used at dosages recommended for heavily soiled clothes. It is recommended to use powder detergents to clean clay and soil stains and the stains that are sensitive to bleaches. Use detergents without bleach. | Liquid detergents suitable for colours and dark colours can be used at dosages recommended for heavily soiled clothes. | Prefer liquid detergents produced for delicate clothes. Woollen and silk clothes must be washed with special woollen detergents. |
| Normally Soiled (For example, stains caused by body on collars and cuffs) | Powder and liquid detergents recommended for whites can be used at dosages recommended for normally soiled clothes. | Powder and liquid detergents recommended for colours can be used at dosages recommended for normally soiled clothes. Use detergents without bleach. | Liquid detergents suitable for colours and dark colours can be used at dosages recommended for normally soiled clothes. | Prefer liquid detergents produced for delicate clothes. Woollen and silk clothes must be washed with special woollen detergents. | |
| Lightly Soiled (No visible stains exist.) | Powder and liquid detergents recommended for whites can be used at dosages recommended for lightly soiled clothes. | Powder and liquid detergents recommended for colours can be used at dosages recommended for lightly soiled clothes. Use detergents without bleach. | Liquid detergents suitable for colours and dark colours can be used at dosages recommended for lightly soiled clothes. | Prefer liquid detergents produced for delicate clothes. Woollen and silk clothes must be washed with special woollen detergents. | |
4 Operating the product
Control panel
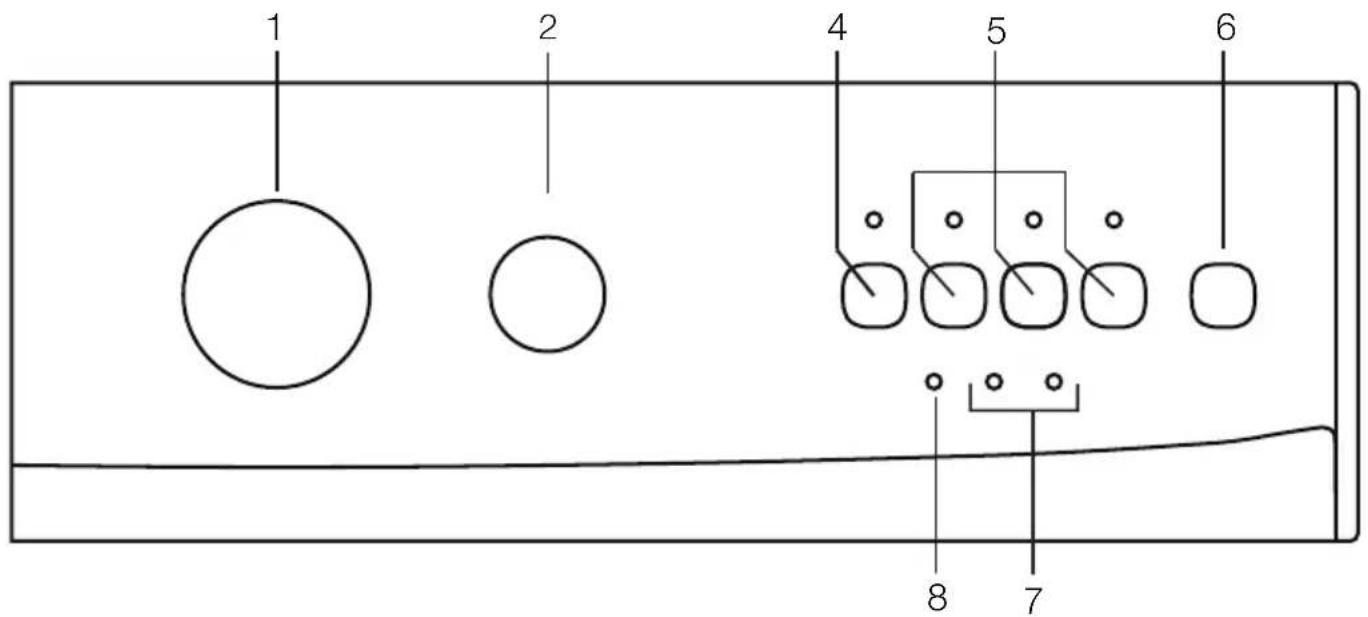
1 - Programme Selection knob 2 - Spin Speed Adjustment button* 3 - Temperature Adjustment button* 4 - Start / Pause / Cancel button 5 - Auxiliary Function buttons
6 - On / Off button 7 - Programme Follow-up indicator 8 - Loading Door light*
* Varies depending on the model of your machine.
Preparing the machine
Make sure that the hoses are connected tightly. Plug in your machine. Turn the tap on completely. Place the laundry in the machine. Add detergent and fabric softener.
Programme selection
Select the programme suitable for the type, quantity and soiling degree of the laundry in accordance with the "Programme and consumption table" and the temperature table below.
| 90°C | Heavily soiled white cottons and linens. (coffee table covers, tableclothes, towels, bed sheets, etc.) |
| 60°C | Normally soiled, coloured, fade proof cottons or synthetic clothes (shirt, nightgown, pajamas, etc.) and lightly soiled white linens (underwear, etc.) |
| 40°C-30°C-Cold | Blended laundry including delicate textile (veil curtains, etc.), synthetics and woolens. |
Select the desired programme with the Programme Selection button.
i Programmes are limited with the highest spin speed appropriate for that particular type of fabric.
When selecting a programme, always consider the type of fabric, colour, degree of soiling and permissible water temperature. Always select the lowest required temperature. Higher temperature means higher power consumption. For further programme details, see "Programme and consumption table".
Main programmes
Depending on the type of fabric, use the following main programmes.
- Cottons
You may wash your normally soiled durable cotton and linen laundry in this programme with the highest energy and water saving compared to all other wash programmes suitable for cottons. Actual water temperature may differ from the declared cycle temperature. Programme duration may automatically be shortened during later stages of the programme if you wash less amount (e.g. 1/2 capacity or less) of laundry. In this case energy and water consumption will be further decreased giving you the opportunity for a more economical wash. This feature is available for certain models having remaining time display.
- Synthetics
Use this programme to wash your synthetic clothes (shirts, blouses, synthetic/cotton blends, etc.). It washes with a gentle action and has a shorter washing cycle compared to the Cottons
programme.
For curtains and tulle, use the Synthetic 40°C programme with prewash function selected. As their meshed texture causes excessive foaming, wash the veils/tulle by putting little amount of detergent into the main wash compartment. Do not put detergent in the prewash compartment.
- Woollens
Use this programme to wash your woolen clothes. Select the appropriate temperature complying with the tags of your clothes. Use appropriate detergents for woolens.
Additional programmes
For special cases, additional programmes are available in the machine.
i Additional programmes may differ according to the model of the machine.
- Delicate
Use this programme to wash your delicate clothes. It washes with a gentle action without any interim spin compared to the Synthetics programme.
- Hand wash
Use this programme to wash your woolen/delicate clothes that bear “not machine-washable” tags and for which hand wash is recommended. It washes laundry with a very gentle washing action to not damage clothes.
- Mini
Use this programme to wash your little amount of lightly soiled cotton clothes in a short time (30 minutes).
- Super
Use this programme to wash your laundry for which you cannot use Cottons 60 °C programme. It gives the same result with the Cottons 60 °C programme by washing for a longer time at 40 °C, thus enabling energy saving.
Special programmes
For specific applications, select any of the following programmes.
- Rinse
Use this programme when you want to rinse or starch separately.
- Spin + Drain
Use this programme to apply an additional spin cycle for your laundry or to drain the water in the machine. Before selecting this programme, select the desired spin speed and press Start / Pause / Cancel button. First, the machine will drain the water inside of it. Then, it will spin the laundry with the set spin speed and drain the water coming out of them.
If you wish to drain water only without spinning your laundry, select the Pump+Spin programme and then select the "No Spin" function with the help of Spin Speed Adjustment button depending on the model of your machine and press Start / Pause button.
If your machine is not equipped with Spin Speed Adjustment button and No Spin
auxiliary function and if you wish to drain the water only without spinning your laundry, select the Pump+Spin programme and press Start / Pause button. Machine will switch to spin step once it completes pump step. Press Start / Pause / Cancel button to stop the machine as soon as you see the drum rotating.
i Use a lower spin speed for delicate laundries.
Temperature selection
In models equipped with Temperature Adjustment button, you can wash your clothes at the desired temperature by using this button.
To prevent damage on your laundry, do not select a temperature that exceeds the one recommended for your laundry in the "Programme and consumption table".
Spin speed selection
In models equipped with Spin Speed Adjustment button, you can spin your laundry at the desired speed by using this button. In models not equipped with Spin Speed Adjustment button, spin will be performed at the recommended speed for the selected programme.
If you wish to take out your laundry without spinning, switch the Spin Speed Adjustment button to No Spin position.
Programme selection and consumption table
| EN | ||||||||||||
| Programme | Max. Load (kg) | Programme Duration (~min) | Water Consumption (l) | Energy Consumption (kWh) | Prewash | Rinse Plus | Rinse Hold | Spin speed reduction | No Spin | No Heat | ||
| Cottons 90 5 | 133 45 | 1.65 | ● ● | ● ● | ||||||||
| Cottons 60** | 5 | 150 50 0 | 87 ● | ● ● ● | ||||||||
| Cottons 60** | 2.5 | 150 45 | 0.72 ● | ● ● ● ● | ||||||||
| Cottons 40** | 2.5 | 135 45 | 0.54 ● | ● ● ● ● ● | ● | |||||||
| Cottons 40 5 | 142 49 | 0.69 ● | ● ● ● ● | |||||||||
| Cottons Cold 5 | 120 45 | 0.16 | ● ● ● ● | |||||||||
| Super 40 5 | 165 45 | 0.78 ● | ● ● | |||||||||
| Synthetics 60 | 2.5 | 113 52 | 0.92 ● ● | ● ● ● ● | ||||||||
| Synthetics 40 | 2.5 | 125 52 | 0.56 ● | ● ● ● ● ● | ● | |||||||
| Synthetics 30 | 2.5 | 95 52 | 0.3 ● | ● ● ● ● ● | ||||||||
| Synthetics | Cold | 2.5 | 90 | 52 | 0.15 | ● | ● | ● | ● | ● | ||
| Delicate | 30 | 2 | 65 | 45 | 0.36 | ● | ● | ● | ● | |||
| Woollens | 40 | 1.5 | 60 | 45 | 0.36 | ● | ● | ● | ● | |||
| Woollens | Cold | 1.5 | 50 | 45 | 0.02 | ● | ● | ● | ● | |||
| Hand wash | 30 | 1 | 45 | 32 | 0.21 | ● | ● | |||||
| Mini | 30 | 2.5 | 30 | 43 | 0.17 | ● | ● | |||||
- : Selectable * : Automatically selected, no canceling. **: Energy Label programme (EN 60456 Ed.3)
- : See the programme description for maximum load. Water and power consumption may vary subject to the changes in water pressure, water hardness and temperature, ambient temperature, type and amount of laundry, selection of auxiliary functions and spin speed, and changes in electric voltage. The auxiliary functions in the table may vary according to the model of your machine.
Auxiliary function selection
Select the desired auxiliary functions before starting the programme. Furthermore, you can also select or cancel auxiliary functions that are suitable to the running programme without pressing the Start / Pause / Cancel button when the machine is operating. For this, the machine must be in a step before the auxiliary function you are going to select or cancel.
If the auxiliary function cannot be selected or canceled, light of the relevant auxiliary function will blink 3 times to warn the user.
i Some functions cannot be selected together. If a second auxiliary function conflicting with the first one is selected before starting the machine, the function selected first will be canceled and the second auxiliary function selection will remain active. An auxiliary function that is not compatible with the programme cannot be selected. (See "Programme and consumption table") i Auxiliary Function buttons may vary according to the model of the machine.
- Prewash
A Prewash is only worthwhile for heavily soiled laundry. Not using the Prewash will save energy, water, detergent and time.
As their meshed texture causes excessive foaming, wash the veils/tulle by putting a little amount of detergent into the main wash compartment. Do not put detergent in the prewash compartment.
- Rinse Plus
This function enables the machine to make another rinsing in addition to the one already made after the main wash. Thus, the risk for sensitive skins (babies, allergic skins, etc.) to be affected by the minimal detergent remnants on the laundry can be reduced.
- Rinse Hold
If you are not going to unload your clothes immediately after the programme completes, you can use the rinse hold function to keep your laundry in the final rinsing water in order to prevent them from getting wrinkled when there is no water in the machine.
In models equipped with the Spin Speed Adjustment button, select the spin speed and press the Start / Pause / Cancel button if you want to spin the laundry held in water.
In models not equipped with the Spin Speed Adjustment button, select the Spin+Pump programme if you want to spin your laundry held in water.
In these models, you need to stop the machine by pressing the Start / Pause / Cancel button before switching to the spin step and after the pump step is completed and the water in the machine is drained. Thus, water inside the machine is drained and your laundry is not spun.
- No Heat
Use this function if you want to wash your laundry in cold water.
- No Spin
Use this function if you do not want your clothes to be spun at the end of the programme.
- Spin speed reduction
This function allows spinning of laundry at a speed lower than the maximum spin speed of the machine.
When the Spin Reduction button is pressed, the spin speed will be limited to the minimum speed specified on the control panel.
Starting the programme
Press the Start / Pause / Cancel button to start the programme. The Start / Pause / Cancel button lights up to indicate that the programme has started. The loading door is locked and the Loading Door light turns off.
Child Lock
Use the Child Lock function to prevent children from tampering with the machine. This avoids any changes in a running programme.
You can switch the machine on and off with the On / Off button when the Child Lock is active. When you switch the machine on again, the programme will resume from where it stopped with the child lock enabled.
To activate the Child Lock:
Press and hold the 1st and 2nd Auxiliary Function buttons for 3 seconds simultaneously after the washing programme has started. The 1st Auxiliary Function light flashes continuously.
To deactivate the Child Lock:
The Child Lock must be deactivated to start a new programme after the programme has finished or to interrupt a running programme.
Press and hold the 1st and 2nd Auxiliary Function buttons for 3 seconds simultaneously to disable the Child Lock.
Progress of programme
The progress of a running programme can be followed from the Programme Follow-up indicator. At the beginning of every programme step, the relevant indicator light will turn on and the light of the completed step will turn off.
To change the auxiliary function, speed, and temperature settings while a programme is running, you need to switch the machine to Pause mode. Press the Start / Pause / Cancel button to switch the machine into Pause mode. In this case, the Start / Pause / Cancel light flashes.
If the machine does not pass to the spinning step, the Rinse Hold function might be active or the automatic unbalanced load detection system might be activated due to the unbalanced distribution of the laundry in the machine.
Loading door lock
There is a locking system on the loading door of the machine that prevents opening of the door in cases when the water level is unsuitable.
When machine is switched to Pause mode, it checks the level of the water inside. If the level is suitable, Loading Door light illuminates steadily within 1-2 minutes and the loading door can be opened.
If the Loading Door light is not on, Loading Door cannot be opened. If you are obliged to open the Loading Door while the Loading Door light is off, you must cancel the current programme; see "Canceling the programme".
Changing the selections after programme has started
To change your settings after the program has started, you have to switch the machine to Pause mode first.
Even if you select a new program by changing the position of the Programme Selection knob while the machine is running or in Pause mode, the programme selected first will continue. You must cancel the current programme to change the washing programme. See "Canceling the programme".
Changing the auxiliary function, speed and temperature
Depending on the step the programme has reached, you can cancel or activate the auxiliary functions; see, "Auxiliary function selection". You can also change the speed and temperature settings; see, "Spin speed selection" and "Temperature selection".
Adding or taking out laundry
Press Start / Pause / Cancel button to switch the machine to pause mode. Wait until the Loading Door can be opened.
If the Loading Door light does not turn on in 1-2 minutes, it means that the water level in the machine is not suitable and laundry cannot be added. You can resume the programme by pressing Start / Pause / Cancel button. Open the Loading Door and add or take out the laundry. Close the Loading Door. Make changes in auxiliary functions, temperature and speed settings if necessary. Press Start / Pause / Cancel button to start the machine.
Canceling the programme
Press and hold Start / Pause / Cancel button for 3 seconds to cancel the current programme. At the end of this period, machine can drain the water inside it or can take in and drain water up to 3 times to cool down the laundry. Washing and End lights turn on.
Once draining is complete, Start / Pause / Cancel and Washing lights turn off, and Loading Door light starts flashing.
When the Loading Door is openable, Loading Door light turns on and remains lit. In this case, you can select and start the new programme.
End of programme
The end-of-programme indicator light will illuminate once the programme has finished. Press the On/Off button to switch off the machine. Remove your laundry and close the loading door. Your machine is ready for the next washing cycle.
5 Maintenance and cleaning
The service life of the product is extended and frequently encountered problems are reduced if it is cleaned at regular intervals.
Cleaning the detergent drawer
Clean the detergent drawer at regular intervals (every 4-5 washing cycles) as shown below to prevent the accumulation of powder detergent over time.
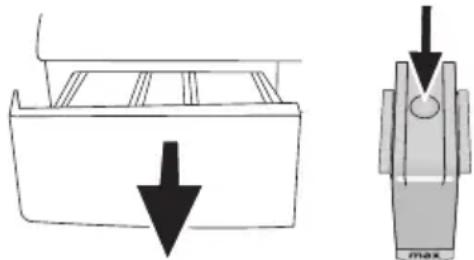
Press the dotted point on the siphon in the softener compartment and pull it towards you until the compartment is removed from the machine.
If more than the normal amount of water and softener mixture starts to gather in the softener compartment, the siphon must be cleaned.
Wash the detergent drawer and the siphon with plenty of lukewarm water in a washbasin. Wear protective gloves or use an appropriate brush to avoid touching the residues in the drawer with your skin when cleaning. Insert the drawer back into its place after cleaning and make sure that it is seated well.
Cleaning the water intake filters
There is a filter at the end of each water intake valve at the rear of the machine and also at the end of each water intake hose where they are connected to the tap. These filters prevent foreign substances and dirt in the water from entering the washing machine. The filters should be cleaned as they do get dirty.
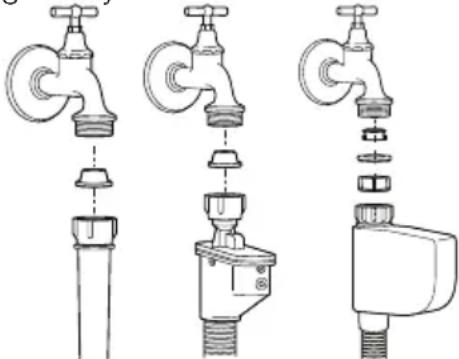
Close the taps. Remove the nuts of the water intake hoses to access the filters on the water intake valves. Clean them with an appropriate brush. If the filters are too dirty, take them out by means of pliers and clean them. Take out the filters on the flat ends of the water intake hoses together with the gaskets and clean them thoroughly under running water. Replace the gaskets and filters carefully in their places and tighten the hose nuts by hand.
Draining remaining water and cleaning the pump filter
The filter system in your machine prevents solid items such as buttons, coins, and fabric fibres from clogging the pump impeller during the discharge of washing water. Thus, the water will be discharged without any problem and the service life of the pump will be extended.
If the machine fails to drain water, the pump filter is clogged. The filter must be cleaned whenever it is clogged or every 3 months. Water must be drained off first to clean the pump filter.
In addition, prior to transporting the machine (e.g., when moving to another house) and in case of freezing of the water, water may have to be drained completely.
⚠️ Foreign substances left in the pump filter may damage your machine or may cause noise problems.
In order to clean the dirty filter and discharge the water:
Unplug the machine to cut off the power supply.
⚠️ The temperature of the water inside the machine may rise up to 90 °C. To avoid the risk of burns, the filter must be cleaned after the water in the machine cools down.
Open the filter cap.
If the filter cap is composed of two pieces, press the tab on the filter cap downwards and pull the piece out towards yourself.

If the filter cap is one piece, pull the cap from both sides at the top to open.

You can remove the filter cover by slightly pushing downwards with a thin plastic-tipped tool, through the gap above the filter cover. Do not use metal-tipped tools to remove the cover.
Some of our products have an emergency draining hose and some do not. Follow the steps below to discharge the water.
Discharging the water when the product has an emergency draining hose:

Pull the emergency draining hose out from its seat. Place a large container at the end of the hose. Drain the water into the container by pulling out the plug at the end of the hose. When the container is full, block the inlet of the hose by replacing the plug. After the container is emptied, repeat the above procedure to drain the water in the machine completely. When draining of water is finished, close the end with the plug again and fix the hose in its place. Turn the pump filter to take it out. Discharging the water when the product does not have an emergency draining hose:
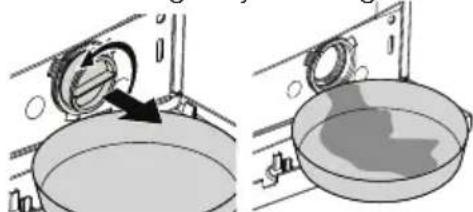
Place a large container in front of the filter to catch water from the filter. Loosen the pump filter (anticlockwise) until water starts to flow. Fill the flowing water into the container you have placed in front of the filter. Always keep a piece of cloth handy to absorb any spilled water. When the water inside the machine is finished, take out the filter completely by turning it. Clean any residues inside the filter as well as fibers, if any, around the pump impeller region. Install the filter.

If your product has a water jet feature, be sure to fit the filter into its housing in the pump. Never force the filter while installing it into its housing. Seat the filter into its place completely. Otherwise, water may leak from the filter cap.
If the filter cap is composed of two pieces, close the filter cap by pressing on the tab. If it is one piece, seat the tabs in the lower part into their places first, and then press the upper part to close.
6 Technical specifications
| Models | WML 15126 P | WML 15106 P | WML 15106 D | WML 15106 PS | WML 15066 D | WML 15086 P |
| Maximum dry laundry capacity (kg) | 5 | 5 | 5 | 5 | 5 | 5 |
| Height (cm) | 84 | 84 | 84 | 84 | 84 | 84 |
| Width (cm) | 60 | 60 | 60 | 60 | 60 | 60 |
| Depth (cm) | 45 | 45 | 45 | 45 | 45 | 45 |
| Net weight ( ± 4 kg.) | 62 | 60 | 60 | 60 | 60 | 60 |
| Electrical input (V/Hz) | 230 V / 50Hz | |||||
| Total current (A) | 10 | 10 | 10 | 10 | 10 | 10 |
| Total power (W) | 2200 | |||||
| Spin speed (rpm max.) | 1200 | 1000 | 1000 | 1000 | 600 | 800 |
| Stand-by mode power (W) | 1.00 | 1.00 | 1.00 | 1.00 | 1.00 | 1.00 |
| Off-mode power (W) | 0.25 | 0.25 | 0.25 | 0.25 | 0.25 | 0.25 |

Technical specifications may be changed without prior notice to improve the quality of the product. Figures in this manual are schematic and may not match the product exactly.
Values stated on the product labels or in the documentation accompanying it are obtained in laboratory conditions in accordance with the relevant standards. Depending on operational and environmental conditions of the product, these values may vary.

This appliance's packaging material is recyclable. Help recycle it and protect the environment by dropping it off in the municipal receptacles provided for this purpose. Your appliance also contains a great amount of recyclable material. It is marked with this label to indicate the used appliances that should not be mixed with other waste. This way, the appliance recycling organised by your manufacturer will be done under the best possible conditions, in compliance with European Directive 2002/96/EC on Waste Electrical and Electronic Equipment. Contact your town hall or your retailer for the used appliance collection points closest to your home. We thank you doing your part to protect the environment.

7 Troubleshooting
| Programme cannot be started or selected. |
| Washing machine has switched to self protection mode due to a supply problem (line voltage, water pressure, etc.). >>> Press and hold Start / Pause button for 3 seconds to reset the machine to factory settings. (See "Canceling the programme") |
| Water in the machine. |
| Some water might have remained in the product due to the quality control processes in the production. >>> This is not a failure; water is not harmful to the machine. |
| Machine vibrates or makes noise. |
| Machine might be standing unbalanced. >>> Adjust the feet to level the machine.A hard substance might have entered into the pump filter. >>> Clean the pump filter.Transportation safety bolts are not removed. >>> Remove the transportation safety bolts.Laundry quantity in the machine might be too little. >>> Add more laundry to the machine.Machine might be overloaded with laundry. >>> Take out some of the laundry from the machine or distribute the load by hand to balance it homogenously in the machine.Machine might be leaning on a rigid item. >>> Make sure that the machine is not leaning on anything. |
| Machine stopped shortly after the programme started. |
| Machine might have stopped temporarily due to low voltage. >>> It will resume running when the voltage restores to the normal level. |
| Programme time does not countdown. (On models with display) |
| Timer may stop during water intake. >>> Timer indicator will not countdown until the machine takes in adequate amount of water. The machine will wait until there is sufficient amount of water to avoid poor washing results due to lack of water. Timer indicator will resume countdown after this.Timer may stop during heating step. >>> Timer indicator will not countdown until the machine reaches the selected temperature.Timer may stop during spinning step. >>> Automatic unbalanced load detection system might be activated due to the unbalanced distribution of the laundry in the drum. Machine does not switch to spinning step when the laundry is not evenly distributed in the drum to prevent any damage to the machine and to its surrounding environment. Laundry should be rearranged and re-spun. |
| Foam is overflowing from the detergent drawer. |
| Too much detergent is used. >>> Mix 1 tablespoonful softener and 1/2 l water and pour into the main wash compartment of the detergent drawer. i Put detergent into the machine suitable for the programmes and maximum loads indicated in the “Programme and consumption table”. When you use additional chemicals (stain removers, bleachs and etc), reduce the amount of detergent. |
| Laundry remains wet at the end of the programme |
| Excessive foam might have occurred and automatic foam absorption system might have been activated due to too much detergent usage. >>> Use recommended amount of detergent. i Machine does not switch to spinning step when the laundry is not evenly distributed in the drum to prevent any damage to the machine and to its surrounding environment. Laundry should be rearranged and re-spun. |
If you cannot eliminate the problem although you follow the instructions in this section, consult your dealer or the Authorized Service Agent. Never try to repair a nonfunctional product yourself.
1 Important safety instructions

Keep the transport safety bolts in a safe place so that you can reuse them when the washing machine is transported again in the future. Never move the appliance without the safety bolts installed!
Water connection
The water pressure required for the product to operate is between 1 and 10 bars (0.1 – 10 MPa). You must have 10 - 80 liters of water flowing from the tap in one minute for the machine to work properly. Install a pressure reducing valve if the water pressure is higher. If you will use the product with dual water inlet as a single cold water inlet unit, you must install the appropriate cap on the hot water valve before operating the device. (Applies to products supplied with a cap group.) If you want to use both water valves on the product, connect the water hose after removing the cap and gasket group from the hot water valve. (Applies to products supplied with a cap group.) ⚠️ Models with a single water inlet must not be connected to a hot water tap. In such a case, the laundry will be damaged or the product will switch to protective mode and will not operate.
⚠️ Do not use old or used water inlet hoses on a new product. This may cause stains on your laundry.
- Connect the special hoses supplied with the machine to the water inlet valve on the machine. The red hose (left) (max. 90°C) is for hot water inlet, the blue hose (right) (max. 25°C) is for cold water inlet.
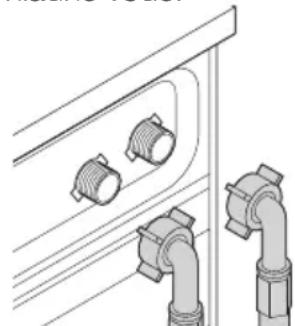
When installing the washing machine, make sure that the connections to the cold and hot water are correctly connected. Otherwise, your laundry may be hot at the end of the wash and will wear out. 2. Tighten all hose screws by hand. Never use a wrench to tighten the screws.

- Loosen the locking screws on the feet by hand.
- Adjust the feet until the product stands straight and balanced.
- Retighten all screws by hand.

⚠️ Do not use any tools to loosen the locking screws. Otherwise, they may be damaged.
Electrical installation
Use a descaling agent suitable for washing machines. There may be a little water left in the appliance due to quality control during production. This is not harmful
to the product.
Disposal of packaging materials
If the product does not include a liquid detergent dispenser:
- Do not use liquid detergent for prewash in programs with prewash.
- Use the detergent measuring cup provided by the manufacturer and follow the instructions on the packaging.
- Liquid detergent leaves stains on your clothes when you use the delayed start function. If you use the delayed start function, do not use liquid detergent.
Use of gel and tablet detergents
When using tablets, gel, or other forms of detergent, carefully read the manufacturer's instructions on the detergent packaging and follow the dosage values. If there are no instructions on the packaging, apply the following.
- If the gel detergent is liquid and your machine does not have a special dispenser for liquid detergent, put the gel detergent in the main detergent compartment during the first water intake. If your machine has a liquid detergent dispenser, fill the detergent into this dispenser before starting the program.
- If the gel detergent is not liquid or is in the form of a liquid tablet, put it directly into the drum before washing.
- Put tablet detergents in the main wash compartment (compartment II) or directly into the drum before washing. Tablet detergents may leave residues in the detergent compartments. If this happens, in the future place the detergent tablet between the laundry, closer to the bottom of the drum. Use tablet or gel detergent without selecting the prewash function.
Using starch
• Add liquid starch, powder starch, or dye to the softener compartment as indicated on the packaging. - Do not use softener and starch together in the wash cycle. - After using starch, wipe the inside of the machine with a wet, clean cloth.
Using bleach
- Select a program with prewash and add bleach at the end of the prewash. Do not put detergent in the prewash compartment. As an alternative, select a program with an extra rinse and add bleach while the machine
Close the taps. Remove the nuts on the water inlet hoses to access the filters on the water inlet valves. Clean them with a suitable brush. If the filters are very dirty, you can pull them out with pliers and clean them. Remove the filters on the flat ends of the water inlet hoses together with the seals and clean them thoroughly under running water. Carefully replace the seals and filters in their positions and screw the hose nuts on by hand.
Draining all remaining water and cleaning the pump filter
The filter system in your machine prevents solid objects such as buttons, coins, and fabric fibers from entering and clogging the pump impeller during the discharge of wash water. This way, water will be discharged without problems and the pump's lifespan
will be extended.
If your washing machine fails to drain water, the pump filter may be clogged. The filter must be cleaned whenever it is clogged or every 3 months. To clean the pump filter, you must drain the water.
In addition, before transporting the machine (e.g., when moving to another house) and in case of water freezing, the water must be drained completely.
⚠ Foreign objects left in the pump filter can damage your machine or cause noise.
To clean the dirty filter and drain the water: Disconnect the washing machine from the power supply to cut off the electrical supply.
⚠️ The water temperature in the washing machine can reach up to 90 °C. To avoid the risk of burns, the filter must be cleaned when the water in the machine has cooled down.
Open the filter cover.
You can remove the filter cover by gently pushing it downwards using a flathead plastic screwdriver through the opening above the filter cover. Do not use metal-tipped tools to remove the cover.
Pull the emergency drain hose from its holder. Place a large container at the end of the hose. Drain the water into the container by pulling the plug at the end of the hose. When the container is full, block the end of the hose by replacing the plug. When the container is emptied, repeat the above procedure
to continue draining the water from the machine until it is empty. When the draining is complete, close the end by replacing the plug and secure the hose in place. Turn the pump filter to remove it.
Place a large container in front of the filter to catch the water that flows from the filter. Loosen the pump filter (counterclockwise) until water starts to flow out of it. Direct the flowing water into the container placed in front of the filter. Always keep a cloth nearby to wipe up any spilled water. Once the water inside the machine has drained, remove the filter by turning it fully. Clean any debris from the filter, as well as any lint around the impeller if present. Replace the filter.

If your product has water jets, make sure to place the filter into the pump housing.
- IMPORTANT SAFETY INSTRUCTIONS
- GENERAL SAFETY
- INTENDED USE
- CHILDREN'S SAFETY
- INSTALLATION
- APPROPRIATE INSTALLATION LOCATION
- REMOVING PACKAGING REINFORCEMENT
- REMOVING THE TRANSPORTATION LOCKS
- CONNECTING WATER SUPPLY
- CONNECTING TO THE DRAIN
- ADJUSTING THE FEET
- ELECTRICAL CONNECTION
- FIRST USE
- DISPOSING OF PACKAGING MATERIAL
- TRANSPORTATION OF THE PRODUCT
- DISPOSING OF THE OLD PRODUCT
- PREPARATION
- THINGS TO BE DONE FOR ENERGY SAVING
- SORTING THE LAUNDRY
- PREPARING LAUNDRY FOR WASHING
- CORRECT LOAD CAPACITY
- LOADING THE LAUNDRY
- USING DETERGENT AND SOFTENER
- DETERGENT DRAWER
- DETERGENT, SOFTENER, AND OTHER CLEANING AGENTS
- CHOOSING THE DETERGENT TYPE
- ADJUSTING DETERGENT AMOUNT
- USING SOFTENERS
- USING LIQUID DETERGENTS
- IF THE PRODUCT CONTAINS A LIQUID DETERGENT CUP
- IF THE PRODUCT DOES NOT CONTAIN A LIQUID DETERGENT CUP
- USING GEL AND TABLET DETERGENT
- USING STARCH
- USING BLEACHES
- USING LIMESCALE REMOVER
- OPERATING THE PRODUCT
- CONTROL PANEL
- PREPARING THE MACHINE
- PROGRAMME SELECTION
- MAIN PROGRAMMES
- COTTONS
- SYNTHETICS
- WOOLLENS
- ADDITIONAL PROGRAMMES
- DELICATE
- HAND WASH
- MINI
- SUPER
- SPECIAL PROGRAMMES
- RINSE
- SPIN + DRAIN
- TEMPERATURE SELECTION
- SPIN SPEED SELECTION
- AUXILIARY FUNCTION SELECTION
- PREWASH
- RINSE PLUS
- RINSE HOLD
- NO HEAT
- NO SPIN
- SPIN SPEED REDUCTION
- STARTING THE PROGRAMME
- CHILD LOCK
- PROGRESS OF PROGRAMME
- LOADING DOOR LOCK
- CHANGING THE SELECTIONS AFTER PROGRAMME HAS STARTED
- CHANGING THE AUXILIARY FUNCTION, SPEED AND TEMPERATURE
- ADDING OR TAKING OUT LAUNDRY
- CANCELING THE PROGRAMME
- END OF PROGRAMME
- MAINTENANCE AND CLEANING
- CLEANING THE DETERGENT DRAWER
- CLEANING THE WATER INTAKE FILTERS
- DRAINING REMAINING WATER AND CLEANING THE PUMP FILTER
- TROUBLESHOOTING
- WATER CONNECTION
- ELECTRICAL INSTALLATION
- DISPOSAL OF PACKAGING MATERIALS
- IF THE PRODUCT DOES NOT INCLUDE A LIQUID DETERGENT DISPENSER
- USE OF GEL AND TABLET DETERGENTS
- USING BLEACH
- DRAINING ALL REMAINING WATER AND CLEANING THE PUMP FILTER
Brand : BEKO
Model : WML 15106 D
Category : Washing machine