
213A - Slicer KRUPS - Free user manual and instructions
Find the device manual for free 213A KRUPS in PDF.
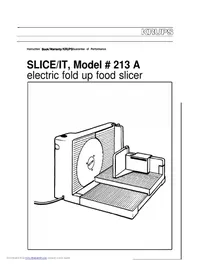


| Product Type | Electric Food Slicer |
| Brand | Krups |
| Model | 213A |
| Dimensions (approx.) | 38 x 24 x 22 cm (15 x 9.5 x 8.7 in) |
| Weight | 3.5 kg (7.7 lbs) |
| Blade Diameter | 17 cm (6.7 in) stainless steel |
| Thickness Adjustment | 0 to 15 mm continuous |
| Power Supply | 230V / 50Hz |
| Power Consumption | 150 W |
| Motor Type | Induction motor |
| Safety Features | Power switch with safety lock, non-slip feet |
| Blade Cover | Removable for cleaning |
| Food Carriage | Adjustable food holder |
| Maintenance | Wipe clean; blade hand wash |
| Spare Parts Availability | Blade, carriage available |
| Repairability | Screws accessible; qualified service |
| Included Accessories | Safety guard, cleaning brush |
| Certifications | CE, RoHS |
Frequently Asked Questions - 213A KRUPS
User questions about 213A KRUPS
0 question about this device. Answer the ones you know or ask your own.
Ask a new question about this device
Download the instructions for your Slicer in PDF format for free! Find your manual 213A - KRUPS and take your electronic device back in hand. On this page are published all the documents necessary for the use of your device. 213A by KRUPS.
USER MANUAL 213A KRUPS
Instruction Book/Warranty/KRUPS Guarantee of Performance
SLICE/IT, Model # 213 A electric fold up food slicer

IMPORTANT SAFEGUARDS
When using electrical appliances, basic safety precautions should always be observed, including the following:
- Read all instructions and information in this instruction book and any other literature included in this carton referring to this product before operating or using this appliance. ● To protect against risk of electrical shock do not put slicing unit in water or other liquid.
- Close supervision is necessary when any appliance is used by or near children. ● Unplug from outlet when not in use, before putting on or taking off parts, and before cleaning. ● Avoid contacting moving parts. Never feed food by hand. Always use completely assembled slicer with food platform and food grip.
- Platform and sliding carriage must always be used. Hand protector must be used when food can fit onto carriage.
- Once the food is only a couple of inches thick you must install the hand protector. ● Do not slice frozen food.
- Do not operate any appliance with a damaged cord or plug or after the appliance malfunctions, has been dropped or damaged in any manner. Return appliance to the nearest authorized service facilities for examination, repair or electrical or mechanical adjustment. ● The use of attachments not recommended or sold by the appliance manufacturer may cause fire, electrical shock or injury.
- Do not use outdoors.
- Do not let cord hang over edge of table or counter. Do not let cord contact hot surface, including the stove.
- Remove blade from slicer before washing. Blade is sharp; handle carefully when cleaning. Always handle blade with hand away from cutting edge and store blade with cutting edge away from you. ● The slicer is only designed for home-use and not commercial applications. Do not use appliance for other than intended use. ● Any servicing other than cleaning and user maintenance should be performed by an authorized representative.
SAVE THESE INSTRUCTIONS

a) slice thickness selector
b) safety push button
c) starter button
d) stainless steel cutting blade (caution: extremely sharp)
e) face plate
f) slicing table
g) food slide
h) end piece holder
i) cord storage


Caution:
● Blade is extremely sharp. Keep hands and fingers away from the cutting edge of the blade at all times. - Operate the safety push button with the thumb of your right hand only. ● Operate slicer only if blade, face plate, slicing table, and food slide are properly assembled. ● Make sure that fingers of your left hand stay away from the cutting edge of the blade. - Keep slicer away from children. ● Do not use the food slicer for cutting frozen food.
Preparing the food slicer (pictures ① through ⑥)
Assemble the appliance as shown in the main picture. Unwind enough cord from the cord storage compartment underneath so that the slicer can be plugged in conveniently after it is set up. Make sure that the cord is guided properly through the small opening slot on the base of the slicer as shown in the main picture. Make sure that the slicer sits on a flat and even surface.
Unfold the slicing table as shown in figure ①. Unfold the food slide and push down the vertical part so that it engages firmly (see figure ②) (for storage purposes only: first pull up the vertical part, then fold down).
Engage the food slide with the sliding table as shown in figure ③ and lower the food slide onto the slicing table. Make sure that the tongue of the food slide inserts properly into the grove between the slicer and the sliding table.
Place a plate on the other side of the food slicer (see figure ④) to catch the cut food.
Setting the Cutting
Thickness (see figure ⑤)
Select the desired cutting thickness by turning the slice thickness selector wheel. The numbers (from 1 to 8) on the top of the face plate indicate the actual setting and serve as memory. Each number corresponds to approximately 2 mm (1/12 of an inch).
When you have finished slicing, always turn the thickness selector wheel anti-clockwise so that the dots to the right of setting 1 are clearly visible. This way the face blade extends over the cutting blade. If you turn the slice thickness selector further anti-clockwise, the face plate can come out.
Plug in the appliance and place food on the food slide (see fig. ⑦). First press the starter button and keep it depressed. Then push the safety push button down. After both buttons have been pressed one after the other, the food slicer will start (see figure ⑥). You can now release the safety starter button. With the other hand, guide the food slide. Keep the safety push button depressed with the thumb of your right hand as long as you want to slice. Gently press the food against the face plate while slicing. When you release the safety push button, the food slicer will stop. To restart, see the above instructions.
Slicing small pieces and leftovers
Unfold the end piece holder (see figure ⑧) and attach it to the food slicer as shown in figure ⑨. Make sure that the piece holder is engaged properly to the food slide. Use your left hand to guide the end piece holder and the food slide, while the thumb of the right hand holds the safety push button down.
Cleaning
Always unplug the cord before cleaning. It is sufficient to wipe the plastic parts of the housing with a damp cloth. Never use scouring agents. Do not put the detachable plastic parts into the dishwasher. You should, however, give the slicer a thorough cleaning in order to be sure that no perishable food residues become deposited on the machine, behind the face plate, or behind the cutting blade. Remove the end piece holder and the food slide.
Removing the cutting blade (see figure 10)
Turn the retaining screw anti-clockwise with a coin. Simultaneously, with your other hand, push the cutting blade lightly against the slicer to avoid that the blade falls down accidentally.
Caution: Keep your fingers away from the cutting edge. When cleaning the cutting blade, remember that the cutting edge is very sharp. Handle with care.
Removing the sliding table. Fold up the sliding table.
Pull out the sliding table by using the recessed grip (see fig. ⑪) (the table can be assembled only in the fold-up position; make sure that the two hooks opposite the recessed grip are placed both inside the slicing table holder; then push the table back into position). Should the sliding table not come out, turn the slice thickness selector clockwise so that the sliding table regains the exact vertical position.
Removing the face plate
Turn the slice thickness selector anti-clockwise until the face blade disengages (see fig. ⑫).
When not in use
Unplug the slicer when not in use. Make sure that the face plate extends the cutting blade slightly. Fold up the slicer. Store the cord in the cord storage (see fig. 13). The sliding table does not stand up in the vertical position if the face plate is too far out. Turn the slice thickness selector clockwise until the sliding table will stay in the vertical position.
For compact storage fold the food slide and the end piece holder and clip together as shown in picture ⑭.
Optional Accessory
A special nonserrated ham/prosciutto blade for cutting densely textured meats is separately available (model #009). See your local dealer or order it from the KRUPS Customer Service Department (see under KRUPS Guarantee of Performance).
Limited two years warranty
Your KRUPS product is covered by the following warranty: If, within two years from date of purchase, this KRUPS product fails to function because of defects in materials or workmanship, ROBERT KRUPS, North America, will, at its option, repair or replace the unit without charge, provided the owner returns:
● the KRUPS product (securely packed) and ● proof of date of purchase to:
KRUPS Customer Service ROBERT KRUPS, North America 7 Reuten Drive CLOSTER, N.J. 07624
To assure prompt service, please include a letter indicating the specific cause for returning your KRUPS product. Do not return any loose parts or any accessories which are not defective with your appliances to avoid damage and loss in transit.
This warranty will be void if malfunction was caused by damage to the product by accident, misuse, use on frequency or voltage other than marked on the product and/or described in the instructions, abuse including tampering, damage in transit, or use for commercial purposes. This warranty gives you specific legal rights, and you may also have other rights which vary from state to state.
KRUPS GUARANTEE OF PERFORMANCE
This fine KRUPS product is manufactured according to a rigid code of quality standards, and, with a minimum of care, should give years of satisfying service. However, should the need arise for repairs or for replacement parts (within or after the warranty), please do as follows for the most convenient, fastest service.
Note the type number of your KRUPS appliance. You will need this information when calling our Customer Service Department, Type: # 213 A.
For parts orders or any other questions on how to operate your KRUPS product, call our CUSTOMER SERVICE DEPARTMENT toll free (Monday through Friday [except holidays] from 9AM until 4PM Eastern Standard Time) 1-886-526-5377 (in New Jersey call [201] 767-5600).
For warranty and after-warranty service, send your KRUPS appliance to:
KRUPS Customer Service ROBERT KRUPS, North America 7 Reuten Drive CLOSTER, New Jersey 07624
Pack up your appliance carefully to avoid damage in shipping and be sure to provide us with the following information:
A. Your name and address and type number of the appliance on the outside wrapping of the packaging.
B. Tape a brief note to the body of the machine indicating: how long you own it; the possible defect.
IMPORTANT: ONLY SEND THE DEFECTIVE APPLIANCE. KEEP ALL REMOVABLE PARTS AT HOME TO AVOID FURTHER DAMAGE IN TRANSPORT!
We will repair or replace your KRUPS product without delay and send it back to you with no charge for shipping (if you send us a receipt for the regular UPS or Parcel Post charges, we will even reimburse you for shipping charges, within or after the warranty period).
On all repair work to be done after the warranty period, our Customer Service Department will bill you for material and labor only.
Do not return your appliance to the store. The KRUPS Guarantee of Performance program has been designed to provide you with the best possible service using genuine KRUPS parts.
All repair work and replaced parts will carry an extended 90-day-warranty.



- SLICE/IT, MODEL # 213 A ELECTRIC FOLD UP FOOD SLICER
- IMPORTANT SAFEGUARDS
- SAVE THESE INSTRUCTIONS
- CAUTION
- PREPARING THE FOOD SLICER (PICTURES ① THROUGH ⑥)
- SETTING THE CUTTING
- THICKNESS (SEE FIGURE ⑤)
- SLICING SMALL PIECES AND LEFTOVERS
- CLEANING
- REMOVING THE CUTTING BLADE (SEE FIGURE 10)
- REMOVING THE SLIDING TABLE. FOLD UP THE SLIDING TABLE
- REMOVING THE FACE PLATE
- WHEN NOT IN USE
- OPTIONAL ACCESSORY
- KRUPS GUARANTEE OF PERFORMANCE
Brand : KRUPS
Model : 213A
Category : Slicer