
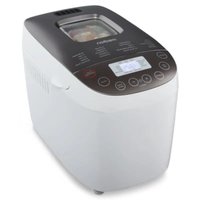
MD 10259 - Bread maker MEDION - Free user manual and instructions
Find the device manual for free MD 10259 MEDION in PDF.


| Product Type | Bread maker |
| Brand | Medion |
| Model | MD 10259 |
| Dimensions (approx.) | 30 x 25 x 35 cm |
| Weight (approx.) | 5 kg |
| Power Supply | 230 V, 50 Hz, 600-800 W |
| Loaf Capacity | Up to 1 kg (2 lb) |
| Bread Programs | 12 programs including basic, whole wheat, French, sweet, gluten-free, rapid, dough, jam, cake, etc. |
| Crust Control | Light, medium, dark |
| Timer | Up to 13 hours delay start |
| Keep Warm Function | Yes (up to 1 hour after baking) |
| Viewing Window | Yes (top lid) |
| Non-Stick Pan | Yes, with removable kneading paddles |
| Safety Features | Automatic shut-off, cool-touch handle, overheat protection |
| Cleaning & Maintenance | Wipe exterior with damp cloth; removable pan and paddles washable with warm soapy water |
| Spare Parts Availability | Replacement bread pans, paddles, and measuring cups available from Medion service |
| Repairability | User-serviceable parts: bread pan, paddles; professional repair for electrical issues |
| Country of Origin | China |
Frequently Asked Questions - MD 10259 MEDION
User questions about MD 10259 MEDION
0 question about this device. Answer the ones you know or ask your own.
Ask a new question about this device
Download the instructions for your Bread maker in PDF format for free! Find your manual MD 10259 - MEDION and take your electronic device back in hand. On this page are published all the documents necessary for the use of your device. MD 10259 by MEDION.
USER MANUAL MD 10259 MEDION
SAFETY INSTRUCTIONS 2
About these instructions 2
General information 2
Setting the unit up safely 2
Power connection 2
Handling the bread machine safely 3
Never undertake your own repairs 3
CLEANING, STORAGE, DISPOSAL 4
Cleaning 4
Storage 4
Disposal 4
SUMMARY OF SETTINGS 5
Operating panel 5
Program 6
OPERATION 8
Before first use 8
Preparing the dough 8
Operation 9
Making settings 10
Start program 11
Notes on the baking process 11
End of program 12
Remove baked goods from the appliance 12
Other baking processes 12
PROGRAM SEQUENCES 13
TROUBLESHOOTING 15
RECIPE EXAMPLES 17
Recipes 18
SAFETY INSTRUCTIONS
About these instructions
- Please read these operating instructions thoroughly and follow them and the safety notes in particular before using the appliance for the first time!
- Anything done to or with this appliance may only be undertaken as described in the operating instructions.
- If you pass on the appliance it is essential that you also provide the operating instructions!
General information
- The appliance is not intended for use by young children or infirm persons without supervision.
- This appliance is only designed for household use and is not suitable for commercial purposes. The appliance may not be used outside.
Setting the unit up safely
- Place the appliance on a heat-resistant, sturdy, level surface.
- Never place the appliance on the edge of a table - it could tip over and fall.
- The appliance must be placed at least 10 cm away from the wall and from other units (to the back and sides). Do not cover the air vents.
- Do not set up the appliance near easily flammable materials (curtains, curtains, paper, etc.). There is a risk of fire.
- Do not place the appliance directly next to a gas or electric stove or next to another hot oven.

- Never set up the appliance over a hotplate or other heat-generating appliance (grill, deep fat fryer); not even if an extraction fan is installed above it.
- Do not permit moisture to penetrate the casing. There is a risk of electric shock.
- Do not use the appliance outside.

Power connection
- Only connect the appliance to a 240V \~ 50 Hz power socket that is easy to reach and is close to the place where you have set up the appliance. The power socket must be freely accessible so that you can unplug the appliance quickly if necessary.
Handling the bread machine safely
General instructions
- Never leave the appliance unattended during operation.
- Never use the appliance if it has been damaged or if the mains cable or plug show signs of damage.
- Never touch the appliance, mains cable or plug with wet hands. There is a risk of electric shock.
- Never immerse the appliance, the mains cable or the plug in water or other liquids.
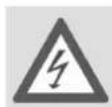
Mains cable
- The mains cable must not be wrapped around the appliance during use. It must not touch any hot surfaces. This could damage it.
- Do not kink or pinch the mains cable.
• Always remove the mains cable from the mains socket by holding the plug - do not pull the cable itself. - Before unplugging the mains cable, switch off the appliance.
Appliance
- The viewing window and the dough container will become very hot when in use. Use oven gloves when removing the dough container.
- Do not move the appliance when in use.
- Do not use the dough container as storage for other objects.
- Only operate the appliance when the dough container is filled. Operation without dough can result in overheating.
• Take the dough container out of the appliance when you fill it to avoid dirtying the baking chamber. - Use only the original accessories.
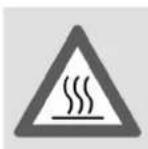
Attention!
Hot Surface
Never undertake your own repairs
- If the plug, cable or appliance is damaged, immediately remove the plug from the power supply.
- In order to reduce the risks, a damaged mains cable must be replaced by a special mains cable that can be obtained from the manufacturer or customer services.
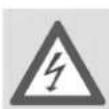
- Never try to open and/or repair the appliance yourself. There is a risk of electric shock. If there is a defect contact contact MEDION Help Desk at 1300 884 987.


natural_image
Pure geometric crosshair symbols without any text or labels

CLEANING, STORAGE, DISPOSAL
Cleaning
Pull the plug from the socket and the appliance and allow it to cool down completely.
Never immerse the appliance in water or other liquid (risk of electrical shock).
The dough container and accessories (measuring cup, measuring spoon, dough hooks and wooden spatula) are not suitable for dishwashers. They can be washed in water with washing up liquid. The casing can be wiped with a slightly moist cloth.
Do not use any sharp or abrasive cleaning solutions or products that could create scratches. Never use steel wool, petrol, thinners or cleaning materials that contain alcohol.
The heating element must not come into contact with water! Therefore if required wipe the heating element with a dry cloth.
Allow the appliance to dry completely before using it again.
Storage
Before storing the appliance pull the plug out of the mains socket.
Before placing the appliance in a cupboard, make sure it is completely cool and dry.
Disposal
Packaging
Your breadmaker is wrapped in packaging to protect it against transportation damage. Packaging is raw material and can be reused or added to the recycling system.
Appliance
At the end of its life, the breadmaker must not be disposed of in household garbage. Seek the advice of your local authority on correct, environmentally-friendly disposal.
SUMMARY OF SETTINGS
Operating panel

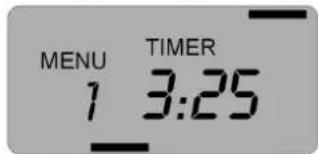
1 Display
The default display appears when you switch the bread maker on.
"MENU 1": Basic" program
"TIMER: 3:25" (Normal baking time for Program 1);
Loaf size: 1,135 g;
Browning level: "Medium".
750g 1000g 1135g
Light Medium Dark Rapid
Program phases
During baking the display shows an arrow to indicate the current baking phase (in the example below the timer is active). Please refer to the table in the "PROGRAM SEQUENCES" on page 13 chapter for the length of the phases.

2 Menu
Using the "Menu" key you can select one of the ten programs in the program list on the left side.
3 Loaf size
You can select three loaf sizes for the bread maker programs 1-4:
"750 g, "1,000 g and "1,135 g. The indicator on the display shows the selected size, and the baking time is altered as required.
4 Colour
For programs 1-3 you can choose between three browning levels"Light", "Medium" and "Dark". The mark on the display indicates the selected browning level.
"RAPID" setting: You can use the same key to select a fast setting for programs 1-3. When you choose this setting the baking time is reduced by around 1 hour by reducing the rising period. This setting is recommended to avoid long rising times.
5 Start/Stop
This key starts and stops the program.
6 Power
The indicator lights up red when the bread maker is switched on.
7 TIMER
You can set the timer for when the selected program should start. This is possible for programs 1-4 and 8. Each time you press the + or keys the timer is adjusted up or down by 10 minutes. The maximum time delay is 14 hours and 58 minutes.
8 Program list
Available programs (refer to next chapter).
Programs
1 Basic
Basic program for normal bread dough.
2 French
Program for breads made of white, protein-enhanced flour in the French style and light breads with a crispy crust.
3 Wholemeal
Program for dough containing a larger portion of wholemeal wheat, rye, oatmeal or bran. This program includes a delay in which the coarse ingredients can soak. These breads are usually smaller and more compact.
4 Sweet
Program for pastry, cake, sweet bread or for bread dough that contains additional sugar, raisins or chocolate.
5 Super Rapid
The program shortens the baking time by approx. 1 hour and 20 minutes by removing the second rising time and rest periods. This makes the bread somewhat more compact and firm.
Please note that the added water must be heated to 30-35°C. Double the amount of yeast.
6 Dough
Use this program to produce yeast dough for rolls, twists or pizza bases. The dough is heated so that it can rise, but not baked. After kneading you can form the dough as usual and bake it in a normal baking oven.
7 Pasta
This program only kneads the dough; the baking phase is omitted. You can knead other doughs apart from pasta with this setting. No more than 800 ml of basic ingredients should be used for this setting.
8 Buttermilk
Program for breads with added yoghurt or buttermilk (up to 1,000g).
9 Jam
Program for processing fresh fruits. Do not exceed the specified amounts, since the jam could boil over and contaminate the baking chamber and the heating coils.
10 Bake
This program bakes pre-baked dough (e.g. if bread is not completely baked). The basic setting is one hour. You can stop the second baking procedure any time by pressing the STOP button.


natural_image
Pure geometric crosshair symbols without any text or labels

OPERATION
Before first use
- Remove all packing materials.
- Check the appliance for visible damage. Do not use the appliance if there is damage of any kind.
- Remove any protective sheets attached to the casing.
- Before using for the first time, wash the dough container, the dough hooks and the casing of the breadmaker with a clean, moist cloth. Do not use any strong detergents.
- Carefully dry the cleaned parts.
Please observe the advice on Pages 2 and 3 regarding setting up the appliance safely.
Heating for the first time
Before using for the first time let the appliance heat up with the baking container inserted and the window open for around 5 minutes.

For first operation, please note:
As preparation it is necessary to lightly grease a few parts of the appliance. This will cause it to smell slightly during initial operation. This smell is normal and is not a sign of a malfunctioning appliance. Ensure there is adequate ventilation.
Preparing the dough
- All liquids should be at room temperature. The ideal temperature for normal programs is between approx. 18 °C and 23 °C.
Only use dry yeast for making the dough. In certain circumstances, fresh yeast will not yield a good result.
- If you bake with rye flour, consider that this flour only rises a little. For this reason, the flour should contain a maximum of seven parts rye and at least three parts wheat flour.
- If you live at a higher altitude (above 900 m sea level) or use very soft water, the fermenting process of the yeast is increased and the dough will rise higher. In this case, decrease the amount of yeast by approx. one fourth of the specified amount.
Please consider local deviations of the ingredients stated with the following recipe as the consistency and quality of e. g. flour might differ locally.
Measuring ingredients
Measure the ingredients precisely. Adhere exactly to the quantities specified in the basic recipe.
Use the measuring cup and measuring spoon supplied to measure the ingredients. Do not heap the ingredients on the measuring spoon; smooth out the ingredients so that they are level with the edge to avoid using more than specified.
Do not use more than the following quantities of ingredients:
- 500 g dry ingredients (baking mixture) and approx. 300 ml liquid for normal and light types of bread.
- 660 g dry ingredients (baking mixture) and approx. 440 ml liquid for loaves.
Ingredient order
- Add the dough ingredients to the dough container as follows: First the liquids, then the flour. Distribute sugar and salt around the edge of the flour. Make a small hollow in the flour for the dry yeast.
The ingredients will only be mixed properly if they are added in this order.
- Please note that the yeast must not touch the liquid nor the salt.
Cleaning the dough container
- Clean the outside of the dough container before insertion. When filling the ingredients, make sure that nothing drips into the baking chamber. The heating coils may not touch the dough!
- Adhere exactly to the specified amounts. In particular do not add larger amounts than those specified.
Bread that is mostly baked with wholemeal flour or with ingredients such as nuts, bran, etc., will be heavier and smaller than bread made of white flour.
Operation
- Insert the clean dough hooks onto the drive shaft in the dough container.
- Prepare the dough in the dough container.
- Make sure that the outside of the dough container is clean before insertion.
- Place the dough container in the brackets in the baking chamber and press down firmly so that the tensions springs on both sides click into place.
- Make sure that the ingredients do not drip into the baking chamber and do not touch the heating coils!
- Close the lid.


natural_image
Pure geometric crosshair symbols without any text or labels

-
Plug the mains socket in.
-
Switch the appliance to the ON position. The mains switch is located on the side of the appliance.
An acoustic signal sounds and the red LED lights up. The appliance now sets itself to the basic program and the normal time.

natural_image
Close-up of a white toilet seat corner with a small control switch (no text or symbols visible)Making settings
Each time a button is pressed, an acoustic signal sounds as confirmation.
Programme selection
Use the MENU key to select the desired program.
Select browning level
Press the COLOUR button repeatedly to select between the LIGHT, MEDIUM and DARK browning levels. This setting is available for programs 1-3.
For programs 1-3 you can also select the RAPID setting using the COLOUR key at the same time. This is recommended to avoid long rising times.
The selected browning level and the RAPID program are indicated by an bar at the lower edge of the display.
Select time delay
You can delay the baking time by up to 14 hours and 58 minutes. This setting is available for programs 1-4 and 8.
Calculate the desired time until the bread is to be ready. This gives you the time delay that you wish to set. For example: It is 20.30 and you would like the bread to be ready at 7.00 tomorrow (i.e. in 10 hours and 30 minutes). Set the timer to 10:30.
To set the time press the TIMER + or - key repeatedly. The + counts the baking time upwards in 10 minute intervals, and the counts down in 10 minute intervals from 14:55. If you keep the button pressed down the time will fast forward.
Do not use the time delay for recipes that use fresh ingredients (such as eggs, fresh milk, cream, cheese).
Start program
Press the START/STOP button to start the baking process. The time will count down backwards.
Add further ingredients
Depending on the selected program, an acoustic signal will sound after 20 to 30 minutes (after the second kneading phase) to remind you that you may now add further ingredients (raisins, nuts, etc.).
However, lift the lid up only briefly to prevent the dough from collapsing. Do not press STOP, otherwise you will stop the baking process!
Notes on the baking process
- The baking settings are maintained if the mains supply is interrupted for a short period (under 5 minutes) during the time delay or heating period. But if the mains power is interrupted after the first kneading phase the baking process is stopped completely.
- It is completely normal for the viewing window to cloud over at the beginning of the baking process. After a while condensation will escape through the vents.
- The appliance may vibrate somewhat noisily during the kneading phase. This does not mean that the appliance is malfunctioning.
Acoustic signals
Acoustic signals are emitted during the baking process
- For programs 1, 3, 4 and 8 an acoustic signal will sound after the second kneading phase to remind you that you may now add further ingredients (raisins, nuts, etc.).
• at the end of the baking phase;
• during the heating phase and at the end of the program (several acoustic signals).
CAUTION!
Never cover up the vents!
- This could cause smoke development if the dough rises over the edge of the dough container and touches the heating element. If smoke emerges from the baking chamber because dough has dropped onto the heating element, keep the lid closed to avoid the formation of flames or to extinguish flames that have already formed.
Press the STOPkey and switch the appliance off.
Unplug the mains power supply.
Allow the appliance to cool down completely before cleaning it!
CAUTION!
Never ever extinguish smouldering dough in the appliance with water!
End of program
Keeping warm and program end
At the end of the set baking time, several acoustic signals will sound and the display will show 0:00.
Keep warm function
For most programs the appliance will automatically switch to the keep warm mode. You can leave the baked goods in the appliance for up to 60 minutes; they are kept warm by the circulating air.
However, do not leave the baked goods in the appliance for longer than an hour!
Switch the appliance off using the on/off switch.
Remove baked goods from the appliance
After switching the appliance off using the on/off switch you can open the lid.
Lift out the dough container using the handle. Use oven gloves when touching the dough container and handle!
Carefully loosen the bread from the edge of the dough container using a wooden spatula. Turn over the dough container. Carefully tap the bottom to release the baked goods. Allow to cool off on a wire rack.
Release dough hooks
If the dough hook gets caught in the baked goods, remove only after the dough has cooled off. Use the metal hooks supplied for this purpose.
If the dough hooks remain in the dough container and cannot be removed easily, immerse the container in warm or hot water for up to 30 minutes as necessary.
Other baking processes
Immediately after baking you can start a new baking process. But the appliance may never be heated to over 40°C. If the appliance is still too hot, the E 01 message is displayed when you press the STARTkey.
If this occurs press START/STOP until the message disappears, remove the baking container and let the appliance cool down.
E 01
PROGRAM SEQUENCES
| Progr. | Crust/Rapid | Weight | Delay | Knead1 | Rest | Knead2 | Rise1 | Punch Rise | Rise2 Knead | Rise3 Bake Total | time |
| 1 Basic | Light | 750 g | 53 Min 3:18 | 20 Min 39 | Min 10 Sec | 25 Min 50 Sec | 15 Sec | 49 Min 45 Sec | 48 Min 3:13 | ||
| 1.000 g | |||||||||||
| 1.135 g | 60 Min 3:25 | ||||||||||
| Medium | 750 g | 48 Min 3:13 | |||||||||
| 1.000 g | 53 Min 3:18 | ||||||||||
| 1.135 g | 60 Min 3:25 | ||||||||||
| Dark | 750 g | 48 Min 3:13 | |||||||||
| 1.000 g | 53 Min 3:18 | ||||||||||
| 1.135 g | 60 Min 3:25 | ||||||||||
| Rapid | 750 g | 53 Min 5:24 | 20 Min 15 | Min 10 Sec | 8 Min 50 Sec | 10 Sec | 29 Min 50 Sec | 48 Min 2:12 | |||
| 1.000 g | |||||||||||
| 1.135 g | 60 Min 2:24 |
| 2French | Light | 750 g | 52 Min 3:32 | 30 Min50 Sec | 10 Sec | 59 Min50 Sec | 50 Min 3:30 | |||||
| 1.000 g | ||||||||||||
| 1.135 g | 55 Min 3:35 | |||||||||||
| Medium | 750 g | 50 Min 3:30 | ||||||||||
| 1.000 g | 52 Min 3:30 | 5 Min | 20 Min 39 | Min 10 Sec | ||||||||
| 1.135 g | 55 Min 3:35 | |||||||||||
| Dark | 750 g | 50 Min 3:30 | ||||||||||
| 1.000 g | 52 Min 3:32 | |||||||||||
| 1.135 g | 55 Min 3:35 | |||||||||||
| schnell | 750 g | 15 Min50 Sec | 10 Sec | 38 Min50 Sec | 50 Min 2:30 | |||||||
| 1.000 g | 52 Min 3:30 | 5 Min | 20 Min 15 | Min 10 Sec | ||||||||
| 1.135 g | 55 Min 2:35 |
| 3Whole-meal | Light | 750 g | 50 Min 3:45 | 25 Min50 Sec | 10 Sec | 44 Min50 Sec | 48 Min 3:43 | |||||
| 1.000 g | ||||||||||||
| 1.135 g | 53 Min 3:48 | |||||||||||
| Medium | 750 g | 48 Min 3:43 | ||||||||||
| 1.000 g | 50 Min 3:45 | Min 5 Min | 15 Min | 49 Min 10 | Sec | |||||||
| 1.135 g | 53 Min 3:48 | |||||||||||
| Dark | 750 g | 48 Min 3:43 | ||||||||||
| 1.000 g | 50 Min 3:45 | |||||||||||
| 1.135 g | 53 Min 3:48 | |||||||||||
| Rapid | 750 g | 10 Min50 Sec | 10 Sec | 34 Min50 Sec | 48 Min 2:28 | |||||||
| 1.000 g | 50 Min 2:30 | Min 5 Min | 15 Min | 24 Min 10 | Sec | |||||||
| 1.135 g | 53 Min 2:33 |








| Progr. | Crust/Rapid | Weight | Delay | Knead1 | Rest | Knead2 | Rise1 | Knead3 | Rise2 | Knead4 | Rise3 | Bake Total | time | |
| 4 Sweet | - | 750 g | 55 Min 53Min 5 Min 20 Min 39 | Min 10 Sec | 25 Min50 Sec | 5 Sec | 51 Min55 Sec | 50 Min 3:17 | ||||||
| 1.000 g | ||||||||||||||
| 1.135 g | 60 Min 3:27 | |||||||||||||
| 5 Super Rapid | ---- | 20 Min 0 | 0 12 Min | 0 0 0 48 | Min 1:20 | |||||||||
| 6 Knead dough | ---- | 5 Min 5 M | Min 20 Min | 60 Min 0 | 0 0 0 0 | 1:30 | ||||||||
| 7 Pasta | - | - | - | 3 Min | 0 | 11 Min | 0 | 0 | 0 | 0 | 0 | 0 | 0 | 0:14 |
| 8 Butter milk | Medium | 1.000 g | 30 Min 5 | Min 10 Min | 20 Min 39 | Min 10 Sec | 25 Min50 Sec | 10 Sec | 44 Min50 Sec | 60 Min 3:55 | ||||
| 9 Jam | - | - | - | 5 Min | 0 | 0 | 0 | 0 | 0 | 0 | 10 Min | 50 Min | 1:05 | |
| 10 Bake | - | - | - | 0 | 0 | 0 | 0 | 0 | 0 | 0 | 0 | 60 Min | 1:00 | |
Additional optional steps
Timer: You can set a time delay of just under 15 hours for the "1 Basic", "2 French", "3 Wholemeal" and "4 Sweet" programs.
Additional ingredients: After the "Knead2" phase an acoustic signal will remind you to add such additional ingredients as fruit and nuts.
Keep warm: You can keep the bread warm after baking for up to 1 hour for the "1 Basic", "2 French", "3 Wholemeal", "4 Sweet", "5 Super Rapid", "8 Butter Milk" and "10 Bake" programs.
TROUBLESHOOTING
If the baking result does not have the desired quality, the following overview should help to find the cause.
| Problem Possible cause/solutions | |
| The bread sags in the middle. Liquid | - too much and too warm.(The liquid should be between 21 and 28°C - for fast baking programs between 30 and 35 °C.) |
| Too little salt. | |
| Too much yeast. | |
| The humidity or room temperature is too high. | |
| The lid was opened for too long during baking. | |
| The rising period is too long. – Use the COLOUR button to select the "RAPID" setting. | |
| The bread did not rise enough. Not | enough yeast was added. |
| The yeast was off. | |
| Not enough sugar was added. | |
| Too much salt was added (affects the yeast). | |
| The liquid is too warm. | |
| The yeast came into contact with salt or liquid before baking. | |
| The bread rises too much. The humidity or room temperature is too high. (If the ambient conditions cannot be changed, try - as an experiment - using cooled ingredients and do not use the time delay.) | |
| Too much yeast. | |
| Liquid - too much or too warm. | |
| Too little flour. | |
| Too little salt. | |
| The bread is too dry and dense. Not | enough liquids. |
| The yeast was off. | |

| The bread is not done and still moist in the centre. | Too many additional ingredients, such as nuts, butter, dried fruits, syrup, etc., were added. |
| Too much fruit juice was added. | |
| The bread is too brown. Too much sugar. | |
| Browning level set too high. | |
| The bread is full of holes. The water is too hot. | |
| Too much liquid. | |
| Too much yeast. | |
| The humidity or room temperature is too high. | |
| The bread crust is sticky, or the bread is too wet. | After finishing baking, the bread remained in the appliance far too long. Condensation formed that could no longer escape and soaked the bread. |
| Dry and wet ingredients were mixed in the wrong ratio. (Reduce the liquids or the yeast somewhat, as necessary.) | |
| The bread forms air bubbles on the crust. | Too much yeast. Reduce the amount of yeast. |
| The dough is not being kneaded even though the motor is running. | The dough hooks or the dough container were not inserted correctly. |
| The ingredients were not kneaded smoothly. | The ingredients were added in the wrong order. |
| The dough was too heavy or too dry. | |
| The dough hooks were not inserted correctly. | |
Recipe examples
Notes on preparing dough
- Add the ingredients only in the listed order. This is the only way to properly mix the ingredients. Above all, the yeast may not touch the salt nor the liquids.
Measuring ingredients
- Adhere exactly to the specified amounts. Especially do not take larger amounts than specified.
- Measure the ingredients exactly. Use the supplied measuring cup and measuring spoon to measure the ingredients.
- Do not heap the ingredients on the measuring spoon; smooth out the ingredients so that it is level with the edge to avoid using more than specified.
Further notes
Most of the commercial flour types are suitable for making bread with fine flour. When adding only minor amounts (10 - 20%) of grist or grains, the programs for fine flour should also be selected. Program 3 can be used to make breads consisting mainly (70 - 95%) of whole grains. If you would like to make your own recipe with a wholemeal portion, we recommend trying this program first.
Lukewarm milk or water is recommended as liquid ingredient. If the added liquid is warmer, then baking can proceed faster. If the liquid is cooler (approx. 20 °C), the bread will be bigger and fluffier.
Please note that butter and margarine should always be added in a soft or even fluid state. Bread that is mostly baked with wholemeal flour or with ingredients such as nuts, bran, etc., will be heavier and smaller than bread made of white flour.
The yeast must always be dry before being placed on top of the flour.


natural_image
Pure geometric crosshair symbols without any text or labels
Recipes
White bread
Normal bread Fast bread
Milk 300 ml 300 ml
Salt 2 level tsp. (10 g) 2 level tsp. (10 g)
Margarine 50 g 50 g
Wheat flour Type 405 500 g 500 g
Sugar 2 heaped tsp. 2 heaped tsp.
Dry yeast 1 packet 1 packet
or fresh yeast 1/2 cube 1/2 cube
Program 1. Normal 6. Fast
Bread size 750 g 750 g
Colour
Rapid Medium
Insert the ingredients into the baking tray in the order stated (dough container).
Sunflower seed bread
| Normal bread | |
| Water | 350 ml |
| Sourdough substitute * | 50 g |
| Sunflower seeds | 75 g |
| Dry yeast | 1 packet |
| or fresh yeast | 1/2 cube |
| Salt | 2 level tsp (10 g) |
Program 1. Normal
Bread size
1.250 g
Colour
Rapid
Spiced bread
| Normal bread Fast bread | ||
| Water | 300 ml | 300 ml |
| Sourdough substitute * | 70 g 70 g | |
| Dry yeast | 1 packet 1 packet | |
| or fresh yeast | 1/2 cube | 1/2 cube |
Salt 2 level tsp. (10 g) 2 level tsp. (10 g)
Cumin 1 level tsp. 1 level tsp.
Fennel 1 level tsp. 1 level tsp.
Anise 1/2 level tsp. 1/2 level tsp.
Coriander 1 level tsp. 1 level tsp.
Wheat grist 350 g 350 g
Rye grist, fine 150 g 150 g
Program
-
Normal
-
Fast
Bread size
750 g 750 g
Colour
Rapid
Medium
\* Sourdough substitute
100 g Natural yoghurt
100 g Lemon juice
100 g Apple vinegar
Mix the ingredients.
2 cl sourdough substitute (1 schnapps glass) is approx. 20 g.
The sourdough substitute can be stored in the fridge for up to 14 days.
Plum purée without sugar
Ingredients: 680 g plums
Program: Jam
Wash plums, remove pits and cut into bite-size pieces. Add 680 g plum pieces to the dough container, insert into the baking area and start the jam program. Since the jam is cooked while being stirred, it thickens even though it does not contain any sugar nor gelling agents.
You can add cinnamon, 1 pinch of cloves or ginger to the plums if desired.
Peach-Raisin Jam, American Style
Ingredients: 340 g ripe peaches with stone removed
340 g sugar
2 Tbsp. raisins
2 whole cloves
1 pinch of ground pepper
Program: Jam
Add all ingredients to the dough container and start the jam program.
- SAFETY INSTRUCTIONS 2
- CLEANING, STORAGE, DISPOSAL 4
- SUMMARY OF SETTINGS 5
- OPERATION 8
- PROGRAM SEQUENCES 13
- TROUBLESHOOTING 15
- RECIPE EXAMPLES 17
- SAFETY INSTRUCTIONS
- About these instructions
- General information
- Setting the unit up safely
- Power connection
- Handling the bread machine safely
- General instructions
- Mains cable
- Appliance
- Never undertake your own repairs
- CLEANING, STORAGE, DISPOSAL
- Cleaning
- Storage
- Disposal
- Packaging
- SUMMARY OF SETTINGS
- Display
- Program phases
- Menu
- Loaf size
- Colour
- Start/Stop
- Power
- TIMER
- Program list
- Programs
- Basic
- French
- Wholemeal
- Sweet
- Super Rapid
- Dough
- Pasta
- Buttermilk
- Jam
- Bake
- OPERATION
- Before first use
- Please observe the advice on Pages 2 and 3 regarding setting up the appliance safely.
- For first operation, please note:
- Preparing the dough
- Measuring ingredients
- Ingredient order
- Cleaning the dough container
- Making settings
- Programme selection
- Select browning level
- Select time delay
- Start program
- Add further ingredients
- Notes on the baking process
- Acoustic signals
- CAUTION!
- Never cover up the vents!
- Never ever extinguish smouldering dough in the appliance with water!
- End of program
- Remove baked goods from the appliance
- Other baking processes
- PROGRAM SEQUENCES
- Additional optional steps
- TROUBLESHOOTING
- Recipe examples
- Notes on preparing dough
- Further notes
- Recipes
- White bread
- \* Sourdough substitute
Brand : MEDION
Model : MD 10259
Category : Bread maker