
Walkman NW-HD1 - Mp3 player SONY - Free user manual and instructions
Find the device manual for free Walkman NW-HD1 SONY in PDF.


| Product Type | MP3 Player with Hard Drive |
| Model | Walkman NW-HD1 |
| Brand | Sony |
| Storage Capacity | 20 GB |
| Dimensions (W x H x D) | 78.5 x 106.5 x 18.5 mm (3.1 x 4.2 x 0.73 in) |
| Weight | Approx. 140 g (4.9 oz) |
| Power Source | Built-in rechargeable lithium-ion battery |
| Battery Life | Up to 30 hours (ATRAC3plus 48 kbps) |
| Charging Time | Approx. 3 hours (AC adapter) |
| Supported Audio Formats | MP3, WMA, ATRAC3, ATRAC3plus |
| Display | Backlit LCD (2 lines) |
| Connectivity | USB 2.0 |
| Supported Operating Systems | Windows 98SE/Me/2000/XP, Mac OS 9.2.2/10.1.3 or later |
| Music Management Software | SonicStage |
| Accessories Included | AC adapter, USB cable, headphones, CD-ROM |
| Battery Type | Non-user-replaceable lithium-ion |
| Maintenance | Clean with dry soft cloth; avoid moisture |
| Safety Warning | Do not disassemble; keep away from heat and water |
| Repairability | Not user-serviceable; contact Sony support |
| Manual Language | English (PDF available) |
Frequently Asked Questions - Walkman NW-HD1 SONY
User questions about Walkman NW-HD1 SONY
0 question about this device. Answer the ones you know or ask your own.
Ask a new question about this device
Download the instructions for your Mp3 player in PDF format for free! Find your manual Walkman NW-HD1 - SONY and take your electronic device back in hand. On this page are published all the documents necessary for the use of your device. Walkman NW-HD1 by SONY.
USER MANUAL Walkman NW-HD1 SONY
Portable Hard Disk Audio Player Network Walkman
Operating Instructions
Owner's Record
The model and serial numbers are located at the rear of the player. Record the serial number in the space provided below. Refer to these numbers whenever you call upon your Sony dealer regarding this product.
Model No. NW-HD1
Serial No. ____
To go to the section you want to read, open the PDF Bookmarks and click the title, or click the title in the “Table of Contents” of the Operating Instructions.

Atrac3plus
"WALKMAN" is a registered trademark of Sony Corporation to represent Headphone
Stereo products. W. Walkman is a trademark of Sony Corporation.
NW-HD1
WARNING
To prevent fire or shock hazard, do not expose the unit to rain or moisture.
Do not install the appliance in a confined space, such as a bookcase or built-in cabinet.
To prevent fire, do not cover the ventilation of the apparatus with newspapers, table cloths, curtains, etc. And don't place lighted candles on the apparatus.
To prevent fire or shock hazard, do not place objects filled with liquids, such as vases, on the apparatus.
Note on installation
If you use the unit at a place subject to static or electrical noise, the track's transferring information may be corrupted. This would prevent successful transferring authorization on your computer.
For the customers in the USA and Canada
RECYCLING LITHIUM-ION BATTERIES
Lithium-ion batteries are recyclable. You can help preserve our environment by returning your used rechargeable batteries to the collection and recycling location nearest you.

For more information regarding recycling of rechargeable batteries, call toll free 1-800-822-8837, or visit http://www.rbrc.org/.
Caution: Do not handle damaged or leaking Lithium-ion batteries.
For the customers in the USA
INFORMATION:
This equipment has been tested and found to comply with the limits for a Class B digital device, pursuant to Part 15 of the FCC Rules. These limits are designed to provide reasonable protection against harmful interference in a residential installation. This equipment generates, uses, and can radiate radio frequency energy and, if not installed and used in accordance with the instructions, may cause harmful interference to radio communications. However, there is no guarantee that interference will not occur in a particular installation. If this equipment does cause harmful interference to radio or television reception, which can be determined by turning the equipment off and on, the user is encouraged to try to correct the interference by one or more of the following measures:
– Reorient or relocate the receiving antenna. - Increase the separation between the equipment and receiver. - Connect the equipment into an outlet on a circuit different from that to which the receiver is connected. - Consult the dealer or an experienced radio/TV technician for help.
You are cautioned that any changes or modifications not expressly approved in this manual could void your authority to operate this equipment.
If you have any questions about this product:
Visit: www.sony.com/walkmansupport
Contact:
Sony Customer Information Service Center at 1-(866)-456-7669
Write:
Sony Customer Information Services Center 12451 Gateway Blvd.,
Fort Myers, FL 33913
Declaration of Conformity
Trade Name: SONY
Model No.: NW-HD1
Responsible Party: Sony Electronics Inc.
Address: 16450 W. Bernardo Dr, San Diego, CA 92127 USA
Telephone Number: 858-942-2230
This device complies with Part 15 of the FCC Rules. Operation is subject to the following two conditions: (1) This device may not cause harmful interference, and (2) this device must accept any interference received, including interference that may cause undesired operation.
Table of Contents
Notice for Users....4
Precautions....5
On safety 5
On installation....5
On heat build-up 5
On the headphones....5
On cleaning 5
Getting Started
Checking the Supplied Accessories.....6
Optional accessories 6
Guide to Parts and Controls....7
About the serial number....7
Preparing a Power Source......8
Checking the remaining power of the battery 9
Installing SonicStage
on Your Computer.... 10
Preparing the required system.... 10
Installing SonicStage....11
Playback
Before Playback.... 12
Importing audio data to your computer..... 12
Transferring audio data to the player.....14
Using SonicStage Help....16
Playing Back...... 18
Locking the controls (HOLD) ......18
Basic playback operations
(Play, stop, search)....19
Checking information in the display .....19
Playing Back Tracks Selected by MODE (Artist, Album, Genre, Group, etc.)..... 20
MODE displays.... 22
Adding a bookmark
(Bookmark track play)...... 23
Changing Playback Options
(Play Mode) 24
Playback options (Play Mode) ......25
Playing tracks repeatedly (Repeat play)... 26
Changing Sound Quality
and Settings 27
Setup items....28
Customizing sound quality (Custom)......30
Other Functions
Transferring Audio Data Back
to Your Computer....31
Connecting Other Devices
Storing Data Other Than Audio Files.. 33
Resetting to the Factory Settings .....33
Initializing Hard Disk
Additional Information
Notes on Disposing of the Unit .... 36
Troubleshooting......37
Error Messages
Specifications.
Index
Notice for Users
On the supplied software
• Copyright laws prohibit reproducing the software or the manual accompanying it in whole or in part, or renting the software without the permission of the copyright holder. - In no event will SONY be liable for any financial damage, or loss of profits, including claims made by third parties, arising out of the use of the software supplied with this player. - In the event a problem occurs with this software as a result of defective manufacturing, SONY will replace it. However, SONY bears no other responsibility. - The software provided with this player cannot be used with equipment other than that which is so designated. - Please note that, due to continued efforts to improve quality, the software specifications may be changed without notice. - Operation of this player with software other than that provided is not covered by the warranty.
Program ©2001, 2002, 2003, 2004 Sony Corporation
Documentation ©2004 Sony Corporation
- SonicStage and SonicStage logo are trademarks or registered trademarks of Sony Corporation.
- OpenMG, ATRAC3, ATRAC3plus and their logos are trademarks of Sony Corporation.
- Microsoft, Windows, Windows NT and Windows Media are trademarks or registered trademarks of Microsoft Corporation in the United States and/or other countries.
- IBM and PC/AT are registered trademarks of International Business Machines Corporation. • Macintosh is a trademark of Apple Computer, Inc. in the United States and/or other countries.
- Pentium is a trademark or a registered trademark of Intel Corporation.
- Adobe and Adobe Reader are trademarks or registered trademarks of Adobe Systems Incorporated in the United States and/or other countries. US and foreign patents licensed from Dolby Laboratories.
- All other trademarks and registered trademarks are trademarks or registered trademarks of their respective holders.
- In this manual, TM and ® marks are not specified.
- CD and music-related data from Gracenote, Inc., copyright © 2000-2003 Gracenote. Gracenote CDDB® Client Software, copyright 2000-2003 Gracenote.
This product and service may practice one or more of the following U.S. Patents: #5,987,525; #6,061,680; #6,154,773, #6,161,132, #6,230,192, #6,230,207, #6,240,459, #6,330,593 and other patents issued or pending.
Gracenote and CDDB are registered trademarks of Gracenote. The Gracenote logo and logotype, the Gracenote CDDB logo, and the “Powered by Gracenote” logo are trademarks of Gracenote.
Precautions
On safety
- Do not put any foreign objects in the DC IN jack of the USB cradle.
- Be sure not to short-circuit the terminals of the USB cradle with other metallic objects.
On installation
- Never use the player where it will be subjected to extremes of light, temperature, moisture or vibration.
- Never wrap the player in anything when it is being used with the AC power adaptor. Heat build-up in the player may cause malfunction or damage.
On heat build-up
Heat may build up in the player or USB cradle while charging if it is used for an extended period of time.
On the headphones
Road safety
Do not use headphones while driving, cycling, or operating any motorized vehicle. It may create a traffic hazard and is illegal in many areas. It can also be potentially dangerous to play at a high volume while walking, especially at pedestrian crossings. You should exercise extreme caution or discontinue use in potentially hazardous situations.
Preventing hearing damage
Avoid using the headphones at a high volume. Hearing experts advise against continuous, loud and extended play. If you experience a ringing in your ears, reduce the volume or discontinue use.
Caring for others
Keep the volume at a moderate level. This will allow you to hear outside sounds and to be considerate to the people around you.
Warning
If there is lightning when you are using the player, take off the headphones immediately.
On cleaning
- Clean the player casing with a soft cloth slightly moistened with water or a mild detergent solution.
- Clean the headphone plug periodically.
Notes
- Do not use any type of abrasive pad, scouring powder or solvent such as alcohol or benzene as it may mar the finish of the casing.
- Be careful not to let water into the USB cradle or the recording USB cradle from the clearance at the connection part.
If you have any questions or problems concerning the player, consult your nearest Sony dealer.
NOTES
- The recorded music is limited to private use only. Use of the music beyond this limit requires permission of the copyright holders.
- Sony is not responsible for incomplete recording/downloading or damaged data due to problems of the player or computer.
Checking the Supplied Accessories
• Headphones (1) • USB cradle (1)

• Dedicated USB cable (1)

• AC power adaptor (1) (For the supplied USB cradle)
- Carrying pouch (1)
- CD-ROM (1) * (SonicStage, PDF of Operating Instructions)
- Quick Start Guide (1)
* Do not play this CD-ROM on an audio CD player.
For customers in the US
The AC power adaptor supplied with this unit is not intended to be serviced. Should the AC power adaptor cease to function in its intended manner during the warranty period, the adaptor should be returned to your nearest Sony Service Center or Sony Authorized Repair Center for replacement, or if a problem occurs after the warranty period has expired, the adaptor should be discarded.
Optional accessories
| Active speaker system | SRS-Z1SRS-Z30 |
| Car connecting pack | CPA-9C |
| Connecting cord | RK-G129RK-G136 |
| Earphones | MDR-EX71SLMDR-Q55SL |
Your dealer may not handle some of the accessories listed above. Please ask the dealer for detailed information about the accessories in your country/region.
Guide to Parts and Controls
Player
1 Ⓡ (headphones)/LINE OUT jack (page 18) 2 ↑, ↓, ◀◀◀, ▶▶▶I buttons (page 19, 20) 3 MENU button (page 24, 27) 4 MODE button (page 20) 5 VOLUME +*/- buttons (page 18) 6 ▶■ (play/stop) button (page 18, 19) 7 Hole for hand strap** 8 USB cradle connector (page 8, 15) 9 BUILT-IN BATTERY switch (page 8) 10 HOLD switch (page 18)
Player display
11 Track number indicator (page 19) 12 Character information display (page 19) 13 Bookmark indicator (page 23) 14 Playback progress bar (page 19) 15 Playback indicator (page 19) 16 Playing time (page 19) 17 Repeat indicator (page 26) 18 Play mode indicator (page 24), Sound indicator (when adjusting the volume, page 28) 19 Battery indicator (page 9) 20 Bit rate (page 13)
About the serial number
The serial number provided for this player is required for the customer registration. The number is on a label on the rear of the player.
Preparing a Power Source
Charge the built-in lithium-ion rechargeable battery before using it for the first time or when it is depleted.
1 Slide the BUILT-IN BATTERY switch to ON.
The protection for the built-in rechargeable battery is released and power is supplied to the player. Keep the switch to ON position.

2 Connect the USB cradle to the AC power adaptor.
Connect the DC plug of the AC power adaptor to the DC IN jack of the USB cradle, and then connect the AC plug to a wall outlet.

3 Place the player on the USB cradle.
Insert the player as shown below until it clicks into place.
Charging of the battery starts. The CHG lamp lights up on the USB cradle, and if the player is on, the battery indicator in the display changes.

Charging is completed and the CHG lamp goes off in approximately 3 hours*. The lighting mark lights up in the display if the player is on. When the player display is off, it takes approximately 1 hour* to charge up to 80%.
* This is the approximate charging time for an empty battery charged under a room temperature. When the player display is on, it takes approximately 6 hours to charge up to 80%. The charging time will differ depending on the remaining power and battery condition. If the battery is charged in a low-temperature environment, the charging time will be longer.
To remove the player from the USB cradle
Press RELEASE.

Notes
- If the player is connected to the computer for a long time while charging, charging may stop to prevent the temperature of the player from increasing too much. In this case, the CHG lamp goes out. Remove the player from the USB cradle and start charging again after a while.
- If the player will not be used for three months or more, set the BUILT-IN BATTERY switch to OFF to prevent degradation of the battery.
- Charge the battery in an ambient temperature of between 5 to 35°C (41 to 95°F).
Notes on the AC power adaptor
- Use only the AC power adaptor and USB cradle supplied with the player. Do not use any other AC power adaptor since this may cause the player to malfunction.

- The player is not disconnected from the AC power source (mains) as long as it is connected to the wall outlet, even if the player itself has been turned off.
- If you are not going to use the player for a long time, be sure to disconnect the power supply. To remove the AC power adaptor from the wall outlet, grasp the adaptor plug itself; never pull the cord.
Checking the remaining power of the battery
The remaining power of the battery is indicated in the display. As the black indicator section decreases, the remaining power is depleted further.
![graph LR A["Rectangular Block"] --> B["Rectangular Block"] B --> C["Rectangular Block"] C --> D["Rectangular Block"] D --> E["*"]](/content/2026/06/1314777/images/f66d4c309100ecbea083586c751c0b7f410f9b5dbc0e53bd24fd181dc4c2469e.jpg)
* "LOW BATTERY" appears in the display and a beep sounds.
When the battery is depleted, recharge the battery.
Notes
- The display shows the approximate battery power remaining. For example, one section does not always indicate one-fourth of the battery power.
- Depending on the operating conditions, the display may increase or decrease relative to the actual power remaining.
Battery life (continuous use)
Playing time for ATRAC3plus 48 kbps is approximately 30 hours.
The amount varies depending on how the player is used.
Installing SonicStage on Your Computer
Using the supplied CD-ROM, install the SonicStage on your computer.
Preparing the required system
The following system environment is required.
| Computer | IBM PC/AT or Compatible |
| CPU: Pentium II 400 MHz or higher (Pentium III 450 MHz or higher is recommended.)Hard disk drive space: 200 MB or more (1.5 GB or more is recommended.) (The amount of space will vary according to the Windows version and the number of music fi les stored on the hard disk.)RAM: 64 MB or more (128 MB or more is recommended.) | |
| Others • CD drive (capable of digital playback by WDM)Sound BoardUSB port (Hi-Speed USB is supported.) | |
| Operating System | Factory installed:Windows XP Media Center Edition 2004/Windows XP Media Center Edition/Windows XP Professional/Windows XP Home Edition/Windows 2000 Professional/Windows Millennium Edition/Windows 98 Second Edition |
| Display | High Color (16 bit) or higher, 800 × 600 dots or better (1024 × 768 dots or better is recommended.) |
| Others | Internet access: for Web registration, EMD services and CDDBWindows Media Player (version 7.0 or higher) installed for playing WMA fi les |
Notes
- SonicStage is not supported by the following environments:
- Operating systems other than those indicated above – personally constructed PCs or operating systems
- An environment that is an upgrade of the original manufacturer-installed operating system
- Multi-boot environment
- Multi-monitor environment
- Macintosh
- We do not guarantee trouble-free operation on all computers that satisfy the system requirements.
- The NTFS format of Windows XP/Windows 2000 Professional can be used only with the standard (factory) settings.
- For Windows 2000 Professional users, install Service Pack 3 or later version before using the software.
- We do not guarantee trouble-free operation of the system suspend, sleep, or hibernation function on the computers.
Installing SonicStage
Check the following before installing the SonicStage software.
- Make sure to close all other software, including any virus-check software, as such software usually demands a large amount of system resources.
- Make sure to use the supplied CD-ROM for installing SonicStage.
- If OpenMG Jukebox or SonicStage has been installed, the existing software will be overwritten by the new version with the new functions.
- If SonicStage Premium, SonicStage Simple Burner, or MD Simple Burner has been installed, the existing software will co-exist with SonicStage.
- You will still be able to use audio data registered by the existing software. As a precaution, we recommend that you back up your audio data. To back up the data, refer to “Backing Up My Library” – “Backing Up Data to a Disk” on SonicStage Help.
1 Turn on your computer and start up Windows. 2 Insert the supplied CD-ROM into the CD drive of your computer.
The setup program starts up automatically and the installation window appears. Depending on the region, a window may appear asking you to select your country. In this case, follow the displayed instructions.
3 Click "Install SonicStage," and then follow the displayed instructions.
"Install SonicStage"

Read the instructions carefully.
Depending on your region, the buttons other than “Install SonicStage” may differ from those in the illustration above.
The installation may take 20 to 30 minutes, depending on your system environment.
Make sure to restart your computer only after the installation is completed.
If any trouble occurs during the installation, see “Troubleshooting” ( page 39).
Note on uninstalling
"OpenMG Secure Module" is installed when you install SonicStage. If you uninstall SonicStage, do not delete OpenMG Secure Module since it may be used by other software.
Before Playback
The following procedures using the SonicStage installed on your computer are necessary before playback.
- Importing tracks (audio data), which you want to listen to with the player, to your computer (right)
- Transferring audio data from your computer to the player (page 14)
playable audio data
This player can play audio data compressed in the ATRAC3plus/ATRAC3 formats.
ATRAC3 (Adaptive Transform Acoustic Coding3) is an audio compression technology that satisfies the demand for high sound quality and high compression rates.
ATRAC3plus is developed from the ATRAC3 format and can compress audio files to about 1/20 of their original size at 64 kbps.
Importing audio data to your computer
Record and store tracks (audio data) from an audio CD to the SonicStage “My Library” on the hard disk drive of your computer. You can record or import tracks from other sources such as the Internet and your computer’s hard disk. Refer to SonicStage Help for details (page 16).

1 Select "Start" – "All Programs"* – "SonicStage" – "SonicStage."
SonicStage starts up. If you use the earlier version of SonicStage, the “SonicStage file conversion tool”** window appears when you start up SonicStage for the first time after installing it. Follow the instructions in the window.

* "Programs" in the case of Windows Millennium Edition/Windows 2000 Professional/Windows 98 Second Edition
**This tool converts the audio files that were imported to your computer with SonicStage2.0 or a prior version into the optimum data format (OpenMG) for this player, in order to transfer audio data to the player at high speed.
2 Insert the audio CD that you want to record into the CD drive of your computer.
The source indication in the top-left of the SonicStage window changes to “Record a CD.”
3 Click "Music Source" on the SonicStage window.
The contents of the audio CD appear in the music source list. If CD information such as album title, artist name, and track names could not be obtained automatically, click “CD Info” on the right side of the window (connection to the Internet is necessary).
4 If necessary, change the format and bit rate for audio CD recording.
Click “Format/Bit Rate” on the right side of the SonicStage window to display “CD Recording Format [My library]” dialog box.
The default setting is OpenMG Audio (ATRAC3plus) for format and 64 kbps for bit rate.
5 Click on the SonicStage window.
The recording of the selected tracks starts.
To stop recording
Click on the SonicStage window.
To select the tracks you do not want to record
Before step 5, click the track number to uncheck ☑ on the SonicStage window.
Note
Only audio CDs with a mark can be used with SonicStage. We do not guarantee normal operation in the case of the copy-controlled CDs.
Continued
Transferring audio data to the player
Transfer the tracks (audio data) stored in SonicStage “My Library” on your computer to the player in ATRAC3plus/ATRAC3 format.

1 Connect the USB cradle to your computer and the AC power adaptor.
Connect the large connector of the dedicated USB cable to a USB port on your computer and the small connector to the USB jack on the USB cradle. Then connect the supplied AC power adaptor to the DC IN jack on the USB cradle, and lastly to a wall outlet.
![graph TD A["to USB port"] --> B["USB cable (supplied)"] B --> C["to USB jack"] C --> D["USB cradle"] D --> E["to DC IN jack"] E --> F["AC power adaptor (supplied)"] F --> G["to an AC outlet"]](/content/2026/06/1314777/images/5d6bb4b01afe56692f98c54b5d43cd2becb577d2e44b84060d86e189a319600e.jpg)
2 Place the player on the USB cradle.
Insert the player as shown below until it clicks into place.
"PC Connect" appears in the display.
The setup display for automatic transfer appears in the SonicStage window. Follow the instructions in the window. For details, see the SonicStage Help (page 16).

3 Click "Transfer" on the right side of the SonicStage window.
The screen is switched to the Transfer window.
4 Select "ATRAC HDD" from the Transfer Destination list on the right side of the SonicStage window.
5 Click the tracks you want to transfer from the My Library list on the left side of the SonicStage window.
To transfer more than one track, hold down the "Ctrl" key while selecting the tracks. To transfer all tracks of the album, click the album.
6 Click on the SonicStage window.
Transfer of the selected tracks starts. You can check the transferring status on the SonicStage window.
To stop transferring
Click on the SonicStage window.
To remove the player from the USB cradle, press RELEASE.

Continued
Notes
- Do not disconnect the USB cable or remove the player from the USB cradle while data is being transferred. The data being transferred may be destroyed.
- Use of the player with a USB hub or a USB extension cable is not guaranteed. Always connect the player to the computer directly using the dedicated USB cable.
- Some USB devices connected to the computer may interfere with the proper operation of the player.
- The control buttons on the player are all disabled while it is connected to a computer. If you place the player on the USB cradle connected to the computer during playback, playback stops and "PC Connect" appears in the player display.
- When there is not enough free space on the player for audio data to be transferred, the transfer will fail.
- During the transfer, the system suspend, sleep, or hibernation function will not operate.
- Depending on the type of text and number of characters, the text entered by SonicStage may not be displayed on the player. This is due to the limitations of the player.
- If the player is connected for a while to a computer that is powered, or after lots of data is transferred to the player, the player may get warm. However, this is not a malfunction. Remove the player from the USB cradle and leave it aside for a while.
Using SonicStage Help
SonicStage Help provides further details on how to use SonicStage. SonicStage Help allows you to search easily for information from a list of operations, such as "Importing audio data" or "Transferring audio data," or from a large list of keywords, or by typing in words that might lead you to the appropriate explanations.
1. Click "Help" – "SonicStage Help" while SonicStage is running.
Help appears.
The player is explained as “ATRAC HDD” in SonicStage Help.
"SonicStage Help"
Notes
- In SonicStage Help, “Device/Media” is the general term for this player.
- Follow the instructions of your internet provider regarding such things as recommended system.
To understand SonicStage Help
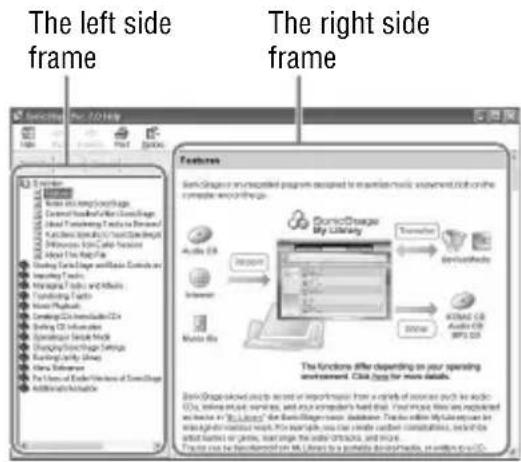
1 Double click "Overview" in the left-side frame of SonicStage Help.
2 Click “About This Help File.” The explanation will appear in the right-side frame. Scroll the display if necessary. Click underlined words to jump to their explanations.
To search for a word inside an explanation

1 Click "Search." 2 Type in the words. 3 Click "List Topics." A list of the typed words is displayed. 4 Click to select the desired item among those displayed. 5 Click "Display." An explanation of the selected item is displayed.
Playing Back
Transfer audio data from your computer to the player beforehand ( page 14).
You can change the language to your own for the menu and the messages in the display ( page 27).
1 After setting the BUILT-IN BATTERY switch to ON (page 8), connect headphones to the player.

2 Press ▶■.
▶ (play) appears on the left bottom of the display and the player starts playback.

appears.
3 Adjust the volume by pressing VOLUME +/-.

Notes
- When using the built-in battery, if the player is not operated for about 30 seconds while in stop mode, the display automatically turns off. When scrolling track titles, etc., the display turns off about 30 seconds after scrolling is finished.
- When using the AC power adaptor, if the player is not operated for about 3 minutes while in stop mode, the display automatically turns off. When scrolling track titles, etc., the display turns off about 3 minutes after scrolling is finished.
- If playback does not start, make sure that the HOLD switch is set to off (below).
Locking the controls (HOLD)
You can prevent accidental button presses while carrying the player by locking the controls. "HOLD" flashes on the display if you press any button when the HOLD function is activated.
1 Slide the HOLD switch in the direction of the arrow.
To unlock the controls
Slide the HOLD switch in the direction opposite to that of the arrow.
Basic playback operations (Play, stop, search)
| To Operation | |
| Play from a point where you stopped the player previously | Press ▶■. Playback starts from the point where you stopped. |
| Stop playback | Press ▶■. |
| Find the beginning of the current track | Press ◀◀ once. |
| Find the beginning of previous tracks* | Press ◀◀ repeatedly. |
| Find the beginning of the next track* | Press ▶▶I once. |
| Find the beginning of succeeding tracks* | Press ▶▶I repeatedly. |
| Go backwards quickly | Press and hold ◀◀. |
| Go forward quickly | Press and hold ▶▶I. |
* When shuffle play or play unit shuffle play (page 25) is selected, playback order is different.
To turn off the player
Press and hold MENU until the display disappears.
To turn on the player again, press any button.
Checking information in the display
You can check audio data and the playback status in the player display.
Player display during playback

Note
The characters A to Z, a to z, 0 to 9, and symbols (except /) can be displayed.
Playing Back Tracks Selected by MODE (Artist, Album, Genre, Group, etc.)
By grouping the tracks in the player into a “MODE,” such as by “Artist” or “Album,” you can select tracks you want to listen to. There are five MODEs, and the steps here use the displays of the Artist MODE as an example.
For details about the displays of each MODE, see page 22.
You can also play the selected tracks repeatedly (page 26) or randomly (shuffle play, page 25).
1 Press MODE repeatedly to select a MODE.
Each press of the button changes the MODE as follows:

2 Press ↑ or ↓ to select an item in the MODE.
To start playback here, press ▶■. Playback starts from the first track in the first album of the artist you selected. All the albums of the artists listed after the selected artist are played in the track number order.
Artist you want to listen to.

3 To search tracks more, press ▶▶▶.
Artist selected in step 2.

Albums of the selected artist appear.
4 Press ↑ or ↓ to select an item, and then press ▶■.
Playback starts from the track you selected or the first track of the item (artist, album, etc.) you selected. All the tracks listed after the selected items are played in the track number order.

To return to the display where you start playback
Press and hold MODE.
To return to the display where you select a MODE
Press MODE.
To return to the track list
Press ↑ or ↓.
To stop playback when selecting a MODE or in the list display
Press and hold ▶■.
To go to the playback display again after returning to the display where you select a MODE or to the list display
Press and hold MODE.
Continued
MODE displays
The display differs depending on the MODE.
You can start playback by pressing ▶■ in all the displays.
Artist![graph LR A["Artist"] --> B["List of artists Albums of the artist selected"] B --> C["Tracks of the album selected"] C --> D["Playing back"] subgraph Selected Artist E["BRAHMS"] --> F["Best Hit Sony"] G["Frank Klein"] --> H["EUENING MAN"] I["Jeffrey Nomura"] --> J["Hello, Mr. michi"] K["The Evenings"…](/content/2026/06/1314777/images/b86a17bf5c90eb443e55823c6ca369c2e55ff89a109bbc9422a8068663d90637.jpg)
Album
![graph LR A["List of genres: Artist of the genre selected"] --> B["Pop: Classic, Hip Hop, J-Pop, Rock"] B --> C["Track of the artist selected"] C --> D["Playing back: Bird Sings: Morning, Y & J, Pop, 001/012"]](/content/2026/06/1314777/images/62ed6ce95ef51cabcaa000e3d7feadfa291e4d5fc7b5b3e8db8cafc4a6d0dbb2.jpg)
Group: playing tracks in the groups created in the SonicStage
Others
- “New Tracks”: Tracks in groups newly transferred to the player (the 5 latest times)
- “Bookmark”: Bookmarked tracks (for how to add the bookmark, page 23)
![graph LR A["New Tracks\nBookmark"] --> B["Groups (New Tracks)\nor tracks (Bookmark)"] B --> C["Tracks of the group\selected (New Tracks)"] C --> D["Playing back"]](/content/2026/06/1314777/images/a3b48b75fabb3c12f5a88582716977c2847e4e78367f55a528cf7b61d628fb2b.jpg)
Adding a bookmark (Bookmark track play)
You can play your favorite tracks by adding a Bookmark to them. To play bookmarked tracks, select Others MODE ( page 20).
1 During playback of the track where you want to add a Bookmark, press and hold or .
The number of bookmarks (the number of bookmarked tracks/the number of possible bookmark) appears, and then (Bookmark) lights up.
If you want to add a Bookmark to two or more tracks, repeat step 1.
You can add Bookmarks to up to 100 tracks.
To play the bookmarked tracks
1 Press MODE repeatedly to select Others MODE. 2 Press ↑ or ↓ to select “Bookmark,” and then press ▶▶▶.
To playback all the bookmarked tracks, press ▶■.
3 Press ↑ or ↓ to select a track, and then press ▶■.
To remove bookmarks
During playback of the track where you want to remove a Bookmark, press and hold ↑ or ↓.
“Off” appears and disappears from the display.
Note
You cannot add or remove a bookmark while the player is stopped.
Changing Playback Options (Play Mode)
You can use various playback options, such as selecting songs you want to listen to and playing songs in random order.
For details about playback options (Play Mode), see ☑ page 25.
You can also play songs repeatedly using the playback options you choose (repeat play, page 26).
1 Press MENU.
The MENU display appears.

2 Press ↑ or ↓ to select "Play Mode," and then press ▶■.
The Play Mode display appears.
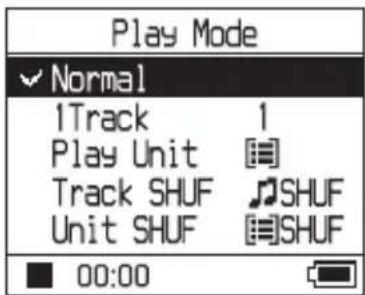
3 Press ↑ or ↓ to select the playback options, and then press ▶■.
The default setting is "Normal" (normal play).

Playback options appear.
4 Press MENU twice to go to the playback display, and then press ▶.
Playback starts in the selected playback option.
To cancel set up
Press MENU to return to the MENU display. Press and hold MODE or press MENU in the MENU display to return to the display before step 1.
To return to normal play
In step 3, select "Normal."
To return to the display where you select a MODE
Press MODE.
Playback options (Play Mode)
A range of tracks to be played (“Play unit” ⓕ below) differs depending on the MODE (page 20) where you start playback.
In the MENU display/icon Explanation
| Normal/No icon(Normalplay) | All the tracks after the selected track are played once in the track number order.When you select an item (album, artist, etc.) other than a track, all the tracks are played once from the first track of the item in the track number order. |
| 1Track/1(Singleplay) | The selected track is played once.When you select an item (album, artist, etc.) other than a track, only the first track is played once. |
| Play Unit/ [RE]( Play unit play) | All the tracks of the selected play unit are played once in a track number order. |
| TrackSHUF/ 🎨 SHUF( Shuffle e play) | All the tracks of the selected play unit are played once in random order. |
| UnitSHUF/ [RE] SHUF( Play unit shuffl e play) | All the tracks in the selected play unit are played once in random order for every play unit. |
What is a "play unit"?
All the items (an artist, an album, a track, etc.) on the list when you start playback is called a “play unit.”
Example: When you select Artist MODE
Artists Albums Tracks

All the tracks of all the artists make a play unit.
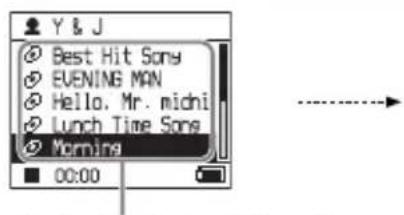
All the tracks in all the albums of the artist "Y & J" make a play unit.

All the tracks in the album "Morning" of the artist "Y & J" make a play unit.
When selecting "Play Unit" (Play unit play)
- Playback starts from the tracks of "Y & J" and stops after playing all the tracks of "The Evenings."
- Playback starts from the album “Morning” and stops after playing all the tracks of the album “Lunch Time Song.”
- Playback starts from the first track of the album “Morning” and stops after playing all the tracks.
When selecting "Unit SHUF" (Play unit shuffle play)
- Playback is in random order for every artist. Albums or tracks of the artist are played in order.
- Playback is in random order for every album. Tracks of the album are played in order.
- The tracks in the album "Morning" are played in random order.
Continued
Playing tracks repeatedly (Repeat play)
Playback of tracks repeats in the playback options selected in ☑ page 24.
1 Select the playback option you want to repeat ( page 24).
2 Press MENU.
The MENU display appears.

3 Press ↑ or ↓ to select "Repeat," and then press ▶■.
The Repeat display appears.

4 Press ↓ to select "On," and then press ▶■.

5 Press MENU twice to go to the playback display, and then press ▶■.
The current playback option repeats.
To repeat all the tracks
Select the MODE other than “Others,” and then follow steps 1 to 5.
To cancel set up
Press MENU to return to the MENU display. Press and hold MODE or press MENU in the MENU display to return to the display before step 2.
To return to normal play
In step 4, select "Off" on the Repeat display.
To return to the display where you select a MODE
Press MODE.
Changing Sound Quality and Settings
For details about various setting items, see page 28.
1 Press MENU.
The MENU display appears.

2 Press ↑ or ↓ to select the item, and then press ▶■.
The display to set the selected item appears.
3 Press ↑ or ↓ to select an option, and then press ▶■.
To change sound quality
After step 3, press ↑ or ↓ to select an option, and then press ▶■.
When you select "Custom 1" or
"Custom 2," you can customize sound quality (page 30).
To return to the previous display
Press ◀◀.
To cancel setup
Press MENU to return to the MENU display. Press and hold MODE or press MENU in the MENU display to return to the display before step 1.
To return to the display where you select a MODE
Press MODE.
Continued
Setup items
| Item | Options (●: Default setting) | |
| Sound(Sound setting) | ● Off | Normal sound quality |
| V-SUR*Studio(VS) | Recreates the sound of a recording studio. | |
| Live(VL) | Recreates the sound of a concert hall. | |
| Club(VC) | Recreates the sound of a dance hall. | |
| Arena(VA) | Recreates the sound of a stadium. | |
| Sound EQ*Heavy (SH) | Powerful sounds, further emphasizing high and low ranges compared with Pops sound | |
| Pops(SP) | Lively sounds, emphasizing high and low range audio | |
| Jazz(SJ) | For vocal, stressing middle range audio | |
| Unique(SU) | Special sounds, emphasizing high and low range audio more than middle range | |
| Custom1(S1) | Customized sound ( page 30 for details) | |
| Custom2(S2) | Customized sound ( page 30 for details) | |
| AVLS** (Limiting volume) | On The maximum volume is limited to protect your hearing. | |
| ● Off | The volume changes without limiting the volume level. | |
| Beep(Sound of operation) | ● On | The beep sounds when you operate the player. |
| Off The beep is turned off. | ||
| AudioOut(External audio output) | ● Headphone | Select this when you connect the supplied headphones. |
| Line Out Select this when you connect other devices such as speakers with an audio cord ( page 32). | ||
| Contrast(Adjustment of the display) | ● Second from the right | The display is moderately bright. |
| - to + Set toward - to make the display brighter and toward + to make it darker. | ||
* When "V-SUR" or "Sound EQ" is selected, the settings appear in the display (page 7). The options in parentheses are displayed on the player. **AVLS is an abbreviation of the Automatic Volume Limiter System.
| Items | Options (●: Default settings) | |
| Backlight(LCD backlight of the display) | ● Auto | The display lights up for about 10 seconds when you press a button and keeps lighting up while you scroll the track titles, etc. |
| 10 seconds The display lights up for about 10 seconds when you press a button. The light turns off in about 10 seconds even if you are scrolling the track titles, etc. | ||
| 30 seconds The display lights up for about 30 seconds when you press a button. The light turns off in about 30 seconds even if you are scrolling the track titles, etc. | ||
| Off The display is turned off to save power. | ||
| ReverseDisplay(Turning over the display) | ● Positive | Characters and icons appear in black and the background in white. |
| Negative Characters and icons appear in white and the background in black. | ||
| Language(Display language) | 日本語 | The messages and the menus are in Japanese. |
| ●English | The messages and the menus are in English. | |
| Français The messages and the menus are in French. | ||
| Deutsch The messages and the menus are in German. | ||
| Italiano The messages and the menus are in Italian. | ||
| Español The messages and the menus are in Spanish. | ||
Continued
Customizing sound quality (Custom)
You can adjust the sound quality for each frequency range individually, checking the settings on the display.
1 After selecting "Sound" in step 2 in "Changing Sound Quality and Settings" (page 27), select "Custom 1" or "Custom 2" of "Sound EQ."

2 Press ◀◀ or ▶▶I to select the frequency range.
There are six frequency ranges.

3 Press or to select the sound level.
The sound level can be adjusted in seven levels.
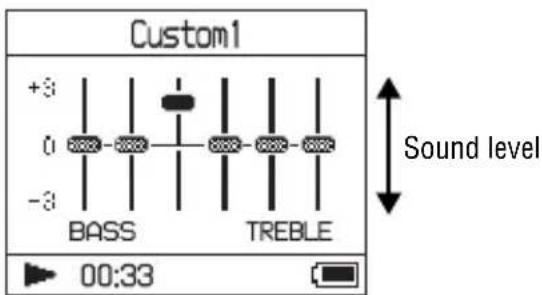
4 Repeat steps 2 and 3 to make adjustments for the remaining frequency ranges.
5 Press ▶■.
The MENU display appears.
To cancel set up
Press MENU to return to the MENU display. Press and hold MODE or press MENU in the MENU display to return to the display before step 1.
To return to the display where you select a MODE
Press MODE.
Notes
- If the sound is distorted by your sound settings when you turn up the volume, turn the volume down.
- If you feel difference in sound volume between the “Custom 1” or “Custom 2” sound setting and other sound settings, adjust the volume to your preference.
Transferring Audio Data Back to Your Computer
Audio data can be transferred back to SonicStage “My Library” on your computer.
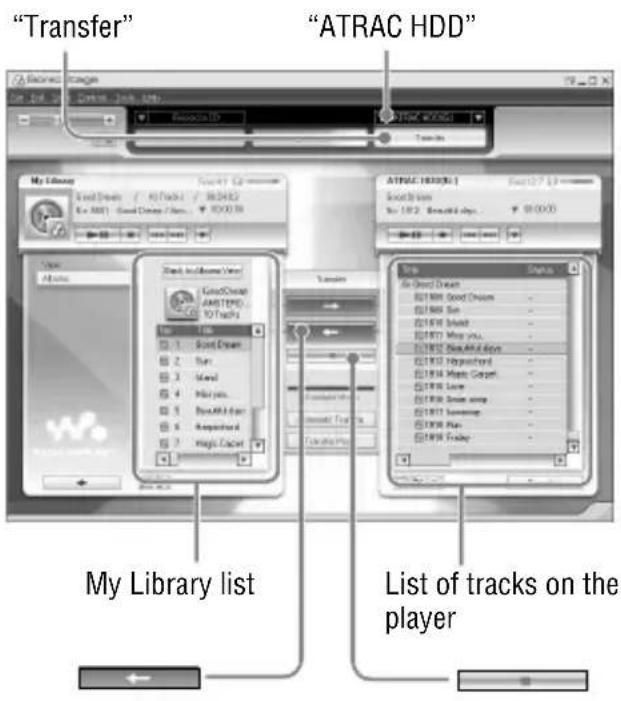
1. Connect the player to your computer (see steps 1 and 2 in "Transferring audio data to the player," page 14).
2. Click "Transfer" on the right side of the SonicStage window.
The screen switches to the Transfer window.
3. Select "ATRAC HDD" from the Transfer Destination list on the right side of the SonicStage window.
4. Click the tracks you want to transfer to My Library in the Network Walkman list on the right side of the SonicStage window.
To transfer more than one track, hold down the “Ctrl” key while selecting the tracks. To transfer all tracks of the album, click the album.
5. Click on the SonicStage window.
Transfer of the tracks selected in step 4 starts.
You can check the transferring status on the SonicStage window.
To stop transferring
Click on the SonicStage window.
To remove the player from the USB cradle, press RELEASE.

Notes
• Tracks transferred to the player from another computer cannot be transferred to My Library on your computer. - Do not disconnect the USB cable or remove the player from the USB cradle while the data is transferred. The data being transferred may be destroyed.
Connecting Other Devices
You can listen to tracks through a stereo system and record tracks in the player onto a MiniDisc or a cassette tape. See the instruction manual that comes with the device you want to connect.
Be sure to turn off all devices before making the connections and changing the settings as explained below.

MiniDisc recorder, AV amplifier, active speaker, cassette recorder, etc.
You need to change the setting for “Audio Out” in the MENU display to output sound to the connected device. The settings of “Audio Out” are shown below. To make those settings, see page 27.
Connected device Setting
| Headphones | Headphone |
| Device connected using the connecting cord | LineOut |
When you connect another device, set this to "Line Out." When the setting is "Line Out," volume cannot be adjusted, and the settings in "Sound" are not available and do not work.
Notes
- When the supplied headphone is connected to the player, you cannot set "Audio Out" to "Line Out."
- Before playback, turn down the volume of the connected device to avoid damaging the connected speaker.
Storing Data Other Than Audio Files
You can transfer data from the hard disk of a computer to the built-in hard disk of this player using Windows Explorer.
The built-in hard disk of the player is displayed in Windows Explorer as an external drive (as a removable storage).
Notes
- Do not use SonicStage while operating the hard disk of the player using Windows Explorer.
- If WAV and MP3 files are transferred to the player using Explorer, they cannot be played. Transfer them in ATRAC3plus or ATRAC3 using SonicStage.
- Do not disconnect the USB cable while the data is transferred. The data being transferred may be destroyed.
- Do not initialize the hard disk of the player on the computer.
Resetting to the Factory Settings
Reset all the settings in the MENU display to the factory settings.
1 While the player is stopped, press MENU.
The MENU display appears.

2 Press ↑ or ↓ to select "Format," and then press ▶■.
The Format display appears.

3 Press ▶■ while selecting "Factory Settings."
The Factory Settings display appears.

Continued
4 Press ◀◀◀ to select "Yes," and then press ▶▶■.
The message appears, and then the Format display appears.
To cancel set up
In step 4, select "No," and then press ▶■. The Format display appears.
Press MENU to return to the MENU display. Press and hold MODE or press MENU in the MENU display to return to the display before step 1.
To return to the display where you select a MODE
Press MODE.
Note
You cannot reset to the factory settings during playback.
Initializing Hard Disk
You can initialize the built-in hard disk of the player. If the hard disk is initialized, all the audio data and the other data stored will be erased. Be sure to verify the data stored in the hard disk prior to initializing.
If tracks are erased by initializing, SonicStage recognizes them as tracks to be transferred back to the computer when the player is connected to your computer. Therefore, the remaining transferable count increases automatically.
1 While the player is stopped, press MENU.
The MENU display appears.

2 Press ↑ or ↓ to select "Format," and then press ▶■.
The Format display appears.

3 Press ↓ to select "Initialize Hard Disk," and then press ▶■.
The Initialize Hard Disk display appears.

4 Press ◀◀◀ to select "Yes," and then press ▶▶■.

5 Press ◀◀◀ to select "Yes," and then press ▶▶■.
The message appears, and then the Format display appears.
To cancel set up
In step 5, select "No," and then press ▶■. The Format display appears.
Press MENU to return to the MENU display. Press and hold MODE or press MENU in the MENU display to return to the display before step 1.
To return to the display where you select a MODE
Press MODE.
Notes
- Do not initialize the hard disk of the player on the computer.
- You cannot format the hard disk during playback.
- All the audio data and the files other than audio data are deleted if the player is initialized.
Notes on Disposing of the Unit
This player has a built-in lithium-ion rechargeable battery. When you dispose of the player, be sure to dispose of it properly.
Certain countries may regulate disposal of the battery used to power this product. Please consult with your local authority.
Notes
- Never disassemble the player except when disposing it.
- Be careful of handling the inside metallic part, especially its edge.
To remove the built-in rechargeable battery
1 Slide the BUILT-IN BATTERY switch on the bottom of the player to OFF. 2 Remove the two screws on both sides.

3 Push the ⏻ (headphones)/LINE OUT jack into the player with your finger and pull out the inside of the player in the direction of the arrow below.

4 Remove the screw on the side of the battery and the adhesive tape on the battery.

5 Remove the built-in battery.

6 Pull the connecting cord between the battery and the player to separate the connector.

Troubleshooting
If you experience trouble with your player, try the following solutions.
1 Set the BUILT-IN BATTERY switch to OFF, and then set to ON again. The data is not lost when you set it to OFF. 2 Check the symptoms in "Troubleshooting." 3 If the problem persists, consult your nearest Sony dealer.
Power
| Symptom Case and/or corrective action | |
| The CHG lamp does not light. | → The terminals of the USB cradle are dirty. Wipe them with a soft, dry cloth.→ The player is not placed correctly on the USB cradle. Insert the player on the USB cradle securely until it clicks into place ( page 8). |
| The CHG lamp fl ashes. | → The temperature is not appropriate. Charge the battery in an ambient temperature of between 5 to 35°C (41 to 95°F). |
| Battery life is short. | → The operating temperature is below 5°C (41°F). This is due to the battery characteristics and not a malfunction.→ You have not used the player for a prolonged period. Effi ciency of the battery will be improved by repeatedly charging and discharging.→ The battery needs to be replaced. Consult your nearest Sony dealer.→ Battery charging time is not enough. The player requires 15 minutes to check the battery condition to protect it before a quick recharge starts. Keep charging the battery until it is complete (until the CHG lamp goes out). |
Continued
Sound
| Symptom Case and/or corrective action | |
| There is no sound. Noise is heard. | → The volume level is set to zero. Turn the volume up ( page 18).→ The headphone plug is not connected properly. Connect it to ○ (headphones)/LINE OUT jack securely ( page 18).→ The headphone plug is dirty. Clean the headphone plug with a soft dry cloth.→ No audio data is stored in the hard disk. |
| The volume does not increase. | → “AVLS” is set to “On.” Set it to “Off” ( page 28). |
| There is no sound from the right channel of the headphones. | → The headphone plug is not connected properly. Connect it to ○ (headphones)/LINE OUT jack securely ( page 18). |
| The volume cannot be adjusted. | → “Audio Out” is set to “Line Out.” Adjust the volume using the volume control on the connected device, or set “Audio Out” to “Headphone” ( page 28). |
| When using the player with a stereo system connected, the sound is distorted or noisy. | → “Audio Out” is set to “Headphone.” Set it to “Line Out” ( page 28). |
Operation/Playback
| Symptom Case and/or corrective action | |
| Buttons do not work. | → The buttons are locked. Slide the HOLD switch back ( page 18).→ Moisture condensation has occurred. Leave the player aside for a few hours until the moisture evaporates.→ The remaining battery power is insufficient. Charge the battery ( page 8).→ When the player is connected to your computer that is powered, if the player is placed on the USB cradle, button operations are disabled. Remove the player from the USB cradle ( page 9). |
| Playback has stopped suddenly. | → The remaining battery power is insufficient. Charge the battery ( page 8). |
| The backlight is not turned on. | → “Backlight” is set to “Off.” Set it to “Auto,” “10 seconds,” or “30 seconds” ( page 29). |
| “□” is displayed for a title. | → Characters that cannot be displayed on the player are involved. Use the SonicStage software to rename the title with appropriate characters. |
| The display turns off. | → The display automatically turns off if there is no operation for about 30 seconds (when using the battery) or about 3 minutes (when using the AC power adaptor) in stop mode. When scrolling track titles, etc., the display turns off about 30 seconds or about 3 minutes after scrolling is finished. Also, the display turns off when pressing and holding MENU. For all the cases, press any button to turn on the display again. |
Connection with the computer/SonicStage
| Symptom Case and/or corrective action | |
| The SonicStage software cannot be installed. | → An operating system not compatible with the software is used ( page 10).→ All Windows applications are not closed. If you start the installation while other programs are running, a malfunction may occur. This is especially true for programs that require large amounts of system resources, such as virus-check software.→ There is not enough space on the hard disk of your computer. You need 200 MB or more free space. Delete the unnecessary fi les on your computer. |
| The installation appears to have stopped before it has fi nished. | → Check for the appearance of an error message beneath the installation window. Press the “Tab” key while holding down the “Alt” key. If an error message has appeared, press the “Enter” key. The installation will resume. If there is no message, the installation is still in progress. Wait for a little while longer. |
Continued
Symptom Case and/or corrective action
| The progress bar on the display of your computer is not moving. The access lamp of your computer has not lit for a few minutes. | →The installation is progressing normally. Please wait. The installation may take 30 minutes or more, depending on your CD drive or system environment. |
| “PC Connect” is not displayed when connecting to the computer with the dedicated USB cable. | →Please wait for the authentication of the SonicStage software.→Another application is running on the computer. Wait for a while and reconnect the USB cable. If the problem persists, disconnect the USB cable, restart the computer, and then reconnect the USB cable.→The dedicated USB cable is not connected properly. Disconnect the USB cable and then reconnect it.→A USB hub is used. Connecting via a USB hub is not guaranteed. Connect the dedicated USB cable directly to the computer. |
| The player is not recognized by the computer when it is connected to the computer. | →The player is not placed correctly on the USB cradle. Inset the player on the USB cradle securely until it clicks into place ( page 15).→The dedicated USB cable is not connected properly. Disconnect the USB cable and then reconnect it.→A USB hub is used. Connecting via a USB hub is not guaranteed. Connect the dedicated USB cable directly to the computer.→The driver fi le for the player has not been installed. Reinstall the SonicStage software for the player using the supplied CD-ROM ( page 11) to install the driver together.→The installation of the SonicStage software had been failed. Disconnect the player and your computer, and then reinstall the software again using the supplied CD-ROM ( page 11). |
| Audio data cannot be transferred to the player from your computer. | →The dedicated USB cable is not connected properly. Disconnect the USB cable and then reconnect it.→The track has already been transferred to the player three times. Transfer back the track to the computer to increase the transferable count ( page 31), and then transfer it to the player again.→The free space of the hard disk in the player is insufficient. Transfer back any unnecessary tracks to your computer to increase the free space ( page 31).→You have already transferred over 65,535 tracks or over 8,192 groups to the hard disk of the player. Or you have already transferred over 999 tracks for a group.→Tracks with a limited playing period or playing count may not be transferred due to restrictions set by copyright holders. For details on the settings of each audio fi le, contact the distributor. |
| Symptom Case and/or corrective action | |
| The number of tracks that can be transferred to the player is not much. (Available recording time is short.) | → The free space in the hard disk of the player is not enough for the size of audio data you tried to transfer. Transfer back any unnecessary tracks to increase the free space ( page 31).→ Data other than audio data is stored in the hard disk of the player. Move data other than audio data to the computer to increase the free space. |
| Audio data cannot be transferred back to your computer from the player. | → A computer other than the one used for transfer to the player is selected as the transfer target. Audio data cannot be transferred back to a computer other than the one used for transfer to the player.→ The audio data has been deleted from computer you used to transfer to the player. The audio data cannot be transferred back to your computer if the track is deleted from the computer used to transfer to the player. |
| Audio data is transferred back to your computer and remaining transferable count increases without operations occasionally when the player is connected to the computer. | → If a track is deleted from the player using the SonicStage software installed on a computer other than the one used for transfer to the player, the track will be transferred back automatically when the player is connected to the computer that you used for transfer to the player. Therefore, the remaining transferable count increases automatically. |
| The operation of the player becomes unstable while it is connected to the computer. | → A USB hub or USB extension cable is used. Connecting via a USB hub or USB extension is not guaranteed. Connect the dedicated USB cable directly to the computer. |
| “Failed to authenticate Device/Media.” is displayed on the computer screen when the player is connected to the computer. | → The player is not connected to the computer properly. Quit the SonicStage software and verify the connection of the dedicated USB cable. Restart the SonicStage software. |
Others
| Symptom Case and/or corrective action | |
| There is no beep sound when the player is operated. | → “Beep” is set to “Off.” Set it to “On” ( page 28). |
| The player or the USB cradle gets warm. | → The player and the USB cradle may get warm when the battery is being charged and just after charging because of quick charge. Besides, the player and the USB cradle may get warm when transferring a large number of tracks. Leave the player aside for a while. |
| The sound is heard from the inside of the player. The player shakes. | → When the built-in hard disk of the player moves, the sound of operation may be heard, and the vibration of the player occurs. This is not a malfunction. |
Error Messages
Follow the instructions below if an error message appears in the display.
| Message Meaning Corrective action | ||
| AVLSNO VOLUMEOPERATION | The volume exceeds the maximum volume of AVLS. | → Set “AVLS” to “Off” ( page 28). |
| BOOKMARKFULL | The number of bookmarks exceeds the limit. | → Remove unnecessary bookmarks ( page 23). |
| CANNOT OPERATE STOP | “Format” in the MENU display is selected during playback. | → Stop playback and select “Format” again. |
| CANNOT OPERATE WHEN STOPPED | You are trying to add a bookmark while the player is stopped. | → Add a bookmark during playback ( page 23). |
| CANNOT PLAY CONNECT TO PC | The clock in the player is not working. | → Connect to the computer ( page 14). |
| CANNOT PLAY TRACK ERROR | Audio data is broken. | → Transfer audio data to the player again ( page 14). |
| CANNOT PLAY TRACK ON THIS DEVICE | · The track is not permitted to be played back on the player.· The tracks with a limited playing count are playing. | → You cannot play back tracks that are not permitted to be played back on the player. |
| CANNOT PLAY UNAVAILABLE FOR PLAYBACK | You are trying to play a track before or after its limited playing period. | → Tracks with a limited playing time can only be played back within the designated playing period. |
| CHARGE5°C – 35°C41F – 95F | You are charging the player in an ambient temperature out of the 5 to 35°C (41 to 95°F) range. | → Charge in an ambient temperature of between 5 to 35°C (41 to 95°F). |
| CONNECT AC POWER ADAPTER | · The player is connected to the computer but the AC power adaptor is not connected to the DC IN jack of the USB cradle.· The AC power adaptor is disconnected from the USB cradle while the player is connected to the computer. | → Connect the AC power adaptor to the USB cradle ( page 14). |
| HARD DISC WRITABLE5°C – 35°C | You are transferring the audio data to the player in an ambient temperature out of the 5 to 35°C (41 to 95°F) range. | → Operate in an ambient temperature of between 5 to 35°C (41 to 95°F). |
| HDD NOT INITIALIZED CORRECTLY | The hard disk of the player is not correctly initialized.The hard disk of the player was initialized on the computer.The hard disk of the player has not been initialized because it was changed. | → Initialize the hard disk of the player again ( page 34). |
| HOLD | The HOLD switch is set to ON. | → Unlock the controls by sliding the HOLD switch in the direction opposite to that of the arrow ( page 18). |
| LINE OUT NO OPERATION | When “Audio Out” is set to “Line Out,” you are trying to change the volume or the setting of “Sound.” | → Set “Audio Out” to “Headphone” ( page 28). |
| LOW BATTERY | There is no remaining battery power. | → Charge the battery ( page 8). |
| MAX NO OF GROUPS EXCEEDED | The number of groups (albums, artists, etc.) exceeds the limit (8,192). | → The total number of items in the list display (except track list) exceeds 8,192. Check the MODE and transfer any unnecessary tracks back to your computer ( page 31). |
| MISMATCH IN SYSTEM FILES | There is mismatch in the system fi les. | → Initialize the hard disk of the player ( page 34) and transfer audio data to the player again ( page 14). |
| NO DATABASE FOUND | When disconnecting from the computer, there are no tracks transferred to the player, or there is lack of MODE information. | → Transfer audio data to the player ( page 14). |
| NO TRACK | There are no tracks in the track list. | → Go to a track list with tracks.Transfer audio data to the player ( page 14). |
| SYSTEM ERROR <No. ***> (Number appears in parenthesis.) | There is a system error. | → Write down the number and consult your nearest Sony dealer. |
Specifications
Maximum recordable number of tracks (Approx.)*
ATRAC3 ATRAC3plus
| 5,000 (132 kbps) | 2,500 (256 kbps) |
| 6,000 (105 kbps) | 10,000 (64 kbps) |
| 10,000 (66 kbps) | 13,000 (48 kbps) |
* When transferring four-minute tracks
Sampling frequency
44.1 kHz
Audio compression technology
Adaptive Transform Acoustic Coding3 (ATRAC3), Adaptive Transform Acoustic Coding3plus (ATRAC3plus)
Frequency response
20 to 20,000 Hz (single signal measurement during playback)
Output
Ω (headphones)/LINE OUT*: Stereo minijack/194 mV
* The jack is used for both headphones and LINE OUT.
Operating temperature
5 to 35°C (41 to 95°F)
Power source
DC IN 6 V (from built-in rechargeable battery)
Battery life (continuous playback)
ATRAC3plus format (48 kbps): Approx. 30 hours
Dimension
Not including projecting parts: 89.0 × 62.1 × 13.8 (the thinnest part 12.6) mm (3 5/8 × 2 1/2 × 9/16 (the thinnest part 1/2) inches) (w/h/d)
Including projecting parts: 89.2 × 63.4 × 14.3 mm (35/8 × 21/2 × 19/32 inches) (w/h/d)
Mass
Approx. 110 g (3.9 oz)
US and foreign patents licensed from Dolby Laboratories.
Design and specifications are subject to change without notice.
Index
Symbols
(Album) 20
(Artist) 20
(Battery) 9
(Bookmark) 23
Genre 20
(Group) 20
(New Tracks) 22
(Play unit play) 25
SHUF (Play unit shuffle play) 25
(repeat) 26
SHUF (Shuffle play) 25
1 (Single play) 25
1 Track 25
A
AC power adaptor 6, 8
Album 22
Arena 28
Artist 22
ATRAC3plus/ATRAC3 12
Audio Out 28, 32
AVLS 28
B
Backlight 29
Battery life 9
Beep 28
Bit rate 13, 19
Bookmark 22
Bookmark track play 23
Built-in rechargeable battery 8
C
Carrying pouch 6
CD-ROM (SonicStage) 6
Charging time 8
Club 28
Computer 10, 12
Contrast 28
Custom 28, 30
D
Deutsch 29
E
English 29
Spanish 29
F
Find the beginning of a track 19
French 29
G
Genre 22
Group 22
Grouping tracks 20
H
Headphone 28, 32
Headphones 6
Heavy 28
HOLD function 18
Italian 29
Japanese 29
Jazz 28
Language 29
Line Out 28, 32
Live 28
MODE 20
My Library (SonicStage) 12, 14, 31
Negative 29
New Tracks 22
Normal play 25
0
Others 22
P
Player display 7, 19
Play Mode 25
Play Unit 25
Play unit play 25
Play unit shuffle play 25
Pops 28
Positive 29
R
Remove the built-in rechargeable battery 36
Repeat play 26
Reverse Display 29
S
Search 19
Search (SonicStage) 16, 17
Shuffle play 25
Single play 25
SonicStage 11
Sound 28
Sound EQ 28
Stop 19
Studio 28
T
Tracks with a limited playing count 42
Tracks with a limited playing period 42
Track SHUF 25
U
Uninstall 11
Unique 28
Unit SHUF 25
USB cable 6
USB cradle 6, 8, 14
V
V-SUR 28
Volume 18
W
Windows Explorer 33


- PORTABLE HARD DISK AUDIO PLAYER NETWORK WALKMAN
- OWNER'S RECORD
- WARNING
- TO PREVENT FIRE OR SHOCK HAZARD, DO NOT EXPOSE THE UNIT TO RAIN OR MOISTURE
- NOTE ON INSTALLATION
- FOR THE CUSTOMERS IN THE USA AND CANADA
- RECYCLING LITHIUM-ION BATTERIES
- FOR THE CUSTOMERS IN THE USA
- INFORMATION
- IF YOU HAVE ANY QUESTIONS ABOUT THIS PRODUCT
- DECLARATION OF CONFORMITY
- TABLE OF CONTENTS
- GETTING STARTED
- PLAYBACK
- OTHER FUNCTIONS
- ADDITIONAL INFORMATION
- NOTICE FOR USERS
- ON THE SUPPLIED SOFTWARE
- PRECAUTIONS
- ON SAFETY
- ON INSTALLATION
- ON HEAT BUILD-UP
- ON THE HEADPHONES
- ROAD SAFETY
- PREVENTING HEARING DAMAGE
- CARING FOR OTHERS
- ON CLEANING
- NOTES
- CHECKING THE SUPPLIED ACCESSORIES
- FOR CUSTOMERS IN THE US
- GUIDE TO PARTS AND CONTROLS
- ABOUT THE SERIAL NUMBER
- PREPARING A POWER SOURCE
- SLIDE THE BUILT-IN BATTERY SWITCH TO ON
- CONNECT THE USB CRADLE TO THE AC POWER ADAPTOR
- PLACE THE PLAYER ON THE USB CRADLE
- TO REMOVE THE PLAYER FROM THE USB CRADLE
- NOTES ON THE AC POWER ADAPTOR
- CHECKING THE REMAINING POWER OF THE BATTERY
- BATTERY LIFE (CONTINUOUS USE)
- INSTALLING SONICSTAGE ON YOUR COMPUTER
- PREPARING THE REQUIRED SYSTEM
- INSTALLING SONICSTAGE
- NOTE ON UNINSTALLING
- BEFORE PLAYBACK
- PLAYABLE AUDIO DATA
- IMPORTING AUDIO DATA TO YOUR COMPUTER
- SELECT "START" – "ALL PROGRAMS"* – "SONICSTAGE" – "SONICSTAGE
- INSERT THE AUDIO CD THAT YOU WANT TO RECORD INTO THE CD DRIVE OF YOUR COMPUTER
- CLICK "MUSIC SOURCE" ON THE SONICSTAGE WINDOW
- IF NECESSARY, CHANGE THE FORMAT AND BIT RATE FOR AUDIO CD RECORDING
- CLICK ON THE SONICSTAGE WINDOW
- TO STOP RECORDING
- TO SELECT THE TRACKS YOU DO NOT WANT TO RECORD
- NOTE
- TRANSFERRING AUDIO DATA TO THE PLAYER
- CONNECT THE USB CRADLE TO YOUR COMPUTER AND THE AC POWER ADAPTOR
- CLICK "TRANSFER" ON THE RIGHT SIDE OF THE SONICSTAGE WINDOW
- SELECT "ATRAC HDD" FROM THE TRANSFER DESTINATION LIST ON THE RIGHT SIDE OF THE SONICSTAGE WINDOW
- CLICK THE TRACKS YOU WANT TO TRANSFER FROM THE MY LIBRARY LIST ON THE LEFT SIDE OF THE SONICSTAGE WINDOW
- TO STOP TRANSFERRING
- TO REMOVE THE PLAYER FROM THE USB CRADLE, PRESS RELEASE
- USING SONICSTAGE HELP
- CLICK "HELP" – "SONICSTAGE HELP" WHILE SONICSTAGE IS RUNNING
- TO UNDERSTAND SONICSTAGE HELP
- TO SEARCH FOR A WORD INSIDE AN EXPLANATION
- PLAYING BACK
- LOCKING THE CONTROLS (HOLD)
- TO UNLOCK THE CONTROLS
- BASIC PLAYBACK OPERATIONS (PLAY, STOP, SEARCH)
- TO TURN OFF THE PLAYER
- CHECKING INFORMATION IN THE DISPLAY
- PLAYER DISPLAY DURING PLAYBACK
- PLAYING BACK TRACKS SELECTED BY MODE (ARTIST, ALBUM, GENRE, GROUP, ETC.)
- PRESS MODE REPEATEDLY TO SELECT A MODE
- PRESS ↑ OR ↓ TO SELECT AN ITEM IN THE MODE
- TO SEARCH TRACKS MORE, PRESS
- PRESS ↑ OR ↓ TO SELECT AN ITEM, AND THEN PRESS
- TO RETURN TO THE DISPLAY WHERE YOU START PLAYBACK
- TO RETURN TO THE DISPLAY WHERE YOU SELECT A MODE
- TO RETURN TO THE TRACK LIST
- TO STOP PLAYBACK WHEN SELECTING A MODE OR IN THE LIST DISPLAY
- TO GO TO THE PLAYBACK DISPLAY AGAIN AFTER RETURNING TO THE DISPLAY WHERE YOU SELECT A MODE OR TO THE LIST DISPLAY
- MODE DISPLAYS
- OTHERS
- ADDING A BOOKMARK (BOOKMARK TRACK PLAY)
- TO PLAY THE BOOKMARKED TRACKS
- TO REMOVE BOOKMARKS
- CHANGING PLAYBACK OPTIONS (PLAY MODE)
- PRESS MENU
- PRESS ↑ OR ↓ TO SELECT "PLAY MODE," AND THEN PRESS
- PRESS ↑ OR ↓ TO SELECT THE PLAYBACK OPTIONS, AND THEN PRESS
- PRESS MENU TWICE TO GO TO THE PLAYBACK DISPLAY, AND THEN PRESS
- TO CANCEL SET UP
- TO RETURN TO NORMAL PLAY
- PLAYBACK OPTIONS (PLAY MODE)
- WHAT IS A "PLAY UNIT
- EXAMPLE: WHEN YOU SELECT ARTIST MODE
- ARTISTS ALBUMS TRACKS
- WHEN SELECTING "PLAY UNIT" (PLAY UNIT PLAY)
- WHEN SELECTING "UNIT SHUF" (PLAY UNIT SHUFFLE PLAY)
- PLAYING TRACKS REPEATEDLY (REPEAT PLAY)
- TO REPEAT ALL THE TRACKS
- CHANGING SOUND QUALITY AND SETTINGS
- PRESS ↑ OR ↓ TO SELECT THE ITEM, AND THEN PRESS
- PRESS ↑ OR ↓ TO SELECT AN OPTION, AND THEN PRESS
- TO CHANGE SOUND QUALITY
- TO RETURN TO THE PREVIOUS DISPLAY
- TO CANCEL SETUP
- CUSTOMIZING SOUND QUALITY (CUSTOM)
- TRANSFERRING AUDIO DATA BACK TO YOUR COMPUTER
- CONNECTING OTHER DEVICES
- STORING DATA OTHER THAN AUDIO FILES
- RESETTING TO THE FACTORY SETTINGS
- WHILE THE PLAYER IS STOPPED, PRESS MENU
- PRESS ↑ OR ↓ TO SELECT "FORMAT," AND THEN PRESS
- PRESS ▶■ WHILE SELECTING "FACTORY SETTINGS
- PRESS ◀◀◀ TO SELECT "YES," AND THEN PRESS
- INITIALIZING HARD DISK
- PRESS ↓ TO SELECT "INITIALIZE HARD DISK," AND THEN PRESS
- NOTES ON DISPOSING OF THE UNIT
- TO REMOVE THE BUILT-IN RECHARGEABLE BATTERY
- TROUBLESHOOTING
- OPERATION/PLAYBACK
- CONNECTION WITH THE COMPUTER/SONICSTAGE
- ERROR MESSAGES
- SPECIFICATIONS
- MAXIMUM RECORDABLE NUMBER OF TRACKS (APPROX.)
- SAMPLING FREQUENCY
- AUDIO COMPRESSION TECHNOLOGY
- FREQUENCY RESPONSE
- OUTPUT
- OPERATING TEMPERATURE
- POWER SOURCE
- BATTERY LIFE (CONTINUOUS PLAYBACK)
- DIMENSION
- MASS
- INDEX
- SYMBOLS
- A
- B
- C
- D
- E
- F
- G
- H
- P
- R
- S
- T
- U
- V
- W
Brand : SONY
Model : Walkman NW-HD1
Category : Mp3 player