
FSK 06 TR - Cooker VESTFROST - Free user manual and instructions
Find the device manual for free FSK 06 TR VESTFROST in PDF.


| Product Type | Freestanding Cooker |
| Brand | Vestfrost |
| Model | FSK 06 TR |
| Overall Dimensions (HxWxD) | 85 x 60 x 60 cm |
| Weight | Approx. 55 kg |
| Power Supply | 220-240 V, 50/60 Hz |
| Energy Source | Gas hob, Electric oven |
| Number of Burners | 4 gas burners |
| Oven Type | Electric fan oven |
| Oven Capacity | Approx. 65 liters |
| Oven Functions | Conventional, grill, fan-assisted |
| Cleaning | Easy-clean enamel interior |
| Safety Features | Flame failure device on gas burners, thermostat control |
| Control Type | Knobs and buttons |
| Colour | White or stainless steel (check specification) |
| Spare Parts Availability | Grates, burners, oven elements, thermostats |
| Repairability | Modular components; authorized service centers |
| Warranty | Standard 2 years (check local) |
Frequently Asked Questions - FSK 06 TR VESTFROST
User questions about FSK 06 TR VESTFROST
0 question about this device. Answer the ones you know or ask your own.
Ask a new question about this device
Download the instructions for your Cooker in PDF format for free! Find your manual FSK 06 TR - VESTFROST and take your electronic device back in hand. On this page are published all the documents necessary for the use of your device. FSK 06 TR by VESTFROST.
USER MANUAL FSK 06 TR VESTFROST
1.1 PRODUCT MAIN PARTS:

RAMPORIENT overview:
1- Control panel 2- Handle 3- Magazine drawer 4- Adjustable feet 5- Oven door 6- Roasting pan 7- Baking tray 8- Wire rack 9- Oven light 10- Ceramic glass hob 11- Dual zone 12- Residual heat indicator 13- ∅14.5 cooking zone 14- ∅18.0 cooking zone
PART 2: WARNINGS
MAKE SURE TO FOLLOW ALL SAFETY INSTRUCTIONS AND READ THE MANUAL BEFORE USING THE APPLIANCE
We aim to offer quality products that exceed your expectations, providing you with products manufactured in modern facilities, carefully and particularly tested for quality.
This manual is prepared to help you use your appliance, which is manufactured with the most recent technology, with confidence and maximum efficiency.
Before using your appliance, carefully read this guide that includes basic information for correct and safe installation, maintenance, and use, and contact the nearest Authorized Service for mounting your product.
CONTENTS:
- PRESENTATION AND SIZES OF PRODUCT
- WARNINGS
- INSTALLATION AND PREPARATIONS FOR USE
- USE OF YOUR OVEN
- CLEANING AND MAINTENANCE
- SERVICE AND TRANSPORT
PART 1: PRESENTATION AND SIZES OF PRODUCT
Part of List:
1- Vitroceramic Cooktop 2- Control Panel 3- Child Lock 4- Oven Door Handle 5- Drawer Cover 6- Supply Leg 7- Oven Door 8- Oven Tray 9- Wire Grid 10- Front Resistance 11- Fan Store 12- Oven Lamp 13- Highlight elements
| Model | Size(cm.) |
| TE 66 | 60X60X85 / 60X60X90 |
| TE 56 | 50X60X85 / 50X60X90 |
PART 2: WARNINGS
TAKE ALL IMPORTANT SECURITY MEASURES AND READ THE MANUAL COMPLETELY BEFORE USING THE APPLIANCE
This appliance has been designed for non-professional, domestic use only. Surely control whether there is any damage after you unpacked the appliance. If there is any defect; do not use the appliance and immediately contact to the authorized maintenance service. As the materials used for package (nylon, stapler, strafoam, etc.) may cause harmful effects to children, they should be collected and removed immediately. The appliance must be set up by an authorized technician and put into use. The producer is not responsible for any damage that might be caused by defective placement. Before connecting your appliance to the electric, carefully control whether it is appropriate for the features determined on the package and/or data plate on the appliance. Compare the features of the electricity organization with the technical information on the presentation label before plugging the appliance in. The feeding cable must never be changed by the customer. When it is damaged by any reason, please contact to your authorized service. Before changing the oven's lamp, plug it off. Turn the appliance off before the operations such as cleaning or maintenance. You can do it after plugging it off or turning the main switches off. Some parts of appliance may hold its heat for a long time, it is required to wait for it to cool before touching onto the points that are exposed to the heat directly. This appliance is not intended for use by persons (including children) with reduced physical, sensory and mental capabilities, or lack of experience and knowledge, unless they have been given supervision or instruction concerning use of the appliance by a person responsible for their safety. Children should be supervised to ensure that they do not play with the appliance.
Do not keep flammable materials close while the appliance is operating. Pay attention to the cables of other electrical devices operating near the appliance, so as not to touch hot points. Ensure that the switches are set to "0" when the appliance is not in use. The glass covers that some models have may crack when exposed to extreme heat. Do not cover the glass cover unless you are sure that the cooker is off and completely cooled. This manual is prepared for more than one model in common. Your appliance may not have some of the features explained in the manual. Pay attention to the expressions that have figures while reading the operating manual. Keep children away from the oven. In case cracks are visible on the ceramic surfaces of the oven, switch off immediately to prevent electrical shocks. During use, the appliance gets hot. Take special care to prevent touching the heating elements inside the oven cavity. During grilling mode, the oven door should be closed. Do not use steam cleaners for cleaning the cooking hobs and oven cavity. Before opening the lid covering the hotplates, ensure that no liquids are on top of the lid. The lid should not be closed until the hobs have cooled down. Ensure that the lid is in the correct position during operation. In case highlight-halogen heaters are installed as hob elements, do not stare into the light. If the oven is placed on a socket, steps must be taken to prevent the oven from falling off the socket.
FOR EFFICIENCY AND SECURITY OF THE APPLIANCE, WE RECOMMEND YOU ALWAYS USE ORIGINAL SPARE PARTS AND CALL ONLY OUR AUTHORIZED SERVICES WHEN NEEDED.
PART 3: INSTALLATION AND PREPARATION FOR USE
This modern, functional, and practical oven, manufactured with the highest quality parts and materials, will meet your needs in every respect. You must read this manual to avoid any problems in the future and to achieve successful results. The following information provides the required rules for proper installation and service processes. It must be read especially by the technician who will install the appliance.
Contact the Authorized Service for mounting your oven.
3.1 INSTALLATION OF OVEN
There are some factors that must be paid attention to while installing your oven. Surely pay attention to our below suggestions in order to be able to prevent any problems and/or dangerous situations that may occur later. It can be placed close to other furniture on condition that in the area where the oven is set up, the furniture's height must not exceed the height of the cooker panel. Pay attention not to place it near the refrigerator, there must be no flammable or inflammable materials such as curtain, waterproof cloth etc. that will begin to burn quickly, while selecting place for oven. It is required there must be at least 2 cm blank space between the back cover of oven and wall for air circulation. The furniture close to oven must be manufactured resistant to heat more than 50 C° of the room temperature. If the kitchen furniture are higher than the pan which the oven's cookers are on, it must be at least 11 cm away from the oven's side. The minimum heights from the oven's pan and wall cupboards and paddle boxes with fan over the oven, are shown as below. Thus, the paddle box must be at minimum 650 mm height from the cooker pan. If there is no paddle box, this height must not be less than 700 mm.
3.2 ADJUSTMENT OF FEET
Your oven stands on 4 adjustable feet. As the feet are adjusted in low location, it is required to control whether it is balanced before installing the oven. You can make this adjustment as turning the feet clockwise if required. It is possible to raise the appliance maximum 15 mm via the feet.
If the feet are adjusted appropriately, it is required not to move the appliance by dragging, otherwise it is required to place it by lifting it up. It is required to bring the oven's drawer out to adjust the appliance's feet. The feet can be adjusted from inside via the small change.
3.3 ELECTRIC CONNECTION AND SECURITY
During the electric connection, surely follow the instructions below.
The earthing cable must be connected to the terminal. Ensure that the insulated cable is connected to the power source during the connection. If there is no appropriate earthed electric outlet in accordance with regulations at the installation site, immediately contact our authorized service. The earthed electric outlet must be close to the appliance. Do not use an extension cord. The feeding cable must not touch the hot surface of the product. If the feeding cable is damaged, contact Qualified Service. The cable must be replaced by the authorized service. Incorrect electrical connection may damage your appliance, and such damage is not covered by the guarantee. The appliance is adjusted for 220-240 Volts and 400V 3N Volts. If the mains electricity differs from this value, immediately contact our authorized service. The electric cable must not touch the hot parts of the appliance. The electric cable must not touch the back part of the appliance, as this may damage the cable and cause a short circuit. The manufacturer declares no responsibility for any damages or losses arising from failure to observe the following safety rules. An all-pole disconnector must be installed in the supply circuit with a contact opening of at least 3.0 mm, rated 32A, and of the delayed-action type.
The appliance is intended for fixed connection to the power supply. The connection of the appliance to an electrical source must be carried out by an authorized technician.
3.4 GENERAL WARNINGS AND MEASURES
Your appliance is produced in accordance with the related safety instructions for electrical appliances. Maintenance and repair work must be carried out only by an authorized service technician trained by the manufacturer. Installation and repair work that does not follow the rules may endanger you. The external surfaces heat up while the appliance is operating. The interior surfaces of the oven, the components that generate heat, and the steam that escapes are quite hot. Even when the appliance is turned off, these parts retain heat for a certain time. Do not touch hot surfaces. Keep children away. Do not leave the cooker unattended while cooking with solid or liquid oils. There is a risk of flaming if overheated. Never pour water on flames caused by oil. Cover the saucepan or frying pan with its lid to smother the flame in such a case, and turn off the cooker. The oven and heat adjustment switches must be set, and the oven's clock must be programmed for cooking in your oven. Otherwise, the oven will not operate. Do not leave anything on the oven door or drawer when they are open. You may unbalance the appliance or break the cover. Do not put heavy items or flammable, combustible materials (nylon, plastic bags, paper, cloth, etc.) into the lower drawer. Unplug the appliance when not in use and turn off the gas valve. Protect your appliance from atmospheric effects. Do not expose it to sun, rain, snow, dust, etc.
3 x 4 mm² 220V~ 3 x 4 mm² 230V~ 3 x 4 mm² 240V~
5 x 1.5 mm² 380V~, 3N~ 5 x 1.5 mm² 400V~, 3N~ 5 x 1.5 mm² 415V~, 3N~
4 x 2.5 mm² 380V~, 2N~ 4 x 2.5 mm² 400V~, 2N~ 4 x 2.5 mm² 415V~, 2N~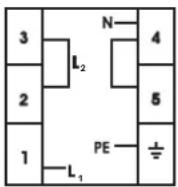
* This appliance must be earthed. * For this connection, a power lead of wire type H05VV-F should be used.
PART 4: USE OF YOUR OVEN
4.1 GENERAL APPEARANCE AND TECHNICAL FEATURES OF YOUR OVEN
| TE 56 | |
| LOWER HEATER | 1000 WATT |
| UPPER HEATER | 1000 WATT |
| GRILL | 1600 WATT |
| TURBO HEATER | 2000 WATT |
| TE 66 | |
| LOWER HEATER | 1100 WATT |
| UPPER HEATER | 1200 WATT |
| GRILL | 2000 WATT |
| TURBO HEATER | 2000 WATT |
4.2 PRESENTATION AND FEATURES OF THE CONTROL PANELS
TE 56/66
4.3 USE OF HOTPLATES AND VITROCERAMIC COOKERS
The electric cooker is controlled by 7-position switches. Position "0" is off. The use settings for the other 6 positions are below.


1......Keeping warm 2-3.....Heating at low heat 4-5-6..Cooking, roasting, and boiling
The upper part of the hotplates is covered with a heat-resistant protective material. To burn in and harden the protective layer at first use, turn the cooker switch to "3" and operate for 5 minutes. During use of electric cookers, ensure that the saucepans used have smooth bases. Using appropriately sized and smooth-based saucepans will give the most efficient cooking. It is not recommended to use small saucepans on large hotplates, as this causes heat loss and wastes energy.

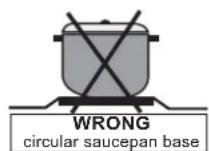


Make sure that your cooker is off and the control switch is at the "0" position after cooking. Also, never touch it as the cooker will remain hot for a certain time after it has been turned off. Do not let children come near it.
Clean the electric cooker with a damp cloth after use. If it becomes excessively dirty, you can clean it with water and detergent quite well.
Heat for a few minutes to dry the upper part after cleaning. If you will not use the upper part for a while, ensure a thin oil layer is applied by oiling with machine oil.

Dual or Oval Vitroceramic Cooker (Only on some models)
Dual or vitroceramic cookers can heat in two different positions. To operate the large diameter of the dual cooker, turn the switch to "☐". Both the large and small diameters of the cooker will operate. To operate the oval part of the oval cooker, turn the switch to "☐". Both the oval and round parts will operate.
(Only on some models)
4.4 USE OF OVEN PART
4.4.1 Use of Electronic Programming Clock
Adjustment of Day Hour
A symbol will start to flash after it is connected to the electrical supply. Press (+) and (-) keys at the same time. It is also possible to adjust (increase or reduce) the time by pressing these keys.

Alarm / Time Setup
This function can be used as a time setup and alarm when desired. The Mode key must be pressed until the LED indicator lamp starts to light. The desired time interval is adjusted via the + and - keys. The desired time remains on the screen after adjustment, and the sign that flashed previously remains fixed. It is possible to set the time between 0-23.59 hours. At the end of the cooking period, an alarm is heard and the symbol flashes. You can press any key to stop the alarm.
Programming by Determining the Cooking Period
This function is used to adjust the cooking time to the desired interval.
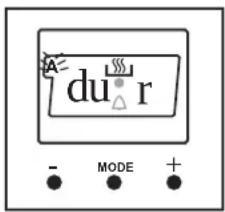
To adjust the cooking period, press the Mode key until the Dur indicator lamp starts to flash. Adjust the desired cooking period using the + and - keys. Once the time is adjusted, it is registered automatically within 5 seconds, and the A and 🎨 symbols start to light continuously. The screen returns to the current time. An alarm (sound) is heard when the cooking period ends, and the A and 🎨 symbols start to flash. Press any switch to stop the signal and the flashing lamp.
It is possible to adjust the cooking period between 0-10 hours.
Programming by Determining the Finish Time
This function is used to adjust the finish time of the cooking period. To adjust the finish time of cooking, press the "Mode" key until the "End" indicator lamp starts to flash. Adjust the desired finish time using the "+" and "-" keys. When the finish time is reached, an alarm sounds, and you can press any key to stop the alarm.
Programming by Determining the Cooking Period and Finish Time
This function is used to adjust the cooking period using the automatic cooking function.
Both the cooking period and the ending time must be adjusted to set the end of the cooking period. The cooking period is adjusted as described above.
Press the "Mode" key until the "End" indicator lamp flashes to adjust the ending time. Use the "+" and "-" keys to set the desired end of the cooking period.
Once the time is adjusted, it is registered automatically within 5 seconds, and the "A" and "###" symbols start to light continuously. The screen returns to the current time. An alarm sounds at the end of the time, and the "A" symbol starts to flash. Pressing any switch stops the signal and the flashing lamp.

4.4.2 Use of Mechanical Timer

Manual Operation
When you set the timer knob to the "M" position as shown in the illustration on the left, the oven can be operated continuously. The oven can never be operated when the timer knob is in the "0" position.
Operation with Time Set
Turn the timer knob clockwise to set a time between 0-100 minutes as shown in the figure on the right. When the adjusted time ends, the oven turns off and a single warning sound is heard.

4.4.3 Use of Oven Function Switches
This switch allows you to select the oven functions. The functions and their settings are shown in the following table. Detailed instructions and their uses will also be explained in detail on the next pages.

Your oven's lamp starts to operate.
Your oven's lamp, red warning lamp, and fan start to operate. This performs the defrosting function for your frozen food.
Your oven's thermostat, warning lamps, and lower and upper heaters start operating.
Your oven's thermostat, warning lamps, turbo heater, and fan are put into use.
Your oven's thermostat, warning lamps, fan, and upper and lower heaters start operating.
Your oven's thermostat, warning lamps, grill heater, and chicken turning function start operating.
Your oven's thermostat, warning lamps, upper heater, grill heater, and chicken turning function start operating.
Your oven's thermostat, warning lamps, upper heater, grill heater, chicken turning, and fan functions start operating.
Your oven's thermostat, lamps, and lower heater operate.
Your oven's thermostat, warning lamps, turbo heater, lower heater, and fan start operating.
Your oven's thermostat, warning lamps, and lower heater start operating.

Ice Melter Function (Defrost)
You can start the defrosting process by placing the frozen food into your oven and turning the switch to the designated sign. This is a program that does not cook the food, but helps to defrost it in a very short time. Place the food to be defrosted on the third shelf support from the bottom, on a wire shelf. Place a tray at the bottom of the oven to collect the water that forms during defrosting.

Lower - Upper Heater Function (Static Cooking)
In this cooking method, defined as the traditional method, the heat spread from the lower and upper heating elements into your oven equally ensures that the food's bottom and top are cooked evenly.
It is recommended to preheat for 10 minutes. Leave the food that was put into the available cooking dish to be cooked for the recommended period. The Lower-Upper Heater function is preferred for cooking cake, sponge cake, flan, spaghetti in the oven, lasagna, and pizza. At the end of the cooking process, turn the oven's switch and heat setting switch off and cancel the time program. Take the cooked food from the oven, put it onto a safe place, open the oven's door, and ensure the oven is completely cool. As the oven will be hot at that moment, stay away from the oven and keep your children away from the oven.

Fan and Lower - Upper Heater Function (Static Cooking with Fan)
The air from the lower and upper heating elements is distributed into the oven via the fan motor and fan.
The heat adjustment switch is adjusted to the degree recommended in the cooking table. Turn the oven's switch to show the symbol of this function and adjust the oven's time to the recommended cooking time. Preheat the oven for 10 minutes. Place the food that had been put into the available cooking dish into the oven and then cook. In general, this function gives very good results for cooking pastries. Every part of the food will be cooked equally with this function. It is appropriate for cooking a single tray.
At the end of cooking, turn off the oven's switch and heat adjustment switch. Cancel the oven's time program, take the cooked food from the oven, and leave it on a safe place. Open your oven's lid and leave it to cool. Do not come close to it until it cools and keep children away.

Turbo Fan Function
The turbo fan function spreads the oven's heat equally. The food on all shelves will be cooked equally during the use of this function.
The top of the oven will not be hotter than the bottom. Adjust the heat adjustment switch of your oven to the desired degree, and turn the function switch to show the Turbo function symbol. Place your food that had been put into the available cooking dishes into the oven after preheating for 10 minutes. This function is appropriate for cooking more than one dish.
If you have two trays of food that you will cook in your oven, you must use the heat that is appropriate for your food while adjusting the cooking heat. Cooking two trays of food requires additional cooking time compared to a single tray. In general, food in two trays is not cooked at the same time. So, take the tray that you observe is cooked out of the oven, and continue cooking the other tray. As there will be heat transfer between the two trays during cooking, the cooking quality will be lower than with a single tray. While cooking double trays, you can get a better cooking result by changing the places and ways of the trays if needed. The processes that will be applied at the end of cooking are the same for all functions. Open your oven's door and leave it to cool after you put your trays in the oven onto a safe place.

Turbo Fan and Lower Heater Function
The Turbo Fan and Lower Heater function is ideal for cooking pizza. The lower heater ensures the pizza base is cooked while the Turbo Fan spreads the heat evenly. Adjust the heat adjustment switch of your oven to the desired temperature, turn the function switch to the sign for this function, and set the oven's timer to the recommended cooking time. Preheat the oven for 10 minutes. This function is suitable for cooking one dish.
At the end of the cooking process, turn off the oven's switch and the heat set-up switch. Cancel the oven's time program, take the cooked food out of the oven, and place it on a safe surface. Open your oven's door and leave it to cool. Do not approach the oven until it has cooled down, and keep children away.
Warning: Max. thermostat setting 190°C

Grill and Chicken Turning Function
This function is used to grill and to turn chicken or other food cooked on a skewer. To make turning, use the "turning skewer". To grill, place the food onto the grill, and place the grill onto the topmost shelf. You can start grilling after placing the oven tray on the 3rd shelf. The tray placed on the 3rd shelf will collect the oils that drip from the food.
Turn your oven's heat set-up switch to the sign for this function. Place your food in the oven after preheating for 5 minutes.
At the end of cooking, as in all other cooking processes, turn off the oven's switch and the heat set-up switch. Cancel the oven's time program, take the cooked food out of the oven, and place it on a safe surface. Do not approach the oven until it has cooled down, and keep children away.
Warning: Max. thermostat setting 190°C

Upper Heater, Grill, and Roast Chicken Function
This function is used to grill rapidly and to roast chicken or other food cooked on a skewer.
To make roasting, use the "roasting skewer". To grill, place the food onto the grill, also the grill onto the shelf at the topmost level. You can start to grill after placing the oven tray onto the 3rd shelf. The tray that is placed onto the 3rd shelf will ensure collection of oils that drop from food.
Turn your oven's heat set up switch as it will show the sign of this function. Place your food into the oven after preheating for 5 minutes.
At the end of cooking process, as in all other cooking processes; turn off the oven's switch and heat set up switch. Cancel the oven's time program and take the cooked food from oven and leave onto a safe place. Do not come close to the oven until it cools and keep children away.
Warning: Max. set of thermostat 190°C

Grill, Chicken Roasting and Fan Function
In this function, grill and upper heater and the fan that ensures to roast perfectly, operate together and cook. It is also used to grill, to roast chicken and cooked food on a skewer.
To make roasting; use the “roasting skewer”. To grill, place the food onto the grill, also the grill onto the shelf at the topmost level. You can start to grill after placing the oven tray onto the 3rd shelf. The tray that is placed onto the 3rd shelf will ensure collection of oils that drop from food.
Turn your oven's heat set up switch as it will show the sign of this function. Place your food into the oven after preheating for 5 minutes.
At the end of cooking process, as in all other cooking processes; turn off the oven's switch and heat set up switch. Cancel the oven's time program and take the cooked food from oven and leave onto a safe place. Do not come close to the oven until it cools and keep children away.
Warning: Max. set of thermostat 190°C

Lower Heater Function
At this cooking the best is spreaded from the lower heating element. Lower heating function is appropriate for heating the food instead of cooking.

Lower Heater and Fan Function
At this cooking, the heat is spreaded from the lower heating element and fan motor. This function can be used to heat the food equally in a short time.
4.4.4 Accessories Used in Oven
You can use glass dishes, cake molds, and special oven trays that are suitable for oven use, which you can find on the market, in addition to the oven trays and grill wire chicken roasting skewer that come with your oven. Pay attention to the manufacturer's instructions regarding this subject. If you use small dishes, place them on the grill wire so that they are centered on the wire. The following information must also be followed for enameled dishes.
If the food to be cooked does not completely cover the oven tray, if the food is taken from the deep freezer, or if the tray is used to collect juices that flow during grilling, the tray may change shape due to the high heat generated during cooking or roasting.
The tray will return to its original shape only after it has cooled down after cooking. This is a normal physical phenomenon that occurs during heat transfer.
Do not immediately place the glass tray or dish in a cold environment after cooking. Do not put it on cold or wet surfaces. Place it on a dry kitchen cloth or a dish rack, and ensure it cools slowly. Otherwise, the glass tray or dish may break. If you grill in your oven, we recommend using the grill tray provided with the product (if your product includes this accessory). This way, splattering and flowing oils will not dirty the inside of the oven. If you use the large wire grill, place a tray on one of the lower shelves to collect oils. Also, add some water to the tray for easier cleaning.
Use the 4th and 5th shelf positions while grilling, and oil the grill to prevent the ingredients from sticking.
Use of rotisserie accessories
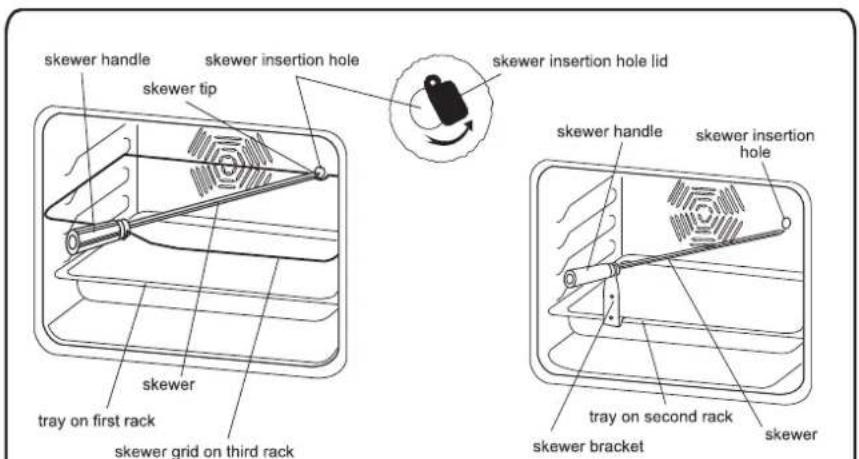
Pass the skewer through the chicken and lock the clamps. Insert the tip of the skewer into the hole at the rear panel of the cavity, making sure it fully rests on the frame and fits into the motor shaft. To do this, first turn the lid to the side, which is located in front of the skewer insertion hole, as shown in the figures. After that, fit the skewer onto the skewer grid (placed on the third rack) or the skewer bracket (placed on the holes of the tray). Remove the handle from the skewer, if installed, and close the oven door. The handle should only be attached for removing the food after grilling.
Make sure the oven is not operating while performing these operations.
PART 5: CLEANING AND MAINTENANCE OF YOUR OVEN
5.1 CLEANING
Before cleaning your oven, ensure that all control switches are off and that the appliance has cooled down. Unplug the appliance.
Check whether the cleaning materials are appropriate and recommended by the manufacturer before using them on your oven. As they may damage the surfaces, do not use caustic creams, abrasive cleaning powders, thick wire wool, or hard tools. If liquids that overflow around your oven burn, the enameled surface may be damaged. Immediately clean up any overflow liquids.
Cleaning the Inside of Your Oven
Be sure to unplug the oven before starting cleaning.
The inside of an enameled oven is cleaned best when the oven is warm. Wipe the oven with a soft cloth dampened with soapy water after each use. Then wipe it with a wet cloth once more, and then dry it. It may be necessary to use a liquid cleaning material from time to time and perform a thorough cleaning. Do not clean with dry or powder cleansers.
Removing the Oven Door
To remove the oven door:
- Open the oven door (1).
- Open the saddle bracket up to the end position (2).
- Close the door until it almost reaches the fully closed position as shown in the 3rd figure, and remove the door by pulling it towards yourself.
NOTE: To re-assemble the door, follow the opposite steps of removal.
⚠️ Please pay attention that the recessed forms should be positioned properly on the hinge counterparts as shown in the 2nd figure.
Cleaning Your Oven's Cover
To clean the cover of your oven from inside and outside, use a glass cleaner. Then rinse, dry it with a dry cloth. The cover can be pulled out for cleaning as shown in the following figure.
* Open the cover completely. * Pass the metal pin through the holes as shown in the picture. * Do this process for both hinges. * Lift up the cover slightly, pull towards the outside smoothly. The cover will completely come out. * Again place it into hinge holes while pinning the cover to its place.
Do not clean the oven's cover while the glass panels are hot. If this precaution is not taken, the glass panel may break. Contact an Authorized Service if any problem occurs.
Cleaning Vitroceramic Cooker
Before starting cleaning, wait for the Vitroceramic cooker to completely cool down. Be sure that the cleaning material does not contain any particles which may cause scratches on the glass. Use cream or liquid detergent. The Vitroceramic surface must be cleaned with cold water and dried with a soft cloth in a way that no cleaning material may be left. Use the pallet provided with your product for cleaning food or residues. Sweet type food must be cleaned right after they are spilled before the glass cools down. Steel cleaning material may damage the Vitroceramic glass. Dust on the surface must be cleaned with a wet cloth. Color change on ceramic surfaces does not affect the functional structure and durability of the Vitroceramic.
Color change is caused by not cleaning the residues, erosion due to casseroles, and using inappropriate cleaning materials, and is not due to material change. The cleaning pallet must always be used before applying chemicals. With this pallet, you can clean even the smallest dirt on the surface. Materials that are hard to clean like liquefied plastic, oil, and sweet materials can be cleaned with the pallet easily. Your pallet is dangerous because it is equipped with a razor, therefore it must be kept away from children. Be careful not to scratch the silicon adhesive placed on the edges of the glass while using the pallet.
5.2 MAINTENANCE
Change of Oven Lamp
The change of the oven lamp must be done by an authorized technician. The rating of the lamp should be 230V, 25Watt, Type E14. Before changing the lamp, the oven should be unplugged and it should be cool.
PART 6: SERVICE AND TRANSPORT
6.1 Requirements Before Contacting Service
If the oven does not operate:
The oven may be unplugged, or there has been a blow-out. On models fitted with a timer, the time may not be regulated.
If the oven does not heat:
The heat may not be adjusted with the oven's heater control switch.
If the interior lighting lamp does not light:
The electricity must be controlled.
It must be controlled whether the lamps are defective. If they are defective, you can change them as following the guide.
Cooking (if lower-upper part does not cook equally);
Control the shelf locations, cooking period and heat values according to the manual.
Except these, if you still have any problem with your product, please call to the "Authorized Service".
6.2 Information Related to Transport
If you need any transport;
Keep the original case of product and carry it with its original case when needed to be carried. Follow the transport signs on case.
Tape the cooker on upper parts, hats and heads and saucepan carriers to the cooking panels.
Place a paper between the upper cover and cooking panel, cover the upper cover, then tape it to the side surfaces of oven.
Tape cardboard or paper onto the front cover on interior glass of oven as it will be suitable to the trays, for the wire grill and trays in your oven not to damage to the oven's cover during transport.
Also tape the oven's covers to the side walls.
If it does not have the original case;
Take measure for the external surfaces (glass and painted surfaces) of oven against possible blows.

The symbol on the product or on its packaging indicates that this product may not be treated as household waste. Instead it shall be handed over to the applicable collection point for the recycling of electrical and electronic equipment. By ensuring this product is disposed of correctly, you will help prevent potential negative consequences for the environment and human health, which could otherwise be caused by inappropriate waste handling of this product. For more detailed information about recycling of this product, please contact your local city office, your household waste disposal service or the shop where you purchased the product.

- PRODUCT MAIN PARTS
- RAMPORIENT OVERVIEW
- PART 2: WARNINGS
- MAKE SURE TO FOLLOW ALL SAFETY INSTRUCTIONS AND READ THE MANUAL BEFORE USING THE APPLIANCE
- CONTENTS
- PART OF LIST
- TAKE ALL IMPORTANT SECURITY MEASURES AND READ THE MANUAL COMPLETELY BEFORE USING THE APPLIANCE
- PART 3: INSTALLATION AND PREPARATION FOR USE
- INSTALLATION OF OVEN
- ADJUSTMENT OF FEET
- ELECTRIC CONNECTION AND SECURITY
- GENERAL WARNINGS AND MEASURES
- PART 4: USE OF YOUR OVEN
- GENERAL APPEARANCE AND TECHNICAL FEATURES OF YOUR OVEN
- PRESENTATION AND FEATURES OF THE CONTROL PANELS
- USE OF HOTPLATES AND VITROCERAMIC COOKERS
- DUAL OR OVAL VITROCERAMIC COOKER (ONLY ON SOME MODELS)
- USE OF OVEN PART
- USE OF ELECTRONIC PROGRAMMING CLOCK
- PROGRAMMING BY DETERMINING THE FINISH TIME
- PROGRAMMING BY DETERMINING THE COOKING PERIOD AND FINISH TIME
- USE OF MECHANICAL TIMER
- MANUAL OPERATION
- OPERATION WITH TIME SET
- USE OF OVEN FUNCTION SWITCHES
- ICE MELTER FUNCTION (DEFROST)
- LOWER - UPPER HEATER FUNCTION (STATIC COOKING)
- FAN AND LOWER - UPPER HEATER FUNCTION (STATIC COOKING WITH FAN)
- TURBO FAN FUNCTION
- TURBO FAN AND LOWER HEATER FUNCTION
- GRILL AND CHICKEN TURNING FUNCTION
- UPPER HEATER, GRILL, AND ROAST CHICKEN FUNCTION
- GRILL, CHICKEN ROASTING AND FAN FUNCTION
- LOWER HEATER FUNCTION
- LOWER HEATER AND FAN FUNCTION
- ACCESSORIES USED IN OVEN
- PART 5: CLEANING AND MAINTENANCE OF YOUR OVEN
- CLEANING
- CLEANING YOUR OVEN'S COVER
- CLEANING VITROCERAMIC COOKER
- MAINTENANCE
- CHANGE OF OVEN LAMP
- PART 6: SERVICE AND TRANSPORT
- REQUIREMENTS BEFORE CONTACTING SERVICE
- INFORMATION RELATED TO TRANSPORT
Brand : VESTFROST
Model : FSK 06 TR
Category : Cooker