
WT 981 - Tumble dryer GORENJE - Free user manual and instructions
Find the device manual for free WT 981 GORENJE in PDF.


| Product Type | Tumble Dryer |
| Brand | Gorenje |
| Model | WT 981 |
| Capacity | 8 kg |
| Drying Type | Condenser |
| Energy Class | C |
| Dimensions (H x W x D) | 85 x 60 x 58 cm |
| Weight | 42 kg |
| Power Consumption | 2.5 kWh per cycle |
| Noise Level | 65 dB(A) |
| Number of Programs | 15 |
| Control Type | Electronic with LED display |
| Display | Yes, digital |
| Heat Pump | No |
| Condenser Self-Cleaning | No |
| Anti-Crease | Yes |
| Child Lock | Yes |
| Filter Indicator | Yes |
| Water Tank Capacity | 4.5 L |
| Reversing Drum | Yes |
| Installation Type | Freestanding |
Frequently Asked Questions - WT 981 GORENJE
User questions about WT 981 GORENJE
0 question about this device. Answer the ones you know or ask your own.
Ask a new question about this device
Download the instructions for your Tumble dryer in PDF format for free! Find your manual WT 981 - GORENJE and take your electronic device back in hand. On this page are published all the documents necessary for the use of your device. WT 981 by GORENJE.
USER MANUAL WT 981 GORENJE
Thank you for your trust and for buying our tumble drier. We hope it will successfully serve its purpose for many years.
This appliance was designed for drying clothes, for home use only.
Laundry dried in the tumble drier is dried quickly, is soft and smooth and does not change its shape during drying. With a tumble drier, there is no need for an extra room and no need for ropes and waiting for a sunny day.
The Instructions for Use should be of some help to you, therefore it is recommendable to read them carefully and to keep them in an adequate place. All warnings on safe use of the dryer should be considered.
The Instructions for Use have been prepared for different models of tumble dryers. Only descriptions applying to your type of dryer, whether venting or condenser-type, should be considered.
Before Use 68 Useful Hints
Important Warnings 68
Positioning and Installation ...... 69-70 Choosing the Right Place Positioning Moist Air Outlet Connecting to Power Supply
Door 70
Description of the Appliance 71 Extractor dryer Condensation dryer
Drying 72-75
Preparing the Laundry for Drying
ON - OFF button
Signal lamp operation
Prior drying
Drying program selection button
Drying stage indicator
START button
Drying
After drying - condensation type dryer
After drying – extractor dryer
The program chart
Economic use of the dryer
Cleaning and Maintenance ....76-77
Housing
Replacement of the lamp
Cleaning of extractor dryer
Cleaning of condensation dryer
Trouble Shooting Guide 78

Before Use
Wipe the interior of the drum with a soft cloth and liquid detergent. Do not use aggressive cleaning agents that could damage the surface. Load the appliance with old wet clothes and set the drying time to 45 minutes.
WHEN YOU FIND YOUR APPLIANCE IS OUT OF USE AND NO LONGER NEEDED, TRY NOT TO BURDEN THE ENVIRONMENT WITH IT. CALL YOUR NEAREST AUTHORIZED "COLLECTING SERVICE FOR USED APPLIANCES".
Useful Hints
- Drying a large quantity of laundry is not recommended because it will remain creased and unevenly dried (max. 5 kg of dry resistant laundry is recommended).
- Drying very delicate laundry (woolens, silk garments) is not recommended as they may shrink or lose shape.
- Synthetic curtains, fabrics with metal threads, nylon stockings, as well as lingerie with prevailing foam rubber components or rubber-like materials, should be dried at low temperature setting (delicate laundry programs or time setting programs).
- Put delicate laundry into a special sack when drying together with other laundry.
- When drying is finished, immediately take the laundry out of the drum so that it won't crease.
- When drying laundry in the dryer, there is no need to add a conditioner. Conditioners are added only when rinsing synthetics to neutralize static electricity.
- When buying clothes, especially underwear, do not forget that they shrink during washing as well as during drying.
- Clothes marked with a "no tumble dry" label are not suitable for drying in the tumble drier.
- Energy consumed when drying the laundry is essentially increased if your washing machine is spinning at less than 800 r.p.m. In that case, it is recommended to purchase an independent spin intended for additional water extraction.

Important Warnings
- Only laundry washed with water can be dried in this dryer. Never try to dry laundry washed or cleaned with inflammable cleaning agents (e.g., benzine, trichloroethylene), as it may cause an explosion.
- Never let children play near or with the appliance while it is operating.
- After cleaning, the filter has to be reinserted into the air duct. Operating the appliance with a damaged filter or without the filter is dangerous and can cause a fire.
- Never let children or pets enter (the drum of) the dryer.
After use, always switch the tumble dryer off and cut the power supply to the appliance.
- All interventions on the machine should be left to an expert. Call the authorized service station. The address is in this manual; if not, contact your purchaser.
- The belt can be replaced only by a service engineer who incorporates an original spare part marked OPTIBELT-RB POLY-V PH 1930 5M - 606532.
- The data plate with all essential information on the dryer is placed under the door frame.
This appliance is marked according to the European directive 2002/96/EC on Waste Electrical and Electronic Equipment (WEEE). This guideline is the framework for a European-wide validity of return and recycling of Waste Electrical and Electronic Equipment.
Positioning and Installation
Your drying machine can be placed in any room with adequate ventilation.
Choosing the Right Place
A - Venting-type Dryer
The most appropriate space is a room with a window or built-in ventilation fan (Figure 1).
In closed, smaller rooms without adequate ventilation, there is too much moisture in the air, drying time is increased, and so is energy consumption.
If during the drying procedure there isn't adequate ventilation in the room, we recommend you direct moist air out in the open by means of vent pipe (Fig. 2).


Vent pipe can be bought in any technical store (identification code PIPE SP-377628).
B - Condenser - type Dryer
Do not install the condenser dryer into the room where a danger of freezing can occur. Freezing of water in the condensed water drawer and the pump can damage the appliance.
Positioning
This dryer is a self standing appliance and can stand alone, or it can be placed either together with a washing machine or in the kitchen as a kitchen unit.
If the floor is uneven, use the adjustable feet to level the machine.


Undo the nuts. Rotate the feet to level the machine (fig. 3).
Lock the nuts (fig. 3a).
- Do not remove the adjustable feet. The machine must be placed horizontally.
- Some models of tumble dryers are supplied with vacuum leg braces, enabling the appliance to be placed on top of a washing machine, without hazard of falling or tripping during the operation of either appliance.
- Do not put the dryer on the thicker rug thus preventing the possibility of air circulation.
Moist Air Outlet
A – Vent dryer
There are two openings for venting out humid air, which are situated at the bottom left-hand rear side part of the dryer. Depending on the position of the machine, please, close down one of the openings with the front cover, which has already been fastened on it, or attached to the drum (Fig 4).
Fix the cover by inserting a coin into the slot and turning it clockwise. It can be removed by turning in the opposite direction.
If during the drying cycle the airing is not good enough, the air-vent tube can be inserted (screwed) into the hole. The distance between the dryer and the venting opening (air duct or window) must not exceed two meters, otherwise condensate can accumulate in the tube (Fig. 5, 6).

1 Decorative cap 2 Vent pipe


B - Condenser-type Dryer
Humidity from the laundry in the condenser dryer is extracted into the air cooler and accumulated in the drainage container or conducted directly into the moist air outlet. After every drying, the condensed water drawer should be emptied, of which you are reminded by the control lamp that is on when the container is full. The air cooler should be cleaned in time (see the chapter Maintenance and Cleaning).
Channelling the condenser tube to the drain outlet
Take off the condensed water drawer tube from the rear side of the dryer and, by fitting an elbow on it, channel the tube into the drain outlet. Height of the drain must not exceed 800 mm.

Connecting to Power Supply
The appliance is connected to the power supply by means of a cable cord plug. The wall socket should be earthed (safety socket). Required nominal current and frequency are stated on the rating plate. The wiring should withstand maximum load. Electric connection and earthing should be carried out in accordance with current standards and regulations.
IMPORTANT
If the supply cord is damaged, it must be replaced by the manufacturer or his service agent or a qualified person in order to avoid hazard.
- The appliance should be placed in a position where the plug is within reach.
Door
The door of the dryer can be opened by pressing the door frame against the machine, as shown in the figure.
The door is closed in the same way. If the door is not closed properly, the machine will not operate.

Be careful not to pinch the laundry with the door as it might get damaged.

IMPORTANT
- The door may be opened during the drying process. The program is interrupted and is resumed as soon as the door is closed again and the START button is pressed.
Description of the Appliance
Extractor dryer
Condensation dryer
- Control panel
- Condensation receptacle
- Door
- Air cooler
- Vent aperture
- Cooling air aperture
- Adjustable legs
- Filter
- Program selection button
- Drying stage indicator
- Signal lamp - condensation receptacle
- Control lamp
- START
- ON / OFF

Drying
Drying programme selection elements are fitted in the control panel as well as the indicator light which is on during the operation of the machine.
Preparing the Laundry for Drying
- Sort the laundry before drying according to type of the laundry.
- Do the buttons, zippers, join the strings and pull out the pockets.
- Very delicate laundry (fine underwear with laces) should prior to drying be put in a special sack so that it won't get damaged by buttons, zippers and pins.
- We recommend loading the drum with items of different size. Larger pieces of laundry get tucked during drying. So we recommend you take them out, shake them and then put them back.
- When drying large sheets (bed sheets, table cloths) put 2 to 3 pieces for one load and when drying delicate smaller items (shirts, blouses) fill only 5 to 6 pieces for one load (max 2.5 kg).
- Never fill the appliance with drip wet laundry.
- Most clothes nowadays have labels marked with recommended drying mode.
| DRYING | |
| Drying in tumble drier allowed | |
| Wring, hang on rope and dry | |
| No wringing, drip dry | |
| Wring, dry flat | |
| Drying in tumble drier not allowed | |
| Drying at normal temperature | |
| Drying at lower temperature | |
ON - OFF button
The appliance is switched on and off by pushing the ON/OFF button.
Signal lamp operation
Signal lamp is on when the appliance is in operation.
Prior drying
- Switch the dryer on by pressing the ON/OFF button.
- Before first selection of drying program set the program selection knob for 1 second to the position STOP/0.
- Set the program selection button to the desired drying program. Signal lamp, adjacent to the selected program is lit (except with the selected time program).
- Press the "START" button to start the program. The beginning of operation is signaled by a beep. The program signal light goes off and actual humidity level indicator light turns on.
- If you wish to change the selected drying program after the machine had been put in operation, set the program selection button back to the position STOP/0 for 1 second, and after that you may select any desired drying program, and start it by pressing the START button. In case this procedure is not performed, the machine will continue executing the originally selected program, notwithstanding the position of the program selector.
- If the preceding program has been completed (indicator light END and ANTI-CREASE are lit), you may select a new program and start it with the START button. It is not necessary to set the program selection button to the STOP/0 position.
Drying program selection button
The appropriate program is selected by operating the program selector switch, which may be turned in either direction. There is a basic choice of three drying groups:


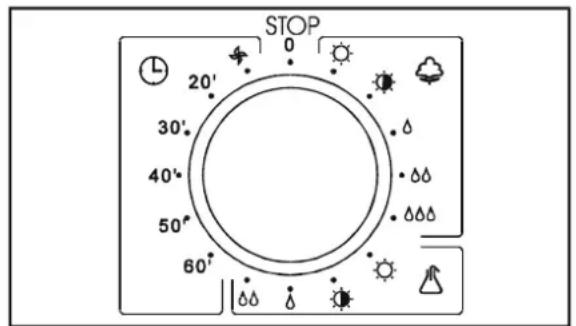
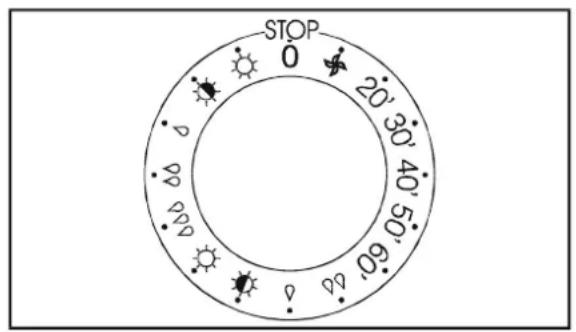
The drying temperature is selected automatically by the selection of the drying program, and it is lower for delicate laundry than for the resistant one. During the drying program with preset time the temperature is the same for both the delicate and resistant laundry.
Drying stage indicator
| ΔΔΔ | Damp for machine ironing |
| ΔΔ | Damp for ironing |
| Mildly damp | |
| Dry for storage | |
| Very dry | |
 | Against crease |
| End |
The drying stage indicator displays the actual drying stage at any given moment. This is signaled by the indicator light, illuminated adjacent to a particular drying stage symbol. The end of drying is signaled by the indicator light END or ANTI-CREASE.
START button
Starts the operation of the appliance. In case of program interruption (open door, voltage failure, condensation receptacle full), it serves to continue the actual program, after the cause for interruption had been removed.
Drying
Drying time depends upon the selected program and the quantity of laundry. If you selected time
defined drying the machine stops upon the expiry of set time. If you selected any of the programs for automatic determination of moisture, drying time will largely depend upon the quantity of laundry and the extent of moisture present in the laundry (spin stage).
Actual stage of moisture during the program is indicated by the moisture stage display, so you at any time may remove particular pieces of clothes you wish to remain damp. When you open the door (add or remove pieces of laundry) the drying program stops and the drum interior is illuminated. When you close the door the light goes off and the program continues by pressing the START button.
In case of voltage failure during the program, the drying operation stops. When the mains supply is back you need to press the START button to continue the program.
Each program is finished by a 10 minute cooling down period, to prevent extracting of hot laundry from the appliance and to improve the anti-crease function.
Drying program is completed when the beep sounds and the indicator lights END and ANTI-CREASE are lit. This indicates that the laundry is dried up to the point of preset moisture stage, or the preset drying time had expired. The drum stops and laundry may be removed from the machine.
In case laundry was not removed after the completion, and the machine was not switched off, it automatically starts a special anti crease program. This program occasionally turns the drum in either direction to prevent the laundry to drop and settle to the bottom and get creased. The program stops automatically after one hour, but it may be interrupted at any moment by opening the door or turning the appliance off.

Signal lamp – condensation vessel (with condensation type dryer)
The lamp is lit when the vessel is full, and it stops the drying program. Once the receptacle is emptied and reinserted, the drying program may be continued by pressing the START button.
After drying - condensation type dryer
- Open the dryer door.
- Clean the filter. If the filter is not cleaned regularly, the air circulation is obstructed, the drying time is longer, and it may also cause overheating failure of the appliance.
- Reinsert the filter.
- Extract the laundry.
- Close the door.
- Empty the condensation receptacle. • Occasionally clean the air cooler.
- Disconnect the mains supply.
After drying - extractor dryer
- Open the dryer door.
- Clean the filter. If the filter is not cleaned regularly, the air circulation is obstructed, the drying time is longer, and it may also cause overheating failure of the appliance.
- Reinsert the filter.
- Remove laundry from the drum.
- Close the door.
- Disconnect the mains supply.
The program chart
| Program Type of laundry Example | ||
| White/colored resistant laundry (1) loading: 5 kg | ||
| Very dry ⚙ | Thick or multi-layer laundry requiring to be dried out | Terry cloth, bathing robes, etc. |
| Dry for storage ⚙ | Equally thick laundry, not requiring ironing | Terry cloth, knitted wear |
| Mildly damp ▲Thin laundry, needing ironing | Knitted wear laundry, thin cotton T-shirts | |
| Damp for ironing ▲□ | Cotton or flax, normally thick Bed linen, table cloth, etc. | |
| Damp for machine ironing ▲□□ | Cotton or flax for machine ironing Bed linen, table cloth, etc. | |
| Synthetic and mixed fabric laundry, improved laundry (1) loading: 2,5 kg | ||
| Very dry dry ⚙ | Thick or multi-layer laundry need to be dried out | Pullovers, suits, blankets |
| Dry for storage ⚙ | Thin laundry, not needing ironing | Shirts, blouses, bed linen, socks, children clothes, etc. |
| Mildly damp ▲Thin laundry, needing ironing | Knitted wear, T-shirts, table cloth, etc. | |
| Damp for ironing ▲□ | Laundry, needing ironing Shirts, blouses, bed linen, table cloth, etc. | |
| (2) Preset time program (1) loading: 5 kg | ||
| 20 do 60 minutes | Single pieces of thick laundry, requiring to be dried out | Bathing robes, bathing towels, pullovers, small quantity of laundry (up to 1 kg),etc. |
| Airing of laundry | ||
| Cold air – 10 minutes ⚙ | Laundry needing to be aired, or straightening of mildly creased clothes | |
(1) weight of dry laundry;
(2) drying temperature is lower, like for the mixed laundry programs.
Economic use of the dryer
Time and energy will be saved with your dryer, if the following is considered:
- spin the laundry as much as possible – the higher the number of spin revolutions the shorter will be drying time and the energy consumption lower;
- by setting the adequate drying temperature, over-drying of laundry can be avoided and consequently difficult ironing;
- always load the dryer maximally as this is the most economical. At the same time you can dry the laundry for “dry, ready to be stored” and “moist for ironing” by taking the latter out when it is still adequately moist for ironing;
- by regular cleaning of the filter an optimum drying time with minimum energy consumption can be ensured.
- room in which your dryer is situated should be adequately vented with no higher temperature than 25°C (should be considered with condenser-type dryer only);
- Venting fissures and the opening on the front or on the rear side of the dryer must be free. After cleaning, close the door of the dryer so that the drum light will turn off. (models with illuminated drum).
- dryer consumption when used at a lower electric power rate can additional save the energy.
For your convenience the chart below indicates approximate values for 5 kg of test laundry at different washing machine spin stages. (program – dry for closet)
| RPM/min | extent of moisture | drying time in min | energy consumption in kWh | |||
| I | % | extractor | condensa-tion dryer | extractor dryer | condensa-tion dryer | |
| 800 | 3,5 | 70 | 110 | 100 | 3,35 | 3 |
| 1000 | 3,1 | 62 | 98 | 90 | 3,0 | 3,2 |
| 1200 | 2,8 | 55 | 88 | 80 | 2,7 | 2,9 |
| 1400 | 2,5 | 50 | 80 | 72 | 2,4 | 2,6 |
| 1600 | 2,4 | 47 | 75 | 70 | 2,3 | 2,5 |
Measured quantities may differ from the indicated because of differences in the type and quantity of laundry, spinning, voltage supply oscillation, as well as the temperature and humidity of the room.
Cleaning and Maintenance
Before cleaning, disconnect the appliance from power supply.
Housing
Wipe the housing with a soft wet cloth and mild cleaning agent. Do not use aggressive cleaning agent which could damage the surface.
Replacement of the lamp
(only some models have it)
- Before you replace the lamp disconnect the appliance from the power supply or turn-off the safety fuse.
- Open the door.
- Undo the lamp cover (inside the door aperture).
- Replace the lamp. Maximum possible power of the lamp is 10 W.
- Firmly screw the lamp cap again. Mind that the lamp cap together with a seal is well embedded, otherwise moisture can come inside and cause a short circuit.

Fluff Filter
After each drying remove the fluff trap filter from its cabinet located inside the door and gently wipe over the filter with a soft cloth or soft brush to remove the coating of fibers and threads. Clean the filter cabinet as well.
Fluff trap filter can also be cleaned under running water, however it must be dried before being replaced.

NOTE
Fluff on the filter is a consequence of normal wear of the material and has nothing to do with drying in the machine. When drying laundry out in the open, the fluff is carried away by the wind.
Cleaning of extractor dryer
If your drier is placed in a room with poor air ventilation or if it often operates, dust deposits in the interior of the appliance (on the bottom and in the outlet pipe) could be the cause for malfunctions. So once a year, wipe the dust in the interior of the drier.
Cleaning procedure
- Pull the plug out of the wall socket.
- Clean (suck out) the moist air outlet through the opening on the rear or side wall (A) and the vent pipe.
- Undo the screws and remove the cover (B).
- Clean (with a vacuum cleaner) the bottom of the drier and parts on the bottom.
- Reinsert the cover in reverse order.

Cleaning of condensation dryer
Emptying the water tank:
It is recommended to empty the condensed water drawer after each drying thus avoiding the automatic break of drying operation due to the full tank. The activated control lamp will remind you of that.
- Pull out the water tank.
- Pull out the draining nozzle, pour out the water and replace the container.


WARNING!
Water from the condenser receptacle is not for drinking!
Cleaning the Air-cooler
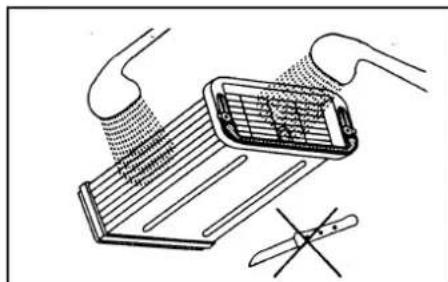
Check the air cooler occasionally, and remove any accumulated fluff particles. Pull the handle off the air cooler and remove it. Rinse it on both sides with lukewarm water to eliminate accumulated fibres of the laundry. Dry it properly and reinsert it into its bedding. At the same time clean the air duct in which the air cooler is situated.


During operation, you can come across some troubles that in most cases result from improper
handling of the appliance and can easily be eliminated by the user.
| Malfunction | Check the following: |
| The machine doesn't operate: | - Check the supply in the outlet socket and the fuse.- Make sure the cable cord is correctly plugged into the socket. |
| The socket is energized, but the drum doesn't rotate: | - Is the door correctly closed (if not, push them towards the machine).- if the program is started by pressing the START button;- If the condenser tank is full or not properly inserted up to the end (only at condenser dryer)- if the correct drying time is set, or if appropriate program is selected. |
| Wet laundry: | - Is the fluff filter clean?- Is the room well ventilated?- Is the amount of loaded laundry too large?- Is the vent pipe too long?- if the laundry loaded into the appliance had been dried enough, or if the appropriate program has been selected. |
| Laundry not uniformly dried: | - Is the amount of loaded laundry too large?- Does the load consist of only large pieces of laundry (always load smaller and larger pieces together).- Does the load consist of laundry made of different materials (always load clothes made of similar fabrics). |
After you have considered all the above stated instructions and the malfunction still cannot be eliminated, call the nearest authorised service.
Any claim or malfunction caused by improper installation or misuse is not covered by the guarantee. All repair costs shall be covered by the user.
WE RESERVE THE RIGHT FOR MODIFICATIONS WITH NO INFLUENCE ON THE OPERATION OF THE APPLIANCE.
THIS INSTRUCTION MANUAL CANNOT BE A REASON FOR A COMPLAINT.
- BEFORE USE
- USEFUL HINTS
- IMPORTANT WARNINGS
- POSITIONING AND INSTALLATION
- CHOOSING THE RIGHT PLACE
- A - VENTING-TYPE DRYER
- B - CONDENSER - TYPE DRYER
- POSITIONING
- MOIST AIR OUTLET
- A – VENT DRYER
- B - CONDENSER-TYPE DRYER
- CHANNELLING THE CONDENSER TUBE TO THE DRAIN OUTLET
- CONNECTING TO POWER SUPPLY
- IMPORTANT
- DOOR
- DESCRIPTION OF THE APPLIANCE
- DRYING
- PREPARING THE LAUNDRY FOR DRYING
- ON - OFF BUTTON
- SIGNAL LAMP OPERATION
- PRIOR DRYING
- DRYING PROGRAM SELECTION BUTTON
- START BUTTON
- SIGNAL LAMP – CONDENSATION VESSEL (WITH CONDENSATION TYPE DRYER)
- AFTER DRYING - CONDENSATION TYPE DRYER
- AFTER DRYING - EXTRACTOR DRYER
- ECONOMIC USE OF THE DRYER
- CLEANING AND MAINTENANCE
- HOUSING
- REPLACEMENT OF THE LAMP
- (ONLY SOME MODELS HAVE IT)
- FLUFF FILTER
- NOTE
- CLEANING OF EXTRACTOR DRYER
- CLEANING PROCEDURE
- CLEANING OF CONDENSATION DRYER
- EMPTYING THE WATER TANK
- WARNING
- CLEANING THE AIR-COOLER
Brand : GORENJE
Model : WT 981
Category : Tumble dryer