
Scanjet N8460 - Scanner HP - Free user manual and instructions
Find the device manual for free Scanjet N8460 HP in PDF.


| Product Type | Document Scanner |
| Model | HP Scanjet N8460 |
| Scan Technology | Duplex Color CIS (Contact Image Sensor) |
| Optical Resolution | 600 dpi |
| Scan Speed (Black & White, Letter) | Up to 40 ppm / 80 ipm |
| Scan Speed (Color, Letter) | Up to 40 ppm / 80 ipm |
| Document Feeder Capacity | 80 sheets (80 g/m²) |
| Maximum Document Size | 8.5 x 14 in (Legal) |
| Dimensions (W x D x H) | 12.4 x 7.1 x 7.9 in (315 x 180 x 200 mm) |
| Weight | 11.0 lb (5.0 kg) |
| Power Supply | 24V DC, 1.67A (40W) external power adapter |
| Interface | USB 2.0 High Speed, USB 3.0 (optional hub) |
| Supported File Formats | PDF, JPEG, TIFF, BMP, PNG, DOCX, XLSX |
| Scanning Software | HP Scan, HP ScanJet Pro, Nuance PaperPort, Readiris Pro |
| Operating Systems | Windows 7/8/10, macOS 10.10 or later |
| Daily Duty Cycle | Up to 4,000 pages per day |
| Maintenance | Clean scanner glass and ADF rollers with soft lint-free cloth and isopropyl alcohol |
| Safety | Overvoltage Category II, CE, FCC Class B, UL, CSA |
| Spare Parts & Repairability | Replacement ADF kit, roller kit, and flatbed glass available; user-replaceable parts |
| Warranty | 1-year limited hardware warranty |
Frequently Asked Questions - Scanjet N8460 HP
User questions about Scanjet N8460 HP
0 question about this device. Answer the ones you know or ask your own.
Ask a new question about this device
Download the instructions for your Scanner in PDF format for free! Find your manual Scanjet N8460 - HP and take your electronic device back in hand. On this page are published all the documents necessary for the use of your device. Scanjet N8460 by HP.
USER MANUAL Scanjet N8460 HP
HP Scanjet N8400 series
User Guide
Copyright and license
© 2007 Copyright Hewlett-Packard Development Company, L.P.
Reproduction, adaptation or translation without prior written permission is prohibited, except as allowed under the copyright laws.
The information contained herein is subject to change without notice.
The only warranties for HP products and services are set forth in the express warranty statements accompanying such products and services. Nothing herein should be construed as constituting an additional warranty. HP shall not be liable for technical or editorial errors or omissions contained herein.
Trademark credits
ENERGY STAR is a U.S. registered service mark of the United States Environmental Protection Agency.
Microsoft and Windows are registered trademarks of Microsoft Corporation.
Contents
1 Scanner overview
What you can do with the scanner....3
Scanner hardware....4
Scanner front panel buttons....4
Power Save button....4
Quick start buttons....4
Copy buttons....5
Scan Document To buttons....5
Tools button....6
Cancel button....6
Scanner lamp setting....6
Scanner software....6
HP Smart Document Scan Software....6
HP Document Copy Utility....7
HP Scanner Tools Utility....7
Where to get additional information....8
Accessibility....9
LCD Reader....9
Control of the scanner buttons....9
2 Scan and Copy
Basic scanning steps....10
Basic copying steps....10
Load originals....11
Place an original on the scanner glass....11
Load paper into the document feeder....11
Scan from the scanner front panel buttons....12
Scan from HP Smart Document Scan Software....12
Scan from other software programs....13
Scan with one button press....13
3 Set up scan profiles
Set up an HP Smart Document Scan Software profile....14
Assign profiles to quick start buttons....15
Choose profiles for display on the scanner front panel....15
Import and export profiles....16
4 Care and maintenance
HP Scanner Tools Utility Maintenance tab....17
Order maintenance and scanning supplies....17
Clean the scanner glass....17
Maintain the automatic document feeder (ADF)....18
Clean the paper path....18
Clean the ADF window....19
Clean the feed roller....20
Replace the feed roller and separation pad....23
Remove the automatic document feeder from the scanner....23
5 Troubleshooting
Scanner error messages....25
Scanner initialization or hardware problems....27
Scanner does not start....27
Scanner has stopped working correctly....28
Scanner operation problems....28
Scanner will not turn on....28
Scanner lamp stays on....29
Scanner does not scan right away....29
Scanner scans only one side of a double-sided page....29
Scanned image is fuzzy....29
Scanned pages are out of order at the scan destination....29
Scanner is scanning items very slowly....29
The image is completely black or completely white....29
Scanned images are not straight....30
Vertical white stripes appear on the printed page....30
Scanner glass is dirty....30
Scan files are too large....30
Scanner buttons are not working correctly....31
Buttons do not work....31
An unexpected program opens when a button is pressed....31
Wrong profile is used when a quick start button is pressed....31
Automatic document feeder (ADF) problems....32
Paper jamming, skewing, misfeeds, or multiple-page feeds....32
Paper does not feed from the ADF....32
The bottom of the scanned image is cut off....32
The scanned images have streaks or scratches....33
An item loaded in the ADF jams repeatedly....33
Clear jams from the ADF....33
Remove a paper jam within the ADF 36
Contact HP Support....36
6 Advanced technical features
Long pages....37
Color dropout....37
Misfeed (Multipick) Detection....37
Index....39
1 Scanner overview
This user guide covers what you need to know about using the HP Scanjet N8400 series scanner.
• What you can do with the scanner - Scanner hardware - Scanner software • Where to get additional information - Accessibility
What you can do with the scanner
The following table summarizes the scanner features. Many of these features are available through the HP Smart Document Scan Software or other included scanning software. For more information, see the HP Smart Document Scan Software Help.
| Feature Description | |
| Wide range of paper sizes With the | the automatic document feeder (ADF), you can scan a stack of originals ranging from 148 mm x 148 mm (5.8 inches x 5.8 inches) to 215.9 mm x 355.6 mm (8.5 inches x 14 inches). You can also scan originals up to 215.9 mm x 863.6 mm (8.5 inches x 34 inches) through the feeder one page at a time.You can scan originals of any size up to 215.9 mm x 355.6 mm (8.5 inches x 14 inches) by placing them directly on the scanner glass. |
| Profiles You can set up and use profiles that contain all settings necessary for scanning tasks such as:Document processingSaving in different file formats (i.e. searchable or non-searchable PDF files) using automatic naming mechanismsSending to different destinations such as e-mail, Microsoft SharePoint, or other applications | |
| Page management You can view, | edit, delete, insert, and reorder pages. You can also have the scanner automatically delete blank pages. |
| File management You can scan all pages to a single file, scan each page to a separate file, or scan to separate files based on bar codes or blank pages in the original. | |
| Optical Character Recognition (OCR) | With OCR software, you can scan originals as editable text that you can send to your favorite application. |
| Send Documents To You can set up profiles to send the scanned documents to a variety of destinations such as a local folder, a network folder, e-mail, or a custom application. | |
Scanner hardware
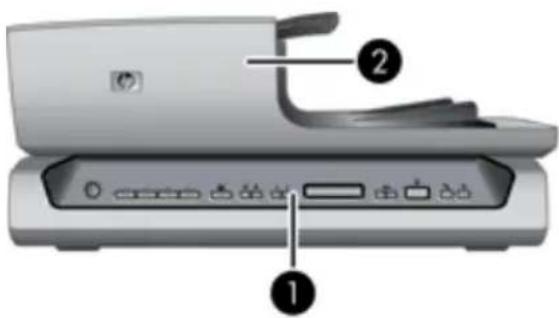

| 1 Front panel |
| 2 Automatic document feeder |
| 3 Power button |
Scanner front panel buttons
Use the buttons on the scanner front panel to start a scan, select a destination for a scan, and configure some scanner settings.

| 1 | Power Save button |
| 2 | Quick start buttons |
| 3 | Copy buttons |
| 4 | Scan Document To buttons |
| 5 | Tools button |
| 6 | Cancel button |
Power Save button
| Press the Power Save button to turn off the lamp and put the scanner in power-save mode when you are not using the scanner. When you are ready to begin scanning again, just press one of the front panel scan buttons to turn the lamp back on and begin scanning immediately. |
Quick start buttons

The quick start buttons are labeled 1, 2, 3, and 4. You can use these buttons to scan with specific HP Smart Document Scan profiles, such as:
- Scan a document to a searchable PDF
- Send a scan directly to an e-mail program
- Scan a document for editable text

NOTE: Use the HP Scanner Tools Utility, available from the Tools (✗) button, to set up the quick start buttons.
NOTE: You can set a quick start button to start scanning with a specific HP Smart Document Scan Software profile or to start a different scanning program.
NOTE: If the HP Smart Document Scan Software is installed, each quick start button defaults to a standard profile. You can override these settings. For information on how to set up an HP Smart Document Scan Software profile, see the HP Smart Document Scan Software Help.
Copy buttons

To copy documents and images quickly, specify the number of copies to make, select black-and-white or color, and then click the Copy (☐) button.
Scan Document To buttons

Use the arrow (◀) buttons to scroll through the list of HP Smart Document Scan Software profiles that are displayed on the scanner front panel, and then press the Scan Document To (◀) button to start scanning with the selected profile. For information on how to set up an HP Smart Document Scan Software profile, see the HP Smart Document Scan Software Help.

NOTE: If the HP Smart Document Scan Software is not installed, these buttons have no effect.
Tools button
| Use the Tools button to open the HP Scanner Tools Utility where you can assign profiles to quick start buttons, choose which profiles are selectable from the scanner front panel, and view information about scanner settings, status, and maintenance. |
Cancel button
| X | Press the Cancel button to cancel a scan in progress, or to cancel a series of scans when you are scanning from the ADF. |
Scanner lamp setting
The scanner supports two modes of lamp operation:
- In Power Save mode, the scanner lamp times out and turns off automatically after about 15 minutes of inactivity. In this mode, the scanner is Energy Star compliant.
- In Instant Lamp On mode, the scanner lamp times out and turns off automatically after about 15 minutes of inactivity, but it remains warm and ready to scan.
To switch from Power Save mode to Instant Lamp On mode, select the Enable Instant Lamp On check box on the Buttons tab of the HP Scanner Tools Utility. To switch back to Power Save mode, clear the Enable Instant Lamp On check box.
Scanner software
The scanner comes with an assortment of scanning and document-management programs, including:
• HP Smart Document Scan Software • HP Document Copy Utility • HP Scanner Tools Utility
For more information and detailed descriptions of the software from other manufacturers that is included with the scanner, see the printed Setup and Support Guide that came with the scanner.
HP Smart Document Scan Software

HP Smart Document Scan Software guides you through the scanning process. To open the software, double-click the HP Smart Document Scan Software icon on the desktop. For more information, see Scan from HP Smart Document Scan Software.
Main Window
The Main Window is displayed when you open the HP Smart Document Scan software. Use this window to complete the following tasks:
- Start a scan: Load the original in the document feeder, select a profile, and then click Scan. The scan will be completed using the settings associated with the selected profile.
- Work with profiles: Create and modify profiles to specify the scanner settings and the actions to take on your scanned documents.
Scan Progress Window
The Scan Progress Window opens when you start a scan. Use this window to complete the following tasks:
• View thumbnails of the pages as they are scanned - Scan more pages - Rescan pages individually - Edit pages individually by using the crop, rotate, and deskew tools - Reorganize or delete pages - Complete the scan and process the document
For more information, see the HP Smart Document Scan Software Help.
HP Document Copy Utility
The HP Document Copy utility processes scan copy requests. To use the utility, do one of the following:
- Press the Copy (☐) button on the scanner front panel. The scanned pages are sent directly to the currently selected printer.
- Click Start, point to Programs or All Programs, point to HP, point to Scanjet, point to N8400 series, and then click Document Copy. Select print settings in the HP Document Copy dialog box.
HP Scanner Tools Utility
Use the HP Scanner Tools Utility to assign profiles to quick start buttons, to choose which profiles are selectable on the scanner front panel, and to view information about scanner settings, status, and maintenance.

To open the utility, do one of the following:
- Double-click the HP Scanner Tools Utility icon on the desktop.
- Press the Tools (✗) button on the scanner front panel.
- Click Start, point to Programs or All Programs, point to HP, point to Scanjet, point to N8400 series, and then click Scanner Tools Utility.
Use the Buttons tab to assign HP Smart Document Scan Software profiles to quick start buttons for direct access from the scanner front panel. For more information, see Set up scan profiles.
Also use the Buttons tab to configure the behavior of the buttons on the scanner front panel and to change the lamp setting.
Use the Profiles tab to choose the HP Smart Document Scan Software profiles that are selectable from the scanner front panel.
(continued)
Use the Maintenance tab to view the scanner usage and maintenance history and to run a test scan pass.
Where to get additional information
Several sources of information describe using the scanner and the scanning software.
Setup and Support Guide
Use the printed Setup and Support Guide that came with the scanner to set up and connect the scanner, test the installation, and troubleshoot installation problems.
User Guide
This scanner User Guide is the primary source for scanner information. It provides information about using, maintaining, and troubleshooting the scanner.
To open the User Guide in the installed (system) language, follow these steps:
Click Start, point to Programs or All Programs, point to HP, point to Scanjet, point to N8400 series, and then click User Guide.
To open the User Guide in another language, follow these steps:
- Insert the HP Scanning Software CD that came with the scanner into the computer CD drive.
Wait for the installation dialog box to display.
- Click View or print guides.
A list of languages is displayed.
- Click the language that you want.
To print one or more User Guide topics, follow these steps:
- Select a topic name on the Contents tab or display that topic, and then click Print on the tool bar.
- In the Print Topics dialog box, select an option:
• To print a single topic, choose Print the selected topic.
- To print a group of topics, choose Print the selected heading and all subtopics.
- Click OK.
- In the Print dialog box, select a printer, specify printing options, and then click Print.

TIP: To print the entire user guide, select the highest-level topic in the Contents tab and then choose the Print the selected heading and all subtopics option.
HP Smart Document Scan Software Help
The HP Smart Document Scan Software Help explains how to use HP Smart Document Scan Software features such as creating and editing profiles.
To open HP Smart Document Scan Software Help, double-click the HP Smart Document Scan Software icon on the computer desktop, and then click Help on the menu bar.
HP Scanner Tools Utility help
The HP Scanner Tools Utility help explains the scanner settings, information about scanner status and maintenance, how to assign functionality to quick start buttons, and how to choose the profiles that you can select from the scanner front panel.
To open HP Scanner Tools Utility help, press the Tools button on the scanner front panel, and then click Help in the HP Scanner Tools Utility dialog box.
Technical Resources
Visit www.hp.com/support for a technical white paper on working with scan profiles across multiple computers.
Accessibility
- LCD Reader • Control of the scanner buttons
LCD Reader
The LCD Reader is a software program that outputs the changing of the scanner front panel display to the computer monitor. The LCD Reader enables accessibility software tools to express what is being shown on the scanner front panel.
To use the LCD Reader, follow these steps:
- On your hard drive, navigate to the C:\Program Files\Common Files\Hewlett-Packard \Scanjet\N8400 directory.
- To start the program, double-click hplcd.exe.
Control of the scanner buttons
To prevent buttons from being pushed accidentally, you can disable the buttons on the scanner front panel.
When the buttons are disabled, you always start scans and copies from the computer using scanning software. You can still press the Cancel button on the scanner front panel to stop a scan or copy and the Power Save button to put the scanner into Power Save mode.
To turn off the scanner buttons, follow these steps:
- Open the HP Scanner Tools Utility.
- On the Buttons tab, select the Disable scanner buttons check box.
To turn on the scanner buttons, clear the Disable scanner buttons check box.

NOTE: You must have administrative privileges on the computer to change the setting of this check box.
2 Scan and Copy
The following topics describe how to scan or copy originals using the scanner and the scanner software.
• Basic scanning steps • Basic copying steps - Load originals - Scan from the scanner front panel buttons • Scan from HP Smart Document Scan Software - Scan from other software programs - Scan with one button press
Basic scanning steps
The basic steps for scanning are:
- Load the originals. For more information, see Load originals.
- Do one of the following:
- Press a quick start button on the scanner front panel.
- Use the arrows ( ↔ ) buttons to scroll through the list of HP Smart Document Scan Software profiles that are displayed on the scanner front panel, and then press the Scan Document To ( Button ) button to start scanning with the selected profile. For information about profiles, see Set up scan profiles.
- Open HP Smart Document Scan Software. For more information, see Scan from HP Smart Document Scan Software.
- Open another scanning software program. For more information, see Scan from other software programs.

TIP: If you select duplex scanning or copying and you load the originals into the automatic document feeder (ADF), the scanner processes both sides of a two-sided original at the same time.
Basic copying steps
The basic steps for copying are:
- Load the originals. For more information, see Load originals.
- Use the Number of Copies (+ -) button on the scanner front panel to select the number of copies, and then press the Copy (☐) button. The copies are printed with the current copy settings.

NOTE: If you want to change the copy settings, start the copy from the HP Document Copy software.

TIP: You can configure HP Document Copy to always prompt for copy settings before starting to print. For information, see the HP Scanner Tools Utility help.
Load originals
- Place an original on the scanner glass
- Load paper into the document feeder
Place an original on the scanner glass
Place items that do not meet the specifications for the automatic document feeder (ADF) directly onto the scanner glass.
| Minimum size: Any size | |
| Maximum size: 215.9 mm x 355.6 mm (8.5 inches x 14 inches) | |
Place the original face down on the scanner glass, as indicated by the reference mark.

Load paper into the document feeder
The scanner document feeder is rated to process paper that meets the following specifications:
| Minimum size: 148 mm x 148 mm (5.8 inches x 5.8 inches) | |
| Maximum size when long-page support is disabled: | 215.9 mm x 355.6 mm (8.5 inches x 14 inches) |
| Maximum size when long-page support is enabled: | 215.9 mm x 863.6 mm (8.5 inches x 34 inches) |
| Minimum weight: 49 g/m | 2 (13 lb) |
| Maximum weight: 120 g/m | 2 (32 lb) |
The paper capacity of the document feeder is 100 sheets of 75 g/m² (20 lb) paper.
NOTE: HP does not recommend using the document feeder for photos, multipart forms, transparencies, or gum-backed pages.
CAUTION: Avoid placing items that have sharp edges, paper clips, staples, wet glue, correction fluid, or other substances in the scanner. Document pages should not be curled, wrinkled, or stuck together.

NOTE: For information on how to enable long-page support, see Long pages.
To load paper into the document feeder, follow these steps:
- Insert a multiple page document with the printed first page of the document facing up and with the top of the document into the feeder.

- Adjust the paper guides to center the original. Make sure the paper guides touch the edges of the original.
Scan from the scanner front panel buttons
To scan from the scanner front panel buttons, do one of the following:
- Press a quick start button on the scanner front panel.
- Use the arrows (↔) buttons to scroll through the list of HP Smart Document Scan Software profiles that are displayed on the scanner front panel, and then press the Scan Document To (□) button to start scanning with the selected profile.
Scan from HP Smart Document Scan Software
You can start a scan from the HP Smart Document Scan Software.
- Do one of the following:
- Double-click the HP Smart Document Scan Software icon on the computer desktop.

- Click Start, point to Programs or All Programs, point to HP, point to Scanjet, and then click HP Smart Document Scan Software.
- Select a profile, and then click Scan.

TIP: A description of the selected profile is displayed below the list.
- Follow the onscreen instructions to complete the scan.
For more information, see the HP Smart Document Scan Software Help.
Scan from other software programs
You can scan an image or document directly into a software program if the program is ISIS or TWAIN compliant. Generally, the program is compliant if it has a menu option such as Acquire, Scan, Import New Object, or Insert. If you are unsure whether the program is compliant or what the option is, see the documentation for that program.
HP Smart Document Scan Software is an ISIS application.
ScanSoft PaperPort and I.R.I.S. Readiris Pro are TWAIN applications.
Scan with one button press
The standard process for using the HP Smart Document Scan Software to complete your scans is as follows:
- Scan document pages.
- Review the scanned document pages in the HP Smart Document Scan Software Scan Progress Window. Reorder, delete, and rescan pages as necessary.
- Finish the scan by clicking Done Scanning in the Scan Progress Window.
- The scanning software processes the scanned document pages according to the profile settings.
You can set up a profile that skips steps 2 and 3 of the standard process. After you select this profile, press the Scan Document To button on the scanner front panel or click Scan in the HP Smart Document Scan Software Main Window. The pages will be scanned and processed without further intervention.
In order for a scan to complete automatically, the selected HP Smart Document Scan Software profile must include the following settings:
- On the Profile tab, the Enable document review and option to scan more pages check box must be cleared.
- Additional settings on the Destination tab, such as disabling the Show Save As dialog box, might be required depending on the profile.
3 Set up scan profiles
An HP Smart Document Scan Software profile contains settings for scanning, processing, and saving or sending scanned documents. You can set up profiles for use with the Scan Document To button on the scanner front panel. The profiles provide a fast, efficient way to scan. You can configure each profile to perform specific scanning functions that you use often. For example, if you frequently need to scan originals at 200 dpi color to a searchable PDF file and e-mail that file to a co-worker, you can create a profile with the necessary settings to accomplish this task.
Use the HP Smart Document Scan Software to set up and modify profiles. Use the HP Scanner Tools Utility to assign profiles to quick start buttons and to choose which profiles are selectable from the scanner front panel.

NOTE: You can choose up to 30 profiles that are selectable from the scanner front panel. If you have more than 30 profiles, choose the most frequently used profiles. You can access all profiles by scanning from the HP Smart Document Scan Software.
For information on how to configure an HP Smart Document Scan Software profile to complete a scan without user interaction, see Scan with one button press.
- Set up an HP Smart Document Scan Software profile
- Assign profiles to quick start buttons
- Choose profiles for display on the scanner front panel • Import and export profiles
Set up an HP Smart Document Scan Software profile
To create an HP Smart Document Scan Software profile, follow these steps:
- To open HP Smart Document Scan Software, do one of the following:
- Double-click the HP Smart Document Scan Software icon on the computer desktop.

- Click Start, point to Programs or All Programs, point to HP, point to Scanjet, and then click HP Smart Document Scan Software.
- Click New.
The Create New Profile dialog box is displayed.
- In the Profile name box, type the name you want or accept the default name.
NOTE: The first 16 characters of the profile name can be displayed on the scanner front panel. It is a good idea to include the information that distinguishes this profile at the beginning of the profile name.
TIP: You might want to set up the new profile based on an existing one. To do so, check the Copy settings from profile check box and select an existing profile from the list.
- Click Continue.
The Profile Settings dialog box is displayed.
- Select the settings for the profile.
For more information, see the HP Smart Document Scan Software Help.
Assign profiles to quick start buttons
Use the HP Scanner Tools Utility to assign an HP Smart Document Scan Software profile to a quick start button.
To assign a profile to a quick start button, follow these steps:
- To open the HP Scanner Tools Utility, do one of the following:
- Double-click the HP Scanner Tools Utility icon on the computer desktop.

- Press the Tools (✗) button on the scanner front panel.
- Click Start, point to Programs or All Programs, point to HP, point to Scanjet, point to N8400 series, and then click Scanner Tools Utility.
- In the Program to Launch drop-down list for a button number, select HP Smart Document Scan Software.
- In the Profile drop-down list, select a profile.

NOTE: If you select a program other than HP Smart Document Scan Software, the quick start button starts that program when you press the associated quick start button.
NOTE: You can modify all profile settings except for the profile name, and the quick start button keeps its assignment.
Choose profiles for display on the scanner front panel
Use the HP Scanner Tools Utility to choose the HP Smart Document Scan Software profiles that are selectable from the scanner front panel.
To choose the profiles that are displayed on the scanner front panel, follow these steps:
- To open the HP Scanner Tools Utility, do one of the following:
- Double-click the HP Scanner Tools Utility icon on the computer desktop.

- Press the Tools (✗) button on the scanner front panel.
- Click Start, point to Programs or All Programs, point to HP, point to Scanjet, point to N8400 series, and then click Scanner Tools Utility.
- Click the Profiles tab.
- In the Available Profiles list, select a profile, and then click Add.
- Use the Move Up and Move Down buttons to arrange the profile sequence in the Display Order list.
The profiles are displayed in this order as you scroll through the profile list.
Import and export profiles
Profiles can be exported into and imported from an XML file so that administrators can set up profiles for a workgroup, users can transfer their profiles from one machine to another, and users can share custom profiles with each other.
For information on working with profiles across multiple computers, visit www.hp.com/support.
4 Care and maintenance
This section presents information about how to care for and maintain the scanner.
• HP Scanner Tools Utility Maintenance tab • Order maintenance and scanning supplies • Clean the scanner glass • Maintain the automatic document feeder (ADF) • Remove the automatic document feeder from the scanner
Occasional cleaning of the scanner helps ensure high-quality scans. The amount of care necessary depends upon several factors, including the amount of use and the environment. You should perform routine cleaning as necessary.
Routine cleaning and maintenance should include cleaning the scanner glass and the automatic document feeder (ADF).
CAUTION: Avoid placing items that have sharp edges, paper clips, staples, wet glue, correction fluid, or other substances in the scanner. Document pages should not be curled, wrinkled, or stuck together.
HP Scanner Tools Utility Maintenance tab
The Maintenance tab of the HP Scanner Tools Utility displays the scanner usage and maintenance history. You can use this tab to record scanner maintenance.
To open the HP Scanner Tools Utility, press the Tools button on the scanner front panel.
For detailed information on using the HP Scanner Tools Utility, see the HP Scanner Tools Utility help.
Order maintenance and scanning supplies
You can purchase maintenance parts online. Items such as the HP paper-path cleaning cloth or the feed roller replacement kit are available for worldwide delivery.
- Visit the HP scanner support Web site at www.hp.com/support.
- Enter the scanner model number, and then press Enter.
Clean the scanner glass
To clean the scanner glass, follow these steps:
- Disconnect the universal serial bus (USB) cable and power cable from the scanner.
- Open the scanner lid.
- Clean the glass by using a soft, lint-free cloth that has been sprayed with a mild glass cleaner.
CAUTION: Use only glass cleaner to clean the scanner glass. Avoid cleaners that contain abrasives, acetone, benzene, and carbon tetrachloride, all of which can damage the scanner glass. Avoid isopropyl alcohol because it can leave streaks on the glass.
Do not spray the glass cleaner directly on the glass. If too much glass cleaner is applied, the cleaner could leak under the glass and damage the scanner.
- Dry the glass with a dry, soft, lint-free cloth.
- When you have finished, reconnect the USB cable and power cable to the scanner.

NOTE: For instructions about how to clean the underside of the scanner glass, visit www.hp.com/support. Follow the online instructions to select your country/region and language, select the option to see support and troubleshooting information, and then enter the scanner product name and model number.
Maintain the automatic document feeder (ADF)
The ADF requires periodic maintenance depending on the amount of use and the type of paper that is fed through it. Use an HP paper-path cleaning cloth to clean the ADF when vertical streaks appear in images scanned by the ADF, when paper used in the ADF is dusty or dirty, or when the environment is dusty. If you use the ADF several times per week, monthly cleaning is recommended. Set up a cleaning routine that is appropriate for the scanner.
Use the following methods to maintain the ADF:
- Clean the paper path
- Clean the ADF window • Clean the feed roller
- Replace the feed roller and separation pad
Clean the paper path
If scanned images have streaks or scratches, use the HP paper-path cleaning cloth to clean the paper path.
To order more HP paper-path cleaning cloths, go to www.hp.com/support.
To clean the paper path, follow these steps:
- Open the sealed HP paper-path cleaning cloth container, starting at the notch. Take care not to tear the cleaning cloth.
- Remove the cleaning cloth and unfold it.
- Place the unfolded cloth into the paper input tray.
- Press the Tools (✗) button on the scanner front panel to open the HP Scanner Tools Utility. Click the Maintenance tab.
- Click the Clean button to feed the cloth through the scanner.
△ CAUTION: Wait two minutes for the components to dry before proceeding to the next step.
- Place up to five pages of printed paper in the ADF. Scan and view the results.
- If streaks still appear, repeat steps 3 through 6. The cleaning cloth can be cycled through the ADF up to five times.
Clean the ADF window
If streaks exist on scanned images, cleaning the ADF window might solve the problem. Use the following steps to clean the ADF window.
To order more HP paper-path cleaning cloths, go to www.hp.com/support.
To clean the ADF window, follow these steps:
- Open the scanner lid.

- Locate the ADF access door on the underside of the ADF.
- Press the tabs on the door, and then pull the door toward you until it detaches from the ADF.

- Locate the clear scan window inside the ADF and clean it with an HP paper-path cleaning cloth.
- Locate the white strip on the inside of the access door and clean it.
- Replace the ADF access door:
a. Position the door over the ADF opening.
b. Press the door into place until it clicks shut on both sides.
- Clean the clear scanning strip on the scanner bed. Wipe the clear area with an HP paper-path cleaning cloth, or a clean, dry, lint-free cloth.

- Close the scanner lid.
- Use the ADF to scan up to five documents. View the results. If streaks still exist on the scanned images, call HP Customer Support.

Clean the feed roller
Clean the feed roller under either of the following conditions:
- Streaks on scans or paper jams occur repeatedly and cleaning the paper path does not help.
- The Feeder Maintenance section of the HP Scanner Tools Utility Maintenance tab indicates that maintenance is due.
To order more HP paper-path cleaning cloths or a feed roller replacement kit, go to www.hp.com/support.
To clean the feed roller, follow these steps:
- Press the Power switch to the off position, and then disconnect the USB cable and power cable from the scanner.
- Open the ADF hatch.

- Lift the green lever to raise the feed roller to the vertical position.

- Inspect the separation pad that is located below the feed roller for wear and damage.

| 1 | New separation pad |
| 2 | Worn separation pad |
| 3 | Damaged separation pad |
NOTE: The feed roller replacement kit includes extra separation pads. If the separation pad shows wear between feed roller replacements, then replace the separation pad as described in the installation instructions that were included with the replacement kit.
- Use an HP paper-path cleaning cloth to clean each of the feed roller pads and the separation pad.
NOTE: If you do not have an HP paper-path cleaning cloth, use a lint-free cloth that has been dampened with isopropyl alcohol.
- Wipe the area around the small rubber pad to remove any paper dust.
- Lower the green lever to return the feed roller to the working position.

- Close the ADF hatch, and then reconnect the USB cable and power cable to the scanner.
- Press the Power switch to the on position, and then update the scanner maintenance history:
a. Press the Tools (✗) button on the scanner front panel to open on the HP Scanner Tools Utility. Click the Maintenance tab.
b. In the Feeder Maintenance section, click Record Cleaning.
For more information, see the HP Scanner Tools Utility help.
Replace the feed roller and separation pad
Replace the feed roller under either of the following conditions:
- Streaks on scans or paper jams occur repeatedly and cleaning the scanner does not help.
- The Feed Roller and Separation Pad Maintenance section of the HP Scanner Tools Utility Maintenance tab indicates that maintenance is due.
The feed roller replacement kit contains a feed roller, separation pads, and installation instructions. To order the replacement kit, go to www.hp.com/support.
To replace the feed roller and separation pad, follow these steps:
- Press the Power switch to the off position, and then disconnect the USB cable and power cable from the scanner.
- Open the ADF hatch, and then replace the feed roller and separation pad as described in the installation instructions that were included with the replacement kit.

NOTE: The feed roller replacement kit includes extra separation pads. If the separation pad shows wear between feed roller replacements, then replace the separation pad as described in the installation instructions that were included with the replacement kit.
- Close the ADF hatch, and then reconnect the USB cable and power cable to the scanner.
- Press the Power switch to the on position, and then update the scanner maintenance history:
a. Press the Tools (✗) button on the scanner front panel to open on the HP Scanner Tools Utility. Click the Maintenance tab. b. In the Feed Roller and Separation Pad Maintenance section, click Record Replacement.
For more information, see the HP Scanner Tools Utility help.
Remove the automatic document feeder from the scanner
If you need to remove the automatic document feeder (ADF) from the scanner, follow these steps:
- Turn the thumbscrews on the connector until they are loose. Disconnect the accessory cable from the accessory cable port on the scanner.
- Remove the ADF input tray.
- Raise the scanner lid to the open position.
△ CAUTION: Do not attempt to uninstall the ADF in the closed position. The ADF must be uninstalled in the opened position. Keep fingers away from the ADF hinges.
- Grasp the ADF by the sides.

- Lift the ADF upwards while slightly tilting it away from you until the hinge posts are pulled out of the sockets on the scanner bed.
5 Troubleshooting
This section contains solutions for common problems with the scanner.
- Scanner error messages
- Scanner initialization or hardware problems • Scanner operation problems
- Scanner buttons are not working correctly • Automatic document feeder (ADF) problems
- Contact HP Support
For additional troubleshooting, see the help for the HP scanning program that you are using. For more information, see Where to get additional information.
Scanner error messages
The scanner displays status and error messages on the scanner front panel. For help responding to a scanner error message, see the appropriate topics below.
| Scanner Error Message Recovery Process | |
| ADF Jam – Input Tray Clear | the jammed paper from the automatic document feeder (ADF) input tray. For instructions, seeClear jams from the ADF in the Troubleshootingsection. |
| ADF Jam – Clean Out Clear | the jammed paper from the opening behind the ADF access door. For instructions, seeClear jams from the ADF in the Troubleshootingsection. |
| ADF Jam – Output Tray Clear | lear the jammed paper from the automatic document feeder (ADF) output tray. For instructions, seeClear jams from the ADF in the Troubleshootingsection. |
Hatch Open Close the automatic document feeder (ADF) hatch. Press down firmly on both sides until you hear a click. | |
| Clean Out Open | Replace the ADF access door by positioning the door over the ADF opening and pressing the door into place until both sides click.[7 HKZ] |
| Duplex Error Follow these steps to resolve the error:1. Close the program you are using to scan.2. Press the Power switch to the off position.3. Check the scanner cables to make sure that they are securely attached to the scanner.4. Press the Power switch to the on position, and then try to scan. If the problem persists, contact HP Support. | |
| Multipick Error The document feeder cannot pick up the paper or the paper is jammed. Follow these steps to resolve the error:1. Remove the paper from the document feeder.2. Sort through the stack to make sure the sheets are not stuck together.3. Make sure the paper meets the size and weight specifications, as specified in the scanner User Guide.4. Replace the stack of originals and try again. | |
| 01 | Press the Power Save button to turn the scanner off, and then turn the scanner on again by pressing one of the front panel buttons. If the message is still displayed, contact HP Support. For more information, see Contact HP Support. |
| 02 | Press the Power Save button to turn the scanner off, and then turn the scanner on again by pressing one of the front panel buttons. If the message is still displayed, contact HP Support. For more information, see Contact HP Support. |
| 03 | Press the Power Save button to turn the scanner off, and then turn the scanner on again by pressing one of the front panel buttons. If the message is still displayed, contact HP Support. For more information, see Contact HP Support. |
| 04 Follow these steps to resolve the error: | 1. Check the USB connection between the scanner and the computer. For more help, seeCheck the cables.2. Verify that the scanner is correctly enumerated on the host. If not, try uninstalling and then reinstalling the software. For more information, see theHP Scanjet N8400 series Setup and Support Guide.3. If the problem persists, contact HP Support. For more information, seeContact HP Support. |
| 05 | Press thePower Savebutton to turn the scanner off, and then turn the scanner on again by pressing one of the front panel buttons. If the message is still displayed, contact HP Support. For more information, seeContact HP Support. |
| 06 | Press thePower Savebutton to turn the scanner off, and then turn the scanner on again by pressing one of the front panel buttons. If the message is still displayed, contact HP Support. For more information, seeContact HP Support. |
| 07 | Press thePower Savebutton to turn the scanner off, and then turn the scanner on again by pressing one of the front panel buttons. If the message is still displayed, contact HP Support. For more information, seeContact HP Support. |
Scanner initialization or hardware problems
- Scanner does not start
- Scanner has stopped working correctly
Scanner does not start
If you receive an error message similar to "Scanner initialization failed" or "Scanner not found" when trying to use the scanner, follow these steps:
- Close the scanning software, if it is open.
- Disconnect the USB cable that connects the scanner to the computer.
- Press the Power switch to the off position.
- Shut down the computer operating system, turn the computer off, wait 60 seconds, and then turn the computer back on.
- Press the Power switch to the on position.
- Reconnect the USB cable that connects the computer and the scanner, making sure that the USB cable is connected to the back of the scanner correctly. After 30 seconds, the scanner display should show Ready. If the display does not show Ready, see the printed Setup and Support guide that came with the scanner.
Scanner has stopped working correctly
If the scanner stops scanning, follow these steps. After each step, start a scan to see if the scanner is working. If the problem persists, proceed with the next step.
- A cable might be loose. Ensure that both the USB cable and power supply are properly connected.
Use the cable that was included with the scanner. Another USB cable might not be compatible with the scanner.
- Turn off the scanner, wait 60 seconds, and then turn the scanner back on.
- Restart your computer.
- Use the Add/Remove tool (in Windows Vista, the Programs and Features tool) from the Control Panel to uninstall the following programs:
• HP Scanjet N8400 series Document ISIS/TWAIN
• HP Scanjet N8400 series Utilities
- Reinstall using the HP Scanning Software CD that came with your scanner. When you insert the CD, an installation dialog box launches automatically.
Scanner operation problems
- Scanner will not turn on
- Scanner lamp stays on
- Scanner does not scan right away
- Scanner scans only one side of a double-sided page
- Scanned image is fuzzy
- Scanned pages are out of order at the scan destination
- Scanner is scanning items very slowly
- The image is completely black or completely white
- Scanned images are not straight
- Vertical white stripes appear on the printed page
- Scanner glass is dirty
- Scan files are too large
Scanner will not turn on
If the scanner will not turn on when you press the front panel scanner buttons, verify the following:
- The scanner power switch might be turned off. Be sure the power switch located on the back of the scanner is turned ON.
- The scanner may have been unplugged. Check to see that the power cable has not become disconnected from the scanner or unplugged from the power source.
- Check to see that the automatic document feeder (ADF) cable has not become disconnected from the scanner.
- The buttons might be disabled in the HP scanning software. Verify the Disable front panel buttons setting in the HP Scanner Tools Utility.
Scanner lamp stays on
The scanner lamp should time out and turn off automatically after a period of inactivity (about 15 minutes). This is the Power Save mode.
If the scanner lamp remains on after a long period of inactivity, turn off the scanner, wait 30 seconds, and then turn the scanner back on.
Scanner does not scan right away
Make sure the power switch on the back of the scanner is turned ON.
If the scanner has not been used for a while, the scanner lamp might need to go through a warm-up period before scanning can begin. If the scanner lamp needs to warm up, it takes a moment after starting the software or pressing a scanner button for scanning to begin.
You can enable Instant Lamp On mode in the HP Scanner Tools Utility.
Scanner scans only one side of a double-sided page
Select the Duplex setting in the scanning or copy software.
Scanned image is fuzzy
It is important that the item you scan comes in close contact with the scanner glass. If the resulting scanned image is not clear, check to see that the item is in full contact with the scanner glass.
Check for any obstructions in the scanner paper path and make sure the paper width guides are positioned appropriately. Try another scan.
Clean the scanner glass as described in the Care and maintenance section.
Scanned pages are out of order at the scan destination
Insert a multiple page document with the printed first page of the document facing up and with the top of the document into the feeder.
Scanner is scanning items very slowly
- If you are scanning to edit text, the optical character recognition (OCR) software program causes the scanner to scan more slowly, which is normal. Wait for the item to scan.
- The resolution might be set too high. Reset the resolution to a lower level. The scanner software automatically selects the resolution to provide the best balance between image quality and file size.
The image is completely black or completely white
The item might not be placed correctly on the scanner glass. Make sure that the item you are trying to scan is placed face down on the glass and the lid is closed. If scanning from the ADF, check the paper orientation.
Scanned images are not straight
The item might have shifted when you closed the lid. Straighten the original on the scanner glass, and then scan again.
Verify that the document feeder guides are centered on the scanner and set to an appropriate width for the original being scanned. Make sure the paper guides touch the edges of the original.
Vertical white stripes appear on the printed page
The destination printer might be out of toner or ink. Scan a different original to the same printer to see if the issue lies with the printer.
If the second original has the same problem, clean the scanner glass as described in Care and maintenance.
Scanner glass is dirty
Clean the scanner glass under the following conditions:
- Ink is on the glass • Fingerprints are on the glass
- Documents or other items placed on the glass have an excessive amount of dust or dirt on them
- Smudges or other marks appear on scanned images
• Haze or dust is on the glass
Allow the glass to dry thoroughly before scanning another image.
For more details, see Care and maintenance.
Scan files are too large
If the saved scans have very large file sizes, try the following:
- Verify the scan resolution setting:
- 200 dpi is sufficient for storing documents as images.
- For most fonts, 300 dpi is sufficient for using optical character recognition (OCR) to create editable text.
- For Asian fonts and small fonts, 400 dpi is the recommended resolution. Scanning at a higher resolution than necessary creates a larger file with no additional benefit.
• Color scans create larger files than do black and white scans.
- If you are scanning a large number of pages at one time, consider scanning fewer pages at a time to create more, smaller files.
- Use the Kofax VirtualReScan software to reduce the number of random gray or black dots that appear on a scanned image. Eliminating these dots can create a smaller file.
Scanner buttons are not working correctly
- Buttons do not work • An unexpected program opens when a button is pressed
- Wrong profile is used when a quick start button is pressed
Buttons do not work
After each step, press a button to see if it is working correctly. If the problem persists, proceed with the next step.
- The buttons might be disabled in the HP scanning software. Verify the Disable front panel buttons setting in the HP Scanner Tools Utility.
- A cable might be loose. Ensure that the USB cable and the power supply are securely connected.
- Turn off the scanner, wait 30 seconds, and then turn the scanner back on.
- Restart your computer.
- If the problem persists, the buttons might be disabled outside of the HP scanning software. Try the following procedure:
a. Open Control Panel, select Scanners and Cameras, and then select your scanner model from the list. b. Examine the buttons setting for your scanner:
- Windows 2000: Ensure that the Disable Device Events option is not selected. • Windows XP and Vista: Ensure the Take No Action option is not selected.
An unexpected program opens when a button is pressed
Depending on the HP scanning software installed on the computer, an unexpected program might open when a profile is selected and a button is pressed.
After each step, press a button to see if it is working correctly. If the problem persists, proceed with the next step.
- Verify that the expected program is installed on the computer by looking at the Start menu.
If the program is not installed, then use the program CD to install the program.
- If the problem persists, the buttons might be assigned outside of the HP scanning software. Try the following procedure:
a. Open Control Panel, select Scanners and Cameras, and then select your scanner model from the list. b. Ensure that the Start this program option is selected and that the correct application is selected in the drop-down list.
Wrong profile is used when a quick start button is pressed
Use the HP Scanner Tools Utility to check which HP Smart Document Scan Software profiles are assigned to the quick start buttons. If necessary, reset the profile assigned to the button.
For more information, see the HP Scanner Tools Utility help.
Automatic document feeder (ADF) problems
Use this section to help resolve issues that might occur when scanning from the ADF.
• Paper jamming, skewing, misfeeds, or multiple-page feeds • Paper does not feed from the ADF • The bottom of the scanned image is cut off • The scanned images have streaks or scratches • An item loaded in the ADF jams repeatedly • Clear jams from the ADF
Paper jamming, skewing, misfeeds, or multiple-page feeds
- If the pages look skewed as they feed into the automatic document feeder, check the resulting scanned images in the software to ensure that they are not skewed.
- The pages might not be placed correctly. Straighten the pages and adjust the paper guides to center the stack.
- The ADF input tray or output tray might contain more than the maximum number of pages. Load fewer pages in the input tray, and remove pages from the output tray.
- If misfeeds occur frequently, perform document feeder maintenance. For information on the following tasks, see Care and maintenance.
- Clean the ADF.
- If the problem persists, clean the feed roller.
- If the problem persists, replace the feed roller.
Remove any objects that are on the ADF lid.
Check to see that the ADF lid is fully closed.
Paper does not feed from the ADF
- The ADF lid might not be securely latched. Open the ADF lid and then close it by pressing firmly.
- A problem with the ADF hardware might exist. Use the following procedure to test the ADF:
- Disconnect the USB cable and the power cable from the scanner. Check that the power cable is still connected to the power source.
- Ensure that the accessory cable is connected to the scanner accessory port, and that the ADF has at least two pieces of paper in the input tray.
- Reconnect the power cable to the scanner, and then turn the scanner on.
- Try to scan another page through the ADF.
If the ADF does not feed paper, contact HP Customer Support.
The bottom of the scanned image is cut off
By default, the scanner can scan media that is up to 355.6 mm (14 inches) long. For longer pages, the end of the document is not included in the scanned image.
Verify that you have specified an appropriate page size in the scanning software.
For information on how to enable scanning of media up to 863.6 mm (34 inches), see the Advanced Technical Features section.
The scanned images have streaks or scratches
After each step, try another scan to see if the streaks or scratches are still apparent. If so, then try the next step. For information on cleaning the scanner, see the Care and maintenance section.
- Check that the originals are clean and unwrinkled.
- Clean the scanner glass.
- Use a cleaning cloth in the ADF.
- Clean the feed roller.
- Clean the ADF window.
An item loaded in the ADF jams repeatedly
- The item does not meet the guidelines for the ADF. For more information, see Load originals.
- The item might have something on it, such as staples or self-adhesive notes on the original that must be removed.
- Make sure the paper guides touch the edges of the original.
- If jams occur frequently, perform document feeder maintenance. For information on the following tasks, see Care and maintenance.
- Clean the ADF.
- If the problem persists, clean the feed roller.
- If the problem persists, replace the feed roller.
Clear jams from the ADF
If the ADF jams, the scanner display indicates where the jam occurred.
Before you contact HP Support for help to resolve jams in the scanner feeder, do all of the following:
- Follow all of the procedures that are described in this section.
- Inspect your originals to be sure that they are in good condition, they are not sticking together, and they are free from foreign objects such as staples, paper clips, or self-adhesive papers.
- Inspect the entire paper path to ensure that no foreign objects are caught in the feeder.
- Clean the feed roller as described in Care and Maintenance.
- Inspect the separation pad and the feed roller. Replace any damaged parts.
Clear a jam from the start of the paper path
- Remove any loose pages from the ADF input tray. Remove the input tray from the ADF.
- Open the ADF hatch.
Chapter 5
- Lift the green lever to raise the feed roller to the vertical position, and then gently remove the jammed page.

- Lower the green lever to return the feed roller to the working position, and then close the ADF hatch. Press down firmly on both sides until you hear a click.

- Put the input tray on the ADF. Reload the unscanned pages in the ADF input tray.
- Resume scanning.
Clear a jam at the end of the paper path
- Remove any loose pages from the ADF input tray.
- Gently pull the jammed page out of the ADF in the opposite direction from which the page fed into the ADF.

- If the jammed page still cannot be removed, lift the lid to its fully open position, loosen the jammed page from the roller on the underside of the lid, and then gently pull the page out of the ADF.

- Close the ADF hatch. Press down firmly on both sides until you hear a click.
- Re-stack the unscanned pages and reload them into the ADF.
- Resume scanning.
Remove a paper jam within the ADF
- Remove any loose pages from the ADF input tray.
- Open the scanner lid.
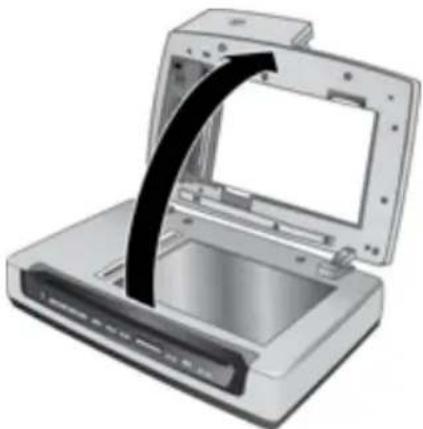
- Locate the ADF access door on the underside of the ADF.
- Press the tabs on the door, and then pull the door toward you until it detaches from the ADF.

- Remove any paper inside the ADF.
- Replace the ADF access door by positioning the door over the ADF opening and pressing the door into place until both sides click.
- Close the scanner lid.
- Reload the unscanned pages in the ADF input tray.
- Resume scanning.
Contact HP Support
For support contact information, see the printed Setup and Support Guide that came with the scanner or visit www.hp.com/support.
6 Advanced technical features
Experienced document management professionals might be interested in the following scan features. These features are available from any document TWAIN or ISIS application that allows you to modify the scan settings in its user interface.
- Long pages
- Color dropout
- Misfeed (Multipick) Detection
Long pages
By default, the automatic document feeder (ADF) accepts a stack of originals up to 215.9 mm x 355.6 mm (8.5 inches x 14 inches). You can choose to scan single pages up to 215.9 mm x 863.6 mm (8.5 inches x 34 inches) through the ADF.

NOTE: If the scanner is set to scan long pages and a page jams, up to 864 mm (34 inches) of document pages can be wrinkled as a result of the jam. Therefore, select scan profiles that specify long pages only when you are scanning pages longer than 355.6 mm (14 inches).
To enable long-page scans in an HP Smart Document Scan Software profile, follow these steps:
- Open the HP Smart Document Scan Software.
- Select a scan profile, and then click Edit.
- Set the page size:
On the Scan tab of the Profile Settings dialog box, select Custom in the Size drop-down list, and then type the actual page dimensions, up to 215.9 mm x 863.6 mm (8.5 inches x 34 inches), in the Width and Height boxes.

TIP: Alternatively, you can select Maximum in the Size drop-down list. The resulting scanned image size will be 215.9 mm (8.5 inches) wide and the actual page length up to 863.6 mm (34 inches) long.

NOTE: Some scanning and destination applications might not support long pages.
Color dropout
You can filter out specific colors from a document scan, for example, you can remove colored lines on a form. Removing colors from the scan reduces the scan file size and can improve the accuracy of optical character recognition (OCR). You can select to filter out one color channel (red, green, or blue).
To eliminate a color from a scan in an HP Smart Document Scan Software profile, follow these steps:
- Open the HP Smart Document Scan Software.
- Select a scan profile, and then click Edit.
- Configure color dropout:
a. On the Scan tab of the Profile Settings dialog box, click Advanced Settings.
b. On the Color Dropout tab of the Properties dialog box, select the channel to be dropped out.
Misfeed (Multipick) Detection
The Misfeed (Multipick) Detection feature stops the scan or copy process if it senses that multiple pages are fed into the scanner at one time. This feature is enabled by default.
Chapter 6
To disable the Misfeed (Multipick) Detection feature in an HP Smart Document Scan Software profile, follow these steps:
- Open the HP Smart Document Scan Software.
- Select a scan profile, and then click Edit.
- On the Scan tab of the Profile Settings dialog box, click Advanced Settings.
- On the More tab of the Properties dialog box, clear the Enable check box.
Index
A
accessibility 9
ADF
clean window 19
cut-off images 32
feeding, troubleshoot 32
jams 33
maintain 18
maintenance 18
skewed pages 32
streaks, troubleshoot 33
applications
scan from 13
B
black scans, troubleshoot 29
buttons
troubleshoot 31
C
clean
ADF window 19
feed roller 20
paper path 18
scanner glass 17
cleaning cloth 18
Color dropout 37
copy
select number of copies 10
crooked images,
troubleshoot 30
customer support 36
cut-off images, troubleshoot 32
D
disable scanner buttons 9
document feeder
load paper 11
double-sided scans
troubleshoot 29
E
editable text 3
export profiles 16
F
features
color dropout 37
long-page support 37
Misfeed (Multipick)
Detection 37
feed roller
clean 20
replace 23
file management 3
fuzzy images, troubleshoot 29
G
glass, clean 17
H
help 8
HP Document Copy
uses for 7
HP paper-path cleaning cloth 18
HP Scanner Tools Utility
assign profiles to quick start
buttons 15
help 9
Maintenance tab 17
uses for 7
HP Smart Document Scan
Software
features 3
help 8
scan from 12
set up profiles 14
troubleshoot 31
|
import profiles 16
ISIS-compliant programs
scan from 13
J
jams, ADF 33
L
lamp
troubleshoot 6
lamp, scanner 29
LCD Reader 9
lines
troubleshoot 30
load originals 11
long-page support 37
M
maintenance
clean feed roller 20
clean paper path 18
HP Scanner Tools Utility
Maintenance tab 17
replace feed roller 23
media jams, ADF 33
Misfeed (Multipick) Detection
feature 37
N
number of copies
select 10
0
OCR 3
onscreen help 8
order
feed roller replacement 23
P
page management 3
pages out of order 29
paper jams, ADF 33
paper path
clean 18
parts
order 23
Power Save mode 6
power-on, troubleshoot 28
profiles
assign to quick start
buttons 15
features 3
import and export 16
select 10
set up 14
programs
scan from 13
Q
quick start buttons
assign profiles 15
troubleshoot 31
R
replace feed roller 23
reset the scanner 27
s
scan
files too large 30
from HP Smart Document
Scan Software 12
from other programs 13
select profiles 10
with one button press 13
scan profiles
troubleshoot 31
scanner
lamp, troubleshoot 29
power-on, troubleshoot 28
scanner glass
place original 11
scanner glass, clean 17
scanner lamp
troubleshoot 6
screen reader 9
separation pad
replace 23
Setup and Support Guide 8
skewed pages, troubleshoot 32
software
features 3
help 8
uninstall and reinstall 28
speed, troubleshoot 29
streaks, troubleshoot 33
stripes
troubleshoot 30
support 36
support guide 8
T
technical support 36
text, editable 3
troubleshoot
ADF 32
ADF feeding 32
black scans 29
buttons 31
crooked images 30
cut-off images 32
double-sided scans 29
fuzzy images 29
HP Smart Document Scan
Software 31
jams, ADF 33
lamp stays on 6, 29
large scan files 30
page order 29
power-on 28
quick start buttons 31
reset the scanner 27
skewed pages 32
speed 29
stops working 28
streaks 33
uninstall and reinstall
software 28
warm-up time 6
white lines 30
white scans 29
TWAIN-compliant programs
scan from 13
U
uninstall and reinstall
software 28
User Guide 8
V
vertical white stripes
troubleshoot 30
W
warm-up time 6
Web sites
replacement parts 23
white scans, troubleshoot 29
white stripes
troubleshoot 30


- HP SCANJET N8400 SERIES
- USER GUIDE
- COPYRIGHT AND LICENSE
- TRADEMARK CREDITS
- CONTENTS
- SCANNER OVERVIEW
- SCAN AND COPY
- SET UP SCAN PROFILES
- CARE AND MAINTENANCE
- TROUBLESHOOTING
- ADVANCED TECHNICAL FEATURES
- WHAT YOU CAN DO WITH THE SCANNER
- SCANNER HARDWARE
- SCANNER FRONT PANEL BUTTONS
- POWER SAVE BUTTON
- QUICK START BUTTONS
- COPY BUTTONS
- SCAN DOCUMENT TO BUTTONS
- TOOLS BUTTON
- CANCEL BUTTON
- SCANNER LAMP SETTING
- SCANNER SOFTWARE
- HP SMART DOCUMENT SCAN SOFTWARE
- MAIN WINDOW
- SCAN PROGRESS WINDOW
- HP DOCUMENT COPY UTILITY
- HP SCANNER TOOLS UTILITY
- WHERE TO GET ADDITIONAL INFORMATION
- SETUP AND SUPPORT GUIDE
- HP SMART DOCUMENT SCAN SOFTWARE HELP
- HP SCANNER TOOLS UTILITY HELP
- TECHNICAL RESOURCES
- ACCESSIBILITY
- LCD READER
- CONTROL OF THE SCANNER BUTTONS
- BASIC SCANNING STEPS
- BASIC COPYING STEPS
- LOAD ORIGINALS
- PLACE AN ORIGINAL ON THE SCANNER GLASS
- LOAD PAPER INTO THE DOCUMENT FEEDER
- SCAN FROM THE SCANNER FRONT PANEL BUTTONS
- SCAN FROM HP SMART DOCUMENT SCAN SOFTWARE
- SCAN FROM OTHER SOFTWARE PROGRAMS
- SCAN WITH ONE BUTTON PRESS
- SET UP AN HP SMART DOCUMENT SCAN SOFTWARE PROFILE
- ASSIGN PROFILES TO QUICK START BUTTONS
- CHOOSE PROFILES FOR DISPLAY ON THE SCANNER FRONT PANEL
- IMPORT AND EXPORT PROFILES
- HP SCANNER TOOLS UTILITY MAINTENANCE TAB
- ORDER MAINTENANCE AND SCANNING SUPPLIES
- CLEAN THE SCANNER GLASS
- MAINTAIN THE AUTOMATIC DOCUMENT FEEDER (ADF)
- CLEAN THE PAPER PATH
- CLEAN THE ADF WINDOW
- CLEAN THE FEED ROLLER
- REPLACE THE FEED ROLLER AND SEPARATION PAD
- REMOVE THE AUTOMATIC DOCUMENT FEEDER FROM THE SCANNER
- SCANNER ERROR MESSAGES
- SCANNER INITIALIZATION OR HARDWARE PROBLEMS
- SCANNER DOES NOT START
- SCANNER HAS STOPPED WORKING CORRECTLY
- SCANNER OPERATION PROBLEMS
- SCANNER WILL NOT TURN ON
- SCANNER LAMP STAYS ON
- SCANNER DOES NOT SCAN RIGHT AWAY
- SCANNER SCANS ONLY ONE SIDE OF A DOUBLE-SIDED PAGE
- SCANNED IMAGE IS FUZZY
- SCANNED PAGES ARE OUT OF ORDER AT THE SCAN DESTINATION
- SCANNER IS SCANNING ITEMS VERY SLOWLY
- THE IMAGE IS COMPLETELY BLACK OR COMPLETELY WHITE
- SCANNED IMAGES ARE NOT STRAIGHT
- VERTICAL WHITE STRIPES APPEAR ON THE PRINTED PAGE
- SCANNER GLASS IS DIRTY
- SCAN FILES ARE TOO LARGE
- SCANNER BUTTONS ARE NOT WORKING CORRECTLY
- BUTTONS DO NOT WORK
- AN UNEXPECTED PROGRAM OPENS WHEN A BUTTON IS PRESSED
- WRONG PROFILE IS USED WHEN A QUICK START BUTTON IS PRESSED
- AUTOMATIC DOCUMENT FEEDER (ADF) PROBLEMS
- PAPER JAMMING, SKEWING, MISFEEDS, OR MULTIPLE-PAGE FEEDS
- PAPER DOES NOT FEED FROM THE ADF
- THE BOTTOM OF THE SCANNED IMAGE IS CUT OFF
- THE SCANNED IMAGES HAVE STREAKS OR SCRATCHES
- AN ITEM LOADED IN THE ADF JAMS REPEATEDLY
- CLEAR JAMS FROM THE ADF
- CLEAR A JAM FROM THE START OF THE PAPER PATH
- CHAPTER
- CLEAR A JAM AT THE END OF THE PAPER PATH
- REMOVE A PAPER JAM WITHIN THE ADF
- CONTACT HP SUPPORT
- LONG PAGES
- COLOR DROPOUT
- MISFEED (MULTIPICK) DETECTION
- INDEX
- A
- B
- C
- D
- E
- F
- G
- H
- J
- L
- M
- N
- P
- Q
- R
- S
- T
- U
- V
- W
Brand : HP
Model : Scanjet N8460
Category : Scanner