
DD-6 - Electronic drum ROLAND - Free user manual and instructions
Find the device manual for free DD-6 ROLAND in PDF.


| Product Type | Electronic percussion module (drum sound module) |
| Brand | Roland |
| Model | DD-6 |
| Dimensions (approx.) | 150 mm x 100 mm x 50 mm |
| Weight (approx.) | 500 g (without batteries) |
| Power Supply | 6 LR20 (C) batteries or AC adapter (not included) |
| Number of internal sounds | 200 percussion and drum sounds |
| Number of playable pads | 4 built-in pads (velocity sensitive) |
| Connectivity | Headphone output (3.5mm jack), auxiliary audio input (3.5mm jack) |
| Main Functions | Solo drumming, rhythmic accompaniment, performance recording, training |
| Maintenance and Cleaning | Wipe with a dry cloth; avoid solvents; protect from moisture |
| Safety | Do not disassemble; use recommended batteries; do not expose to water |
| Spare parts and repairability | Contact an authorized Roland center; parts available via after-sales service |
| General Information | Class B digital device compliant with Canadian standards |
Frequently Asked Questions - DD-6 ROLAND
User questions about DD-6 ROLAND
0 question about this device. Answer the ones you know or ask your own.
Ask a new question about this device
Download the instructions for your Electronic drum in PDF format for free! Find your manual DD-6 - ROLAND and take your electronic device back in hand. On this page are published all the documents necessary for the use of your device. DD-6 by ROLAND.
USER MANUAL DD-6 ROLAND
Thank you, and congratulations on your choice of BOSS DD-6 Digital Delay.
Before using this unit, carefully read the sections entitled: "USING THE UNIT SAFELY" and "IMPORTANT NOTES" (separate sheet). These sections provide important information concerning the proper operation of the unit.
Additionally, in order to feel assured that you have gained a good grasp of every feature provided by your new unit, this manual should be read in its entirety. The manual should be saved and kept on hand as a convenient reference.
A battery is supplied with the unit. The life of this battery may be limited, however, since its primary purpose was to enable testing.
Copyright © 2002 BOSS CORPORATION
All rights reserved. No part of this publication may be reproduced in any form without the written permission of BOSS CORPORATION.
Features
- Amazing delay times, even allowing long delays of up to 5.2 seconds (*1).
Even in HOLD mode, there is plenty of room for loop play and sound on sound. - Includes the world's first "warp" function, which allows you to use the pedal to shift from the most popular, standard delays to some out-of-this-world spaces, with fantastic delays.
- This 2-in/2-out full stereo delay puts out a delay sound with a big, solid sound.
- Provides stereo effects like panning and "direct + effect."
- The delay time can be set in real time by pressing the pedal to input the tempo.
(^*1) Some of the effects can be set to a maximum of 2.6 seconds when used in stereo.
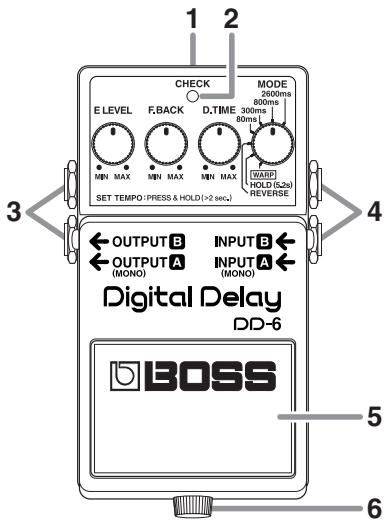
1. AC Adaptor Jack
Accepts connection of an AC Adaptor (optionally available BOSS PSA-Series). By using an AC Adaptor, you can play without being concerned about how much battery power you have left.
- As soon as you connect the AC adaptor, the unit is turned on.
- If there are batteries in the unit while an AC adaptor is being used, normal operation will continue should the line voltage be interrupted (power blackout or power cord disconnection).
- Use only the specified AC adaptor (PSA-Series).
2. CHECK Indicator
This is a combination indicator, which indicates whether the effect is on or off, indicates the various functions (p. 12-15), and functions as the battery check indicator.
The indicator lights when an effect is ON.
-
If this indicator goes dim or no longer lights while an effect is ON, or when the functions are indicated, the battery is near exhaustion and should be replaced immediately. For instructions on changing the batteries, refer to "Changing the Battery" (p. 19).
-
The CHECK indicator shows whether the effect is on or off, and indicates the different functions. It does not indicate whether the power to the device is on or not.
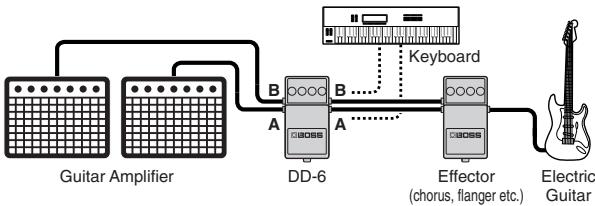
3. OUTPUT-A (MONO) Jack OUTPUT-B Jack
The output jacks are used to connect the unit to an amplifier or another effects unit.
- The unit's functions differ according to how it is connected. Refer to "Setting the Output Method" (p. 16).
4. INPUT-A (MONO) Jack INPUT-B Jack
These jacks accept input signals (coming from a guitar, some other musical instrument, or another effects unit).
- The unit's functions differ according to how it is connected. Refer to "Setting the Output Method" (p. 16).
- When running the unit on battery power, the INPUT-A (MONO) and INPUT-B jacks double as power switches. Power to the unit is turned on when you plug into the INPUT-A (MONO) or INPUT-B jack; the power is turned off when the cable is unplugged. Be sure to disconnect any cord plugged into the INPUT-A (MONO) or INPUT-B jack when not using this effects device. When the AC adaptor is used, the power remains on at all times, and this function is disabled.
5. Pedal Switch
This is used for switching the effect on and off, and for switching between the different functions (p. 12-15).
6. Thumbscrew
When this screw is loosened, the pedal will open, allowing you to change the battery.
- For instructions on changing the battery, refer to "Changing the Battery" (p. 19).
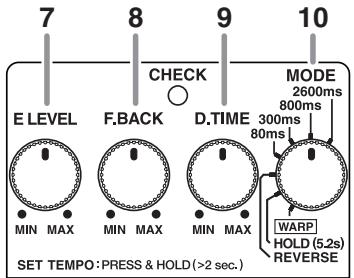
7. E. LEVEL (effect level) Knob
This adjusts the volume of the effect sound. Turn the knob to the right (clockwise) to increase the effect sound. When set to MAX, the effect is played at the same volume as the direct sound.
- Only the effect sound is output when the E.LEVEL knob is set to MAX while in REVERSE mode.
8. F.BACK (feedback) Knob
This adjusts the feedback level. The number of times the delay sound is repeated increases as the knob is turned to the right.
- This cannot be used in HOLD mode.
- Oscillation may occur when the knob is set at certain positions.
9. D.TIME (delay time) Knob
This is a fine adjustment for the delay time. The delay time can be changed within the allowable range.
- This cannot be used in HOLD mode.
10. MODE Knob
This switches the delay effect and pedal mode.
Ordinary Delay
| MODE Switch | Delay Time | Tempo Setting |
| 2600 ms | 600 - 2600 ms | J |
| 800 ms | 200 - 800 ms | J. |
| 300 ms | 60 - 300 ms | J |
| 80 ms | 1 - 80 ms | J3 |
| LONG: D.TIME x 2(MAX:5.2S) | ||
- When inputting the tempo, refer to "Using the Tempo Delay" (p. 12).
- When using long delay or other output, refer to "Setting the Output Method" (p. 16).
Specialized Delays
| MODE Switch | Delay Time | Tempo Setting |
| REVERSE | 300 - 2600 ms | J |
| HOLD | 5200 ms | - |
| WARP | 30 - 800 ms | - |
| LONG: D.TIME x 2 (MAX: 5.2S) | ||
- When inputting the tempo, refer to "Using the Tempo Delay" (p. 12).
- When using long delay or other output, refer to "Setting the Output Method" (p. 16).
REVERSE:
This produces an effect where the sound is played back in reverse.
You can get two different effects, "direct sound + effect sound," or "effect sound
only," depending on the position of the E. LEVEL knob. When the E. LEVEL knob is turned up, so it's near MAX, the unit switches to "effect sound only."
HOLD (5.2 s):
Up to 5.2 seconds of performance content is recorded, then played back repeatedly.
- For details, refer to "Using the HOLD (Over dubbing) Function" (p. 14).
WARP:
As the pedal is depressed, the amount of feedback and the effect level increase above the levels determined by the knob positions.
- For details, refer to "Using the WARP Function" (p. 15).
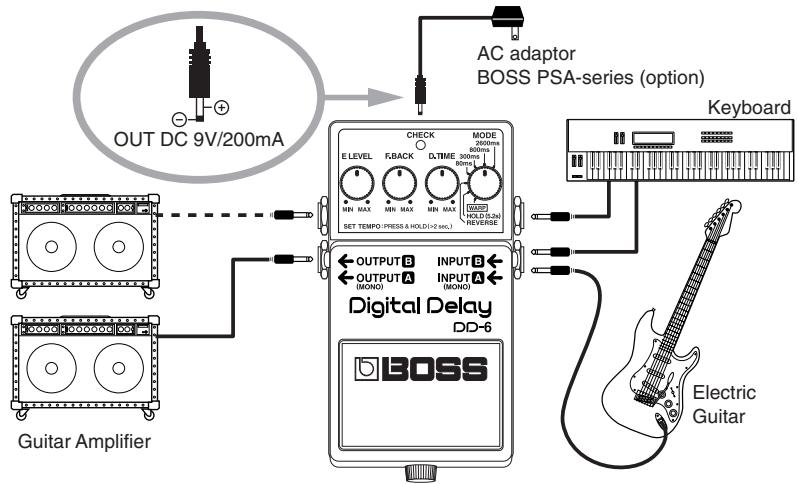
- Be sure to lower the output level of any device being connected.
-
The unit's functions differ according to how it is connected. Refer to "Setting the Output Method" (p. 16).
-
When running the unit on battery power, inserting a plug into the INPUT-A (MONO) or INPUT-B Jack will automatically switch the unit on.
- The use of an AC adaptor is recommended as the unit's power consumption is relatively high. Should you prefer to use batteries, please use the alkaline type.
- To prevent malfunction and/or damage to speakers or other devices, always turn down the volume, and turn off the power on all devices before making any connections.
- If there are batteries in the unit while an AC adaptor is being used, normal operation will continue should the line voltage be interrupted (power blackout or power cord disconnection).
- Once the connections have been completed (p. 9), turn on power to your various devices in the order specified. By turning on devices in the wrong order, you risk causing malfunction and/or damage to speakers and other devices.
When powering up: Turn on the power to your guitar amp last.
When powering down: Turn off the power to your guitar amp first.
- Always make sure to have the volume level turned down before switching on power. Even with the volume all the way down, you may still hear some sound when the power is switched on, but this is normal, and does not indicate a malfunction.
- When operating on battery power only, the unit's indicator will become dim when battery power gets too low. Replace the battery as soon as possible.
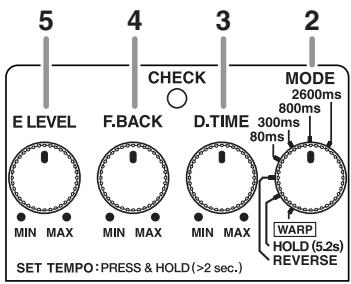
1. Turn on the effect
After you have finished making the connections (p. 9), press the pedal switch to turn the effect on (CHECK indicator lights red).
- This operation cannot be performed in HOLD mode.
- The unit functions differently depending on how you have it hooked up. Refer to "Setting the Output Method" (p. 16).
2. Select the mode
Use the MODE switch to select the mode to be used.
- Operations vary according to the mode. Refer to each operation.
3. Adjust the delay time
Fine tune the delay time with the D.TIME knob.
4. Adjust the feedback level
Use the F.BACK knob to adjust the feedback level (or how much the sound is repeated).
- Oscillation may occur with certain input sounds, or when the knob is set at certain positions.
5. Adjust the volume
Adjust the volume level of the effect sound with the E. LEVEL knob.
Using the Tempo Delay
You can set the delay time to match the tempo by pressing the pedal switch to the tempo of the song being played. You can also change the delay time as you perform.
Using tempo input, the delay time can be set within the range of 0.2-2.6 seconds.
- With long delay, the maximum setting is 5.2 seconds. You can set this regardless of whether the effect is on or off.
1. Select the mode
Use the MODE switch to select the mode to be used.
- Tempo input cannot be used in HOLD and WARP modes.
2. Switch to TEMPO mode
Hold down the pedal switch for at least two seconds (the CHECK indicator alternately flashes red and green).
- When the basic tempo has not been determined, then even if you switch to TEMPO mode, the delay time switches to the setting mode (the position of the D.TIME knob).
3. Begin inputting the tempo
Press the pedal switch in time with the song tempo (converted to quarter notes as the basic tempo).
4. Finish inputting the tempo
Hold down the pedal switch for at least two seconds to complete the setting (the CHECK indicator lights red).
-
The tempo may become confused momentarily when you go from Step 3 to Step 4.
-
If you move the D.TIME knob after finishing this setting, the delay time corresponding to the knob position takes effect.
-
The basic tempo is preserved even when the mode is switched.
The delay sound produced is as shown in the figure.
- The input range varies according to the mode used as well as the connections.
- The CHECK indicator flashes red in time with the tempo being played.
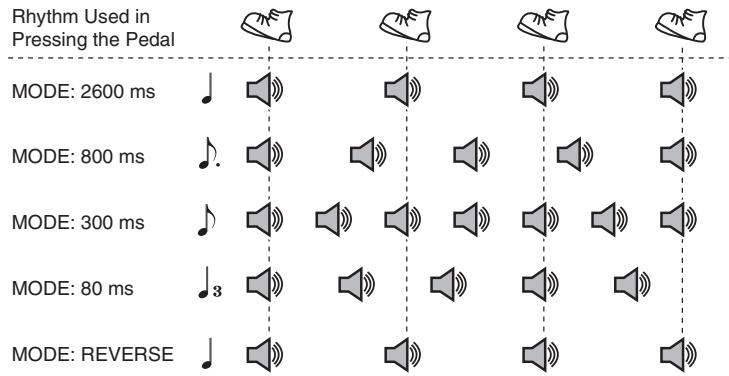
The CHECK indicator's red flashing is indicated by "
Using the HOLD (Over dubbing) Function
With the HOLD function, you can record up to 5.2 seconds of your performance, and then have that content played back repeatedly. You can also layer this as you perform something else, then record these together (overdub). You can keep the recorded content playing continuously as backing and produce other special effects.
1. Select HOLD
Set the MODE switch to HOLD (the CHECK indicator goes out).
2. Begin recording
Recording starts when you press the pedal switch. Hold down the pedal switch for the duration of the recording (the CHECK indicator flashes).
3. When recording is finished, playback starts Release the pedal switch to stop recording. Playback of the recorded content be
gins simultaneously (the CHECK indicator remains lit).
- The maximum recording time is 5.2 seconds. If the pedal switch is held down for more than 5.2 seconds, the recording stops automatically, and the recorded content is then played back.
- An oscillating sound may be audible with extremely short recording times.
4. Overdubbing
When layering recordings, repeat Steps 2 and 3.
5. Adjust the volume
Adjust the volume of the playback sound with the E. LEVEL knob.
6. Finish playback
Press the pedal switch to stop the playback (the CHECK indicator goes out).
- When playback is stopped, the recorded content is erased.
- The recorded content is erased when the mode is switched, or when the power is turned off.
Using the WARP Function
The WARP function continues increasing the feedback on top of regular delay effects to produce an extraordinary effect. You can also repeat the warped delay sound to produce an effect similar to layering sounds on top of this.
1. Select WARP
Set the MODE switch to WARP.
2. Switch the effect on
Press the pedal switch to turn on the effect (the CHECK indicator lights up).
3. Adjust the delay time
Fine tune the delay time with the D.TIME knob.
4. Adjust the feedback level
Use the F.BACK knob to adjust the feedback level (how much the sound is repeated).
5. Adjust the volume
Adjust the volume level of the effect sound with the E. LEVEL knob.
6. Using WARP
As you hold down the pedal, the feedback and volume continue to increase. When you release the pedal switch, the levels return to the settings corresponding to the knob positions.
- Oscillation may occur when the knobs are set at certain positions.
- You can use the pedal merely to switch the effect on and off by quickly pressing and releasing the pedal switch, rather than continuing to hold it down.
- You may be unable to achieve the WARP effect with the E. LEVEL and F.BACK knob settings near maximum.
Setting the Output Method
Panning
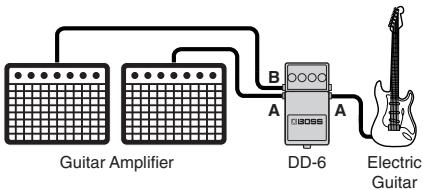
- The panning function is not available in HOLD mode.
Effect + Direct
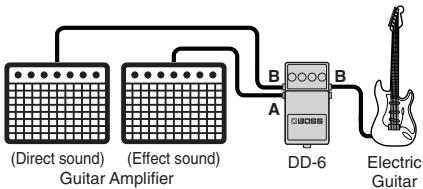
Long Delay
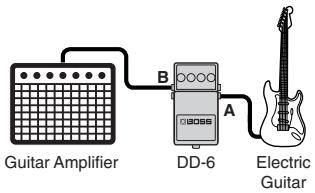
| MODE | Normal Delay (MAX) | Long Delay (MAX) |
| 2600ms | 2600 ms | 5200 ms |
| 800ms | 800 ms | 1600 ms |
| 300ms | 300 ms | 600 ms |
| 80ms | 80 ms | 160 ms |
| REVERSE | 2600 ms | 5200 ms |
| HOLD | 5200 ms | 5200 ms |
| WARP | 800 ms | 1600 ms |
Stereo
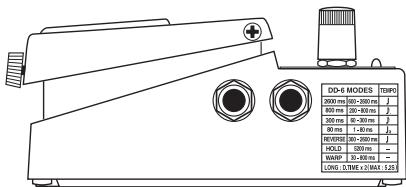
Attaching the Included Sticker
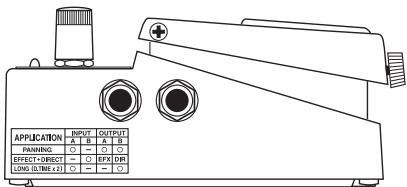
This device comes with a "mode sticker" and an "application sticker."
Apply these to the DD-6 as shown in the figure.
Mode Sticker
This allows you to check the function of each mode.
Application Sticker
This allows you to check the difference in functions according to the input and output connections.
Changing the Battery
When the indicator goes dim or no longer lights while an effect is on, it means that the battery is nearly dead and must be replaced. Replace the battery following the steps below.
- The use of an AC adaptor is recommended as the unit's power consumption is relatively high. Should you prefer to use batteries, please use the alkaline type.
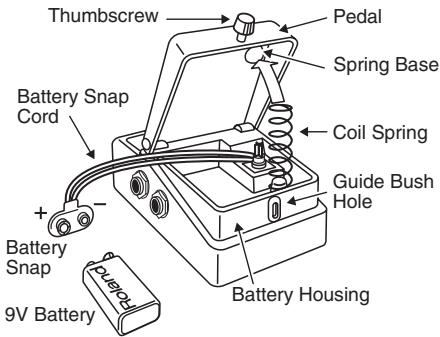
- Loosen the thumbscrew at the front of the pedal, then lift the pedal upwards to open the unit.
- The thumbscrew can be left in the pedal while changing the battery.
- Remove the old battery from the battery housing, and remove the snap cord connected to it.
-
Connect the snap cord to the new battery, and place the battery inside the battery housing.
-
Be sure to carefully observe the battery's polarity (+ versus -).
-
Slip the coil spring onto the spring base on the back of the pedal, then close the pedal.
- Carefully avoid getting the snap cord caught in the pedal, coil spring and battery housing.
- Finally, insert the thumbscrew into the guide bush hole and fasten it securely.
Troubleshooting
Power won't come on / CHECK indicator doesn't light:
Is the specified adaptor (PSA-series; sold separately) properly connected? Check the connection once more (p. 9).
Never use any AC adapter other than one specified for use with the DD-6.
- Is the guitar connected properly to the INPUT-A (MONO) or INPUT-B jack? Check the connection once more (p. 9).
To prevent excess battery drainage, turn the power on without the plug inserted in the INPUT-A (MONO) or INPUT-B jack.
* The CHECK indicator shows whether the effect is being applied or not, and is used to indicate other effects. It does not indicate whether the power to the device is on or not.
Is the battery low or dead?
Replace with a new battery (p. 19).
-
The battery that was supplied with the unit is for temporary use, intended primarily for testing its operation. For extended use, we suggest replacing this with an alkaline battery.
-
Is the MODE knob set to HOLD?
In HOLD mode, the CHECK indicator is normally off (the effect is off). This flashes while the pedal is held down (HOLD).
The CHECK indicator lights for several seconds immediately after the power is turned on, then goes out.
- Are you in TEMPO mode?
In TEMPO mode, the CHECK indicator flashes alternately in red and green.
- For details, refer to "Using the Tempo Delay" (p. 12).
No sound / Low volume:
- Is the RV-5 properly connected to your instrument?
Check the connection once more (p. 9, 16-17). With certain kinds of connections, the direct sound won't be output.
- Is the volume turned down on any guitar amp or effects device you have connected?
Check the settings of the connected device (p. 9, 16-17).
- Do you have a stereo plug connected?
This device will not operate properly with stereo plugs. Please use mono plugs.
- Do you have the E. LEVEL knob turned to MAX in REVERSE mode?
The direct sound is not output when the E. LEVEL knob is set to MAX.
- Is the guitar connected to the INPUT B jack, and the amplifier connected to the OUTPUT B jack?
Check the connection once more (p. 9).
Sound is distorted:
- Is the battery low?
As the battery is drained, the CHECK indicator dims, and the RV-5 may start to function incorrectly. Replace with a new battery (p. 19).
-
The battery that was supplied with the unit is for temporary use, intended primarily for testing its operation. For extended use, we suggest replacing it with an alkaline battery.
-
Could the level of the sound being input be excessive?
With some guitars, distortion may be produced. Be careful of your guitar's output level. When sounds are layered in WARP mode, the input volume levels may result in distortion.
Oscillation may occur with certain F.BACK knob settings.
Setting Samples
Solo Play
This sound is perfect for playing guitar solos.
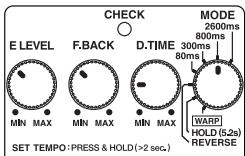
Doubling
This provides an effect similar to the sound of two guitars layered together.
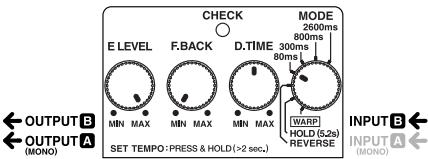
HardRiffSound
This is a hard distortion sound that is perfect for playing riffs.
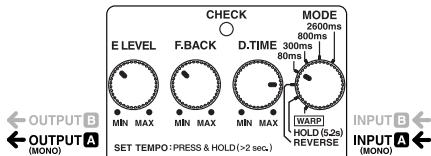
ReversePlaybackDelay
This delay gives an effect somewhat similar to reverse playback. It's a sound that's just a little out of the ordinary.
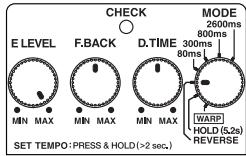
Warp
When applying vibrato or bending strings, you can press the pedal to add expansiveness to the sound.
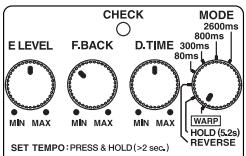
Arpeggio
Excellent for playing arpeggios. An even more expansive sound is created by matching the tempo of songs in TEMPO mode.
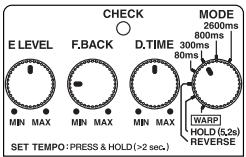
Room Ambience Sound
This delay simulates the sound that would be picked up by an ambience mic located on a stand within the room.
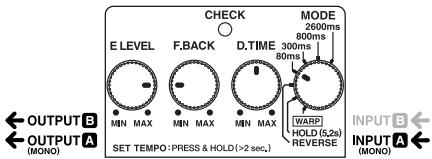
Trick Sound
Employs repetitions of delayed sound to create an oscillating sound. Unique effects can be obtained by adjusting the D.TIME knob.
- Care should be taken, since this effect tends to increase the volume.
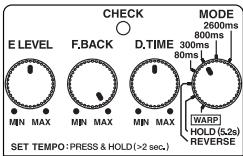
Setting Memo

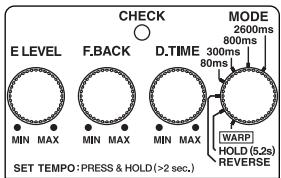
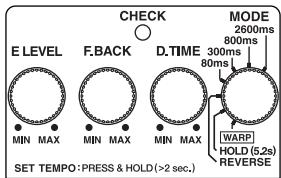

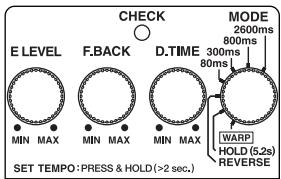
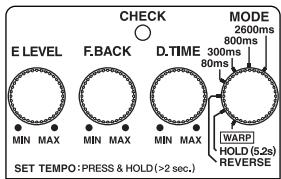
DD-6: Digital Delay
Nominal Input Level. .20 dBu
Input Impedance. 1 MΩ
Nominal Output Level. 20 dBu
Output Impedance. 1 kΩ
Recommended Load Impedance.....10 or greater
Delay Time. 1 ms-5.2 s
- Values may vary according to the mode and connections.
Residual Noise. -90 dBu (IHF-A, Typ.): All knobs at center position
Controls... Pedal Switch, E. LEVEL knob, F. BACK knob, D. TIME knob, MODE Switch
Indicator CHECK Indicator
(Used for indication of TEMPO, HOLD, and WARP, and to check battery)
Connectors INPUT-A (MONO) jack, INPUT-B jack,
OUTPUT-A (MONO) jack, OUTPUT-B jack,
AC adaptor jack (DC 9 V)
Power Supply DC 9 V: Dry battery (9 V type) S-006P/9 V (6F22/9 V)
Dry battery (9 V type) 6AM6/9 V (alkaline)
AC Adaptor
Current Draw .55 mA (DC 9 V)
- Expected battery life under continuous use:
Carbon: 2 hours, Alkaline: 6 hours
These figures will vary depending on the actual conditions of use.
Dimensions. 73 (W) x 129 (D) x 59 (H) mm
2-7/8 (W) x 5-1/8 (D) x 2-3/8 (H) inches
Weight. 440 g / 1 lb (including Battery)
Accessories............Owner's Manual
Leaflet ("USING THE UNIT SAFELY," "IMPORTANT NOTES," and "Information")
Dry battery (9 V type) S-006P/9 V (6F22/9 V)
Mode Sticker
Application Sticker
- The battery that was supplied with the unit is for temporary use-intended primarily for testing its operation.
We also suggest replacing this with an alkaline dry cell.
Options .AC Adaptor PSA-Series
-
0 dBu = 0.775 Vrms
-
In the interest of product improvement, the specifications and/or appearance of this unit are subject to change without prior notice.
For the USA
FEDERAL COMMUNICATIONS COMMISSION RADIO FREQUENCY INTERFERENCE STATEMENT
This equipment has been tested and found to comply with the limits for a Class B digital device, pursuant to Part 15 of the FCC Rules. These limits are designed to provide reasonable protection against harmful interference in a residential installation. This equipment generates, uses, and can radiate radio frequency energy and, if not installed and used in accordance with the instructions, may cause harmful interference to radio communications. However, there is no guarantee that interference will not occur in a particular installation. If this equipment does cause harmful interference to radio or television reception, which can be determined by turning the equipment off and on, the user is encouraged to try to correct the interference by one or more of the following measures:
Reorient or relocate the receiving antenna.
- Increase the separation between the equipment and receiver.
Connect the equipment into an outlet on a circuit different from that to which the receiver is connected.
- Consult the dealer or an experienced radio/TV technician for help.
This device complies with Part 15 of the FCC Rules. Operation is subject to the following two conditions:
(1) This device may not cause harmful interference, and
(2) This device must accept any interference received, including interference that may cause undesired operation.
Unauthorized changes or modification to this system can void the users authority to operate this equipment. This equipment requires shielded interface cables in order to meet FCC class B Limit.
For Canada
NOTICE
This Class B digital apparatus meets all requirements of the Canadian Interference-Causing Equipment Regulations.
AVIS
- Features
- AC Adaptor Jack
- CHECK Indicator
- OUTPUT-A (MONO) Jack OUTPUT-B Jack
- INPUT-A (MONO) Jack INPUT-B Jack
- Pedal Switch
- Thumbscrew
- E. LEVEL (effect level) Knob
- F.BACK (feedback) Knob
- D.TIME (delay time) Knob
- MODE Knob
- Ordinary Delay
- Specialized Delays
- REVERSE:
- HOLD (5.2 s):
- WARP:
- Turn on the effect
- Select the mode
- Adjust the delay time
- Adjust the feedback level
- Adjust the volume
- Using the Tempo Delay
- Select the mode
- Switch to TEMPO mode
- Begin inputting the tempo
- Finish inputting the tempo
- Using the HOLD (Over dubbing) Function
- Select HOLD
- Begin recording
- Overdubbing
- Finish playback
- Using the WARP Function
- Select WARP
- Switch the effect on
- Using WARP
- Setting the Output Method
- Panning
- Effect + Direct
- Long Delay
- Stereo
- Attaching the Included Sticker
- Mode Sticker
- Application Sticker
- Changing the Battery
- Troubleshooting
- Power won't come on / CHECK indicator doesn't light:
- No sound / Low volume:
- Sound is distorted:
- Setting Samples
- Solo Play
- Doubling
- HardRiffSound
- ReversePlaybackDelay
- Warp
- Arpeggio
- Room Ambience Sound
- Trick Sound
- Setting Memo
- DD-6: Digital Delay
- FEDERAL COMMUNICATIONS COMMISSION RADIO FREQUENCY INTERFERENCE STATEMENT
- NOTICE
- AVIS
Brand : ROLAND
Model : DD-6
Category : Electronic drum