
Padrone Smart plus CC-SC100B - Meter Cateye - Free user manual and instructions
Find the device manual for free Padrone Smart plus CC-SC100B Cateye in PDF.


| Product Type | GPS Cycling Computer |
| Model | Padrone Smart plus CC-SC100B |
| Brand | Cateye |
| Dimensions | Approx. 50 x 70 x 20 mm |
| Weight | Approx. 80 g |
| Power Supply | Rechargeable lithium-ion battery, USB charging |
| Battery Life | Up to 15 hours (GPS on), up to 30 hours (GPS off) |
| Display | 2.3-inch monochrome LCD with auto backlight |
| Navigation | Turn-by-turn directions with preloaded maps |
| Smartphone Connectivity | Bluetooth Smart for notifications, data sync via Cateye Cycling app |
| Sensor Compatibility | ANT+ and Bluetooth Smart: speed, cadence, heart rate, power meter |
| GPS | Built-in GPS + GLONASS |
| Data Recording | Automatic lap detection, up to 100 hours of ride data |
| Water Resistance | IPX7 (waterproof up to 1 meter for 30 minutes) |
| Mounting | Handlebar mount (included), optional out-front mount |
| Maintenance | Clean with soft, damp cloth; avoid solvents. Keep USB port dry. |
| Safety | Not a substitute for safe riding. Use as a guide, not for emergency navigation. |
| Spare Parts & Repairability | Replacement mounts and sensors available. Battery not user-replaceable. Contact Cateye support. |
| General Information | Designed for road and mountain biking. Compatible with iOS and Android. |
Frequently Asked Questions - Padrone Smart plus CC-SC100B Cateye
User questions about Padrone Smart plus CC-SC100B Cateye
0 question about this device. Answer the ones you know or ask your own.
Ask a new question about this device
Download the instructions for your Meter in PDF format for free! Find your manual Padrone Smart plus CC-SC100B - Cateye and take your electronic device back in hand. On this page are published all the documents necessary for the use of your device. Padrone Smart plus CC-SC100B by Cateye.
USER MANUAL Padrone Smart plus CC-SC100B Cateye
To use Padrone Smart+, the "Cateye Cycling™" smartphone application (free of charge) is required.
For the latest information on the smartphones that are compatible with Cateye Cycling™ operations, see "Cateye Cycling™ Recommended Devices".

Usage Instructions
For troubleshooting related to the smart computers or to Cateye Cycling™, see "Frequently Asked Questions".
* For explanatory purposes, in this manual red text/icons on the smart computer screen represent flashing items. * The display screens and illustrations used in this manual are provided for instructional purposes only. Actual screens and illustrations may differ depending on devices used. * The online manual and YouTube videos for this product are subject to change without notice.
Setup Flowchart
The setup procedure is as follows.
- Checking package contents
- Install Cateye Cycling™
- Pairing with smart computer
- Pairing with a sensor (If you have sensors)
- Mounting the bracket
- Mounting the speed (cadence) sensor (ISC-12) (Optional)
- Wearing the heart rate sensor (HR-12) (Optional)
After setup is complete, please see How to Use.
Usage Instructions
Setup Flowchart
1. Checking package contents
- Smart computer unit

* Check button locations before starting set up.
- Accessories Bracket band

Bracket rubber pad
Bracket
Dial
* The Speed + Cadence Kit includes an integrated speed (cadence) sensor (ISC-12) in addition to the items above. * The Triple Wireless Kit includes an integrated speed (cadence) sensor (ISC-12) and a heart rate sensor (HR-12).
- Install Cateye Cycling™
- Pairing with smart computer
- Pairing with a sensor (If you have sensors)
- Mounting the bracket
- Mounting the speed (cadence) sensor (ISC-12) (Optional)
- Wearing the heart rate sensor (HR-12) (Optional)
Usage Instructions
Setup Flowchart
- Checking package contents
- Install Cateye Cycling™
Install the Cateye Cycling™ smartphone app (free) on the smartphone to be used.
Smartphone
- Install Cateye Cycling™.

If using an iPhone

Available on the
App Store
If using an Android smartphone

ANDROID APP ON
Google play
* See Cateye Cycling Recommended Devices for the latest information about smartphones recommended for use with Cateye Cycling™.
- Launch Cateye Cycling™.
Follow the on-screen instructions and allow the use of GPS and Bluetooth® devices.
Important
When the smartphone's Bluetooth settings are turned on, it will search for devices, but do not configure settings at this stage. Switch to Cateye Cycling™ and follow the procedure below.
Once basic settings are complete the Trip screen appears.
To continue, refer to "Pairing with smart computer".
- Pairing with smart computer
- Pairing with a sensor
(If you have sensors)
- Mounting the bracket
- Mounting the speed (cadence) sensor (ISC-12) (Optional)
- Wearing the heart rate sensor (HR-12) (Optional)
Usage Instructions
Setup Flowchart
- Checking package contents
- Install Cateye Cycling™
- Pairing with smart computer
The following section explains how to format (initialize) the smart computer and then pair with a smartphone.
Important
- Pairing is necessary to use a smart computer or a sensor.
- Do not pair sensors at a race venue or in similar locations where there are a lot of other users. Doing so may cause the smart computer to be paired with another device.
Smart computer
1. Pull free the smart computer's insulation sheet.
After pulling out the insulation sheet, return the battery holder and battery cover to their previous locations.


2. Press the AC button on the smart computer.

The initialization screen is displayed.
- Verify that [FORMAT] is flashing, and press MODE for 1 second.
Caution
All data will be deleted and smart computer will be reset to factory default settings.
![graph TD A["FORMAT"] --> B["MODE"] B --> C["RESTART"] C --> D["MODE"] D --> E["Long Press"] F["MODE"] --> G["MODE"] G --> H["RESET"] I["MODE"] --> J["Confirm"]](/content/2026/06/1304645/images/bbcffbde513a9b13878c37feb6714ab765302c804918ecf32e347d0f0308eb1c.jpg)
The display switches to the smartphone search screen.
Smartphone
- From (MENU) at the top left of the screen, turn on [Connect] and tap [Device].

Tap [Pair to Device] to start pairing.
When Cateye Cycling™ detects smart computer, a message is displayed on the smartphone.

Tap [Pairing] to complete pairing.
* Tap [Smart computer name] to display the settings configuration screen for the various smart computer settings.
Smart computer pairing is now complete.
If you have sensors, proceed to "Pairing with a sensor". If you do not have sensors, skip to
"Mounting the bracket".
- Pairing with a sensor (If you have sensors)
- Mounting the bracket
- Mounting the speed (cadence) sensor (ISC-12) (Optional)
- Wearing the heart rate sensor (HR-12) (Optional)
Usage Instructions
Setup Flowchart
- Checking package contents
- Install Cateye Cycling™
- Pairing with smart computer
- Pairing with a sensor
(If you have sensors)
Smart computer can be used with sensors compatible with Bluetooth 4.0. Pair it with optional accessories or commercial sensors as required.
Important
- Pair all sensors that you intend to use.
- When using an iPhone, you cannot sync settings of commercial sensors.
When measuring in Sensor Direct Mode, it is necessary to configure sensor settings separately via smart computer.

- Switching to Sensor Direct Mode
- Pairing a smart computer with a sensor
- Tire circumference setting
Smartphone
- Verify that [Connect] is set to ON in the (MENU), and then tap [Device].

Tap [Pair to Device] to start pairing.
- Activate the sensor.

Activating the sensor
When Cateye Cycling™ detects the sensor signal, a message is displayed on the smartphone.
Tap [Pair]. The synchronized sensor is displayed on the [Device] screen and pairing is completed.
* When pairing a sensor with Cateye Cycling™, an "A" is displayed after the sensor name. * If you have paired a sensor capable of speed measurement, proceed to step 3.
3. Set the tire circumference for a sensor capable of speed measurement.
Tap [Device], and then tap [Sensor name] > [Tire Circumference] (the length of the outer circumference of the tire).
Select the tire circumference according to the tire size written on the side of the tire.
Determining tire circumference
* Default value: 2096 mm (700x23c) * Requires to set tire circumference for each sensor. * You can also change sensor names and cancel pairing from this screen.
Sensor pairing is now complete.
* If you want to pair another sensor, repeat the same procedure again.
Important
Cadence, heart rate, and power data will not be displayed under the initial configuration. Change the measurement screen to be able to display measured values from paired sensors.
Changing the measurement screen
- Mounting the bracket
- Mounting the speed (cadence) sensor (ISC-12) (Optional)
- Wearing the heart rate sensor (HR-12) (Optional)
Usage Instructions
Pairing with a sensor
Switching to Sensor Direct Mode
Switch from Mirror Mode to Sensor Direct Mode.
Smartphone
1. Close Cateye Cycling™ or from (MENU), turn off [Connect].

Smart computer
2. From the smartphone search screen, press MODE for 1 second to switch to Sensor Direct Mode.
![graph LR A["SEARCHING"] --> B["MODE (1 second)"] B --> C["Measurement screen"]](/content/2026/06/1304645/images/d68fe3e69aab1ad580cd9e12ba4457769d2a7bd7cdaf9da5e4db77f6df8a49a3.jpg)
* Smart computer will search for a sensor instead of your smartphone. In this mode, the sensor icon flashes to indicate sensor reception status.
- S (Flash): When the speed signal is received • C (Flash): When the cadence signal is received
- S/C (S and C flash simultaneously): When the speed/cadence (ISC) sensor signal is received • H (Flash): When the heart rate signal is received • P (Flash): When the power signal is received
Important
Sensor Direct Mode and Mirror Mode measure independently and data has no continuity.
Pairing with a sensor
Switching to Sensor Direct Mode
Pairing a smart computer with a sensor
Pair a sensor that you want to use with the smart computer.
Important
- Pairing (sensor ID synchronization) must be performed in order to use a sensor.
- Do not pair sensors at a race venue or in similar locations where there are many other users. Doing so may cause the smart computer to be paired with another device.
- Pair all sensors that you intend to use.
! iPhone
Currently, only Bluetooth sensors that comply with Bluetooth Low Energy (BLE) profiles can be used in Sensor Direct Mode.
- From the measurement screen, press OPTION for 2 seconds to switch to the sensor pairing screen.
![0.0 Speed km/h AM 10:14 0.0 Clock AV Speed km/h 0:00.00 0.00 Elapsed Time Distance km Measurement screen OPTION (2 seconds) SENSOR PAIRING Sensor Name Tire Circumference [mm] Sensor pairing screen](/content/2026/06/1304645/images/4638058860ab160cf7c11f1ac562f5d41978ab90a0607211a3d2be5639e8b046.jpg)
* When the sensor pairing screen is left on for 1 minute, the smart computer returns to the measurement screen.
- Press SS/LAP to start pairing.
SS/LAP
- Activate the sensor that you want to pair.
Activating the sensor
![graph LR A["Sensor Name\nTire Circumference [mm"]] --> B["Ready for synchronization"] B --> C["Sensor activated"] C --> D["Synchronization complete"] D --> E["Sensor Name\nISC-C1\nTire Circumference [mm"]] E --> F["Sensor Activated"] F --> G["Sensor: Sensor Pairing\nPairing: Press SS/LAP Button"]](/content/2026/06/1304645/images/6e51ad52154fda20bf3d757d3b0a8576fae8e9a7022c9c75bd5c001a86c367d7.jpg)
The name of the synchronized sensor is displayed and pairing is completed.
- SP: Speed sensor • ISC: Speed/cadence sensor
- CD: Cadence sensor
- HR: Heart rate sensor
- PW: Power sensor
* When pairing a sensor with a smart computer, a "C" is displayed after the sensor name.
Important
When the smart computer displays [ID FULL] on the screen and returns to the sensor pairing screen, the maximum number of sensors have been paired.
Up to 9 separate sensor IDs can be paired with the smart computer.
If the maximum number of sensors have been paired, in the sensor pairing screen, press OPTION for 4 seconds to clear all pairings.
Then re-pair the required sensors.
* Pairing standby time is 5 minutes. Activate the sensor within this time. * If you want to pair another sensor, repeat steps 2 and 3.
4. Press OPTION to return to the measurement screen.


Pairing is now complete.
If you have paired a sensor capable of speed measurement, proceed with setting the tire circumference.
Tire circumference setting
Pairing with a sensor
Switching to Sensor Direct Mode
Pairing a smart computer with a sensor
Tire circumference setting
Set the tire circumference for a sensor capable of speed measurement.
Important
- Pairing (sensor ID synchronization) must be performed first. Pairing a smart computer with a sensor
- Set tire circumference for each sensor. The default value is 2096 mm (700x23c).

- From the measurement screen, press OPTION for 2 seconds to switch to the sensor pairing screen.
![0.0 Speed km/h AM 10:14 0.0 Clock AV Speed km/h 0:00.00 0.00 Elapsed Time Distance km Measurement screen OPTION (2 seconds) SENSOR PAIRING [Export] Pairing Press SS/LAP Button Sensor Name ISC-C1 Time Circumference [mm] 2096 Sensor pairing screen](/content/2026/06/1304645/images/7f6e160d0ae57054795846f770651a9aada8f621a31d93624101e3e2f1b1e77a.jpg)
* When the sensor pairing screen is left on for 1 minute, the smart computer returns to the measurement screen.
- Select the sensor you want to set, and enter the tire circumference.
Enter the circumference in mm of the tire (the length of the outer circumference of the tire) on which the sensor is installed. (Setting range: 0100 – 3999 mm)

Determining tire circumference
![graph TD A["SENSOR PAIRING\nPainting-Press SSA.AP Button\nSensor Name ISC-C1\nTire Circumference (mm) 2096"] --> B["Sensor selection"] B --> C["MODE"] C --> D["MODE (1 second)"] D --> E["Tire circumference value"] E --> F["Increase numbers"] F --> G["MODE"] G --> H["Move to next digit"] H --> I["MOD…](/content/2026/06/1304645/images/17ef311eb6acbd6319753b58a50dbe6620e358c9fdae63a987f8aa70d21c7e7b.jpg)
* Sensors that can be selected are those that have been paired with Cateye Cycling™ or a smart computer. The letter that appears after the sensor name indicates how the sensor was paired.
• A : Sensor paired with Cateye Cycling™
• C : Sensor paired with a smart computer
* Error is displayed if values outside the setting range are entered.
3. Press OPTION to confirm settings.

Pressing OPTION again returns to the measurement screen.
* If you have changed settings, always press OPTION to confirm changes.
This completes the tire circumference setting procedure.
Setup Flowchart
- Checking package contents
- Install Cateye Cycling™
- Pairing with smart computer
- Pairing with a sensor
(If you have sensors)
- Mounting the bracket
The bracket can be mounted on either the stem or the handlebar.
Watch video

See illustrations
When mounting on the stem When mounting on the handlebar Mounting and removing the smart computer unit
- When mounting on the stem
- Check bracket orientation and attach it to the bracket band.

- Remove the seal from the bracket rubber pad and stick the bracket rubber pad onto the bracket band.

- Loop the bracket band around the stem and tighten the dial to secure it.

Caution
• Always tighten the dial by hand.
Using a tool or other object to tighten the dial may crush the screw thread.
- Trim bracket band carefully so the cut end will not cause injury (see step 3 above).
- When mounting on the handlebar
- Check bracket orientation and attach it to the bracket band.

- Remove the seal from the bracket rubber pad and stick the bracket rubber pad onto the bracket band.

- Loop the bracket band around the handlebar and tighten the dial to secure it.


Caution
• Always tighten the dial by hand. Using a tool or other object to tighten the dial may crush the screw thread. - Trim bracket band carefully so the cut end will not cause injury (see step 3 above).
- Mounting and removing the smart computer unit

Removing
While holding smart computer
Caution
To remove smart computer, push out while holding the unit with the other hand to ensure that it does not fall.
- Mounting the speed (cadence) sensor (ISC-12) (Optional)
- Wearing the heart rate sensor (HR-12) (Optional)
Usage Instructions
Setup Flowchart
- Checking package contents
- Install Cateye Cycling™
- Pairing with smart computer
- Pairing with a sensor
(If you have sensors)
- Mounting the bracket
- Mounting the speed (cadence) sensor
(ISC-12) (Optional)
The speed (cadence) sensor can be mounted either on the top or bottom of the chain stay.
Caution
If the speed (cadence) sensor is mounted on the bottom of the chain stay rather than on the top, the adjustment range between the sensor and the magnet will be narrower.
- Mounting on top of chain stay

- Mounting on bottom of chain stay

Wheel magnet
* Mounting procedures give instructions for mounting on the top of the chain stay.
Watch video

See illustrations
1. Temporarily attach the sensor to the left chain stay.
(1) Loosen the sensor screw using a Phillips screwdriver and check that the sensor arm moves.

(2) Attach the sensor rubber pad to the sensor.

(3) Refer to the illustration and temporarily attach the sensor to the left chain stay with nylon ties.

Caution
Do not fully tighten the nylon ties. Once the nylon ties are fully tightened they cannot be removed.
2. Temporarily attach the magnet.

(1) Using a nylon tie, temporarily attach the cadence magnet to the inside of the left crank arm so that it faces the cadence sensor zone. (2) Rotate the sensor arm and temporarily attach the wheel magnet to a spoke facing the speed sensor zone.
* If the sensor cannot be positioned so that both magnets (speed and cadence) pass through their respective sensor zones, reposition the sensor and the magnets so that each magnet passes through its sensor zone.
3. Adjust the gap between the sensor zone and the magnet.
(1) Tilt the sensor so that the gap between the cadence magnet and the cadence sensor zone is approximately 3 mm, then fasten the sensor securely with nylon ties.

(2) Rotate the sensor arm so that the gap between the wheel magnet and the speed sensor zone is approximately 3 mm, then tighten the sensor screw securely.

4. Secure all parts.
Tighten the sensor's nylon ties, the sensor screw, and the magnets, and check that they are not loose.
Trim off the excess nylon tie.
* If using pedals with steel axles, the cadence magnet can be attached magnetically to the
pedal axle. In this case, remove the adhesive tape from the magnet and do not use the nylon tie.
7. Wearing the heart rate sensor (HR-12)
(Optional)
Usage Instructions
Setup Flowchart
- Checking package contents
- Install Cateye Cycling™
- Pairing with smart computer
- Pairing with a sensor (If you have sensors)
- Mounting the bracket
- Mounting the speed (cadence) sensor (ISC-12) (Optional)
- Wearing the heart rate sensor (HR-12) (Optional)
Heart rate measurement is performed by wearing a heart rate sensor around the chest.
Before wearing the heart rate sensor
Warning
Never use this device if you use a pacemaker.
- To eliminate measurement errors, it is recommended to moisten the electrode pads with water or apply electrolyte cream to the pads.
- If you have sensitive skin, moisten the electrode pads with water and wear it over a thin shirt.
- Chest hair may interfere with measurement in some cases.
Watch video

See illustrations
1. Attach the sensor to the HR strap.
Press until you hear a clicking sound.

2. Wear the HR strap by sliding the hook over the other end of the strap.
Wind the HR strap around your body and adjust the length to suit your chest (underbust).
Overtightening the strap may cause discomfort during measurement.

* Wear the heart rate sensor so that TOP faces up. * Ensure that the electrode pads are in close contact with your body. * If you have dry skin or are wearing the sensor over a shirt, measurement errors may result. In such cases, moisten the electrode pads with water.
Usage Instructions
Usage Instructions
You can use smart computer in mirror mode or sensor direct mode depending on your preferences or the situation.
Important Information for iPhone Users
Mirror Mode and Sensor Direct Mode functions and display details
Mirror Mode
Sensor Direct Mode
What is Mirror Mode?
About screen displays
Smart computer screen
Cateye Cycling™ screen
Start measurement
Viewing activities
With Cateye Cycling™, you can check and manage trip and summary data (called "activities").
All activity summary
Activity list
Uploading
Changing settings
Cateye Cycling™ can be used to configure all settings for smart computer and connected devices.
* Only sensor pairing settings can be configured with just the smart computer.
Important
Sensor information on the smart computer is overwritten with data from Cateye Cycling™ when the smart computer connects to the smartphone.
* Information on commercial sensors paired with the smart computer remains as it is.
General
Device
Account
Usage Instructions
Important Information for iPhone Users
Important
Currently, some restrictions on functions that can be used with Padrone Smart+ apply to Cateye Cycling™ for iPhone.
These functions will become available through updates to the Padrone Smart+ firmware and the Cateye Cycling™ app.
It is recommended that users update to the most recent version of Cateye Cycling™ and Padrone Smart+ firmware whenever possible.
* Areas relevant to the above are described with the ! iPhone mark.
Updating the firmware:
With the smart computer connected to the iPhone, tap (menu) > [Device] > [Smart computer name] > [Update Firmware].
Usage Instructions
Functions and details displayed in Mirror Mode and Sensor Direct Mode
The following functions can be used in Mirror Mode and Sensor Direct Mode.
| Measured data and functions | Mirror Mode | Sensor Direct Mode | |
| CC | App | ||
| Measurements | |||
| Current speed | OK | OK | OK |
| Average speed | OK | NO | OK |
| Maximum speed | OK | NO | OK |
| Trip distance | OK | OK | OK |
| Total distance | OK | NO | OK |
| Elapsed time | OK | OK | OK |
| Trip time | OK | OK | NO |
| Cadence | OK*1 | OK*1 | OK*1 |
| Average cadence | OK*1 | NO | OK*1 |
| Maximum cadence | OK*1 | NO | OK*1 |
| Heart rate | OK*1 | OK*1 | OK*1 |
| Average heart rate | OK*1 | NO | OK*1 |
| Maximum heart rate | OK*1 | NO | OK*1 |
| Power | OK*1 | OK*1 | OK*1 |
| Average power | OK*1 | NO | OK*1 |
| Maximum power | OK*1 | NO | OK*1 |
| Custom average power | OK*1 | NO | OK*1 |
| Power balance | OK*2 | NO | OK*2 |
| Date | OK | NO | OK |
| Clock time | OK | NO | OK |
| Calorie consumption | OK*1 | NO | NO |
| Altitude | OK | NO | NO |
| Ascending altitude | OK | NO | NO |
| Total altitude | OK | NO | NO |
| Slope angle | OK | NO | NO |
| Maximum slope | OK*3 | NO | NO |
| Average slope | OK*3 | NO | NO |
| Notifications | |||
| Incoming phone, SMS (Text) and email application notifications | OK | NO | NO |
| Function | |||
| Compass | OK | NO | NO |
| Simple navigation function | OK | NO | NO |
| Lap function | OK | NO | NO |
| Auto lap function | OK | OK | NO |
| Countdown function | OK | NO | NO |
| Auto pause function | OK | NO | NO |
| Recording | |||
| Route | NO | OK | NO |
| Graph | NO | OK | NO |
| Lap | NO | OK | NO |
*1 Heart rate, cadence, and power measurements require pairing with each sensor. *2 Requires separate left and right power sensors. *3 Requires a smartphone with a built-in pressure sensor.
Usage Instructions
What is Mirror Mode?
Mirror Mode refers to syncing smart computer with Cateye's smartphone app, Cateye Cycling™. By using smart computer with Cateye Cycling™, you can connect smart computer and optional/commercial sensors (speed, cadence, heart rate, and power) with your smartphone, and record log information including your smartphone's GPS function while you measure. In this case smart computer becomes a monitor that displays smartphone measurement data in real time.
![graph TD A["GPS"] --> B["Perform measurement and save trip data"] C["Bluetooth SMART"] --> B D["ISC-12"] --> E["Cateye Cycling™"] F["HR-12"] --> E E --> G["Monitor display"] E --> H["Smart computer"]](/content/2026/06/1304645/images/e49556720d5c2e93c97d3ab1bca1d03651f627a37518e2b3d059dc5084d91b23.jpg)
The Bluetooth word mark and logos are owned by the Bluetooth SIG, Inc. and any use of such marks by CATEYE Co., Ltd. is under license. Other trademarks and trade names are those of their respective owners.
By mounting a smart computer on your handlebars, in addition to being able to operate the Cateye Cycling™ smartphone app when your smartphone is in your bag or pocket, you can also view measurement data and check if you have received any phone calls or emails. This feature reduces smartphone battery consumption and avoids the danger of dropping your smartphone.

It is possible to upload measurement results (trip data) immediately to a service site such as Cateye Atlas™.
* Even if you do not have a sensor capable of speed measurement, you can use smart computer as a "sensorless" cyclocomputer using your smartphone's GPS function.
Smart computer screen
Cateye Cycling™ screen
Usage Instructions
What is Mirror Mode?
Smart computer screen
The screen segments and display functions to be displayed on the measurement screen can be assigned through screen customization.
The following explains about customizable display, using the default screen as an example.

Measurement screen

Simple Navigation display
* To customize the screen, tap Ⓞ (MENU) > [Device] > [Smart computer name] > [Display Customization].
Changing the measurement screen
① Explanation of icons:
(Night Mode)
Turns on when the Night Mode setting is ON.
* The Night Mode settings can be accessed by tapping ☐ (MENU) > [Device] > [Smart computer name].
Device
(Compass)
Allows you to check which direction is north.
(Incoming call/SMS/email notification icon)
The display shows the number of incoming notifications and flashes for apps with incoming notifications.
When an incoming notification is received, the display will show the app name as well as the name of the sender.
! iPhone
Only incoming notifications for e-mail addresses registered through [Phone] and [Add Account] will be displayed.
When an incoming notification is received, the display will not show the app name or the name of the sender.
* Contact name registered with non-alphabet characters will be displayed as "Other".
* The incoming notification icons and count are reset when measurement is paused, reset, or finished.
* The notification settings can be accessed by tapping ⏻ (MENU) > [Device] > [Notification Setting].
Configuring Incoming Notifications
(Remaining smartphone battery)
Indicates the smartphone's remaining battery.
(Smart computer battery alarm)
Flashes when the smart computer's remaining battery power is low. Replace battery as soon as possible.
Battery Replacement : Smart computer
(GHS sensitivity)
Indicates GPS signal reception status.
(Sensor signal icon)
Indicates the Bluetooth® sensor's signal reception status.
- Types of icons:
S (Speed signal)
Indicates the speed sensor signal.
C (Cadence signal)
Indicates the cadence sensor signal.
S / C (S and C displayed simultaneously)
Indicates the speed (cadence) sensor (ISC) signal.
H (Heart rate signal)
Indicates the heart rate sensor signal.
P (Power signal)
Indicates the power sensor signal.
- Icon states:
On
Receiving signal in Mirror Mode
Off
No signal
Pice arrows)
Indicate whether the current speed is faster (▲) or slower (▼) than the average speed.
km/h · m/h · rpm · bpm (measurement unit)
Displays the currently selected measurement unit.
• On
Measurement stopped
- Flashing
Measurement in progress
Displays various measurement data.
• Speed/cadence/heart rate flash:
If using a CATEYE sensor, the values related to the sensor's battery replacement period start flashing to indicate that it is time to replace the battery.
Battery replacement: Optional sensors
- Power values flash:
When using separate left and right power sensors, power values flash on and off to indicate that only signals from one sensor are being received.
③ Direction and straight-line distance
Displays the direction and straight-line distance to the goal (or the start point).
Cateye Cycling™ screen
Usage Instructions
What is Mirror Mode?
Smart computer screen
Cateye Cycling™ screen
This is the Cateye Cycling™ home screen.
From this screen you can start, pause, and finish measurement.
* Starting, pausing, and finishing measurement can be done remotely from the smart computer unit. * Measurement data will be displayed as [--] if the sensor signal cannot be received.

① Menu button
Displays the menu.
② Device connection status icon
Displays connection status with other devices.


* A grayed-out icon indicates an unconnected sensor.
* Speed (cadence) sensors (ISC) display both SP and CD
③ Quick Set
The Quick Set function allows various measurement functions to be turned ON/OFF or a goal to be set in simple navigation quickly.
④ GPS icon
Indicates GPS signal reception status.
⑤ Calibration button
Performs power sensor calibration.
Power sensor calibration
⑥ Switch display mode
Swiping the screen switches to the map display, graph display, and lap display, letting you check where you have been and view measurement data.

Graph display

Map display

Lap display
* Tap the screen on the lap display to switch between AV (average value) and MX (maximum value).
* Data recorded using Auto Lap will be shown with an "A" after the number.
⑦ Start measurement button
Starts measurement.
* Not available if speed signal or GPS signal cannot be received.
⑧ Use button
Pauses measurement.
⑨ Flag button
Finishes measurement.
Switches to the trip upload screen.
Saving and uploading trips
⑩ Number of temporarily saved trips
Displays the number of temporarily saved trips.
Important
The maximum number of trips that can be saved temporarily is 30. If this number is exceeded, the icon changes to [Full] and it is not possible to temporarily save any more trips. It is recommended that trip data is saved and uploaded regularly.
Usage Instructions
Start measurement
Important
- Smartphone use
When measuring, turn the smartphone display off, and with Cateye Cycling™ running, store the smartphone in a safe place such as a bag or pocket. As measurement start/pause/resume and reset operations (finish trip) can be performed remotely from smart computer, there is no need to take out your smartphone until you want to save or upload trips.
* Cateye Cycling™ can measure even when running in the background.
• Restrictions on measurement
In Mirror Mode, the maximum elapsed time that can be measured is approximately 1000 hours and maximum trip distance is 10000 km [6200 mile]. When either of these values is exceeded, measurement finishes and trip data is saved temporarily.
In this case, the display returns to the [READY] (measurement standby) screen ready to start the next trip measurement.
This section explains the measurement flow and the measurement functions.
- Connecting smart computer and smartphone
- Performing pre-measurement preparation
- Starting measurement
- Pausing/resuming measurement
- Finishing measurement (reset operation)
- Saving and uploading trips
• Functions during measurement
Switching measurement data display
Simple navigation function
Lap function
Auto lap function
Countdown function
Auto pause function
Power-saving mode
Button lock function
If you have power sensors
Start measurement
1. Connecting smart computer and smartphone
Smartphone
1. Launch Cateye Cycling™, and from (MENU) turn on [Connect].

Smart computer
2. On the measurement screen, press MODE for 1 second to display the smartphone search screen and connect with your smartphone.
When the smart computer connects to a smartphone, it switches to the measurement standby display.
![graph LR A["SEARCHING"] --> B["Measurement standby"]](/content/2026/06/1304645/images/fa02d6eeb7c9de48dcbc23cf0e86e78be8b51f6de0b6db592f81fe30fa37b324.jpg)
* If the connection is made when Cateye Cycling™ is already measuring, [PAUSE] and measured values are displayed.
* The appearance of the smart computer screen depends on the state of Cateye Cycling™.
Smartphone connection is now complete.
- Performing pre-measurement preparation
- Starting measurement
- Pausing/resuming measurement
- Finishing measurement
(reset operation)
6. Saving and uploading trips
• Functions during measurement
Switching measurement data display
Simple navigation function
Lap function
Auto lap function
Countdown function
Auto pause function
Power-saving mode
Button lock function
If you have power sensors
Start measurement
1. Connecting smart computer and smartphone
2. Performing pre-measurement preparation
The following procedure shows how to turn various measurement functions ON/OFF and how to configure goal settings as desired.
This section also explains the quick set feature for quickly configuring settings from the Trip screen.
Smartphone
1. Tap (MENU) and then [Trip].

2. Tap [Quick Set] on the upper right of the screen.

- Auto lap / Countdown
Turn the function ON/OFF as desired.

to lap function

untdown function
* The settings reflect the previous setting configuration. Navigate to the following screens to change settings.
• Auto Lap : ⚪ (MENU) > [General] > [Auto Lap] - Countdown : ⚪ (MENU) > [Device] > [Countdown]


3. Tap (back).
The display returns to the Trip screen.
- Starting measurement
- Pausing/resuming measurement
- Finishing measurement (reset operation)
- Saving and uploading trips
• Functions during measurement
Switching measurement data display
Simple navigation function
Lap function
Auto lap function
Countdown function
Auto pause function
Power-saving mode
Button lock function
If you have power sensors
Start measurement
- Connecting smart computer and smartphone
- Performing pre-measurement preparation
- Starting measurement
Smart computer
When smart computer is on the [READY] (measurement standby) screen, pressing SS/LAP for 1 second starts measurement.

* If the connection with the smartphone is interrupted during measurement, the smart computer switches to the smartphone search screen. When the connection is reestablished, the smart computer returns to the measurement screen.
4. Pausing/resuming measurement
5. Finishing measurement (reset operation)
6. Saving and uploading trips
• Functions during measurement
Switching measurement data display
Simple navigation function
Lap function
Auto lap function
Countdown function
Auto pause function
Power-saving mode
Button lock function
If you have power sensors
Start measurement
- Connecting smart computer and smartphone
- Performing pre-measurement preparation
- Starting measurement
- Pausing/resuming measurement
Smart computer
Pressing SS/LAP for 1 second displays [PAUSE] and pauses measurement.
Pressing SS/LAP again for 1 second resumes measurement.

- Finishing measurement
(reset operation)
- Saving and uploading trips
• Functions during measurement
Switching measurement data display
Simple navigation function
Lap function
Auto lap function
Countdown function
Auto pause function
Power-saving mode
Button lock function
If you have power sensors
Start measurement
- Connecting smart computer and smartphone
- Performing pre-measurement preparation
- Starting measurement
- Pausing/resuming measurement
- Finishing measurement (reset operation)
Smart computer
Pressing MODE for 3 seconds will end measurement and switch to the [READY] display.
At this time, the trip data will be temporarily saved to the smartphone, and the measurements on the smart computer will be reset.
![graph TD A["30.5 km/h Speed"] --> B["Reset/finish trip"] B --> C["MODE (3 seconds)"] C --> D["Measurement standby"] E["30.5 km/h AM 10:14"] --> F["Mode"] G["2:26.53"] --> H["Mode"] I["41.35"] --> J["Mode"] K["2:26.53"] --> L["Mode"] M["41.35"] --> N["Mode"] O["2:26.53"] --> P["Mode"] Q["41.35"] -->…](/content/2026/06/1304645/images/a9036bcdffcd28303f0891f3c6e289c2f5f2ef90da535ffdbf88dc6f60bc9850.jpg)
To continue measuring, press SS/LAP for 1 second.
To finish measuring, save and upload the trip data through the smartphone.

Saving and uploading trips
6. Saving and uploading trips
• Functions during measurement
Switching measurement data display
Simple navigation function
Lap function
Auto lap function
Countdown function
Auto pause function
Power-saving mode
Button lock function
If you have power sensors
Start measurement
- Connecting smart computer and smartphone
- Performing pre-measurement preparation
- Starting measurement
- Pausing/resuming measurement
- Finishing measurement (reset operation)
- Saving and uploading trips
After measurement is complete, the trip can be saved in Cateye Cycling™ and can be uploaded to various service sites.
Smartphone
1. On the Trip screen, tap (Flag) to finish measurement.
The app switches to the upload screen.

2. Turn on an upload destination.
* Trip names can be edited. * You must have an account with the relevant site to upload data.

* Cateye Cycling™ only allows you to post links of trips uploaded to CATEYE Atlas™ on Facebook™ and Twitter™. Links to other service sites cannot be posted.
3. Tap (Save & Upload). Trips are saved in Cateye Cycling™ and uploaded to the selected service sites.
* Repeat this action if there are multiple trips. * Tap (Delete) to delete a trip. * Tap ≡ (MENU) > [Activity List] to see the trips saved in Cateye Cycling™.
* When not performing measurement, it is recommended that you turn off [Connect] from (MENU) to minimize smartphone battery drain.
• Functions during measurement
Switching measurement data display
Simple navigation function
Lap function
Auto lap function
Countdown function
Auto pause function
Power-saving mode
Button lock function
If you have power sensors
Start measurement
Switching measurement data display
Smart computer
You can switch the display of data being measured in Cateye Cycling™ by pressing MODE.
* The data displayed changes depending on the state of the sensor connection and the screen customization settings. The following gives an example of initial configuration of the measurement screen.

![graph TD A["(Can be added through screen customization)"] --> B["MODE"] B --> C["Screen 5"] C --> D["Undefined (Can be added through screen customization)"]](/content/2026/06/1304645/images/94f6dbbe55d6937e4ecff75304da7e68beba1bf3b90a6c2500b573bc10f58714.jpg)
* During initial configuration, screens 3 through 5 are undefined and thus not shown. To add screens or to change screen segments or measurement data, tap ☐ (MENU) > [Device] > [Smart computer name] > [Display Customization]. Changing the measurement screen * Heart rate, cadence, and power data will not be displayed unless each sensor is paired.
Simple navigation function
Lap function
Auto lap function
Countdown function
Auto pause function
Power-saving mode
Button lock function
If you have power sensors
Start measurement
Switching measurement data display
Simple navigation function
The Simple navigation function displays the direction and straight-line distance from a current location to a goal or a start point.
Important
- The simple navigation function shows the direction and straight-line distance. It does not provide route (street) guidance.
- The simple navigation function cannot be displayed when screen customization is set to display 7 or 8 screen segments. * To configure the screen segment settings for the measurement screen, tap (MENU) > [Device] > [Smart computer name] > [Display Customization].


Changing the measurement screen
Display goal
Display the direction and straight-line distance to the goal.
Important
This function cannot be used if no goal is defined.

Specifying a goal
* Goals can also be set while a trip is being recorded if the smart computer is in the [PAUSE] state.
Smart computer
- Press OPTION on the measurement screen for 1 second to show simple navigation (goal) on the upper part of the screen.

Being able to check the direction and straight-line distance to a goal makes it possible to continue travelling without losing sight of the goal.
- Press OPTION for 1 second to return to the measurement screen.

* Performing the same operation will display the simple navigation (goal) again. * To go back to a start point, see "Back to start point".
Back to start point
Display the direction and straight-line distance to the start point.
* Because a trip's start point is set automatically, this function can be used right away.
Smart computer
- Press OPTION on the measurement screen or on the simple navigation display (goal) to show simple navigation (back to start point) on the upper part of the screen.

This function allows you to return to a start point while checking the direction and straight-line distance to the start point.
- Press OPTION to return to the measurement screen.

* Performing the same operation will display the simple navigation (start point) again.
Lap function
Auto lap function
Countdown function
Auto pause function
Power-saving mode
Button lock function
If you have power sensors
Start measurement
Switching measurement data display
Simple navigation function
Lap function
Smart computer
You can record a lap by pressing SS/LAP on the measurement screen during measurement. When the lap is recorded, the lap information is displayed temporarily before returning to the original measurement screen.
The displayed lap information is as follows.
* This feature can be used in conjunction with the auto lap function.
![graph TD A["30.5 mph"] --> B["10:14 AM Clock"] A --> C["21.3 AV Speed mph"] A --> D["2:26.53 Elapsed Time"] A --> E["41.35 Distance mls"] A --> F["SS/LAP"] G["LAP 2"] --> H["Lap number (*1)"] G --> I["Lap time"] I --> J["0:12.12 LAP Time"] I --> K["3.45 Distance km"] I --> L["Split time"] L --> M["0…](/content/2026/06/1304645/images/09fdedb5b94f113bde617195197d062b9d9ecf74354fbd9ca1248402a3684d50.jpg)
*1 The sequential lap number, including auto laps, will be displayed.
If the total number of laps exceeds 999, the following laps will not be recorded.
*2 Measurement data will be displayed as [--] if the sensor signal cannot be received.
*3 Requires a smartphone with a built-in pressure sensor.
Auto lap function
Countdown function
Auto pause function
Power-saving mode
Button lock function
If you have power sensors
Start measurement
Switching measurement data display
Simple navigation function
Lap function
Auto lap function
Smart computer
Laps can be recorded automatically without any button operation according to distances, times, or locations set in advance.
When the lap is recorded, the lap information is displayed temporarily before returning to the original measurement screen.
The displayed lap information is as follows.
* This feature can be used in conjunction with the lap function.
![graph TD A["30.5 km/h Speed"] --> B["10:14 AM Clock"] A --> C["21.3 AV Speed mph"] A --> D["41.35 Elapsed Time"] E["Time Split"] --> F["0:12.12 LAP Time"] E --> G["0:24.24 SPLIT Time"] E --> H["120 AV HR bpm"] E --> I["125 AV Power watt"] J["Max Speed km/h MAX Speedkm/h"] --> K["34.5 MAX Max 165 RPM…](/content/2026/06/1304645/images/38b8e286c36228dc6a953aa650aaf3ad4a60b10db2d193eece4893eebc12a2b0.jpg)
*1 A number that includes both the lap number and the auto lap number will be displayed. If the total number of laps exceeds 999, the following laps will not be recorded. *2 The display shows the measurement status of the auto lap being measured and the lap count. *3 Measurement data will be displayed as [--] if the sensor signal cannot be received. *4 Requires a smartphone with a built-in pressure sensor. * The Auto lap function settings can be accessed by tapping ☐ (MENU) > [General] > [Auto Lap].

Power-saving mode
Button lock function
If you have power sensors
Start measurement
Switching measurement data display
Simple navigation function
Lap function
Auto lap function
Countdown function
Smart computer
This function delivers a notification when a distance or time set as a goal is reached.
When the goal is reached, [FINISH] flashes on the screen and an alarm sounds.
• Distance: The specified distance is set as the goal. • Time: The specified time is set as the goal.

* The countdown function settings can be accessed by tapping ☐ (MENU) > [Device] > [Smart computer name] > [Countdown].

* The countdown restarts after measurement is finished.

Finishing measurement (reset operation)
Auto pause function
Power-saving mode
Button lock function
If you have power sensors
Start measurement
Switching measurement data display
Simple navigation function
Lap function
Auto lap function
Countdown function
Auto pause function
Smartphone
This function automatically pauses measurement when the connection between the smartphone and smart computer is broken.
Measurement resumes automatically when the connection is reestablished.
* The Auto Pause settings can be accessed by tapping ⏚ (MENU) > [Device].

Power-saving mode
Button lock function
If you have power sensors
Start measurement
Switching measurement data display
Simple navigation function
Lap function
Auto lap function
Countdown function
Auto pause function
Power-saving mode
Smart computer
When smart computer is left on the [ready] (measurement standby) screen, [PAUSE] screen, or smartphone search screen for approximately 20 minutes; Cateye Cycling™ is closed; or [Connect] is turned off, the sleep display is activated.
When any button is pressed, the smart computer returns to the smartphone search screen and then returns to the measurement screen when the connection with the smartphone is reestablished.
![graph TD A["Measurement standby"] --> B{When left for approx. 20 minutes} B --> C["Sleep"] C --> D{Any button except the AC button} D --> E["Searching"] F["PAUSE"] --> G["Paused"] G --> H["0.0 100% AM 10.14 AV Speed km/h 0:00.00 Altitude km"] H --> I["0.0 0.0 0.0 0.0 0.0 0.0 0.0 0.0 0.0 0.0 0.0 0.0…](/content/2026/06/1304645/images/b03ad9d5de90507f83d78e73c60bc575f7f073ddb3ddf2164fedfec89e1521a9.jpg)
Smartphone search screen
Button lock function
If you have power sensors
Start measurement
Switching measurement data display
Simple navigation function
Lap function
Auto lap function
Countdown function
Auto pause function
Power-saving mode
Button lock function
Smart computer
Pressing SS/LAP and OPTION simultaneously will lock the buttons, preventing accidental operation when the smart computer is stored in a pocket, etc. Repeating the same operation will unlock the buttons.


Lock/unlock buttons
SS/LAP
OPTION
Button lock
If you have power sensors
Start measurement
Switching measurement data display
Simple navigation function
Lap function
Auto lap function
Countdown function
Auto pause function
Power-saving mode
Button lock function
If you have power sensors
When a signal is received from a paired power sensor, power data is displayed as a value.
Smart computer
The power, average power, custom average power, maximum power, average lap power in real time, and power balance can be displayed on a smart computer.
* Separate left and right power sensors are necessary for power balance measurement.
* To display power data on the measurement screen, it is necessary to register functions (measurement data) by tapping ⚪ (MENU) > [Device] > [Smart computer name] > [Display Customization].

Changing the measurement screen
* Tap (MENU) > [Device] > [Smart computer name] > [Custom Average Power] to specify the calculated number of seconds for the custom average power.

Device
Smartphone
Only current power can be viewed on a smartphone.

* When the power value exceeds 999, the last three digits are displayed.
* To increase precision, it is recommended to perform calibration before power measurement.

Power sensor calibration
Usage Instructions
All activity summary
It is possible to check total values for all activities saved in Cateye Cycling™ and maximum values for individual trips.
Smartphone
1. Tap (MENU) and then [All Activity Summary].

Activity list
Uploading
Usage Instructions
All activity summary
Activity list
It is possible to check individual activities (trip data and summary data collectively) saved in Cateye Cycling™.
Smartphone
1. Tap (MENU) and then [Activity List].

* The Activity List can be displayed in graph, list, or calendar format. * Tapping (Select to Delete) moves to the activity deletion screen.
Select the activities you want to delete and tap 📄 (Delete).
2. Tap each activity to check details or upload/delete it.

• (Upload) :
Upload to service sites
- (Delete) :
Delete activity
Usage Instructions
All activity summary
Activity list
Uploading
Multiple activities can be uploaded to service sites in one action.
Smartphone
1. Tap (MENU) and then [Upload].
* Activities already uploaded to service sites are not displayed.

2. Select the activities you want to upload and tap (Upload) to upload them to the specified sites.
* You must have an account with the relevant site to upload data. * The upload destinations for Upload All are those sites turned on under (MENU) > [Account].
Account
Usage Instructions
General
This section explains how to configure various measurement settings.
Smartphone
1. Tap (MENU) and then [General].

- Recording Interval
Selects the interval at which the log is recorded.
- Units
Selects the measurement unit.
Important
If the unit is changed with the smart computer unconnected, the settings will be applied the next time the smart computer is connected.
- Preset Altitude
Applies a preset to the altitude of a specified position such as your home.
Turning Preset Altitude ON will correct the altitude at the start point of the measurement, improving the reliability of the altitude measurement.
* The iPhone 6 and other smartphones with high-accuracy altitude measurement capabilities do not require an altitude preset.
• Auto Lap
Selects which method—distance, time, or map—to use for automatic lap input.
* Designating a point on the map:
To designate a point, press and hold on the desired location on the map.
Device
Account
Usage Instructions
General
Device
The following section explains how to pair a smart computer with a sensor and how to configure various settings.
Important
• Device settings are shared when the smart computer is connected to your smartphone. - When using an iPhone, you cannot sync settings of commercial sensors. When measuring in Sensor Direct Mode, it is necessary to configure sensor settings separately via the smart computer.

Switching to Sensor Direct Mode
- Pairing a smart computer with a sensor
- Tire circumference setting
Smartphone
1. Tap (MENU) and then [Device].

Changing smart computer settings

- Nickname
Changes the name of the smart computer.
* Paired sensors are displayed with "A" or "C" after the sensor name.
A: Sensor paired with Cateye Cycling™ C: Sensor paired with a smart computer
- Notification Setting
Configures settings for incoming call, email, and SMS app notifications and smartphone remaining battery notification.
Important
! iPhone
Only incoming notifications for e-mail addresses registered through [Phone] and [Add Account] will be displayed.
When an incoming notification is received, the display will not show the app name or the name of the sender.
Configuring Incoming Notifications
- Countdown
Sets a distance or a time as a goal.
- Simple Navigation
Designates a goal in simple navigation.
Designating a goal
- Auto Pause
This function automatically pauses measurement when the connection between the smart computer and your smartphone is interrupted if you move away from the bicycle with your smartphone during measurement.
- Display Customization
Lets you select the measurement screens to add or delete in addition to the screen segments and functions (measurement data) to be displayed on each screen.
Changing the measurement screen
- Night Mode
Configures when to start and end backlight illumination.
When Night Mode is ON, pressing any button on the smart computer during the specified time will turn the backlight on.
- Sounds
Lets you turn the operation sounds, alert sounds, and notification sounds on or off.
- Compass
Lets you select whether to show or hide the compass on the measurement screen.
- Odometer
Lets you manually set total distance traveled.
* Use this function when you want to continue from the same distance after purchasing a new smart computer or when resetting the smart computer.
- Function Names
Lets you select between [Abbreviated] or [Full] for displaying measurement data names on the measurement screen.
(Ex.) Abbreviated display for trip distance: DST
Full display for trip distance: Distance
- Custom Average Power
Sets the number of seconds for calculating average power to your preferences.
* Custom average power measurements require pairing with a power sensor.
- Firmware Update
Updates the smart computer firmware to the most recent version.
Changing sensor settings
Important
These settings can be configured even when your smartphone is not connected to smart computer.
If settings differ between devices, they will be overwritten with data from Cateye Cycling™ the next time the devices are connected.
* Information on commercial sensors paired with the smart computer remains as it is.

- Nickname
Changes the name of the sensor.
- Tire Circumference (only with a sensor capable of speed measurement)
Set the tire circumference for a sensor capable of speed measurement.
Select the tire circumference according to the tire size written on the side of the tire.
Determining tire circumference
* Default value: 2096 mm (700x23C)
* Requires to set tire circumference for each sensor.
* See the following for pairing with a smart computer or a sensor.
Pairing with smart computer
Pairing with a sensor
Account
Device
Configuring Incoming Notifications
Notifications from smartphone applications and the smartphone's remaining battery can be displayed on the smart computer.
Important
- Cateye Cycling notification settings are applied to applications enabled in the smartphone's notification settings.
- Email notifications are shown for e-mail accounts registered in the smartphone settings.
! iPhone
Only incoming notifications for e-mail addresses registered through [Phone] and [Add Account] will be displayed.
When an incoming notification is received, the display will not show the app name or the name of the sender.
Changing settings on an iPhone
Smartphone
Tap (MENU) > [Device] > [Smart computer name], and then follow the procedure below.
1. Tap [Notification Setting].
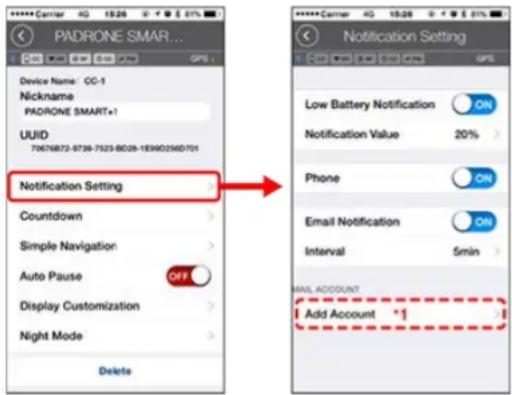
- Low Battery Notification
When the smartphone battery reaches a specified amount, 100% (remaining smartphone battery) flashes on the smart computer.
- Phone / Email :
When a notification arrives, [Phone] or [Mail] flashes on the smart computer's screen, with an audible alarm. After the notification closes, / incoming call/email notification icon) will flash.
*1: It is necessary to configure email account settings to receive incoming notification.
Smartphone
Tap (MENU) > [Device] > [Smart computer name], and then follow the procedure below.
1. Tap [Notification Setting].

- Low Battery Notification
When the smartphone battery reaches a specified amount, 100% (remaining smartphone battery) flashes on the smart computer.
• Phone / Messages / Email / Social Network
When a notification arrives, [Application name] and [Contact name] (alphabetical), or [Phone number] or [Email address] flashes on the smart computer's screen, with an audible alarm.
BEEP! BEEP! BEEP!
* Contact name registered with non-alphabet characters will be displayed as "Other".
After the notification closes, / (incoming notification icon) and the notification count will flash.

* The incoming notification icons and count cannot be displayed when screen customization is set to display 8 screen segments. * The incoming notification icons and count are reset when measurement is paused, reset, or finished.
Device
Designating a goal
The following explains how to designate a goal in simple navigation.
Smartphone
Tap (MENU) > [Device] > [Smart computer name], and then follow the procedure below.
1. Tap [Simple Navigation].
Under [Simple Navigation], there are four methods for designating a goal.

- Enter the address:
Enter an address in the search field.
- Select from a map:
Swipe the map to move the location, and long-press to confirm.
- Select from an iPhone contact:
Tap [History] > [Select from Contacts] to select a goal from the addresses of your registered contacts.
- Select from history:
Tap [History] to select a goal from the history list.
Device
Changing the measurement screen
This section explains how to change the display of the measurement screen.
Smartphone
Tap (MENU) > [Device] > [Smart computer name], and then follow the procedure below.
1. Tap [Display Customization].
Here, you can verify the current screen segments and functions (measurement data).

- Changing the order of screens 1 through 5:
Tap [Edit] and swipe the desired screen to change the order.
2. Tap a screen to change how it is displayed.
Select the measurement screens to show or hide and the screen segments and functions (measurement data) to be displayed.

- Displaying/hiding the measurement screen
If the screen display is set to ON, that measurement screen will be displayed. If it's set to OFF, that screen will not be displayed.
- Selecting screen segments:
Tap [Screen Segments] to select between [None] and [8 segments].
* The simple navigation function cannot be displayed when [Screen Segments] is set to [7 segments] or [8 segments]. * The incoming notification icons and count cannot be displayed when [Screen
Segments] is set to [8 segments].
- Selecting a function (measurement data):
Tap [Function Names] or + to select a function.
- Reordering functions:
Tap [Edit] and swipe the desired function to another location to change the display position.
* Screen customization settings will be applied to both Mirror Mode and Sensor Direct Mode.
Usage Instructions
General
Device
Account
Set up the service sites and social networking services (SNSs) to upload your activities.
1. Tap (MENU) and then [Account].

Adjust settings for the service sites below.
* You must have an account with the relevant site to upload data.
Service sites
• CATEYE Atlas™ - STRAVA™ • TRAINING PEAKS™
SNS
- Facebook™
- Twitter™
* When using an SNS, links to activities uploaded to Cateye Atlas™ are posted.
Usage Instructions
You can use smart computer in mirror mode or sensor direct mode depending on your preferences or the situation.
Important Information for iPhone Users
Mirror Mode and Sensor Direct Mode functions and display details
Mirror Mode
Sensor Direct Mode
What is Sensor Direct Mode?
About screen displays
Smart computer screen
Start measurement
Viewing activities
With Cateye Cycling™, you can check and manage trip and summary data (called "activities").
All activity summary
Activity list
Uploading
Changing settings
Cateye Cycling™ can be used to configure all settings for the smart computer and connected devices.
* Only sensor pairing settings can be configured with just the smart computer.
Important
- Sensor information on the smart computer is overwritten with data from Cateye Cycling™ when the smart computer connects to the smartphone. * Information on commercial sensors paired with the smart computer remains as it is.
- When using an iPhone, you cannot sync settings of commercial sensors.
When measuring in Sensor Direct Mode, it is necessary to configure sensor settings separately via the smart computer.

Switching to Sensor Direct Mode
- Pairing a smart computer with a sensor
- Tire circumference setting
General
Device
Account
Usage Instructions
Important Information for iPhone Users
Important
Currently, some restrictions on functions that can be used with Padrone Smart+ apply to Cateye Cycling™ for iPhone.
These functions will become available through updates to the Padrone Smart+ firmware and the Cateye Cycling™ app.
It is recommended that users update to the most recent version of Cateye Cycling™ and Padrone Smart+ firmware whenever possible.
* Areas relevant to the above are described with the ! iPhone mark.
Updating the firmware:
With the smart computer connected to the iPhone, tap (menu) > [Device] > [Smart computer name] > [Update Firmware].
Usage Instructions
Functions and details displayed in Mirror Mode and Sensor Direct Mode
The following functions can be used in Mirror Mode and Sensor Direct Mode.
| Measured data and functions | Mirror Mode | Sensor Direct Mode | |
| CC | App | ||
| Measurements | |||
| Current speed | OK | OK | OK |
| Average speed | OK | NO | OK |
| Maximum speed | OK | NO | OK |
| Trip distance | OK | OK | OK |
| Total distance | OK | NO | OK |
| Elapsed time | OK | OK | OK |
| Trip time | OK | OK | NO |
| Cadence | OK*1 | OK*1 | OK*1 |
| Average cadence | OK*1 | NO | OK*1 |
| Maximum cadence | OK*1 | NO | OK*1 |
| Heart rate | OK*1 | OK*1 | OK*1 |
| Average heart rate | OK*1 | NO | OK*1 |
| Maximum heart rate | OK*1 | NO | OK*1 |
| Power | OK*1 | OK*1 | OK*1 |
| Average power | OK*1 | NO | OK*1 |
| Maximum power | OK*1 | NO | OK*1 |
| Custom average power | OK*1 | NO | OK*1 |
| Power balance | OK*2 | NO | OK*2 |
| Date | OK | NO | OK |
| Clock time | OK | NO | OK |
| Calorie consumption | OK*1 | NO | NO |
| Altitude | OK | NO | NO |
| Ascending altitude | OK | NO | NO |
| Total altitude | OK | NO | NO |
| Slope angle | OK | NO | NO |
| Maximum slope | OK*3 | NO | NO |
| Average slope | OK*3 | NO | NO |
| Notifications | |||
| Incoming phone, SMS (Text) and email application notifications | OK | NO | NO |
| Function | |||
| Compass | OK | NO | NO |
| Simple navigation function | OK | NO | NO |
| Lap function | OK | NO | NO |
| Auto lap function | OK | OK | NO |
| Countdown function | OK | NO | NO |
| Auto pause function | OK | NO | NO |
| Recording | |||
| Route | NO | OK | NO |
| Graph | NO | OK | NO |
| Lap | NO | OK | NO |
Usage Instructions
What is Sensor Direct Mode?
Sensor Direct Mode refers to using smart computer as a regular cyclocomputer without your smartphone.
In this case, Smart computer measures by receiving signals directly from each sensor (speed, cadence, heart rate, and power).
![graph LR A["ISIC-12"] --> B["Perform measurement and save summary data"] C["HR-12"] --> D["Smart computer"]](/content/2026/06/1304645/images/9edb030e508d6d907e6630782c76e239ad4870c13de7e60095a2f6eacff29c3c.jpg)
The Bluetooth word mark and logos are owned by the Bluetooth SIG, Inc. and any use of such marks by CATEYE Co., Ltd. is under license. Other trademarks and trade names are those of their respective owners.
Measurement results such as elapsed time and trip distance (summary data) can be forwarded to a smartphone via Cateye Cycling™ and uploaded to a service site such as CATEYE Atlas™.
* Trip logs cannot be recorded in Sensor Direct Mode. * When using an iPhone, you cannot sync settings of commercial sensors. When measuring in Sensor Direct Mode, it is necessary to configure sensor settings separately via smart computer.
- Switching to Sensor Direct Mode
- Pairing a smart computer with a sensor
- Tire circumference setting
Smart computer screen
Usage Instructions
What is Sensor Direct Mode?
Smart computer screen
The screen segments and display functions to be displayed on the measurement screen can be assigned through screen customization.
The following explains about customizable display, using the default screen as an example.

Measurement screen
* To customize the screen, tap (MENU) > [Device] > [Smart computer name] > [Display Customization].
Changing the measurement screen
① Explanation of icons:
(Night Mode)
Turns on when the Night Mode setting is ON.
* The Night Mode settings can be accessed by tapping [MENU] > [Device] > [Smart computer name].
(Smart computer battery alarm)

Flashes when the smart computer's remaining battery power is low. Replace battery as soon as possible.
Flashes when the smart computer's remaining battery power is low. Replace battery as soon as possible.
Sensor signal icon)
Indicates the Bluetooth® sensor's signal reception status.
Indicates the Bluetooth® sensor's signal reception status.
S (Speed signal)
Indicates the speed sensor signal.
C (Cadence signal)
C (Cadence signal)
Indicates the cadence sensor signal.
S / C (S and C displayed simultaneously)
Indicates the speed (cadence) sensor (ISC) signal.
H (Heart rate signal)
Indicates the heart rate sensor signal.
P (Power signal)
Indicates the power sensor signal.
- Icon states:
Flashing
Signal being received in Sensor Direct Mode
Off
No signal
Pice arrows)
Indicate whether the current speed is faster (▲) or slower (▼) than the average speed.
km/h · m/h · rpm · bpm (measurement unit)
Displays the currently selected measurement unit.
· On
Measurement stopped
- Flashing
Measurement in progress
② Measurement screen
Displays various measurement data.
• Speed/cadence/heart rate flash:
If using a CATEYE sensor, the values related to the sensor's battery replacement period start flashing to indicate that it is time to replace the battery.
Battery replacement : Optional sensors
- Power values flash:
When using separate left and right power sensors, power values flash on and off to indicate that only signals from one sensor are being received.
Usage Instructions
Start measurement
This section explains the measurement flow and the measurement functions.
- Switching to Sensor Direct Mode
- Starting/stopping measurement
- Saving measurement data (reset operation)
- Importing summary data
• Functions during measurement
Switching measurement data display
Power-saving mode
Button lock function
If you have power sensors
Start measurement
1. Switching to Sensor Direct Mode
Switch from Mirror Mode to Sensor Direct Mode.
Smartphone
1. Close Cateye Cycling™ or from (MENU), turn off [Connect].

Smart computer
2. From the smartphone search screen, press MODE for 1 second to switch to Sensor Direct Mode.
![graph LR A["SEARCHING"] --> B["MODE (1 second)"] B --> C["Measurement screen"]](/content/2026/06/1304645/images/8ba8c2907a1654dd964ac3f81c399519cb2a101e2c6596cf318e15724d991fa6.jpg)
* The smart computer will search for a sensor instead of your smartphone. In this mode, the sensor icon flashes to indicate sensor reception status.
- S (Flash): When the speed signal is received • C (Flash): When the cadence signal is received
- S/C (S and C flash simultaneously): When the speed/cadence (ISC) sensor signal is received • H (Flash): When the heart rate signal is received
- P (Flash): When the power signal is received
Important
Sensor Direct Mode and Mirror Mode measure independently and data has no continuity.
2. Starting/stopping measurement
3. Saving measurement data
(reset operation)
4. Importing summary data
●Functions during measurement
Switching measurement data display
Power-saving mode
Button lock function
If you have power sensors
Start measurement
- Switching to Sensor Direct Mode
- Starting/stopping measurement
Smart computer
Measurement starts automatically when the bicycle moves.
During measurement the measurement unit flashes.

* The pause function is not available in Sensor Direct Mode.
- Saving measurement data (reset operation)
- Importing summary data
•Functions during measurement
Switching measurement data display
Power-saving mode
Button lock function
If you have power sensors
Start measurement
- Switching to Sensor Direct Mode
- Starting/stopping measurement
- Finishing measurement (reset operation)
Smart computer
Pressing and holding MODE when on the measurement screen generates measurement data as summary results and resets measurement data to 0.
* When MODE has been pressed for 1 second, a smartphone search screen appears, but you should continue to hold down the button. * Total Distance (Odo) cannot be reset. * The summary data generated is loaded into the smartphone.

porting summary data
Reset MODE (3 seconds)
Important
The maximum number of trips that smart computer can save temporarily is 30. If this number is exceeded, the M MEMORY FULL appears on the screen, and the oldest summary data is deleted when smart computer is reset.
Frequent importing of summary data to a connected smartphone is recommended.

iPhone
Currently, summary data cannot be generated for trips less than 3 minutes long.
4. Importing summary data
●Functions during measurement
Switching measurement data display
Power-saving mode
Button lock function
If you have power sensors
Start measurement
- Switching to Sensor Direct Mode
- Starting/stopping measurement
- Saving measurement data (reset operation)
- Importing summary data
You can send summary data accumulated in smart computer (measurement results of sensor direct mode) to your smartphone.
Important
Before importing summary data, always finish smart computer measurement (reset operation).
You cannot import data for which measurement has not finished.

Saving measurement data (reset operation)
Smartphone
- Launch Cateye Cycling™, and from (MENU) turn on [Connect].

Smart computer
- On the measurement screen, press MODE for 1 second to display the smartphone search screen and connect with your smartphone.
When the smart computer connects to a smartphone, it switches to the measurement standby display.

* The appearance of the smart computer screen depends on the state of Cateye Cycling™. * It is not possible to import data while measuring with Cateye Cycling™.
Smartphone
3. Tap (MENU) and then [Activity List].

If there is summary data in the smart computer, the Ⓞ (Import from CC) is displayed.
Tapping the button imports summary data to your smartphone and updates the activity list.
* This action deletes summary data from the smart computer.
* After importing summary data, it is recommended that you turn off [Connect] from (MENU) to minimize smartphone battery drain.
![Cateye Padrone Smart plus CC-SC100B - Tap (MENU) and then [Activity List]. - 2](/content/2026/06/1304645/images/3bbf559eb3b4ead6dbace85357500d26f6c9df2e351ffe7e7247e9c2fe17c3c8.jpg)
•Functions during measurement
Switching measurement data display
Power-saving mode
Button lock function
If you have power sensors
Start measurement
Switching measurement data display
Smart computer
Pressing MODE switches the measurement data displayed at the bottom of the screen.
* The data displayed changes depending on the state of the sensor connection and the screen customization settings. The following gives an example of initial configuration of the measurement screen.

![graph TD A["(Can be added through screen customization)"] --> B["MODE"] B --> C["Screen 5"] C --> D["Undefined (Can be added through screen customization)"]](/content/2026/06/1304645/images/cecd4e2aee6c00a13a754acbb964c1418621859fcc0a958c7c664027559f6cd8.jpg)
* During initial configuration, screens 3 through 5 are undefined and thus not shown. To add screens or to change screen segments or measurement data, tap ☐ (MENU) > [Device] > [Smart computer name] > [Display Customization].
Changing the measurement screen
* Measurement data and lap-related data that require use of the smartphone's GPS will not be displayed in Sensor Direct Mode.
Functions and details displayed in Mirror Mode and Sensor Direct Mode
* Heart rate, cadence, and power data will not be displayed unless each sensor is paired.
* Average values are displayed as .E instead of the measurement value when Elapsed Time exceeds approximately 1000 hours. Average speed is also displayed as .E instead of the measurement value when Trip Distance exceeds 10000 km [6200 mile]. Reset smart computer and start measurement again to enable average value measurement.
Saving measurement data (reset operation)
Power-saving mode
Button lock function
If you have power sensors
Start measurement
Switching measurement data display
Power-saving mode
Smart computer
If there is no sensor signal nor button operation for 10 minutes, the power-saving screen is activated. If such a state continues for a further hour, the sleep display is activated.
The power-saving screen returns to the measurement screen when the bicycle starts moving.
![graph TD A["Measurement screen"] --> B{Any button except the AC button} B --> C["MODE"] C --> D["Sleep"] D --> E["Power-saving screen"] E --> F["When left for approx. 10 min"] F --> G["2015 AM 1.31 25: Time"] G --> H["When left for approx. 60 min"] H --> I["0.0 km/h 10:14"] I --> J["0.0 km/h 0:00.00…](/content/2026/06/1304645/images/b12eb8acb1f2d72fa890fe7a64422ca2a226c110b12c0e2876e6bab2903c6f45.jpg)
Button lock function
If you have power sensors
Start measurement
Switching measurement data display
Power-saving mode
Button lock function
Smart computer
Pressing SS/LAP and OPTION simultaneously will lock the buttons, preventing accidental operation when the smart computer is stored in a pocket, etc.
Repeating the same operation will unlock the buttons.

Button lock
SS/LAP OPTION
Lock/unlock buttons
If you have power sensors
Start measurement
Switching measurement data display
Power-saving mode
Button lock function
If you have power sensors
When a signal is received from a paired power sensor, power data is displayed as a value.
Smart computer
The power, average power, custom average power, maximum power, average lap power in real time, and power balance can be displayed on a smart computer.
* Separate left and right power sensors are necessary for power balance measurement. * To display power data on the measurement screen, it is necessary to register functions (measurement data) by tapping ☐ (MENU) > [Device] > [Smart computer name] > [Display Customization].
Changing the measurement screen
* Tap ☐ (MENU) > [Device] > [Smart computer name] > [Custom Average Power] to specify the calculated number of seconds for the custom average power.
Device
* To increase precision, it is recommended to perform calibration before power measurement. Perform calibration using Cateye Cycling™, making sure to first connect a smartphone.
- Connecting smart computer and smartphone
- Power sensor calibration
Usage Instructions
All activity summary
It is possible to check total values for all activities saved in Cateye Cycling™ and maximum values for individual trips.
Smartphone
1. Tap (MENU) and then [All Activity Summary].

Activity list
Uploading
Usage Instructions
All activity summary
Activity list
It is possible to check individual activities (trip data and summary data collectively) saved in Cateye Cycling™.
Smartphone
1. Tap (MENU) and then [Activity List].

* The Activity List can be displayed in graph, list, or calendar format. * Tapping (Select to Delete) moves to the activity deletion screen.
Select the activities you want to delete and tap (Delete).
2. Tap each activity to check details or upload/delete it.

• (Upload) :
Upload to service sites
- (Delete) :
Delete activity
Usage Instructions
All activity summary
Activity list
Uploading
Multiple activities can be uploaded to service sites in one action.
Smartphone
1. Tap (MENU) and then [Upload].
* Activities already uploaded to service sites are not displayed.

2. Select the activities you want to upload and tap (Upload) to upload them to the specified sites.
* You must have an account with the relevant site to upload data.
* The upload destinations for Upload All are those sites turned on under (MENU) > [Account].
Account
Usage Instructions
General
This section explains how to configure various measurement settings.
Smartphone
1. Tap (MENU) and then [General].

- Recording Interval
Selects the interval at which the log is recorded.
- Units
Selects the measurement unit.
Important
If the unit is changed with the smart computer unconnected, the settings will be applied the next time the smart computer is connected.
- Preset Altitude
Applies a preset to the altitude of a specified position such as your home.
Turning Preset Altitude ON will correct the altitude at the start point of the measurement, improving the reliability of the altitude measurement.
* The iPhone 6 and other smartphones with high-accuracy altitude measurement capabilities do not require an altitude preset.
· Auto Lap
Selects which method—distance, time, or map—to use for automatic lap input.
* Designating a point on the map:
To Designate a point, press and hold on the desired location on the map.
Device
Account
Usage Instructions
General
Device
The following section explains how to pair a smart computer with a sensor and how to configure various settings.
Important
- Device settings are shared when the smart computer is connected to your smartphone.
- When using an iPhone, you cannot sync settings of commercial sensors. When measuring in Sensor Direct Mode, it is necessary to configure sensor settings separately via the smart computer.

Switching to Sensor Direct Mode
- Pairing a smart computer with a sensor
- Tire circumference setting
Smartphone
1. Tap (MENU) and then [Device].

Changing smart computer settings

- Nickname
Changes the name of the smart computer.
* Paired sensors are displayed with "A" or "C" after the sensor name.
A: Sensor paired with Cateye Cycling™ C: Sensor paired with a smart computer
- Notification Setting
Configures settings for incoming call, email, and SMS app notifications and smartphone remaining battery notification.
Important
! iPhone
Only incoming notifications for e-mail addresses registered through [Phone] and [Add Account] will be displayed.
When an incoming notification is received, the display will not show the app name or the name of the sender.

Configuring Incoming Notifications
- Countdown
Sets a distance or a time as a goal.
- Simple Navigation
Designates a goal in simple navigation.

Designating a goal
- Auto Pause
This function automatically pauses measurement when the connection between the smart computer and your smartphone is interrupted if you move away from the bicycle with your smartphone during measurement.
- Display Customization
Lets you select the measurement screens to add or delete in addition to the screen segments and functions (measurement data) to be displayed on each screen.

Changing the measurement screen
- Night Mode
Configures when to start and end backlight illumination.
When Night Mode is ON, pressing any button on the smart computer during the specified time will turn the backlight on.
- Sounds
Lets you turn the operation sounds, alert sounds, and notification sounds on or off.
- Compass
Lets you select whether to show or hide the compass on the measurement screen.
• Odometer
Lets you manually set total distance traveled.
* Use this function when you want to continue from the same distance after purchasing a new smart computer or when resetting the smart computer.
- Function Names
Lets you select between [Abbreviated] or [Full] for displaying measurement data names on the measurement screen.
(Ex.) Abbreviated display for trip distance: DST
Full display for trip distance: Distance
- Custom Average Power
Sets the number of seconds for calculating average power to your preferences.
* Custom average power measurements require pairing with a power sensor.
- Firmware Update
Updates the smart computer firmware to the most recent version.
Changing sensor settings
Important
These settings can be configured even when your smartphone is not connected to smart computer.
If settings differ between devices, they will be overwritten with data from Cateye
Cycling ™ the next time the devices are connected.
* Information on commercial sensors paired with the smart computer remains as it is.

- Nickname
Changes the name of the sensor.
- Tire Circumference (only with a sensor capable of speed measurement)
Set the tire circumference for a sensor capable of speed measurement.
Select the tire circumference according to the tire size written on the side of the tire.
Determining tire circumference
* Default value: 2096 mm (700x23C)
* Requires to set tire circumference for each sensor.
* See the following for pairing with a smart computer or a sensor.
Pairing with smart computer
Pairing with a sensor
Account
Device
Configuring Incoming Notifications
Notifications from smartphone applications and the smartphone's remaining battery can be displayed on the smart computer.
Important
- Cateye Cycling notification settings are applied to applications enabled in the smartphone's notification settings.
- Email notifications are shown for e-mail accounts registered in the smartphone settings.
! iPhone
Only incoming notifications for e-mail addresses registered through [Phone] and [Add Account] will be displayed.
When an incoming notification is received, the display will not show the app name or the name of the sender.
Changing settings on an iPhone
Smartphone
Tap (MENU) > [Device] > [Smart computer name], and then follow the procedure below.
1. Tap [Notification Setting].

- Low Battery Notification
When the smartphone battery reaches a specified amount, 100% (remaining smartphone battery) flashes on the smart computer.
- Phone / Email :
When a notification arrives, [Phone] or [Mail] flashes on the smart computer's screen, with an audible alarm. After the notification closes, / incoming call/email notification icon) will flash.
*1: It is necessary to configure email account settings to receive incoming notification.
Smartphone
1. Tap [Notification Setting].

- Low Battery Notification
When the smartphone battery reaches a specified amount, 100% (remaining smartphone battery) flashes on the smart computer.
• Phone / Messages / Email / Social Network
When a notification arrives, [Application name] and [Contact name] (alphabetical), or [Phone number] or [Email address] flashes on the smart computer's screen, with an audible alarm.
BEEP! BEEP! BEEP!
* Contact name registered with non-alphabet characters will be displayed as "Other".
After the notification closes, / (incoming notification icon) and the notification count will flash.

* The incoming notification icons and count cannot be displayed when screen customization is set to display 8 screen segments. * The incoming notification icons and count are reset when measurement is paused, reset, or finished.
Device
Designating a goal
The following explains how to designate a goal in simple navigation.
Smartphone
Tap (MENU) > [Device] > [Smart computer name], and then follow the procedure below.
1. Tap [Simple Navigation].
Under [Simple Navigation], there are four methods for designating a goal.

- Enter the address:
Enter an address in the search field.
- Select from a map:
Swipe the map to move the location, and long-press to confirm.
- Select from an iPhone contact:
Tap [History] > [Select from Contacts] to select a goal from the addresses of your registered contacts.
- Select from history:
Tap [History] to select a goal from the history list.
Device
Changing the measurement screen
This section explains how to change the display of the measurement screen.
Smartphone
Tap (MENU) > [Device] > [Smart computer name], and then follow the procedure below.
1. Tap [Display Customization].
Here, you can verify the current screen segments and functions (measurement data).

- Changing the order of screens 1 through 5:
Tap [Edit] and swipe the desired screen to change the order.
2. Tap a screen to change how it is displayed.
Select the measurement screens to show or hide and the screen segments and functions (measurement data) to be displayed.

- Displaying/hiding the measurement screen
If the screen display is set to ON, that measurement screen will be displayed.
If it's set to OFF, that screen will not be displayed.
- Selecting screen segments:
Tap [Screen Segments] to select between [None] and [8 segments].
* The simple navigation function cannot be displayed when [Screen Segments] is set to [7 segments] or [8 segments].
* The incoming notification icons and count cannot be displayed when [Screen Segments] is set to [8 segments].
- Selecting a function (measurement data):
Tap [Function Names] or + to select a function.
- Reordering functions:
Tap [Edit] and swipe the desired function to another location to change the display position.
* Screen customization settings will be applied to both Mirror Mode and Sensor Direct Mode.
Usage Instructions
General
Device
Account
Set up the service sites and social networking services (SNSs) to upload your activities.
1. Tap (MENU) and then [Account].

Adjust settings for the service sites below.
* You must have an account with the relevant site to upload data.
Service sites
• CATEYE Atlas™ - STRAVA™ • TRAINING PEAKS™
SNS
- Facebook™
- Twitter™
* When using an SNS, links to activities uploaded to Cateye Atlas™ are posted.
Battery replacement
Smart computer
When (battery icon) turns on, it is time to replace the battery.
- Remove the battery cover and pull out the battery holder.
- Insert two new lithium batteries (CR2032) into the battery holder, with the (+) sides facing each other.

- After replacing the battery, press AC on the back of the computer. (Restart operation)

- Optional sensors
Speed (cadence) sensor (ISC-12)
Important
If using a CATEYE sensor, the values related to the sensor's battery replacement period start flashing to indicate that it is time to replace the battery.
If smart computer's current speed or cadence display starts flashing, it is time to replace the battery.
Install a new lithium battery (CR2032) so that the (+) side is visible and close the battery cover securely.

* After replacing the battery, always press RESET and check the position of the sensor relative to the magnet.

Heart rate sensor (HR-12)
Important
If using a CATEYE sensor, the values related to the sensor's battery replacement period start flashing to indicate that it is time to replace the battery.
If the smart computer's heart rate display starts flashing, it is time to replace the battery. Install a new lithium battery (CR2032) so that the (+) side is visible and close the battery cover securely.

* After replacing the battery, always press RESET.
Activating the sensor
Activate the sensor via the following method:
- Speed sensor / Speed (cadence) sensor (ISC) / Cadence sensor Move the magnet through the sensor zone several times. (Within 3 mm)

Magnet
- Heart rate sensor Rub both electrode pads with thumbs to transmit heart rate signal.

• Power sensor Refer to the power sensor instruction manual.
Determining tire circumference
Determine tire circumference (L) by referring to the tire size chart or by measuring the actual circumference of your bicycle tire.
Tire circumference reference table
* The tire size or ETRTO code is indicated on the side of the tire.
| ETRTO | Tire size | L (mm) |
| 47-203 | 12x1.75 | 935 |
| 54-203 | 12x1.95 | 940 |
| 40-254 | 14x1.50 | 1020 |
| 47-254 | 14x1.75 | 1055 |
| 40-305 | 16x1.50 | 1185 |
| 47-305 | 16x1.75 | 1195 |
| 54-305 | 16x2.00 | 1245 |
| 28-349 | 16x1-1/8 | 1290 |
| 37-349 | 16x1-3/8 | 1300 |
| 32-369 | 17x1-1/4 (369) | 1340 |
| 40-355 | 18x1.50 | 1340 |
| 47-355 | 18x1.75 | 1350 |
| 32-406 | 20x1.25 | 1450 |
| 35-406 | 20x1.35 | 1460 |
| 40-406 | 20x1.50 | 1490 |
| 47-406 | 20X1.75 | 1515 |
| 50-406 | 20x1.95 | 1565 |
| 28-451 | 20x1-1/8 | 1545 |
| 37-451 | 20x1-3/8 | 1615 |
| 37-501 | 22x1-3/8 | 1770 |
| 40-501 | 22x1-1/2 | 1785 |
| 47-507 | 24x1.75 | 1890 |
| 50-507 | 24x2.00 | 1925 |
| 54-507 | 24x2.125 | 1965 |
| 25-520 | 24x1 (520) | 1753 |
| 24x3/4 Tubular | 1785 | |
| 28-540 | 24x1-1/8 | 1795 |
| 32-540 | 24x1-1/4 | 1905 |
| 25-559 | 26x1 (559) | 1913 |
| 32-559 | 26x1.25 | 1950 |
| 37-559 | 26x1.40 | 2005 |
| 40-559 | 26x1.50 | 2010 |
| 47-559 | 26x1.75 | 2023 |
| 50-559 | 26x1.95 | 2050 |
| 54-559 | 26x2.10 | 2068 |
| 57-559 | 26x2.125 | 2070 |
| 58-559 | 26x2.35 | 2083 |
| 75-559 | 26x3.00 | 2170 |
| 28-590 | 26x1-1/8 | 1970 |
| 37-590 | 26x1-3/8 | 2068 |
| 37-584 | 26x1-1/2 | 2100 |
| 650C Tubular 26x7/8 | 1920 | |
| 20-571 | 650x20C | 1938 |
| 23-571 | 650x23C | 1944 |
| 25-571 | 650x25C 26x1 (571) | 1952 |
| 40-590 | 650x38A | 2125 |
| 40-584 | 650x38B | 2105 |
| 25-630 | 27x1 (630) | 2145 |
| 28-630 | 27x1-1/8 | 2155 |
| 32-630 | 27x1-1/4 | 2161 |
| 37-630 | 27x1-3/8 | 2169 |
| 40-584 | 27.5x1.50 | 2079 |
| 54-584 | 27.5x2.1 | 2148 |
| 57-584 | 27.5x2.25 | 2182 |
| 18-622 | 700x18C | 2070 |
| 19-622 | 700x19C | 2080 |
| 20-622 | 700x20C | 2086 |
| 23-622 | 700x23C | 2096 |
| 25-622 | 700x25C | 2105 |
| 28-622 | 700x28C | 2136 |
| 30-622 | 700x30C | 2146 |
| 32-622 | 700x32C | 2155 |
| 700C Tubular | 2130 | |
| 35-622 | 700x35C | 2168 |
| 38-622 | 700x38C | 2180 |
| 40-622 | 700x40C | 2200 |
| 42-622 | 700x42C | 2224 |
| 44-622 | 700x44C | 2235 |
| 45-622 | 700x45C | 2242 |
| 47-622 | 700x47C | 2268 |
| 54-622 | 29x2.1 | 2288 |
| 56-622 | 29x2.2 | 2298 |
| 60-622 | 29x2.3 | 2326 |
Measure actual tire circumference
With tire air pressure adjusted appropriately, apply a load to the bicycle.
Using the valve, etc., as a marker, rotate the tire once and measure the distance traveled along the ground.
When using front wheel for speed measurement
L mm
When using rear wheel for speed measurement
L mm
Connecting smart computer and smartphone
Smartphone
1. Launch Cateye Cycling™, and from (MENU) turn on [Connect].

Smart computer
2. On the measurement screen, press MODE for 1 second to display the smartphone search screen and connect with your smartphone.
When smart computer connects to a smartphone, it switches to the measurement standby display.
![graph LR A["SMARTPHONE SEARCHING"] --> B["Measurement standby"] style A fill:#d4edda,stroke:#333 style B fill:#e6f7ff,stroke:#333](/content/2026/06/1304645/images/61da71b2523b404b0915dd32c5977b591a61d9b482354fc77900d639654d24cd.jpg)
* If the connection is made when Cateye Cycling™ is already measuring, [PAUSE] and measured values are displayed.
* The appearance of the smart computer screen depends on the state of Cateye Cycling™.
Smartphone connection is now complete.
Power sensor calibration
When the power sensor is used continuously, slight variation may occur in its unloaded state. Correct this by calibrating it periodically.
When making a particularly important measurement, it is recommended that you calibrate the sensor in advance.
Caution
- Before starting calibration, read the power sensor instruction manuals and check the precautions for the calibration procedure. If calibration fails, accurate power measurement cannot be made.
- Always perform calibration without any power applied to parts to which the power sensor is attached (cranks, etc.)
Smartphone
While the smart computer is connected and measurement is stopped, tap [Calibrate] on the [Trip] screen.

Calibration is completed in 3 seconds.
Pairing with smart computer
Pair a smart computer.
Important
- Pairing is necessary to use a smart computer or a sensor.
- Do not pair sensors at a race venue or in similar locations where there are a lot of other users. Doing so may cause the smart computer to be paired with another device.
Smart computer
- On the measurement screen, press MODE for 1 second to display the smartphone search screen.
Smartphone search screen
- From (MENU) at the top left of the screen, turn on [Connect] and tap [Device].

Tap [Pair to Device] to start pairing.
When Cateye Cycling™ detects a smart computer, the smart computer's name will be displayed on the screen, and pairing will be complete.
* To continue, tap [Smart computer name] to display the settings configuration screen for the various smart computer settings.

Smart computer pairing is now complete.
Pairing with a sensor
Smart computer can be used with sensors compatible with Bluetooth 4.0. Pair it with optional accessories or commercial sensors as required.
Important
- Pairing is necessary to use a smart computer or a sensor.
- When using an iPhone, you cannot sync settings of commercial sensors. When measuring in Sensor Direct Mode, it is necessary to configure sensor settings separately via smart computer.

Switching to Sensor Direct Mode
- Pairing a smart computer with a sensor
- Tire circumference setting
Smartphone
- Verify that [Connect] is set to ON in the (MENU), and then tap [Device].
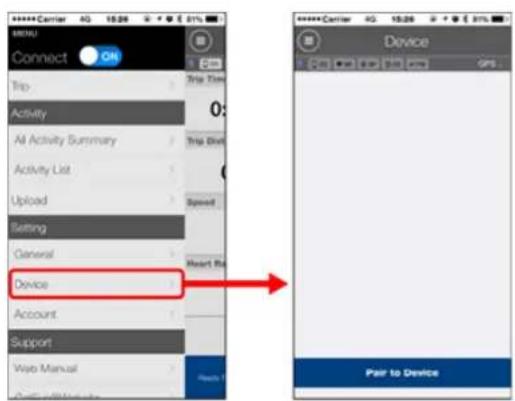
Tap [Pair to Device] to start pairing.
- Activate the sensor.

Activating the sensor
When Cateye Cycling™ detects the sensor signal, a message is displayed on the smartphone.
Tap [Pair]. The synchronized sensor is displayed on the [Device] screen and pairing is completed.
* When pairing a sensor with Cateye Cycling™, an "A" is displayed after the sensor name. * If you have paired a sensor capable of speed measurement, proceed to step 3.
- Set the tire circumference for a sensor capable of speed measurement.
Tap [Device], and then tap [Sensor name] > [Tire Circumference] (the length of the outer circumference of the tire).
Select the tire circumference according to the tire size written on the side of the tire.

Determining tire circumference
* Default value: 2096 mm (700x23c)
* Requires to set tire circumference for each sensor. * You can also change sensor names and cancel pairing from this screen.
Sensor pairing is now complete.
* If you want to pair another sensor, repeat the same procedure again.
Important
Cadence, heart rate, and power data will not be displayed under the initial configuration. Change the measurement screen to be able to display measured values from paired sensors.

Changing the measurement screen
Switching to Sensor Direct Mode
Switch from Mirror Mode to Sensor Direct Mode.
Smartphone
1. Close Cateye Cycling™ or from (MENU), turn off [Connect].

Smart computer
2. From the smartphone search screen, press MODE for 1 second to switch to Sensor Direct Mode.
![graph LR A["SEARCHING"] --> B["MODE (1 second)"] B --> C["Measurement screen"]](/content/2026/06/1304645/images/a4563d04bb2ab2e998171485cb881b15349cb3e5d5fbfe56360261309ce97c62.jpg)
* Smart computer will search for a sensor instead of your smartphone. In this mode, the sensor icon flashes to indicate sensor reception status.
- S (Flash): When the speed signal is received • C (Flash): When the cadence signal is received
- S/C (S and C flash simultaneously): When the speed/cadence (ISC) sensor signal is received • H (Flash): When the heart rate signal is received
- P (Flash): When the power signal is received
Important
Sensor Direct Mode and Mirror Mode measure independently and data has no continuity.
Pairing a smart computer with a sensor
Tire circumference setting
Switching to Sensor Direct Mode
Pairing a smart computer with a sensor
Pair a sensor that you want to use with the smart computer.
Important
- Pairing (sensor ID synchronization) must be performed in order to use a sensor.
- Do not pair sensors at a race venue or in similar locations where there are a lot of other users. Doing so may cause the smart computer to be paired with another device. Pair all sensors that you intend to use.
! iPhone
Currently, only Bluetooth sensors that comply with Bluetooth Low Energy (BLE) profiles can be used in Sensor Direct Mode.
- From the measurement screen, press OPTION for 2 seconds to switch to the sensor pairing screen.
![0.0 Speed km/h. AM 10:14 0.0 Clock. AV Speed km/h. 0:00.00 0.00 Elapsed Time. Distance km. Measurement screen. OPTION (2 seconds). SENSOR PAIRING. Sensor Name. Tire Circumference [mm]. Sensor pairing screen.](/content/2026/06/1304645/images/940f4eaa3d8bd53ef3f3838df620d346294732acdbfbb3ecd270291f0d4a686f.jpg)
* When the sensor pairing screen is left on for 1 minute, the smart computer returns to the measurement screen.
- Press SS/LAP to start pairing.

- Activate the sensor that you want to pair.
![graph LR A["SENSOR PAIRING\nPairing: Press SS/LAP Button"] --> B["Sensor Name"] B --> C["Tire Circumference\n[mm"]] C --> D["Ready for synchronization"] D --> E["Sensor activated"] E --> F["Synchronization complete"] F --> G["SENSOR PAIRING\nPairing: Press SS/LAP Button\nSensor Name ISC-C1\nTire Cir…](/content/2026/06/1304645/images/b52f6ada2cb20606009df2d067a003bd983b186fe151f453a0f563c3404176b7.jpg)

Activating the sensor
The name of the synchronized sensor is displayed and pairing is completed.
- SP : Speed sensor • ISC : Speed/cadence sensor
- CD : Cadence sensor
- HR : Heart rate sensor
- PW : Power sensor
* When pairing a sensor with a smart computer, a "C" is displayed after the sensor name.
Important
When the smart computer displays [ID FULL] on the screen and returns to the sensor pairing screen, the maximum number of sensors have been paired.
Up to 9 separate sensor IDs can be paired with the smart computer.
If the maximum number of sensors have been paired, in the sensor pairing screen, press
OPTION for 4 seconds to clear all pairings.
Then re-pair the required sensors.
* Pairing standby time is 5 minutes.
Activate the sensor within this time.
* If you want to pair another sensor, repeat steps 2 and 3.
4. Press OPTION to return to the measurement screen.

Pairing is now complete.
If you have paired a sensor capable of speed measurement, proceed with setting the tire circumference.
Tire circumference setting
Switching to Sensor Direct Mode
Pairing a smart computer with a sensor
Tire circumference setting
Set the tire circumference for a sensor capable of speed measurement.
Important
- Pairing (sensor ID synchronization) must be performed first. Pairing a smart computer with a sensor
- Set tire circumference for each sensor. The default value is 2096 mm (700x23c).

1. From the measurement screen, press OPTION for 2 seconds to switch to the sensor pairing screen.
![0.0 Speed km/h. AM 10:14 0.0 Clock. AV Speed km/h. 0:00.00 0.00 Elapsed Time. Distance km. Measurement screen. OPTION (2 seconds). SENSOR PAIRING. Pairing Press SS/LAP Button. Sensor Name ISC-C1. Tire Circumference [mm] 2096. Sensor pairing screen.](/content/2026/06/1304645/images/a2ec5c8a783f22568d679b8e4e3097d11028c7101e0e5a2f53837436d259438b.jpg)
* When the sensor pairing screen is left on for 1 minute, the smart computer returns to the measurement screen.
2. Select the sensor you want to set, and enter the tire circumference.
Enter the circumference in mm of the tire (the length of the outer circumference of the tire) on which the sensor is installed.
(Setting range: 0100 - 3999 mm)

Determining tire circumference
![graph TD A["SENSOR PAIRING\nPainting-Press SSA.AP Button\nSensor Name ISC-C1\nTire Circumference (mm) 2096"] --> B["Sensor selection"] B --> C["MODE"] C --> D["MODE (1 second)"] D --> E["Tire circumference value"] E --> F["Increase numbers"] F --> G["MODE"] G --> H["Move to next digit"] H --> I["MOD…](/content/2026/06/1304645/images/2c8ec6a74325ae138a85c98b2e4ace34b3048d282f27f45b9669605d2b8c1bdb.jpg)
* Sensors that can be selected are those that have been paired with Cateye Cycling™ or a smart computer. The letter that appears after the sensor name indicates how the sensor was paired.
• A : Sensor paired with Cateye Cycling™
• C : Sensor paired with a smart computer
* Error is displayed if values outside the setting range are entered.
3. Press OPTION to confirm settings.

Pressing OPTION again returns to the measurement screen.
* If you have changed settings, always press OPTION to confirm changes.
This completes the tire circumference setting procedure.
Mounting the speed (cadence) sensor (ISC-12)
The speed (cadence) sensor can be mounted either on the top or bottom of the chain stay.
Caution
If the speed (cadence) sensor is mounted on the bottom of the chain stay rather than on the top, the adjustment range between the sensor and the magnet will be narrower.
- Mounting on top of chain stay

- Mounting on bottom of chain stay

* Mounting procedures give instructions for mounting on the top of the chain stay.
Watch video

See illustrations
- Temporarily attach the sensor to the left chain stay.
(1) Loosen the sensor screw using a Phillips screwdriver and check that the sensor arm moves.

(2) Attach the sensor rubber pad to the sensor.

(3) Refer to the illustration and temporarily attach the sensor to the left chain stay with nylon ties.

Caution
Do not fully tighten the nylon ties. Once the nylon ties are fully tightened they cannot be removed.
2. Temporarily attach the magnet.

(1) Using a nylon tie, temporarily attach the cadence magnet to the inside of the left crank arm so that it faces the cadence sensor zone. (2) Rotate the sensor arm and temporarily attach the wheel magnet to a spoke facing the speed sensor zone.
* If the sensor cannot be positioned so that both magnets (speed and cadence) pass through their respective sensor zones, reposition the sensor and the magnets so that each magnet passes through its sensor zone.
3. Adjust the gap between the sensor zone and the magnet.
(1) Tilt the sensor so that the gap between the cadence magnet and the cadence sensor zone is approximately 3 mm, then fasten the sensor securely with nylon ties.

(2) Rotate the sensor arm so that the gap between the wheel magnet and the speed sensor zone is approximately 3 mm, then tighten the sensor screw securely.

4. Secure all parts.
Tighten the sensor's nylon ties, the sensor screw, and the magnets, and check that they are not loose.
Trim off the excess nylon tie.
* If using pedals with steel axles, the cadence magnet can be attached magnetically to the pedal axle. In this case, remove the adhesive tape from the magnet and do not use the nylon tie.
Wearing the heart rate sensor (HR-12)
Heart rate measurement is performed by wearing a heart rate sensor around the chest.
Before wearing the heart rate sensor
Warning
Never use this device if you use a pacemaker.
- To eliminate measurement errors, it is recommended to moisten the electrode pads with water or apply electrolyte cream to the pads.
- If you have sensitive skin, moisten the electrode pads with water and wear it over a thin shirt.
- Chest hair may interfere with measurement in some cases.
Watch video

See illustrations
1. Attach the sensor to the HR strap.
Press until you hear a clicking sound.

2. Wear the HR strap by sliding the hook over the other end of the strap.
Wind the HR strap around your body and adjust the length to suit your chest (underbust). Overtightening the strap may cause discomfort during measurement.

* Wear the heart rate sensor so that TOP faces up. * Ensure that the electrode pads are in close contact with your body. * If you have dry skin or are wearing the sensor over a shirt, measurement errors may result. In such cases, moisten the electrode pads with water.
Frequently Asked Questions
Abnormal display
General
Altitude
Simple navigation and compass
Heart rate
Power
Measurement does not work
In Mirror Mode
In Sensor Direct Mode
Cannot measure heart rate
Cannot measure power
Data cannot be reset
On the measurement screen, press MODE for 3 seconds.
Difference between "finishing a trip" and "completing measurement"
What does "finishing a trip" mean?
- "Finishing a trip" refers to resetting the smart computer (by pressing MODE for 3 seconds). This action resets measurement values to 0 and changes the screen to the "ready" display. You can then start measuring your next trip.
What does "completing measurement" mean?
- "Completing measurement" refers to saving and uploading a trip or a series of trips from the save & upload screen in Cateye Cycling™. You can do this by tapping (Flag) on the trips screen in Cateye Cycling™.
Data is not saved
Why is data sometimes not saved as summary data even after a reset operation?
- Measurements for trips of 0.1 km or shorter are not saved as summary data.
Data cannot be uploaded
Why can't I upload activities to a service site?
- Have you completed login settings for each service site? From Cateye Cycling™, tap (MENU) > [Account], and then complete login settings by entering account information for each site.

Posting to Facebook from an iPhone is not possible
- Follow the procedure below to resolve the issue.
- On the iPhone, tap [Settings] > [Facebook].
- Under "Allow These Apps to Use Your Account", switch "Cycling" off and then back on.
Why does my smartphone battery drain so quickly?
Have you been leaving [Connect] turned on in Cateye Cycling™ even when you are not performing measurement?
- It is recommended that you turn off [Connect] from smartphone battery drain.

(MENU) to minimize
Frequently Asked Questions
Abnormal display: General
Measurements from a paired sensor are not displayed on the smart computer screen.
Heart rate, cadence, and power data will not be displayed under the initial configuration of the measurement screen.
On Cateye Cycling™, tap 📄 (MENU) > [Device] > [PADRONE SMART+] > [Display Customization] to change the measurement screen so that measured values from paired sensors can be displayed.

Changing the measurement screen
Why is the display blank?
The battery is flat. Replace the battery with a new one.

Battery Replacement: Smart computer
The display is behaving abnormally. How do I fix it?
The display may be abnormal if there is something that emits radio waves (such as railway tracks or a TV transmitter station) in the vicinity. Move away from the possible cause, reset the smart computer (press MODE for 3 seconds), and start measurement again.
The screen is frozen. What should I do?
The following procedure explains how to restart the smart computer.
1. Press the AC button on the smart computer.

The initialization screen is displayed.
2. Press MODE once to cause [RESTART] to blink, and then press MODE for 1 second.
![graph TD A["FORMAT"] --> B["MODE"] B --> C["RESTART"] C --> D["MODE"] D --> E["Long Press"] F["FORMAT"] --> G["RESET"] G --> H["MODE"] H --> I["Confirm"] I --> J["MODE"] J --> K["(1 second)"]](/content/2026/06/1304645/images/6231a302444d9cb8b98bf67b60c6122f162701414d42ed42aeef3840092f1eef.jpg)
The smart computer will restart and switch to the smartphone search screen.
MEMORY FULL is displayed on the screen
The smart computer's memory is full.
If you are using the smart computer linked to a smartphone, connect to Cateye Cycling™ and import summary data. This will clear the memory and the message will disappear.
Screen is locked
Press SS/LAP and OPTION at the same time to unlock.

Button lock
Current speed, cadence, and heart rate values are flashing
If using a CATEYE sensor, measurement values start flashing to indicate that there is little remaining battery power in the relevant sensor.
Replace the battery for the relevant sensor.
Battery replacement: Optional sensors
Why are power values flashing on and off?
When using separate left and right power sensors, power values flash on and off to indicate that only signals from one sensor are being received.
Check the power sensor.
Why are speed values strange?
If you are not using a sensor that is capable of measuring speed, the smart computer uses your smartphone's GPS for measurement, so depending on reception conditions (for example, if you are in a tunnel), measurement may be interrupted or the smart computer may indicate values other than actual values.
Frequently Asked Questions
Abnormal display: Altitude
Why is there variation in measurement values for ascending altitude?
As altitude measurement relies on the smartphone's GPS function, it may be different from the actual altitude.
Frequently Asked Questions
Abnormal display: Simple navigation and compass
The compass points the wrong way.
Because the compass relies on the smartphone's GPS function, the reading may be different from the actual reading.
Simple navigation cannot be displayed
Did you press and hold the OPTION on the back of the smart computer?
- After specifying the destination using Cateye Cycling™, press and hold the OPTION on the smart computer to display the simple navigation function.

Simple navigation function
Is the smart computer in Sensor Direct Mode?
- Simple navigation cannot be displayed in Sensor Direct Mode. Switch to Mirror Mode to use simple navigation.

Connecting smart computer and smartphone
Does the measurement screen show 7 or 8 screen segments?
Simple navigation is shown when the measurement screen has between 1 and 6 segments. Press MODE to change the screen or change the number of screen segments in screen customization.
To configure the screen segment settings for the measurement screen, tap (MENU) > [Device] > [Smart computer name] > [Display Customization].


Changing the measurement screen
Frequently Asked Questions
Abnormal display: Heart rate
Why are heart rate readings still displayed even after I take off the sensor?
When using a sensor made by another company, heart rate may continue to be displayed for a long time after the sensor has been removed.
Heart rate display is unstable. What should I do?
The heart rate sensor may not be attached correctly.
- Refer to the heart rate sensor instruction manual and attach the heart rate sensor in the correct position. Wearing the heart rate sensor
- Ensure that the heart rate sensor is attached so that TOP is facing up.
- Try moving the electrode from the left to the right so that it sits over your heart. This may improve heart rate display in some cases.
Frequently Asked Questions
Abnormal display: Power
Power display is not accurate. How can I fix it?
Calibrate the power sensor.
Power sensor calibration
* Calibrate using Cateye Cycling™. In Sensor Direct Mode, connect to a smartphone and perform calibration.
Connecting smart computer and smartphone
Frequently Asked Questions
Measurement does not work:
In Mirror Mode
Smart computer does not switch to Mirror Mode measurement screen. What should I do?
Have you installed Cateye Cycling™ in your smartphone?
• Install Cateye Cycling™.

If using an iPhone
Available on the
App Store
If using an Android smartphone

ANDROID APP ON
Google play
* See Cateye Cycling Recommended Devices for the latest information about smartphones recommended for use with Cateye Cycling™.
Have you paired your smartphone with smart computer?
- If you do not pair smart computer via Cateye Cycling™, smart computer cannot perform Mirror Mode measurement.

Pairing with smart computer
Is [Connect] set to [ON] in the Cateye Cycling™ menu on your smartphone?
- Set [Connect] to [ON] or close Cateye Cycling™.
Is smart computer in Sensor Direct Mode?
- Press MODE for 1 second.
Smart computer switches to the smartphone search screen and connects with your smartphone.

Connecting smart computer and smartphone
Cannot connect to smartphone via the smart computer's smartphone search screen
Is [Connect] under (MENU) set to [ON] in Cateye Cycling™?
- Ensure that [Connect] is set to [ON].
If a connection cannot be established even when set to [ON], perform pairing with the smart computer again. Solutions will vary depending on the smartphone and model.
- Padrone Smart users with iPhones
Remove the smart computer registered under [Settings] > [Bluetooth] on the iPhone.
Then remove the smart computer once under Ⓔ (MENU) > [Device] in Cateye Cycling™, and perform pairing again.
Pairing with smart computer
- For Strada Smart users and Android smartphone users:
Under (MENU) > [Device] in Cateye Cycling™, remove the smart computer once and perform pairing again.
Pairing with smart computer
The display says [READY], but measurement will not start. What should I do?
Press SS/LAP for 1 second to start measurement.
Tapping the ● (Start Measurement) in Cateye Cycling™ has the same effect.
Measurement standby![Cateye Padrone Smart plus CC-SC100B - The display says [READY], but measurement will not start. What should I do? - 1](/content/2026/06/1304645/images/b97cb7c123c58dc307f1310a9e2be7013fd55a8e680f25c9fe6e1de8950463e7.jpg)
[PAUSE] and measurement
Measurement is paused.
Press SS/LAP for 1 second to resume measurement.
Paused![Cateye Padrone Smart plus CC-SC100B - [PAUSE] and measurement - 1](/content/2026/06/1304645/images/72fcdcfba6116607344ce49079dfa01bc27f337fd0aea6337fa0825f5acf3e7e.jpg)
Why can't I measure speed?
When using a speed (cadence) sensor (ISC-12), if the wheel magnet moves so that it is not facing the sensor zone, the computer registers the speed signal as 0 and measurement is not possible. (This is because the speed signal from the sensor has priority over GPS when measuring speed.)
Why is the sensor signal not being received?
Have you paired the sensor?
- You must pair the smart computer with your smartphone via Cateye Cycling™.
Pairing with a sensor
Are you using a Bluetooth Smart sensor?
- Smart computer can only receive signals from Bluetooth Smart sensors.
The sensor battery may be flat.
- Replace the battery with a new one.
Battery replacement: Optional sensors
The magnet may not be in the correct position relative to the speed sensor or speed (cadence) sensor (ISC).
Refer to the sensor instruction manual and attach the sensor correctly.
Mounting the speed (cadence) sensor (ISC-12)
Why can't I measure without a speed sensor?
You may have to wait a little longer after starting measurement.
- Your smartphone may take a while to acquire GPS in some cases.
Wait somewhere outdoors for a while before starting.
* The time it takes to acquire GPS will depend on your smartphone.
The location or weather may not be appropriate for acquiring a GPS signal.
- If your smartphone's GPS connection is lost, smart computer can no longer perform measurement.
* For information on how to acquire a GPS signal, refer to your smartphone instruction manual.
I lost the connection between my smartphone and a connected device (smart computer or sensor).
How do I reconnect them?
If you cannot reconnect to the sensor
Press the reset button on the sensor.
If this does not resolve the issue, restart your smartphone.
If you cannot reconnect to the smart computer
- Start Cateye Cycling™.
If this does not resolve the issue, try the procedure below:
- Restart your smartphone.
- Restart the smart computer.
- Press the AC button on the smart computer.

The initialization screen is displayed.
- Press MODE once to cause [RESTART] to blink, and then press MODE for 1 second.
![graph TD A["FORMAT"] --> B["MODE"] B --> C["RESTART"] C --> D["MODE Long Press"]](/content/2026/06/1304645/images/387f753e8aeb282caa21edb1897370ca3b588bc015e2d964a66ccbe7c9427f37.jpg)

MODE
Confirm MODE (1 second)
The smart computer will restart and switch to the smartphone search screen.
The smart computer shows a blank screen after leaving the bike and then coming back to it
When the smartphone moves away from the bicycle even for a short time, the smart computer may automatically enter sleep mode and show a blank screen.
Clicking smart computer will make it enter smartphone search mode, allowing you to reconnect to your smartphone.
Smart computer operation is abnormal. What should I do?
Restart your smartphone.
If the issue persists, restart the smart computer.
1. Press the AC button on the smart computer.

The initialization screen is displayed.
2. Press MODE once to make [RESTART] blink, then press and hold MODE for 1 second.
![Cateye Padrone Smart plus CC-SC100B - Press MODE once to make [RESTART] blink, then press and hold MODE for 1 second. - 1](/content/2026/06/1304645/images/065f543f11d73f3700b81e42747c612abe343e1294e463db3ee184b8c325770d.jpg)
FORMAT
↓
RESTART MODE![Cateye Padrone Smart plus CC-SC100B - Press MODE once to make [RESTART] blink, then press and hold MODE for 1 second. - 2](/content/2026/06/1304645/images/a40c1aacde9c68145c042ea8675a64ce58b6511efc4fecd99c9be8b66cefc618.jpg)
Confirm MODE (1 second)![Cateye Padrone Smart plus CC-SC100B - Press MODE once to make [RESTART] blink, then press and hold MODE for 1 second. - 3](/content/2026/06/1304645/images/2be42bbefe9cbab34580db385b1f8b08a62146fd280cf65297f71d1e94feafab.jpg)
The smart computer will restart and switch to the smartphone search screen.
Frequently Asked Questions
Measurement does not work:
In Sensor Direct Mode
Why does the smart computer not switch to the measurement screen?
Is the smartphone icon displayed on the entire screen?
- The smart computer is in Mirror Mode. Press and hold MODE for 1 second to switch to Sensor Direct Mode.
Smartphone search screen
Why is the sensor signal not being received?
Is [Connect] set to [ON] in the Cateye Cycling™ menu on your smartphone?
- Set [Connect] to [OFF] or close Cateye Cycling™.
Have you paired the sensor?
• The sensor must be paired with the smart computer.

Pairing with a sensor
You may be using another smartphone app at the same time that can connect with Bluetooth sensors.
- Another Bluetooth device may be connected with your smartphone. Bluetooth sensors are only able to connect with a single device at a time. Stop using the other app or change its settings so that it does not connect to Bluetooth sensors.
You may be using an iPhone with a commercial sensor.
- Sensors made by another company must be paired separately with the smart computer. The same applies to tire circumference for sensors capable of measuring speed.

Pairing with a sensor

Tire circumference setting
Are you using a Bluetooth Smart sensor?
- Smart computer can only receive signals from Bluetooth Smart sensors.
The sensor battery may be flat.
- Replace the battery with a new one.

Battery replacement: Optional sensors
The magnet may not be in the correct position relative to the speed sensor or speed (cadence) sensor (ISC).
- Refer to the sensor instruction manual and attach the sensor correctly.
Smart computer operation is abnormal.
What should I do?
The following procedure explains how to restart the smart computer.
1. Press the AC button on the smart computer.

The initialization screen is displayed.
2. Press MODE once to cause [RESTART] to blink, and then press MODE for 1 second.
![graph TD A["FORMAT"] --> B["MODE"] B --> C["RESTART"] C --> D["MODE"] D --> E["Long Press"] F["FORMAT"] --> G["RESET"] G --> H["MODE"] H --> I["Confirm"] I --> J["MODE"] J --> K["(1 second)"]](/content/2026/06/1304645/images/757578e367a9a4641463625391a874531f4a1126cb7073ec432b17e1203361be.jpg)
The smart computer will restart and switch to the smartphone search screen.
Frequently Asked Questions
Measurement does not work:
Cannot measure heart rate
Why isn't the [H] icon flashing?
Have you paired the sensor?
- The sensor must be paired with Cateye Cycling™ or with a smart computer.

Pairing with a sensor
The electrode pad may have slipped out of position.
- Check that the electrode pad is still in close contact with your body.
Your skin may be dry.
- Wet the electrode pad a little.
The electrode pad may have deteriorated or become damaged due to prolonged usage.
- If this is the case, replace the attachment belt with a new one.
Frequently Asked Questions
Measurement does not work:
Cannot measure power
Why isn't the [P] icon flashing?
Have you paired the sensor?
- The sensor must be paired with Cateye Cycling™ or with a smart computer.

Wiring with a sensor
The power sensor may not be attached correctly.
- Refer to the power sensor instruction manual and attach the power sensor correctly.
Handling and Support
Caution
Smart computer / Optional sensors
- Do not concentrate on the smart computer or your smartphone while riding. Always ride safely.
- Mount the bracket, sensor, and other components securely, and check them periodically to ensure that they are not loose.
- Do not leave the smart computer in direct sunlight for a long period of time.
- Never disassemble the smart computer.
- Do not drop the smart computer. Doing so may result in damage or personal injury.
- Always install the bracket band dial by hand. Using a tool or other object to tighten the dial may crush the screw thread.
- When cleaning the smart computer and accessories, do not use thinners, benzine, or alcohol.
- Risk of explosion if battery is replaced by an incorrect type. Dispose of used batteries according to local regulations.

- The LCD screen may be distorted when viewed through sunglasses with polarized lenses.
Cateye Cycling™
Smart computer can be used with the Cateye Cycling™ smartphone app for measurement and settings.
Downloading and using applications involves communication charges. It is therefore recommended to use Wi-Fi.
Maintenance
If smart computer unit or accessories become dirty, clean with a soft cloth moistened with mild detergent, and then wipe with a dry cloth.
Never apply paint thinner, benzine or alcohol; damage will result.
Standard accessories / Optional accessories
Standard accessories
160 2194
Bracket kit
1600280N
Bracket band

Optional accessories
The Bluetooth word mark and logos are owned by the Bluetooth SIG, Inc. and any use of such marks by CATEYE Co., Ltd. is under license. Other trademarks and trade names are those of their respective owners.
160 3970
Speed sensor
(ISC-12)

160 3980
Heart rate sensor (HR-12)

160 3595
HR strap
160 4100
Out-front bracket
1699691N
Wheel magnet
169 9766
Cadence magnet


Specifications
Batteries used/battery life
- Smart computer
Lithium battery (CR2032) x2 / Approximately 4 months
(When ISC-12 and HR-12 are paired and used for one hour a day.)
- Optional accessories
• Heart rate sensor (HR-12):
Lithium battery (CR2032) x1 / Approximately 5 months (If used for 1 hour a day.)
• Speed sensor (ISC-12):
Lithium battery (CR2032) x1 / Approximately 5 months (If used for 1 hour a day.)
* It may be shortened significantly when backlight is used frequently.
* As pre-installed battery is for monitor use, battery life may be shorter than that indicated above.
* Battery life may be reduced depending on the number of sensors paired and usage conditions.
Controller
Microcomputer (Crystal controlled oscillator)
Display
Liquid crystal display (LCD)
Current speed and cadence detection
Non-contact magnetic sensor (ISC-12)
* Current speed can also be measured via smartphone GPS.
Sensor signal transmission/reception
Bluetooth 4.0
Signal range
Approx. 30 m (The range will vary depending on weather and surroundings.)
Speed sensor tire circumference range
0100 to 3,999 mm
(Default value: 2096 mm)
Operating temperature range
0°C to 40°C
* Display visibility may deteriorate if used outside operating temperature range.
Dimensions/weight
- Smart computer
2-29/32" x 1-13/16" x 25/32" (74 x 46 x 20 mm) / 1.41 oz (40 g)
- Optional accessories
• Heart rate sensor (HR-12):
1-7/32" x 2-29/64" x 29/64" (31 x 62.5 x 11.8 mm) / 0.59 oz (16.6 g)
• Speed sensor (ISC-12):
2-49/64" x 3-25/64" x 59/64"
(70.4 x 86.3 x 23.5 mm) / 0.68 oz (19.2 g)
(With arm pointing down)
* Specifications and design are subject to change without notice.
Product warranty
2-year guarantee
- Padrone Smart + unit
• ISC-12 Speed/cadence sensor
• HR-12 Heart rate sensor
(Accessories and battery consumption excluded)
CatEye cycle computers are warranted to be free of defects from materials and workmanship for a period of two years from original purchase. If the product fails to work due to normal use, CatEye will repair or replace the defect at no charge. Service must be performed by CatEye or an authorized retailer. To return the product, pack it carefully and enclose the warranty certificate (proof of purchase) with instruction for repair. Please write or type your name and address clearly on the warranty certificate. Insurance, handling and transportation charges to CatEye shall be borne by person desiring service. For UK and REPUBLIC OF IRELAND consumers, please return to the place of purchase. This does not affect your statutory rights.
CATEYE CO., LTD.
2-8-25, Kuwazu, Higashi Sumiyoshi-ku, Osaka 546-0041 Japan
Attn: CATEYE Customer Service Section
Phone : (06)6719-6863
Fax : (06)6719-6033
E-mail : support@cateye.co.jp
URL : http://www.cateye.com
[For US Customers]
CATEYE AMERICA, INC.
2825 Wilderness Place Suite 1200, Boulder CO 80301-5494 USA
Phone : 303.443.4595
Toll Free : 800.5.CATEYE
Fax : 303.473.0006
E-mail : service@cateye.com
Legal Notices
Changes or modifications not expressly approved by the party responsible for compliance could void the user's authority to operate the equipment.
NOTE:
This equipment has been tested and found to comply with the limits for a Class B digital device, pursuant to part 15 of the FCC Rules. These limits are designed to provide reasonable protection against harmful interference in a residential installation. This equipment generates, uses and can radiate radio frequency energy and, if not installed and used in accordance with the instructions, may cause harmful interference to radio communications. However, there is no guarantee that interference will not occur in a particular installation. If this equipment does cause harmful interference to radio or television reception, which can be determined by turning the equipment off and on, the user is encouraged to try to correct the interference by one or more of the following measures:
- Reorient or relocate the receiving antenna. – Increase the separation between the equipment and receiver.
- Connect the equipment into an outlet on a circuit different from that to which the receiver is connected.
- Consult the dealer or an experienced radio/TV technician for help.
Under Industry Canada regulations, this radio transmitter may only operate using an antenna of a type and maximum (or lesser) gain approved for the transmitter by Industry Canada. To reduce potential radio interference to other users, the antenna type and its gain should be so chosen that the equivalent isotropically radiated power (e.i.r.p) is not more than that necessary for successful communication.
This device complies with Industry Canada licence-exempt RSS standard(s).
Operation is subject to the following two conditions:
(1) this device may not cause interference, and (2) this device must accept any interference, including interference that may cause undesired operation of the device.

- SETUP FLOWCHART
- CHECKING PACKAGE CONTENTS
- IMPORTANT
- SMART COMPUTER
- PULL FREE THE SMART COMPUTER'S INSULATION SHEET
- PRESS THE AC BUTTON ON THE SMART COMPUTER
- CAUTION
- SMARTPHONE
- SET THE TIRE CIRCUMFERENCE FOR A SENSOR CAPABLE OF SPEED MEASUREMENT
- DETERMINING TIRE CIRCUMFERENCE
- CHANGING THE MEASUREMENT SCREEN
- USAGE INSTRUCTIONS
- PAIRING WITH A SENSOR
- SWITCHING TO SENSOR DIRECT MODE
- CLOSE CATEYE CYCLING™ OR FROM (MENU), TURN OFF [CONNECT]
- FROM THE SMARTPHONE SEARCH SCREEN, PRESS MODE FOR 1 SECOND TO SWITCH TO SENSOR DIRECT MODE
- PAIRING A SMART COMPUTER WITH A SENSOR
- IPHONE
- PRESS OPTION TO RETURN TO THE MEASUREMENT SCREEN
- TIRE CIRCUMFERENCE SETTING
- PRESS OPTION TO CONFIRM SETTINGS
- MOUNTING AND REMOVING THE SMART COMPUTER UNIT
- TEMPORARILY ATTACH THE SENSOR TO THE LEFT CHAIN STAY
- TEMPORARILY ATTACH THE MAGNET
- ADJUST THE GAP BETWEEN THE SENSOR ZONE AND THE MAGNET
- SECURE ALL PARTS
- WEARING THE HEART RATE SENSOR (HR-12)
- BEFORE WEARING THE HEART RATE SENSOR
- WARNING
- WATCH VIDEO
- SEE ILLUSTRATIONS
- ATTACH THE SENSOR TO THE HR STRAP
- WEAR THE HR STRAP BY SLIDING THE HOOK OVER THE OTHER END OF THE STRAP
- VIEWING ACTIVITIES
- CHANGING SETTINGS
- IMPORTANT INFORMATION FOR IPHONE USERS
- UPDATING THE FIRMWARE
- FUNCTIONS AND DETAILS DISPLAYED IN MIRROR MODE AND SENSOR DIRECT MODE
- WHAT IS MIRROR MODE
- SMART COMPUTER SCREEN
- ① EXPLANATION OF ICONS
- (NIGHT MODE)
- (COMPASS)
- (INCOMING CALL/SMS/EMAIL NOTIFICATION ICON)
- (REMAINING SMARTPHONE BATTERY)
- (SMART COMPUTER BATTERY ALARM)
- (GHS SENSITIVITY)
- (SENSOR SIGNAL ICON)
- S (SPEED SIGNAL)
- C (CADENCE SIGNAL)
- S / C (S AND C DISPLAYED SIMULTANEOUSLY)
- H (HEART RATE SIGNAL)
- P (POWER SIGNAL)
- PICE ARROWS)
- KM/H · M/H · RPM · BPM (MEASUREMENT UNIT)
- ③ DIRECTION AND STRAIGHT-LINE DISTANCE
- CATEYE CYCLING™ SCREEN
- ① MENU BUTTON
- ② DEVICE CONNECTION STATUS ICON
- ③ QUICK SET
- ④ GPS ICON
- ⑤ CALIBRATION BUTTON
- ⑥ SWITCH DISPLAY MODE
- ⑦ START MEASUREMENT BUTTON
- ⑧ USE BUTTON
- ⑨ FLAG BUTTON
- ⑩ NUMBER OF TEMPORARILY SAVED TRIPS
- START MEASUREMENT
- SMARTPHONE USE
- RESTRICTIONS ON MEASUREMENT
- CONNECTING SMART COMPUTER AND SMARTPHONE
- LAUNCH CATEYE CYCLING™, AND FROM (MENU) TURN ON [CONNECT]
- ON THE MEASUREMENT SCREEN, PRESS MODE FOR 1 SECOND TO DISPLAY THE SMARTPHONE SEARCH SCREEN AND CONNECT WITH YOUR SMARTPHONE
- (RESET OPERATION)
- SAVING AND UPLOADING TRIPS
- PERFORMING PRE-MEASUREMENT PREPARATION
- TAP (MENU) AND THEN [TRIP]
- TAP [QUICK SET] ON THE UPPER RIGHT OF THE SCREEN
- AUTO LAP / COUNTDOWN
- TAP (BACK)
- PAUSING/RESUMING MEASUREMENT
- FINISHING MEASUREMENT (RESET OPERATION)
- ON THE TRIP SCREEN, TAP (FLAG) TO FINISH MEASUREMENT
- TURN ON AN UPLOAD DESTINATION
- TAP (SAVE & UPLOAD). TRIPS ARE SAVED IN CATEYE CYCLING™ AND UPLOADED TO THE SELECTED SERVICE SITES
- FUNCTIONS DURING MEASUREMENT
- SWITCHING MEASUREMENT DATA DISPLAY
- SIMPLE NAVIGATION FUNCTION
- DISPLAY GOAL
- BACK TO START POINT
- LAP FUNCTION
- AUTO LAP FUNCTION
- COUNTDOWN FUNCTION
- AUTO PAUSE FUNCTION
- POWER-SAVING MODE
- ALL ACTIVITY SUMMARY
- TAP (MENU) AND THEN [ALL ACTIVITY SUMMARY]
- ACTIVITY LIST
- TAP (MENU) AND THEN [ACTIVITY LIST]
- TAP EACH ACTIVITY TO CHECK DETAILS OR UPLOAD/DELETE IT
- TAP (MENU) AND THEN [UPLOAD]
- SELECT THE ACTIVITIES YOU WANT TO UPLOAD AND TAP (UPLOAD) TO UPLOAD THEM TO THE SPECIFIED SITES
- GENERAL
- TAP (MENU) AND THEN [GENERAL]
- RECORDING INTERVAL
- UNITS
- PRESET ALTITUDE
- AUTO LAP
- DEVICE
- ACCOUNT
- TAP (MENU) AND THEN [DEVICE]
- CHANGING SMART COMPUTER SETTINGS
- NICKNAME
- NOTIFICATION SETTING
- CONFIGURING INCOMING NOTIFICATIONS
- COUNTDOWN
- SIMPLE NAVIGATION
- DESIGNATING A GOAL
- AUTO PAUSE
- DISPLAY CUSTOMIZATION
- NIGHT MODE
- SOUNDS
- COMPASS
- ODOMETER
- FUNCTION NAMES
- CUSTOM AVERAGE POWER
- FIRMWARE UPDATE
- CHANGING SENSOR SETTINGS
- CHANGING SETTINGS ON AN IPHONE
- TAP [NOTIFICATION SETTING]
- LOW BATTERY NOTIFICATION
- PHONE / EMAIL
- PHONE / MESSAGES / EMAIL / SOCIAL NETWORK
- TAP [SIMPLE NAVIGATION]
- TAP [DISPLAY CUSTOMIZATION]
- TAP A SCREEN TO CHANGE HOW IT IS DISPLAYED
- TAP (MENU) AND THEN [ACCOUNT]
- SERVICE SITES
- SNS
- WHAT IS SENSOR DIRECT MODE
- FLASHES WHEN THE SMART COMPUTER'S REMAINING BATTERY POWER IS LOW. REPLACE BATTERY AS SOON AS POSSIBLE
- INDICATES THE BLUETOOTH® SENSOR'S SIGNAL RECEPTION STATUS
- INDICATES THE SPEED SENSOR SIGNAL
- FLASHING
- OFF
- ② MEASUREMENT SCREEN
- BATTERY REPLACEMENT : OPTIONAL SENSORS
- STARTING/STOPPING MEASUREMENT
- SAVING MEASUREMENT DATA
- IMPORTING SUMMARY DATA
- BUTTON LOCK FUNCTION
- IF YOU HAVE POWER SENSORS
- TIRE CIRCUMFERENCE (ONLY WITH A SENSOR CAPABLE OF SPEED MEASUREMENT)
- BATTERY REPLACEMENT
- SPEED (CADENCE) SENSOR (ISC-12)
- HEART RATE SENSOR (HR-12)
- ACTIVATING THE SENSOR
- TIRE CIRCUMFERENCE REFERENCE TABLE
- MEASURE ACTUAL TIRE CIRCUMFERENCE
- POWER SENSOR CALIBRATION
- PAIRING WITH SMART COMPUTER
- FROM THE MEASUREMENT SCREEN, PRESS OPTION FOR 2 SECONDS TO SWITCH TO THE SENSOR PAIRING SCREEN
- SELECT THE SENSOR YOU WANT TO SET, AND ENTER THE TIRE CIRCUMFERENCE
- MOUNTING THE SPEED (CADENCE) SENSOR (ISC-12)
- FREQUENTLY ASKED QUESTIONS
- ABNORMAL DISPLAY
- MEASUREMENT DOES NOT WORK
- DATA CANNOT BE RESET
- DIFFERENCE BETWEEN "FINISHING A TRIP" AND "COMPLETING MEASUREMENT
- WHAT DOES "FINISHING A TRIP" MEAN
- WHAT DOES "COMPLETING MEASUREMENT" MEAN
- DATA IS NOT SAVED
- DATA CANNOT BE UPLOADED
- WHY CAN'T I UPLOAD ACTIVITIES TO A SERVICE SITE
- POSTING TO FACEBOOK FROM AN IPHONE IS NOT POSSIBLE
- WHY DOES MY SMARTPHONE BATTERY DRAIN SO QUICKLY
- ABNORMAL DISPLAY: GENERAL
- MEASUREMENTS FROM A PAIRED SENSOR ARE NOT DISPLAYED ON THE SMART COMPUTER SCREEN
- WHY IS THE DISPLAY BLANK
- THE DISPLAY IS BEHAVING ABNORMALLY. HOW DO I FIX IT
- THE SCREEN IS FROZEN. WHAT SHOULD I DO
- PRESS MODE ONCE TO CAUSE [RESTART] TO BLINK, AND THEN PRESS MODE FOR 1 SECOND
- MEMORY FULL IS DISPLAYED ON THE SCREEN
- SCREEN IS LOCKED
- CURRENT SPEED, CADENCE, AND HEART RATE VALUES ARE FLASHING
- WHY ARE POWER VALUES FLASHING ON AND OFF
- WHY ARE SPEED VALUES STRANGE
- ABNORMAL DISPLAY: ALTITUDE
- ABNORMAL DISPLAY: SIMPLE NAVIGATION AND COMPASS
- SIMPLE NAVIGATION CANNOT BE DISPLAYED
- DID YOU PRESS AND HOLD THE OPTION ON THE BACK OF THE SMART COMPUTER
- IS THE SMART COMPUTER IN SENSOR DIRECT MODE
- DOES THE MEASUREMENT SCREEN SHOW 7 OR 8 SCREEN SEGMENTS
- ABNORMAL DISPLAY: HEART RATE
- HEART RATE DISPLAY IS UNSTABLE. WHAT SHOULD I DO
- THE HEART RATE SENSOR MAY NOT BE ATTACHED CORRECTLY
- ABNORMAL DISPLAY: POWER
- IN MIRROR MODE
- PADRONE SMART USERS WITH IPHONES
- FOR STRADA SMART USERS AND ANDROID SMARTPHONE USERS
- THE DISPLAY SAYS [READY], BUT MEASUREMENT WILL NOT START. WHAT SHOULD I DO
- [PAUSE] AND MEASUREMENT
- WHY CAN'T I MEASURE SPEED
- WHY IS THE SENSOR SIGNAL NOT BEING RECEIVED
- HAVE YOU PAIRED THE SENSOR
- ARE YOU USING A BLUETOOTH SMART SENSOR
- THE SENSOR BATTERY MAY BE FLAT
- THE MAGNET MAY NOT BE IN THE CORRECT POSITION RELATIVE TO THE SPEED SENSOR OR SPEED (CADENCE) SENSOR (ISC)
- WHY CAN'T I MEASURE WITHOUT A SPEED SENSOR
- YOU MAY HAVE TO WAIT A LITTLE LONGER AFTER STARTING MEASUREMENT
- THE LOCATION OR WEATHER MAY NOT BE APPROPRIATE FOR ACQUIRING A GPS SIGNAL
- IF YOU CANNOT RECONNECT TO THE SENSOR
- IF YOU CANNOT RECONNECT TO THE SMART COMPUTER
- THE SMART COMPUTER SHOWS A BLANK SCREEN AFTER LEAVING THE BIKE AND THEN COMING BACK TO IT
- SMART COMPUTER OPERATION IS ABNORMAL. WHAT SHOULD I DO
- PRESS MODE ONCE TO MAKE [RESTART] BLINK, THEN PRESS AND HOLD MODE FOR 1 SECOND
- IN SENSOR DIRECT MODE
- WHY DOES THE SMART COMPUTER NOT SWITCH TO THE MEASUREMENT SCREEN
- SMART COMPUTER OPERATION IS ABNORMAL
- WHAT SHOULD I DO
- CANNOT MEASURE HEART RATE
- WHY ISN'T THE [H] ICON FLASHING
- THE ELECTRODE PAD MAY HAVE SLIPPED OUT OF POSITION
- YOUR SKIN MAY BE DRY
- CANNOT MEASURE POWER
- WHY ISN'T THE [P] ICON FLASHING
- HANDLING AND SUPPORT
- SMART COMPUTER / OPTIONAL SENSORS
- CATEYE CYCLING™
- MAINTENANCE
- STANDARD ACCESSORIES / OPTIONAL ACCESSORIES
- STANDARD ACCESSORIES
- OPTIONAL ACCESSORIES
- SPECIFICATIONS
- BATTERIES USED/BATTERY LIFE
- CONTROLLER
- DISPLAY
- CURRENT SPEED AND CADENCE DETECTION
- SENSOR SIGNAL TRANSMISSION/RECEPTION
- SIGNAL RANGE
- SPEED SENSOR TIRE CIRCUMFERENCE RANGE
- OPERATING TEMPERATURE RANGE
- DIMENSIONS/WEIGHT
- PRODUCT WARRANTY
- YEAR GUARANTEE
- CATEYE CO., LTD
- [FOR US CUSTOMERS]
- LEGAL NOTICES
- NOTE
Brand : Cateye
Model : Padrone Smart plus CC-SC100B
Category : Meter