
Z 08059 - Vacuum Cleaner Cleanmaxx - Free user manual and instructions
Find the device manual for free Z 08059 Cleanmaxx in PDF.


| Product type | Canister vacuum cleaner |
| Model | Z 08059 |
| Brand | Cleanmaxx |
| Dimensions (L x W x H) | 40 x 25 x 30 cm |
| Weight | 5 kg |
| Power supply | Mains 220-240 V, 50/60 Hz |
| Suction power | 800 W |
| Reservoir type | Bagless (cyclonic) |
| Reservoir capacity | 1.5 L |
| Filtration | Washable HEPA |
| Noise level | 75 dB(A) |
| Cable length | 5 m |
| Operating radius | 8 m |
| Included accessories | Flat nozzle, furniture brush, crevice tool, hard floor brush |
| Main functions | Dry vacuuming of hard floors and carpets |
| Maintenance and cleaning | Empty the reservoir after each use; wash the HEPA filter every 3 months |
| Safety | Do not vacuum liquids or hot ashes; unplug before maintenance |
| Spare parts and repairability | Filters, reservoir, nozzles available from after-sales service |
| Warranty | 2 years |
| General information | Household use only |
Frequently Asked Questions - Z 08059 Cleanmaxx
User questions about Z 08059 Cleanmaxx
0 question about this device. Answer the ones you know or ask your own.
Ask a new question about this device
Download the instructions for your Vacuum Cleaner in PDF format for free! Find your manual Z 08059 - Cleanmaxx and take your electronic device back in hand. On this page are published all the documents necessary for the use of your device. Z 08059 by Cleanmaxx.
USER MANUAL Z 08059 Cleanmaxx
natural_image
Black and silver vacuum cleaner with handle and bulb, displayed against white background (no text or symbols)Gebrauchsanleitung
ab Seite 2
Instruction manual
starting on page 16
Mode d'emploi
natural_image
Black plastic T-shaped object with a cylindrical top and flange (no text or symbols visible)
natural_image
Black cylindrical object with a textured handle and protruding rod, isolated on white background (no text or symbols)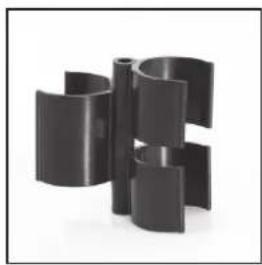
natural_image
Abstract black geometric sculpture with interlocking curved shapes (no text or symbols)natural_image
Close-up of a black and white vacuum cleaner with a curved hose, no visible text or symbolsnatural_image
Close-up of a curved black cable with a downward arrow indicating compression or dislocation (no text or symbols)natural_image
Close-up of a black vacuum cleaner with a downward arrow indicating compression or suction (no text or symbols visible)natural_image
Close-up of a black mechanical component with a labeled arrow pointing to part B (no text or symbols beyond label)natural_image
Black plastic mechanical component with a T-shaped base (no text or symbols visible)natural_image
Two black plastic cylindrical objects with internal ribbed structures, one being rotated (no text or symbols visible)natural_image
Close-up of a hand using a hairdryer to clean or store air, no visible text or symbolsnatural_image
Close-up of hands holding a digital camera module with lens and screen (no visible text or symbols)natural_image
Exterior view of a transparent cylindrical device with a grid pattern on the front panel (no text or symbols visible)natural_image
Close-up of a black mechanical component with a rectangular plate and mounting brackets (no visible text or symbols)natural_image
Close-up of a hand inserting a filter into a device with a mesh grille (no visible text or symbols)natural_image
Close-up of a vacuum cleaner's side arm and handle (no visible text or symbols)natural_image
Black plastic mechanical component with no visible text or symbolsMeaning of the Symbols in These Instructions 17
Safety Instructions 17
Intended Use 17
Danger of Injury 17
Correct Connection 18
Proper Use 18
Warranty Terms 19
Items Supplied and Device Overview 20
Assembly 21
Inserting / Removing the Suction Hose 21
Inserting the Telescopic Tube 22
Adjusting the Length of the Telescopic Tube 22
Accessories 22
Operation 23
Cleaning 24
Emptying the Dust Container 24
Cleaning the Dust Filter 25
Cleaning the Motor Filter 25
Cleaning the HEPA Exhaust Air Filter 26
Cleaning the Housing 26
Cleaning the Nozzles 26
Storage 26
Ordering New Filters 27
Troubleshooting 27
Technical Data 28
Disposal 28
Dear Customer,
We are delighted that you have chosen our Cyclone Vacuum Cleaner.
Before using the device for the first time, please read the instructions through carefully and store them in a safe place. If the device is given to someone else, it should always be accompanied by these instructions. The manufacturer and importer will not accept liability if the directions in these instructions are not observed!
We reserve the right to modify the product, packaging or enclosed documentation at any time in conjunction with our policy of continuous development.
If you have any questions, contact the customer service department via our website:
www.service-shopping.de
Meaning of the Symbols in These Instructions

All safety instructions are marked with this symbol. Read these instructions carefully and follow them to avoid injury to persons or damage to property.

Tips and recommendations are marked with this symbol.
Intended Use
☐ This device is designed for vacuum cleaning normal household dust.
☐ On no account should the device be used to suck up the following:
–Liquids or wet substances (e. g. wet carpet shampoo)
-Glowing ash, cigarette ends, matches, etc.
– Inflammable or explosive substances
- Very fine dust (e.g. concrete dust), ash or toner
-Pointed, hard objects such as large shards of glass
This may cause damage to the device or personal injury. Glowing ash etc. may cause the filter to catch fire, liquids which are sucked up may cause a short-circuit, very fine dust may clog up the filters and sharp pointed objects may damage the filters.
☐ This device is for personal use only and is not intended for commercial applications.
☐ Use the device only as described in the operating instructions. Any other use is deemed to be improper.
☐ The following are excluded from the warranty: all defects caused by improper handling, damage or unauthorised attempts to repair. The same applies for normal wear.
Safety Instructions

Danger of Injury
☐ Keep children and animals away from the packaging film. There is a danger of suffocation!
☐ This device is not suitable for use by people (including children) with restricted physical, sensory or mental capacity, or who lack experience and / or knowledge, unless they are supervised by a person responsible for their safety. The device is not a toy!
Children must not sit or ride on the device.
☐ Make sure you wear closed shoes when using this device!
☐ Never hold the nozzles, the handle or the telescopic tube close to parts of your body, hair or animals during use. They could become stuck to the device. Should
the vacuum cleaner become stuck, press the On/Off button immediately to switch off the device.
☐ The device should only be used and stored out of the reach of children. Improper use can lead to injuries and electric shock. The mains cable must also be kept out of the reach of children.

Correct Connection
☐ Only ever connect the device to a properly installed plug socket. The socket must also be readily accessible after connection. The mains voltage must match the technical data for the device (see the "Technical Data" chapter). Only use suitable extension cables whose technical data is the same as that of the device.
☐ Ensure that it is not possible for others to trip over the connected mains cable.
☐ Position the cable in such a way that it does not become squashed or bent and does not come into contact with hot surfaces.

Proper Use
☐ The device should only be used in closed rooms. Do not operate it outdoors or in rooms with high humidity.
□ Always check the device for damage before putting it into operation. If parts of the device, cable and / or plug show visible signs of damage, the device must not be used. Do not try to repair the device yourself or to replace any individual parts. In the event of any damage, contact our customer service department.
☐ Do not use the device if it has malfunctioned, sucked up liquids or objects or been dropped. Have the device checked by a specialist or contact the customer service department.
☐ The device should only be used when it is fully and correctly assembled. The dust container and the filters must be inserted. The dust container must be closed for it to be inserted correctly.
☐ Do not immerse the device in water or other liquids in order to avoid electric shocks.
☐ Never touch the device, the cable or the plug with wet hands.
☐ Do not expose the device to extreme temperatures, wide temperature fluctuations, open fire, direct sunlight, moisture or wet conditions.
☐ Do not drop the device or allow it to be knocked violently.
☐ Never place heavy objects on the device.
☐ Do not suck up any liquids and do not pour any liquids into the dust container.
☐ Do not insert anything into the openings/nozzles of the device and make sure that these do not become clogged.
☐ Never leave the device unattended when it is switched on or connected to the mains.
☐ Switch the device off immediately and pull the mains plug from the mains socket
-if you stop working with the device for a period of time,
-if you are no longer using the device,
—before you change the nozzles,
-if a fault or error occurs while the device is in operation,
-if liquids or foreign bodies have found their way into the device,
—before a thunderstorm,
—before you clean parts of the device and accessories.
☐ The device must be switched off when inserting or removing the mains plug.
□ Always pull the plug and never the cable!
☐ Never pull the device by the cable to move it. Use the handle.
☐ Do not try to lubricate the rollers with lubricant or oil. This would cause dust and dirt to increasingly adhere to the rollers.
☐ Note the MAX marking on the dust container. If the marking is reached during use, empty the dust container before you carry on vacuum cleaning.
☐ Empty the dust container after each use. The filters must also be regularly cleaned in order to prevent overloading of the motor.
☐ The dust container and the filters must be completely dry before you insert them again and use or store away the device.
☐ Store the device in a dry place that is not accessible to children and animals when it is not being used.
Items Supplied and Device Overview
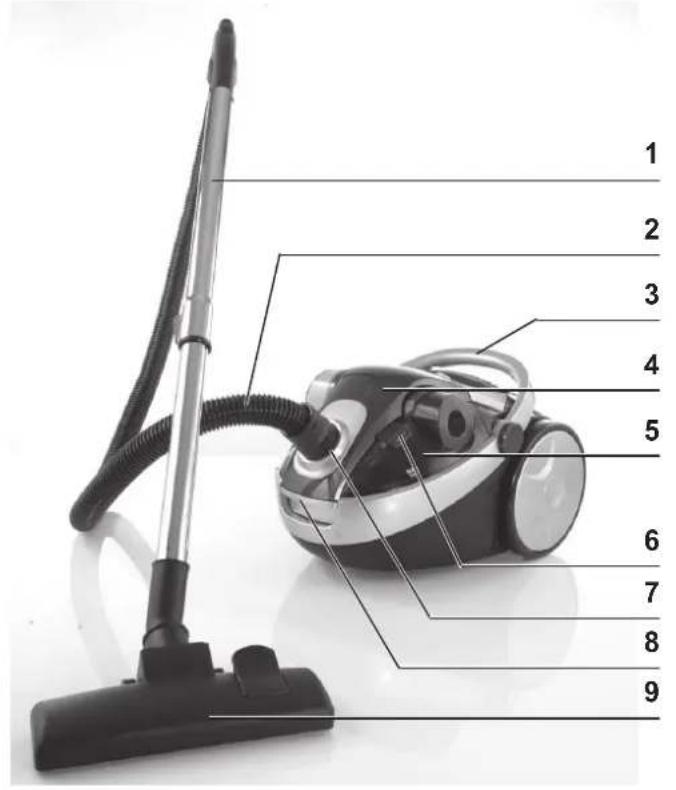
1 Telescopic tube
2 Suction hose
3 Carrying handle
4 Dust container cover
5 Dust container
6 Fastener of the dust container
7 Suction hose socket
8 Catch for opening the dust container cover
9 Floor nozzle
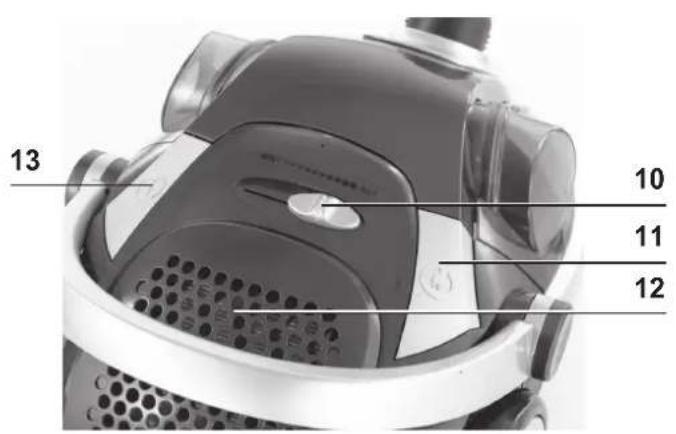
10 Suction strength control
11 Button for retracting the cable
12 Exhaust air hatch
13 On/Off button
Not shown:
• Dust fi Iter (two-parts, sits on the back of the dust container)
• Motor filter (sits behind the dust container in the dust container compartment)
• HEPA exhaust air filter (sits in the exhaust air hatch)
natural_image
Black plastic T-shaped object with a cylindrical top and flange (no text or symbols visible)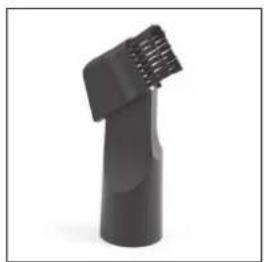
natural_image
Black cylindrical object with a textured handle and ribbed end, isolated on white background (no text or symbols)
natural_image
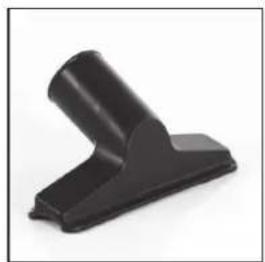
Abstract black geometric sculpture with interlocking curved shapes (no text or symbols)Upholstery nozzle Crevice and brush nozzle Bracket for the crevice and
brush upholstery
nozzle nozzle
Assembly

CAUTION!
□ Keep children away from the packaging material. There is a danger of suffocation!
Take all parts out of the packaging and place them carefully on a level surface. If necessary, place protective film underneath the parts to prevent any damage to delicate surfaces. Carefully remove all packaging materials. Check the items supplied for completeness (see the "Items Supplied and Device Overview" chapter) and possible transport damage. If you find any damage to the components, do not use them (!), but contact our customer service department.
Inserting / Removing the Suction Hose
natural_image
Close-up of a black and white vacuum cleaner with a curved hose, no visible text or symbols-
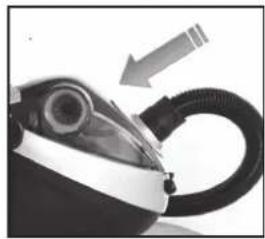
Insert the thicker end of the suction hose as illustrated into the connection on the front of the device. The suction hose must be heard to engage in place.
-
To remove the suction hose, press the two opposite buttons on the connection piece and as you do this pull out the suction hose.
Inserting the Telescopic Tube

natural_image
Close-up of a curved black cable with a downward arrow indicating compression or dislocation (no text or symbols)- Insert the curved end of the suction hose into the larger opening of the telescopic tube. To ease insertion, twist the tube slightly back and forth.
natural_image
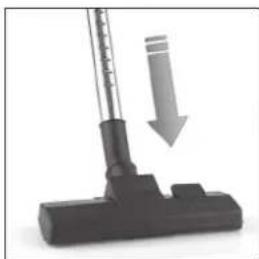
Close-up of a black vacuum cleaner with a downward arrow indicating compression (no text or symbols)- Insert the other end of the telescopic tube into the desired nozzle.
Adjusting the Length of the Telescopic Tube

-
Press the slide (A) on the telescopic tube downwards and adjust the tube to the desired length.
-
Release the slide and move the tube slightly up or down until it engages.
Accessories

CAUTION!
□ Always switch off the vacuum cleaner first before changing the nozzles.

The nozzles can be attached either to the telescopic tube or directly to the handle.
Floor Nozzle

natural_image
Close-up of a black mechanical component with a labeled section B (no other text or symbols visible)The floor nozzle is suitable for both carpets and hard floors.
The foot switch (B) allows you to change between carpet and hard floor. A brush and a rubber lip are extended on the underside of the nozzle for use on hard floors.
Upholstery Nozzle

natural_image
Black plastic mechanical component with a curved handle and flange (no text or symbols visible)The upholstery nozzle is suitable for cleaning all kinds of upholstery, e. g. sofas, car seats etc.
Crevice and Brush Nozzle

natural_image
Two black plastic clip holders with a right-hand arrow indicating transformation (no text or symbols)Fold over the end piece in the direction of the arrow to convert the crevice nozzle into a brush nozzle:
- The crevice nozzle is suitable for upholstery, cleaning the inside of cars and for all nooks and crannies that cannot be reached with the other nozzles.
- The brush nozzle is suitable for all uneven objects, furniture, lamps, profi les and skirting boards, window ledges, etc.
Operation

CAUTION!
☐ Never hold the nozzles, the handle or the telescopic tube close to parts of your body, hair or animals during use. They could become stuck to the device. Should the vacuum cleaner become stuck, press the On/Off button immediately to switch off the device.
☐ Switch on the vacuum cleaner only when you have checked that all the parts have been properly attached, and that the dust container and the filters have been correctly inserted and are completely dry.
☐ On no account should the device be used to suck up the following:
–Liquids or wet substances (e. g. wet carpet shampoo)
-Glowing ash, cigarette ends, matches, etc.
– Inflammable or explosive substances
- Very fine dust (e.g. concrete dust), ash or toner
-Pointed, hard objects such as large shards of glass
☐ Note the MAX marking on the dust container. If the marking is reached during use, empty the dust container before you carry on vacuum cleaning (see also the "Cleaning" chapter, "Emptying the Dust Container" section).

The handle has an exhaust air valve with which you can quickly reduce the suction force if necessary. Open the valve when cleaning curtains, rugs or other light, mobile items. Otherwise you should keep the valve closed.
- Pull the mains cable out as far as you require. Do not pull out the cable with force up to its maximum length. It should not be pulled out further than the red mark. The yellow mark indicates the optimum cable length.
- Insert the mains plug into a properly installed mains socket that is easily accessible.
- Press the On/Off button to switch the vacuum cleaner on. The vacuum cleaner can be pulled along like a sledge during cleaning.
- Adjust the suction strength with the aid of the suction strength control.
- Guide the nozzle over the surface to be cleaned.
- After cleaning, press the On/Off button to switch off the vacuum cleaner.
- Remove the mains plug from the mains socket. Hold the mains cable firmly and press the button to retract the mains cable. Holding the mains cable prevents any "whiplash" effect of the cable, e.g. against your legs.
Cleaning

CAUTION!
□ Always remove the mains plug from the plug socket before cleaning the filters and before emptying the dust container.
☐ Empty the dust container after each use. The filters must also be regularly cleaned in order to prevent overloading of the motor.
☐ To ensure optimum suction performance, the filters should be replaced annually. You can purchase new filters from our customer service department (see the "Ordering New Filters" chapter).
☐ The dust container and the filters must be completely dry before you insert them again and use or store away the device.
☐ Do not use any sharp or abrasive cleaning agents or cleaning pads to clean the vacuum cleaner housing. These could damage the surface.
☐ Do not insert anything into the openings/nozzles of the device and make sure that these do not become clogged.
Emptying the Dust Container

natural_image
Close-up of a hand using a hairdryer to clean a small white object (no visible text or symbols)- Pull up the catch to open the dust container cover and flip up the cover at the same time.
- Pull the dust container up out of the device by its handle.

natural_image
Close-up of hands holding a digital camera module with lens and case (no visible text or symbols)- Hold the dust container by its handle over a dustbin. Press the fastener on the dust container and remove the dust container hatch. The dust container can now be emptied.
- Place the dust container hatch back onto the dust container and close the hatch. The hatch must be heard to engage in place.
- Then place the dust container into the device and close the dust container cover. The cover must be heard to engage in place.
Cleaning the Dust Filter
natural_image
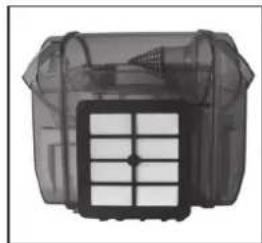
Exterior view of a transparent cylindrical device with internal grid and control panel (no text or symbols visible)The dust fi lter sits on the back of the dust container. It consists of two parts.
- Pull up the catch to open the dust container cover and flip up the cover at the same time.
- Pull the dust container up out of the device by its handle.
- Remove the filter from the dust container.
- Tap the filter out over a dustbin. Clean the filter using a soft brush if necessary. You can also rinse the filter under clear, lukewarm water. Attention: Do NOT use any detergent! Allow the filter to dry completely.
- Insert the filter back into the dust container:
- Then place the dust container into the device and close the dust container cover. The cover must be heard to engage in place.
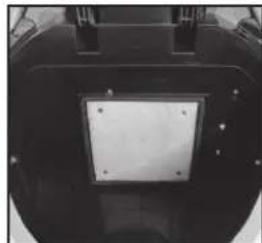
Cleaning the Motor Filter
natural_image
Close-up of a black mechanical component with a central square and mounting holes (no visible text or symbols)The motor filter sits behind the dust container in the dust container compartment.
- Pull up the catch to open the dust container cover and flip up the cover at the same time.
- Pull the dust container up out of the device by its handle.
- Remove the filter from the dust container compartment.
- Tap the filter out over a dustbin. Clean the filter using a soft brush if necessary. You can also rinse the filter under clear, lukewarm water. Attention: Do NOT use any detergent! Allow the filter to dry completely.
-
Insert the filter back into the dust container compartment.
-
Then place the dust container into the device and close the dust container cover. The cover must be heard to engage in place.
Cleaning the HEPA Exhaust Air Filter

natural_image
Close-up of a hand holding a vacuum cleaner's hood with a mesh grille (no visible text or symbols)-
Pull the fastener of the exhaust air hatch (C) upwards and detach the hatch from the device.
-
Remove the filter from the exhaust air hatch.
-
Tap the filter out over a dustbin. Clean the filter using a soft brush if necessary. You can also rinse the filter under clear, lukewarm water. Attention: Do NOT use any detergent! Allow the filter to dry completely.
-
Insert the filter back into the exhaust air hatch.
-
Then place the exhaust air hatch into the device and close the hatch. The hatch must be heard to engage in place.
Cleaning the Housing
If necessary, clean the housing using a slightly damp, soft cloth.
Cleaning the Nozzles
Remove hair and fl uff from the nozzles at regular intervals.
Storage
Store the vacuum cleaner in a dry, cool place indoors that is not accessible to children and animals.

Tips for practical storage:

natural_image
Close-up of a vacuum cleaner's hood and base, showing mechanical components and mounting bracket (no text or symbols visible)-Push together the telescopic tube as far as possible and, if you have not already done so, place the floor nozzle onto the telescopic tube. You can now hook the floor nozzle onto the back of the device.
natural_image
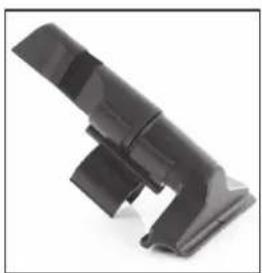
Black plastic mechanical component with no visible text or symbols-You can attach the crevice and brush nozzle as well as the upholstery nozzle to the telescopic tube using the bracket that is also supplied.
Ordering New Filters
You can order a new HEPA, dust and motor filter at: www.service-shopping.de
Troubleshooting
Should your device stop working at any time, exhibit signs of damage or require a spare part, please contact the customer service department. For your own safety, do not attempt to carry out repairs yourself.
The following table contains tips on how you can remedy small problems yourself:
| Problem Possible cause / solution | |
| The device generates no suction. | Ensure that the plug is correctly inserted into the plug socket. |
| Low suction force. • Is the exhaust air valve in the handle open?Close it.Adjust the suction strength on the suction strength control.Is the dust container full (MAX marking reached)? Empty the dust container.Is one of the fi Iters heavily soiled? Clean it.Is the nozzle, the telescopic tube or the suction hose clogged? Pull out the mains plug and clear the clogging. | |
| Dust escapes from the device during cleaning. | • Is the dust fi Iter seated correctly in the dust container? Is the dust container closed correctly and inserted in the device? Is the dust container cover closed correctly? Correct this if necessary.• Is one of the fi Iters heavily soiled? Clean it. |
| Unusual odour A new odour is normal when the device is used for the fi rst time; it disappears after a while. | |
Technical Data
Model number: CP-CY4207EP-7
Article number: Z 08059
Voltage supply: 220–240 V\~50 Hz
Power: nom. 2400 W, max. 3000 W
Volume of dust container: 3 L
Protection class: II

Disposal

The packaging can be recycled. Please dispose of it in an environmentally friendly manner and take it to a recycling centre.

Dispose of the device in an environmentally friendly manner. Dispose of it at a recycling centre for used electrical and electronic devices. You can obtain more information from your local authorities.
Sommaire
www.service-shopping.de
natural_image
Black plastic T-shaped object with a cylindrical top (no text or symbols visible)
natural_image
Black cylindrical object with a textured handle and ribbed top, isolated on white background (no text or symbols)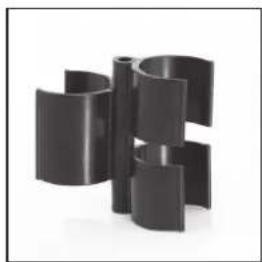
natural_image
Abstract black geometric sculpture with interlocking curved shapes (no text or symbols)natural_image
Close-up of a black and white vacuum cleaner with a curved handle, no visible text or symbolsnatural_image
Close-up of a curved cable with a downward arrow indicating compression or dislocation (no text or symbols)natural_image
Close-up of a black vacuum cleaner with a downward arrow indicating compression (no text or symbols)natural_image
Close-up of a black mechanical component with a labeled section B (no other text or symbols visible)natural_image
Black plastic mechanical component with a curved handle and flange (no text or symbols visible)natural_image
Two black plastic clip holders with a right-hand arrow indicating transformation (no text or symbols)natural_image
Close-up of a hand using a hairdryer to clean a small appliance (no visible text or symbols)natural_image
Close-up of hands holding a digital camera module with lens and screen (no visible text or symbols)natural_image
Exterior view of a transparent cylindrical device with a grid pattern on the front panel (no text or symbols visible)natural_image
Close-up of a black mechanical component with a rectangular plate and mounting holes (no visible text or symbols)natural_image
Close-up of a hand holding a vacuum cleaner with a mesh grille (no visible text or symbols)natural_image
Close-up of a vacuum cleaner's hood and base (no visible text or symbols)natural_image
Black plastic mechanical component with folded edges and a notch (no text or symbols visible)www.service-shopping.de
www.service-shopping.de
natural_image
Black plastic mechanical component with a cylindrical top and flange (no text or symbols visible)Bekledingzuigmond kieren- en

natural_image
3D rendered image of a black cylindrical object with a textured handle and ribbed top (no text or symbols visible)natural_image
Abstract 3D geometric sculpture composed of interlocking black curved shapes (no text or symbols)natural_image
Close-up of a black vacuum cleaner with a curved hose and arrow indicating motion (no text or symbols visible)natural_image
Close-up of a curved black cable with a downward arrow indicating compression or dislocation (no text or symbols)natural_image
Close-up of a black vacuum cleaner with a downward arrow indicating compression or suction (no text or symbols visible)natural_image
Close-up of a black mechanical component with a labeled section B (no text or symbols on the part itself)natural_image
Black plastic mechanical component with a curved handle and flange (no text or symbols visible)natural_image
Two black plastic clip holders with a right-hand rule showing the change from left to right (no text or symbols)natural_image
Close-up of a hand using a hairdryer to clean a small white object (no visible text or symbols)natural_image
Close-up of hands holding a digital camera module with lens and case (no visible text or symbols)natural_image
Exterior view of a transparent cylindrical device with internal grid structure (no visible text or symbols)natural_image
Close-up of a black circular mechanical component with a central square and mounting holes (no visible text or symbols)natural_image
Close-up of a hand holding a vacuum cleaner's mesh cover (no text or symbols visible)natural_image
Close-up of a vacuum cleaner's hood and base, showing mechanical components and no visible text or symbols.natural_image
Black plastic mechanical component with no visible text or symbolsVolume stofreservoir: 3 L



- Gebrauchsanleitung
- Instruction manual
- Mode d'emploi
- Meaning of the Symbols in These Instructions
- Intended Use
- Safety Instructions
- Danger of Injury
- Correct Connection
- Proper Use
- Items Supplied and Device Overview
- Not shown:
- Assembly
- CAUTION!
- Inserting / Removing the Suction Hose
- Inserting the Telescopic Tube
- Adjusting the Length of the Telescopic Tube
- Accessories
- Floor Nozzle
- Upholstery Nozzle
- Crevice and Brush Nozzle
- Operation
- Cleaning
- Emptying the Dust Container
- Cleaning the Dust Filter
- Cleaning the Motor Filter
- Cleaning the HEPA Exhaust Air Filter
- Cleaning the Housing
- Cleaning the Nozzles
- Storage
- Ordering New Filters
- Troubleshooting
- Technical Data
- Disposal
- Sommaire
Brand : Cleanmaxx
Model : Z 08059
Category : Vacuum Cleaner