
Z 08925 - Vacuum Cleaner Cleanmaxx - Free user manual and instructions
Find the device manual for free Z 08925 Cleanmaxx in PDF.


| Product Type | Vacuum Cleaner |
| Brand | Cleanmaxx |
| Model | Z 08925 |
| Power | 800 W |
| Tank Capacity | 2 L |
| Filter Type | HEPA 13 |
| Collection Method | Bagless (cyclonic) |
| Power Cord | 6 m |
| Operating Radius | 8 m |
| Weight | 4.5 kg |
| Dimensions (L x W x H) | 400 x 280 x 300 mm |
| Noise Level | 76 dB(A) |
| Floor Type | Carpet, tile, hardwood |
| Included Accessories | Floor nozzle, crevice tool, upholstery brush |
| Power Adjustment | Variable (electronic) |
| Maintenance | Clean the filter regularly, empty the tank |
| Safety | Automatic shut-off in case of overheating |
| Spare Parts | Available (filters, bags, accessories) |
| Warranty | 2 years |
Frequently Asked Questions - Z 08925 Cleanmaxx
User questions about Z 08925 Cleanmaxx
0 question about this device. Answer the ones you know or ask your own.
Ask a new question about this device
Download the instructions for your Vacuum Cleaner in PDF format for free! Find your manual Z 08925 - Cleanmaxx and take your electronic device back in hand. On this page are published all the documents necessary for the use of your device. Z 08925 by Cleanmaxx.
USER MANUAL Z 08925 Cleanmaxx
natural_image
Black and white photo of a vacuum cleaner with coiled hose and control panel (no visible text or symbols)Gebrauchsanleitung
ab Seite 3
Instruction manual
starting on page 18
Mode d'emploi
www.service-shopping.de
natural_image
Close-up of a vacuum cleaner component with a black arrow pointing to a small feature (no visible text or symbols)natural_image
Close-up of a gray cylindrical mechanical component with a downward arrow indicating compression or dislocation (no text or symbols visible)natural_image
Close-up of a connector with a black cable and arrow pointing to it (no visible text or symbols)natural_image
Close-up of a black cable with two arrows pointing to its ends (no text or symbols visible)natural_image
Close-up of a vacuum cleaner with attached blade and handle (no visible text or symbols)natural_image
Close-up of a vacuum cleaner with attached cable and control knob (no visible text or symbols)natural_image
Close-up of a black cable with a double-headed arrow indicating vertical displacement (no text or symbols)
natural_image
Close-up of a vacuum cleaner with a black arrow pointing to the handle (no visible text or symbols)natural_image
Hand holding a transparent cylindrical device with arrows indicating rotational motion (no text or symbols)natural_image
Close-up of a small industrial vacuum cleaner with a black arrow pointing to the handle (no visible text or symbols)natural_image
Black and white photo of a water dispenser bottle with handle and spout (no visible text or symbols)natural_image
Close-up of a mechanical component with a black handle and upward arrow indicator (no text or symbols)natural_image
Close-up of a mechanical component with arrows pointing to features (no visible text or symbols)natural_image
Close-up of a white plastic water dispenser with a black faucet inserted (no text or symbols visible)natural_image
Close-up of a plastic container with an open lid and internal filter structure (no text or symbols visible)natural_image
Close-up of a mechanical device with a mesh circular component and attached tubing (no visible text or symbols)Meaning of symbols in these instructions 19
Proper use 19
Safety instructions 20
Risks of injury 20
Proper connection 20
Proper use 20
Product contents and device overview 22
Complete device overview 22
Rear view 23
Suction nozzles 23
Prior to first use 24
Assembly 24
Inserting/removing the hose 24
Inserting/removing the telescoping tube 24
Adjusting the length of the telescoping tube 25
Mounting/removing suction nozzles 25
Removing/inserting the dust container 25

Operation 25
Cleaning the Device 27
Emptying and cleaning the dust container 27
Cleaning the dust filter and the plastic dust filter 28
Cleaning the Exhaust Air Filter 30
Storage 30
Troubleshooting 30
Technical data 31
Disposal 31

Dear customer,
We are delighted that you have decided on this vacuum cleaner.
Prior to using the device for the first time, please carefully read through the operating instructions and store them in a safe place. These instructions are to accompany the device when it is passed on to others. The manufacturer and importer assume no liability in the event the data in these instructions have not been observed!
As part of ongoing development, we reserve the right to alter the device, packaging or enclosed documentation at any time.
Please note: The illustrations in these operating instructions may vary slightly from the real appliance.
If you have any questions, please contact customer service via our website:
www.service-shopping.de
Meaning of symbols in these instructions

All safety notices are marked with this symbol. Please carefully read through and obey the safety notices in order to avoid injury to persons and damage to property.

Tips and recommendations are marked with this symbol.
Proper use
☐ This device is designed for vacuuming up normal household dust.
☐ Do not in any case vacuum up the following: – Liquids or wet materials (such as wet carpet shampoo) – smouldering ashes, cigarette butts, matches etc. – fl ammable or ignitable materials
- very fine dust (e.g. cement dust), ash or toner -hard, pointy objects such as bigger glass shards
This device may be used by children aged 8 and over and by people with reduced physical, sensory or mental abilities or a lack of experience and/or knowledge if they are supervised or have received instruction on how to use the device safely and have understood the dangers resulting from this. Children may not play with the device. Cleaning and user maintenance may not be performed by children, unless they are supervised.
- The device is intended for domestic, not commercial, use. - Only use the device as described in these instructions. Any other use is deemed improper. - Defects arising due to improper handling, damage or attempts at repair are excluded from the warranty. This also applies to normal wear and tear.
Safety instructions

Risks of injury
☐ Risk of suffocation! Keep the packaging material away from children and animals.
☐ Keep the device, cord and plug away from water or other liquids in order to avoid the risk of electrical shock. Never touch the mains plug, cord or device with wet or damp hands.
- Keep animals, hair, jewellery, loose fitting clothing, fingers and all other body parts away from the device's nozzles. They could be caught in the vacuum cleaner. If something does get caught in the vacuum cleaner, immediately turn off the device.
☐ Take special care to avoid falling when cleaning stairs.
☐ Wear firm footwear during use.
☐ Only use and store the device out of the reach of children. Improper use may result in injury and electrical shock. The mains cord may also not be accessible for children.

Proper connection
☐ Only connect the device to a properly installed socket. The socket must also be easily accessible after the device has been connected. The mains voltage must correspond to the technical data of the device (see chapter "Technical data"). Only use proper extension cords, whose technical data correspond to those of the device.
☐ Make sure that the connected mains cable does not get pinched, pose a tripping hazard or get kinked and that it does not come into contact with hot surfaces.


Proper use
☐ Only use and store the device in enclosed areas. Do not use the device outdoors, in rooms with high humidity or on hot surfaces.
☐ Check the device and accessories for damages prior to each use. If the device, cord, plug or a filter are visibly damaged do not use the device. Do not attempt to repair the device or to replace parts yourself. In the event of damage, contact customer service.
☐ Do not use the device if it malfunctions, has vacuumed up liquids or objects or has fallen down. Have the device repaired by a qualified professional.
☐ Only use the device if it has been completely and correctly assembled! The dust bin and filter must be in place and not be damaged! Dirt that has penetrated the inside of the device could damage the motor. The dust bin must be shut in order for it to be inserted properly.
☐ Do not subject the device to extreme temperatures, severe changes in temperatures, open flames, direct sunlight, moisture or wetness.
☐ Do not allow the device to fall and do not subject it to strong percussions.
☐ Never place heavy objects on the device.
☐ Do not submerge the device in water or other liquids in order to avoid electrical shocks. Do not fill the dust bin with liquids.

☐ Never touch the device, the cord or the plug with wet hands.
Do not insert anything in the device's openings/nozzles and ensure that they are not plugged.
☐ Never leave the device unattended when on or when connected to a power supply.
☐ Turn the device off by pulling the mains plug out of the socket – if you stop using the device,
- if you are finished using the device,
—before you change any accessories,
-if an error or fault occurs during operation,
-if liquids or foreign debris have penetrated the device,
—before a storm,
—before you clean the device parts and accessories.
☐ The device must be deactivated when you pull the mains plug out of the socket or insert it in the socket.
□ Always pull on the plug itself and never on the cable!
☐ Never move the device by pulling it by the cord. Use the handles.
☐ Do not attempt to grease the wheels with lubricants or oil. Otherwise, this may cause more dust or dirt to accumulate on the wheels.
☐ Empty the dust bin after every use. The filters must also be cleaned regularly to prevent the motor from being overloaded.
☐ Allow the dust bin, plastic dust filter and exhaust filter to dry completely before you reinstall them in the device.
☐ Only use original spare parts provided by the manufacturer.
Store the device in a cool, dry area that is not accessible to children and animals when not in use.
Product contents and device overview

Visit our website to reorder original spare parts/accessories:
www.service-shopping.de
Complete device overview
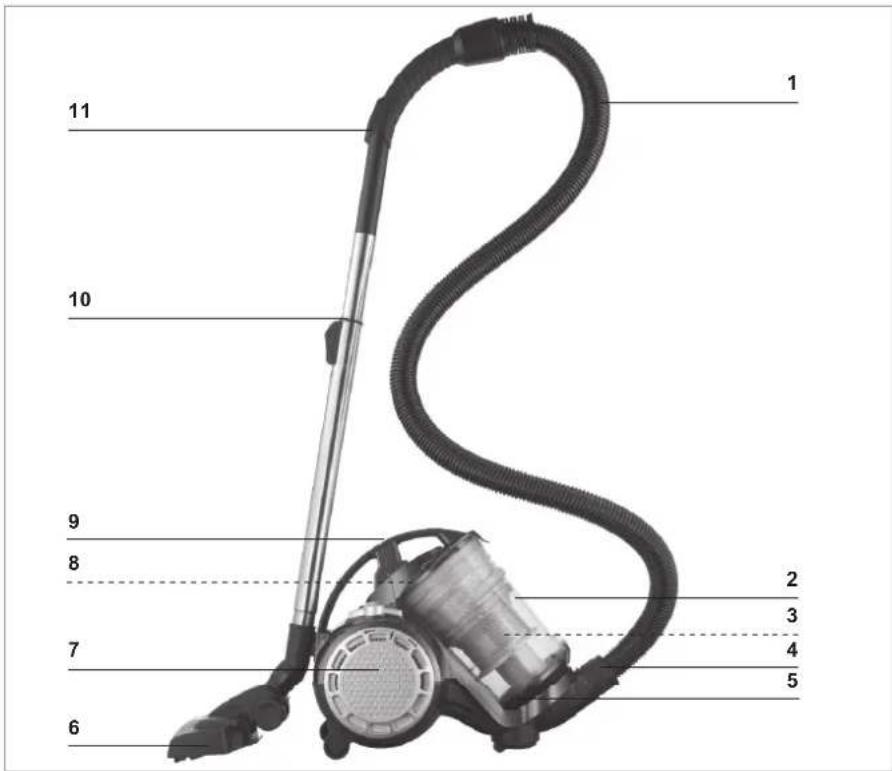
1 Suction hose
2 Dust container
3 Plastic dust filter (in the dust container)
4 Connection piece
5 Dust container base
6 Floor nozzle
7 Exhaust filter compartment
8 Dust filter in the dust container lid
9 Dust container lid with handle
10 Telescopic tube
11 Exhaust air valve on the vacuum hose handle
Rear view

12 Release button for dust bin
13 On/Off switch ①
14 Bracket for hooking in the floor nozzle
15 2in1 crevice and brush nozzle
16 Mains plug
17 Button for cable winder
Suction nozzles

ATTENTION!
□ Always turn off the vacuum cleaner first before changing the nozzles.
Floor nozzle

natural_image
Close-up of a vacuum cleaner blade with a black arrow pointing to a small component (no visible text or symbols)The floor nozzle is suitable both for carpets and smooth floors.
With the foot switch, you can switch between a smooth floor and a carpet. A brush is deployed on the device bottom for smooth floors.
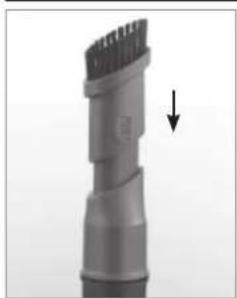
2in1 Crevice and Brush Nozzle
natural_image
Close-up of a gray mechanical component with a downward arrow indicating a feature (no text or symbols visible)You find this nozzle in the storage compartment in the motor unit (see section „Rear view“).
Push the brush down in order to make a crevice nozzle out of the brush nozzle
- The crevice nozzle is suitable for upholstery, cleaning the inside of cars and for all nooks and crannies that cannot be reached with the other nozzles.
- The brush nozzle is suitable for all uneven objects, furniture, lamps, profi les and skirting boards, window ledges, etc.

Prior to first use

ATTENTION!
☐ Risk of suffocation! Keep the packaging material away from children and animals.
- Unpack all parts and make sure that the scope of delivery is complete (see chapter "Product contents and device overview") and check for any damages from transport. If you identify damages to the components, do not use them (!), instead contact our customer service centre.
- If necessary, remove any piece of paper or sticker etc. from the dust bin. In chapter "Cleaning the Device" you will find instructions on how to remove and open the dust bin.
Assembly

ATTENTION!
☐ Make sure that the device is not connected to the power supply before you attach or remove any accessories.
Inserting/removing the hose
natural_image
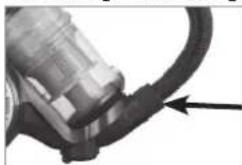
Close-up of a black cable with a connector and arrow indicating direction (no text or symbols)- Insert the suction hose connector into the suction opening (see arrow). It must audibly lock into place.
- To remove the suction hose push the knobs on the connector and pull the suction hose out.
Inserting/removing the telescoping tube

natural_image
Close-up of a black rubber hose with two arrows pointing to the end (no text or symbols visible)- Insert the suction hose into the handle. It has to lock into place audibly.
- Insert the open end of the handle into the corresponding opening on the telescoping tube. In the process, turn the handle back and forth somewhat. Check to make sure that the connection is secure.
• To remove the telescoping tube pull it off of the handle.
Adjusting the length of the telescoping tube
natural_image
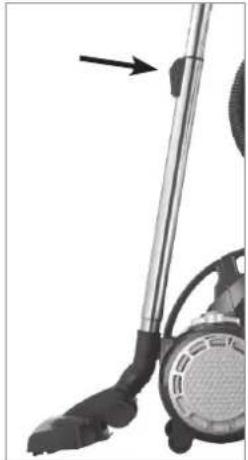
Close-up of a vacuum cleaner with attached mechanical components and a directional arrow (no text or symbols visible)- Push the slider on the telescopic tube downwards and then pull the telescopic tube out to the required length.
- Release the slider and move the tube slightly up or down until it engages.
Mounting/removing suction nozzles
- Insert the open end of the telescoping tube in one of the enclosed suction nozzles up to the stop. Turn the nozzle back and forth slightly in the process.
- The suction nozzles can also be attached directly to the suction hose without the telescoping tube for more fl exibility.
• To remove a suction nozzle pull it off.
Removing/inserting the dust container
natural_image
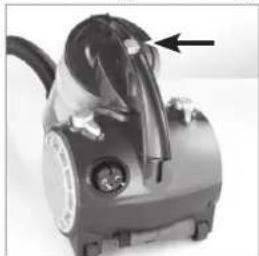
Close-up of a vacuum cleaner with attached tubing and a black arrow pointing to the handle (no visible text or symbols)- Removal: Push the release button on the dust container and take it out of the device by the handle.
- Insertion: Take the dust container by the handle and first place the bottom of the container in the device (the bottom is facing down and handle is facing up). Then push the handle against the device housing until the dust container audibly locks into place. Hold the device by the handle and lift it to check whether the dust bin is properly seated.
Operation

CAUTION!
☐ Never hold the nozzles close to parts of your body during use and do not place your hands inside the nozzles. They could become stuck to the device/injured. If the vacuum cleaner becomes firmly attached due to suction, turn it off immediately (① press down the On / Off switch).
☐ Keep the nozzles away from animals during operation. Never attempt to vacuum animals using the device. They could become stuck to the device/injured. If the vacuum cleaner becomes firmly attached due to suction, turn it off immediately (① press down the On / Off switch).
☐ Switch on the vacuum cleaner only when you have checked that all parts have been properly assembled and that the dust container and all filters have been inserted correctly.
☐ To ensure that the cable does not become hot during operation, pull out at least two thirds of its total length from the device before you switch on the vacuum cleaner. Do not pull out the cable with force up to its maximum length (not further than the red marking on the cable) in order to prevent damage!
□ Always switch the device off first and remove the mains plug from the mains socket before replacing a nozzle or attaching or removing any accessories.
☐ On no account should the device be used to suck up the following:
–Liquids or wet substances (e.g. wet carpet shampoo)
-Glowing ash, cigarette ends, matches, etc.
- Inflammable or explosive substances
– Very fine dust (e.g. concrete dust), ash or toner
-Pointed, hard objects such as large pieces of broken glass
- Make sure that the accessories are attached correctly to the device (see the „Assembly“ chapter).
- Pull the mains cable out of the unit as far as you require, ideally up to the yellow marking, but not further than the red marking on the cable!
- Insert the mains plug into a properly installed mains socket that is easily accessible.
- Press the① On/Off switch down to switch on the vacuum cleaner.
- Guide the nozzle over the surface to be cleaned. The vacuum cleaner can be pulled along like a sledge during cleaning.
- Press the ① On/Off switch down again after you have finished vacuum cleaning to switch off the vacuum cleaner.
- Pull the mains plug out of the socket, hold the mains cable firmly and using your foot, depress the ⏻ button to retract the cable. Holding the mains cable prevents any „whiplash“ effect of the cable, e.g. against your legs.
- To ensure optimum performance of the device, you should empty the dust container and clean all dust filters regularly (see the „Cleaning the Device“ chapter) after every use.
natural_image
Close-up of a black cable with a double-headed arrow indicating vertical displacement (no text or symbols)
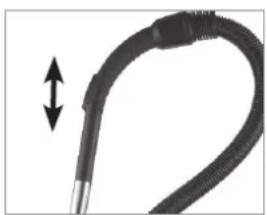
Tip: The handle is equipped with an exhaust air valve. Open this valve (by sliding the cover) to reduce the suction force when cleaning upholstery or rugs or light, movable objects.
Normally the exhaust air valve should be closed to prevent the unnecessary reduction of the suction force.
Cleaning the Device

CAUTION!
☐ Empty the dust container frequently. Ideally, empty the dust container after every use or when the MAX mark is reached at the latest.
□ Clean the filter regularly to prevent overheating of the motor.
Remove the mains plug from the plug socket before doing any cleaning of the device.
Keep the device, the cable and the mains plug away from water or other liquids in order to avoid electric shocks. Make sure that no liquid gets into the device during cleaning. Only the dust bin, the plastic dust filter and the exhaust air filter may be cleaned with water. However, they must be completely dry before they are put back into the device.
Never clean the dust filter in the dust container lid using water or other liquids!
The filters are neither machine-washable, dishwasher-safe nor suitable for tumble drying! Only ever dry the filters in the air, and never use a hair dryer to do so.
Do not use any sharp or abrasive cleaning agents or cleaning pads to clean the device. These could damage the surfaces.
- Clean the dust filter, the plastic dust filter and the exhaust air filter regularly, or if you notice a reduction in the suction power.
- Clean the housing if necessary using a damp, soft cloth. Dry it with a soft cloth.
- Remove hair and fluff from the nozzles at regular intervals.
The filters may lose some of their colour over time. This is normal and does not have any adverse effect on function.
Emptying and cleaning the dust container

natural_image
Close-up of a mechanical device with a black arrow pointing to a component (no visible text or symbols)-
Push the release button on the dust container and pull it out of the device by the handle.
-
Hold the dust container over an open garbage bin. The dust container should be as close as garbage bin so that dust from the dust container only falls into the garbage bin and is not dispersed in the surrounding area.
possible to the
natural_image
Hand holding a transparent cylindrical device with arrows indicating rotational motion (no text or symbols visible)-
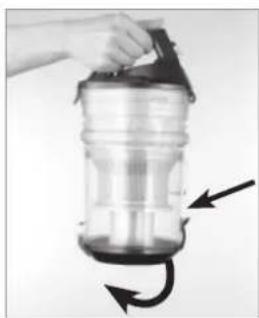
Unlock the release button to open the dust container. The bottom of the dust container will open and the dirt will fall out.
-
Shut the bottom of the dust container again. The fastener must audibly lock into place.
-
If you need to clean the dust container, you have to remove the dust container lid first by turning it conterclockwise and pulling it off. NOTE: Orientation marks for the removal and placement of the lid are provided on the lid and dust container. You can remove the lid when the ▼ mark on the lid is pointing towards the △ mark on the dust container. If necessary, thoroughly rinse the dust container with clear, lukewarm water. CAUTION: Do not under any circumstances clean the dust container in a washing machine or dishwasher! Then shake off any excess water and allow the dust container to dry completely in the air.
- When the dust container is completely dry, screw the dust container lid firmly back onto the dust container. NOTE: Orientation marks for the removal and placement of the lid are provided on the lid and dust container. Place the lid on the dust container. The ▼ mark on the lid has to point to the △ mark on the dust container. Turn the lid clockwise until the ▼ mark on the lid is pointing to the ▲ mark on the dust container.
- Place the dust container into the device: Hold it by the handle and place the bottom of the container into the device first. Then push the handle against the device housing until the dust container is heard to lock in place. Hold the device by the handle and lift it to check that the dust container is in the correct position.
Cleaning the dust filter and the plastic dust filter

natural_image
Close-up of a vacuum cleaner with a black arrow pointing to the handle (no visible text or symbols)- Push the release button on the dust bin and pull it out of the device by the handle.
natural_image
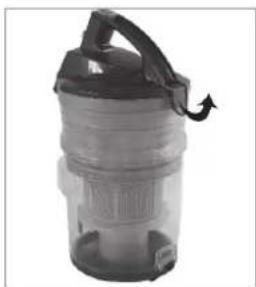
Black plastic water dispenser with handle and side panel (no visible text or symbols)- The dust filter is located in the dust container lid. Open the dust container lid by releasing the catch on the handle and flipping up the lid.

natural_image
Close-up of a mechanical component with a black handle and upward arrow indicator (no text or symbols)-
Remove the dust filter for cleaning. Tap out the contents of the dust filter over a dustbin and brush off the loose dirt. Never clean the dust fi liter with water!
-
If you need to clean the plastic dust filter, you have to remove the dust bin cover first by turning it conterclockwise and pulling it off. NOTE: Orientation marks for the removal and placement of the cover are provided on the cover and dust bin. You can remove the cover when the ▼ mark on the lid is pointing towards the △ mark on the dust bin.

natural_image
Close-up of a mechanical component with arrows pointing to features (no text or symbols visible)- Then, remove the dust bin cover from the plastic dust filter. The cover is sitting on the plastic dust filter. In order to remove it, push the cover down.

natural_image
Close-up of a water tap with a metallic handle and outlet pipe (no text or symbols visible)- If necessary, thoroughly rinse the plastic dust filter with clear, lukewarm water. CAUTION: Do not under any circumstances clean the dust container in a washing machine or dishwasher! Then shake off any excess water and allow the dust container to dry completely in the air.

natural_image
Close-up of a plastic container with a lid and internal structure, no visible text or symbols-
If necessary, wipe the dust bin cover with a wet cloth and place that plastic dust filter back into the dust bin cover. Make sure that the filter locks correctly into place.
-
Place the dust container lid with the plastic dust filter back onto the dust container. NOTE: Orientation marks for the removal and placement of the cover are provided on the cover and dust bin. Place the lid on the dust bin. The ▼ mark on the lid has to point to the △ mark on the dust bin. Turn the lid clockwise until the ▼ mark on the lid is pointing to the ▲ mark on the dust bin.
-
Place the dust filter back in the dust container lid. Close the dust container lid. Make sure that the latch on the dust container lid is locked in place correctly.
-
Place the dust container into the device: Hold it by the handle and place the bottom of the container into the device first. Then push the handle against the device housing until the dust container is heard to lock in place. Hold the device by the handle and lift it to check that the dust container is in the correct position.
Cleaning the Exhaust Air Filter
The exhaust air filter is located in the compartment on the side of the vacuum cleaner (see „Product contents and device overview“ chapter, „Complete Device overview“ section).
NOTE: Orientation marks for the removal and placement of the compartment cover are provided on the cover of the exhaust air filter compartment and the motor unit.

natural_image
Close-up of a handheld electronic device with a circular button and handle (no visible text or symbols)- Open the exhaust air filter compartment by turning the compartment cover in the direction of the arrow OPEN and remove the cover.
- Remove the exhaust air filter by pulling it down and out of the filter compartment.
-
Tap out the contents of the exhaust air filter over a dustbin and brush off the loose dirt.
-
If necessary, thoroughly rinse the exhaust air filter using clear, lukewarm water. CAUTION: Do not under any circumstances clean the filter in a washing machine or dishwasher! Then shake off any excess water and allow the filter to dry completely in the air before reinserting it.
-
When all parts are dry, insert the exhaust air filter in the filter compartment.
-
Place the filter compartment cover onto the exhaust filter compartment. Make sure that arrow on the cover in the middle of the OPEN and LOCK arrow points to the left hand arrow on the motor unit and turn the cover in the direction of the arrow LOCK.
-
When all parts are dry, insert the exhaust air filter in the filter compartment.
- Place the filter compartment cover onto the exhaust filter compartment. Make sure that arrow on the cover in the middle of the OPEN and LOCK arrow points to the left hand arrow on the motor unit and turn the cover in the direction of the arrow LOCK.


Storage
- You can hook the floor nozzle into the bracket on the back of the device for convenient storage and push the telescoping tube together as far as possible.
- You can store the 2in1 Crevice and Brush nozzle in the storage compartment in the motor unit (see chapter „Product contents and device overview“, section „Rear View“)
- Store the vacuum cleaner in a dry, cool indoor room that is not accessible for children and animals.
Troubleshooting
If your device no longer functions properly, exhibits damages or requires a spare part, please contact our customer service centre. For your own safety, do not perform any repairs yourself. The following table gives you tips on how to resolve minor problems yourself.
| Problem | Potential cause/solution/tips |
| The vacuum cleaner has no suction power. | Is the mains plug not correctly connected with the socket? Correct the position of the mains plug.Is the socket defective? Try another socket.Check the fuse for your mains connection.Are the filters plugged? Clean the dust and exhaust filter. |
| Problem Potential | cause/solution/tips |
| The suction power is weak. | Is the auxiliary air valve on the handle open? Close it.Is the dust bin too full? Empty the bin.Are the filters very dirty? Clean them.Is the nozzle, telescoping tube or suction hose plugged?Turn the device off, pull the mains plug out of the socket and remove the obstruction (also see chapter “Assembly”). |
| The device emits dust when vacuuming. | Has the dust bin not been closed properly and/or is it not (properly) inserted in the device? Correct this. |
| The power cord cannot be wound up completely. | The cord has not been properly wound up in the device. Pull it out somewhat and then push the button for engaging the cord winder again. |
| An unpleasant odour develops when vacuuming. | Are you using the device for the first time? An odour often develops when using new devices for the first time. The odour should disappear once you have used the device a few times. |
Technical data
Model number: VC349
Product number: Z 8925
Voltage supply: 220 – 240 V\~, 50/60 Hz
Output: 650 W
Safety class: II

Disposal

The packaging material can be recycled. Dispose of the packaging in an environmentally-friendly manner and make it available to the collection service for recyclable materials.

Dispose of the device in an environmental-friendly manner. The device does not belong in the household waste. Dispose of it at a recycling centre for old electrical and electronic devices.
For more information, please contact the administration in your community.
Customer service/importer:
*) Calls subject to a charge.
All rights reserved.

FR
Contenu
www.service-shopping.de
natural_image
Close-up of a vacuum cleaner component with a black arrow pointing to a small feature (no visible text or symbols)natural_image
3D rendering of a mechanical component with a downward arrow indicating compression or dislocation (no text or symbols)natural_image
Close-up of a mechanical component with a black cable and arrow pointing to a detail (no visible text or symbols)natural_image
Close-up of a black cable or wire with two arrows pointing to its ends (no text or symbols visible)natural_image
Close-up of a black and silver vacuum cleaner with a handle and spool, showing mechanical components and a directional arrow (no text or symbols visible)natural_image
Close-up of a vacuum cleaner with a black arrow pointing to the handle (no visible text or symbols)natural_image
Close-up of a black flexible hose with a double-headed arrow indicating vertical compression (no text or symbols)
natural_image
Close-up of a small industrial vacuum cleaner with a black arrow pointing to the handle (no visible text or symbols)natural_image
Hand holding a water dispenser with arrows indicating rotation (no text or symbols)natural_image
Close-up of a black vacuum cleaner with a handle and control knob (no visible text or symbols)natural_image
Exterior view of a black and white plastic water dispenser with handle (no text or symbols visible)natural_image
Close-up of a mechanical component with a black handle and upward arrow indicator (no text or symbols)natural_image
Close-up of a mechanical component with three arrows pointing to a cylindrical opening (no text or symbols visible)natural_image
3D rendering of a water dispenser with a faucet and filter (no text or symbols)natural_image
Close-up of a white plastic container with a lid and internal mesh structure, no visible text or symbolsnatural_image
Close-up of a hand holding a circular mechanical device with mesh grille (no visible text or symbols)www.service-shopping.de
natural_image
Close-up of a vacuum cleaner component with a pointed tip and arrow indicator (no visible text or symbols)natural_image
Close-up of a gray mechanical component with a downward arrow indicating a change or motion (no text or symbols visible)natural_image
Close-up of a mechanical component with a black curved line and an arrow pointing to it (no visible text or symbols)natural_image
Close-up of a curved black cable or wire with two arrows pointing to its ends (no text or symbols visible)natural_image
Close-up of a vacuum cleaner with attached mechanical components and a directional arrow (no text or symbols visible)natural_image
Close-up of a black vacuum cleaner with a black arrow pointing to the handle (no visible text or symbols)natural_image
Close-up of a black cable with a double-headed arrow indicating vertical displacement (no text or symbols)
natural_image
Close-up of a black industrial vacuum cleaner with a handle and valve, showing no visible text or symbols.natural_image
Hand holding a transparent plastic water dispenser with directional arrows indicating motion (no text or symbols)natural_image
Close-up of a small industrial vacuum cleaner with a black arrow pointing to the handle (no visible text or symbols)natural_image
Exterior view of a water dispenser bottle with handle and side panel (no text or symbols visible)natural_image
Close-up of a mechanical component with a black arrow indicating upward motion (no text or symbols visible)natural_image
Close-up of a mechanical component with three downward arrows indicating force or direction (no text or symbols visible)natural_image
White cylindrical water heater with a faucet inserted, no text or symbols visiblenatural_image
Close-up of a plastic container with an open lid and internal filter structure (no text or symbols visible)natural_image
Close-up of a hand holding a mechanical device with a mesh circular component (no visible text or symbols)


- Gebrauchsanleitung
- Instruction manual
- Mode d'emploi
- Meaning of symbols in these instructions
- Proper use
- Safety instructions
- Risks of injury
- Proper connection
- Product contents and device overview
- Suction nozzles
- ATTENTION!
- Prior to first use
- Assembly
- Inserting/removing the hose
- Inserting/removing the telescoping tube
- Adjusting the length of the telescoping tube
- Mounting/removing suction nozzles
- Removing/inserting the dust container
- Operation
- CAUTION!
- Cleaning the Device
- Emptying and cleaning the dust container
- Cleaning the dust filter and the plastic dust filter
- Cleaning the Exhaust Air Filter
- Storage
- Troubleshooting
- Technical data
- Disposal
- FR
- Contenu
Brand : Cleanmaxx
Model : Z 08925
Category : Vacuum Cleaner