USER MANUAL LFT 217 A HA Hotpoint Ariston
Upper basket

Ribaltine Baby*
Positioning and levelling
Connecting the water and electricity supplies
Advice regarding the first wash cycle
Technical data
Description of the appliance, 16
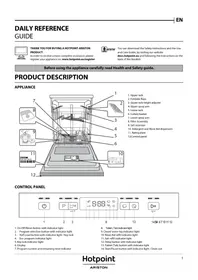
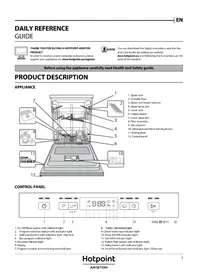
Overall view
Control panel
Loading the racks, 17
Lower rack
Cutlery basket
Upper rack
Start-up and use, 18-19
Starting the dishwasher
Measuring out the detergent
Wash options
LFT 321
LFT 320
LFT 229
LFT 228
LFT 217
Wash cycles, 20
Table of wash cycles
Rinse aid and refined salt, 21
Measuring out the rinse aid
Measuring out the refined salt
Care and maintenance, 22
Shutting off the water and electricity supplies
Cleaning the dishwasher
Preventing unpleasant odours
Cleaning the sprayer arms
Cleaning the water inlet filter
Cleaning the filters
Leaving the machine unused for extended periods
Precautions, advice and Assistance, 23
General safety
Disposal
Saving energy and respecting the environment
Assistance
Troubleshooting, 24

Hotpoint
ARISTON
Keep this instruction manual in a safe place for future reference. If the appliance is sold, given away or moved, please ensure the manual is kept with the machine, so that the new owner may benefit from the advice contained within it. Please read this instruction manual carefully: it contains important information regarding the safe installation, use and maintenance of the appliance. If the appliance must be moved at any time, keep it in an upright position; if absolutely necessary, it may be tilted onto its back.
Positioning and levelling
- Remove the appliance from all packaging and check that it has not been damaged during transportation. If it has been damaged, contact the retailer and do not proceed any further with the installation process.
- Check the dishwasher by placing it so that its sides or back panel are in contact with the adjacent cabinets or even with the wall. This appliance can also be recessed under a single worktop* (see the Assembly instruction sheet).
- Position the dishwasher on a level and sturdy floor. If the floor is uneven, the front feet of the appliance may be adjusted until it reaches a horizontal position. If the appliance is levelled correctly, it will be more stable and much less likely to move or cause vibrations and noise while it is operating.
- Adjust the height of the rear foot from the front of the appliance* on the central lower part of the dishwasher, turning a hexagonal spanner (red color) with an opening of 8 mm in a clockwise direction to increase the height or in an anticlockwise direction to decrease the height.
Connecting the water and electricity supplies
⚠️ Connection to the water and electricity supplies should only be performed by a qualified technician. The dishwasher should not stand on top of the water hoses or the electricity supply cable. The appliance must be connected to the water supply network using new hoses. Do not use old hoses.
The water inlet (A) and outlet (B) hoses and the electricity supply cable may be positioned towards the right or the left in order to achieve the best possible installation (see figure).

Connecting the water inlet hose
- To a suitable cold water connection point: before attaching the hose, run the water until it is perfectly clear so that any impurities that may be present in the water do not clog the appliance; after performing this operation, screw the inlet hose tightly onto a tap with a 3/4 gas threaded connection.
- To a suitable hot water connection point: your dishwasher may be supplied with hot water from the mains supply (if you have a central heating system with radiators) provided that it does not exceed a temperature of 60°C. Screw the hose to the tap as described for connection to a cold water supply.
If the inlet hose is not long enough, contact a specialist store or an authorised technician (see Assistance).
The water pressure must be within the values indicated in the Technical data table (see adjacent information). The hose should not be bent or compressed.
Anti-flooding protection
To ensure floods do not occur, the dishwasher: - is provided with a special system which blocks the water supply in the event of anomalies or leaks from inside the appliance.
Some models are also equipped with the supplementary safety device New Acqua Stop*, which guarantees anti-flooding protection even in the event of a supply hose rupture.

WARNING: HAZARDOUS VOLTAGE!
Under no circumstance should the water inlet hose be cut as it contains live electrical parts.
Connecting the water outlet hose
Connect the outlet hose (without bending it) to a drain duct with a minimum diameter of 4 cm. Alternatively, rest it over a sink or tub; the free end of the hose should not remain immersed in water.

The special plastic elbow * makes it easier to find the best layout: fix the elbow to the wall securely in order to prevent the outlet hose from moving and spilling the dirty water.
The part of the hose marked with the letter A should be between 40 and 100 cm
above the ground (see figure).
We advise against the use of hose extensions.
Electrical connection
Before inserting the plug into the electrical socket, make sure that:
- The socket is earthed and complies with current regulations.
- The socket can withstand the maximum load of the appliance, which is indicated on the data plate located on the inside of the door (see chapter entitled Description of the appliance).
- The power supply voltage falls within the values indicated on the data plate on the inside of the door.
- The socket is compatible with the plug of the appliance. If this is not the case, ask an authorised technician to replace the plug (see Assistance); do not use extension cables or multiple sockets.
Once the appliance has been installed, the power supply cable and the electrical socket should be easily accessible.
The cable should not be bent or compressed.
If the power supply cable is damaged, it must be replaced by the manufacturer or its Technical Assistance Service in order to prevent all potential hazards. (See Assistance)
The Company shall not be held responsible for any incidents that occur if these regulations are not observed.
Anti-condensation strip*
After installing the dishwasher, open the door and stick the adhesive transparent strip under the wooden shelf in order to protect it from any condensation which may form.
Advice regarding the first wash cycle
After the appliance has been installed, immediately before running the first wash cycle, completely fill the salt dispenser with water and add only then approximately 1 kg of salt (see chapter entitled Rinse aid and refined salt). The water may overflow: this is normal and is not a cause for concern. Select the water hardness value (see chapter entitled Rinse aid and refined salt). - After the salt has been poured into the machine, the LOW SALT indicator light * switches off.
If the salt container is not filled, the water softener and the heating element may be damaged as a result.
Technical data
|
| Dimensions | width 59.5 cmheight 82 cmdepth 57 cm |
| Capacity | 12 standard place-settings |
| Water supply pressure | 0,05 ÷ 1MPa (0.5 ÷ 10 bar)4.3 psi – 145 psi |
| Power supply voltage | See appliance data plate |
| Total absorbed power | See appliance data plate |
| Fuse | See appliance data plate |
 | This dishwasher conforms to the following European Community Directives:-73/23/EEC dated 19/02/73(Low Voltage) and subsequent modifications-89/336/EEC dated 03/05/89(Electromagnetic Compatibility)and subsequent modifications-97/17/EC (Labelling)-2002/96/ CE (Waste Electrical and Electronic Equipment WEEE) |
 |
* Only available in selected models.
Description of the appliance
EN
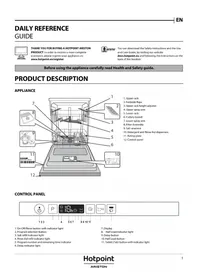
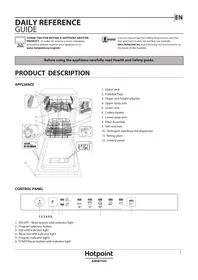
Overall view
- Upper rack
- Upper sprayer arm
- Tip-up compartments
- Rack height adjuster
- Lower rack
- Lower sprayer arm
- Cutlery basket
- Washing filter
- Salt dispenser
- Detergent and rinse aid dispensers
- Data plate
- Control Panel
Control panel
*** Only in completely built-in models. * Only available in selected models.
Before loading the racks, remove all food residues from the crockery and empty liquids from glasses and cups.
After loading the appliance, check that the sprayer arms can rotate freely.
Lower rack
The lower rack can hold pans, lids, plates, salad bowls, cutlery, etc. as seen in the Loading examples.
Plates and large covers should be placed at the sides of the rack, ensuring that they do not block the rotation of the upper sprayer arm.
Some dishwasher models are fitted with tip-up sections, which can be used in a vertical position when arranging plates or in a horizontal position when arranging pans and salad bowls.

Cutlery basket
The type of cutlery basket may vary according to the dishwasher model: it may be modular, non-modular or a sliding version. The non-modular basket must only be positioned at the front of the lower rack.
The modular basket may be separated into two parts, a solution which is recommended when performing a half load wash (only in models offering this option), is available in a sliding version (positioned at any point on the lower rack by sliding it between the fixed or tip-up inserts.
- Both versions are fitted with a collapsible sliding system which means the cutlery can be arranged in the best possible way.
Knives and other utensils with sharp edges must be placed in the cutlery basket with the points facing downwards, or they must be positioned horizontally in the tip-up compartments on the upper rack.
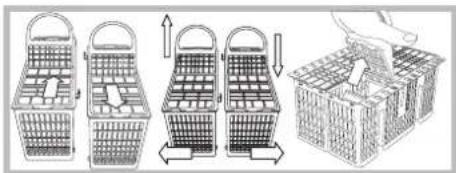
Cutlery basket positioning examples

Upper rack
Load this rack with delicate and lightweight crockery: glasses, tea and coffee cups, saucers, small salad bowls, saucepans and small saucepans which are not too soiled, using the Loading examples as a guide.
- Mugs and cups: place these on the tip-up compartments
- Long sharp knives and serving utensils: place these on the tip-up compartments **.
Adjusting the height of the upper rack
In order to make it easier to arrange the crockery, the upper rack may be moved to a higher or lower level.
(in models which offer the Baby cycle, the upper rack must be placed in its lower position when the appliance is being loaded).
The height of the upper rack should ideally be adjusted WHEN THE RACK IS EMPTY.

Never lift or lower the rack on one side only.

Open the left and right guide rail stops and pull out the rack; position it higher or lower as required, slide it along the guide rails until the front wheels are in place and close the stops (see figure).

If the rack is fitted with "Dual Space" handles * (see figure), pull out the upper rack until it reaches its stop point, grip the handles at the sides of the rack and move it upwards or downwards, then slowly let it fall back into place.
Loading examples for the upper rack
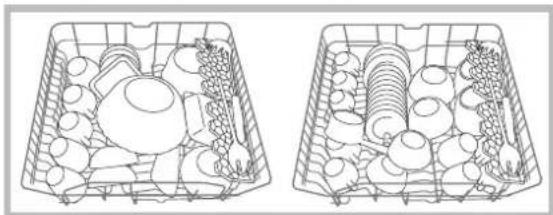
Loading examples for the lower rack


Baby Tip-up compartments
For dishwasher models with a Baby Cycle, tip-up compartments suitable for washing bottles, rings and teats are provided. (see the instruction sheet)
Items which should not be washed in the dishwasher
- Wooden items, objects with wooden or horn handles or glued-on parts.
- Items made from aluminium, copper, brass, pewter or tin.
- Items made from plastic material which is not heat-resistant.
- Antique or hand-painted porcelain.
- Antique silver. Silver which is not antique may, however, be washed in the dishwasher using a delicate wash cycle, provided that it does not come into contact with other metals.

We recommend the use of crockery which is dishwasher safe.
* Only available in selected models.
** The number and position may vary.
Starting the dishwasher
- Turn the water tap on.
- Open the door and press the ON/OFF button: you will hear a short beep and the display and option indicator lights switch on.
- Measure out the detergent (see below).
- Load the racks (see Loading the racks).
- Select the wash cycle in accordance with the type of crockery and its soil level (see Table of wash cycles) by pressing the P button.
- Select the wash options (see adjacent information).
- Start the wash cycle by shutting the door: a long beep signals the start of the wash cycle.
- Two short beeps and one long one indicate the end of the wash cycle and the wash cycle number flashes on the display. Open the door, switch off the appliance by pressing the ON/OFF button, shut off the water tap and unplug the appliance from the electricity socket.
- Wait for a few minutes before removing the crockery, in order to avoid burns. Unload the racks, beginning with the lower level.
The order in which the different wash cycles are displayed will change according to the frequency with which each cycle is used.
AUTO WASH CYCLES*: this model of dishwasher is equipped with a special sensor which can be used to assess the level of soiling and automatically select the most efficient and economic wash cycle accordingly.
The duration of the auto wash cycles may vary due to the operation of the sensor.
If the crockery is only lightly soiled or if it has been rinsed with water before being placed in the dishwasher, reduce the amount of detergent used accordingly.
Modifying a wash cycle in progress
If a mistake was made during the wash cycle selection process it is possible to change the cycle, provided that it has only just begun: open the door, avoiding the escaping steam, and press and hold the ON/OFF button; the machine will switch off with a long beep. Switch the machine back on using the ON/OFF button and select the new wash cycle and any options desired; start the cycle by closing the door.
Without switching off the machine, open the door, taking care to avoid the escaping steam, and place the crockery inside the dishwasher. Close the door: the cycle starts from the point at which it was interrupted.
Accidental interruptions
If the door is opened during the wash cycle, or if there is a power cut, the cycle stops. It starts again from the point at which it was interrupted once the door has been shut or once the electricity supply is restored.
Measuring out the detergent
A good wash result also depends on the correct amount of detergent being used; exceeding the stated amount does not result in a more effective wash and increases environmental pollution.
Only use detergent which has been specifically designed for dishwashers.
DO NOT USE washing up liquid.
Using excessive detergent may result in foam residue remaining in the machine after the cycle has ended.
The use of tablets is only recommended for models which offer the MULTI-FUNCTIONAL TABLETS option.
To achieve the best results from each washing and drying cycle, powder detergent, rinse aid liquid and salt should be used.
Compartment A: Washing detergent
Compartment B: Pre-wash detergent

- Open cover C by pressing button D.
- Pour in the detergent after consulting the Table of wash cycles:
- For powder detergent use compartments A and B.
- For detergent in tablet form: when the cycle requires 1 tablet, place it in compartment A and close the cover;
when it requires 2, place the second tablet at the bottom of the appliance.
- Remove detergent residues from the edges of the compartment and close the cover until it clicks.
Wash options
If an option is not compatible with the selected wash cycle (see Table of wash cycles), the corresponding LED flashes rapidly 3 times and 2 short beeps will sound.
Delayed start
It is possible to delay the start time of the cycle by 3, 6 or 9 hours.
- Press the DELAYED START button: every time it is pressed a buzzer sounds and the selected period of time is displayed.
- Select the wash cycle and shut the door: after the beep sounds, the timer begins counting down.
- Once this time has elapsed, the indicator light switches off and the wash cycle begins. To adjust the delay time and select a smaller period of time, press the DELAYED START button. To cancel it, press the button repeatedly until the selected delayed start indicator light switches off. The wash cycle will start automatically as soon as the door is shut.
Half load using the upper or lower rack*
If there are not many dishes to be washed, a half load cycle may be used in order to save water, electricity and detergent. Select the wash cycle and press the HALF LOAD button repeatedly: the triangle corresponding to the selected load will illuminate and the wash cycle will take place only using the upper or the lower rack.
The Half load option is not compatible with the Good Night and ShorTime options. Remember to load the upper or lower rack only, and to reduce the amount of detergent accordingly.
Multi-functional tablets*
This option optimises washing and drying results. When using multi-functional tablets, press the MULTI-FUNCTIONAL TABLETS button. The corresponding indicator light will illuminate. The “Multi-functional tablets” option results in the lengthening of the wash cycle.
The MULTI-FUNCTIONAL TABLETS option remains set for subsequent wash cycles if it is not deselected. The use of tablets is only recommended for models which offer the MULTI-FUNCTIONAL TABLETS option. This option is not recommended for use with wash cycles which do not specify the use of multi-functional tablets (see Table of options).
ShorTime option*
This option can be used to reduce the duration of the main wash cycles while maintaining the same washing and drying performance levels.
After selecting the wash cycle, press the ShorTime option button; the illumination of the corresponding indicator light followed by a short beep indicates its selection.
To deselect the option, press the same button again.
Good Night option*
This option reduces the amount of noise made by the machine and lengthens the wash cycles. It is a useful option because it enables users to benefit from the night-time energy rate.
After selecting the wash cycle, press the Good Night option button; the illumination of the corresponding indicator light followed by a short beep indicates its selection.
To deselect the option, press the same button again.
The ShorTime and Good Night options are not compatible with each other. The ShorTime and Good Night options are not compatible with the HALF LOAD option.
| Table of options* | A | B | C | D | E |
| Delayed Start | Half Load | Multi-functional Tablets | ShorTime | Good Night |
| 1. Auto Intensive | Yes | Yes | Yes | Yes | No |
| 2. Auto Normal | Yes | Yes | Yes | Yes | Yes |
| 3. Daily wash | Yes | Yes | Yes | No | No |
| 4. Soak | Yes | Yes | No | No | No |
| 5. Eco | Yes | Yes | Yes | No | Yes |
| 6. Quick | Yes | No | Yes | No | No |
| 7. Crystal | Yes | Yes | Yes | No | No |
| 8. Auto Duo Wash | Yes | No | Yes | Yes | No |
| 9. Ultra Intensive | Yes | Yes | Yes | No | No |
| 10. Special Guest Wash | Yes | Yes | No | No | No |
| 11. Baby cycle | Yes | No | No | No | No |
* Only available in selected models.
For available OPTIONS please refer to the Table of options on the Start-up and use page.
The number and type of wash cycles and options may vary depending on the dishwasher model.
| Wash cycle selection instructions | Wash cycle | Detergent(A) = compartment A(B) = compartment B | Wash cycles which include drying | Options | Wash cycle duration (tolerance ±10%) Hrs. Min. |
| Powder | Liquid | Tablets |
| Heavily soiled dishes and pans (not to be used for delicate items). 1. Auto Intensive | 30 g (A) | 30 ml (A) | 1 (A) | Yes | A-B-C-D | 2:15' |
| Normally soiled pans and dishes. Standard daily wash cycle. | 2. Auto Normal Wash | 25 g (A)5 g (B) | 25 ml (A)5 ml (B) | 1 (A) | Yes | A-B-C-D-E | 1:45' |
| Limited quantity of daily soiling.(4 place settings + 1 saucepan +1 frying pan). | 3. Daily | 25 g (A) | 25 ml (A) | 1 (A) | No | A-B-C | 1:00' |
| Pre-wash for dishes while awaiting completion of the load with the dishes from the next meal. | 4. Soak | No | No | No | No | A-B | 0:08' |
| Environmentally-friendly wash cycle with low energy consumption levels, suitable for pans and dishes. | 5. Eco* | 25 g (A)5 g (B) | 25 ml (A)5 ml (B) | 1 (A) | Yes | A-B-C-E | 2:35' |
| Economic and fast wash to be used for lightly soiled dishes. (Run cycle immediately after use) (2 plates + 2 glasses + 4 pieces of cutlery + 1 saucepan + 1 small frying pan). | 6. Quick | 25 g (A) | 25 ml (A) | 1 (A) | No | A-C | 0:25'-0:35' |
| Economic and fast wash for delicate items which are sensitive to high temperatures. (Run cycle immediately after use) (12 glasses + delicate plates). 7. Crystal | | 30 g (A) | 30 ml (A) | 1 (A) | Yes | A-B-C | 1:30' |
| Wash spread over the two racks: delicate for crystal and glasses on the upper rack and heavy duty for the pans on the lower rack. | 8. Auto Duo Wash | 30 g (A) | 30 ml (A) | 1 (A) | Yes | A-C-D | 1:43' |
| Heavily soiled saucepans or pans with residual dried-on food. | 9. Ultra Intensive | 30 g (A)5 g (B) | 30 ml (A)5 ml (B) | 1 (A)1 (bottom of the appliance) | Yes | A-B-C | 2:07' |
| Rinse and drying cycle for dishes that are seldom used and are only dusty. | 10. Guest Wash | No | No | No | Yes | A-B | 0:32' |
| Disinfecting wash cycle suitable for washing bottles, rings and teats together with plates, cups, glasses and cutlery. The crockery should only be loaded on the upper rack. | 11. Baby Wash | 20 g (A) | 20 ml (A) | No | Yes | A | 1:20' |
Notes:
Optimum performance levels when using the "Daily wash" and "Quick wash" cycles can be achieved by observing the maximum amounts of crockery specified.
To make it easier to measure out the detergent, it is worth remembering that:
1 tablespoon = 15 gr. of powder = approximately 15 ml of liquid - 1 teaspoon = 5 gr. of powder = approximately 5 ml of liquid
* The Eco wash cycle adheres to the regulation EN-50242. Although it has a longer duration than other wash cycles it uses less energy and is less harmful to the environment.
Note for Test Laboratories: for information relating to comparative EN testing conditions, please send an email to the following address:
ASSISTENZA_EN_LVS@indesitcompany.com
Only use products which have been specifically designed for dishwashers. Do not use table salt or industrial salt, or washing up liquid.
Follow the instructions given on the packaging.
If using a multi-functional product it is not necessary to add rinse aid; however, we recommend that you add salt, especially if you live in an area where the water is hard or very hard. Follow the instructions given on the packaging.
If you do not add salt or rinse aid, the LOW SALT* and LOW RINSE AID* indicator lights remain lit.
Measuring out the rinse aid
Rinse aid makes it easier for the crockery to dry, as water runs off surfaces more readily and therefore does not leave streaks or marks.
The rinse aid dispenser should be filled:
- When the LOW RINSE AID indicator light on the control panel is illuminated;

- Open the dispenser by turning the lid (G) in an anticlockwise direction.
- Pour in the rinse aid, making sure it does not overflow from the dispenser. If this happens, clean the spill immediately with a dry cloth.
- Screw the lid back on.
NEVER pour the rinse aid directly into the appliance tub.
Adjusting the amount of rinse aid
If you are not completely satisfied with the drying results, you may adjust the quantity of rinse aid used. Use a screwdriver to turn the dosage adjuster (F) to one of the 6 pre-set positions (the default position is set to 4):
- If there are streaks on the crockery, set the adjustment device to a lower number (1-3).
- If drops of water remain on the crockery or if there are limescale marks present after the cycle has finished, set the adjuster to a higher number (4-6).
Setting the water hardness
Every dishwasher is equipped with a water softener which, by using refined salt designed especially for this type of appliance, supplies water without limescale which is then used to wash the crockery.
This dishwasher offers a setting which helps to reduce pollution and optimises washing performance in accordance with the water hardness level in your area. This information can be obtained from the organisation which supplies your household with water.
- Open the door and switch on the machine by pressing the ON/OFF button.
- Press the P button and hold for approximately 5 seconds; two short beeps will sound and the set hardness number will flash slowly on the display (the water softening system is set
to number 3).
- Press the P button repeatedly until the desired hardness level has been reached (1-2-3-4-5 * see Water hardness table).
- To exit the function, wait approximately 30 seconds or press another option button, or switch off the machine using the ON/OFF button.
Even if using multi-functional tablets, the salt dispenser should still be filled.
| Water Hardness Table |
| °dH | °fH | mmol/l | level |
| 0 | 6 | 0 | | 10 | 0 | 1 | 1 |
| 6 | 11 | 11 | 20 | 1.1 | | 2 | 2 |
| 12 | 17 | 21 | 30 | 2.1 | 3 | | 3 |
| 17 | 34 | 31 | 60 | 3.1 | | 6 | 4 |
| 34 | 50 | 61 | 90 | 6.1 | | 9 | |
| For values between 0 ° f and 10 ° f, we do not recommend the use of salt.* this setting may cause a slight increase in the duration of the cycle. |
(°dH = hardness measured in German degrees - °f = hardness measured in French degrees - mmol/l = millimoles per litre)
Measuring out the refined salt
In order to achieve the best possible results using a wash cycle, make sure that the dispenser is never empty. Refined salt removes limescale from the water, thus avoiding the formation of deposits on crockery.
The salt dispenser is located in the lower part of the dishwasher (see Description) and should be filled:
- When the green float * cannot be seen by simply looking at the cap of the salt dispenser.
- When the LOW SALT indicator light on the control panel is illuminated;
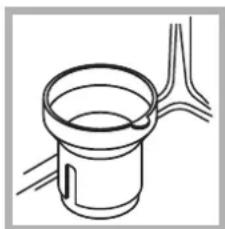
- Remove the lower rack and unscrew the container cap (anticlockwise).
- The first time you do this: fill the water tank right up to its edge.
- Position the funnel * (see figure) and fill the salt container right up to its edge (this should hold approximately
1 kg); it is not unusual for a little water to
leak out.
- Remove the funnel * and wipe any salt residue away from the opening; rinse the cap under running water and then screw it on, the head facing downwards so as to let the water flow out of the four cracks which are arranged in a star shape on the lower part of the cap. (Salt cap with green float)
Make sure the cap is screwed on tightly, so that no detergent can get into the container during the wash cycle (this could damage the water softener beyond repair).
When necessary, measure out the salt before a wash cycle so that any saline solution which has leaked out of the salt dispenser is removed.
Shutting off the water and electricity supplies
- Turn off the water tap after every wash cycle to avoid leaks. Always unplug the appliance when cleaning it and when performing maintenance work.
Cleaning the dishwasher
- The external surfaces of the machine and the control panel may be cleaned using a non-abrasive cloth which has been dampened with water. Do not use solvents or abrasive products.
- Any marks on the inside of the appliance may be removed using a cloth dampened with water and a little vinegar.
Preventing unpleasant odours
- Always keep the door of the appliance ajar in order to avoid moisture from forming and being trapped inside the machine.
- Clean the seals around the door and detergent dispensers regularly using a damp sponge. This will avoid food becoming trapped in the seals, which is the main cause behind the formation of unpleasant odours.
Cleaning the sprayer arms
Food residue may become encrusted onto the sprayer arms and block the holes used to spray the water. It is therefore recommended that the arms are checked from time to time and cleaned with a small non-metallic brush.
The two sprayer arms may both be removed.
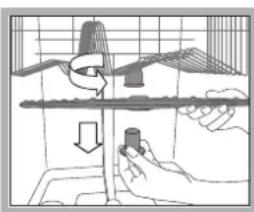
To remove the upper sprayer arm, rotate the locking ring in an anti-clockwise direction. The upper sprayer arm should be replaced with the holes facing upwards.
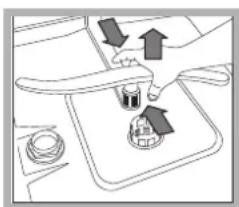
The lower sprayer arm can be removed by pressing on the side tabs and pulling it upwards.
Cleaning the water inlet filter*
If the water hoses are new or have not been used for an extended period of time, let the water run to make sure it is clear and free of impurities before performing the necessary connections. If this precaution is not taken, the water inlet could become blocked and damage the dishwasher.
Clean the water inlet filter at the tap outlet regularly.
- Turn off the water tap.
- Unscrew the end of the water inlet hose, remove the filter and clean it carefully under running water.
- Replace the filter and screw the water hose back into position.
Cleaning the filters
The filter assembly consists of three filters which remove food residues from the washing water and then recirculate the water. They should be cleaned if you wish to achieve the best results in every wash.
Clean the filters regularly.
The dishwasher should not be used without filters, or if the filter is loose.
- After several washes, check the filter assembly and if necessary clean it thoroughly under running water, using a non-metallic brush and following the instructions below:
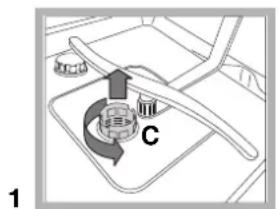
- Turn the cylindrical filter C in an anti-clockwise direction and pull it out (fig. 1).
- Remove the cup filter B by exerting a slight pressure on the side flaps (fig. 2).
- Slide out the stainless steel plate filter A (fig. 3).
- Inspect the trap and remove any food residue. NEVER REMOVE the wash cycle pump (black detail) (fig. 4).

1
4
After cleaning the filters, replace the filter assembly and fix it in position correctly; this is essential for maintaining the efficient operation of the dishwasher.
Leaving the machine unused for extended periods
- Disconnect the appliance from the electricity supply and shut off the water tap.
- Leave the door of the appliance ajar.
- When you return, run a wash cycle when the dishwasher is empty.
This appliance was designed and manufactured in compliance with current international safety standards. The following information has been provided for safety reasons and should therefore be read carefully.
General safety
- The appliance was designed for domestic use inside the home and is not intended for commercial or industrial use.
- The appliance must be used by adults only, to wash domestic crockery in accordance with the instructions in this manual.
- The appliance must not be installed outdoors, even in covered areas. It is extremely dangerous to leave the machine exposed to rain and storms.
- Do not touch the appliance when barefoot.
- When unplugging the appliance, always pull the plug from the mains socket, do not pull on the cable.
- The water supply tap must be shut off and the plug should be removed from the electrical socket before cleaning the appliance or carrying out any maintenance work.
- If the appliance breaks down, do not under any circumstances touch the internal parts in an attempt to perform the repair work yourself.
- Never touch the heating element.
- Do not lean or sit on the open door of the appliance: this may cause the appliance to overturn.
- The door should not be left open as it may create a dangerous obstacle.
- Keep detergent and rinse aid out of reach of children.
- The packaging material should not be used as a toy.
Disposal
- Disposal of packaging materials: observe local legislation so that the packaging may be reused.
- The European Directive 2002/96/EC relating to Waste Electrical and Electronic Equipment (WEEE) states that household appliances should not be disposed of using the normal solid urban waste cycle. Exhausted appliances should be collected separately in order to optimise the cost of re-using and recycling the materials inside the machine, while preventing potential damage to the atmosphere and to public health. The crossed-out dustbin is marked on all products to remind the owner of their obligations regarding separated waste collection.
For further information relating to the correct disposal of household appliances, owners may contact the relevant public authority or the local appliance dealer.
Saving energy and respecting the environment
Saving water and energy
- Only begin a wash cycle when the dishwasher is full. While waiting for the dishwasher to be filled, prevent unpleasant odours using the Soak cycle (see Wash cycles).
- Select a wash cycle which is suited to the type of crockery and to the soil level of the crockery using the Table of wash cycles.
- For dishes with a normal soil level, use the Eco wash cycle, which guarantees low energy and water consumption levels.
- If the load is smaller than usual activate the Half load option * (see Start-up and use).
If your electricity supply contract gives details of electricity saving time bands, run wash cycles during the periods when a lower tariff is applied. The Delayed start™ button (see Start-up and use) helps you organise the wash cycles accordingly.
Phosphate-free and chlorine-free detergents containing enzymes
- We strongly recommend that you use detergents that do not contain phosphates or chlorine, as these products are harmful to the environment.
- Enzymes provide a particularly effective action at temperatures around 50°C, and as a result detergents containing enzymes can be used in conjunction with low-temperature wash cycles in order to achieve the same results as a normal 65°C wash cycle.
- To avoid wasting detergent, use the product in appropriate quantities based on the manufacturer's recommendations, the hardness of the water and the soil level and quantity of crockery to be washed. Even if they are biodegradable, detergents contain substances which may alter the balance of nature.
Assistance
- Check whether the problem can be resolved using the Troubleshooting guide (see Troubleshooting).
- Restart the programme to check whether the problem has ceased to exist.
- If the problem persists, contact the Authorised Technical Assistance Service.
Never use the services of unauthorised technicians.
• The type of malfunction. • The appliance model (Mod.). • The serial number (S/N). This information can be found on the appliance data plate (see Description of the appliance).
Whenever the appliance fails to work, check for a solution from the following list before calling for Assistance.
| Malfunction: Possible causes / Solutions: |
| The dishwasher does not start. | · The plug has not been inserted into the electrical socket properly, or there is no power in the house.· The dishwasher door has not been shut properly.· A delayed start has been programmed (see Start-up and use). |
| No water drains out from the dishwasher. | · The dishwasher cycle has not yet finished.· The water outlet hose is bent (see Installation).· The drain duct is blocked.· The filter is clogged up with food residues. |
| The dishwasher makes excessive noise. | · The dishes are rattling against each other or against the sprayer arms.· An excessive amount of foam has been produced: the detergent has not been measured out correctly or it is not suitable for use in dishwashers (see Start-up and use). |
| The dishes and glasses are covered in a white film or limescale deposits. | · The level of the refined salt is low or the dosage setting is not suited to the hardness of the water (see Rinse aid and salt).· The lid on the salt dispenser is not closed properly.· The rinse aid has been used up or the dosage is too low.· The crockery is made from non-stick material. |
| The dishes and glasses are streaked or have a bluish tinge. | · The rinse aid dosage is too high. |
| The crockery has not been dried properly. | · A wash cycle without a drying programme has been selected.· The rinse aid has been used up or the dosage is too low (see Rinse aid and salt).· The rinse aid dispenser setting is not high enough. |
| The dishes are not clean. | · The racks are overloaded (see Loading the racks).· The crockery has not been arranged well.· The sprayer arms cannot move freely.· The wash cycle is too gentle (see Wash cycles).· An excessive amount of foam has been produced: the detergent has not been measured out correctly or it is not suitable for use in dishwashers (see Start-up and use).· The lid on the rinse aid compartment has not been shut correctly.· The filter is dirty or blocked (see Care and maintenance).· The refined salt level is low (see Rinse aid and salt). |
| The dishwasher does not take any water in/Tap shut-off alarm.(several short beeps are emitted)(the ON/OFF indicator light flashes and the number 6 appears on the display). | · There is no water in the mains supply.· The water inlet hose is bent ( see Installation).· Turn on the tap and the appliance will start after a few minutes.· The appliance lock has been activated because no action was taken when the beeps sounded. Switch off the machine using the ON/OFF button, turn on the tap and switch the machine back on after 20 seconds by pressing the same button. Re-programme the machine and restart the wash cycle. |
| Water intake solenoid valve malfunction alarm(the ON/OFF indicator light flashes and the number 2 appears on the display). | · Switch off the appliance by pressing the ON/OFF button and switch it back on after one minute. If the alarm continues, shut off the water tap to eliminate the risk of flooding, remove the plug from the electrical socket and contact Assistance. |
| Water inlet hose alarm(the ON/OFF indicator light flashes and the number 1 appears on the display). | · Switch off the appliance by pressing the ON/OFF button.Shut off the water tap to eliminate the risk of flooding, remove the plug from the electrical socket and contact Assistance. |
| Water inlet hose alarm/Water inlet filter blocked.(the ON/OFF indicator light flashes and the number 7 appears on the display). | · Switch off the appliance by pressing the ON/OFF button. Shut off the water tap to eliminate the risk of flooding and remove the plug from the electrical socket. Make sure the water inlet filter has not become blocked by various impurities. (see “Care and maintenance” chapter). |
Table of contents
Installation, 26-27
Cutlery basket
Upper rack
the top.
2

4
The special
Some
Upper dish rack
Foldable racks "Baby" *
Cutlery basket
Oven rack
Baby folding racks*
Upper basket
Cutlery basket
Upper basket

4