
TexStyle Control SI18896 - Iron BRAUN - Free user manual and instructions
Find the device manual for free TexStyle Control SI18896 BRAUN in PDF.
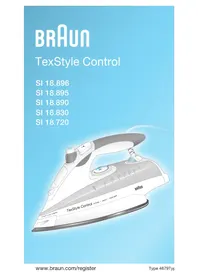


| Brand | Braun |
| Model | TexStyle Control SI18896 |
| Product type | Steam iron |
| Power | 2400 W |
| Water tank capacity | 300 ml |
| Soleplate type | Eloxal ceramic soleplate |
| Steam function | Continuous steam up to 40 g/min, boost steam up to 150 g/min |
| Anti-calc system | Yes, integrated anti-calc function |
| Auto shut-off | Yes, safety auto shut-off |
| Vertical function | Vertical steaming |
| Cord type | 2 m power cord |
| Dimensions (L x W x H) | 30 x 15 x 20 cm |
| Weight | 1.5 kg |
| Color | White and blue |
| Care | Clean the soleplate with a damp cloth; descale regularly with the anti-calc system |
| Safety | Auto shut-off, thermal fuse |
| Country of manufacture | China |
| Warranty | 2 years |
Frequently Asked Questions - TexStyle Control SI18896 BRAUN
User questions about TexStyle Control SI18896 BRAUN
0 question about this device. Answer the ones you know or ask your own.
Ask a new question about this device
Download the instructions for your Iron in PDF format for free! Find your manual TexStyle Control SI18896 - BRAUN and take your electronic device back in hand. On this page are published all the documents necessary for the use of your device. TexStyle Control SI18896 by BRAUN.
USER MANUAL TexStyle Control SI18896 BRAUN
Internet:
www.braun.com
www.service.braun.com
Braun GmbH
E Textile Protectors ⑪/⑫
F
G
H Cleaning the anti-calc valve
| Anticalc system


Deutsch
Our products are engineered to meet the highest standards of quality, functionality and design. We hope you enjoy your new Braun steam iron.
Important Safeguards
- Before using the iron, read the use instructions completely. Keep the use instructions during the entire life of the appliance.
- Make sure your voltage corresponds to the voltage printed on the iron.
- Caution: Due to the high power of this steam iron, please make sure that your mains supply is sufficient. Please contact your local electric power company to make sure that the so-called mains impedance is not higher than 0.31 Ohm. Always unplug the iron before filling with water. Always pull the plug, not the cord.
- The cord should never come in contact with hot objects or the sole plate.
- Never immerse the iron in water or other liquids.
- The iron must be used and rested on a stable surface.
- During ironing pauses, always place the iron upright on its heel rest and ensure that the heel rest is placed on a stable surface.
- The iron must not be left unattended while it is connected to the mains supply.
- This appliance is not intended for use by children or persons with reduced physical or mental capabilities, unless they are given supervision by a person responsible for their safety.
- Keep the iron away from children, especially when using the precision shot function. Electric irons combine high temperatures and hot steam that could lead to burns.
- Never iron or dampen clothes while wearing them.
- The iron is not to be used if it has dropped, if there are visible signs of damage, or if it is leaking. Regularly check the cord for damage.
- If the appliance (including cord) shows any defect, stop using it and take it to a Braun Service Centre for repair. Faulty or unqualified repair work may cause accidents or injury to the user. Braun electric appliances meet applicable safety standards.
A Description
1 Preconditioning nozzles 2 Spray nozzle 3 Water tank opening 4 Precision shot button 5 Spray button 6 Steam regulator
7 Temperature selector
8 Temperature pilot light
9 «auto-off» light (only with SI 18895 and SI 18896 models)
10 Heel rest 11 Textile Protector Plus (only with SI 18896, SI 18895 and SI 18890 models) 12 Soft Textile Protector (only with SI 18896 model)
B Before starting off
This iron is designed for tap water. If you have extremely hard water, we recommend that you use a mixture of 50% tap water and 50% distilled water. Fill the water tank to the «max» marking. Never use distilled water exclusively. Do not add any additives (e.g., starch).
- Before filling with water, turn off the steam regulator (6) ( «0» = steam off ).
- Holding the iron slightly inclined (as shown in B), fill the water tank up to the «max» marking.
- Place the iron upright on its heel rest and connect it to the mains. Select the temperature according to the ironing guide on the heel rest of the iron or on the label in your garments.
The pilot light (8) goes off when the desired temperature is reached (after approx. 1 1/2 min.).
C Ironing
Vario steam
You can select the steam quantity by turning the steam regulator (6) in a range from «0» to «6».
The temperature selector (7) has to be set within the red range.
We recommend a medium steam setting for all normal ironing. Only when ironing linen, thick cotton or similar fabrics we recommend the maximum steam setting.
Notice: While ironing, do not turn the steam regulator beyond setting «6».
Vario plus steam
For extra steam, press the steam regulator (6) for max. 30 seconds.
The temperature selector (7) has to be set within the solid red range.
Precision shot
Prior to use, press the precision shot button (4) 3 to 4 times to activate it. Press the precision shot button in intervals of at least 5 seconds for a powerful steam shot with preconditioning steam. Precision shot can be activated when dry ironing. However, the temperature selector has to be within the solid red range.
The precision shot function can also be used in the vertical position for steaming hanging clothes.
Caution: Hot steam comes out from the preconditioning nozzles.
Spray function
Press the spray button (5).
Dry ironing
Set the steam regulator (6) on position «0» (= steam off).
D Automatic shut-off
(SI 18 895 and SI 18 896 models only)
The «auto-off» mechanism causes a slight rattling noise during ironing. This is normal and in no case indicates a fault of the iron. The red «auto-off» light (9) will flash when the automatic shut-off is activated.
This happens when the iron has rested
- horizontally on its sole plate for about 30 seconds or
- vertically on its heel rest for about 8 minutes.
To turn on the iron again, just move it. When the «auto-off» pilot light stops flashing, the electrical power is on again. The automatic shut-off will be activated approximately 2 minutes after the iron is plugged into a socket.
E Textile Protectors
Textile Protector Plus (11) (only with SI 18 896, SI 18 895 and SI 18 890 models)
The Textile Protector Plus protects delicate fabrics from heat damage so that you can iron most fabrics without an intermediate cloth. A special coating avoids shiny patches.
With the Textile Protector, you are able to iron delicate fabrics with the temperature setting within the solid red range so that you can use all steam functions your iron offers.
To check the reaction of your fabrics before you start ironing, we recommend that you iron a small section of material on the reverse side. However, in order not to damage the coating, avoid ironing over e.g. zippers, metal buttons/rivets or strass with the Textile Protector Plus attached.
After having attached the Textile Protector, wait about 1 1/2 minutes before you start ironing.
Soft Textile Protector (12) (only with SI 18 896 model)
The Soft Textile Protector ensures an increased heat protection and utmost care for most delicate fabrics thanks to its specially designed SoftTouch cushion. Even most delicate, ironable* fabrics are protected against heat damage and shiny patches are avoided.
With the Soft Textile Protector attached, you can iron all ironable fabrics without an intermediate cloth. The Soft Textile Protector is perfectly suited for touching up e.g. creases of delicate business suits without having to use an ironing cloth.
With the Soft Textile Protector, you are able to iron delicate fabrics with the temperature setting within the solid red range so that you can use all steam functions your iron offers.
However, in order not to damage the SoftTouch cushion, avoid ironing over e.g. zippers, metal buttons/rivets or strass with the Soft Textile Protector attached.
(* in order to know whether a piece of garment is ironable, please refer to its care label.)
F After ironing
Unplug the iron and turn the steam regulator to position «0». To prolong the life of the iron, empty the water tank. Store the cool iron in a dry place, always standing on its heel rest.
G Maintenance and cleaning
To clean the sole plate, use steel wool. Never use a scouring pad, vinegar, or other chemicals. To clean the soft material on the handle, use soapy water.
H Cleaning the anticalc valve
The anticalc valve located on the lower end of the steam regulator has to be decalcified regularly (e.g., whenever steam development is insufficient). For this, the water tank has to be empty.
Removing the steam regulator with the anticalc valve
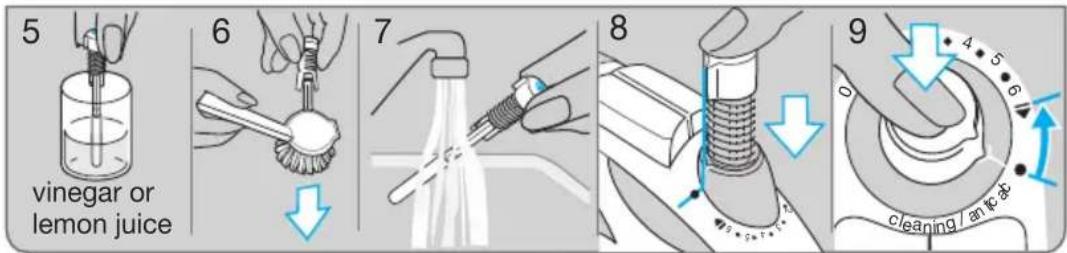
Turn the steam regulator clockwise towards the steam setting «6». Keep on turning firmly beyond the resistance until the steam regulator is lifted. When positioned at ●, pull it out vertically. Do not touch the anticalc valve at its lower end. Immerse the anticalc valve in vinegar (not vinegar essence) or lemon juice for a minimum of 30 minutes. Brush off remaining residues and rinse under running water (fig. H, 1-7).
Re-inserting the steam regulator When re-inserting the steam regulator, make sure the steam regulator base still points on setting ● (fig. H, 8). Firmly push down the steam regulator until it turns back to setting «6» (fig. H) where it catches.
Notice: The iron must never be used without steam regulator.
I Decalcifying/anticalc system
In order to clean the steam chamber from residues, decalcify it as shown in picture section I, 1-8.
Caution: Hot water and steam will come out from the sole plate when the steam regulator is turned clockwise beyond setting «6».
Wait for the sole plate to cool down, then clean it as described above. Then refill the tank with water, heat up the iron, and press the precision shot button 4 times to rinse the iron before ironing (fig. I, 9-13).
Do not use commercial decalcifiers; they may damage the iron.
Trouble-shooting guide
Problem Remedy
| Drops coming out of the steam vents. | Turn the steam regulator anti-clock-wise to reduce the steam or turn it off.Take longer intervals when pressing the precision shot button.Select a higher temperature setting. |
| Less steam develops or no steam at all. | Check water level.Clean the anticalc valve. |
| Calcium particles coming through the steam vents. | Decalcify the steam chamber. |
Subject to change without notice.
This product conforms to the European Directives EMC 2004/108/EC and Low Voltage 2006/95/EC.

Please do not dispose of the product in the household waste at the end of its useful life. Disposal can take place at a Braun Service Centre or at appropriate collection points provided in your country.

Guarantee
We grant 2 years guarantee on the product commencing on the date of purchase. Within the guarantee period we will eliminate, free of charge, any defects in the appliance resulting from faults in materials or workmanship, either by repairing or replacing the complete appliance as we may choose. This guarantee extends to every country where this appliance is supplied by Braun or its appointed distributor.
This guarantee does not cover: damage due to improper use, normal wear or use as well as defects that have a negligible effect on the value or operation of the appliance.
The guarantee becomes void if repairs are undertaken by unauthorised persons and if original Braun parts are not used.
To obtain service within the guarantee period, hand in or send the complete appliance with your sales receipt to an authorised Braun Customer Service Centre.
For UK only:
This guarantee in no way affects your rights under statutory law.
French
trconsumers@custhelp.com
Greek
Country of origin: Hungary
Year of manufacture
To determine the year of manufacture, refer to the 3-digit production code located near the type plate. The first digit of the production code refers to the last digit of the year of manufacture. The next two digits refer to the calendar week in the year of the manufacture.
Example: "538" - The product was manufactured in week 38 of 2005.
- DEUTSCH
- IMPORTANT SAFEGUARDS
- A DESCRIPTION
- B BEFORE STARTING OFF
- C IRONING
- VARIO STEAM
- VARIO PLUS STEAM
- PRECISION SHOT
- SPRAY FUNCTION
- DRY IRONING
- D AUTOMATIC SHUT-OFF
- (SI 18 895 AND SI 18 896 MODELS ONLY)
- E TEXTILE PROTECTORS
- TEXTILE PROTECTOR PLUS (11) (ONLY WITH SI 18 896, SI 18 895 AND SI 18 890 MODELS)
- SOFT TEXTILE PROTECTOR (12) (ONLY WITH SI 18 896 MODEL)
- F AFTER IRONING
- G MAINTENANCE AND CLEANING
- H CLEANING THE ANTICALC VALVE
- I DECALCIFYING/ANTICALC SYSTEM
- TROUBLE-SHOOTING GUIDE
- GUARANTEE
- FOR UK ONLY
- FRENCH
- GREEK
- COUNTRY OF ORIGIN: HUNGARY
- YEAR OF MANUFACTURE
Brand : BRAUN
Model : TexStyle Control SI18896
Category : Iron