
ZGL 631 N - Cooker ZANUSSI - Free user manual and instructions
Find the device manual for free ZGL 631 N ZANUSSI in PDF.


| Product type | Freestanding cooker |
| Brand | Zanussi |
| Model | ZGL 631 N |
| Dimensions (W x D x H) | 60 cm x 60 cm x 85 cm |
| Net weight | 50 kg |
| Electrical supply | 230 V / 50 Hz |
| Gas supply | Natural gas (G20) 20 mbar or butane/propane 30/50 mbar (appropriate injectors) |
| Number of burners | 4 (including 1 rapid burner, 1 semi-rapid, 2 auxiliary) |
| Oven type | Electric fan oven |
| Oven capacity | 65 litres |
| Oven functions | Fan heat, grill, bottom heat, defrost, lighting |
| Cleaning | Easy-clean enamel walls, removable door |
| Safety | Automatic oven shut-off, child safety on door, thermocouple on burners |
| Repairability index | 7.5 / 10 |
| Energy class (oven) | A |
| Oven energy consumption (conventional) | 0.85 kWh |
| Total installed power | 10 kW (gas + electric) |
| Spare parts | Available via Zanussi after-sales service |
Frequently Asked Questions - ZGL 631 N ZANUSSI
User questions about ZGL 631 N ZANUSSI
0 question about this device. Answer the ones you know or ask your own.
Ask a new question about this device
Download the instructions for your Cooker in PDF format for free! Find your manual ZGL 631 N - ZANUSSI and take your electronic device back in hand. On this page are published all the documents necessary for the use of your device. ZGL 631 N by ZANUSSI.
USER MANUAL ZGL 631 N ZANUSSI
Fig. 4
Fig. 7
Fig. 8
Electrolux Home Products Belgium
Consumer services 02/363.04.4402/363.04.00 ELECTROLUX
SERVICE 02/363.04.60 Bergensesteenweg 719 1502
Lembeek
E-mail: consumer.services@electrolux.be
GRAND-DUCHÉ DE LUXEMBOURG
ELECTROLUX HOME PRODUCTS
Service Après-vente
0035242431-1 0035242431-360
Fig. 4
Regeling minimum gaspitten

Fig. 7
Fig. 8
Table 1: bypass diameters
| Brander ∅ By-pass | 1/100 mm. |
| Kleinbrander 28Normaalbrander 32Sterkbrander 42 |
Installation

Electrolux Home Products Belgium
Consumer services 02/363.04.44 02/363.04.00 ELECTROLUX
SERVICE 02/363.04.60 Bergensesteenweg 719
1502
Lembeek
E-Mail: consumer.services@electrolux.be
GRAND-DUCHÉ DE LUXEMBOURG
ELECTROLUX HOME PRODUCTS
Consumer services 0035242431-1
0035242 431-360
Fig. 7
Fig. 8
Electrolux Home Products Belgium Consumer services 02/363.04.4402/363.04.00 ELECTROLUX SERVICE
02/363.04.60 Bergensesteenweg 719 1502 Lembeek
E-mail: consumer.services@electrolux.be
Grand-Duché de Luxembourg
ELECTROLUX HOME PRODUCTS Consumer services 00 35242431-1 0035242 431-360
These warnings are provided in the interest of safety. You must read them carefully before installing or using the appliance.
During Operation
- It is most important that this instruction book should be retained with the appliance for future reference. Should the appliance be sold or transferred, always ensure that the book is left with the appliance in order that the new owner can get to know the functions of the appliance and the relevant warnings.
- This appliance has been designed for non professional purpose in private houses only. It is meant to cook edible foodstuff only and MUST NOT be used for any other purposes. • It is dangerous to alter the specification in any way.
- For hygiene and safety reasons, this appliance should be kept clean at all times. A build-up of fats or other foodstuff could result in a fire. • Under no circumstances should you attempt to repair the appliance yourself. Repairs carried out by unexperienced persons may cause injury or serious malfunctioning. Refer to your local Zanussi Service Centre. Always insist on genuine Zanussi spare parts.
- Ensure that all control knobs are in the OFF position when not in use.
- Should you connect any electrical tool to a plug near this cooking appliance, ensure that electric cables are not in contact with it and keep them far enough from the heated parts of this appliance.
- If the appliance is out of order, disconnect it from the electric supply.
Child Safety
- This appliance has been designed to be operated by adults and children under supervision. Young children MUST NOT be allowed to tamper with the controls or play near or with the oven.
- Accessible parts of this appliance may become hot when it is in use. Children should be KEPT AWAY until it has cooled.
- This appliance is not intended for use by children or other persons whose physical, sensory or mental capabilities or lack of experience and knowledge prevents them from using the appliance safely without supervision or instruction by a responsible person to ensure that they can use the appliance safely.
About Installation, Cleaning and Maintenance
- It is mandatory that all operations required for the installation are carried out by a qualified or competent person, in accordance with existing rules and regulations.
- Disconnect the appliance from the electrical supply, before carrying out any cleaning or maintenance work.
- Ensure a good ventilation around the appliance. A poor air supply could cause lack of oxygen.
- Ensure that the gas supply complies with the gas type stated on the identification label, placed near the gas supply pipe.
- Using a gas cooking appliance will produce heat and moisture in the room which it has been installed in. Ensure a continuous air supply, keeping the air vents in good conditions or installing a cooker hood with discharge tube.
- In case of intensive or long time use of the appliance, make the ventilation more efficient, by opening a window or increasing the electric exhaust fan power.
- Once you removed all packaging from the appliance, ensure that it is not damaged and the electric cable is in perfect conditions. Otherwise, contact your dealer before proceeding with the installation.
- The manufacturer disclaims any responsibility should all the safety measures not be carried out.
Service
- Under no circumstances should you attempt to repair the appliance yourself. Repairs carried out by unexperienced persons may cause injury or serious malfunctioning. Refer to your local Service Centre. Always insist on genuine spare parts.

Environmental Information
• After installation, please dispose of the packaging with due regard to safety and the environment. - When disposing of an old appliance, make it unusable, by cutting off the cable.
The symbol

on the product or its packaging indicates that this product is not to be treated as normal household waste. Instead it must be handed over to a collection point for the recycling of electrical and electronic equipment. The correct disposal of this product will help to protect the environment and human health. Environment and health are endangered by incorrect disposal. For more detailed information about recycling of this product, please contact your local town hall, your household waste disposal service or the shop where you purchased the product.
These instructions are only for the countries stated by the symbol printed on the front cover of this instruction book.
Contents
For the User
Important Safety Information 38
Instruction for the User 40
Cleaning and Maintenance 41
Declaration of guarantee terms 42
European Guarantee 49
MANUFACTURER: ELECTROLUX ZANUSSI S.p.A.
Viale Bologna, 298
47100 FORLI (Italie)
Guide to Use the Instructions
The following symbols will be found in the text to guide you throughout the Instructions:

Safety Instructions

Step by step instructions for an operation

Hints and Tips

Environmental information
For the Installer
Technical Data 42
Electrical Connection 44
Adaptation to different types of gas 45
Building In 46
CE This appliance complies with the following E.E.C. Directives:
- 2006/95 (Low Voltage Directive);
- 89/336 (Electromagnetical Compatibility Directive);
- 93/68 (General Directives) and subsequent modifications.
Instruction for the User
Hob burners control knobs
The hob burners control knobs are situated on the hob right hand side. The symbols on the knobs mean that:
● there is no gas supply; there is maximum gas supply; there is minimum gas supply


Lighting the burners

For easier lighting, proceed before putting a pan on the pan support.

Models with automatic ignition
To light a burner, depress the relevant switch marked with a small spark. Then, push in the relevant knob and turn it anticlockwise to "maximum position".

Models with semi-automatic ignition
Push in the relevant knob and turn it anticlockwise to "maximum position". After lighting the flame, keep the knob pushed down for about 5 seconds. This will allow the "thermocouple" (Fig. 2, lett. C) to be heated and the safety device to be switched off, otherwise the gas supply would be interrupted.
Then, check the flame is regular and adjust it as required.
If you cannot light the flame even after several attempts, check the "cap" (Fig. 1-2, lett. A) is in the correct position.
To put the flame out, turn the knob to the symbol ●.
• Always turn the flame down or put it out before taking the pans off the burner.

Do not keep the control knob pressed for more than 15 seconds.
If the burner does not light even after 15 seconds, release the control knob, turn it to the "off" position and wait for at least one minute before trying to light the burner again.
If the burner accidentally goes out, turn the control knob to the "off" position and wait for at least 1 minute before trying to light the burner again.

| Burner minimum maximum diameter diameter | ||
| Big (rapid) 160 mm. | 260 mm. | |
| Medium (semirapid) | 120 mm. 220 mm. | |
| Small (Auxiliary) 80 mm. | 160 mm. | |
Using the hob correctly
To ensure maximum burner efficiency, it is strongly recommended that you use only pots and pans with a bottom fitting the size of the burner used, so that the flame will not spread beyond the bottom of the vessel.
It is also advisable, as soon as a liquid starts boiling, to turn down the flame so that it will barely keep the liquid simmering.

Use only pans or pots with flat bottoms.

Carefully supervise cooking with fats or oil, since these types of foodstuff can result in a fire if over-heated.
Cleaning and Maintenance

Disconnect the appliance from the electrical supply before carrying out any cleaning or maintenance work.
Wash the enamelled components with warm soapy water. Never use abrasive cleaners.
Frequently wash the "caps" and the "crowns" with hot soapy water, carefully taking away any built-up food.
The pan supports are dishwasher proof.
If the marks are particularly difficult to remove, use common non-abrasive cleaners or specific products.
Never use steel wool pads or acids.
Regularly wipe over the hob top using a soft cloth well wrung out in warm water to which a little liquid detergent has been added. Avoid the use of the following:
- household detergent and bleaches;
- impregnated pads unsuitable for non-stick saucepans;
- steel wool pads;
- bath/sink stain removers.
Should the hob top become heavily soiled, it is recommended that a proper cleaning product is used.
The electric ignition is obtained through a ceramic "candle" and a metal electrode (fig.1-lett. C, fig.2-lett. B). Keep these components well clean, to avoid difficult lighting, and check that the burner crown holes are not obstructed.
ZGL 63 ITCX: The cap and crown of each burner are secured with two screws. To separate the two pieces, lift the cap, turn it upside down, then undo the two fixing screws as shown in fig. 4.
After a thorough cleaning, reassemble the two parts and refit the cap in its correct position on the burner.
Periodic Maintenance
Periodically ask your local Service Centre to check the conditions of the gas supply pipe and the pressure adjuster, if fitted.
To ensure the good operation of the hob and its safety features, it is necessary that the taps are periodically lubricated.
- The periodic lubrication of the taps must be carried out by qualified personnel, which you must refer to also in case of malfunctioning.

Fig. 3
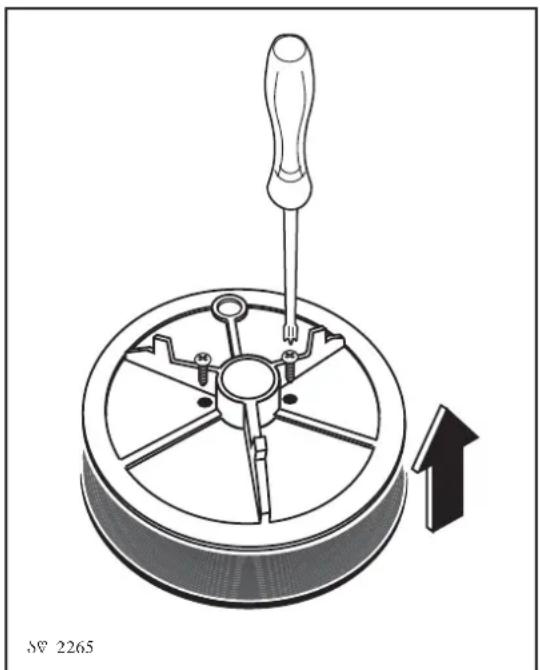
Fig. 4
Technical Data
Gas Burners Rating
Rapid Burner 3 kW (G20) - 2.8 kW (G30/G31)
Auxiliary Burner 1 kW
Semirapid Burner 2 kW
Class 3 Appliance
Category II 2E+3+
Setting Natural Gas G20/G25 - 20/25 mbar
Gas connection G 1/2"
Electric Supply 230 V
Hob recess dimensions
Length 550 mm.
Width 470 mm.
Table 1 : By-pass diameters
| Burner ∅ By-pass | in 1/100 of mm. |
| Auxiliary 28 Semi-rapid Rapid | 3242 |
Table 2 : injectors
| BURNER | NORMAL POWERkW | REDUCED POWERkW | NORMAL POWER | ||||
| NATURAL GASG 20 - 20 mbar | LPG28/37 mbar | ||||||
| inj. 1/100 | m3/h | inj. 1/100 | g/h - G30 | g/h - G31 | |||
| Auxiliary | 1 | 0,33 | 70 | 0,095 | 50 | 72 | 71 |
| Semi-rapid | 2 | 0,45 | 96 | 0,190 | 71 | 145 | 143 |
| Rapid | Natural gas :3LPG : 2,8 | 0,75 | 119 | 0,286 | 86 | 203 | 200 |
Instruction for the Installer
- The following instructions about installation and maintenance must be carried out by qualified personnel in compliance with the regulations in force. The regulation to be applied for this type of installation is NBN D 51.003: "Installations functioning with combustible gas lighter than air".
- The side walls of the unit in which the hob is going to be installed must not exceed the height of the working top.
- Avoid installing the appliance in the proximity of inflammable materials (e.g., curtains, tea towels, etc.).
- The appliance must be electrically disconnected before all interventions. If any electric supply to the appliance is required to carry out the work, ensure all the necessary precautions are followed.

Fig. 5
Gas connection
It is indispensable that the connection to the gas mains is carried out by means of an AGB tap. Choose fixed connections or use a flexible pipe in AGB (stainless steel).
If using flexible metallic pipes, be careful that they do not come in contact with mobile parts or that they are not squeezed. Use the same attention when the hob is combined with an oven.
This hob can be operated by Slochteren gas (G25) with a nominal pressure of 25 mbar or by natural gas with nominal pressure of 20 mbar. No regulation is required for use by these two types of gas.
Before fitting the appliance, ensure that the installation has the correct voltage for the appliance. At full capacity, the drop in pressure must not exceed 5%. Such a drop in pressure is caused by the following parameters:
- maximum capacity of meter;
- diameter and length of the tube in front and behind the meter;
- section of transit of various tubes positioned on the circuit;
- diameter of eventual connections.
IMPORTANT - To ensure correct operation, energy savings, and long life of the appliance, the voltage of the appliance must correspond to the recommended values.
The adjustable connection is fixed to the comprehensive ramp by means of a threaded nut G 1/2".
All the components shown in Fig.5 have already been assembled in the factory.
The appliance, before leaving the factory, has been tested in order to give you the best results.
IMPORTANT - When the final connection has been made, it is essential that a thorough leak test is carried out on the hob and installation. Use some soapy water, never a flame.
Electrical Connection
The appliance is designed to be connected to 230 V monophase electricity supply.
The connection must be carried out in compliance with the laws and regulations in force.
Before the appliance is connected:
1) check that the main fuse and the domestic installation can support the load (see the rating label); 2) check that the power supply is properly earthed in compliance with the current rules; 3) check the socket or the double pole switch used for the electrical connection can be easily reached with the appliance built in the forniture unit.
The appliance is supplied with a connection cable. This has to be provided with a proper plug, able to support the load marked on the identification plate. To connect the plug to the cable, follow the recommendation given in Fig. 5. The plug has to be fitted in a proper socket.
If connecting the appliance directly to the electric system, it is necessary that you install a double pole switch between the appliance and the electricity supply, with a minimum gap of 3 mm. between the switch contacts and of a type suitable for the required load in compliance with the current rules.
The connection cable has to be placed in order that, in each part, it cannot reach a temperature 50° C higher than the room temperature.
The brown coloured phase cable (fitted in the terminal block contact marked with "L") must always be connected to the network phase.
Replacement of the voltage cable
Only cable type H05RR-F or H05V2V2-F T90 must be used. The cable section must be suitable for the voltage and the working temperature.
The yellow/green earth wire must be approximately 2 cm longer than the phase wires (Fig. 6).

Fig. 6
Adaptation to different types of gas
Injectors replacement

- Remove the pan supports.
- Remove the burner's caps and crowns.
- With a socket spanner 7, unscrew and remove the injectors (Fig. 7), and replace them with the ones required for the type of gas in use (see "Technical Data").
- Reassemble the parts, following the same procedure backwards.
- Replace the rating label (placed near the gas supply pipe) with the relevant one for the new type of gas supply. You can find this label in the package of the injectors supplied with the appliance.
Should the feeding gas pressure be different or variable compared with the required pressure, an appropriate pressure adjuster must be fitted on the gas supply pipe, in compliance with the rules in force.
Adjustment of minimum level
To adjust the minimum level of the burners, proceed as follows:

• Light the burner.
- Turn the knob on the minimum position.
- Remove the knob.
- With a thin screwdriver, adjust the by-pass screw positioned in the centre of the gas tap control shaft (see Fig. 8). If changing from natural gas to LPG, completely tighten clockwise the screw, until a small regular flame is obtained.
- Finally check the flame does not go out when quickly turning the knob from the maximum position to the minimum position.
This procedure can easily be carried out, anyhow the hob has been positioned or built in the working top.

Fig. 7

Building In
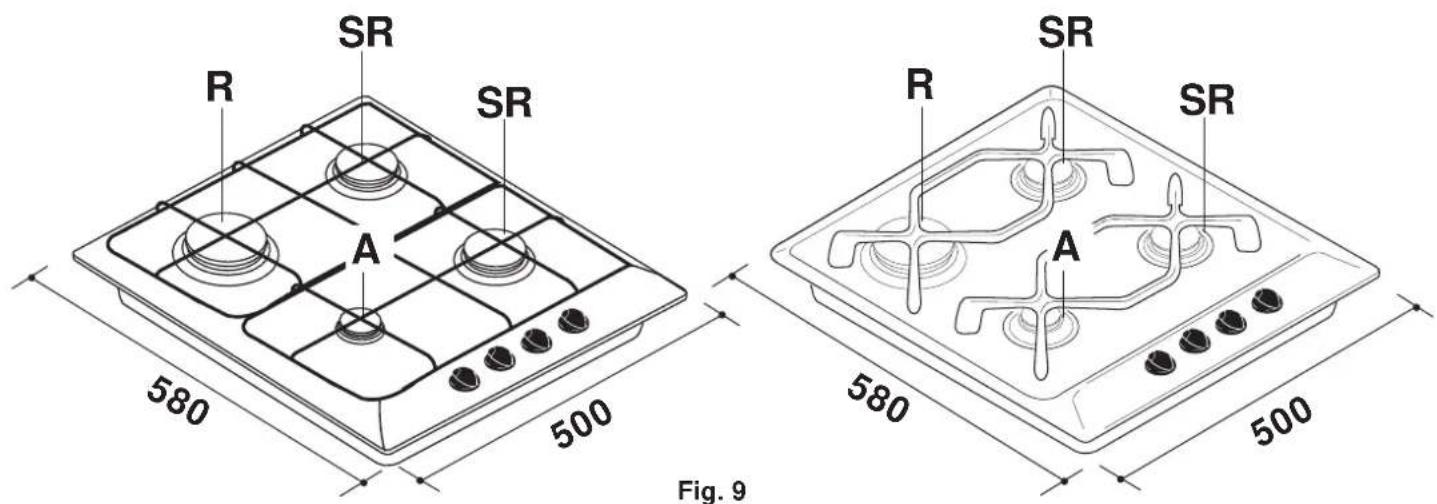
Dimensions are given in millimeters
These hobs can be inserted in a built-in kitchen unit whose depth is between 550 and 600 mm. The hobs dimensions are shown in Fig. 9.
The edge of the cut out must have a minimum distance from the rear wall of 55 mm.
If there are side walls, or sides of the furniture unit near the hob, the cut out edges must have a minimum distance of 100 mm.
Hanging forniture units or hoods must be placed at 650 mm. minimum from the hob.
A = Auxiliary burner
SR = Semirapid burner
R = Rapid Burner
Fitting the hob to the worktop
The hobs can be installed in a kitchen unit with an opening for insertion whose dimensions are shown in fig. 10. To install the hob, proceed as follows:
1) Remove the pan supports, the burner caps and crowns, and turn the hob upside down, taking care that the ignition candles are not damaged in this operation. 2) Place the sealing gasket (supplied with the hob) on the edges of the cutout: place it exactly on the front and rear edges, taking care that the sealings meet without overlapping. 3) Fix the hob with the relevant screws (fig. 11). The traction of the screws is able to trace the sealing, any excess of which can be easily removed.
The edge of the hob forms a double labyrinth seal which provides a total guarantee against infiltration of liquids.


Possibilities for insertion
Kitchen unit with door
Proper arrangements must be taken in designing the furniture unit, in order to avoid any contact with the bottom of the hob which can be heated when it is operated. The recommended solution is shown in Fig. 12.
The panel fitted under the hob should be easily removable to allow easy access if a technical assistance intervention is needed.
Kitchen unit with oven
The hob recess dimensions must comply with the indications given in Figs. 13 and 14 and must be provided with brackets to allow a continuous supply of air.
To avoid overheating, the building in should be carried out as shown in Figs. 15 and 16.
The hob's electric connection and the oven's must be carried out separately, both for safety reasons and to allow the oven to be easily taken off the unit.
In case a hood with a length of 600 mm is fitted over the hob, the hanging furniture units beside the hood must be placed at a minimum of 550 mm from the hob, to allow the fitting and the correct use of the lid, if required (fig. 17).
Fig. 12
Fig. 13
Fig. 14
a) Removable panel b) Space possibly useful for connections
Fig. 15
Fig. 16
Fig. 17
Declaration of guarantee terms
Our appliances are produced with the greatest of care. However, a defect may still occur. Our consumer services department will repair this upon request, either during or after the guarantee period. The service life of the appliance will not, however, be reduced as a result.
This declaration of guarantee terms is based on European Union Directive 99/44/EC and the provisions of the Civil Code.
The statutory rights that the consumer has under this legislation are not affected by this declaration of guarantee terms.
This declaration does not affect the vendor's statutory warranty to the end user. The appliance is guaranteed within the context of and in adherence with the following terms:
- In accordance with provisions laid down in paragraphs 2 to 15, we will remedy free of charge any defect that occurs within 24 months from the date the appliance is delivered to the first end user.
These guarantee terms do not apply in the event of use for professional or equivalent purposes.
- Performing the guarantee means that the appliance is returned to the condition it was in before the defect occurred.
Defective parts are replaced or repaired. Parts replaced free of charge become our property.
- So as to avoid more severe damage, the defect must be brought to our attention immediately.
- Applying the guarantee is subject to the consumer providing proof of purchase showing the purchase and/or delivery date.
- The guarantee will not apply if damage caused to delicate parts, such as glass (vitreous ceramic), synthetic materials and rubber, is the result of inappropriate use.
- The guarantee cannot be called on for minor faults that do not affect the value or the overall reliability of the appliance.
- The statutory warranty does not apply when defects are caused by:
- a chemical or electrochemical reaction caused by water,
- abnormal environmental conditions in general,
- unsuitable operating conditions,
- contact with harsh substances.
- The guarantee does not apply to defects due to transport which have occurred outside of our responsibility. Nor will the guarantee cover those caused by inadequate installation or assembly, lack of maintenance or failure to respect the assembly instructions or directions for use.
- Defects that result from repairs or measures carried out by people who are not qualified or expert or defects that result from the addition of non-original accessories or spare parts are not covered by the guarantee.
- Appliances that are easy to transport may be delivered or sent to the consumer services department. Home repairs are only anticipated for bulky appliances or built-in appliances.
- If the appliances are built-in, built-under, fixed or suspended in such a way that removing and replacing them in the place where they are fitted takes more than half an hour, the costs that result therefrom will be charged for. Connected damage caused by these removal and replacement operations will be the responsibility of the user.
- If, during the guarantee period, repairing the same defect repeatedly is not conclusive, or if the repair costs are considered disproportionate, in agreement with the consumer, the defective appliance may be replaced with another appliance of the same value.
In this event, we reserve the right to ask for a financial contribution calculated according to the length of time it has been used.
- A repair under guarantee does not mean that the normal guarantee period will be extended nor that a new guarantee period begins.
- We give a twelve month guarantee for repairs, limited to the same defect.
- Except in the event where liability is legally imposed, this declaration of guarantee terms excludes any compensation for damage outside the appliance for which the consumer wishes to assert his rights. In the event of legally admitted liability, compensation will not exceed the purchase price paid for the appliance.
These guarantee terms are only valid for appliances purchased and used in Belgium. For exported appliances, the user must first make sure that they satisfy the technical conditions (e.g.: voltage, frequency, installation instructions, etc.) for the country concerned and that they can withstand the local climatic and environmental conditions. For appliances purchased abroad, the user must first ensure that they meet the qualifications required in Belgium. Non-essential or requested adjustments are not covered by the guarantee and are not possible in all cases.
Our consumer services department is always at your disposal, even after the guarantee period has expired.
Address for our consumer services department: BELGIUM
Tel: Fax:
Electrolux Home Products Belgium Consumer services 02/363.04.44 02/363.04.00
ELECTROLUX SERVICE 02/363.04.60
Bergensesteenweg 719
1502 Lembeek
E-mail: consumer.services@electrolux.be
GRAND-DUCHÉ DE LUXEMBOURG
ELECTROLUX HOME PRODUCTS
Consumer services 00 35242431-1 0035242 431-360
Rue de Bitbourg. 7
L-1273 Luxembourg-Hamm
E-mail: consumer-service.luxembourg@electrolux.lu
European Guarantee
This appliance is guaranteed by Electrolux in each of the countries listed at the back of this user manual, for the period specified in the appliance guarantee or otherwise by law. If you move from one of these countries to another of the countries listed below the appliance guarantee will move with you subject to the following qualifications:-
- The appliance guarantee starts from the date you first purchased the appliance which will be evidenced by production of a valid purchase document issued by the seller of the appliance.
- The appliance guarantee is for the same period and to the same extent for labour and parts as exists in your new country of residence for this particular model or range of appliances.
- The appliance guarantee is personal to the original purchaser of the appliance and cannot be transferred to another user.
- The appliance is installed and used in accordance with instructions issued by Electrolux and is only used within the home, i.e. is not used for commercial purposes.
- The appliance is installed in accordance with all relevant regulations in force within your new country of residence.
The provisions of this European Guarantee do not affect any of the rights granted to you by law.
| Albania | +35 5 4 261 450 | Rr. Pjeter Bogdani Nr. 7 Tirane |
| Belgique/België/Belgien | +32 2 363 04 44 | Bergensesteenweg 719, 1502 Lembeek |
| Česká republika | +420 2 61 12 61 12 | Budějovická 3, Praha 4, 140 21 |
| Danmark | +45 70 11 74 00 | Sjællandsgade 2, 7000 Fredericia |
| Deutschland | +49 180 32 26 622 | Muggenhofer Str. 135, 90429 Nürnberg |
| Eesti | +37 2 66 50 030 | Pärnu mnt. 153, 11624 Tallinn |
| España | +34 902 11 63 88 | Carretera M-300, Km. 29,900 Alcalá de Henares Madrid |
| France | www.electrolux.fr | |
| Great Britain | +44 8705 929 929 | Addington Way, Luton, Bedfordshire LU4 9QQ |
| Hellas | +30 23 10 56 19 70 | 4, Limnou Str., 54627 Thessaloniki |
| Hrvatska | +385 1 63 23 338 | Slavonska avenija 3, 10000 Zagreb |
| Ireland | +353 1 40 90 753 | Long Mile Road Dublin 12 |
| Italia | +39 (0) 434 558500 | C.so Lino Zanussi, 26 - 33080 Porcia (PN) |
| Latvija | +37 17 84 59 34 | Kr. Barona iela 130/2, LV-1012, Riga |
| Lietuva | +370 5 2780609 | Ozo 10A, LT 08200 Vilnius |
| Luxembourg | +352 42 431 301 | Rue de Bitbourg, 7, L-1273 Hamm |
| Magyarország | +36 1 252 1773 | H-1142 Budapest XIV, Erzsébet királyné útja 87 |
| Nederland | +31 17 24 68 300 | Vennootsweg 1, 2404 CG - Alphen aan den Rijn |
| Norge | +47 81 5 30 222 | Risløkkvn. 2 , 0508 Oslo |
| Österreich | +43 18 66 400 | Herziggasse 9, 1230 Wien |
| Polska | +48 22 43 47 300 | ul. Kolejowa 5/7, Warszawa |
| Portugal | +35 12 14 40 39 39 | Quinta da Fonte - Edificio Gonçalves Zarco - Q 35 -2774-518 Paço de Arcos |
| Romania | +40 21 451 20 30 | Str. Garii Progresului 2, S4, 040671 RO |
| Schweiz - Suisse - Svizzera | +41 62 88 99 111 | Industriestrasse 10, CH-5506 Mägenwil |
| Slovenija | +38 61 24 25 731 | Gerbičeva ulica 98, 1000 Ljubljana |
| Slovensko | +421 2 43 33 43 22 | Electrolux Slovakia s.r.o., Electrolux Domáce spotrebiče SK, Seberíniho 1, 821 03 Bratislava |
| Suomi | www.electrolux.fi | |
| Sverige | +46 (0)771 76 76 76 | Electrolux Service, S:t Göransgatan 143, S-105 45 Stockholm |
| Türkiye | +90 21 22 93 10 25 | Tarłabași caddesi no : 35 Taksim İstanbul |
| Россия | +7 495 937 7837 | 129090 Москва, Олимпийский проспект, 16, БЦ "Олимпик" |
- REGELING MINIMUM GASPITTEN
- INSTALLATION
- DURING OPERATION
- CHILD SAFETY
- ABOUT INSTALLATION, CLEANING AND MAINTENANCE
- SERVICE
- ENVIRONMENTAL INFORMATION
- CONTENTS
- FOR THE USER
- GUIDE TO USE THE INSTRUCTIONS
- FOR THE INSTALLER
- INSTRUCTION FOR THE USER
- HOB BURNERS CONTROL KNOBS
- LIGHTING THE BURNERS
- MODELS WITH AUTOMATIC IGNITION
- MODELS WITH SEMI-AUTOMATIC IGNITION
- ALWAYS TURN THE FLAME DOWN OR PUT IT OUT BEFORE TAKING THE PANS OFF THE BURNER
- USING THE HOB CORRECTLY
- CLEANING AND MAINTENANCE
- PERIODIC MAINTENANCE
- TECHNICAL DATA
- GAS BURNERS RATING
- HOB RECESS DIMENSIONS
- INSTRUCTION FOR THE INSTALLER
- GAS CONNECTION
- ELECTRICAL CONNECTION
- REPLACEMENT OF THE VOLTAGE CABLE
- ADAPTATION TO DIFFERENT TYPES OF GAS
- INJECTORS REPLACEMENT
- ADJUSTMENT OF MINIMUM LEVEL
- BUILDING IN
- FITTING THE HOB TO THE WORKTOP
- POSSIBILITIES FOR INSERTION
- KITCHEN UNIT WITH DOOR
- KITCHEN UNIT WITH OVEN
- DECLARATION OF GUARANTEE TERMS
- EUROPEAN GUARANTEE
Brand : ZANUSSI
Model : ZGL 631 N
Category : Cooker