
ZDI22001XA - Dishwasher ZANUSSI - Free user manual and instructions
Find the device manual for free ZDI22001XA ZANUSSI in PDF.


| Product type | Built-in dishwasher |
| Height (cm) | 82 |
| Width (cm) | 45 |
| Depth (cm) | 57 |
| Net weight (kg) | 32 |
| Capacity (place settings) | 9 |
| Water consumption per cycle (L) | 9 |
| Energy consumption per cycle (kWh) | 0.92 |
| Energy class | F |
| Noise level (dB) | 49 |
| Number of programs | 6 |
| Available programs | Eco, Intensive, Quick, Glass, Basket cleaning, Auto |
| Delayed start | Yes, up to 24h |
| Half-load option | Yes |
| Drying | Natural condensation |
| Child safety | Yes, key lock |
| Salt indicator | Yes |
| Rinse aid indicator | Yes |
| Power supply (V/Hz) | 220-240 / 50 |
| Installation type | Built-in (under counter) |
| Maintenance | Clean the filter regularly, check the spray arms |
| Spare parts | Available on the manufacturer's website and authorized dealers |
Frequently Asked Questions - ZDI22001XA ZANUSSI
User questions about ZDI22001XA ZANUSSI
0 question about this device. Answer the ones you know or ask your own.
Ask a new question about this device
Download the instructions for your Dishwasher in PDF format for free! Find your manual ZDI22001XA - ZANUSSI and take your electronic device back in hand. On this page are published all the documents necessary for the use of your device. ZDI22001XA by ZANUSSI.
USER MANUAL ZDI22001XA ZANUSSI
EN User Manual 2
Dishwasher
Before the installation and use of the appliance, carefully read the supplied instructions. The manufacturer is not responsible if an incorrect installation and use causes injuries and damages.
Always keep the instructions with the appliance for future reference.
GENERAL SAFETY
- This appliance is intended to be used in household and similar applications such as:
- farm houses; staff kitchen areas in shops, offices and other working environments;
- by clients in hotels, motels, bed & breakfast and other residential type environments.
- Do not change the specification of this appliance.
- The operating water pressure (minimum and maximum) must be between 0.5 (0.05) / 8 (0.8) bar (Mpa)
- Obey the maximum number of 13 place settings.
- If the supply cord is damaged, it must be replaced by the manufacturer, its Authorised Service Centre or similarly qualified persons in order to avoid a hazard.
- Put knives and cutlery with sharp points in the cutlery basket with the points down or in a horizontal position.
- Do not keep the appliance door open without supervision to prevent to fall on it.
- Before maintenance, deactivate the appliance and disconnect the mains plug from the mains socket.
- Do not use water spray and steam to clean the appliance.
- The ventilation openings in the base (if applicable) must not be obstructed by a carpet.
- The appliance is to be connected to the water mains using the new supplied hose-sets. Old hose sets must not be reused.
CHILDREN AND VULNERABLE PEOPLE SAFETY
- This appliance can be used by children aged from 8 years and above and persons with reduced physical, sensory or mental
capabilities or lack of experience and knowledge if they have been given supervision or instruction concerning use of the appliance in a safe way and understand the hazards involved.
- Do not let children play with the appliance.
- Keep all detergents away from children.
- Keep children and pets away from the appliance door when it is open.
- Cleaning and user maintenance shall not be made by children without supervision.
SAFETY INSTRUCTIONS
INSTALLATION
- Remove all the packaging.
- Do not install or use a damaged appliance.
- Do not install or use the appliance where the temperature is less than 0 °C.
- Obey the installation instruction supplied with the appliance.
- Make sure that the appliance is installed below and adjacent to safe structures.
ELECTRICAL CONNECTION

WARNING! Risk of fire and electrical shock.
- The appliance must be earthed.
- Make sure that the electrical information on the rating plate agrees with the power supply. If not, contact an electrician.
- Always use a correctly installed shockproof socket.
- Do not use multi-plug adapters and extension cables.
- Make sure not to cause damage to the mains plug and to the mains cable. Should the mains cable need to be replaced, this must be carried out by our Authorised Service Centre.
- Connect the mains plug to the mains socket only at the end of the installation. Make sure that there is access to the mains plug after the installation.
- Do not pull the mains cable to disconnect the appliance. Always pull the mains plug.
- This appliance complies with the E.E.C. Directives.
- Only for UK and Ireland. The appliance has a 13 amp mains plug. If it is necessary to change the fuse in the mains plug, use fuse: 13 amp ASTA (BS 1362).
WATER CONNECTION
- Make sure not to cause damage to the water hoses.
- Before you connect the appliance to new pipes or pipes not used for a long time, let the water flow until it is clean.
- The first time you use the appliance, make sure that there is no leakage.
- If the water inlet hose is damaged, immediately disconnect the mains plug from the mains socket. Contact the Authorised Service Centre to replace the water inlet hose.
USE
- Do not sit or stand on the open door.
- Dishwasher detergents are dangerous. Obey the safety instructions on the detergent packaging.
- Do not drink and play with the water in the appliance.
- Do not remove the dishes from the appliance until the programme is completed. There can be detergent on the dishes.
- The appliance can release hot steam if you open the door while a programme operates.
- Do not put flammable products or items that are wet with flammable products in, near or on the appliance.
SERVICE
- Contact the Authorised Service Centre to repair the appliance. We recommend only the use of original spare parts.
- When you contact the Authorised Service Centre, ensure that you have the following information that is available on the rating plate.
Model :
PNC:
Serial Number:
DISPOSAL

WARNING! Risk of injury or suffocation.
- Disconnect the appliance from the mains supply.
- Cut off the mains cable and discard it.
- Remove the door catch to prevent children and pets from getting closed in the appliance.
EASY START

1 On/off indicator 2 Programme marker 3 Indicators 4 Delay button
5 Start button 6 Programme knob
INDICATORS

Washing phase. It comes on when the washing phase operates.
Drying phase. It comes on when the drying phase operates.
End indicator.
Salt indicator. It is always off while the programme operates.
| Programme | Degree of soil Type of load | Programme phases | Consumption values1) | ||
| Duration (min) | Energy (kWh) | Water (l) | |||
| ECO2) | Normal soil Crockery and cutlery | PrewashWash 50 °CRinsesDry | 195 1.039 | 11 | |
| 3) | Heavy soil Crockery, cutlery, pots and pans | PrewashWash 70 °CRinsesDry | 140 - 160 | 1.3 - 1.5 13 | - 15 |
| Normal soil Crockery and cutlery | PrewashWash 65 °CRinsesDry | 100 - 120 | 1.2 - 1.5 15 | - 17 | |
| 4) | Fresh soil Crockery and cutlery | Wash 60 °Cor 65 °CRinses | 30 0.9 9 | ||
| 5) | All Prewash 14 | 0.1 4 | |||
1) The pressure and temperature of the water, variations in the mains supply, the options selected, and the quantity of dishes can affect the values.
2) This programme provides the most efficient use of water and energy for normally soiled crockery and cutlery. (This is the standard programme for test institutes).
3) This programme includes a high-temperature phase for improved hygiene. During the rinse phase, the temperature remains at 70 °C for at least 10 minutes.
4) This programme is suitable for washing a load with fresh soil. It delivers good washing results in a short time.
5) Use this programme to quickly rinse dishes. This prevents food residues from bonding to the dishes and prevents bad odours from emanating from the appliance. Do not use detergent with this programme.
INFORMATION FOR TEST INSTITUTES
For all necessary information for test performance, send an email to:
info.test@dishwasher-production.com
Note the product number (PNC) found on the rating plate.
BEFORE FIRST USE
- Ensure that the current water softener setting matches the hardness of your water supply. If not, adjust the water softener level. Contact your local water authority to determine the water hardness in your area.
- Fill the salt container with dishwasher-specific salt.
- Fill the rinse aid dispenser with dishwasher-specific rinse aid.
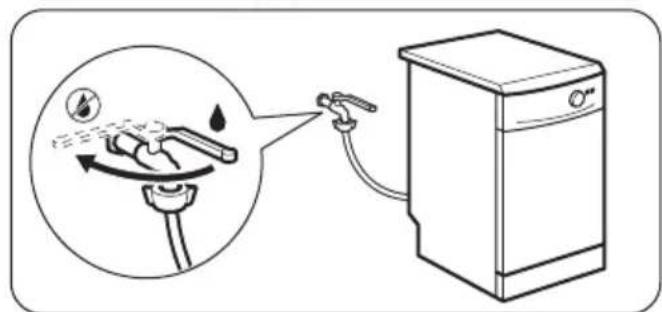
- Open the water tap.
- Start a programme to remove any processing residuals that can still be inside the appliance.
Do not use detergent and do not load the baskets.
THE WATER HARDNESS TABLE
| German degrees (°dH) | French degrees (°fH) | mmol/l Clarke degrees | Water softener level |
| 47 -50 84 | 90 8.4 - 9.0 58 - 63 10 | ||
| 43 - 46 76 | 83 7.6 - 8.3 53 - 57 9 | ||
| 37 - 42 65 | 75 6.5 - 7.5 46 - 52 8 | ||
| 29 - 36 51 | 64 5.1 - 6.4 36 - 45 7 | ||
| 23 - 28 40 | 50 4.0 - 5.0 28 - 35 6 | ||
| 19 - 22 33 | 39 3.3 - 3.9 23 - 27 | 51) | |
| 15 - 18 26 | 32 2.6 - 3.2 18 - 22 4 | ||
| 11 - 14 19 | 25 1.9 - 2.5 13 - 17 3 | ||
| 4 - 10 7 - 1 | 8 0.7 - 1.8 5 - 12 2 | ||
| <4 <7 <0.7 < 5 | 12) | ||
1) Factory setting 2) Do not use salt at this level.
Adjusting the water softener


The programme marker must be aligned with ⏻
- Make sure that the appliance is in programme selection mode.
- Press and hold and simultaneously turn the knob counterclockwise until the programme marker is aligned with
- Release when and start to flash.
- Press .Indicators , and flash. The current setting is indicated by the intermittent flashing of the indicator :e.g. 5 intermittent flashes + pause + 5 intermittent flashes = level 5.
- Press to change the setting. Each time you press the button, the level increases. After level 10 you will start again from level 1.
- Turn the knob to ① to confirm the setting.
ADDING SALT


Before first use put one litre of water in the salt container.
Water and salt can come out from the salt container when you fill it. Risk of corrosion. To prevent it, after you fill the salt container, start a programme.
ADDING RINSE AID


The rinse aid helps to dry the dishes without streaks and stains. It is automatically released during the hot rinse phase.
DAILY USE
- Open the water tap.
- Set the correct programme for the type of load and the degree of soil.
Make sure that the appliance is in Programme selection mode.
- If the salt indicator is on, fill the salt container.
- Load the baskets.
- Add the detergent.
- Start the programme.
ADDING DETERGENT


If the programme has a prewash phase, put a small quantity of detergent also in compartment B.
ADDING MULTI-TABLETS


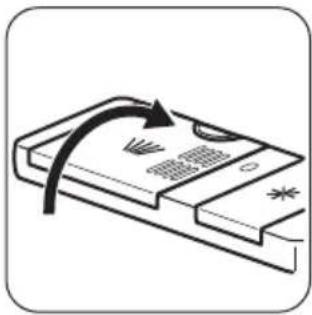
- Do not fill the salt container and the rinse aid dispenser.
- Adjust the water softener to the lowest level.
- Set the rinse aid dispenser to the lowest position.
PROGRAMME SELECTION MODE

The appliance must be in Programme selection mode to start a programme. If the control panel does not show this condition, do the Reset.
RESET

With Reset you can cancel the running programme or the delay start. The appliance goes back to the Programme selection mode.
STARTING A PROGRAMME


Open the water tap, close the door, select a programme, press ▷.
OPTION DELAY


With this option you can postpone the start of a programme of 3 hours.
Set the programme, press Delay.
Press ▷ to start the countdown.
At the end of the countdown, the programme starts.
OPENING THE DOOR WHILE THE APPLIANCE OPERATES
If you open the door while a programme is running, the appliance stops. When you close the door, the appliance continues from the point of interruption.
AT THE END OF THE PROGRAMME


The indicator comes on. If you do not deactivate the appliance within 5 minutes, all indicators go off. This helps to decrease energy consumption.
Turn the knob to Ⓐ. Close the tap.
HINTS AND TIPS
GENERAL
The following hints will ensure optimal cleaning and drying results in daily use and also help to protect the environment.
- Remove larger residues of food from the dishes into the waste bin.
- Do not pre-rinse dishes by hand. When needed, use the prewash programme (if available) or select a programme with a prewash phase.
- Always use the whole space of the baskets.
- When loading the appliance, make sure that the dishes can be completely reached and washed by the water released from the spray arm nozzles. Make sure that items do not touch or cover each other.
- You can use dishwasher detergent, rinse aid and salt separately or you can use the multi-tablets (e.g. "3in1", "4in1", "All in 1"). Follow the instructions written on the packaging.
- Select the programme according to the type of load and degree of soil. With the ECO programme you have the most efficient use of water and energy consumption for crockery and cutlery with normal soil.
THE WATER SOFTENER
The water softener removes minerals from the water supply, which would have a detrimental effect on the washing results and on the appliance.
The higher the content of these minerals, the harder your water is. Water hardness is measured in equivalent scales.
The water softener should be adjusted according to the hardness of the water in your area. Your local water authority can advise you on the hardness of the water in your area. It is important to set the right level of the water softener to assure good washing results.
USING SALT, RINSE AID AND DETERGENT
- Only use salt, rinse aid and detergent for dishwasher. Other products can cause damage to the appliance.
- Multi-tablets are usually suitable in areas with a water hardness up to 21 °dH. In areas exceeding this limit, rinse aid and salt must be used in addition to the multi-tablets. However, in areas with hard and very hard water we recommend to use solo-detergent (powder, gel, tablets without additional functions), rinse aid and salt separately for optimal cleaning and drying results.
- If you use multi-tablets you can select the Multitab option (if available). This option increases the cleaning and drying results with the use of multi-tablets.
- Detergent tablets do not fully dissolve with short programmes. To prevent detergent residues on the tableware, we recommend that you use the tablets with long programmes.
- Do not use more than the correct quantity of detergent. Refer to the instructions on the detergent packaging.
WHAT TO DO IF YOU WANT TO STOP USING MULTI-TABLETS
Before you start to use separately detergent, salt and rinse aid do the following procedure.
- Set the highest level of the water softener.
- Make sure that the salt and rinse aid containers are full.
- Start the shortest programme with a rinsing phase. Do not add detergent and do not load the baskets.
- When the programme is completed, adjust the water softener according to the water hardness in your area.
- Adjust the released quantity of rinse aid.
LOADING THE BASKETS
- Only use the appliance to wash items that are dishwasher-safe.
- Do not put in the appliance items made of wood, horn, aluminium, pewter and copper.
- Do not put in the appliance items that can absorb water (sponges, household cloths).
- Remove remaining food from the items.
- Make soft the remaining burned food on the items.
CARE AND CLEANING

WARNING! Before maintenance, deactivate the appliance and disconnect the mains plug from the main socket.
- Put hollow items (cups, glasses and pans) with the opening down.
- Make sure that cutlery and dishes do not bond together. Mix spoons with other cutlery.
- Make sure that glasses do not touch other glasses.
- Put small items in the cutlery basket.
- Put light items in the upper basket. Make sure that the items do not move.
- Make sure that the spray arm can move freely before you start a programme.
BEFORE STARTING A PROGRAMME
Make sure that:
- The filters are clean and correctly installed.
- The cap of the salt container is tight.
- The spray arms are not clogged.
- There is dishwasher salt and rinse aid (unless you use multi-tablets).
- The position of the items in the baskets is correct.
- The programme is applicable for the type of load and for the degree of soil.
- The correct quantity of detergent is used.
UNLOADING THE BASKETS
- Let the tableware cool down before you remove it from the appliance. Hot items can be easily damaged.
- First remove items from the lower basket, then from the upper basket.

At the end of the programme water can still remain on the sides and on the door of the appliance.

Dirty filters and clogged spray arms decrease the washing results. Make a check regularly and, if necessary, clean them.
CLEANING THE FILTERS

- Make sure that there are no residues of food or soil in or around the edge of the sump.
- Put back in place the flat filter (C). Make sure that it is correctly positioned under the 2 guides.
- Reassemble the filters (A) and (B).
- Put back the filter (A) in the flat filter (C). Turn it clockwise until it locks.

An incorrect position of the filters can cause bad washing results and damage to the appliance.
CLEANING THE SPRAY ARMS
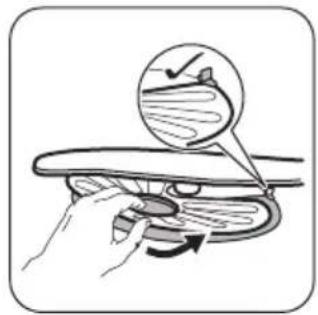
Do not remove the spray arms. If the holes in the spray arms are clogged, remove remaining parts of soil with a thin pointed object.
EXTERNAL CLEANING
- Clean the appliance with a moist soft cloth.
- Only use neutral detergents.
- Do not use abrasive products, abrasive cleaning pads or solvents.
TROUBLESHOOTING
If the appliance does not start or it stops during operation, before you contact the Service, check if you can solve the problem by yourself with the help of the information in the table.
INTERNAL CLEANING
- Carefully clean the appliance, including the rubber gasket of the door, with a soft moist cloth.
- If you regularly use short duration programmes, these can leave deposits of grease and limescale inside the appliance. To prevent this, we recommend to run long duration programmes at least 2 times per month.
With some problems different indicators flash intermittently and/or continuously to show an alarm code.
| Problem and alarm code Possible solution | |
| You cannot activate the appliance.▪ Make sure that the mains plug is connected to the mains socket.▪ Make sure that there is no a damage fuse in the fuse box. | |
| The programme does not start. · Make sure that the appliance door is closed. · Press Start. · If the delay start is set, cancel the setting or wait for the end of the countdown. · The appliance has started the procedure to recharge the resin inside the water softener. The duration of the procedure is approximately 5 minutes. | |
| The appliance does not fill with water. · The indicator flashes 1 time intermittently. · The indicator flashes continuously. | · Make sure that the water tap is open. · Make sure that the pressure of the water supply is not too low. For this information, contact your local water authority. · Make sure that the water tap is not clogged. · Make sure that the filter in the inlet hose is not clogged. · Make sure that the inlet hose has no kinks or bends. |
| The appliance does not drain the water. · The indicator flashes 2 times intermittently. · The indicator flashes continuously. | · Make sure that the sink spigot is not clogged. · Make sure that the drain hose has no kinks or bends. |
| The anti-flood device is on. · The indicator flashes 3 times intermittently. · The indicator flashes continuously. | · Close the water tap and contact the Service. |
Once you have checked the appliance, press ▷. If the problem occurs again, contact the Service.
For alarm codes not described in the table, contact the Service.
THE WASHING AND DRYING RESULTS ARE NOT SATISFACTORY
| Problem Possible solution | |
| There are whitish streaks or bluish layers on glasses and dishes. | The release quantity of rinse aid is too much. Adjust the rinse aid selector to a lower position.The quantity of detergent is too much. |
| There are stains and dry water drops on glasses and dishes. | The released quantity of rinse aid is not sufficient. Adjust the rinse aid selector to a higher position.The quality of the rinse aid can be the cause. |
| The dishes are wet. • The programme does not have a drying phase or has a drying phase with low temperature.The rinse aid dispenser is empty.The quality of the rinse aid can be the cause. | |

Refer to "Hints and tips" for other possible causes.
TECHNICAL INFORMATION
| Dimensions Width / height / depth (mm) 596 / 818 - 898 / 575 | ||
| Electrical connection 1) Voltage (V) 220 - 240 | ||
| Water supply pressure Min. / max. bar (MPa) 0.5 (0.05) / 8 (0.8) | ||
| Water supply | Cold water or hot water 2) max | 60 °C |
| Capacity Place settings 13 | ||
| Power consumption Left-on mode (W) 0.50 | ||
| Power consumption Off-mode (W) 0.50 | ||
1) Refer to the rating plate for other values. 2) If the hot water comes from alternative source of energy, (e.g. solar panels, aeolian energy), use the hot water supply to decrease energy consumption.
RATING PLATE
INFORMATION FOR TEST INSTITUTES
For all the necessary information for test performance, send an email to:
info.test@dishwasher-production.com
Write down the product number (PNC) that is on the rating plate.
ENVIRONMENTAL CONCERNS
Recycle materials bearing the symbol. Place packaging in appropriate containers for recycling. Help protect the environment and human health, and recycle waste from electrical and electronic appliances. Do not dispose of appliances marked with
the symbol Ⓧ with household waste. Return the product to your local recycling facility or contact your municipal office.






- GENERAL SAFETY
- CHILDREN AND VULNERABLE PEOPLE SAFETY
- SAFETY INSTRUCTIONS
- INSTALLATION
- ELECTRICAL CONNECTION
- WATER CONNECTION
- USE
- SERVICE
- DISPOSAL
- EASY START
- INDICATORS
- INFORMATION FOR TEST INSTITUTES
- BEFORE FIRST USE
- DAILY USE
- OPENING THE DOOR WHILE THE APPLIANCE OPERATES
- AT THE END OF THE PROGRAMME
- HINTS AND TIPS
- GENERAL
- THE WATER SOFTENER
- USING SALT, RINSE AID AND DETERGENT
- WHAT TO DO IF YOU WANT TO STOP USING MULTI-TABLETS
- LOADING THE BASKETS
- CARE AND CLEANING
- BEFORE STARTING A PROGRAMME
- UNLOADING THE BASKETS
- CLEANING THE FILTERS
- CLEANING THE SPRAY ARMS
- EXTERNAL CLEANING
- TROUBLESHOOTING
- INTERNAL CLEANING
- ENVIRONMENTAL CONCERNS
Brand : ZANUSSI
Model : ZDI22001XA
Category : Dishwasher