
WF2409E - Router Netis - Free user manual and instructions
Find the device manual for free WF2409E Netis in PDF.


| Product type | Wireless router |
| Brand | Netis |
| Model | WF2409E |
| Dimensions (L x W x H) | Approximately 160 x 120 x 30 mm |
| Weight | Approximately 200 g |
| Power supply | 5 V DC, 1 A (power adapter included) |
| Wi-Fi standard | IEEE 802.11 b/g/n (up to 300 Mbps) |
| Frequency | 2.4 GHz |
| Antennas | 2 external omnidirectional antennas |
| Ports | 1 WAN RJ45 port, 4 LAN RJ45 ports (10/100 Mbps) |
| Main functions | Router, access point, repeater, firewall, QoS, parental control, VPN pass-through |
| Wireless security | WEP, WPA/WPA2, WPA-PSK/TKIP/AES, MAC filtering, SSID disable |
| Configuration | Via web interface (http://192.168.1.1) or Netis mobile app |
| Maintenance and cleaning | Disconnect power, clean with a soft dry cloth. Do not use liquid or abrasive products. |
| Operating temperature | 0°C to 40°C |
| Operating humidity | 10% to 90% (non-condensing) |
| Spare parts and repairability | Parts not available individually. In case of failure, contact Netis support. Power adapter available as an option. |
| General information | Netis WF2409E router, comes with power adapter, Ethernet cable, quick installation guide, resource CD. |
Frequently Asked Questions - WF2409E Netis
User questions about WF2409E Netis
0 question about this device. Answer the ones you know or ask your own.
Ask a new question about this device
Download the instructions for your Router in PDF format for free! Find your manual WF2409E - Netis and take your electronic device back in hand. On this page are published all the documents necessary for the use of your device. WF2409E by Netis.
USER MANUAL WF2409E Netis
Appendix A: Wireless Power Control (Turbo) 49
1. Package Contents

*This QIG is for all netis 150Mbps/300Mbps wireless N routers, including models: WF2409/WF2409D/WF2409DS/WF2409E, WF2411/WF2411D/WF2411E/WF2411I/WF2411ID, WF2412, WF2414/WF2414D, WF2419/WF2419D/WF2419E/WF2419I/WF2419ID, WF2420, WF2522, WF2533, WF2631/WF2631D, etc.
* The product model shown in this QIG is WF2419, as an example.
2. Hardware Connection
![graph TD A["xDSL/Cable Modem"] -->|1| B[" notebook with wireless network adapter"] A -->|2| C["Computer with wired network adapter"] A -->|3| D["POWER"] A -->|4| E["LINE IN"] B -->|5| F["Laptop"] C -->|6| G["CABLE"] D -->|7| H["CABLE"]](/content/2026/06/1295766/images/237bad913b4c1f7d329996e65a273a703a2489caa7513d40a861263e29704eb9.jpg)
2.1. Power off your Modem. 2.2. Connect the WAN port on netis Router to the Modem's LAN port with an Ethernet cable. 2.3. Connect your computer to one of the LAN ports on netis Router with an Ethernet cable. 2.4. Power on your Modem. 2.5. Plug the provided Power Adapter into the PWR jack of netis Router and the other end to a standard electrical socket. Then wait for one minute.
3. Configure the Router via Web Management Page
3.1. Set the IP address of the wired network adapter on your computer as "Automatic" or "DHCP".
For Windows 8/7/Vista
1) Go to "Settings" (Win 8)/ "Start" (Win 7/Vista)> "Control Panel". 2) Left-click on "Network and Internet">"Network and Sharing Center">"Change adapter settings" (Win 8/7)/"Manage network connections" (Win Vista). 3) Right-click on "Local Area Connection" and left-click on "Properties". 4) Double-click on "Internet Protocol Version 4 (TCP/IPv4)". 5) Select "Obtain an IP address automatically" and "Obtain DNS server address automatically" then left-click on "OK".
For Windows XP/2000
1) Go to "Start"> "Control Panel". 2) Left-click on "Network and Internet Connections"> "Network Connections". 3) Right-click on "Local Area Connection" and left-click on "Properties". 4) Double-click on "Internet Protocol (TCP/IP)". 5) Select "Obtain an IP address automatically" and "Obtain DNS server address automatically" then left-click on "OK".
For MAC OS
1) Click on the "Apple" menu> "System Preferences". 2) Click on the "Network" icon. 3) Click on "Ethernet" in the left side box and click on "Advanced" in the lower right corner. 4) In the top options, select "TCP/IP". 5) In the pull-down menu next to "Configure IPv4", select "Using DHCP". 6) Click "OK" then "Apply".
3.2. Open your browser and type in the address field to visit router's http://netis web management page.

http://netis.cc
- Select the language you need from the top box; the default is English.
1) In the "Quick Setup" page, select your Internet Connection Type. If "DHCP (Cable Modem)" is selected, the router will automatically receive the IP parameters from your ISP (Internet Service Provider). If "Static IP" is selected, please enter the IP Address, Subnet Mask, Default Gateway, and DNS Servers provided by your ISP. If "PPPoE" is selected, please enter the Username and Password provided by your ISP. 2) Under Wireless Setup, configure your wireless network name (SSID) and password. 3) Left-click on "Save" to make your settings take effect.
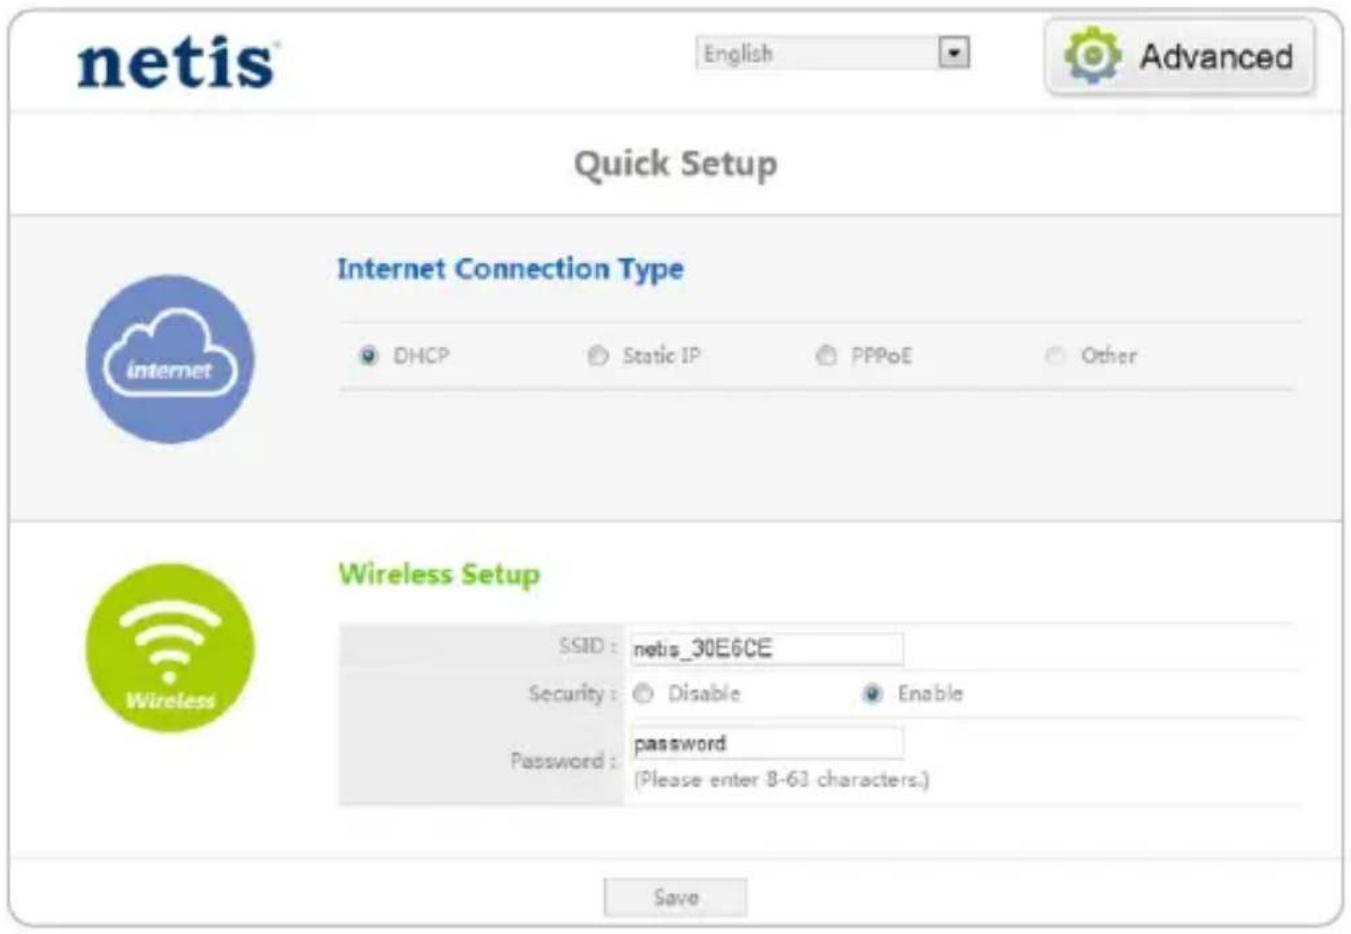
Tip 1:
Default address: http://netis.cc
Default SSID: netis_XXXXXX
Default wireless password: password
(XXXXXX: Last 6 digits of LAN MAC Address)
Tip 2:
You can click on the Advanced button at the top for other Internet connection types and further settings.
4. Troubleshooting

How do I restore my netis Router's configuration to its default settings?

With the router powered on, use a pin to press and hold the Default button on the rear panel for 8 to 10 seconds before releasing it. The router will reboot and all configurations will be restored to factory defaults.


What can I do if my Internet cannot be accessed?

1) Check to verify the hardware connections are correct. Please refer to the "Hardware Connection" step.
2) Login to netis Router's web management page and ensure that you set the correct Internet Connection Type. For cable modem users, please configure "MAC Clone" additionally.
On the left-side menu, left-click on And in the middle page, left-click on then "Save" it.
Advanced > "Network" > "WAN".
"Advanced"> "MAC Clone" and
MAC Address : 08:10:76:3a:70:fb
MAC Clone
Default MAC
3) Reboot the modem first and then netis Router. Wait for one minute before you check the Internet again.
4) If Internet access is not available, please connect your computer directly to your modem and try the Internet again. If the Internet is still not working, please contact your ISP for further help.
Technical Support: support@netis-systems.com
NETIS SYSTEMS CO., LTD.
www.netis-systems.com
MADE IN CHINA
Router inalámbrico N

Wireless N Router

Wireless N Router

Power adapter

Technical support: support@netis-systems.com
NETIS SYSTEMS CO., LTD.
www.netis-systems.com
MADE IN CHINA
* This quick installation guide applies to all netis 150Mbps/300Mbps Wireless N routers, including models WF2409/WF2409D/WF2409DS/WF2409E, WF2411/WF2411D/WF2411E/WF2411I/WF2411ID, WF2412, WF2414/WF2414D, WF2419/WF2419D/WF2419E/WF2419I/WF2419ID, WF2420, WF2522, WF2533, WF2631/WF2631D, etc.
Wireless N Router

Quick Installation Guide
* This quick installation guide applies to all netis 150Mbps/300Mbps Wireless N routers, including models WF2409/WF2409D/WF2409DS/WF2409E, WF2411/WF2411D/WF2411E/WF2411I/WF2411ID, WF2412, WF2414/WF2414D, WF2419/WF2419D/WF2419E/WF2419I/WF2419ID, WF2420, WF2522, WF2533, WF2631/WF2631D, etc.
Wireless N Router

Power adapter
Ethernet cable

Quick Installation Guide
* This SIG is for all netis 150Mbps/300Mbps wireless N routers, including models WF2409/WF2409D/WF2409DS/WF2409E, WF2411/WF2411D/WF2411E/WF2411I/WF2411ID, WF2412, WF2414/WF2414D, WF2419/WF2419D/WF2419E/WF2419I/WF2419ID, WF2420, WF2522, WF2533, WF2631/WF2631D, etc.
* This PRI is for all netis 150Mbps/300Mbps wireless N routers, including models WF2409/WF2409D/WF2409DS/WF2409E, WF2411/WF2411D/WF2411E/WF2411I/WF2411ID, WF2412, WF2414/WF2414D, WF2419/WF2419D/WF2419E/WF2419I/WF2419ID, WF2420, WF2522, WF2533, WF2631/WF2631D, etc.
Wireless N Router

Tip 1:
Power Adapter
Ethernet Cable

Wireless N Router

Power Adapter

Appendix A: Wireless Power Control (For WF2522, WF2533)
WF2522 and WF2533 are both wireless high power routers. In default, they work in normal power mode. You may change it into high power mode to improve the signal strength.
Before you change the settings, please check the color of the Turbo LED on your router.
Blue — Normal Power Mode
Red — High Power Mode
There're two methods to change the wireless power for your router.
Method 1: Through Turbo Button (Particularly recommended)

Turbo LED
Press the Turbo Button, then the Turbo LED color will change from blue to red. Now the router will work in the high power mode with perfect wireless performance in penetrating walls and eliminating the Wi-Fi dead zones.
Method 2: Through Web Management Page

Wireless Signal
Signal Strength:
Normal
Enhanced
1) In "Quick Setup" > "Wireless Signal" page, select "Enhanced" as the Signal Strength. 2) Click on "Save" to make your settings take effect.
Now the router will work in the high power mode with perfect wireless performance in penetrating walls and eliminating the Wi-Fi dead zones.
Note: The Quick Setup is just for the default wireless mode (Access Point). For the
other modes (WISP, Repeater, AP+WDS, WDS, Client), you can click on

Advanced
"Wireless" > "Signal Strength" to change the strength mode, then "Save" it.


- PACKAGE CONTENTS
- HARDWARE CONNECTION
- CONFIGURE THE ROUTER VIA WEB MANAGEMENT PAGE
- FOR WINDOWS 8/7/VISTA
- FOR WINDOWS XP
- FOR MAC OS
- TIP
- TROUBLESHOOTING
- APPENDIX A: WIRELESS POWER CONTROL (FOR WF2522, WF2533)
- METHOD 1: THROUGH TURBO BUTTON (PARTICULARLY RECOMMENDED)
- METHOD 2: THROUGH WEB MANAGEMENT PAGE
- WIRELESS SIGNAL
Brand : Netis
Model : WF2409E
Category : Router