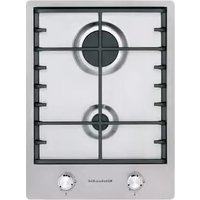
KHDD2 38510 - Cooker KITCHENAID - Free user manual and instructions
Find the device manual for free KHDD2 38510 KITCHENAID in PDF.


| Product Type | Freestanding Cooker |
| Brand | KitchenAid |
| Model | KHDD2 38510 |
| Width | 90 cm |
| Height | 90 cm |
| Depth | 60 cm |
| Weight | 75 kg |
| Power Supply | 220-240 V, 50/60 Hz |
| Total Power Consumption | 10.5 kW |
| Number of Ovens | 2 (Double Oven) |
| Main Oven Type | Convection with Grill |
| Secondary Oven Type | Convection |
| Hob Type | Induction |
| Number of Cooking Zones | 5 |
| Cleaning Method | Pyrolytic Self-Cleaning |
| Safety Features | Child Lock, Auto Shut-off, Cool Touch Door |
| Energy Efficiency Class | A+ |
| Annual Energy Consumption | 450 kWh |
| Usable Oven Capacity (Main) | 73 L |
| Usable Oven Capacity (Secondary) | 39 L |
| Noise Level | 48 dB |
| Spare Parts Availability | Authorized Service Centers |
| Repairability Index | 8.0 / 10 |
Frequently Asked Questions - KHDD2 38510 KITCHENAID
User questions about KHDD2 38510 KITCHENAID
0 question about this device. Answer the ones you know or ask your own.
Ask a new question about this device
Download the instructions for your Cooker in PDF format for free! Find your manual KHDD2 38510 - KITCHENAID and take your electronic device back in hand. On this page are published all the documents necessary for the use of your device. KHDD2 38510 by KITCHENAID.
USER MANUAL KHDD2 38510 KITCHENAID
Product descripon and symbols....4
Control Symbols....4
Using the burners....4
Praccal advice on using the hob 5
Posioning the pan supports....5
Hood and cabinetry clearances (mm) 6
Gas Consumpon and Injectors table 7
Warnings and Suggesons....7
Safeguarding the Environment 8
Installaon....9
Gas conncon 10
Electrical Connecon....11
Installaon....12
Adapon to a dierent type of gas supply....12
Replacing the injectors....13
Regulang the minimum ow level of the gas taps....13
Care and Maintenance....14
Care and maintenance of the gas burners....14
Troubleshoong guide 15
Aer Sales Service....15
Product descripon and symbols
- Removable grids
- Auxiliary burner
- Rapid burner
- Auxiliary burner control knob
- Rapid burner control knob

Control Symbols

O

Maximum ame

Minimum ame
Using the burners
To turn on one of the burners:
- Turn the corresponding control knob anclockwise unl the indicator coincides
with the maximum ame symbol - Press the control knob to ignite the burner.
- Once the burner has lit, keep the control knob pressed for about 5 seconds to allow the safety thermocouple ed to each burner to engage. The thermocouple will switch o the gas supply to the burner should the ame be accidentally lost (A gust of air, momentary interrupon of gas supply or liquid spillage etc.).

If the burner does not ignite within about 15 seconds, switch o the burner, check the ng of the burner cap and plate for correct ng. Wait at least 1 minute before trying again.
If the burner goes out when the control knob is released, the thermocouple did not engage. Wait at least 1 minute before repeang steps 1 to 3.
Praccal advice on using the hob
Read the instrucons to get the best out of your hob.
- Use pans with a similar diameter to the burner (see the table on this page)
- Use at boomed pans except with the wok support.
- Do not use excessive water when cooking foods and use the lid.
- Ensure that pans are fully supported by the pan supports and do not protrude over the edges
You should never use:
- Cast iron pots and pans, steate stone grills or terracoa dishes on the hob as this may damage the pan supports.
- Convectors such as metal neng, or others.
- The use of two burners simultaneously with just one container such as a sh kele.
Posioning the pan supports
To posion the pan supports rstly align with burners and then t into the nal posion paying aenon to do not scratch metal top with the support.

natural_image
Technical line drawings of a dual-chamber electronic device with mounting holes and a central circular component (no text or symbols)Important:
Do not rest or drag the pan supports upside down on the hob as this could scratch it.
Failure to comply with these recommendaons could lead to the glass ceramic hob being damaged, or broken and the safety of your appliance being compromised.
Burner ∅ Pans
rapid from 24 to 26 cm
auxiliary from 8 to 14 cm
Hood and cabinetry clearances (mm)
This appliance is not provided with a combuston product discharge. It is recommended that it be installed insufficiently aerated places, in terms of the laws in force.
Gas appliance air shall not be contaminated.
As per AS/NZS5601.1 minimum clearance must be maintained.
Clearance between the highest part of the highest burner of the cook top and a range hood or an exhaust fan (overhead clearance) shall not be less than 60 mm for a range hood and not less than 750 for an exhaust fan.
NOTE: In case of installaon of a hood above the cook top please refer to the range hood instrucons for the correct distance.
NOTE: Indicated clearance dimensions are applicable to non-combusable materials.

If needing to install mulple Domino products in the same cut-out, the Domino Connector 481010793572 (not included) accessory must be purchased separately from the After-sales Service. In addition, also order special kit 480121103229 in case of installaon in a stone counter top.
Gas Consumpon and Injectors table
Model KHDD2 38510
| Gas Type | Natural @ 1.00 kPa (test point pressure) | Universal LP @ 2.75 kPa (inlet pressure) | ||
| Burner | Nominal Gas Consumpon (MJ/h) | Nominal Injector Size (mm) | Nominal Gas Consumpon (MJ/h) | Nominal Injector Size (mm) |
| REAR Rapid | 11.4 | 1.55 | 10.5 | 0.88 |
| FRONT Auxiliary | 4.0 | 0.92 | 4.0 | 0.55 |
| TOTAL | 15.4 | - | 14.5 | - |
Electric supply: 220-240 V \~ 50/60 Hz 0.6W
NOTE: a duplicate Data Plate provided with the appliances should be axed adjacent to the appliance nearby on a cabinet or area where it is easily accessible for reference.
Warnings and Suggesons
To get the most out of your hob, please read the instrucons carefully and keep them for future consultaon.
• These instrucons are only valid in the countries whose desnaon symbol is shown on the serial number plate on the hob.
- The packing (plasc bags, expanded polyurethane, etc.) pose a potential threat to children and should be disposed of carefully.
- Check the appliance has not been damaged during transportaon and remove all protective packing and lms before installaon.
- This hob (cat. 3) was designed to be used exclusively for cooking food in household surroundings. Any other use (for example heang rooms) should be regarded as improper and dangerous.
- The installaon and conneccon of this appliance to a gas or electrical supply must be carried out by a competent, qualified person in compliance with current legislaon.
- This appliance should be installed incompliance with standards in force and only used in well venlated rooms. Read the instrucons before installing and using this appliance.
- The pre-ed gas connector and its supply pressure are shown on the label aached to the boom of the hob. If this type of gas supply is not being used, please refer to the secon called Adapon to dierent types of gas supply on page 11.
Note:
- Incorrect placement of the pans supports can scratch the hob. To avoid this always ensure that the rubber feet on the boom of the pan supports are the only part of the pan supports that touch the hob and do not drag the pan supports across the hob surface.
- On the glass surface do not use:
- Cast iron grills, terracoa pots or pans.
- Heat convectors (e.g. metal neng). - Using two burners to cook 1 pan.
- In the event of prolonged usage, additional venlaon may be required (opening a window or increasing the extracon speed of the hood).
Warning
- Keep children away from the hob when in use and don't let them play with the control knobs or any other part of the appliance.
-
This appliance is not intended for use by persons (including children) with reduced physical, sensor or mental capabilities or lack of experience and knowledge unless they have been given initial supervision or instrucon concerning use of the appliance by a person responsible for their safety.
-
Do not let children play with the pan supports. The rubber feet on the underneath of the pan supports could be swallowed by small and cause serious injury or suocaon.
- Before replacing the pan supports on the hob, please check that all the rubber feet are in place.
- Each me you nish using the hob, always check that the control buons are in the o posion and shut o the tap to the gas mains or cylinder.
- Do not obstruct the air vents at the back of the appliance in any way.
- DO NOT USE OR STORE FLAMMABLE MATERIALS IN THE APPLIANCE STORAGE DRAWER OR NEAR THIS APPLIANCE
- DO NOT SPRAY AEROSOLES IN THE VICINITY OF THIS APPLIANCE WHILE IT IS IN OPERATION
• DO NOT MODIFY THIS APPLIANCE - WHERE THIS APPLIANCE IS INSTALLED IN MARINE CRAFT OR IN A CARAVANS, IT SHALL NOT BE USED A SPACE HEATER
Safeguarding the Environment
Packing
The packing material is 100% recyclable and is labelled with the recycling symbol. Please dispose of all packing responsibly and carefully.
Product
This appliance is marked according to the European Directive 2012/19/EU, Waste Electrical and Electronic Equipment (WEEE). By ensuring that this product is disposed of correctly, you will help prevent potentially negative consequences for the environment and human health.

The symbol on the product or on the
documents accompanying this appliance indicates that this product should not be disposed of as household waste. Please dispose of this appliance at an Electrical & Electronic Equipment Collecon point as in accordance with local environmental regulaons for waste disposal. For details of your local Collecon Point please contact your Local Authority.
Installaon
THIS OPERATION MUST BE PERFROMED BY QUALIFIED TECHNICIAN OR AUTHORISED PERSON.
Technical informaon for the installer
- This appliance can be built into a 30mm to 70mm thick worktop.
- If no oven is to be installed below the hob, a panel must be ed under the hob to prevent hob damage and protect the cupboard contents. This panel must cover the whole of the underside of the hob and must be posioned so that an air gap of at least 15mm between the panel and hob underside is maintained, as a minimum, and as a maximum 150mm to the underneath of the work surface.
- This hob is designed to operate perfectly with any oven in the KitchenAid range. The Manufacturer declines all responsibility should any other make of oven be installed.
The manufacturer declines all responsibility should another make of oven be installed.
Before installaon, please ensure that:
- Warning: this is a heavy product which requires the installaon to be carried out by two people.
- The gas supply (type and pressure) and the calibraon on the hob are compatible (see serial number plate on the hob and the table on page 7).
NOTE: as per AS/NZS 5601.1 gas appliance shall be installed in such a way that surface temperature of any nearby surface will not exceed 65 Deg. C above ambient.
PLEASE NOTE GAS REGULATRO PACKED WITH THIS APPLICACNE IS ONLY SUITABLE FOR CONNECTION TO NATURAL GAS.
- The cabinetry and appliances surrounding/next to the hob are heat resistant and in compliance with local regulaons.
- The products of combuston are removed from the atmosphere in the room by using an extracon hood or electrical fan installed to the walls and or windows, in line with current regulaons.
- The air circulates naturally through a suitable opening that is no less than 100cm2 in cross secon, which must be:
- Permanent and accessible on the walls of the room being venlated and extracng towards the outside.
- created in such a way that the openings both inside and out cannot be obstructed, even in error.
- Protected by plasc grill, metallic neng etc. that should not reduce the 100cm2 cross secon
- Located in such a posion so as not to interfere with the extracon of the products of combuston.
-Connecon from one type of gas to another should be only performed by qualified technician or approved gas er.
This appliance shall be installed in accordance with installaon requirements of AS/NZS 5601 current edion).
IMPORTANT: if exible hose is used, it must be installed in such a way that does not come into the contact with the drawers or any other mobile kitchen parts. The hose must be installed in such a way that is easy to visually inspect without obstrucons
Hose assembly used with cooking appliances shall be cered as conforming to AS/NZS 1869 and be class B or class D.
Gas conncon
WARNING! This operaon must be performed by a qualified technician.
- Before Installaon make sure that local gas delivery conditions (nature and pressure) are compatible with the seng of the hob (see the gas consumpon and injector size table on page 7).
- Before installing the hotplate considers the locaon of the gas supply and round the gas line. (Refer Fig. 1)
- This appliance shall be installed in accordance with installaon requirement of the local gas authority of the appropriate installaon code.
- The gas supply system must comply with local regulations to the current relevant gas standard (AS/NZS 5601, current edion).
- For Natural Gas model the gas supply is connected to a regulator which is supplied. The inlet conncon has 1/2" B.S.P. male thread (in compliance with ISO 7.1 thread).
IT IS ESSENTIAL THAT THE ELBOW ON THE APPLIANCE HELD FIRMLY WITH A SPANNER .DO OT OVER TIGHTEN. The regulator pressure for NG is 1.0 kPa.
- For ULPG model the gas supply must be regulated to a pressure of 2.75 kPa. The gas inlet conncon ng is 1/2" B.S.P. male tread (in compliance with ISO 7.1 thread).
- A manual shut o valve must be installed in the gas line, in an accessible posion external tot the hotplate, so in the event of emergency the gas supply can be shuto.
- For gas inlet posion of appliance refer to gure 2 for NG and gure 3 for ULPG.
Aer installing the gas supply and making all connecons check thoroughly for possible leaks.
Turn all control knobs on the unit to "OFF" posion. Open the valve on gas supply. Using the soap water soluon check each gas conncon one at the me, by brushing the soluon over conncon. Presence of bubble will indicate the leak. Tighten the ng and re check for leaks. If it is not possible to correct the leak, replace the ng. Turn on cook top and light each burner.
- Check for a clear blue ame without yellow pping. If burner shows any abnormality check the following:
-burner cap on correctly
-burner posioned correctly
-burner veridically aligned with injector nipple

Fig. 1


Fig. 2
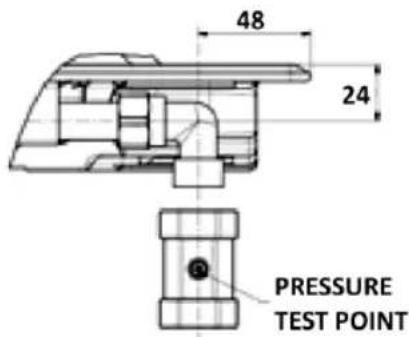
Fig. 3
- In some cases burner will fail to ignite immediately and will seem to blow's lightly when do ignite, this is usually due to the air in the gas pipe which should clear itself within seconds of operaon.
If aer following instrucons given, sasfactory performance cannot be obtained, contact the local gas authority for advice and assistance.
Electrical Connecon
The electrical connecons must comply with current local legislaon and be carried out by a qualified, competent person.
- Informaon on the voltage and power absorbed are shown on the serial number plate.
• The appliance must be earthed. - When installing the appliance, we recommend that this hob is protected by a 3mm bi-polar switch.
- If damaged, the power cable must be replaced with an identical type of power cable. We recommend that this operaon be conducted by our Aer Sales Service. Please contact our Customer Care Centre.
- Do not use extension cables.
- The manufacturer declines all responsibility for damage to persons, pets or goods as a result of failure to comply with the regulaons above.

WIRING DIAGRAM

Installaon
The cook top is designed to be built in to a work surface as shown in the gure.
Before installing the cook top, install the gasket seal "X" around the enre perimeter of the hole where it will be inserted.
The dimensions of the hole are shown in gures 6-7-8-9.
For Filo top (semi ush) models, the perimeter of the hole must be lowered by a depth of 1.5 mm.
The hole does not need to be milled for Semi-lo (semi ush) top models.
The cook top can be installed on dierent materials such as brickwork, steel, marble, conglomerates, synthecs, wood and wood covered with plasc laminates, so long as resistant to a temperature of 90^ C.

Adapon to a dierent type of gas supply
If you are using a dierent kind of gas from the one indicated on the serial no. plate and the orange label on the back of the hob, you must replace the injectors; in the case of the Wok burner, adjust the primary air (see Injector table on page 6). The orange label should be removed and kept together with the manual.
Use pressure regulators suitable for the gas pressures indicated on page 6
- In order to replace the injectors, contact the Customer Care, or a qualified electrician.
- Injectors not supplied as standard should be requested from the Customer Care Centre.
• Regulate the minimum levels of the taps.
If you experience diculty in turning the control knob, contact our Customer Care Centre:
Australia: www.kitchenaid.com.au
New Zealand: www.kitchenaid.co.nz who will arrange for a replacement aer ascertaining that the tap is damaged.
Replacing the injectors
Note: Refer to the injector table earlier in the manual to ensure the correct type of injector is to be ed.
Tradional burners (T)
- Remove the cap (A).
- Remove the spreader (B).
- Unscrew the injector (C) with a box spanner 7.
- Replace the injector with the one for the new gas.
- Put back burners and pan supports.
Note: Before installing the hob, please remember to sck the gas calibraon label, provided with the replacement injectors over the gas informaon on the underside of the hob.

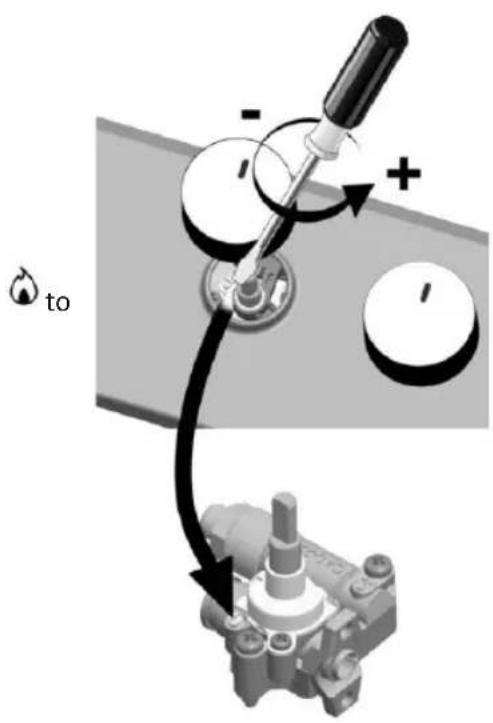
Regulang the minimum ow level of the gas taps
Regulang the minimum ow level must be done with the tap at the lowest posion (small ame).
There is no need to regulate the primary air in the burners. To ensure the minimum level is properly regulated, remove the control knob and adjust the screws found on the tap as follows:
- ghten to reduce the height of the ame 1 (-)
- slacken to increase the height of the ame (+);
- With the burners on, rotate the buons from the
maximum to the minimum posion to check the stability of the ame.
NOTE:
Service and maintenance only to be carried by an authorized person.
To replace the parts such as burners, valve and electric components, the hot plate must be removed from the bench top by releasing the aachment hooks, loosening the aachment screws of each burner, unscrewing the hotplate aachment nuts.
Note: If the valves must be replaced, rst disassemble the chain if ignition switches.
It is recommended to replace the valve gasket each me the valve is replaced thus ensuring a perfect seal between the body and the gas train.
WARNING: DO NOT MODIFY THIS APPLIANCE
Care and Maintenance
Before any cleaning and/or maintenance operaon, disconnect the hob from power supply and wait unl it is cold.
To keep the hob in perfect condion, remove any food residuals and clean it aer every use.
Hob cleaning:
- Clean the surfaces of the hob with lukewarm water and/or neutral detergent rinse and dry thoroughly with a so cloth or shammy leather.
-
Prolonged contact with hard water or aggressive detergents could corrode or stain the stainless steel surfaces; detergents containing chlorine and/or chlorine composites, ammoniac or that are highly acidic will cause irreparable damage to the hob. Before any kind of use, we advise you read the product label to check if a product is suitable.
-
Do allow acid or alkaline substances, such as vinegar, mustard, salt or lemon juice to come into contact with the hob for extended periods.
- It is advisable to immediately wipe any spills (water, sauce, coee, etc.).
- Do not use abrasive products and pan scourers.
- Do not use steam cleaners.
- Do not use ammable products.
- All enamelled and glass parts should be cleaned with warm water and/or a neutral detergent.
Care and maintenance of the gas burners
The pan supports and burners can be removed to make cleaning easier.
- Hand wash carefully in hot water with a mild detergent making sure that all the ingrained dirt is removed and the openings on the burner are not blocked. The internal burner cap (D), on page 13 is made of brass and is subject to a natural burnishing when it heats up. Clean it each me you use it with a product specially designed for brass. Use hot water and a mild detergent to clean the wok burner external cap (item (C) on page 13). Never use harsh products, or scourers that will damage the special surface coverings.
- Rinse and dry carefully.
-
Correctly ret the burners and caps in their place.
-
Make sure that when replacing the pan supports, the pan support is located correctly for each burner.
Note: Hobs ed with electronic ignition and thermocouples must have the ends of the igniters and thermocouples cleaned regularly and frequently in order to operate. Please clean them very carefully with a damp cloth. Any remaining ingrained food should be removed carefully with a toothpick, or similar.
To avoid damaging the electronic ignition only operate with the burners and pan supports correctly in place.
Troubleshoong guide
If the hob is not working properly work through this guide before contacting our Customer Care Centre.
The burner does not ignite, or the ame is unsteady? Check that:
- the gas, or electricity supply has not been interrupted and that the control knob is turned fully on.
- the gas supply has not run out.
- the openings on the burner have become blocked.
- the end of the electronic igniter is clean.
-
all the parts on the burner are properly posioned.
-
the burner's openings are not blocked in relaon to the thermocouple.
- the end part of the thermocouple is clean.
The pans are not stable? Check that:
- the boom of the pot is perfectly at.
- the pot is centred on the burner.
- the pan supports are correctly posioned with all the rubber feet in place.
If, despite all these checks and aer tuning the hon o and on again, you are sll experiencing problems please contact our Customer Care Centre.
The ame doesn't stay on? Check that:
- the buon was pushed in properly when turning on the burner for the me required to acvate the safety thermocouple.
Aer Sales Service
Before contacng our Customer Care Centre please check to see if the problem can be xed by referring to the troubleshoong guide.
If fault persists, contact our Customer Care Centre:
Australia: www.kitchenaid.com.au
New Zealand: www.kitchenaid.co.nz
SERVICE
0000 000 00000

We will ask you for some informaon, it will help us, help you if you have the following informaon ready to give us:
- a short descripon of the fault
- the serial number and model number of the appliance
- the service number: the number aer the word service on the rang plate on the boom of the hob. The service number can also be found in the warranty booklet.
- your name, full address including postcode and telephone number.

- Product descripon and symbols
- Control Symbols
- Using the burners
- To turn on one of the burners:
- Praccal advice on using the hob
- Posioning the pan supports
- Important:
- Hood and cabinetry clearances (mm)
- Gas Consumpon and Injectors table
- Warnings and Suggesons
- Note:
- Warning
- Safeguarding the Environment
- Packing
- Product
- Installaon
- THIS OPERATION MUST BE PERFROMED BY QUALIFIED TECHNICIAN OR AUTHORISED PERSON.
- Gas conncon
- WARNING! This operaon must be performed by a qualified technician.
- Electrical Connecon
- Adapon to a dierent type of gas supply
- Use pressure regulators suitable for the gas pressures indicated on page 6
- Replacing the injectors
- Tradional burners (T)
- Regulang the minimum ow level of the gas taps
- Care and Maintenance
- Before any cleaning and/or maintenance operaon, disconnect the hob from power supply and wait unl it is cold.
- Hob cleaning:
- Care and maintenance of the gas burners
- Troubleshoong guide
- The burner does not ignite, or the ame is unsteady? Check that:
- The pans are not stable? Check that:
- The ame doesn't stay on? Check that:
- Aer Sales Service
- Before contacng our Customer Care Centre please check to see if the problem can be xed by referring to the troubleshoong guide.
Brand : KITCHENAID
Model : KHDD2 38510
Category : Cooker