
Concept E 450 Digital - Loudspeaker Teufel - Free user manual and instructions
Find the device manual for free Concept E 450 Digital Teufel in PDF.


| Product Type | 5.1 Surround Sound Speaker System |
| Brand | Teufel |
| Model | Concept E 450 Digital |
| Subwoofer Dimensions (W x H x D) | Approx. 320 x 420 x 420 mm (12.6 x 16.5 x 16.5 in) |
| Satellite Dimensions (W x H x D) | Approx. 110 x 260 x 120 mm (4.3 x 10.2 x 4.7 in) |
| Center Speaker Dimensions (W x H x D) | Approx. 310 x 110 x 120 mm (12.2 x 4.3 x 4.7 in) |
| Total System Weight | Approx. 15 kg (33 lb) |
| Subwoofer Power Output | 150 W RMS |
| Satellite Power Output | 30 W RMS each |
| Center Speaker Power Output | 30 W RMS |
| Total System Power | 330 W RMS |
| Frequency Response | 32 Hz - 20 kHz |
| Input Connections | Optical (TOSLINK), Coaxial (S/PDIF), Analog (RCA), 3.5mm Aux |
| Output Connections | Subwoofer pre-out, Headphone jack |
| Remote Control | Included, IR |
| Power Supply | AC 230V, 50/60 Hz |
| Power Consumption | Max 400 W, Standby < 0.5 W |
| Cleaning Instructions | Wipe with a soft, dry cloth. Do not use any solvents or abrasive cleaners. |
| Safety Precautions | Do not expose to moisture or extreme temperatures. Ensure ventilation slots are unobstructed. |
| Repairability / Spare Parts | Spare parts available through Teufel customer service. Repair by qualified personnel only. |
| Warranty | 2 years (may vary by region) |
Frequently Asked Questions - Concept E 450 Digital Teufel
User questions about Concept E 450 Digital Teufel
0 question about this device. Answer the ones you know or ask your own.
Ask a new question about this device
Download the instructions for your Loudspeaker in PDF format for free! Find your manual Concept E 450 Digital - Teufel and take your electronic device back in hand. On this page are published all the documents necessary for the use of your device. Concept E 450 Digital by Teufel.
USER MANUAL Concept E 450 Digital Teufel
Technical description and instruction manual

Concept E 450 Digital
Active subwoofer CM 2014 SW
Teufel
Contents
General Notes and Information .... 3
Notice ....3
Original packaging 3
Complaints 3
Contact....3
Proper use ....3
For your safety 4
Signal terms ....4
Safety notes 4
Explanation of symbols ....5
Overview 6
Product Contents 6
Operational controls and connections 6
Control panel 6
Setup panel 7
Remote control 7
Back side 7
Preparation 8
Unpacking....8
Setup notes 8
Setup as a PC sound system 8
Connecting....9
Connecting external players 9
Connection examples ....10
Connecting satellite speakers ....11
Connection to the grid ....11
Remote control 12
Changing the batteries 12
Pairing of the remote control 12
Functions....12
Operation....13
Switching the device on/to standby .....13
Activating....13
Switching to standby 13
Selecting an input 13
Bluetooth pairing ....14
Selecting an output 14
Audio format 14
Setting the volume 15
Setting the system volume 15
Setting the volume of the individual speakers ....15
Mute....15
Setup 15
Cleaning & Maintenance 16
Environmental protection 16
Batteries and storage batteries ....16
Disposal of the unit 16
Troubleshooting....17
Technical data 18
Notice
The information in this document may change without prior notice and in no way constitutes any liability on the part of Lautsprecher Teufel GmbH.
No part of this instruction manual may be reproduced in any form or be broadcasted in any way electronically, mechanically, by photocopy or recording without the written permission of Lautsprecher Teufel GmbH.
Version 1, October 2014
Original packaging
If you wish to exercise your eight-week right of return, we ask that you be absolutely sure to hold onto the packaging. We can only accept the return of a unit WITH THE ORIGINAL PACKAGING.
Empty boxes are not available!
Complaints
In case of complaint we will need the following information to process your enquiry:
1. Invoice number
Can be found on the sales slip (enclosed with the product) or on the order confirmation received as a PDF document, e.g. 4322543.
2. Serial number or batch number
Located on the back of the device, e.g. serial #: CO 30009440122A
Thank you for your support!
Contact
Please contact our customer service with any questions, suggestions or criticism:
10787 Berlin (Germany)
Phone 00800 - 200 300 40 (toll-free)
Fax +49 (0)30 / 300 930 930
E-mail: service@teufelaudio.com
teufelaudio.com
Proper use
The device is designed as an amplifier and as a control unit for audio signals of external players as well as for playing back low frequencies.
Only use the device as described in this instruction manual. Any other use will be deemed as not in accordance with the instructions and may lead to damage of property or even persons.
The manufacturer cannot be held liable for damages caused by improper use.
The device is intended for private use.

Before operating the device, please read the safety notes and instruction manual carefully. Only in this way, can you ensure that all func-
tions are used in a safe and reliable manner.
Store the instruction manual in a safe place and also be sure to pass it on to any subsequent owner.
NOTICE
Check that all items have been delivered and that nothing is damaged. If you find damage, do not operate the device; instead contact our service department.
Signal terms
You can find the following signal terms in these instructions:
WARNING
This signal term indicates a moderate risk, which, if not avoided, may result in death or severe injury.
CAUTION
This signal term indicates a low risk, which, if not avoided, may result in minor or moderate injury.
NOTICE
This signal term warns you of potential damage.
Safety notes
Improper electrical Installation or excessive mains voltage may result in an electrical shock.
- The device is suitable for a mains voltage of 230 V \~ / 50 Hz. When connecting the device, make sure that the correct voltage is present. You can find more information in this respect on the nameplate.
- Check the device regularly for damage. Immediately disconnect the mains plug and do not operate the device if its housing or mains cord is defective or exhibits other visible damages.
- If the mains cord of the device is damaged, only have it replaced by the manufacturer, its customer service department or a person with similar qualifications.
- This device is disconnected from the grid by pulling the mains plug. Thus, make sure that the mains plug is always easily accessible.
- If the device emits smoke, smells burnt or produces unusual sounds, immediately disconnect it from the mains and do not operate it further.
- Never open the device housing. Repairs may only be carried out by an authorised specialist workshop. In the process, only parts that correspond to the original device data may be used.
- Only use the accessory products specified by the manufacturer.
- Only use the device in indoor areas.
- Do not operate the device in wet rooms and protect it from dripping and splash water.
- Make sure that no vases or other vessels filled with liquid are located on the device or nearby in order to prevent liquid from penetrating the housing. If water or other debris ends up penetrating the housing, immediately pull the mains plug and take out any batteries. Then send the device to our service address.
- Never modify the device. Unauthorized interventions may affect the safety and functionality.
- Never touch the mains plug with wet hands.
An unsuitable setup location may result in Injury and damage.
- If the speakers are not securely mounted, do not use them in vehicles, in unstable locations, on wobbly tripods or furniture, on underdimensioned brackets etc. The speakers may tip or fall over and cause injury to persons or be damaged themselves.
- Only place the subwoofer on the floor.
- Place the speakers in such a way that they cannot be knocked over inadvertently and make sure that the cables do not pose a trip hazard.
- Do not place the speakers near sources of heat (e.g. heaters, ovens, other heat generating equipment such as amplifiers etc.).
- Do not use the device in environments where there is a risk of explosion.
- Only use the Bluetooth function in locations where wireless radio transmission is allowed.
An unstable base may cause the unit to tlp and injure or even kill persons, children are particularly at risk. You can prevent a large number of accidents by taking the following precautions:
- Only place the subwoofer on the floor.
- If you want to use underframes or speaker stands, only use those recommended by the manufacturer.
- When storing the product, also ensure that it stands safely and that it cannot be knocked down or over.
Children can become trapped in the packing film when playing and suffocate.
- Do not allow children to play with the device or the packing film. Danger of suffocation.
- Ensure that children do not remove small parts from the device or take them off of the device (e.g. control knobs or plug adapters). They could swallow the parts and choke.
- Never let children use electrical equipment unsupervised.
Leaking battery acid may lead to chemical burns.
- Do not allow battery acid to come into contact with skin, eyes or mucus membranes. In the event of contact with acid, immediately flush the applicable areas with plenty of clean water and consult a physician if necessary.
Batteries (particularly lithium batteries) can explode if used improperly.
- Never attempt to recharge batteries.
- Only use batteries of the same or equivalent type.
- You may not heat or short circuit batteries and storage batteries or dispose of them in fire.
- Do not expose batteries and storage batteries to direct sunlight.
Extended listening at high volumes may lead to hearing loss.
To avoid damage to health, avoid extended listening at high volumes.
- When the volume is set high, always keep a certain distance from the device and never place your ear directly on the speaker.
- If a speaker is set to full volume, this may produce very high sound pressure. This may have psychological consequences and also cause physical injury. Children and pets are particularly at risk. Set your signal source device volume control to a low setting before turning on the power.
Explanation of symbols
 | Protection class II |
 | Risk of electrical shock! |
Product Contents
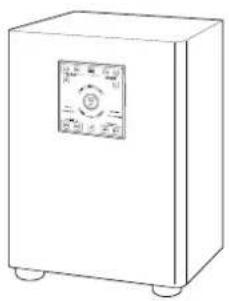
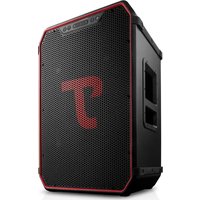
① 1x subwoofer CM 2014 SW
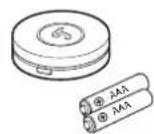
② 1x remote control including batteries
③ 1x USB cable (2 m)
④ 1x speaker cable, 2 x 1 mm², 30 m
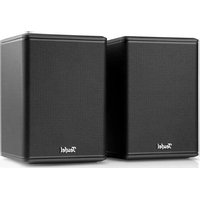
The satellite speakers are delivered in separate packaging. Here you can also find the corresponding instruction manual.
- Check that all items have been delivered and that nothing is damaged. If the delivery is incomplete or exhibits transport damages, please contact our service team (see page 3).
- Never start up a damaged device.
①
②
③

④

Operational controls and connections
Control panel
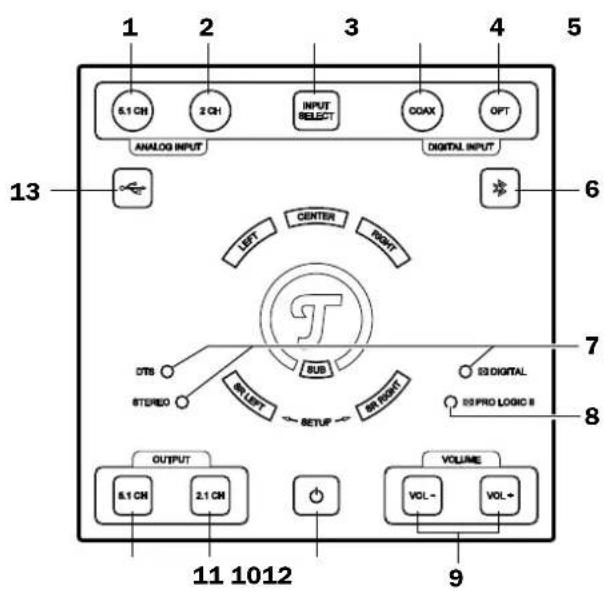
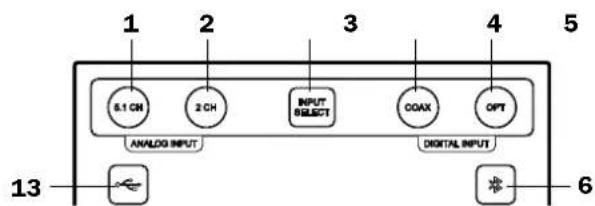
Item Name Description
1 5.1 CH "Line In" input is active
2 2 CH "Analogue In" input is active
3 Input Select Select the input
4 COAX
"Digital In Coaxial" input is active
5 OPT
"Digital In Optical" input is active
6
Select Bluetooth as the input
DTS
7 STEREO Digital
Audio format of the input signal
8 Pro Logic II
LED illuminates if 5.1 CH is set as the output (12), but if the input signal consists of fewer channels (the Concept E 450 Digital generates an upmix)
9 VOL - / +
Set the volume
10
Switch the device on/to standby
11 2.1 CH
Playback: only front speakers + subwoofer
12 5.1 CH Playback: all speakers
13
Select USB as the input
Setup panel

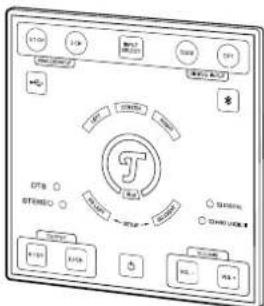
Remote control

Back side

Item Name Description
| 14 CENTER | Sensor field for center speakers |
| 15 RIGHT | Sensor field for right front speaker |
| 16 SR RIGHT | Sensor field for right surround speaker |
| 17 SUB Sensor field for subwoofer | |
| 18 SR LEFT | Sensor field for left surround speaker |
| 19 LEFT | Sensor field for left front speaker |
Item Name Description
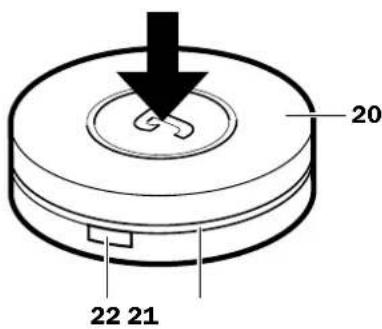
| 20 | Control dial |
| 21 | LED ring |
| 22 | Side button |
Item Name Description
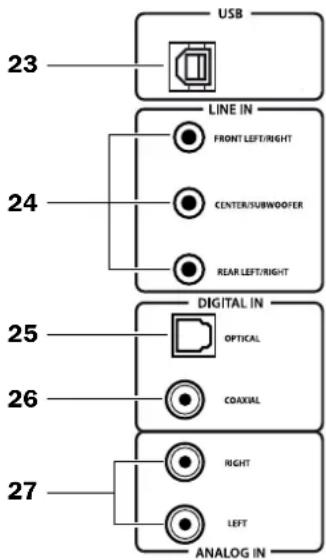
| 23 USB | Input jack for the integrated USB sound card | |
| 24 LINE IN Analogue 5.1 inputs | ||
| 25 | DIGITAL IN OPTICAL | Digital optical input |
| 26 | DIGITAL IN COAXIAL | Digital RCA input |
| 27 ANALOG IN Analogue stereo input | ||
| 28 | SPEAKER OUT | Outputs for satellite speakers |
Unpacking
- Carefully open the box and lift the subwoofer with the EPE foam parts out without touching the diaphragms in the subwoofer base.
Setup notes
NOTICE
If the device is subjected to warm temperatures after being cold (e.g. after transport), condensation may occur inside of it.
- In this case, wait at least 2 hours before you connect and activate it.

Our website contains comprehensive notes for correct setup.
- Select a stable, level base.
- Make sure that the environment is clean and free from dust.
• Make sure that the speakers are firmly positioned to prevent vibrations. - Select a location away from heat sources and direct sunlight.
- Lay the connector cables so that they do not pose a tripping hazard.
- Do not place any heavy objects on the cables or the speakers.
- Set up the satellite speakers such that they are at an equal distance from the listener on both the left and right side (if possible) or mount them on the wall.
- The location of the subwoofer can be freely selected and does not influence the other speakers. However, do not set it up in the corner of the room as this may result in uncontrollable frequency rises. A location between the satellite speakers is often ideal.
Setup as a PC sound system
- When using the device as a PC sound system, concentrating on emitting sound directly at the PC workstation is advisable, that is, the area where the monitor and listener are located.
- Please position the speakers within the grey areas.
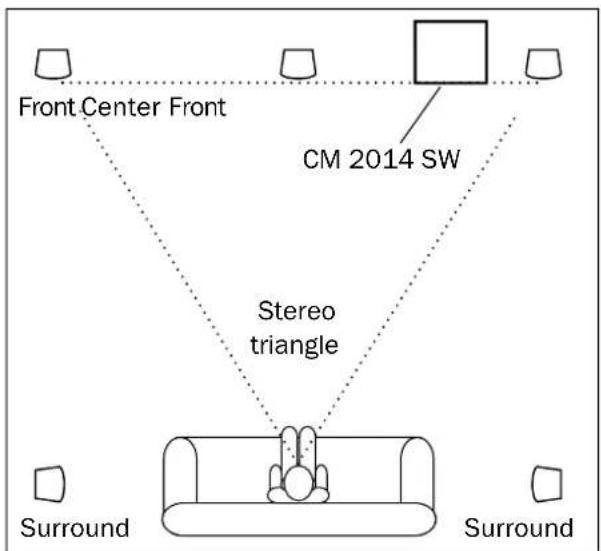
Setup in a living area

Set up as PC sound system
Connecting external players
- Pull the mains plug of all devices to be connected out of the socket to prevent accidental activation.
- Connect the Concept E 450 Digital to your external players as shown in the following examples.
• PC:
- Connection to USB (23) using a USB cable. Set audio output on the PC to the USB sound device or similar.
You can download a suitable driver for Windows ® from the product web site at www.teufelaudio.com.
- Decoder station, ControlStation or PC with 5.1 sound card:
- Connection to LINE IN (24) using 3 stereo cables "RCA to a 3.5 mm TRS" or "TRS to TRS (3.5 mm)".
- Blu-ray player or Smart-TV:
- Connection to DIGITAL IN OPTICAL (25) using an optical cable with TOSLINK plugs or using a coax cable.
- Satellite receiver:
- Connection to DIGITAL IN COAXIAL (26) using an RCA cable or an optical cable.
- MP3 player:
- Connection to ANALOGUE IN (27) using a stereo cable "RCA to 3.5 mm TRS".
You can find suitable cables in our web shop.
You can also connect a smartphone or tablet to the Concept E 450 Digital via Bluetooth (see "Bluetooth pairing" on page 14).
Connection examples
![graph TD A["Computer"] --> B["Sat-Receiver"] B --> C["MP3-Player"] C --> D["CM 2014 SW"] D --> E["Blu-Ray-Player"] E --> F["Smartphone"] A --> G["DecoderStation"] G --> H["Microcontroller"] H --> I["Audio Out Optical"] I --> J["Analog In"] J --> K["Digital In"] K --> L["LINE IN"] L --> M["Front Left…](/content/2026/06/1292800/images/109eb951e4b899f74453b2ca640a5615cda4b62d7a8344256a5a7dc699bb5cb3.jpg)
Connecting satellite speakers
CAUTION
The speaker cables may pose a tripping hazard.
- Lay the cables so that no one can get caught in them.
NOTICE
Make sure the polarity is correct!
- Connect the like coloured terminals. Otherwise, the sound quality will suffer.
The strands of the speaker cables are marked with different colours or shapes.
- The connector terminals SPEAKER OUT (28) for the satellite speakers are located on the back side of the Concept E 450 Digital.
Run the speaker cables from the subwoofer to each satellite speaker.
Small piece of advice: Label the cables on the subwoofer end – this facilitates setup and tear-down of the system.
-
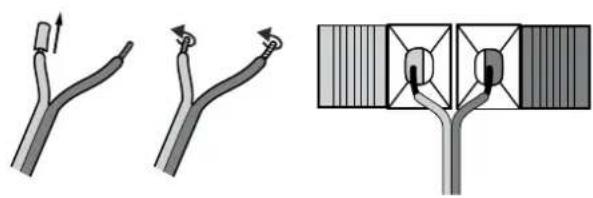
Split the speaker cables down to approx. 30 mm on both ends and strip approx. 10 mm of insulation off of each cord.
-
Twist the stripped single wire ends together so that no wire protrudes. Tin coating is not necessary.
-
Push down the connector terminal levers and run the stripped cable ends into the corresponding holes. When releasing the lever, the cable ends will be locked.
Connect all cables to the subwoofer in this way. Ensure that no part of the insulation is clamped in place.
- Connect the other ends of the speaker cables to the satellite speakers. The instruction manual of the speakers should contain notes on this.
Connection to the grid
- Insert the mains plug in an easily accessible mains socket.
- Plug the mains plugs of your external players back into the mains socket.

The remote control is magnetic and can be fixed in place on the setup panel.
Changing the batteries
The remote control is powered by 2 type AAA batteries. Simply pull off the control dial (20) to open the battery compartment.
CAUTION
Leaking battery acid may lead to chemical burns.
- Do not allow battery acid to come into contact with skin, eyes or mucus membranes. In the event of contact with acid, immediately flush the applicable areas with plenty of clean water and consult a physician if necessary.
Batteries (particularly lithium batteries) can explode if used improperly.
- Never attempt to recharge batteries.
- Only use batteries of the same or equivalent type.
- You may not heat or short circuit batteries and storage batteries or dispose of them in fire.
- Do not expose batteries and storage batteries to direct sunlight. Changing the battery
Pairing of the remote control
The remote control is already paired with the system by default. If the connection is interrupted at some point, the pairing process must be repeated. In such a case, proceed as follows:
- Turn the Concept E 450 Digital on.
- Position the remote control at a distance of no more than 25 cm to the Concept E 450 Digital.
- Hold the side button (22) down until the LED ring (21) starts to blink and release it.
- Blinks three times: Pairing was successful.
- Blinks ten times: Pairing failed and must be repeated.

Functions
- Activating the Concept E 450 Digital: Push the middle of the control dial (20).
- Switching the Concept E 450 Digital to standby: Push and hold the control dial (20) for 3 seconds.
- Adjusting the volume: Turn the control dial (20).
- Activating/deactivating mute: Briefly press the control dial (20).
- Selecting the input: Push the side button (22) (repeatedly). Pushing the button selects the next input (see table on the right).
| Selected input LED illuminates: | |
| LINE IN (24) 5.1 CH (1) | |
| ANALOGUE IN (27) 2.1 CH (2) | |
| DIGITAL IN COAXIAL (26) | COAX (4) |
| DIGITAL IN OPTICAL (25) | OPT (5) |
| BLUETOOTH | (6) |
| USB (23) | ↔ (13) |
Operation
Switching the device on/to standby
Activating
- On the device: Briefly push the button ⏻ (10).
- With the remote control: Briefly press the middle of the control dial (20).
The following LEDs illuminate when the device is activated:
- the selected input (1, 2, 4, 5, 6 or 13)
- the volume display
- the active speakers (5.1 or 2.1)
- the audio format of the input signal
The last settings that were used will still be active even after the device has been turned on.
Switching to standby
- On the device: Briefly push the button ⏻ (10).
- With the remote control: Push and hold the middle of the control dial (20) for approx. 3 seconds.
The button ⏻(10) will illuminate in standby.
Selecting an input
- On the device: Push the button INPUT SELECT (3) repeatedly until the LED of the desired input illuminates.
- With the remote control: Push the side button (22) repeatedly until the LED of the desired input illuminates (1, 2, 4, 5, 6 and 13).
- You can select the Bluetooth and USB inputs by tapping the button * (6) or • (13).

Bluetoothpalrlng
You can connect compatible devices, such as most smartphones, with your Concept E 450 Digital via Bluetooth (pairing). The sound output of the smartphone then occurs via the Concept E 450 Digital.
- Use the ✗ button (6) to select the "Bluetooth" input. The button will now illuminate.
- Activate the Bluetooth function on your external player (e.g. smartphone).
-
Let your smartphone scan for Bluetooth devices. You can find more information about this in the instruction manual for your smartphone.
"Teufel Concept E" should appear in the list of the detected devices after the search run. -
Select the Teufel Concept E from the list of detected devices.
Pairing is now complete and your Concept E 450 Digital will now function similar to Bluetooth headphones. The Concept E 450 Digital will now play back all sounds that would otherwise be played by your smartphone.
- Deactivate the Bluetooth function on your external player to terminate the Bluetooth connection.
Selecting an output
You can select whether sound output will be played via all speakers or just the front speakers and subwoofer.
- Button 2.1 CH (11): Playback via the front speakers + subwoofer.
- Button 5.1 CH (12): Playback via all speakers.
The corresponding sensor fields of the speakers (14 - 19) will illuminate depending on the setting.
Audio format
The LEDs (7) and (8) indicate the audio format:
| Input signal Output LED Illuminates | ||
| Stereo 2.1 CH (11) | Stereo (7) | |
| 5.1 CH (12) | PRO LOGIC II (8) | |
| Dolby Digital 5.1 CH (12) | Digital (7) | |
| DTS Digital Sur-round | 5.1 CH (12) | DTS (7) |
If you have set the output to 5.1 CH (12), but the input signal consists of fewer channels, the
Concept E 450 Digital will generate an upmix and emit sound in ▶RO LOGIC II.

![graph TD A["ANALOG INPUT"] --> B["19"] C["DIGITAL INPUT"] --> D["15"] E["OUTPUT"] --> F["2.1 CH"] G["VOLUME"] --> H["VOL-"] G --> I["VOL+"] J["Center"] --> K["14"] L["SUB"] --> M["17"] N["SETUP"] --> O["16"] P["LEFT"] --> Q["18"] R["RIGHT"] --> S["17"] T["DTB"] --> U["STEREO"] V["PRO LOGIC II"] -->…](/content/2026/06/1292800/images/166e64505adc484ae2d870b1cecb7f57007847c43afc7f96a519b70cbdaeb1ef.jpg)

Setting the volume
Setting the system volume
- On the device: Adjust the volume of the entire system using the buttons Vol +/- (9).
- With the remote control: Adjust the volume by turning the control dial (20).
The set volume will also appear optically on the volume display.
Setting the volume of the individual speakers
- Tap on the sensor field (14 - 19) of the corresponding speaker.
The sensor field will illuminate and the current set volume be displayed. - Set the volume for the selected speaker with the buttons Vol +/- (9) or the control dial (20) of the remote control.
- Follow the same steps, if applicable, with the other speakers.
Mute
- By briefly pressing on the middle of the control dial (20) repeatedly, you can turn the sound on or off.
Setup
In setup mode, you can check the volume of the individual speakers and make permanent settings.
- At the same time, tap on the sensor fields SR RIGHT (16) and SR LEFT (18) to enable setup mode.
The sensor field LEFT (19) will illuminate; you will hear noise from the left front speaker; the volume set for the speaker will be displayed.
- If applicable, correct the volume using the buttons Vol +/- (9) or the control dial (20) on the remote control.
After 5 seconds without any input, the next speakers will be actuated one after another (CENTER ⇒ RIGHT ⇒ SR RIGHT ⇒ SR LEFT ⇒ SUB ⇒ normal mode).
By pushing on the middle of the control dial (20), you can select the previous speaker again (ends at LEFT).
- Set the optimal volume for each speaker this way. After the subwoofer has been set, the
Concept E 450 Digital returns to normal mode. The settings are saved as a result.
![graph LR A["STEREO"] --> B["OUTPUT"] B --> C["6.1 CH"] B --> D["2.1 CH"] E["AUST"] --> F["SETUP"] F --> G["BR-REQ"] H["SSPRO LOGIC II"] --> I["VOLUME"] I --> J["VOL-"] I --> K["VOL+"] L["9"] --> M["Power Current"]](/content/2026/06/1292800/images/ab207dc60ebf298a6085aac047f6f9054a31ef240a5109490bc264c6693714ef.jpg)

Volume display
![graph TD A["Center"] --> B["SUB"] C["Left"] --> A D["Right"] --> A E["SE UP"] --> F["SR LEFT"] G["SR RIGHT"] --> H["SR LEFT"] I["1618"] --> J["17"] K["14"] --> L["15"] M["19"] --> N["14"]](/content/2026/06/1292800/images/df536ab0fdb59c55f9f476417dbe1dacf068eef90f82601c23f142a85fecfd07.jpg)
Clean the speakers regularly with a soft, damp microfibre cloth. Please be absolutely sure to observe the following notes in the process:
CAUTION
In contact with live parts, water can lead to electric shock or short circuit.
- Make sure that no liquids penetrate the unit.
- Disconnect the mains plug before cleaning.
NOTICE
External influences may damage or destroy the device.
- If the device is to be left unattended for a prolonged period of time (e.g. during a vacation) or if a thunderstorm is forecast, pull the mains plug out of the socket. Otherwise, sudden overvoltage could cause the device to become defective.
- In the event of prolonged absence, remove the batteries from the remote control.
Leaked batteries may damage the remote control. - If possible, only use plain water without any additives. In case of stubborn marks, a mild soap solution may be used.
- Do not use caustic cleaning products, white spirit, thinners, petrol or similar under any circumstances. Such cleaning agents may damage the delicate surface of the housing.
Environmental protection
Batteries and storage batteries

Batterles and storage batteries do not belong in the household waste!
Every consumer is required by law to bring all batteries and storage batteries, regardless whether they contain harmful substances*) or not, to a collection point run by the communal authority or borough or to a retailer, so that they can be disposed of in an environmentally friendly manner.
Please only turn in batteries and storage batteries which are empty!
*) labelled with: Cd = cadmium, Hg = mercury, Pb = lead
Disposal of the unit

Used units must not be disposed of with household waste!
If the device is no longer operational, every consumer is required by law to dispose of old devices separately from household waste, e.g. at a collection point run by the communal authority/boroughs. This ensures that old devices are recycled in a professional manner and also rules out negative consequences for the environment.
For this reason, electrical equipment is labelled with the displayed symbol.
The following notes and further detailed information on our website should help you to rectify malfunctions. In case you don't succeed, please contact our hotline ☑ Phone 00800 - 200 300 40 (toll-free). Please also observe the warranty notes.
| Problem Possible cause Solution | ||
| The device doesn't emit any sound. | The volume is set to “0”. Increase the volume.(see “Setting the volume” on page 15) | |
| Input signal is too weak. Increase the volume on the external player. | ||
| Incorrect input selected. Select the correct input (see “Selecting an input” on page 13). | ||
| The remote control does not work. | No connection between the remote control and Concept E 450 Digital. | Establish a connection (see “Pairing of the remote control” on page 12). |
| Batteries are empty. Insert new batteries (see “Changing the batteries” on page 12). | ||
| Not all speakers are active. | The output has been set to 2.1 CH. | Switch the output to 5.1 CH (see “Selecting an output” on page 14). |
| Some speakers are too quiet and some are too loud. | The balance between the individual speakers is incorrect. | Adjust the volume (see “Setting the volume of the individual speakers” on page 15) and (see “Setup” on page 15). |
| The subwoofer hums. The | humming is caused by problems with the power supply. | Buy a line filter and connect it to the unit. |
| The humming is caused by a multiple socket strip. | Use a different multiple socket strip or connect the subwoofer directly to the wall socket. It may also help to insert the mains plug in the socket the other way around. | |
| The audio source is not played back. | An inappropriate digital output format has been set on the player. | Set the digital output format to “PCM” in the setup menu of your player. |
| Playback is noisy. Generally speaking, the Concept E 450 Digital is a very low-noise system. In most cases, speaker systems with excellent resolution in the high range area expose the poor quality of a signal source (e.g. from MP3 files). | Make sure that the external player emits a clear signal to the Concept E 450 Digital. | |
Technical data
Max. power consumption: 500 W
Operating voltage: 230 V\~, 50 Hz
Dimensions (W x H x D) 40 x 40 x 62 cm
Net weight: 25.3 kg
You can find further technical data on our website.
No responsibility is assumed for the correctness of this information. Technical changes, typographical errors and other errors reserved.
CE This product conforms with Council of the European Union guidelines 2004/108/EC, 2006/95/EC and 1999/5/EC.
Teufel
Please contact our customer service with any questions, suggestions or criticism:
10787 Berlin (Germany)
Phone: 00800 - 200 300 40
(toll-free)
Fax: +49 (0)30 - 300 930 930
www.teufelaudio.com
No responsibility is assumed for the
correctness of this information.
Technical changes, typographical
errors and other errors reserved.


- TECHNICAL DESCRIPTION AND INSTRUCTION MANUAL
- CONCEPT E 450 DIGITAL
- CONTENTS
- GENERAL NOTES AND INFORMATION .... 3
- FOR YOUR SAFETY 4
- OVERVIEW 6
- OPERATIONAL CONTROLS AND CONNECTIONS 6
- PREPARATION 8
- CONNECTING....9
- REMOTE CONTROL 12
- OPERATION....13
- CLEANING & MAINTENANCE 16
- ENVIRONMENTAL PROTECTION 16
- TROUBLESHOOTING....17
- TECHNICAL DATA 18
- NOTICE
- ORIGINAL PACKAGING
- COMPLAINTS
- INVOICE NUMBER
- SERIAL NUMBER OR BATCH NUMBER
- CONTACT
- PROPER USE
- SIGNAL TERMS
- WARNING
- CAUTION
- SAFETY NOTES
- AN UNSUITABLE SETUP LOCATION MAY RESULT IN INJURY AND DAMAGE
- AN UNSTABLE BASE MAY CAUSE THE UNIT TO TLP AND INJURE OR EVEN KILL PERSONS, CHILDREN ARE PARTICULARLY AT RISK. YOU CAN PREVENT A LARGE NUMBER OF ACCIDENTS BY TAKING THE FOLLOWING PRECAUTIONS
- CHILDREN CAN BECOME TRAPPED IN THE PACKING FILM WHEN PLAYING AND SUFFOCATE
- LEAKING BATTERY ACID MAY LEAD TO CHEMICAL BURNS
- BATTERIES (PARTICULARLY LITHIUM BATTERIES) CAN EXPLODE IF USED IMPROPERLY
- EXTENDED LISTENING AT HIGH VOLUMES MAY LEAD TO HEARING LOSS
- PRODUCT CONTENTS
- OPERATIONAL CONTROLS AND CONNECTIONS
- ITEM NAME DESCRIPTION
- UNPACKING
- SETUP NOTES
- SETUP AS A PC SOUND SYSTEM
- CONNECTING EXTERNAL PLAYERS
- CONNECTING SATELLITE SPEAKERS
- MAKE SURE THE POLARITY IS CORRECT
- CONNECTION TO THE GRID
- CHANGING THE BATTERIES
- PAIRING OF THE REMOTE CONTROL
- FUNCTIONS
- OPERATION
- SWITCHING THE DEVICE ON/TO STANDBY
- ACTIVATING
- SWITCHING TO STANDBY
- SELECTING AN INPUT
- BLUETOOTHPALRLNG
- SELECTING AN OUTPUT
- AUDIO FORMAT
- SETTING THE VOLUME
- SETTING THE SYSTEM VOLUME
- SETTING THE VOLUME OF THE INDIVIDUAL SPEAKERS
- MUTE
- SETUP
- ENVIRONMENTAL PROTECTION
- BATTERIES AND STORAGE BATTERIES
- BATTERLES AND STORAGE BATTERIES DO NOT BELONG IN THE HOUSEHOLD WASTE
- DISPOSAL OF THE UNIT
- USED UNITS MUST NOT BE DISPOSED OF WITH HOUSEHOLD WASTE
- TECHNICAL DATA
- TEUFEL
Brand : Teufel
Model : Concept E 450 Digital
Category : Loudspeaker