
985GM-GS3 FX - Motherboard ASROCK - Free user manual and instructions
Find the device manual for free 985GM-GS3 FX ASROCK in PDF.


| Product type | Motherboard |
| Brand | ASRock |
| Model | 985GM-GS3 FX |
| Form factor | ATX |
| Processor socket | AM3+ |
| Chipset | AMD 985G + SB810 |
| Supported memory type | DDR3 |
| Number of memory slots | 4 (up to 32 GB) |
| Max memory frequency | DDR3 1866 MHz (OC) |
| Expansion slots | 1x PCIe 2.0 x16, 2x PCIe 2.0 x1, 3x PCI |
| Storage connectors | 6x SATA 3 Gb/s, 1x IDE |
| Audio | Realtek ALC662, 7.1 HD channels |
| Network | Realtek RTL8111E, Gigabit Ethernet |
| Rear USB ports | 4x USB 2.0, 2x USB 3.0 |
| Video ports | 1x VGA, 1x DVI-D, 1x HDMI |
| Dimensions | 305 mm x 244 mm |
| Weight | Approximately 900 g |
| Recommended power supply | ATX 12V power supply, 8-pin CPU connector |
| Key features | Supports AMD FX/Phenom II/Athlon II, Dual Channel DDR3, Integrated Radeon HD 4200 GPU, CrossFireX |
| Maintenance and cleaning | Regularly dust with compressed air, avoid moisture |
| Safety | Overvoltage protection, CPU temperature and fan monitoring |
| Spare parts and repairability | Capacitor replacement, CMOS batteries available |
Frequently Asked Questions - 985GM-GS3 FX ASROCK
User questions about 985GM-GS3 FX ASROCK
0 question about this device. Answer the ones you know or ask your own.
Ask a new question about this device
Download the instructions for your Motherboard in PDF format for free! Find your manual 985GM-GS3 FX - ASROCK and take your electronic device back in hand. On this page are published all the documents necessary for the use of your device. 985GM-GS3 FX by ASROCK.
USER MANUAL 985GM-GS3 FX ASROCK
Copyright Notice: Copyright Notice:
No part of this installation guide may be reproduced, transcribed, transmitted, or translated in any language, in any form or by any means, except duplication of documentation by the purchaser for backup purpose, without written consent of ASRock Inc.
Products and corporate names appearing in this guide may or may not be registered trademarks or copyrights of their respective companies, and are used only for identification or explanation and to the owners' benefit, without intent to infringe.
Disclaimer: Disclaimer:
Specifications and information contained in this guide are furnished for informational use only and subject to change without notice, and should not be constructed as a commitment by ASRock. ASRock assumes no responsibility for any errors or omissions that may appear in this guide.
With respect to the contents of this guide, ASRock does not provide warranty of any kind, either expressed or implied, including but not limited to the implied warranties or conditions of merchantability or fitness for a particular purpose. In no event shall ASRock, its directors, officers, employees, or agents be liable for any indirect, special, incidental, or consequential damages (including damages for loss of profits, loss of business, loss of data, interruption of business and the like), even if ASRock has been advised of the possibility of such damages arising from any defect or error in the guide or product.

This device complies with Part 15 of the FCC Rules. Operation is subject to the following two conditions:
(1) this device may not cause harmful interference, and
(2) this device must accept any interference received, including interference that may cause undesired operation.
CALIFORNIA, USA ONLY
The Lithium battery adopted on this motherboard contains Perchlorate, a toxic substance controlled in Perchlorate Best Management Practices (BMP) regulations passed by the California Legislature. When you discard the Lithium battery in California, USA, please follow the related regulations in advance.
"Perchlorate Material-special handling may apply, see
www.dtsc.ca.gov/hazardouswaste/perchlorate"
ASRock Website: http://www.asrock.com
Published July 2013
Copyright©2013 ASRock INC. All rights reserved.
Motherboard Layout Motherboard Layout (985GM-985GM/ 985GM-S3 FX )GS3 FX / 985GM-S3 FX )

1 PS2_USB_PW1 Jumper 15 System Panel Header (PANEL1, White)
2 ATX 12V Power Connector (ATX12V1) 16 Secondary SATAII Connector
3 CPU Heatsink Retention Module (SATAI1_2 (PORT 1))
4 AM3 CPU Socket 17 Primary SATAII Connector
5 2 x 240-pin DDR3 DIMM Slots (SATAII_1 (PORT 0))
(Dual Channel: DDR3_A1, DDR3_B1; Blue)
6 CPU Fan Connector (CPU_FAN1) 19 USB 2.0 Header (USB6_7, Blue)
7 ATX Power Connector (ATXPWR1) 20 Chassis Fan Connector (CHA_FAN1)
8 Chassis Speaker Header 21 Floppy Connector (FLOPPY1)
(SPEAKER 1, White)
9 Clear CMOS Jumper (CLRCMOS1)
10 Primary IDE Connector (IDE1, Blue)
11 Northbridge Controller
12 Southbridge Controller
13 Third SATAII Connector (SATAII_3 (PORT 2)) 26 PCI Express 2.0 x16 Slot (PCIE2; Blue)
14 Fourth SATAII Connector (SATAII_4 (PORT 3)) 27 PCI Express 2.0 x1 Slot (PCIE1; Blue)
28 Power Fan Connector (PWR_FAN1)
I/O PbOeP (985GM-GS81FX)85GM-FX)

1 PS/2 Mouse Port (Green) 6 Microphone (Pink)
2 USB 2.0 Ports (USB23) 7 USB 2.0 Ports (USB01)
* 3 RJ-45 Port 8 VGA Port
4 Line In (Light Blue) 9 COM Port
5 Line Out (Lime) 10 PS/2 Keyboard Port (Purple)
* There are two LED next to the LAN port. Please refer to the table below for the LAN port LED indications.
LAN Port LED Indications
Activity/Link LED SPEED LED
| Status | Description |
| Off | No Activity |
| Blinking | Data Activity |
| Status | Description |
| Off | 10Mbps connection |
| Orange | 100Mbps connection |
| Green | 1Gbps connection |
ACT/LINK SPEED

LAN Port
* To enable Multi-Streaming function, you need to connect a front panel audio cable to the front panel audio header. Please refer to below steps for the software setting of Multi-Streaming. For Windows® XP:
After restarting your computer, you will find "Mixer" tool on your system. Please select "MixerToolBox", click "Enable playback multi-streaming", and click "ok". Choose "2CH" or

"4CH" and then you are allowed to select "Realtek HDA Primary output" to use Rear Speaker and Front Speaker, or select "Realtek HDA Audio 2nd output" to use front panel audio. Then reboot your system.
For Windows ® 7 / Vista TM :
After restarting your computer, please double-click "Realtek HD Audio Manager" on the system tray. Set "Speaker Configuration" to "Quadraphonic" or "Stereo". Click "Device advanced settings", choose "Make front and rear output devices playbacks two different audio streams simultaneously", and click "ok". Then reboot your system.
I/O PhOeP (985GM-S3 FX)anel (985GM-S3 FX)
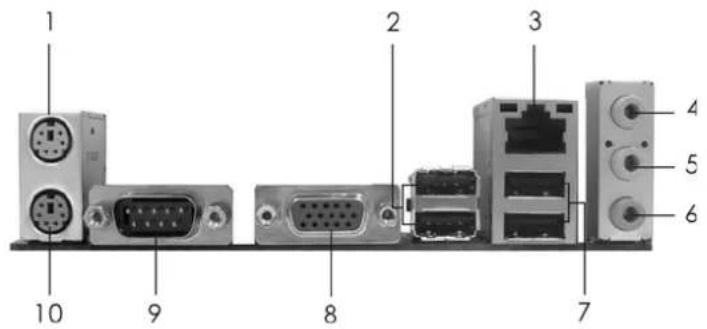
1 PS/2 Mouse Port (Green) 6 Microphone (Pink) 2 USB 2.0 Ports (USB23) 7 USB 2.0 Ports (USB01)
*3 RJ-45 Port 8 VGA Port 4 Line In (Light Blue) 9 COM Port 5 Line Out (Lime) 10 PS/2 Keyboard Port (Purple)
* There are two LED next to the LAN port. Please refer to the table below for the LAN port LED indications.
LAN Port LED Indications
Activity/Link LED
| Status | Description |
| Off | No Activity |
| Blinking | Data Activity |
SPEED LED
| Status | Description |
| Off | 10Mbps connection |
| Orange | 100Mbps connection |
ACT/LINK SPEED

LAN Port
* To enable Multi-Streaming function, you need to connect a front panel audio cable to the front panel audio header. Please refer to below steps for the software setting of Multi-Streaming.
For Windows ® XP:
After restarting your computer, you will find "Mixer" tool on your system. Please select "MixerToolBox", click "Enable playback multi-streaming", and click "ok". Choose "2CH" or
"4CH" and then you are allowed to select "Realtek HDA Primary output" to use Rear Speaker and Front Speaker, or select "Realtek HDA Audio 2nd output" to use front panel audio. Then reboot your system.
For Windows® 7 / Vista™:
After restarting your computer, please double-click "Realtek HD Audio Manager" on the system tray. Set "Speaker Configuration" to "Quadraphonic" or "Stereo". Click "Device advanced settings", choose "Make front and rear output devices playbacks two different audio streams simultaneously", and click "ok". Then reboot your system.
1. IntroductionIntroduction
Thank you for purchasing ASRock 985GM-GS3 FX / 985GM-S3 FX motherboard, a reliable motherboard produced under ASRock's consistently stringent quality control. It delivers excellent performance with robust design conforming to ASRock's commitment to quality and endurance.
In this manual, chapter 1 and 2 contain introduction of the motherboard and step-by-step guide to the hardware installation. Chapter 3 and 4 contain the configuration guide to BIOS setup and information of the Support CD.

Because the motherboard specifications and the BIOS software might be updated, the content of this manual will be subject to change without notice. In case any modifications of this manual occur, the updated version will be available on ASRock website without further notice. You may find the latest VGA cards and CPU support lists on ASRock website as well. ASRock website http://www.asrock.com If you require technical support related to this motherboard, please visit our website for specific information about the model you are using. www.asrock.com/support/index.asp
1.11. Package Contentsage Contents
ASRock 985GM-GS3 FX / 985GM-S3 FX Motherboard
(Micro ATX Form Factor: 9.6-in x 7.2-in, 24.4 cm x 18.3 cm)
ASRock 985GM-GS3 FX / 985GM-S3 FX Quick Installation Guide
ASRock 985GM-GS3 FX / 985GM-S3 FX Support CD
2 x Serial ATA (SATA) Data Cables (Optional)
1 x I/O Panel Shield
1.21. SpecificationsSpecifications
| Platform - Micro ATX Form Factor: 9.6-in x 7.2-in, 24.4 cm x 18.3 cm- Solid Capacitor for CPU power | |
| CPU - Support for Socket AM3+ processors- Support for Socket AM3 processors: AMD PhenomTM II X6 / X4 / X3 / X2 (except 920 / 940) / Athlon II X4 / X3 / X2 / Sempron processors- Supports 8-Core CPU- Supports AMD OverDriveTM with ACC feature (Advanced Clock Calibration)- AMD LIVE!TM Ready- Supports AMD's Cool ‘n’ QuietTM Technology- FSB 2600 MHz (5.2 GT/s)- Supports Untied Overclocking Technology (seeCAUTION 1)- Supports Hyper-Transport 3.0 (HT 3.0) Technology | |
| Chipset - Northbridge: AMD 785G- Southbridge: AMD SB710 | |
| Memory | - Dual Channel DDR3 Memory Technology (seeCAUTION 2)- 2 x DDR3 DIMM slots- Support DDR3 1800(OC)/1600(OC)/1333/1066/800 non-ECC, un-buffered memory (seeCAUTION 3)- Max. capacity of system memory: 8GB (seeCAUTION 4) |
| Expansion Slot - 1 x PCI Express 2.0 x16 slot (blue @ x16 mode)- 1 x PCI Express 2.0 x1 slot- 2 x PCI slots- Supports AMD Hybrid CrossFireXTM | |
| Graphics - Integrated AMD Radeon HD 4200 graphics- DX10.1 class iGPU, Pixel Shader 4.1- Max. shared memory 512MB (seeCAUTION 5)- Supports D-Sub with max. resolution up to 2048x1536 @ 60Hz | |
| Audio - 5.1 CH HD Audio (Realtek ALC662 Audio Codec) | |
| LAN - 985GM-GS3 FXRealtek PCIE x1 Gigabit LAN RTL8111E, speed 10/100/1000 Mb/s- 985GM-S3 FXRealtek PCIEx1 LAN 8105EL, speed 10/100 Mb/s- Supports Wake-On-LAN- Supports PXE | |
| Rear Panel I/O I/O | Panel- 1 x PS/2 Mouse Port- 1 x PS/2 Keyboard Port- 1 x Serial Port: COM1- 1 x VGA Port- 4 x Ready-to-Use USB 2.0 Ports- 1 x RJ-45 LAN Port with LED (ACT/LINK LED and SPEED LED)- HD Audio Jack: Line in / Front Speaker / Microphone |
| Connector - 4 x SATA2 3.0Gb/s connectors, support RAID (RAID 0, RAID 1, RAID 10 and JBOD), NCQ, AHCI and “Hot Plug” functions (seeCAUTION 6)- 1 x ATA133 IDE connector (supports 2 x IDE devices)- 1 x Floppy connector- 1 x Print port header- CPU/Chassis/Power FAN connector- 24 pin ATX power connector- 4 pin 12V power connector- Front panel audio connector- 2 x USB 2.0 headers (support 4 USB 2.0 ports) | |
| BIOS Feature - 8Mb AMI BIOS- AMI Legal BIOS- Supports “Plug and Play”- ACPI 1.1 Compliance Wake Up Events- Supports jumperfree- SMBIOS 2.3.1 Support- CPU, VCCM, NB Voltage Multi-adjustment | |
| Support CD - Drivers, Utilities, AntiVirus Software (Trial Version), CyberLinkMediaEspresso 6.5 Trial, Google Chrome Browser and Toolba | |
| Unique Feature | - ASRock OC Tuner (seeCAUTION 7)- ASRock Intelligent Energy Saver (seeCAUTION 8)- ASRock Instant Boot- ASRock Instant Flash (seeCAUTION 9)- ASRock OC DNA (seeCAUTION 10)- ASRock APP Charger (seeCAUTION 11)- ASRock XFast USB (seeCAUTION 12)- ASRock XFast LAN (seeCAUTION 13)- Hybrid Booster:- CPU Frequency Stepless Control (seeCAUTION 14)- ASRock U-COP (seeCAUTION 15) |
| - Boot Failure Guard (B.F.G.) | |
| Hardware - CPU Temperature SensingMonitor - Chassis Temperature Sensing- CPU/Chassis/Power Fan Tachometer- CPU Quiet Fan- Voltage Monitoring: +12V, +5V, +3.3V, Vcore | |
| OS - Microsoft | Windows 7 / 7 64-bit / Vista TM / Vista TM 64-bit/ XP / XP Media Center / XP 64-bit compliant |
| Certifications - FCC, CE, WHQL- ErP/EuP Ready (ErP/EuP ready power supply is required)(see CAUTION 16) | |
* For detailed product information, please visit our website: http://www.asrock.com
WARNING
Please realize that there is a certain risk involved with overclocking, including adjusting the setting in the BIOS, applying Untied Overclocking Technology, or using the third-party overclocking tools. Overclocking may affect your system stability, or even cause damage to the components and devices of your system. It should be done at your own risk and expense. We are not responsible for possible damage caused by overclocking.
CAUTION!
- This motherboard supports Untied Overclocking Technology. Please read "Untied Overclocking Technology" on page 24 for details.
- This motherboard supports Dual Channel Memory Technology. Before you implement Dual Channel Memory Technology, make sure to read the installation guide of memory modules on page 13 for proper installation.
- Whether 1800/1600MHz memory speed is supported depends on the AM3/AM3+ CPU you adopt. If you want to adopt DDR3 1800/1600 memory module on this motherboard, please refer to the memory support list on our website for the compatible memory modules. ASRock website http://www.asrock.com
- Due to the operating system limitation, the actual memory size may be less than 4GB for the reservation for system usage under Windows ® 7 / Vista ™ / XP. For Windows ® OS with 64-bit CPU, there is no such limitation.
- The maximum shared memory size is defined by the chipset vendor and is subject to change. Please check AMD website for the latest information.
-
Before installing SATAII hard disk to SATAII connector, please read the "SATAII Hard Disk Setup Guide" on page 27 of "User Manual" in the support CD to adjust your SATAII hard disk drive to SATAII mode. You can also connect SATA hard disk to SATAII connector directly.
-
It is a user-friendly ASRock overclocking tool which allows you to surveil your system by hardware monitor function and overclock your hardware devices to get the best system performance under Windows® environment. Please visit our website for the operation procedures of ASRock OC Tuner. ASRock website: http://www.asrock.com
-
Featuring an advanced proprietary hardware and software design, Intelligent Energy Saver is a revolutionary technology that delivers unparalleled power savings. The voltage regulator can reduce the number of output phases to improve efficiency when the CPU cores are idle. In other words, it is able to provide exceptional power saving and improve power efficiency without sacrificing computing performance. To use Intelligent Energy Saver function, please enable Cool 'n' Quiet option in the BIOS setup in advance. Please visit our website for the operation procedures of Intelligent Energy Saver. ASRock website: http://www.asrock.com
-
ASRock Instant Flash is a BIOS flash utility embedded in Flash ROM. This convenient BIOS update tool allows you to update system BIOS without entering operating systems first like MS-DOS or Windows 38 . With this utility, you can press
key during the POST or press key to BIOS setup menu to access ASRock Instant Flash. Just launch this tool and save the new BIOS file to your USB flash drive, floppy disk or hard drive, then you can update your BIOS only in a few clicks without preparing an additional floppy diskette or other complicated flash utility. Please be noted that the USB flash drive or hard drive must use FAT32/16/12 file system. -
The software name itself – OC DNA literally tells you what it is capable of. OC DNA, an exclusive utility developed by ASRock, provides a convenient way for the user to record the OC settings and share with others. It helps you to save your overclocking record under the operating system and simplifies the complicated recording process of overclocking settings. With OC DNA, you can save your OC settings as a profile and share with your friends! Your friends then can load the OC profile to their own system to get the same OC settings as yours! Please be noticed that the OC profile can only be shared and worked on the same motherboard.
-
If you desire a faster, less restricted way of charging your Apple devices, such as iPhone/iPod/iPad Touch, ASRock has prepared a wonderful solution for you - ASRock APP Charger. Simply installing the APP Charger driver, it makes your iPhone charged much quickly from your computer and up to 40% faster than before. ASRock APP Charger allows you to quickly charge many Apple devices simultaneously and even supports continuous charging when your PC enters into Standby mode (S1), Suspend to RAM (S3), hibernation mode (S4) or power off (S5). With APP Charger driver installed, you can easily enjoy the marvelous charging experience than ever.
ASRock website: http://www.asrock.com/Feature/AppCharger/index.asp
- ASRock XFast USB can boost USB storage device performance. The performance may depend on the property of the device.
- ASRock XFast LAN provides a faster internet access, which includes below benefits. LAN Application Prioritization: You can configure your application priority ideally and/or add new programs. Lower Latency in Game: After setting online game priority higher, it can lower the latency in game. Traffic Shaping: You can watch Youtube HD video and download files simultaneously. Real-Time Analysis of Your Data: With the status window, you can easily recognize which data streams you are currently transferring.
- Although this motherboard offers stepless control, it is not recommended to perform over-clocking. Frequencies other than the recommended CPU bus frequencies may cause the instability of the system or damage the CPU.
- While CPU overheat is detected, the system will automatically shutdown. Before you resume the system, please check if the CPU fan on the motherboard functions properly and unplug the power cord, then plug it back again. To improve heat dissipation, remember to spray thermal grease between the CPU and the heatsink when you install the PC system.
- EuP, stands for Energy Using Product, was a provision regulated by European Union to define the power consumption for the completed system. According to EuP, the total AC power of the completed system shall be under 1.00W in off mode condition. To meet EuP standard, an EuP ready motherboard and an EuP ready power supply are required. According to Intel's suggestion, the EuP ready power supply must meet the standard of 5v standby power efficiency is higher than 50% under 100 mA current consumption. For EuP ready power supply selection, we recommend you checking with the power supply manufacturer for more details.
2. Installation Installation
This is a Micro ATX form factor (9.6-in x 7.2-in, 24.4 cm x 18.3 cm) motherboard. Before you install the motherboard, study the configuration of your chassis to ensure that the motherboard fits into it.
Pre-Installation PrecautionsPre-Installation Precautions
Take note of the following precautions before you install motherboard components or change any motherboard settings.

Before you install or remove any component, ensure that the power is switched off or the power cord is detached from the power supply. Failure to do so may cause severe damage to the motherboard, peripherals, and/or components.
- Unplug the power cord from the wall socket before touching any component.
- To avoid damaging the motherboard components due to static electricity, NEVER place your motherboard directly on the carpet or the like. Also remember to use a grounded wrist strap or touch a safety grounded object before you handle components.
- Hold components by the edges and do not touch the ICs.
- Whenever you uninstall any component, place it on a grounded anti-static pad or in the bag that comes with the component.
- When placing screws into the screw holes to secure the motherboard to the chassis, please do not over-tighten the screws! Doing so may damage the motherboard.
2.12. CPU InstallationCPU Installation
Step 1. Unlock the socket by lifting the lever up to a 90 °angle.
Step 2. Position the CPU directly above the socket such that the CPU corner with the golden triangle matches the socket corner with a small triangle.
Step 3. Carefully insert the CPU into the socket until it fits in place.

The CPU fits only in one correct orientation. DO NOT force the CPU into the socket to avoid bending of the pins.
Step 4. When the CPU is in place, press it firmly on the socket while you push down the socket lever to secure the CPU. The lever clicks on the side tab to indicate that it is locked.
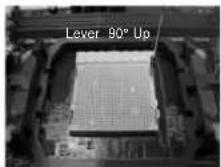
STEP 1:
Lift Up The Socket Lever

STEP 2 / STEP 3:
Match The CPU Golden Triangle
To The Socket Corner Small
Triangle

STEP 4:
Push Down And Lock
The Socket Lever
2.22 Installation of CPU Fan and Heatsink Installation of CPU Fan and Heatsink
After you install the CPU into this motherboard, it is necessary to install a larger heatsink and cooling fan to dissipate heat. You also need to spray thermal grease between the CPU and the heatsink to improve heat dissipation. Make sure that the CPU and the heatsink are securely fastened and in good contact with each other. Then connect the CPU fan to the CPU FAN connector (CPU_FAN1, see Page 2, No. 6). For proper installation, please kindly refer to the instruction manuals of the CPU fan and the heatsink.
2.3 Installation of Memory2.Microbidsa(DIMM)YMicrobules (DIMM)
985GM-GS3 FX / 985GM-S3 FX motherboard provides two 240-pin DDR3 (Double Data Rate 3) DIMM slots, and supports Dual Channel Memory Technology. For dual channel configuration, you always need to install two identical (the same brand, speed, size and chip-type) memory modules in the DDR3 DIMM slots to activate Dual Channel Memory Technology. Otherwise, it will operate at single channel mode.

- It is not allowed to install a DDR or DDR2 memory module into DDR3 slot; otherwise, this motherboard and DIMM may be damaged.
- If you install only one memory module or two non-identical memory modules, it is unable to activate the Dual Channel Memory Technology.
Installing a DIMMInstalling a DIMM

Please make sure to disconnect power supply before adding or removing DIMMs or the system components.
Step 1. Unlock a DIMM slot by pressing the retaining clips outward.
Step 2. Align a DIMM on the slot such that the notch on the DIMM matches the break on the slot.
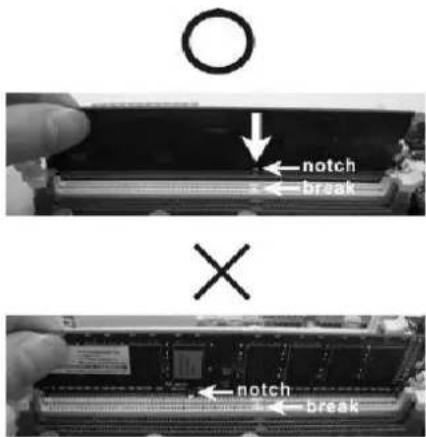

The DIMM only fits in one correct orientation. It will cause permanent damage to the motherboard and the DIMM if you force the DIMM into the slot at incorrect orientation.
Step 3. Firmly insert the DIMM into the slot until the retaining clips at both ends fully snap back in place and the DIMM is properly seated.
2.4 Expansion Slots (PCI and PCI Express Slots) 2.4 Expansion Slots (PCI and PCI Expr
There are 2 PCI slots and 2 PCI Express slots on this motherboard.
PCI slots: PCI slots are used to install expansion cards that have the 32-bit PCI interface.
PCIE slots:
PCIE1 (PCIE x1 slot; Blue) is used for PCI Express cards with x1 lane width cards, such as Gigabit LAN card, SATA2 card, etc. PCIE2 (PCIE x16 slot; Blue) is used for PCI Express cards with x16 lane width graphics cards.
Installing an expansion cardInstalling an expansion card
Step 1. Before installing the expansion card, please make sure that the power supply is switched off or the power cord is unplugged. Please read the documentation of the expansion card and make necessary hardware settings for the card before you start the installation.
Step 2. Remove the bracket facing the slot that you intend to use. Keep the screws for later use.
Step 3. Align the card connector with the slot and press firmly until the card is completely seated on the slot.
Step 4. Fasten the card to the chassis with screws.
2.5 Multi Monitor Feature2.5 Multi Monitor Feature
This motherboard supports multi monitor feature. With the internal VGA output support and the external add-on PCI Express VGA card, you can easily enjoy the benefits of multi monitor feature.
Please refer to the following steps to set up a surround display environment:
- Install the ATI TM PCI Express VGA cards on PCIE2 slot. Please refer to page 14 for proper expansion card installation procedures for details.
- Connect D-Sub monitor cable to VGA port on the I/O panel. And connect other monitor cables to the corresponding connectors of the add-on PCI Express VGA cards on PCIE2 slot.

VGA port
-
Boot your system. Press
to enter BIOS setup. Enter "Share Memory" option to adjust the memory capability to [32MB], [64MB], [128MB] [256MB] or [512MB] to enable the function of VGA. Please make sure that the value you select is less than the total capability of the system memory. If you do not adjust the BIOS setup, the default value of "Share Memory", [Auto], will disable VGA function when the add-on VGA card is inserted to this motherboard. -
Install the onboard VGA driver and the add-on PCI Express VGA card driver to your system. If you have installed the drivers already, there is no need to install them again.
-
Set up a multi-monitor display.
For Windows ® XP / XP 64-bit OS:
Right click the desktop, choose "Properties", and select the "Settings" tab so that you can adjust the parameters of the multi-monitor according to the steps below.
A. Click the "Identify" button to display a large number on each monitor.
B. Right-click the display icon in the Display Properties dialog that you wish to be your primary monitor, and then select "Primary". When you use multiple monitors with your card, one monitor will always be Primary, and all additional monitors will be designated as Secondary.
C. Select the display icon identified by the number 2.
D. Click "Extend my Windows desktop onto this monitor".
E. Right-click the display icon and select "Attached", if necessary.
F. Set the "Screen Resolution" and "Color Quality" as appropriate for the second monitor. Click "Apply" or "OK" to apply these new values.
G. Repeat steps C through E for the display icon identified by the number one, two and three.
For Windows ® 7 / 7 64-bit / Vista TM / Vista TM 64-bit OS:
Right click the desktop, choose "Personalize", and select the "Display Settings" tab so that you can adjust the parameters of the multi-monitor according to the steps below.
A. Click the number "2" icon.
B. Click the items "This is my main monitor" and "Extend the desktop onto this monitor".
C. Click "OK" to save your change.
D. Repeat steps A through C for the display icon identified by the number three.
- Use multi monitor feature. Click and drag the display icons to positions representing the physical setup of your monitors that you would like to use. The placement of display icons determines how you move items from one monitor to another.
2.62.ATI™ Hyltonid CrossFireXide Operation Guide Operation Guide
This motherboard supports ATI TM Hybrid CrossFireX TM feature. ATI TM Hybrid CrossFireX TM brings multi-GPU performance capabilities by enabling an AMD 785G integrated graphics processor and a discrete graphics processor to operate simultaneously with combined output to a single display for blisteringly-fast frame rates. Currently, ATI TM Hybrid CrossFireX TM Technology is only supported with Windows Vista TM / 7 OS, and is not available with Windows XP OS. In the future, ATI TM Hybrid CrossFireX TM may be supported with Windows XP OS. Please visit our website for updated information.

What does an ATI TM Hybrid CrossFireX TM system include?
An ATITM Hybrid CrossFireX™ system includes an ATITM Radeon™ 2400 or ATITM Radeon™ 3450 series graphics processor and a motherboard based on an AMD 785G integrated chipset, all operating in a Windows® Vista™ / 7 environment. Please refer to below PCI Express graphics card support list for ATITM Hybrid CrossFireX™. For the future update of more compatible PCI Express graphics cards, please visit our website for further information.
| Vendor | Chipset Model | Driver | |
| ATI | RADEON X2400PRO | MSI RX2400 PRO-TD256EH | Catalyst 9.12 |
| RADEON HD2400XT * | POWERCOLOR HD2400 XT 256MB DDR3 | Catalyst 9.12 | |
| RADEON HD3450 | POWERCOLOR AX3450 256MD2-S | Catalyst 9.12 |
* Currently, RADEON HD2400XT series graphics cards are only supported with AMD Phenom CPU. Please visit our website for the future driver update and the latest information.
Enjoy the benefit of AByMolybredbCrossFireXlEa CrossF
Step 1. Install one compatible PCI Express graphics card to PCIE2 slot (blue). For the proper installation procedures, please refer to section "Expansion Slots".
Step 2. Connect the monitor cable to the correspondent connector on the PCI Express graphics card on PCIE2 slot.
Step 3. Boot your system. Press
Step 4. Boot into OS. Please remove the ATI TM driver if you have any VGA driver installed in your system.
Step 5. Install the onboard VGA driver from our support CD to your system for both the onboard VGA and the discrete graphics card.
Step 6. Restart your computer. Then you will find "ATI Catalyst Control Center" on your Windows® taskbar.

ATI Catalyst Control Center
Step 7. Double-click "ATI Catalyst Control Center". Click "View", click "CrossFire™", and then select the option "Enable CrossFire™".

Step 8. Click "Yes" to continue.

Step 9. Click "OK" to save your change.

Step 10. Reboot your system. Then you can freely enjoy the benefit of Hybrid TM CrossFireX TM feature.
* Hybrid CrossFireX™ appearing here is a registered trademark of ATI™ Technologies Inc., and is used only for identification or explanation and to the owners' benefit, without intent to infringe.
* For further information of ATI™ Hybrid CrossFireX™ technology, please check AMD website for up dates and details.
2.72.Jumpers SetupJumpers Setup
The illustration shows how jumpers are setup. When the jumper cap is placed on pins, the jumper is "Short". If no jumper cap is placed on pins, the jumper is "Open". The illustration shows a 3-pin jumper whose pin1 and pin2 are "Short" when jumper cap is placed on these 2 pins.


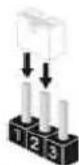
OpenShort
Jumper Setting

USB wake up events.
Note: To select +5VSB, it requires 2 Amp and higher standby current provided by power supply.
Clear CMOS Jumper
(CLRCMOS1)
(see p.2, No. 9)


Clear CMOSDefault
Note: CLRCMOS1 allows you to clear the data in CMOS. The data in CMOS includes system setup information such as system password, date, time, and system setup parameters. To clear and reset the system parameters to default setup, please turn off the computer and unplug the power cord from the power supply. After waiting for 15 seconds, use a jumper cap to short pin2 and pin3 on CLRCMOS1 for 5 seconds. However, please do not clear the CMOS right after you update the BIOS. If you need to clear the CMOS when you just finish updating the BIOS, you must boot up the system first, and then shut it down before you do the clear-CMOS action.
2.8 Onboard Headers and Connectors2.8 Onboard Headers and Connectors

Onboard headers and connectors are NOT jumpers. Do NOT place jumper caps over these headers and connectors. Placing jumper caps over the headers and connectors will cause permanent damage of the motherboard!
Floppy Connector
(33-pin FLOPPY1)
(see p.2 No. 21)

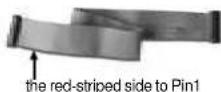
Note: Make sure the red-striped side of the cable is plugged into Pin1 side of the connector.
Primary IDE connector (Blue)
(39-pin IDE1, see p.2 No. 10)

connect the blue end to the motherboard

connect the black end to the IDE devices
80-conductor ATA 66/100/133 cable
Note: Please refer to the instruction of your IDE device vendor for the details.
Serial ATAIL Connectors These four Serial ATAIL (SATAII)
(SATAII_1 (PORT 0): connectors support SATAII see p.2, No. 17) or SATA hard disk for internal (SATAII_2 (PORT 1): storage devices. The current see p.2, No. 16) SATAII interface allows up to (PORT 3)
(SATAI1_3 (PORT 2): 3.0 Gb/s data transfer rate.
see p.2, No. 13)
(SATAII_4 (PORT 3):
see p.2, No. 14)
Gb/s data transfer rate.
[NO TEXT]
SATAII_1
(PORT 0)

SATAII_2
(PORT 1)

connector on this motherboard.
Serial ATA (SATA) Either end of the SATA data cable
Data Cable can be connected to the SATA
(Optional) SATAII hard disk or the SATAII
USB 2.0 Headers Besides four default USB 2.0
(9-pin USB6_7) ports on the I/O panel, there are
(see p.2 No. 19) two USB 2.0 headers on this
(9-pin USB4 5)
(see p.2 No. 18)


motherboard. Each USB 2.0 header cansupport two USB 2.0 ports.
Print Port Header This is an interface for print
(25-pin LPT1) port cable that inflows
(see p.2 No. 22) convenie

devices.
Front Panel Audio Header This is an interface for the front
(9-pin HD_AUDIO1) panel audio cable that allows
(see p.2, No. 23) convenient connectio

control of audio devices.

- High Definition Audio supports Jack Sensing, but the panel wire on the chassis must support HDA to function correctly. Please follow the instruction in our manual and chassis manual to install your system.
- If you use AC'97 audio panel, please install it to the front panel audio header as below:
A. Connect Mic_IN (MIC) to MIC2_L.
B. Connect Audio_R (RIN) to OUT2_R and Audio_L (LIN) to OUT2_L.
C. Connect Ground (GND) to Ground (GND).
D. MIC_RET and OUT_RET are for HD audio panel only. You don't need to connect them for AC'97 audio panel.
E. To activate the front mic.
For Windows ® XP / XP 64-bit OS:
Select "Mixer". Select "Recorder". Then click "FrontMic".
For Windows ® 7 / 7 64-bit / Vista TM / Vista TM 64-bit OS:
Go to the "FrontMic" Tab in the Realtek Control panel. Adjust
"Recording Volume".
System Panel Header This header accommodates
(9-pin PANEL1) several system front panel
(see p.2 No. 15) functions.

Chassis Speaker Header Please connect the chassis
(4-pin SPEAKER 1) speaker to this header
(see p.2 No. 8)

Chassis and Power Fan Connectors Please connect the fan cables
(3-pin CHA_FAN1) to the fan connectors and
(see p.2 No. 20) match the black wire to the
(3-pin PWR_FAN1)
(see p.2 No. 28)
CHA_FAN_SPEED

CPU Fan Connector Please connect the CPU fan
(4-pin CPU_FAN1) cable to this connector and
(see p.2 No. 6) match the black wire to the CPU FAN SPEED FAN SPEED CONTROL
ground pin.

Though this motherboard provides 4-Pin CPU fan (Quiet Fan) support, the 3-Pin CPU fan still can work successfully even without the fan speed control function. If you plan to connect the 3-Pin CPU fan to the CPU fan connector on this motherboard, please connect it to Pin 1-3.
Pin 1-3 Connected
3-Pin Fan Installation

ATX Power Connector Please connect an ATX power
(24-pin ATXPWR1) supply to this connector.
(see p.2 No. 7)
1 13

Though this motherboard provides 24-pin ATX power connector, it can still work if you adopt a traditional 20-pin ATX power supply. To use the 20-pin ATX power supply, please plug your power supply along with Pin 1 and Pin 13.
20-Pin ATX Power Supply Installation
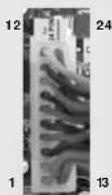
ATX 12V Power Connector Please connect an ATX 12V
(4-pin ATX12V1)
(see p.2 No. 2)

power supply to this connector.
2.92Driver Installation GuideDriver Installation Guide
To install the drivers to your system, please insert the support CD to your optical drive first. Then, the drivers compatible to your system can be auto-detected and listed on the support CD driver page. Please follow the order from up to bottom side to install those required drivers. Therefore, the drivers you install can work properly.
2.102 installing Windows installing 4WbitdoVista™77/764-bit/Vista
VistaVista4-bit / XP / XP 64-bit With RAID Functions 64-bit / XP / XP 64-bit With RAID Function
If you want to install Windows ® 7/7 64-bit/Vista ™ /Vista ™ 64-bit/XP/XP 64-bit on your SATA/SATAII HDDs with RAID functions, please refer to the document at the following path in the Support CD for detailed procedures:
..\ RAID Installation Guide
2.112nftalling Windowsinstalling4AbitdoVista™ /
VistaVis64-bit / XP / XP 64-bit Without RAID Functions
If you want to install Windows ® 7/764-bit/Vista ™ /Vista ™ 64-bit/XP/XP64-bit OS on your SATA/SATAII HDDs without RAID functions, please follow below procedures according to the OS you install.
2.11.1 Installing Windows® XP / XP 64-bit Without RAID Functions
If you want to install Windows® XP / XP 64-bit on your SATA / SATAII HDDs without RAID functions, please follow below steps.
Using SATA / SATAII HDDs without NCQ and Hot Plug functions (IDE mode)
STEP 1: Set up BIOS.
A. Enter BIOS SETUP UTILITY → Advanced screen → Storage Configuration.
B. Set the "SATA Operation Mode" option to [IDE].
STEP 2: Install Windows ® XP / XP 64-bit OS on your system.
2.11.2 Installing Windows2.71/.2 64-bitting/Windows 64-bit / Vista Vista™ 64-bit With 4-bit RAID FunctionsAIDcions
If you want to install Windows ® 7/764-bit/Vista ™ /Vista ™ 64-bit on your SATA/SATAII HDDs without RAID functions, please follow below steps.
Using SATA / SATAII HDDs without NCQ and Hot Plug functions (IDE mode)
STEP 1: Set up BIOS.
A. Enter BIOS SETUP UTILITY → Advanced screen → Storage Configuration.
B. Set the "SATA Operation Mode" option to [IDE].
STEP 2: Install Windows ® 7 / 7 64-bit / Vista ™ / Vista ™ 64-bit OS on your system.
Using SATA / SATAII HDDs with NCQ and Hot Plug functions (AHCI mode)
STEP 1: Set Up BIOS.
A. Enter BIOS SETUP UTILITY → Advanced screen → Storage Configuration.
B. Set the "SATA Operation Mode" option to [AHCI].
STEP 2: Install Windows ® 7 / 7 64-bit / Vista TM / Vista TM 64-bit OS on your system.
2.12 Untied Overclocking Technology
This motherboard supports Untied Overclocking Technology, which means during overclocking, FSB enjoys better margin due to fixed PCI / PCIE buses. Before you enable Untied Overclocking function, please enter "Overclock Mode" option of BIOS setup to set the selection from [Auto] to [Manual]. Therefore, CPU FSB is untied during overclocking, but PCI / PCIE buses are in the fixed mode so that FSB can operate under a more stable overclocking environment.

Please refer to the warning on page 8 for the possible overclocking risk before you apply Untied Overclocking Technology.
3. BIOS Information3. BIOS Information
The Flash Memory on the motherboard stores BIOS Setup Utility. When you start up the computer, please press
4. Software SupportwCDeiSupportiont CD information
This motherboard supports various Microsoft® Windows® operating systems: 7 / 7 64-bit / Vista™/ Vista™ 64-bit / XP / XP Media Center / XP 64-bit. The Support CD that came with the motherboard contains necessary drivers and useful utilities that will enhance motherboard features. To begin using the Support CD, insert the CD into your CD-ROM drive. It will display the Main Menu automatically if "AUTORUN" is enabled in your computer. If the Main Menu does not appear automatically, locate and double-click on the file "ASSETUP.EXE" from the "BIN" folder in the Support CD to display the menus.
www.asrock.com/support/index.asp
1.1 Kartoninhalt
ASRock 985GM-GS3 FX / 985GM-S3 FX Motherboard
(Micro ATX-Formfaktor: 24.4 cm x 18.3 cm; 9.6 Zoll x 7.2 Zoll)
(CLRCMOS1, 3-Pin jumper)
(siehe S.2, No. 9)
1_2

Default-
Einstellung
2_3

CMOS
löschen
1.4 Anschlüsse1.4 Anschlüsse

Seriell-ATAII-Anschlüsse
(SATAII_1 (PORT 0):
siehe S.2, No. 17)
(SATAII_2 (PORT 1):
siehe S.2, No. 16)
(SATAII_3 (PORT 2):
siehe S.2, No. 13)
(SATAII_4 (PORT 3):
siehe S.2, No. 14)

SATAII_1
(PORT 0)

SATAII 3
(PORT 2)

SATAII 4
(PORT 3)

SATAII_2
(PORT 1)
3. Software Support CD information3. Software Support CD in
(Micro ATX Form Factor: 9.6-in x 7.2-in, 24.4 cm x 18.3 cm)
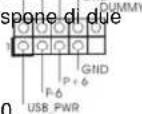
(9-pin USB4_5) due porte USB 2.0
(vedi p.2 No. 18)
(39-pin IDE1, vea p.2, No. 10)

Conector azul a placa madre
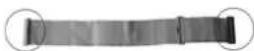
Conector negro a aparato IDE
www.asrock.com/support/index.asp
1.1 Комплектность
Материнская плата ASRock 985GM-GS3 FX / 985GM-S3 FX
(форм-фактор Micro ATX: 9,6 x 7,2 дюйма / 24,4 x 18,3 см)
(CLRCMOS1, jumper de 3 pinos)
www.asrock.com/support/index.asp
1 x G/C Panel Kalkani
1.2 Özellikler
| (CLRCMOS1, 3-pinli jumper) |
| (bkz. s.2 No. 9) |
1_2

(SATAII 1 (PORT 0): bkz s.2, No. 17)
(SATAII 2(PORT 1): bkz s.2, No. 16)
(SATAII 3(PORT2): bkz s.2, No. 13)
(SATAII 4(PORT3): bkz s.2, No. 14)

SATAII_3 (PORT 2)

SATAII_4 (PORT 3)

SATAII_1 (PORT 0)

SATAII_2 (PORT 1)
SATAII arayüzü 3,0 Gb/sn veri
(Micro ATX 품 팩터: 9.6" X 7.2", 24.4 X 18.3 cm)
www.asrock.com/support/index.asp
1.1 包装盒内物品
- COPYRIGHT NOTICE: COPYRIGHT NOTICE
- DISCLAIMER: DISCLAIMER
- CALIFORNIA, USA ONLY
- MOTHERBOARD LAYOUT MOTHERBOARD LAYOUT (985GM-985GM/ 985GM-S3 FX )GS3 FX / 985GM-S3 FX )
- I/O PHOEP (985GM-S3 FX)ANEL (985GM-S3 FX)
- FOR WINDOWS ® XP
- FOR WINDOWS® 7 / VISTA™
- INTRODUCTIONINTRODUCTION
- PACKAGE CONTENTSAGE CONTENTS
- WARNING
- CAUTION
- INSTALLATION INSTALLATION
- PRE-INSTALLATION PRECAUTIONSPRE-INSTALLATION PRECAUTIONS
- CPU INSTALLATIONCPU INSTALLATION
- 2.22 INSTALLATION OF CPU FAN AND HEATSINK INSTALLATION OF CPU FAN AND HEATSINK
- 2.3 INSTALLATION OF MEMORY2.MICROBIDSA(DIMM)YMICROBULES (DIMM)
- INSTALLING A DIMMINSTALLING A DIMM
- 2.4 EXPANSION SLOTS (PCI AND PCI EXPRESS SLOTS) 2.4 EXPANSION SLOTS (PCI AND PCI EXPR
- PCIE SLOTS
- INSTALLING AN EXPANSION CARDINSTALLING AN EXPANSION CARD
- 2.5 MULTI MONITOR FEATURE2.5 MULTI MONITOR FEATURE
- FOR WINDOWS ® XP / XP 64-BIT OS
- FOR WINDOWS ® 7 / 7 64-BIT / VISTA TM / VISTA TM 64-BIT OS
- 2.62.ATI™ HYLTONID CROSSFIREXIDE OPERATION GUIDE OPERATION GUIDE
- WHAT DOES AN ATI TM HYBRID CROSSFIREX TM SYSTEM INCLUDE
- ENJOY THE BENEFIT OF ABYMOLYBREDBCROSSFIREXLEA CROSSF
- 2.72.JUMPERS SETUPJUMPERS SETUP
- JUMPER SETTING
- 2.8 ONBOARD HEADERS AND CONNECTORS2.8 ONBOARD HEADERS AND CONNECTORS
- 2.92DRIVER INSTALLATION GUIDEDRIVER INSTALLATION GUIDE
- 2.102 INSTALLING WINDOWS INSTALLING 4WBITDOVISTA™77/764-BIT/VISTA
- 2.112NFTALLING WINDOWSINSTALLING4ABITDOVISTA™
- 2.11.1 INSTALLING WINDOWS® XP / XP 64-BIT WITHOUT RAID FUNCTIONS
- 2.11.2 INSTALLING WINDOWS2.71/.2 64-BITTING/WINDOWS 64-BIT / VISTA VISTA™ 64-BIT WITH 4-BIT RAID FUNCTIONSAIDCIONS
- STEP 1: SET UP BIOS
- 2.12 UNTIED OVERCLOCKING TECHNOLOGY
- BIOS INFORMATION3. BIOS INFORMATION
- SOFTWARE SUPPORTWCDEISUPPORTIONT CD INFORMATION
- 1.1 KARTONINHALT
- 1.4 ANSCHLÜSSE1.4 ANSCHLÜSSE
- SOFTWARE SUPPORT CD INFORMATION3. SOFTWARE SUPPORT CD IN
- 1.1 КОМПЛЕКТНОСТЬ
- 1.1 包装盒内物品
Brand : ASROCK
Model : 985GM-GS3 FX
Category : Motherboard